When creating game UIs in Unity, have you ever wanted to display a character's Live2D model on a menu or status screen to make it richer and more interactive?
However, when you try it out, simply placing a Live2D model Prefab directly onto the UI Canvas like regular UI elements (Image, Text, etc.) often doesn't work. This is because Live2D's rendering method differs from Unity's UI system (uGUI).
This article explains a common technique for displaying a Live2D model cleanly on Unity's UI Canvas. Specifically, we'll walk through a step-by-step process of embedding a Live2D model as a UI element using Unity's RenderTexture and RawImage features.
Prerequisites: Example UI Structure
For this tutorial, we'll use a simple menu screen with button-based view switching as an example. We'll demonstrate how to display a Live2D model inside "WindowStatus."
UICanvas (GameObject with Canvas component)
 |- WindowItem (Item screen GameObject)
 |- WindowStatus (Status screen GameObject)
 |   |- TextMeshPro (Character name, etc.)
 |   |- Image (Background image, etc.)
 |   +- Live2DPrefab (We want to display the Live2D model here, but direct placement doesn't work)
 |- WindowOption (Option screen GameObject)
To display a Live2D model within this WindowStatus, we'll add and configure the following elements:
- Live2D Model Prefab: The Prefab auto-generated when importing the Live2D model into your Unity project using the Live2D Cubism SDK.
- Dedicated Camera for Live2D: A camera that captures only the Live2D model, separate from other cameras in the scene.
- RenderTexture: An asset that stores the image captured by the dedicated camera (the Live2D model) as a texture.
- RawImage: A component placed on the UI Canvas that displays the RenderTexture content as an image.
In short, the flow is: "Capture the Live2D Prefab with a dedicated camera, render its output to a RenderTexture, and display that RenderTexture on the UI Canvas through a RawImage component."
Note that this method works regardless of the UI Canvas Render Mode ("Screen Space - Overlay," "Screen Space - Camera," or "World Space"). (This tutorial assumes "Screen Space - Overlay.")
The final Hierarchy structure will look like this:
UICanvas (GameObject with Canvas component)
 |- WindowItem
 |- WindowStatus (Status screen GameObject)
 |   |- TextMeshPro
 |   |- Image (Background, etc.)
 |   |- RawImage (Set RenderTexture here to display the Live2D model) [ADDED]
 |   |- Live2D Camera (Camera for capturing Live2D) [ADDED]
 |   |- Live2D Prefab (The Live2D model to display) [ADDED]
 |- WindowOption
Let's go through the specific steps.
Steps to Display a Live2D Model on UI Canvas (RenderTexture + RawImage)
Step 1: Create a Dedicated Camera for Live2D
First, prepare a dedicated camera to capture only the Live2D model you want to display in the UI. This camera's sole purpose is to render just the Live2D model, separate from other cameras in the scene.
The easiest approach is to duplicate an existing camera in the scene (e.g., Main Camera) using Ctrl+D (or Cmd+D). After duplicating, rename it to something descriptive (e.g., Live2D Camera).
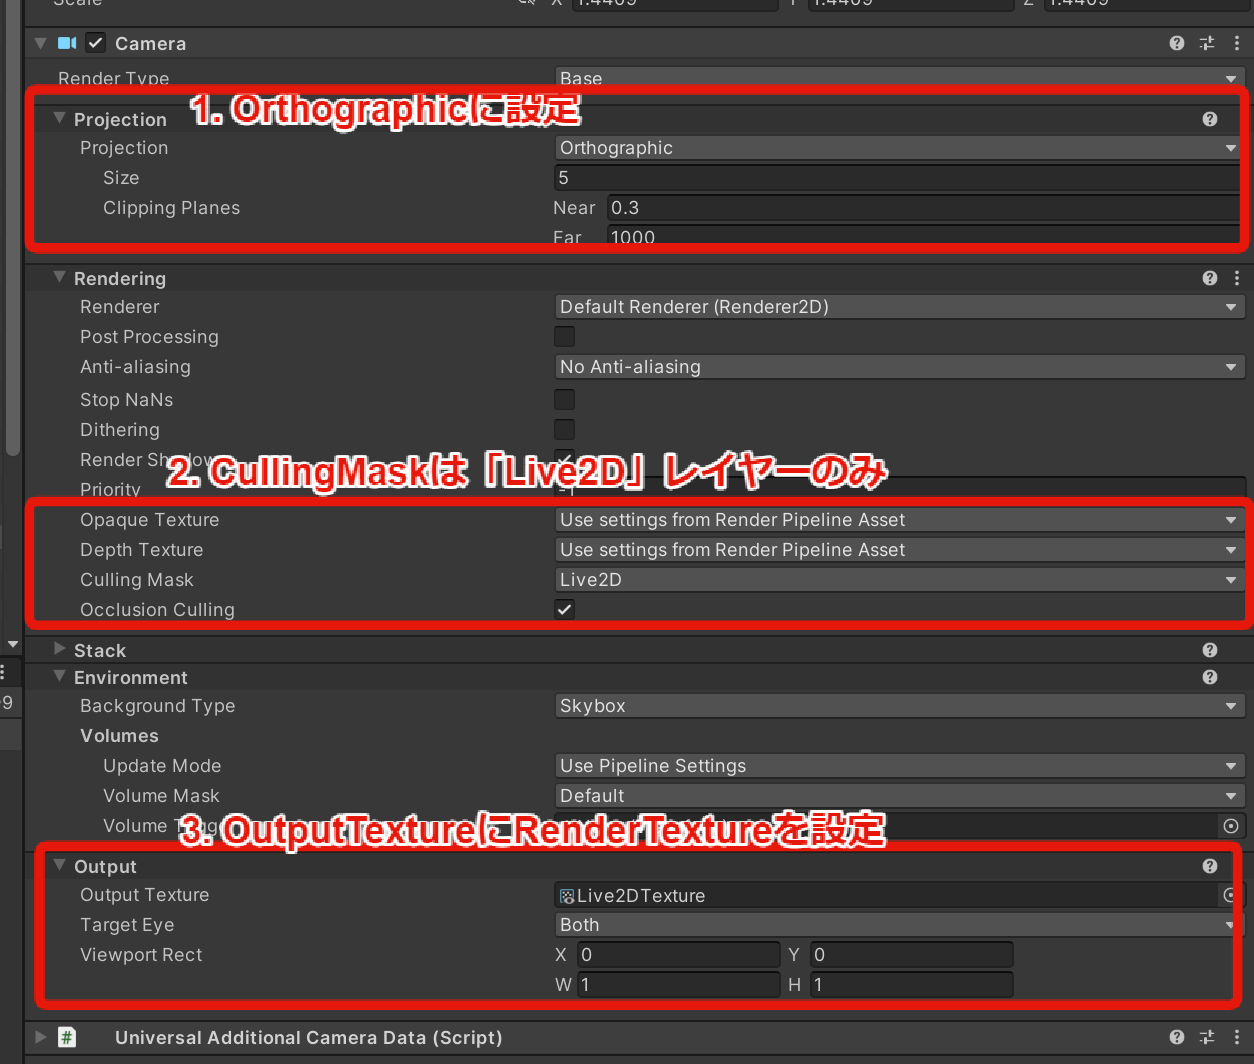
Next, select the Live2D Camera and check/modify the camera settings in the Inspector window. The most important setting is Projection — set this to Orthographic. Orthographic projection is typically suitable for 2D display in UI.
Adjust the camera's position and size (Size for Orthographic mode) so that the Live2D model fits properly within the camera's view.
[Troubleshooting] If the Live2D Model Itself Isn't Displaying Correctly
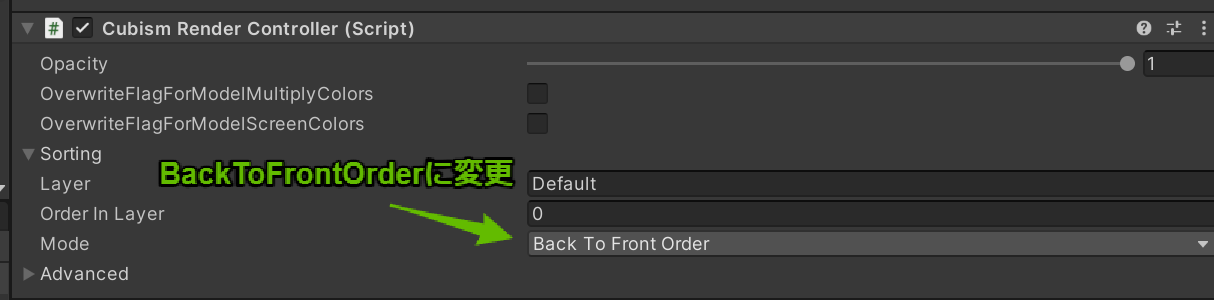
If the Live2D model Prefab placed in the scene isn't rendering correctly (parts are missing, draw order is wrong, etc.), check the CubismRenderController component attached to the Live2D Prefab's GameObject.
In particular, look at the Mode setting under the Sorting section. In many cases, changing this to Back To Front Order resolves draw order issues.
Reference: Fixing Model Draw Order (Live2D Manuals & Tutorials)
Step 2: Assign a Dedicated Layer to the Live2D Prefab
Next, assign a dedicated layer to the Live2D model Prefab so the Live2D camera can identify it specifically.
- Open the "Layers" dropdown menu at the top right of the Unity Editor and select "Edit Layers..."
- Enter a new layer name (e.g.,
Live2D) in an available slot under "User Layers" (Layer 8 or later). The name can be anything you prefer. - Select the Live2D model Prefab's GameObject placed in the scene.
- Open the "Layer" dropdown menu at the top right of the Inspector window and select the
Live2Dlayer you just created. When asked "Change children?", select "Yes, change children" to apply the same layer to all child objects.

Step 3: Configure the Culling Mask for Each Camera
After setting up the layers, narrow down what each camera renders.
-
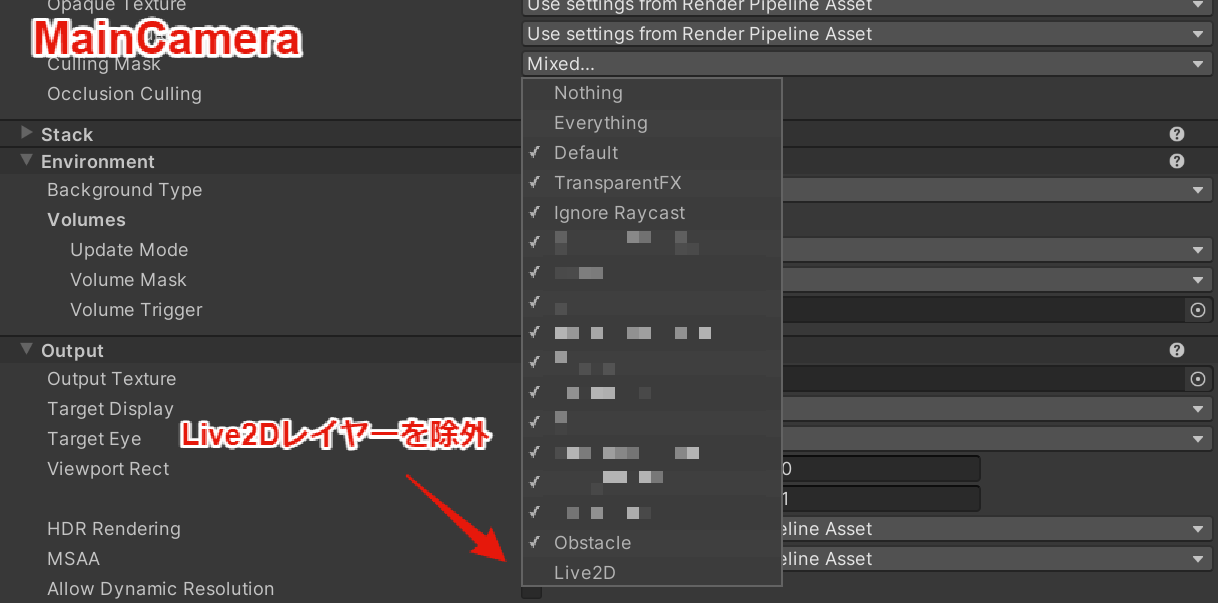
Main Camera:
- Select the Main Camera object, and open the Culling Mask dropdown in the Camera component in the Inspector window.
- Uncheck the
Live2Dlayer. This prevents the Main Camera from rendering the Live2D model.
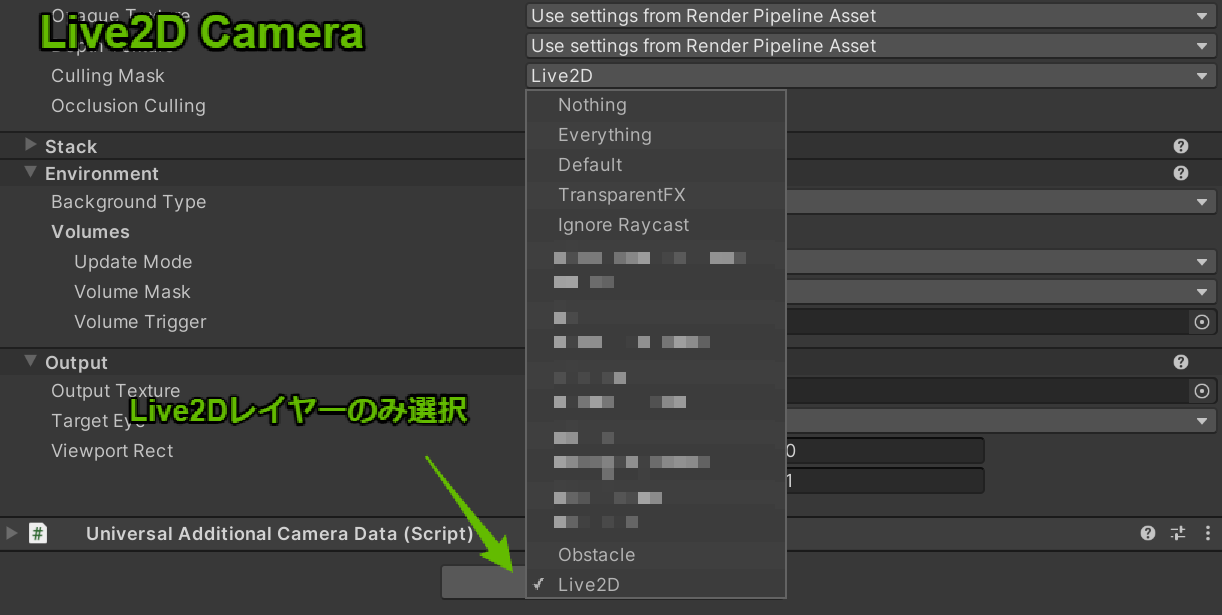
-
Live2D Camera:
- Select the
Live2D Cameraobject and open the Culling Mask similarly. - Select "Nothing" to uncheck everything first, then check only the
Live2Dlayer. This ensures this camera only renders objects on the Live2D layer (i.e., the Live2D model).
- Select the
Main Camera Culling Mask (excluding Live2D):
Live2D Camera Culling Mask (Live2D only):
Step 4: Create a RenderTexture
Create a RenderTexture asset to store the output from the Live2D camera.
- Right-click in the Project window and select Create > RenderTexture.
- Give the created RenderTexture asset a descriptive name (e.g.,
Live2DRenderTexture). - Select the RenderTexture asset and configure its settings in the Inspector window:
- Size: Set the resolution of the RenderTexture. Adjust based on the display size in the UI — start with 1024 x 1024 or 2048 x 2048. If the Live2D model appears blurry in the UI, increase these values.
- Color Format: The default is usually fine, but if you want background transparency, select a format with an alpha channel (e.g., ARGB32).
Step 5: Link the Live2D Camera to the RenderTexture
Set the RenderTexture created in Step 4 as the output target for the Live2D camera created in Step 1.
- Select the
Live2D Cameraobject. - In the Camera component in the Inspector window, drag and drop the
Live2DRenderTextureasset into the Output Texture field.
The Live2D model captured by Live2D Camera is now rendered in real-time to Live2DRenderTexture. All that's left is to display this RenderTexture in the UI.
Step 6: Display on Canvas Using RawImage
Finally, place a RawImage component on the UI Canvas and display the RenderTexture through it.
- Select the UI element where you want to display the Live2D model (e.g.,
WindowStatusGameObject). - Right-click and select UI > Raw Image to create a new child GameObject with a RawImage component. Rename the GameObject (e.g.,
Live2DView). - Select the
Live2DViewGameObject. - In the RawImage component in the Inspector window, drag and drop the
Live2DRenderTextureasset into the Texture field. - Use the Rect Transform component to adjust the display position and size in the UI.
You should now see the Live2D model displayed at the specified position on the UI Canvas in Unity's Game view!
Final Setup and Notes
For easier management, it's recommended to organize the following elements as children of the UI panel that displays them (e.g., WindowStatus GameObject):
- Live2D Prefab (with Live2D layer assigned)
- Live2D Camera (with Culling Mask and Output Texture configured)
- RawImage GameObject (with RenderTexture assigned)
By doing this, toggling the parent WindowStatus GameObject's visibility (SetActive(true/false)) will also toggle the Live2D model display on and off.
That covers the basic steps for displaying a Live2D model on Unity's UI Canvas using RenderTexture and RawImage. With this technique, you can leverage Live2D in various UIs such as menu screens and character detail screens.