Have you ever wanted to add a player option for changing screen resolution in your Unity game? Some users want to enjoy crisp visuals at Full HD (1920×1080), while others prefer a lighter resolution (e.g., 1280×720) to match their PC specs. Unity provides the convenient Screen.SetResolution function to meet this need.
This function allows you to dynamically change screen resolution and fullscreen/window mode during gameplay through code.
This article covers everything from the basics of Screen.SetResolution to practical UI button implementations, usage notes, platform-specific behavior, and UI scaling considerations.
In This Article
- Introduction: Why a Resolution Change Feature?
- Sample Implementation: Creating Resolution Switch Buttons
- C# Script Example (ResolutionChangeButton.cs)
- Assigning the Script to UI Buttons
- Screen.SetResolution Function Details
- Parameter Meanings (width, height, fullscreen)
- Controlling Window and Fullscreen Modes
- Troubleshooting When Resolution Won't Change
- Implementation Tips and Notes
- Behavior Differences by Target Platform
- Aspect Ratio Changes and UI Scaling
- Ideas for Better Resolution Menus
- References
- Summary: Providing a Comfortable Play Environment with Screen.SetResolution
Introduction: Why a Resolution Change Feature?
Players use monitors with varying resolutions and PC specs. Allowing players to choose the optimal screen size for their environment improves game accessibility and comfort. For example, you can provide crisp visuals for users with high-res monitors while letting lower-spec PC users reduce resolution for stable frame rates. Unity's Screen.SetResolution provides the basic functionality to achieve this.
Sample Implementation: Creating Resolution Switch Buttons
Here's the simplest example: implementing UI buttons to switch between "1920×1080 (Full HD)" and "1280×720 (HD)" resolutions.
C# Script Example (ResolutionChangeButton.cs)
First, create a C# script for changing resolution.
using UnityEngine;

public class ResolutionChangeButton : MonoBehaviour
{
    /// <summary>
    /// Common method to set resolution with specified width and height
    /// </summary>
    /// <param name="width">Desired width in pixels</param>
    /// <param name="height">Desired height in pixels</param>
    public void SetResolution(int width, int height)
    {
        // Screen.SetResolution(width, height, fullscreen);
        // Passing Screen.fullScreen as the 3rd argument maintains the current fullscreen state while changing resolution.
        // Use true for fullscreen, false for windowed mode.
        Screen.SetResolution(width, height, Screen.fullScreen);
        Debug.Log($"Resolution set to: {width}x{height}, Fullscreen: {Screen.fullScreen}");
    }

    /// <summary>
    /// Sets resolution to 1920x1080 (called from button)
    /// </summary>
    public void SetResolution1080p()
    {
        SetResolution(1920, 1080);
    }

    /// <summary>
    /// Sets resolution to 1280x720 (called from button)
    /// </summary>
    public void SetResolution720p()
    {
        SetResolution(1280, 720);
    }

    // --- Add more resolution methods as needed ---
    // public void SetResolutionYourChoice()
    // {
    //     SetResolution(yourWidth, yourHeight);
    // }

    // --- Example fullscreen toggle method ---
    // public void ToggleFullscreen()
    // {
    //     Screen.fullScreen = !Screen.fullScreen;
    //     // To maintain current resolution:
    //     // Screen.SetResolution(Screen.currentResolution.width, Screen.currentResolution.height, Screen.fullScreen);
    //     Debug.Log($"Fullscreen toggled: {Screen.fullScreen}");
    // }
}
This script consists of methods for setting specific resolutions (SetResolution1080p, SetResolution720p) and a common SetResolution method called internally.
Assigning the Script to UI Buttons
Next, assign the script to Unity UI buttons.
- In the Unity Editor, create two resolution change UI buttons (Button component GameObjects), e.g., "1080p Button" and "720p Button."
- Create an empty GameObject (e.g.,
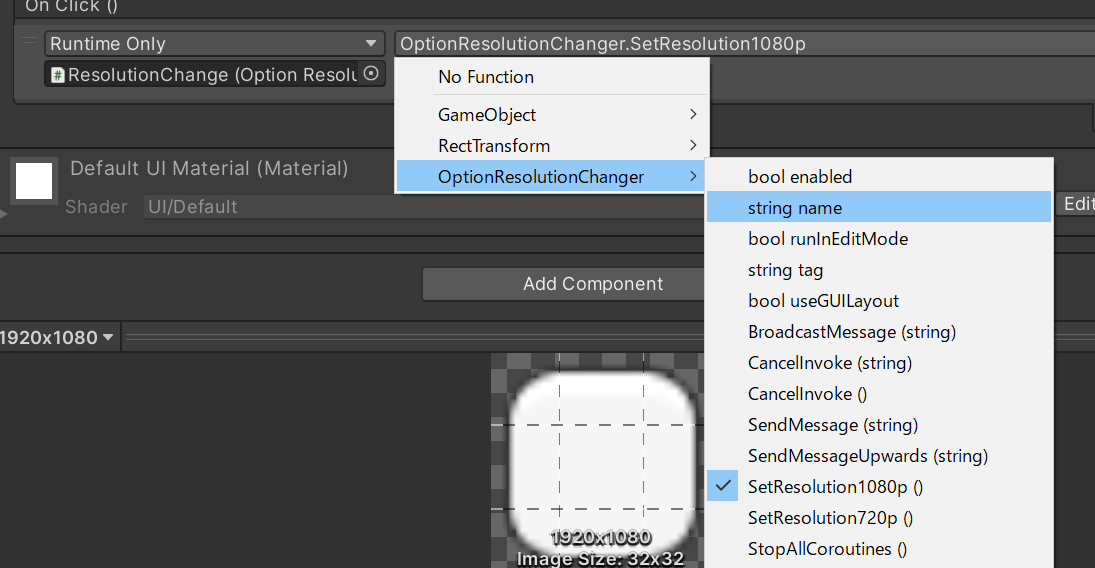
ResolutionManager) and attach theResolutionChangeButton.csscript to it. - Select "1080p Button," click the "+" button on the OnClick () event list in the Button component's Inspector.
- Drag the
ResolutionManagerGameObject from the Hierarchy into the "None (Object)" field. - From the dropdown menu (initially showing "No Function"), select "ResolutionChangeButton" > "SetResolution1080p ()".
- Similarly, select "720p Button," assign
ResolutionManagerto OnClick(), and choose "ResolutionChangeButton" > "SetResolution720p ()".
Now, clicking each button during gameplay will call the corresponding script method, changing the screen resolution via Screen.SetResolution.
Screen.SetResolution Function Details
Parameter Meanings (width, height, fullscreen)
Screen.SetResolution takes three basic arguments:
Screen.SetResolution(int width, int height, bool fullscreen)
int width: Desired screen width in pixels.int height: Desired screen height in pixels.bool fullscreen: Screen mode.true: Sets the specified resolution in fullscreen mode.false: Sets the specified resolution (window size) in windowed mode.
For example, Screen.SetResolution(1920, 1080, true); switches to 1920×1080 fullscreen display.
(Note: From Unity 2021.2 onwards, an overload with a 4th argument for refresh rate is available, but the 3-argument version above covers basic usage.)
Controlling Window and Fullscreen Modes
Let's look more closely at the fullscreen parameter:
-
To maintain the current mode: Write
Screen.SetResolution(width, height, Screen.fullScreen);as in the sample code.Screen.fullScreenreturns the current fullscreen state (true or false), allowing you to change resolution without changing the display mode.- In windowed mode: the window resizes to
widthxheight. - In fullscreen mode: the fullscreen resolution changes to
widthxheight(if supported by the monitor).
- In windowed mode: the window resizes to
-
To switch modes simultaneously: Pass
trueorfalsedirectly as the 3rd argument.Screen.SetResolution(1280, 720, false);— Switch to 1280×720 windowed modeScreen.SetResolution(1920, 1080, true);— Switch to 1920×1080 fullscreen
-
To toggle only the fullscreen state: Assign directly to the
Screen.fullScreenproperty:Screen.fullScreen = !Screen.fullScreen;(Note: the screen may briefly flicker during mode switching.)
Troubleshooting When Resolution Won't Change
If Screen.SetResolution isn't working as expected, check the following:
- Unity Editor limitations: Resolution changes via
Screen.SetResolutionmay not fully reflect or behave differently in the Unity Editor's Game view. Fullscreen testing is particularly limited. Always test with a built executable. - Target platform limitations:
- WebGL: Running in a browser means browser window size and HTML/CSS controls take priority.
Screen.SetResolutionoften doesn't work as intended on WebGL. Use Canvas element sizing instead. - Mobile (iOS/Android): Devices run at their native resolution, so arbitrary resolution changes via
Screen.SetResolutionare not recommended and often don't work. For mobile, internal rendering resolution adjustments (different fromScreen.SetResolution) are typically used to reduce rendering load.
- WebGL: Running in a browser means browser window size and HTML/CSS controls take priority.
- Conflicts with other scripts/assets: Check for other scripts or assets in the project that control screen size or fullscreen settings (especially window management assets).
- OS-level settings: OS display settings (scaling, etc.) may also have an impact.
Implementation Tips and Notes
Behavior Differences by Target Platform
As mentioned, Screen.SetResolution behavior varies by target platform:
- PC (Windows, Mac, Linux) standalone builds: The platform where it works most reliably. It's standard practice to offer players resolution and fullscreen/windowed mode options.
- WebGL: Generally don't use
Screen.SetResolution; consider controlling Canvas size via HTML/JavaScript. - Mobile: Don't change resolution arbitrarily; run at native resolution. Reduce rendering load through other methods (render scale adjustment, etc.).
Be aware of your target platform when planning your implementation.
Aspect Ratio Changes and UI Scaling
Changing resolution may alter the screen's aspect ratio (e.g., 16:9, 4:3), which can break UI layouts.
Use Unity's UI system (uGUI) features to handle this:
- Canvas Scaler component: Set the UI Scale Mode to "Scale With Screen Size" on the Canvas object. This automatically scales UI elements to match the reference resolution as screen resolution changes. Use the "Match" slider to balance scaling between width and height.
- Anchors and Pivot: Properly configure anchors and pivots in each UI element's Rect Transform to control relative positioning from screen edges and element stretching behavior across different aspect ratios.
- Layout Group components: Vertical Layout Group, Horizontal Layout Group, and Grid Layout Group automatically arrange child elements, making it easier to create resolution-resilient layouts.
When implementing resolution switching, always verify UI display across multiple resolutions and aspect ratios.
Ideas for Better Resolution Menus
The sample uses fixed resolution buttons, but here are ideas for more user-friendly settings menus:
- Resolution dropdown list: Use the
Screen.resolutionsproperty to get a list of resolutions supported by the player's monitor and display them in a dropdown menu. - Fullscreen/windowed toggle button/checkbox: Provide a dedicated button or checkbox separate from resolution to toggle between fullscreen and windowed modes (using the
Screen.fullScreenproperty). - Custom resolution input fields (advanced): Provide fields for entering width and height directly, though input validation is needed to handle invalid values.
- Saving and loading settings: Save the player's selected resolution and fullscreen settings using
PlayerPrefsand auto-apply them on next launch for improved convenience.
References
- Screen.SetResolution - Unity Scripting Reference
- Screen.fullScreen - Unity Scripting Reference
- Screen.resolutions - Unity Scripting Reference
- SETTINGS MENU in Unity - Brackeys (YouTube)
Summary: Providing a Comfortable Play Environment with Screen.SetResolution
This article covered how to use Unity's Screen.SetResolution function to change screen resolution and fullscreen/windowed mode during gameplay.
Implementing this feature lets players choose display settings that match their PC environment and preferences, delivering a more comfortable gaming experience.
Key considerations include platform-specific behavior differences and UI layout adjustments (aspect ratio, scaling) when resolution changes. Leverage Canvas Scaler and anchor settings to create UIs that work well across various screen sizes.
From basic button-based switching to displaying supported resolution lists and saving/loading settings, there are many ways to create advanced option menus. Add resolution switching to your project to boost player satisfaction.