This article explains how to implement a charge attack action -- similar to the spin attack from The Legend of Zelda -- using Unity's Input System.
While the Input System offers a "Hold Interaction" for detecting long presses, this guide takes a different approach. Instead, we'll use the basic button events "the moment a button is pressed (started)" and "the moment a button is released (canceled)" to measure the time difference between them.
Compared to the traditional approach of monitoring input every frame in the Update function, the Input System's event-driven approach results in cleaner code and better maintainability, especially when adding or modifying features.
In this article
- Implementing Charge Attacks: Input System (Press) vs Update vs Hold Interaction
- Installing the Input System and Creating an Input Actions Asset
- Input Actions: Defining the Left Click (Attack Button) Action
- Script Integration: PlayerInput and Event Handling Script
- Charge Time Calculation Logic: Using started and canceled
- Adding Mid-Charge Effects: Compensating for Input System Limitations with Coroutines
- Summary: Pros, Cons, and When to Use the Press Event Approach
Implementing Charge Attacks: Input System (Press) vs Update vs Hold Interaction
There are several ways to implement a charge attack. Let's look at the characteristics of each approach.
- Traditional
Updatefunction approach:- Check input every frame in
Update()and measure how long the button has been held. - The concept is intuitive, but the code tends to become complex as the number of input types and conditional branches increases.
- Check input every frame in
- Using Input System's
Hold Interaction:- Set the Interaction to "Hold" in the Input Actions asset. After the button is held for a specified time (Hold Time), the
performedevent fires. - Easy to set up, but as we'll discuss later, implementing both "short press (normal attack)" and "long press (charge attack)" on the same button can become somewhat complex.
- Set the Interaction to "Hold" in the Input Actions asset. After the button is held for a specified time (Hold Time), the
- Using Input System
Pressevents (started/canceled) (this article's approach):- Use the moment the button is pressed (
started) and the moment it's released (canceled) to measure the time between them. - Event-driven code stays organized, and you can flexibly implement short press vs. long press detection and mid-charge processing.
- Use the moment the button is pressed (
Q. Why use Press events (started/canceled) instead of Hold Interaction?
Hold Interaction is convenient for detecting that a button has been held for a specified duration. However, it has some drawbacks when you want to "use the same button for both short press (normal attack) and long press (charge attack)" or when you want to "add visual effects while charging."
- Combining short and long presses: With Hold Interaction, if you want to execute a short press action (like a normal attack) immediately when the button is pressed -- before the Hold is completed and
performedis called -- extra work is needed. For example, you might need to trigger a normal attack onstartedand cancel it if Hold completes, or set up a separate action for short presses, which complicates the implementation. - Using the press start timing: If you want the character to immediately enter a ready stance or start a charge effect the moment the button is pressed, it can be difficult to control the timing with Hold Interaction alone.
- Mid-charge control: When displaying a charge gauge or implementing level-up effects at certain intervals during charging, Hold Interaction makes fine-grained control difficult since you have to wait for the final
performedevent.
On the other hand, the Press event (started/canceled) approach introduced in this article offers:
- Precise measurement of hold duration by calculating the time difference between the
startedevent (button pressed) and thecanceledevent (button released). - Easy determination of "normal attack if held less than the threshold, charge attack if held longer" within the
canceledevent handler. - A natural flow: start the charge animation and effects on
started, then trigger the attack oncanceled. - Flexible mid-charge effects and state changes when combined with coroutines (discussed later).
In summary, when you need flexible short press / long press detection and mid-charge effects and state management, the started/canceled event approach is well-suited.
Installing the Input System and Creating an Input Actions Asset
First, install the Input System package in your project and create an Input Actions asset to define your inputs.
Installing the Input System Package
This is done through the Unity Editor menu.
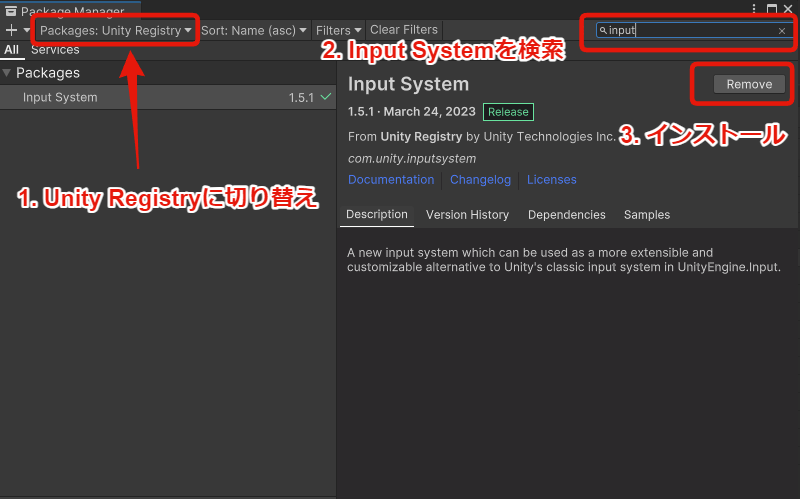
- Open Window > Package Manager.
- Select "Packages: Unity Registry" from the dropdown in the upper left.
- Find "Input System" in the list and click the "Install" button.
- If a dialog prompts you to change project settings during installation, select "Yes" to restart the editor.
Creating an Input Actions Asset File
Next, create an asset file to define input actions.
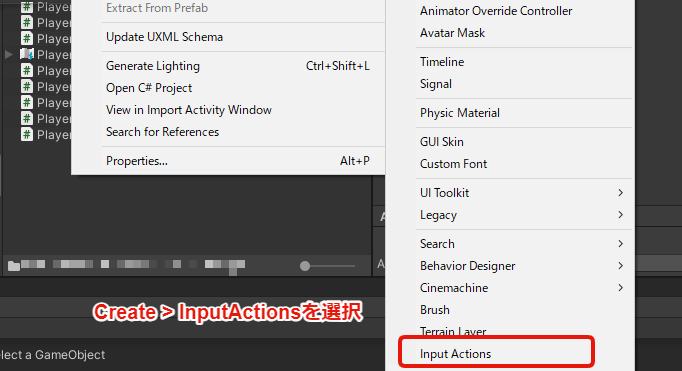
- Right-click in the Project window and select Create > Input Actions.
- Give the created asset file a descriptive name (e.g.,
PlayerInputActions.inputactions). - Select the created asset file, check "Generate C# Class" in the Inspector window, and click the "Apply" button.
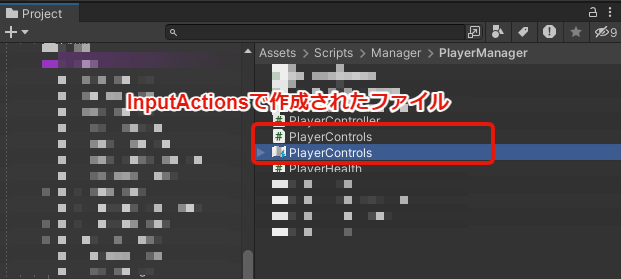
Checking "Generate C# Class" auto-generates a C# class corresponding to this Input Actions asset, making it easier to handle input events from scripts.
Input Actions: Defining the Left Click (Attack Button) Action
Double-click the Input Actions asset file (e.g., PlayerInputActions.inputactions) to open the editor window, and define the action used for the charge attack.
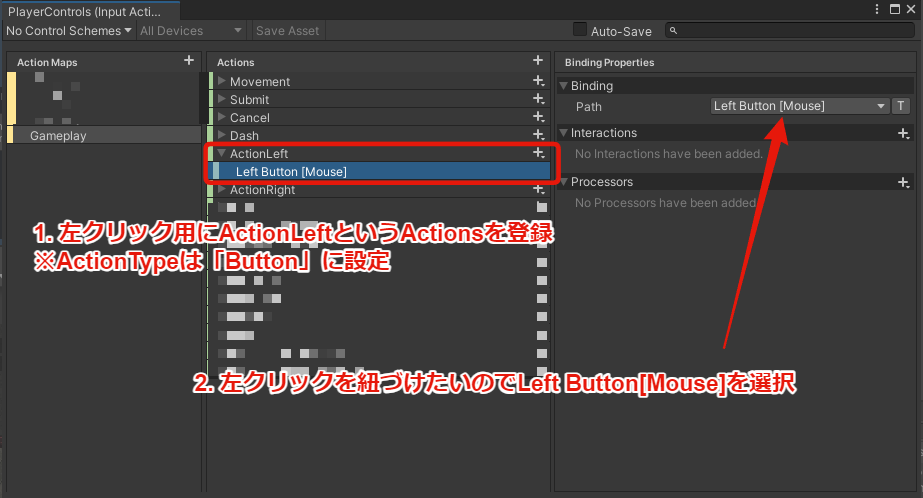
- Click the "+" button in the Action Maps column to create a new Action Map (e.g.,
Gameplay). An Action Map is a group that organizes related actions. - Click the "+" button in the Actions column to create a new Action (e.g.,
AttackLeft). This corresponds to a specific input operation. - Select the
AttackLeftAction and configure the following in the Properties panel on the right:- Action Type: Select "Button." This is suitable for simple press/release inputs.
- Select
<No Binding>under theAttackLeftAction and configure the following in the Properties panel. This binds the action to a specific device button:- Path: Select "Mouse" > "Left Button" from the dropdown menu. (Gamepad buttons can also be configured here)
- When you're done editing, click the "Save Asset" button at the top of the window to save your changes.
Now, "left mouse click" is registered as an action named AttackLeft that can be received as events from scripts.
Script Integration: PlayerInput and Event Handling Script
To make the defined Input Actions work in your game, set up the script integration.
-
Create an empty GameObject in the scene and give it a descriptive name (e.g.,
InputManager). -
Add a "Player Input" component to the
InputManagerGameObject. -
Drag and drop the Input Actions asset you created earlier (e.g.,
PlayerInputActions.inputactions) into the "Actions" field of the Player Input component. -
Create the following C# script (e.g.,
InputManager.cs) and attach it to theInputManagerGameObject.
using UnityEngine;
using UnityEngine.InputSystem;

// Indicates that the PlayerInput component is required
[RequireComponent(typeof(PlayerInput))]
public class InputManager : MonoBehaviour
{
    // Variable to record the time when the button was first pressed
    private float buttonPressStartTime;
    // Threshold time for determining a charge attack (e.g., 1 second)
    private const float specialAttackThreshold = 1.0f;

    // Method called by the PlayerInput component
    // The method name should be "On" + the action name defined in Input Actions (e.g., AttackLeft),
    // or manually configured in the Inspector as described below
    public void OnAttackLeft(InputAction.CallbackContext context)
    {
        // Processing when the button is pressed (started)
        if (context.started)
        {
            Debug.Log("Attack button pressed (started)");
            // Record the press start time
            buttonPressStartTime = Time.time;
            // You can also add ready stance or charge effect start processing here
        }
        // Processing when the button is released (canceled)
        else if (context.canceled)
        {
            Debug.Log("Attack button released (canceled)");
            // Calculate how long the button was held
            float pressDuration = Time.time - buttonPressStartTime;
            Debug.Log($"Press duration: {pressDuration} seconds");

            // If the hold time exceeds the threshold, perform a charge attack
            if (pressDuration > specialAttackThreshold)
            {
                PerformSpecialAttack(); // Call charge attack method
            }
            // Otherwise, perform a normal attack
            else
            {
                PerformNormalAttack(); // Call normal attack method
            }
        }
        // context.performed is often called at nearly the same time as started for Button type
        // When not using Hold Interaction, primarily use started and canceled
    }

    // Perform a normal attack (placeholder implementation)
    private void PerformNormalAttack()
    {
        Debug.Log("Perform Normal Attack!");
        // Add actual normal attack logic here
    }

    // Perform a charge attack (placeholder implementation)
    private void PerformSpecialAttack()
    {
        Debug.Log("Perform Special Attack!");
        // Add actual charge attack logic here
    }
}
-
Select the
InputManagerGameObject and set the Player Input component's "Behavior" to "Invoke Unity Events" in the Inspector window. -
Expand the "Events" section, open the Action Map name you configured (e.g.,
Gameplay), and click the "+" button next to the action name (e.g.,Attack Left). -
Drag and drop the
InputManagerGameObject itself into the event field, then select "InputManager" > "OnAttackLeft (InputAction.CallbackContext)" from the dropdown menu on the right. (If your script method is namedOn[ActionName], it may be recognized automatically)
Now, every time the left mouse button is clicked (pressed or released), the OnAttackLeft method in the InputManager.cs script will be called. This event-driven mechanism allows you to handle input without using the Update function.
Charge Time Calculation Logic: Using started and canceled
Let's take a closer look at the charge time calculation logic in the OnAttackLeft method of the InputManager.cs script discussed above.
- Press start (
context.started):- This block executes the moment the left mouse button is pressed.
- The current time (
Time.time) is recorded in thebuttonPressStartTimevariable. This becomes the starting point for measuring charge time.
- Press end (
context.canceled):- This block executes the moment the held left button is released.
- The press duration (
pressDuration) is calculated by subtracting the recorded press start time (buttonPressStartTime) from the current time (Time.time). - The calculated
pressDurationis compared to the predefined charge attack threshold (specialAttackThreshold). - If
pressDurationexceeds the threshold,PerformSpecialAttack()is called; otherwise,PerformNormalAttack()is called.
By using the Input System's started and canceled events this way, you can precisely measure how long a button was held and branch between normal and charge attacks accordingly. Since there's no need to add time every frame inside Update(), the code becomes simpler and may reduce processing overhead.
Adding Mid-Charge Effects: Compensating for Input System Limitations with Coroutines
The Input System's event-driven model excels at capturing instantaneous events like "pressed" and "released," but it requires some extra work when you want to trigger processing at a specific timing while the button is being held (e.g., the moment a charge attack becomes available).
For instance, if you want effects like "make the character glow when the charge time reaches the threshold" or "play a charge complete sound effect," the started and canceled events alone cannot directly detect that "midpoint."
One common solution is to use Unity's Coroutines. Start a coroutine when the button is pressed (started), and after a set time (the charge attack threshold) has elapsed, send a charge complete signal.
Here's an example of the InputManager.cs with a coroutine added to implement a charge complete signal (using Debug log output here).
using UnityEngine;
using UnityEngine.InputSystem;
using System.Collections; // Required for coroutines

[RequireComponent(typeof(PlayerInput))]
public class InputManager : MonoBehaviour
{
    private float buttonPressStartTime;
    private const float specialAttackThreshold = 1.0f;
    // Variable to hold the running coroutine
    private Coroutine chargeCheckCoroutine;
    // Flag indicating whether the charge complete signal has been sent
    private bool isChargeComplete = false;

    public void OnAttackLeft(InputAction.CallbackContext context)
    {
        if (context.started)
        {
            Debug.Log("Attack button pressed (started)");
            buttonPressStartTime = Time.time;
            isChargeComplete = false; // Reset flag when charging starts

            // Stop any existing coroutine (handles rapid button presses)
            if (chargeCheckCoroutine != null)
            {
                StopCoroutine(chargeCheckCoroutine);
            }
            // Start the charge timer coroutine
            chargeCheckCoroutine = StartCoroutine(ChargeTimerCoroutine());
        }
        else if (context.canceled)
        {
            Debug.Log("Attack button released (canceled)");
            // Stop the charge timer coroutine when the button is released
            if (chargeCheckCoroutine != null)
            {
                StopCoroutine(chargeCheckCoroutine);
                chargeCheckCoroutine = null; // Clear the coroutine reference
            }

            float pressDuration = Time.time - buttonPressStartTime;
            Debug.Log($"Press duration: {pressDuration} seconds");

            // If the charge complete flag is set (= threshold exceeded), perform charge attack
            if (isChargeComplete) // You could also use pressDuration > specialAttackThreshold
            {
                PerformSpecialAttack();
            }
            else
            {
                PerformNormalAttack();
            }

            // Reset the flag after executing the attack
            isChargeComplete = false;
        }
    }

    // Coroutine that monitors charge time
    private IEnumerator ChargeTimerCoroutine()
    {
        // Wait for the threshold duration
        yield return new WaitForSeconds(specialAttackThreshold);

        // When the threshold is reached (and the button is presumably still held)
        // Set the isChargeComplete flag and send the charge complete signal
        // Note: checking context.ReadValue<float>() > 0 would be more precise
        Debug.Log("Charge Complete threshold reached!");
        isChargeComplete = true;

        // Trigger charge complete effects here (glow, sound effect, etc.)
        TriggerChargeCompleteEffect();

        chargeCheckCoroutine = null; // Coroutine finished
    }

    private void PerformNormalAttack()
    {
        Debug.Log("Perform Normal Attack!");
        // Normal attack logic
    }

    private void PerformSpecialAttack()
    {
        Debug.Log("Perform Special Attack!");
        // Charge attack logic
    }

    private void TriggerChargeCompleteEffect()
    {
         Debug.Log("Play Charge Complete Effect!");
        // Charge complete effect processing (display effects, play sound, etc.)
    }
}
In this code, when the button is pressed, ChargeTimerCoroutine starts and after specialAttackThreshold seconds, sets the isChargeComplete flag to true and calls the TriggerChargeCompleteEffect() method. When the button is released (canceled), the code checks whether this flag is true to determine whether to execute a charge attack or a normal attack.
By combining coroutines this way, you can leverage the benefits of the Input System's event-driven model while also handling mid-charge processing at intermediate timings. While it may seem more complex than implementing it in Update, as the number of input types grows or coordination with other actions becomes necessary, the Input System's Action Maps and event-based separation of concerns help keep your overall code organized.
Summary: Pros, Cons, and When to Use the Press Event Approach
We've seen how using Unity's Input System Press events (started / canceled) enables an event-driven implementation of charge attacks.
Pros:
- No need to use the
Updatefunction; code is organized on a per-event basis. - Precise capture of press start and end timings.
- Relatively easy to distinguish between short and long presses and branch processing accordingly.
- Input mapping management through Input Actions assets is intuitive, with high extensibility for key configuration and similar features.
Cons (considerations):
- Processing at "specific timings while the button is held" (like charge complete effects) requires complementary mechanisms such as coroutines.
- For simple charge time measurement alone, implementing in the
Updatefunction may feel simpler in some cases.
Which approach should you choose?
The best implementation method depends on your project's scale, requirements, and team preferences.
- For small projects or prototypes with few inputs beyond the charge attack, a simple
Updatefunction implementation may be sufficient. - For medium to large projects that prioritize diverse inputs (gamepad support, key configuration, etc.), coordination with other actions, and future extensibility and maintainability, combining the Input System's Press events with coroutines is a strong option. Hold Interaction is also an option, but the Press event approach has advantages when you need the flexibility described in this article.
The Input System has a learning curve, but once you're comfortable with it, it becomes a powerful tool. Give it a try and implement charge attacks in whatever way best suits your project.