When switching scenes in Unity, the standard approach is to use SceneManager.LoadScene("SceneName"). However, specifying scene names directly as strings makes your code fragile — it's prone to errors from typos and missed updates when scene files are renamed, and it reduces maintainability as your project grows.
This article introduces a technique that combines UnityEditor.SceneAsset with the OnValidate method to avoid these string-based pitfalls and implement safer, more efficient scene transitions. With this approach, you can intuitively select destination scenes from the Inspector in the Unity editor, and everything works correctly after building — improving both daily development efficiency and code safety.
What this article covers
- Problems with traditional scene transitions (string-based)
- Why string-based references are risky
- The solution: Overview of SceneAsset + OnValidate
- Basic implementation (string-based)
- Standard scene transition code example
- [Important] Adding scenes to Build Settings
- Improved implementation: Using SceneAsset and OnValidate
- Code example using SceneAsset
- Why OnValidate is necessary: The key to avoiding build errors
- Technical deep dive
- What is UnityEditor.SceneAsset?
- The role of the OnValidate method
- Flow from editor selection to post-build operation
- Other scene management approaches
- Summary: Boost development efficiency with safe scene transitions
Problems with Traditional Scene Transitions (String-Based)
Why String-Based References Are Risky
Writing scene names directly in code like SceneManager.LoadScene("MyScene") seems simple, but tends to cause these problems:
- Fragile against scene file renames: When you rename a scene file in the Project window, the strings in your code don't update automatically. You have to manually fix every reference, and it's easy to miss some.
- Typo-induced errors: Even a small mistake like "MyScen" instead of "MyScene" will cause a runtime error when the scene isn't found. These won't be caught at compile time, making them harder to discover.
- Increasingly complex management: As the number of scenes in your project grows, it becomes difficult to track where each scene name string is used, reducing code maintainability.
These issues lead to significant additional development costs, especially in team projects or long-term development.
The Solution: Overview of SceneAsset + OnValidate
This is where the combination of UnityEditor.SceneAsset and the OnValidate method becomes valuable. Here are the benefits:
- Select scenes from the Inspector: By adding a
SceneAssetfield to your script, you can drag and drop scene files directly in the Inspector. This eliminates manual string entry and prevents typos. - Works safely after building: While
SceneAssetis editor-only, theOnValidatemethod saves the scene name as a string the moment a scene is selected in the editor. This makes the correct scene name available in the built application. - Better maintainability and efficiency: If a scene name changes, you just re-select the file in the Inspector — no code changes needed.
Basic Implementation (String-Based)
First, let's look at the traditional string-based scene transition for comparison.
Standard Scene Transition Code Example
The following script transitions to a specified scene when the player contacts a specific GameObject (e.g., a goal point):
using UnityEngine;
using UnityEngine.SceneManagement;

public class SceneTransitionTrigger : MonoBehaviour
{
    // Enter the destination scene name in the Inspector
    [SerializeField] private string sceneToLoad;

    private void OnTriggerEnter2D(Collider2D other)
    {
        // If the colliding object is the player
        if (other.CompareTag("Player"))
        {
            // Load the scene specified by string
            SceneManager.LoadScene(sceneToLoad);
        }
    }
}
When this script is attached to a GameObject, a Scene To Load text field appears in the Inspector.

You need to type the exact scene name (e.g., "Stage2") into this field.
[Important] Adding Scenes to Build Settings
A critical note: any scene loaded via SceneManager.LoadScene must be added to Build Settings beforehand. Without this, it may work in the editor but will fail with a scene-not-found error after building.
- Open File > Build Settings... from the Unity menu.
- Drag and drop the destination scene files from the Project window into the "Scenes In Build" list.
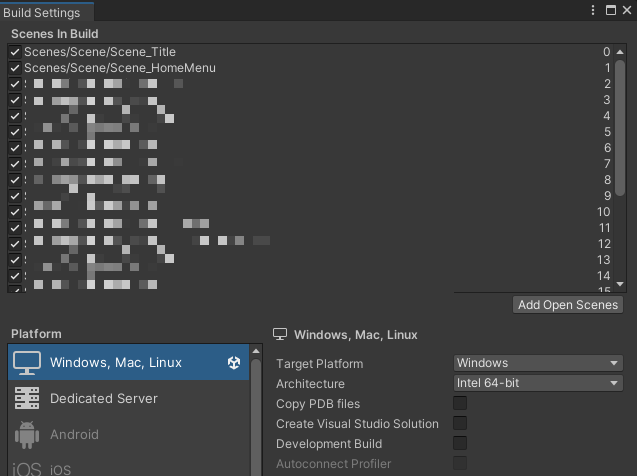
(Only scenes listed here can be loaded after building.)
Improved Implementation: Using SceneAsset and OnValidate
Now let's look at the improved implementation that solves the problems of string-based references.
Code Example Using SceneAsset
The following script provides a SceneAsset field in the Inspector where you can directly drag and drop scene files. The OnValidate method automatically copies the selected scene's name to an internal string variable.
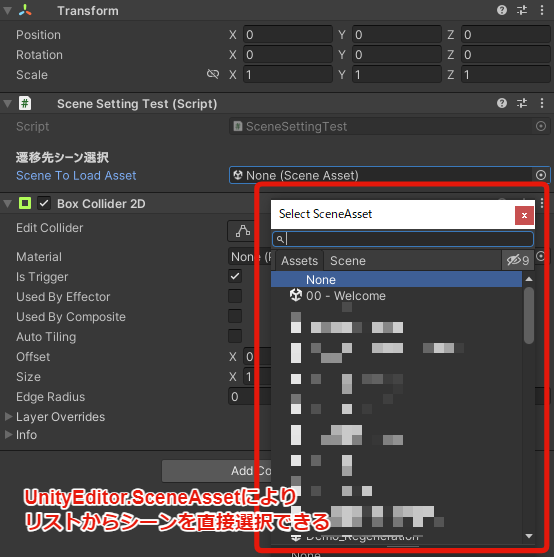
(You can now directly attach scene files in the Inspector!)
using UnityEngine;
using UnityEngine.SceneManagement;
// The UnityEditor namespace is needed for editor-only features
#if UNITY_EDITOR
using UnityEditor;
#endif

public class SceneLoaderSafe : MonoBehaviour
{
    // [HideInInspector] Only the string is needed at runtime, so hide it from the Inspector
    [HideInInspector]
    [SerializeField] private string sceneToLoad;

// Code inside #if UNITY_EDITOR ~ #endif is only active in the editor
#if UNITY_EDITOR
    // SceneAsset field displayed in the Inspector
    [Header("Destination Scene Selection")] // Display a header in the Inspector
    [SerializeField] private SceneAsset sceneAsset; // Drag & drop scene files here
#endif

    private void OnTriggerEnter2D(Collider2D other)
    {
        if (other.CompareTag("Player"))
        {
            // Use the stored string variable for loading
            if (!string.IsNullOrEmpty(sceneToLoad))
            {
                SceneManager.LoadScene(sceneToLoad);
            }
            else
            {
                Debug.LogError("Destination scene name is not set!");
            }
        }
    }

// OnValidate is also editor-only
#if UNITY_EDITOR
    // Automatically called when values change in the Inspector
    private void OnValidate()
    {
        // When a scene is assigned to the sceneAsset field
        if (sceneAsset != null)
        {
            // Copy the scene's name (string) to the sceneToLoad variable
            sceneToLoad = sceneAsset.name;
        }
        else
        {
            // Clear the string if SceneAsset is unset
            sceneToLoad = "";
        }
    }
#endif
}
Key points in the code:
using UnityEditor;and#if UNITY_EDITOR/#endif: SinceSceneAssetandOnValidateare editor-only features, these directives prevent build errors.[SerializeField] private SceneAsset sceneAsset;: The Inspector field for assigning scene files.[HideInInspector] [SerializeField] private string sceneToLoad;: The string variable that stores the scene name forSceneManager.LoadScene. Hidden from the Inspector.private void OnValidate(): Called wheneversceneAssetchanges in the Inspector. It getssceneAsset.name(the selected scene's name) and assigns it tosceneToLoad.SceneManager.LoadScene(sceneToLoad);: At runtime, the scene is loaded using the string set byOnValidate.
Why OnValidate Is Necessary: The Key to Avoiding Build Errors
You might wonder, "If I can select a SceneAsset in the Inspector, why not just load it directly with SceneManager.LoadScene(sceneAsset.name) instead of converting to a string with OnValidate?"
That won't work. UnityEditor.SceneAsset is a Unity editor-only class and isn't available in built games. If you tried to use sceneAsset.name directly at runtime without OnValidate, it would work in the editor but crash in a built game with a "UnityEditor namespace not found" error, and the scene transition would fail.
The OnValidate method is the "bridge" that solves this problem. Every time a SceneAsset is selected or changed in the editor, OnValidate runs automatically and saves the scene name to the sceneToLoad string variable. Since sceneToLoad is a regular string, it works perfectly in built games.
In other words, OnValidate gives you the best of both worlds: "safe, intuitive scene selection in the editor (SceneAsset)" and "reliable scene loading after building (string)."
Technical Deep Dive
What is UnityEditor.SceneAsset?
The UnityEditor.SceneAsset class lets you reference scene files (.unity) as assets within the Unity editor. It enables an intuitive, drag-and-drop interface for setting scene files in the Inspector, minimizing human error. However, since it belongs to the UnityEditor namespace, it's not included in built executables.
Reference: Unity Documentation: UnityEditor.SceneAsset (The link may point to an older version — check the documentation for your Unity version.)
The Role of the OnValidate Method
OnValidate() is a special method available in classes that inherit from MonoBehaviour. It is called only in the editor when the script is loaded or when a value is changed in the Inspector. This behavior lets you use Inspector changes as triggers to automatically perform processing — in this case, converting and saving the scene name as a string.
Reference: Unity Documentation: MonoBehaviour.OnValidate()
Flow from Editor Selection to Post-Build Operation
Here's how the improved implementation works from start to finish:
- During development (in the editor):
- The developer drags and drops the desired scene file (e.g.,
Stage2.unity) into thesceneAssetfield in the Inspector. - Since the value changed, the
OnValidate()method runs automatically. - Inside
OnValidate(),sceneAsset.name(in this case, "Stage2") is retrieved and saved to thesceneToLoadvariable as the string "Stage2".
- The developer drags and drops the desired scene file (e.g.,
- At runtime (after building):
- The player contacts the trigger.
- The
OnTriggerEnter2Dmethod executes. SceneManager.LoadScene(sceneToLoad)is called. At this point,sceneToLoadcontains the string "Stage2" that was set in the editor.- Scene "Stage2" loads successfully.
This is how OnValidate bridges editor-only functionality with runtime-valid data, enabling safe and efficient scene transitions.
Other Scene Management Approaches
Beyond the SceneAsset + OnValidate method introduced here, there are several other ways to manage scene transitions in Unity:
- Managing scene names as constants or enums: Define scene names as code constants or enum values. This avoids hardcoded strings, but you still need to update the constants or enum whenever scenes are added or removed.
- Managing scene lists with ScriptableObjects: Create ScriptableObject assets that contain a list of available scenes. This provides centralized management but adds setup overhead.
- Using the Addressable Asset System: Treat scenes as Addressable assets and load them by address (string key). This suits async loading and dynamic content delivery but has a learning curve.
Each approach has its pros and cons. The SceneAsset + OnValidate method stands out because it requires no special assets or complex systems, is relatively easy to implement, and balances editor convenience with build safety — making it a strong choice, especially for small to mid-sized projects.
Summary: Boost Development Efficiency with Safe Scene Transitions
Specifying scene names as strings for Unity scene transitions carries risks of typos and missed updates when scene names change, potentially reducing your project's maintainability.
The UnityEditor.SceneAsset + OnValidate method introduced in this article is an effective approach to solving these problems:
- Select scene files directly from the Inspector, preventing typos and making setup intuitive.
OnValidatepreserves editor selections as string data that remains valid after building, enabling safe scene loading.- When scene names change, you just re-select the file in the Inspector — dramatically reducing the need for code changes.
This reduces the risk of scene transition errors and improves both development efficiency and code maintainability. If you're finding scene management getting unwieldy as your project grows, give this approach a try.