
Want to reach international audiences with your YouTube videos? Adding dubbed audio — not just subtitles — dramatically improves the viewing experience. Previously, this required hiring professional narrators or speaking foreign languages yourself, but ElevenLabs' TTS API has changed the game.
This article walks through my complete workflow for automatically generating multilingual dubbed audio for YouTube videos. The tools are Claude, Python, ffmpeg, and ElevenLabs API. Claude handles the core text processing, while Python + ffmpeg automate audio generation and processing. No special equipment needed — individual creators can get started right away.
- Workflow Overview
- Prerequisites
- Why Claude (LLM) Is Essential
- Step 1: Create Subtitles (Text)
- Step 2: Create Translated Subtitles with Claude & Optimize for TTS
- Step 3: Generate Audio with ElevenLabs API
- Step 4: Build Timeline with ffmpeg
- Step 5: Mastering & Quality Verification
- Step 6: Combine with BGM & SFX in Premiere Pro
- Step 7: Upload to YouTube Studio
- Cost & Usage Estimates
- Conclusion
Workflow Overview
This workflow consists of 7 steps.
Video file
  ↓ Step 1: Transcription + Python preprocessing + Claude refinement
Japanese text
  ↓ Step 2: Claude translation + TTS optimization
Dubbing subtitles (_en_dub.srt)
  ↓ Step 3: ElevenLabs TTS API
Per-cue audio files (.mp3)
  ↓ Step 4: ffmpeg timeline construction (★absolute timestamp placement, not simple concatenation)
Timeline audio (.wav)
  ↓ Step 5: Mastering
Dubbed audio (.mp3)
  ↓ Step 6: Premiere Pro — mute original audio + combine with BGM/SFX
Final dubbed audio (.mp3)
  ↓ Step 7: Upload
YouTube Studio (dubbed audio track)
Here are the tools used at each step.
| Step | Tools | Role |
|---|---|---|
| Step 1 | Premiere Pro / Whisper + Python + Claude | Transcription, preprocessing, text refinement |
| Step 2 | Claude | Translation, dubbing subtitle creation, TTS optimization |
| Step 3 | Python + ElevenLabs API | TTS audio generation |
| Step 4 | ffmpeg | Speed adjustment, timeline placement |
| Step 5 | ffmpeg | Gain adjustment, limiter, MP3 output |
| Step 6 | Premiere Pro | Mute original audio, BGM/SFX mixing |
| Step 7 | YouTube Studio | Dubbed audio registration |
The text processing phase in Steps 1-2 requires the most intellectual effort, and Claude (LLM) is essential here. Steps 3-5 are automated processing with scripts and ffmpeg.
Prerequisites
Required Tools & Accounts
Prepare the following tools and accounts.
- Claude (Anthropic) — core tool for translation and text optimization
- Python 3.10+
- ffmpeg / ffprobe (available in PATH)
- ElevenLabs account (Starter Plan or above)
- Premiere Pro (for transcription; Whisper is an alternative)
- Python libraries:
requests,python-dotenv(plusfaster-whisperif using Whisper)
pip install requests python-dotenv faster-whisper
Getting Your ElevenLabs API Key
- Create an account at ElevenLabs
- Copy your API key from the Profile + API Key section in the dashboard
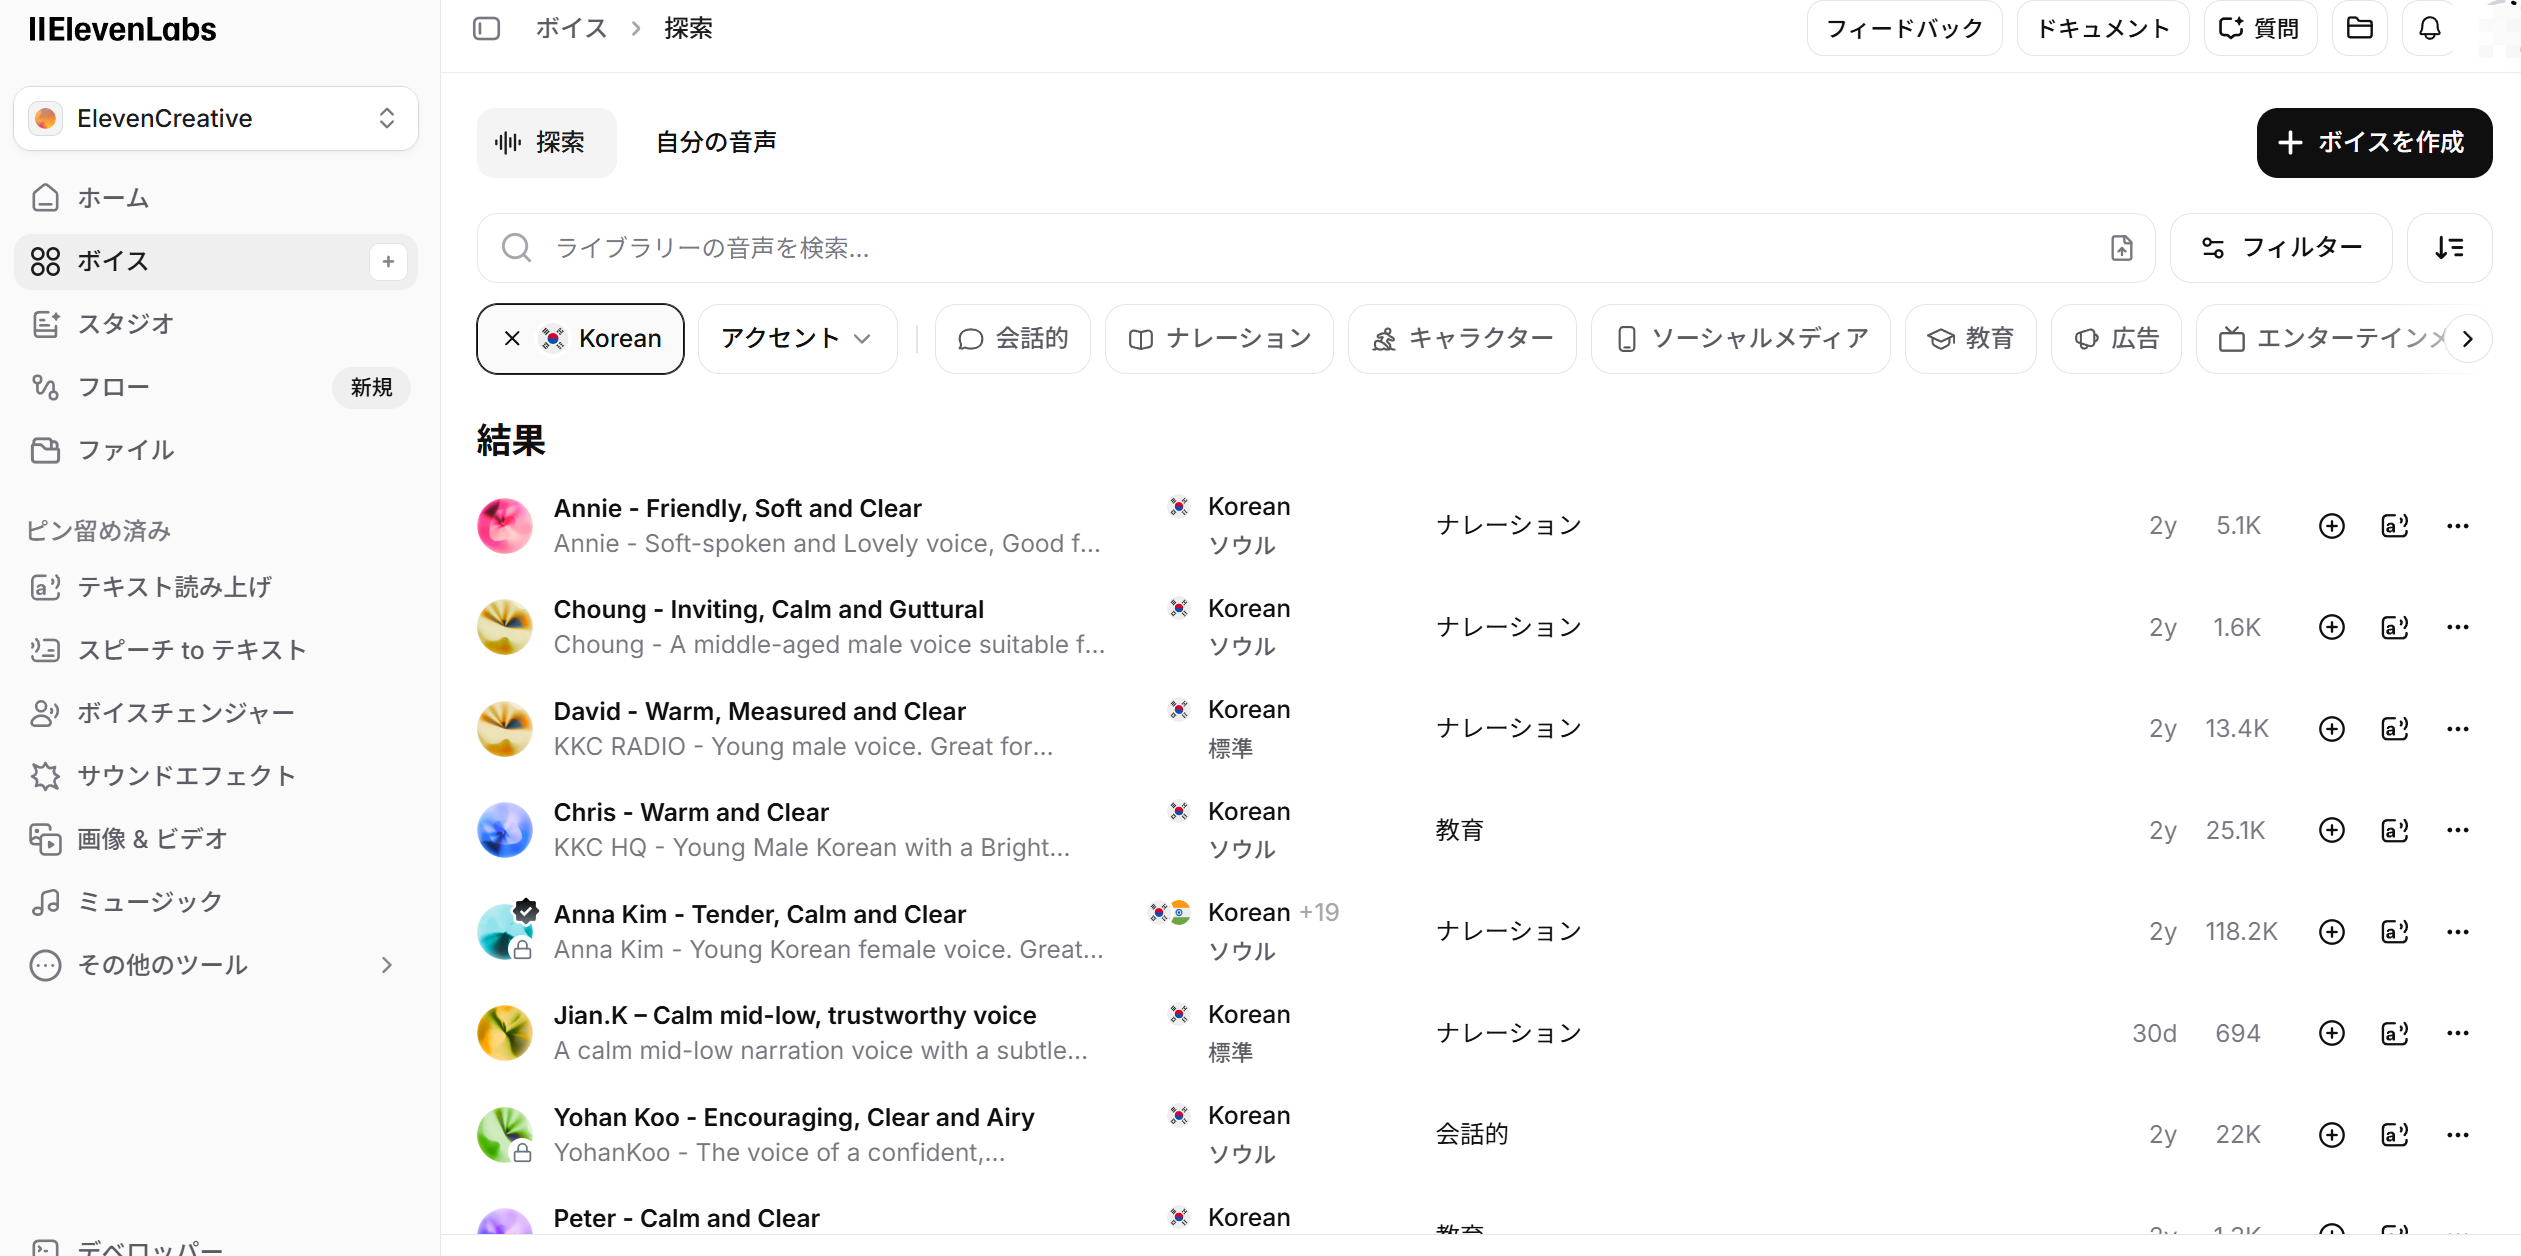
- Go to "Voices" → "Explore" in the sidebar, filter by language and category (Narration, Conversational, etc.) to find a voice you like
- Copy the Voice ID from the voice detail page
Create a .env file in your project root with your API key and Voice IDs.
ELEVENLABS_API_KEY=sk-xxxxxxxxxxxxxxxxxxxxxxxx
ELEVENLABS_VOICE_ID_EN=UgBBYS2sOqTuMpoF3BR0
ELEVENLABS_VOICE_ID_KR=PDoCXqBQFGsvfO0hNkEs
The Voice IDs above are the voices I actually use. I selected them after auditioning voices from ElevenLabs' voice library.

Voice IDs aren't secret — they're IDs of publicly available voices in ElevenLabs' library, so feel free to use them directly. Of course, finding voices that match your own channel's tone is recommended.
You can also check available voices via the ElevenLabs API /voices endpoint.
import requests, os
from dotenv import load_dotenv

load_dotenv()
api_key = os.getenv("ELEVENLABS_API_KEY")

resp = requests.get(
    "https://api.elevenlabs.io/v1/voices",
    headers={"xi-api-key": api_key},
)
for v in resp.json()["voices"]:
    print(f"{v['voice_id']}  {v['name']}  ({v['category']})")
Why Claude (LLM) Is Essential
This workflow relies not only on Python + ffmpeg automation, but on Claude (LLM) playing a central role.
Why Python Alone Isn't Enough
Preprocessing transcriptions and creating translated subtitles require context-aware judgment. Python scripts can only handle formulaic processing like filler removal and string replacement. The following tasks are beyond Python's capabilities:
- Context-based text refinement: Restructuring spoken language into readable text while understanding the speaker's intent
- Translation: Natural multilingual translation that preserves nuance
- TTS optimization: Compressing text to fit within specified time windows while preserving meaning
- Contextual proper noun judgment: Cases where the same sound maps to different correct spellings depending on context
In other words, this workflow is built on a two-stage approach: "parts Python can handle mechanically" and "parts that require LLM understanding".
Why I Recommend Claude
Translation and dubbing subtitle creation can also be done with ChatGPT (GPT-5.4). However, I find that Claude is clearly superior when it comes to creating dubbing subtitles (TTS optimization).
Creating dubbing subtitles involves a massive number of constrained instructions like "compress this sentence to fit within a 3.5-second window, keeping it under 15 words while preserving meaning." Claude excels at this kind of deft text compression to fit specified time windows. It doesn't just shorten sentences — it consistently produces output that considers naturalness when read aloud by TTS (breath points, contraction usage, list compression).
When building this workflow, I actually created dubbing subtitles with Claude and optimized 181 cues down to 146 cues (19.3% reduction). Claude handled the delicate task of keeping every cue's speed ratio (text length / display time) within 1.3x with high precision.
Step 1: Create Subtitles (Text)
Transcription Methods
First, prepare the Japanese text that serves as the starting point for dubbing. There are two main methods.
Method 1: Premiere Pro's Transcription (Recommended)
This is the method I actually use. Premiere Pro has a built-in Speech to Text feature that delivers high-accuracy transcription with video context awareness. Simply run "Transcribe" from Premiere Pro's caption panel and export the result as a text (.txt) file.
Premiere Pro's transcription also analyzes video visual information, making it feel more accurate for proper nouns and technical terms compared to Whisper alone. If you're already editing in Premiere Pro, it works without any additional setup — a major advantage.
Note that Premiere Pro also has a filler word auto-removal feature ("um," "uh," etc.), but I recommend exporting without applying it. Applying filler removal over-fragments the timecodes, which can degrade Claude's context comprehension accuracy during the meaning-based refinement that follows. Letting Claude handle filler removal while considering context produces higher quality text.
Method 2: Using Whisper (faster-whisper)
For environments without Premiere Pro, faster-whisper is a powerful alternative. With a GPU, the large-v3-turbo model provides fast, high-accuracy transcription.
python transcribe.py "input_video.mp4" "output_dir/" \
    --model large-v3-turbo \
    --language ja \
    --beam-size 5
from faster_whisper import WhisperModel

model = WhisperModel("large-v3-turbo", device="cuda", compute_type="float16")
segments, info = model.transcribe(
    "input_video.mp4",
    language="ja",
    beam_size=5,
    vad_filter=True,
    vad_parameters={"min_silence_duration_ms": 500},
    word_timestamps=True,
    temperature=0.0,
)
vad_filter=True auto-detects silent sections, improving segment splitting. Save the output in SRT format.
Either method leads to the same preprocessing and translation steps that follow.
Preprocessing: Python + Claude Two-Stage Approach
Raw transcription output isn't ready for translation. Preprocessing uses a two-stage approach: mechanical processing with Python and meaning-based refinement with Claude.
Stage 1: Mechanical Preprocessing with Python
The following three tasks can be automated with Python scripts.
Filler removal: Remove segments entirely composed of filler words like "um," "uh," "well."
FILLER_ONLY = {
    "はい", "はい。", "えー", "えーと", "えっと",
    "うーん", "うん", "あの", "あー", "おー",
    "そう", "そうです", "そうですね", "ね", "で",
}

if segment["text"].strip() in FILLER_ONLY:
    continue  # Skip this segment entirely
Leading fillers ("um, so next..." → remove the "um,") are also removed with regex.
Mechanical proper noun replacement: Whisper frequently misrecognizes technical terms and proper nouns. Prepare a "misrecognition → correct spelling" replacement list in advance.
# Example channel-specific replacement list
REPLACEMENTS = [
    ("新学校", "進学校"),      # Homophone confusion
    ("元受け", "元請け"),      # Kanji error
    ("下受け", "下請け"),      # Kanji error
    ("MisrecognizedNameA", "CorrectChannelName"),  # Proper noun
]

for old, new in REPLACEMENTS:
    text = text.replace(old, new)
You don't need to build this replacement list perfectly from the start. As you create subtitles for more videos and find new misrecognition patterns, just tell Claude to "add this misrecognition to the lookup table." The more videos you process, the more comprehensive the list becomes, and preprocessing accuracy improves over time.
Segment merging: Merge segments that are too short with adjacent ones.
def should_merge(current, next_seg, max_gap=0.8, max_duration=16.0, max_chars=160):
    gap = next_seg["start"] - current["end"]
    if gap > max_gap:       # More than 0.8s gap = separate segments
        return False
    if next_seg["end"] - current["start"] > max_duration:  # Over 16s after merge
        return False
    if len(current["text"] + next_seg["text"]) > max_chars:  # Over 160 chars after merge
        return False
    return True
Stage 2: Meaning-Based Refinement with Claude
Even after Python's mechanical processing, the transcription is still "spoken language written down." Let's look at an example.
Whisper output (after Python preprocessing):
えーとですね今日はまあ設定周りの話をちょっとしたいなと思ってまして
まあ結構つまずくポイントっていうかですねそのへんをまとめていきます
After Claude refinement:
今回は設定周りでつまずきやすいポイントをまとめて解説します。
What's happening here isn't just "typo correction."
- "えーとですね," "まあ," "ちょっと," "っていうかですね" → Remove conversational filler expressions
- Condense content spanning 2 sentences into 1
- Reconstruct into clear text that's easy to translate, capturing the speaker's intent
Here's another example from the beginning of a livestream.
Whisper output:
はいみなさんこんにちは
今日はちょっと天気が良くてですね散歩がてら来たんですけど
まあそれはさておきですね今日の本題なんですが
After Claude refinement:
(Greeting and small talk removed; starts from the main topic)
Livestream videos often have several minutes of greetings and small talk at the beginning, but dubbed audio only needs content directly related to the topic. The judgment of "where the main topic begins" is something Python can't make — it's a process only possible with Claude's contextual understanding.
This two-stage approach — Stage 1 (Python) mechanically removing noise, Stage 2 (Claude) reconstructing spoken language into natural text — is critical to translation quality.
Step 2: Create Translated Subtitles with Claude & Optimize for TTS
Translation Tips
Pass the preprocessed Japanese text to Claude for translation into target languages. It's efficient to instruct TTS optimization simultaneously with translation.
When giving Claude translation instructions, specify these points explicitly.
All languages:
- Translate as natural spoken language. Unlike display subtitles, this will be read aloud by TTS, so avoid written-language expressions
- Keep text within each cue short enough for TTS to finish reading within the display time window
For English:
- Use contractions actively ("can not" → "can't", "do not" → "don't")
- Cut verbose expressions ("Furthermore" → "Also", "In order to" → "To")
For Korean:
- Use 해요체 (haeyo-che) consistently. Korean has multiple speech levels with varying formality. 해요체 is the casual-polite register equivalent to Japanese "〜です・〜ます," and sounds most natural for YouTube's conversational tone. In contrast, 합니다체 (hamnida-che) is the formal register used in news and official documents, and sounds stiff and unnatural when read by TTS
- Break up long Sino-Korean compound words that TTS reads in one breath into natural rhythm (e.g., "충분조건" → "충분한 조건")
Let's look at an actual conversion example.
Japanese (Claude-refined):
興味があるとか好きだなと思うこと以外、人ってそもそも長い時間はできないじゃないですか。
English dubbing subtitle (_en_dub.srt, created by Claude):
Other than things you're interested in or things you like,
you can't spend long hours on them, right?
Korean dubbing subtitle (_kr_dub.srt, created by Claude):
흥미가 있거나, 좋아하지 않으면
오랜 시간을 들일 수 없잖아요
Claude appropriately converts the Japanese colloquial nuance ("〜じゃないですか" — seeking agreement) to "right?" in English and "〜잖아요" (haeyo-che agreement expression) in Korean. This kind of nuance-level translation accuracy is why I use Claude instead of machine translation.
TTS Optimization Rules
Create "dubbing subtitles" optimized for TTS from the translated subtitles. Name files with language code + _dub like video_name_en_dub.srt to distinguish them from display subtitles.
Core Rule: 1 cue = 1 complete sentence
In regular subtitles, one sentence may span multiple cues, but in TTS dubbing subtitles, each cue contains one complete sentence. TTS engines read per-cue, so cutting mid-sentence produces unnatural intonation.
Let's see a concrete example. If the original Japanese is "基礎練習を毎日続けることが上達の近道ですが、ただ量をこなすだけでは効率が悪い" (Practicing basics daily is the fastest way to improve, but just doing a lot isn't efficient):
Regular display subtitle (_en.srt) — short segments for on-screen display:
1
00:00:03,200 --> 00:00:05,800
Practicing the basics every day

2
00:00:05,800 --> 00:00:08,500
is the fastest way to improve,

3
00:00:08,500 --> 00:00:11,200
but just doing a lot of practice
isn't very efficient.
TTS dubbing subtitle (_en_dub.srt) — 1 complete sentence per cue:
1
00:00:03,200 --> 00:00:11,200
Practicing basics daily is the fastest way to improve, but just doing a lot isn't efficient.
The display subtitle split across 3 cues is combined into 1 cue in the dubbing subtitle. TTS reads this single sentence in one breath starting at 00:00:03,200, producing natural intonation.
Here are more text shortening examples.
| Before (direct translation) | After (TTS-optimized) | Shortening point |
|---|---|---|
| It is important to understand that... | You need to understand that... | Cut verbose opener |
| In order to achieve this goal | To achieve this | Compress prepositional phrase |
| Furthermore, you should also consider | Also, consider | Reduce conjunction and filler |
| Rule | Details |
|---|---|
| Words per cue | English: 15-20 words, Korean: 25-35 characters |
| Ultra-short cues | Merge cues under 1 second with adjacent ones |
| Breath points | Insert commas in continuous text over 20 words |
| Numbers | Spell out in Hangul for Korean (TTS number reading is unstable) |
Speed estimation guide (English)
1 word ≈ 120-150ms
2-second window → max 13-16 words
3-second window → max 20-25 words
4-second window → max 27-33 words
If text is too long for the cue's display time, speed adjustment will exceed its limit and fail. Use the guide above to calibrate text length.
Step 3: Generate Audio with ElevenLabs API
This is the core of the workflow. Send each cue from the dubbing SRT to ElevenLabs API and retrieve audio files.
API Basics
Endpoint: POST https://api.elevenlabs.io/v1/text-to-speech/{voice_id}
Auth header: xi-api-key: <your-api-key>
Response: audio/mpeg (MP3 binary)
Request body:
{
  "text": "The text to synthesize.",
  "model_id": "eleven_flash_v2_5",
  "voice_settings": {
    "stability": 0.5,
    "similarity_boost": 0.75
  }
}
stability controls voice consistency (higher = more stable, lower = more expressive), similarity_boost controls fidelity to the selected voice. The balance above is recommended for dubbing.
Python Script Implementation
Here's the overall processing flow.
import requests, hashlib, json, re, subprocess
from pathlib import Path
from dotenv import load_dotenv

API_BASE = "https://api.elevenlabs.io/v1"

def tts_generate(api_key, voice_id, text, output_path,
                 model_id="eleven_flash_v2_5", max_retries=3):
    """Generate MP3 audio from a single text"""
    url = f"{API_BASE}/text-to-speech/{voice_id}"
    headers = {
        "xi-api-key": api_key,
        "Content-Type": "application/json",
    }
    body = {
        "text": text,
        "model_id": model_id,
        "voice_settings": {"stability": 0.5, "similarity_boost": 0.75},
    }

    for attempt in range(max_retries):
        resp = requests.post(url, headers=headers, json=body,
                             stream=True, timeout=60)
        if resp.status_code == 200:
            with open(output_path, "wb") as f:
                for chunk in resp.iter_content(chunk_size=4096):
                    f.write(chunk)
            return
        if resp.status_code in (429, 500, 502, 503):
            wait = 2 ** (attempt + 1)
            time.sleep(wait)
            continue
        resp.raise_for_status()
    raise RuntimeError(f"TTS failed after {max_retries} retries")
SRT parsing is also implemented from scratch using regex to extract cue numbers, timestamps, and text.
SRT_BLOCK_RE = re.compile(
    r"(?ms)^\s*(\d+)\s*\n"
    r"(\d{2}:\d{2}:\d{2},\d{3}) --> (\d{2}:\d{2}:\d{2},\d{3})\s*\n"
    r"(.*?)(?=\n{2,}|\Z)"
)

def parse_ts(value):
    """Convert SRT timestamp to milliseconds"""
    hh, mm, rest = value.split(":")
    ss, ms = rest.split(",")
    return ((int(hh) * 60 + int(mm)) * 60 + int(ss)) * 1000 + int(ms)

def parse_srt(path):
    text = Path(path).read_text(encoding="utf-8-sig")
    cues = []
    for m in SRT_BLOCK_RE.finditer(text):
        cues.append({
            "index": int(m.group(1)),
            "start_ms": parse_ts(m.group(2)),
            "end_ms": parse_ts(m.group(3)),
            "text": m.group(4).strip(),
        })
    return cues
Call tts_generate() for each cue to retrieve individual MP3 files.
Caching & Retry Strategy
To minimize API costs, cache generated audio. Generate a SHA1 hash from text, Voice ID, and model ID as the cache key.
def build_cache_key(voice_id, model_id, text):
    payload = f"{voice_id}\n{model_id}\n{text}".encode("utf-8")
    return hashlib.sha1(payload).hexdigest()

cache_dir = Path("_tts_cache")
cache_dir.mkdir(exist_ok=True)

key = build_cache_key(voice_id, model_id, cue["text"])
cached = cache_dir / f"{key}.mp3"

if cached.exists():
    # Cache hit → skip API call
    shutil.copy(cached, output_path)
else:
    tts_generate(api_key, voice_id, cue["text"], cached, model_id)
    shutil.copy(cached, output_path)
Modifying text changes the hash, automatically invalidating old cache. Cache from test runs (generating only the first 5 cues) is reused in production runs, eliminating wasted credits.
Step 4: Build Timeline with ffmpeg
Once per-cue MP3s are ready, combine them into a single timeline audio with ffmpeg.
Speed Adjustment (atempo)
When TTS audio is longer than the cue's display time, use the atempo filter to adjust playback speed.
def adjust_speed(input_path, output_path, tempo):
    """Adjust WAV audio playback speed by tempo factor"""
    subprocess.run([
        "ffmpeg", "-y", "-hide_banner", "-loglevel", "error",
        "-i", str(input_path),
        "-filter:a", f"atempo={tempo:.4f}",
        "-c:a", "pcm_s16le", "-ar", "48000", "-ac", "2",
        str(output_path),
    ], check=True)
Speed ratio decision criteria:
| ratio | Decision |
|---|---|
| ≤ 1.0 | No adjustment needed (audio shorter than cue window) |
| 1.0–1.3 | Speed up with atempo |
| > 1.3 | Text too long → fix the dubbing subtitle |
English can tolerate up to 1.5x, but speech starts sounding rushed above 1.3x.
Silence Base + adelay for Absolute Timestamp Placement
This is the key to timeline construction. YouTube dubbed audio must match the original video's length exactly. Simply concatenating TTS audio front-to-back eliminates silent gaps between cues, making the result shorter than the original video in most cases — causing the upload to be rejected.
Instead, create a silence WAV matching the full video duration as a base, then place each cue's audio at absolute positions based on SRT start times.
# Generate silence WAV matching full video duration
subprocess.run([
    "ffmpeg", "-y", "-hide_banner", "-loglevel", "error",
    "-f", "lavfi", "-i", "anullsrc=r=48000:cl=stereo",
    "-t", f"{total_duration_sec:.3f}",
    "-c:a", "pcm_s16le", "silence.wav",
], check=True)
Apply adelay filter to each cue's audio, placing it at the SRT start time (in milliseconds).
# ffmpeg filter graph example
[1:a]adelay=3200|3200[d0]    # Place cue1 at 3.2s
[2:a]adelay=8500|8500[d1]    # Place cue2 at 8.5s
[3:a]adelay=15000|15000[d2]  # Place cue3 at 15.0s
This approach ensures that even if a cue fails, subsequent timing isn't affected.
Mixdown with amix
Finally, combine the silence base with all cues using the amix filter.
[0:a][d0][d1][d2]amix=inputs=4:duration=first:dropout_transition=0:normalize=0[out]
Important: Always specify normalize=0. With the default normalize=1, each input's volume gets normalized to 1/N, which with many cues (e.g., 150) results in near-silence.
For large cue counts, batch-process 30 cues at a time with staged mixing. Since filter graphs get long, pass them via -filter_complex_script through a file for safety.
Step 5: Mastering & Quality Verification
Gain Adjustment & Peak Limiter
Apply gain and limiter to the timeline audio and output the final MP3.
def apply_mastering(input_path, output_path, gain_db=7.0, limit_db=-1.0):
    limit_linear = 10 ** (limit_db / 20)  # Convert dBFS to linear
    subprocess.run([
        "ffmpeg", "-y", "-hide_banner", "-loglevel", "warning",
        "-i", str(input_path),
        "-filter:a", f"volume={gain_db:.2f}dB,alimiter=limit={limit_linear:.4f}",
        "-ar", "48000", "-ac", "2",
        "-c:a", "libmp3lame", "-b:a", "192k",
        str(output_path),
    ], check=True)
volume=7.0dB: TTS audio tends to be quieter than original video, so boost italimiter: Prevent clipping by limiting peaks to -1.0 dBFS
Quality Check via Report
Verify generation results with a JSON report.
{
  "input_cues": 171,
  "ok_cues": 170,
  "silenced_cues": 0,
  "failed_cues": 0,
  "skipped_empty_cues": 1,
  "cache_hits": 5,
  "duration_ok": true,
  "max_ratio": 1.28
}
Three key points to check:
- failed_cues = 0: All cues generated successfully
- silenced_cues = 0: No cues filled with silence
- duration_ok = true: Output MP3 length matches the original video
As a final check, verify no decode errors with ffmpeg.
ffmpeg -v error -xerror -i output_dub.mp3 -f null NUL
# exit code 0 means no issues
Step 6: Combine with BGM & SFX in Premiere Pro
The MP3 from Step 5 contains only TTS audio — no BGM (background music) or SFX (sound effects). Here we leverage Premiere Pro's edited timeline.
By adding dubbed audio tracks to the original video's editing project, you can export both the regular video and dubbed audio from the same timeline.
The export procedure is as follows.
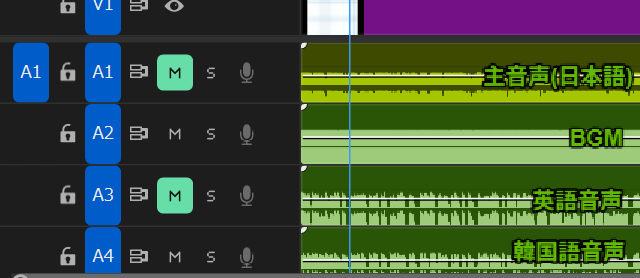
- Japanese video export: Enable main audio (A1) + BGM (A2) and export as video (.mp4) normally
- English dubbed audio export: Mute main audio (A1), export audio-only (.mp3) with English audio (A3) + BGM (A2)
- Korean dubbed audio export: Similarly export with Korean audio (A4) + BGM (A2)
The final output is these 3 files.
video_name.mp4— Video with Japanese audio (upload to YouTube)video_name_en_dub.mp3— English dubbed audio (includes BGM+SFX)video_name_kr_dub.mp3— Korean dubbed audio (includes BGM+SFX)
With this approach, you only need to toggle track mutes to export each language's audio, so adding more languages barely increases the workload. When viewers switch languages, they get a natural experience where "only the voice changes, BGM and SFX stay the same."
Furthermore, since the original video and all language dubbed audio tracks are on the same timeline, you can also export Shorts with dubbed audio included. No need to prepare separate audio for Shorts — supporting multilingual Shorts at scale is a major advantage.
Step 7: Upload to YouTube Studio
- Open the target video's edit page in YouTube Studio
- Add the target language from the "Subtitles" tab
- Select "Add dub"
- Upload the final MP3 created in Step 6
YouTube dubbed audio must exactly match the original video's length or the upload will be rejected. This is why Step 4 uses the timeline placement approach (placing each cue at its original timecode position with ffmpeg instead of simple concatenation). This design ensures the total duration always matches the original video, regardless of whether individual cues run slightly long or short.
Viewers can switch audio languages from the video settings menu (gear icon).
Cost & Usage Estimates
ElevenLabs' eleven_flash_v2_5 model costs 0.5 credits per character.
Actual Cost (11-Minute Video)
Here are the actual credits consumed when dubbing an 11-minute video into English and Korean.
| Language | Credits consumed |
|---|---|
| English | 4,452 |
| Korean | 2,199 |
ElevenLabs uses per-character billing, so languages with higher information density per character are more cost-effective.
| Language | Cost relative to English (100%) |
|---|---|
| Chinese | 35–40% |
| Korean | ~45% |
| Japanese | 50–55% |
| English | 100% (baseline) |
| German | 110–120% |
German tends to be pricier than English due to its longer compound words.
Cost in Japanese Yen
At 1 USD = 158 JPY, dubbing an 11-minute video into English + Korean costs:
| Plan | Monthly | Credits | English | Korean | Total |
|---|---|---|---|---|---|
| Starter | $5 | 30,000 | ¥117 | ¥58 | ¥175 |
| Creator | $22 | 100,000 | ¥155 | ¥76 | ¥231 |
Even the Starter Plan covers 2 languages for about ¥175 per 11-minute video. With 30,000 monthly credits, you can process 4–5 videos of similar length per month.
Cost Reduction Tips
The key to cost reduction is reducing text character count. Using contractions ("do not" → "don't") and cutting verbose expressions ("Furthermore" → "Also") can achieve 5–10% savings. Changing the model or audio format does not affect credit consumption.
Conclusion
This article presented a workflow for automatically generating multilingual dubbed audio using ElevenLabs API combined with Python + ffmpeg.
Here's a recap of the full flow.
- Generate Japanese text with Premiere Pro or Whisper, then preprocess and refine with Python + Claude
- Create TTS-optimized dubbing subtitles with Claude translation
- Generate per-cue MP3 audio with ElevenLabs API
- Build an absolute-timestamp timeline with ffmpeg's
adelay+amix - Master with gain adjustment and limiter, output dubbed audio MP3
- Mute the original audio in Premiere Pro and combine with BGM/SFX to create the final MP3
- Upload to YouTube Studio as dubbed audio
This workflow has two critical elements. First, Claude's text processing (Steps 1–2): spoken language refinement, nuance-preserving translation, time-constrained text compression — these all require semantic understanding that Python scripts alone can't provide. Second, absolute timestamp placement (Step 4): by placing each cue at its original video timecode position with ffmpeg rather than simple concatenation, the output duration always matches the original video exactly. This is essential since YouTube requires dubbed audio to be the exact same length as the original.
ElevenLabs starts at $5/month and Claude is available on a free plan, making multilingual expansion accessible for individual channels. If you're looking to expand your reach to international audiences, give it a try.