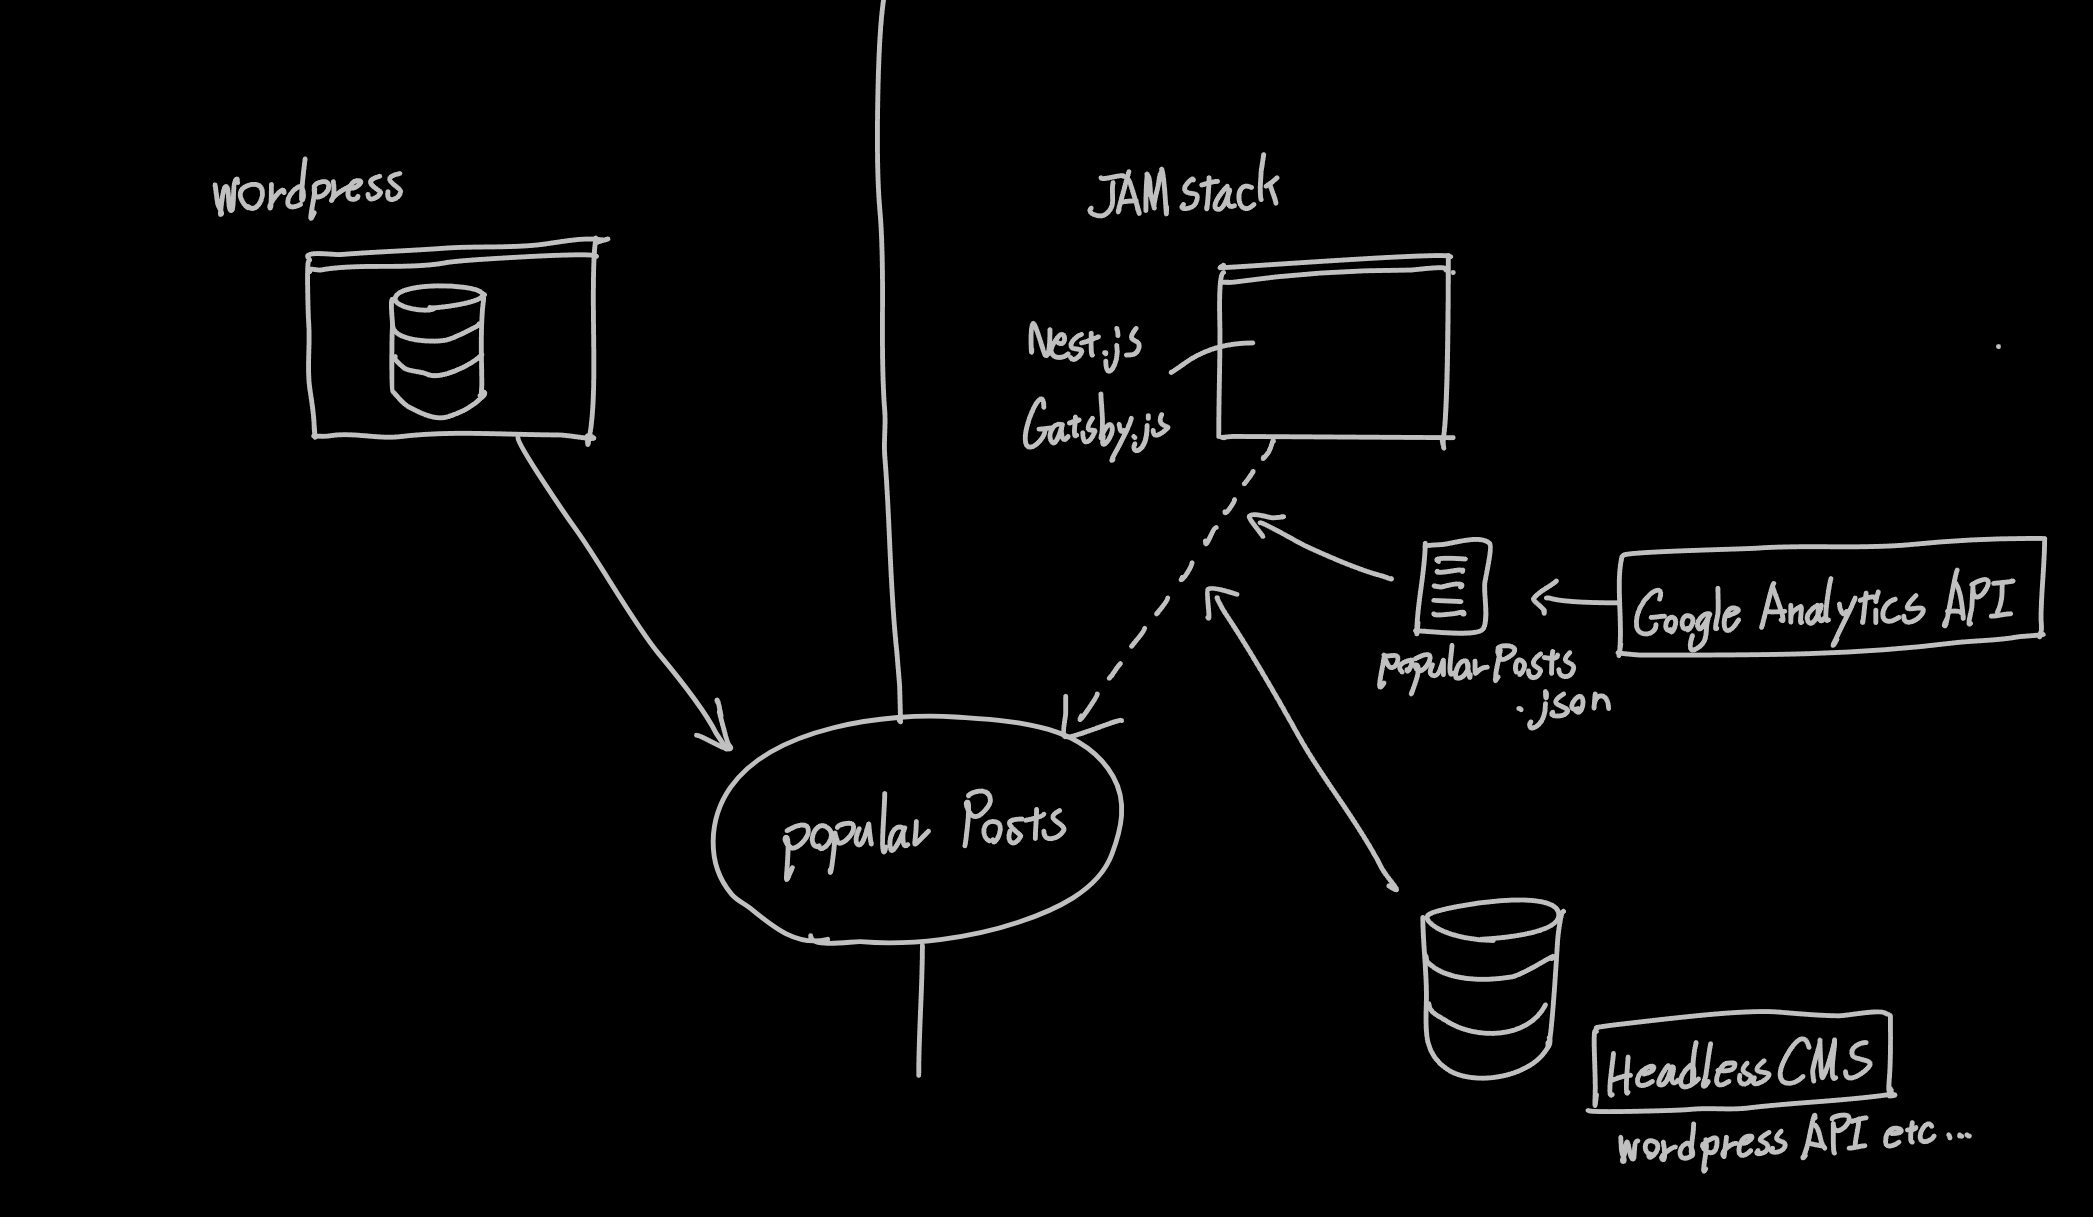
The JAMstack architecture (e.g., Next.js or Gatsby.js + a headless CMS) decouples the frontend from the backend, offering great flexibility in technology choices along with significant benefits in performance and security. It's a modern approach to building websites that continues to grow in popularity.
However, features that were trivially implemented with plugins on traditional WordPress sites -- such as a "Popular Posts" ranking -- require a bit more creativity in this architecture.
WordPress makes popular posts easy because article data and page view counts are stored in the same database, allowing dynamic data retrieval and aggregation for ranking display. Most JAMstack setups, on the other hand, generate static HTML files at build time, making it difficult to dynamically display rankings based on real-time view counts. Additionally, with the frontend and backend separated, there's no built-in mechanism for recording and referencing access counts.
This is where Google Analytics comes in -- the widely-adopted analytics tool already installed on most websites. By fetching per-page view count data through its API (Google Analytics Data API / GA4 Data API) and integrating it into the build process, you can display a "Popular Posts" section even on a fully static site.
This article walks you through the specific steps and concepts for using the Google Analytics Data API (GA4) to fetch popular post data and implement a "Popular Posts" section in a static site generator environment like Next.js or Gatsby.js.
In this article
- The challenge of implementing popular posts on static sites (headless CMS)
- Enabling and setting up the Google Analytics Data API (GA4)
- Using service accounts and security considerations
- Implementation example: Node.js script for fetching popular post data
- Integrating JSON data into your static site at build time
- Summary: API integration makes popular posts possible on static sites!
The Challenge of Implementing Popular Posts on Static Sites (Headless CMS)
As mentioned, traditional dynamic CMS platforms (like WordPress) typically aggregate page views in real-time through database access to display popular post rankings.
However, in a JAMstack static site setup, content is generated at build time, and there's fundamentally no dynamic server-side data processing. This makes it impractical to aggregate view counts in real-time and update rankings on every page load.
This is where leveraging Google Analytics as an external data source becomes effective. Here's the basic flow:
- Fetch data before building: Run a script that retrieves per-page view counts for a specified period through the Google Analytics Data API. (e.g., top 10 posts by page views over the last 30 days)
- Format and save the data: Transform the retrieved ranking data into a convenient format (e.g., a JSON file) and save it within the project.
- Reference the data at build time: When the static site generator (Next.js or Gatsby.js) builds the site, it reads the saved JSON file.
- Embed in static pages: Use the ranking data (article titles, URLs, page views, etc.) to generate a "Popular Posts" component or list and embed it in the static HTML pages.
With this approach, the latest ranking information is reflected every time the site is deployed (built), while the site itself is served as fast static files -- no performance compromise.
Enabling and Setting Up the Google Analytics Data API (GA4)
First, let's enable the API and prepare the necessary credentials to programmatically access Google Analytics data.
-
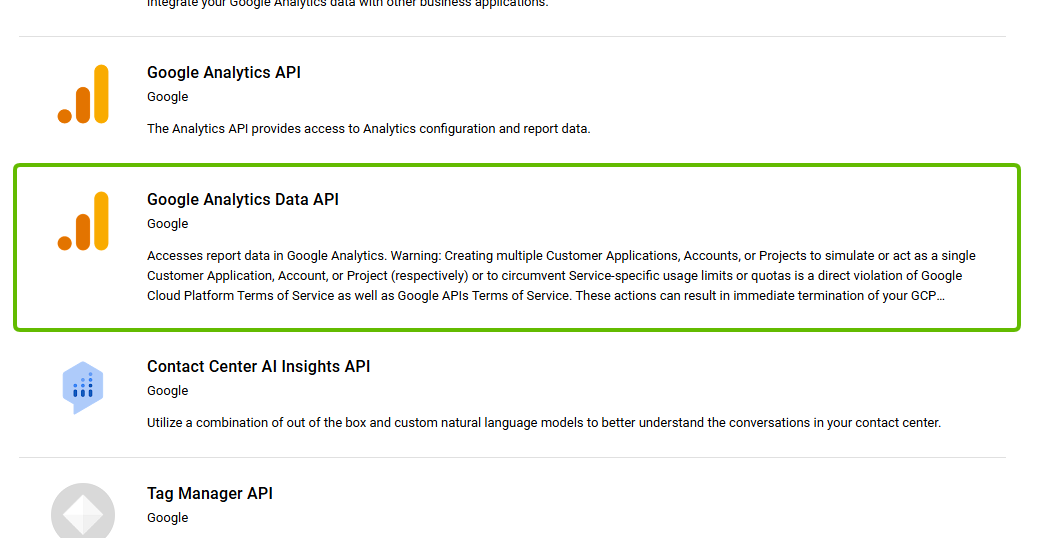
Enable the API on Google Cloud Platform (GCP):
- Go to the Google Cloud Console (https://console.cloud.google.com/) and select or create a project.
- Navigate to "APIs & Services" > "Library," search for "Google Analytics Data API," and enable it.
-
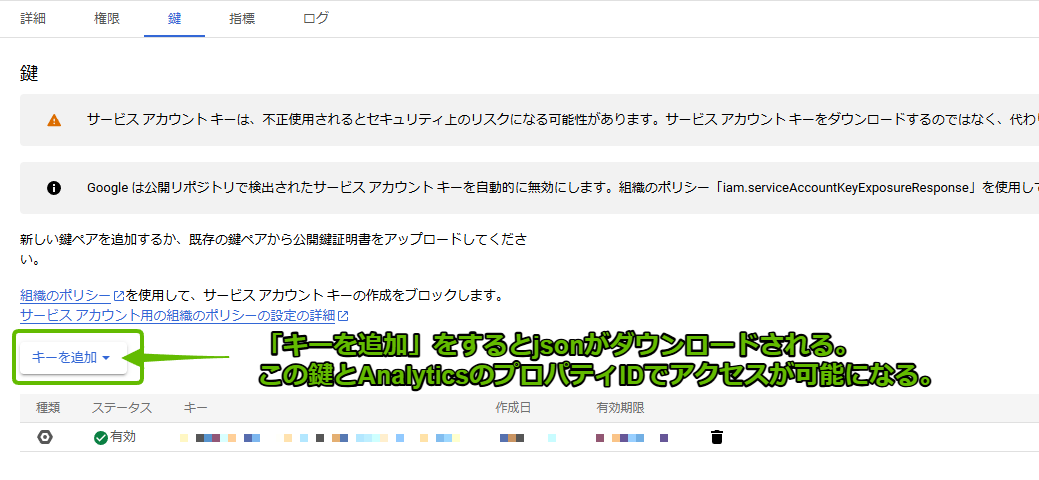
Create a service account and download the key:
- In GCP, go to "APIs & Services" > "Credentials," select "Create Credentials" > "Service Account," and create a new service account. (The name can be anything; a role is often not required.)
- Select the created service account, go to "Keys" tab > "Add Key" > "Create New Key," and create a JSON format key. Download it. This JSON file will be used by your script. Keep it safe.
-
Grant the service account access to your GA4 property:
- Go to Google Analytics (https://analytics.google.com/) and open "Admin" (gear icon) for your target GA4 property.
- Navigate to "Property Settings" > "Property Access Management," click the "+" button, and select "Add Users."
- Enter the service account's email address (visible on the GCP credentials page) and grant at least "Viewer" permissions.
-
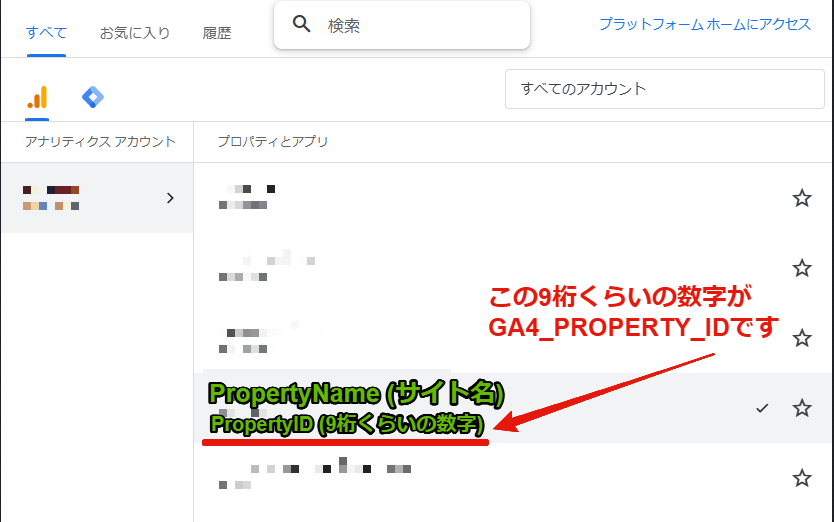
Note your GA4 Property ID:
-
In Google Analytics under "Admin" > "Property Settings," find the "Property ID" (a numeric-only ID) and save it. This will also be used in your script.
-
For detailed guidance on these steps (especially GCP and GA4 operations), refer to Google's official documentation and other tutorial resources as appropriate for your setup.
Using Service Accounts and Security Considerations
When programmatically accessing Google services like the Google Analytics Data API, you typically use a "service account" -- a special account type. Unlike a personal Google account, it's designed for applications and scripts to authenticate themselves.
The service account key (JSON file) you created and downloaded earlier contains secret credentials for API access as that service account. Therefore, handle this key file with extreme care.
- Never expose it publicly: Never commit the JSON key file to a Git repository (especially public repositories). Accidental exposure creates a risk of unauthorized use. Add the key filename to your
.gitignorefile to exclude it from Git tracking. - Store it securely: During local development, you might keep it in the project root, but for production environments (deployment targets), the standard practice is to pass credentials securely via environment variables or secret management features. (See the script example below.)
- Minimize permissions: Grant the service account only the minimum required "Viewer" permission on the GA4 property for data retrieval.
Implementation Example: Node.js Script for Fetching Popular Post Data
Here's a Node.js script example that uses the prepared service account key and GA4 Property ID to fetch popular post data and save it as a JSON file.
[Setup]
- Create a
scriptsfolder in your project root directory and save the following script asfetch-popular-posts.js(or any name you prefer). - Place the GCP service account key JSON file in your project root directory as
service-account.json(or any name). - Create a
.envfile in your project root directory with your GA4 Property ID in the following format (replace?????????with your actual ID):
GA4_PROPERTY_ID=?????????
- [Important] Since
service-account.jsonand.envcontain sensitive information, add them to your.gitignoreto prevent them from being included in the Git repository.
# .gitignore example
service-account.json
.env
- Install the required npm packages by running the following command in your terminal:
npm install @google-analytics/data dotenv
(Or `yarn add @google-analytics/data dotenv`)
[Script Example: scripts/fetch-popular-posts.js]
// Load environment variables from .env file
require("dotenv").config();
// Google Analytics Data API client library
const { BetaAnalyticsDataClient } = require("@google-analytics/data");
// Node.js file system and path modules
const fs = require("fs");
const path = require("path");

// Define the popular posts fetching logic as an async function
async function fetchPopularPosts() {
  let credentials;

  // --- Credential Setup ---
  // Prefer GA_CREDENTIALS_JSON env variable for production (recommended)
  if (process.env.GA_CREDENTIALS_JSON) {
    try {
      credentials = JSON.parse(process.env.GA_CREDENTIALS_JSON);
    } catch (e) {
      console.error("Failed to parse GA_CREDENTIALS_JSON environment variable.", e);
      process.exit(1);
    }
  }
  // Fall back to local service-account.json file
  else {
    const keyFilePath = path.resolve(__dirname, "../service-account.json");
    if (fs.existsSync(keyFilePath)) {
      credentials = JSON.parse(fs.readFileSync(keyFilePath, "utf8"));
    } else {
      console.error(`Service account key file not found at ${keyFilePath}. Or set GA_CREDENTIALS_JSON env var.`);
      process.exit(1);
    }
  }

  // --- Initialize GA4 Data API Client ---
  const analyticsDataClient = new BetaAnalyticsDataClient({
    credentials: {
      client_email: credentials.client_email,
      private_key: credentials.private_key,
    },
  });

  // --- Get GA4 Property ID ---
  const propertyId = process.env.GA4_PROPERTY_ID;
  if (!propertyId) {
    throw new Error("GA4_PROPERTY_ID is not set in environment variables.");
  }

  // --- Execute API Request ---
  try {
    const [response] = await analyticsDataClient.runReport({
      // Specify the property ID
      property: `properties/${propertyId}`,
      // Data range (last 30 days)
      dateRanges: [{ startDate: "30daysAgo", endDate: "today" }],
      // Dimensions to retrieve (page path, page title)
      dimensions: [{ name: "pagePath" }, { name: "pageTitle" }],
      // Metrics to retrieve (page views)
      metrics: [{ name: "screenPageViews" }], // GA4 uses "screenPageViews" instead of "ga:pageviews"
      // Sort order (descending by page views = highest first)
      orderBys: [{ metric: { metricName: "screenPageViews" }, desc: true }],
      // Number of results (top 10)
      limit: 10,
      // Dimension filter (only pages starting with '/blog/')
      dimensionFilter: {
        filter: {
          fieldName: "pagePath",
          stringFilter: {
            matchType: "PARTIAL_REGEXP", // Partial regex match
            value: "^/blog/", // Paths starting with /blog/
          },
        },
      },
    });

    // --- Format Results ---
    const popularPosts = response.rows.map((row) => ({
      pagePath: row.dimensionValues[0].value,
      pageTitle: row.dimensionValues[1].value,
      pageViews: parseInt(row.metricValues[0].value, 10), // Convert view count to integer
    }));

    // --- Write to JSON File ---
    // Create data directory in project root if it doesn't exist
    const dataDir = path.resolve(__dirname, "../data");
    if (!fs.existsSync(dataDir)) {
      fs.mkdirSync(dataDir);
    }
    // Save as popular-posts.json in the data directory
    fs.writeFileSync(
      path.join(dataDir, "popular-posts.json"),
      JSON.stringify(popularPosts, null, 2) // Pretty-print for readability
    );
    console.log("Successfully fetched popular posts and saved to data/popular-posts.json");

  } catch (error) {
      console.error("Error fetching Google Analytics data:", error);
      process.exit(1); // Exit on error
  }
}

// Execute the function
fetchPopularPosts();
Key points about the script:
- Authentication: The script prioritizes the
GA_CREDENTIALS_JSONenvironment variable, falling back to the localservice-account.jsonfile. This allows secure credential handling across both local development and production environments (like Cloudflare Pages). In production, it's common practice to set the entire JSON key content as an environment variable. - API Request: The
runReportmethod sends a request to GA4.dateRanges: Specifies the data retrieval period (e.g., "30daysAgo" to "today").dimensions: Specifies the types of information to retrieve (page path, title, etc.).metrics: Specifies the metrics to aggregate (page views viascreenPageViews, etc.).orderBys: Specifies the sort order (e.g., descending by page views).limit: Specifies the maximum number of results to retrieve.dimensionFilter: [Important] Filters which pages to include. In this example, only pages whose path (pagePath) matches the regex^/blog/are retrieved. This prevents non-blog pages (like the homepage/) from appearing in the ranking. Make sure to adjust thisvalueto match your blog's URL structure.
- Formatting and saving: The API response is converted to a convenient JSON format (an array of objects with path, title, and view count) and written to
data/popular-posts.json.
Running this script in your terminal with node scripts/fetch-popular-posts.js will save the popular post data as a JSON file in the data folder (created if it doesn't exist).
Integrating JSON Data into Your Static Site at Build Time
Once the JSON file with popular post data is ready, all that's left is to have your static site generator (Next.js or Gatsby.js) read this JSON file during the build process and pass the data to pages or components for display.
The critical requirement here is ensuring that the JSON file is updated with the latest data every time the site is built (deployed). Otherwise, the ranking will become stale.
To achieve this, you typically edit the scripts section of your project's package.json file to run the data-fetching script before the build command executes.
[package.json configuration example (for Gatsby.js)]
{
  "scripts": {
    // Define the command that runs the data-fetching script
    "fetch-data": "node scripts/fetch-popular-posts.js",
    // Optionally fetch data when starting the dev server
    "develop": "npm run fetch-data && gatsby develop",
    // Ensure data is fetched before production builds
    "build": "npm run fetch-data && gatsby build",
    // Start command (for dev server startup, etc.)
    "start": "npm run develop"
    // Plus test, serve, etc.
  }
}
In this example:
- A command called
fetch-datais defined to run the data-fetching script. - The
buildcommand (for production builds) first runsnpm run fetch-data, then executesgatsby build. (&&chains commands sequentially.) - Similarly, the development server startup commands (
develop,start) also fetch data (useful for working with current data during development). For Next.js, addnpm run fetch-data &&beforenext devornext build.
With this configuration, when you run npm run build (or when automatic builds are triggered on hosting services like Vercel or Cloudflare Pages):
fetch-popular-posts.jsexecutes first, saving the latest popular post data todata/popular-posts.json.- Then the Gatsby (or Next.js) build process starts, reading
data/popular-posts.jsonand generating static HTML pages that include the popular posts section.
This build-time data fetching approach ensures that site visitors always see the most up-to-date popular posts ranking (as of build time) served as fast static pages, without concerns about server load or runtime API calls. This is a major advantage of the JAMstack architecture from both performance and security perspectives.
From here, follow your framework's conventions to read the JSON data at build time and pass it to React components for display. (For example, in Gatsby you might read the JSON in gatsby-node.js and add it to the GraphQL data layer; in Next.js you could use fs.readFile within getStaticProps.)
Summary: API Integration Makes Popular Posts Possible on Static Sites!
In static site environments built with JAMstack or headless CMS architectures, it's not straightforward to display a "Popular Posts" section in real-time like you would with a traditional dynamic CMS such as WordPress.
However, as this article has demonstrated, by leveraging the Google Analytics Data API (GA4) to fetch and format access data before the site build process, saving it as a JSON file, and embedding it into static pages at build time, you can maintain all the advantages of a static site (fast loading, high security, scalability) while still displaying an up-to-date popular posts ranking.
This approach isn't tightly coupled to any specific CMS or frontend framework, making it applicable to Next.js, Gatsby.js, and various other JAMstack configurations. While there are some considerations -- such as secure management of service account keys and proper API request filter configuration -- once the system is set up, it automatically updates your ranking on every build.
I encourage you to adapt this approach to your own static blog or website architecture and implement a "Popular Posts" section of your own.