
In my previous article, I covered the basics of learning Godot. This time, as a follow-up, I took on building a more practical 2D action-adventure game. I completed the Udemy course "Godot4: Build a 2D Action-Adventure Game" and learned many practical features that weren't covered in the fundamentals.
The course systematically covers everything from basic player controls to NPC dialogue, puzzle elements, and combat systems — all the essentials for 2D game development. Rather than repeating the course content, I'll use this article to review the key Godot features and concepts I learned along the way.
- Course Overview: Learning Through 2D Action-Adventure Game Development
- Deep Dive Notes on Key Godot Features
- Node Process Mode: Smart Pause Control
- CharacterBody2D Motion Mode: Top-Down vs Side-Scrolling
- InputMap: Efficient Key Binding Management
- Basic Input Handling: just_pressed, pressed, and released
- Movement Functions: move_and_slide vs move_toward
- Groups: Flexible Object Identification
- Collision Layers/Masks: Organizing Collision Detection
- Terrains: RPG Maker-Level Auto-Tiling
- Marker2D: The Ideal Manager Node
- Editable Children and Scene Inheritance: Efficient NPC Creation
- Autoload: Cross-Scene Data Management
- Visual Effects: White Flash with modulate
- AnimatedSprite2D vs AnimationPlayer: Choosing the Right Animation System
- Conclusion: Godot's True Strengths Revealed Through Practical Development
Course Overview: Learning Through 2D Action-Adventure Game Development
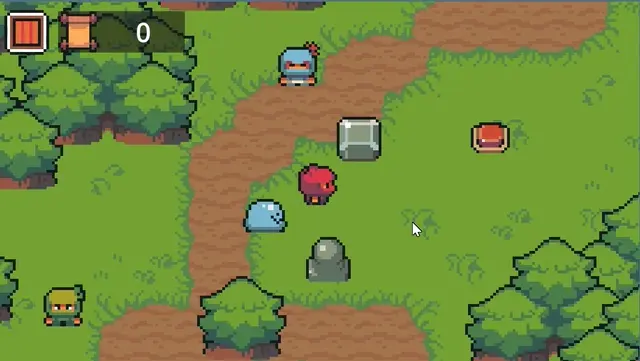
The course "Godot4: Build a 2D Action-Adventure Game" is an excellent English-language course that teaches practical Godot features systematically by building a 2D action-adventure game from scratch. Specifically, it covers:
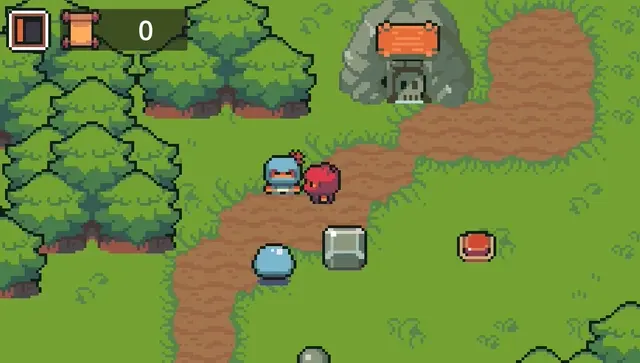
- 8-directional player movement and animation
- Environment building with auto-tiles using the Terrains feature
- Y-Sort for controlling character and object draw order
- Physics puzzles using RigidBody2D (block pushing)
- NPC dialogue system with pause control
- Data persistence using Autoload (e.g., treasure chest open states)
- Combat system with enemy AI and knockback
- Particle effects for visual polish
This is a step up in difficulty from the beginner course I covered in my previous article, but it's incredibly valuable for learning how to build basic enemy AI, combat systems, and dialogue systems.
- How do you handle area transitions?
- How do you implement pushable objects?
- How do you persist the state of opened treasure chests?
- How do you manage NPC conversations?
- How do you implement a door that opens when multiple switches are pressed?
- Where do you control the damage flash effect?
These are the kinds of "real-world game development" problems this course addresses, and working through them takes your Godot understanding to the next level.
If you're interested, check out the course on Udemy below.
Udemy frequently runs 90% off sales, so I recommend adding it to your wishlist and buying during a sale. Even if you're not comfortable with English, you can follow along by copying the code on screen and looking up documentation or asking ChatGPT/Gemini for explanations. You can also request a refund if it's too challenging, so don't hesitate to give it a try.
Deep Dive Notes on Key Godot Features
From here, I'll share notes on the Godot features and concepts I found most important throughout the course, organized to deepen my own understanding.
Node Process Mode: Smart Pause Control
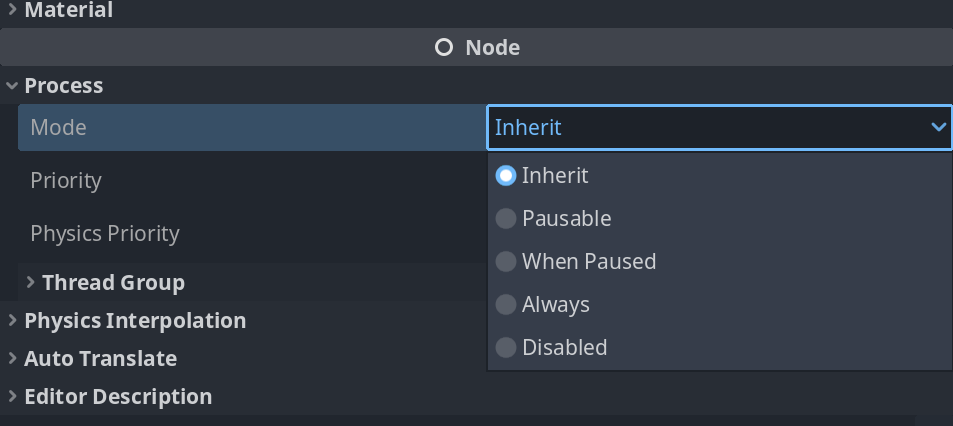
In Godot, you can control how each node behaves during a pause by setting its Process Mode. This is an extremely powerful feature.
For example, when talking to an NPC, you might want to freeze enemies and the player in the background while keeping the dialogue window interactive.
- Pausable (default): When
get_tree().paused = true,_processand_physics_processstop. Ideal for game world objects like players and enemies. - Always: Ignores pause state and keeps running. Used for NPCs during conversations, UI elements, or background music that should continue during pauses.
- When Paused: Only runs during pause. Perfect for pause-only UI like a "PAUSED" overlay.
This lets you selectively exempt specific nodes from being affected by the pause.
Example: Pausing the game during dialogue
The scene pauses during conversation (get_tree().paused = true) and resumes when the dialogue ends
# NPC.gd

# Set this NPC node's Process Mode to "Always" in the inspector

func _process(delta):
    # (If the player is nearby and the interact key is pressed)
    if Input.is_action_just_pressed("interact") and can_talk:
        if is_dialog_active():
            # Close dialogue and unpause
            close_dialog()
            get_tree().paused = false
        else:
            # Open dialogue and pause the game
            open_dialog()
            get_tree().paused = true
By keeping the NPC itself running while pausing the rest of the game, you can safely handle dialogue open/close operations.
CharacterBody2D Motion Mode: Top-Down vs Side-Scrolling
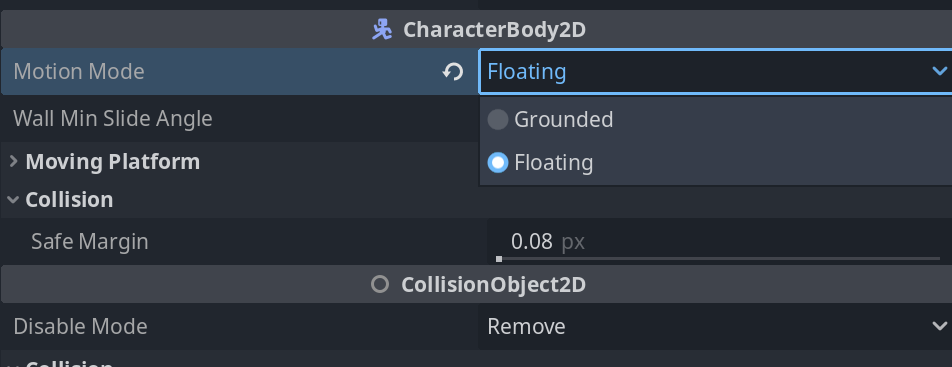
CharacterBody2D has an important setting called Motion Mode that determines the character's physics behavior. Setting this correctly based on your game genre is essential.
- Grounded (default): Gravity is automatically applied, and floor detection functions like
is_on_floor()work. Best for platformers and side-scrolling action games with jumping and falling. - Floating: No gravity influence and no floor concept. Suited for top-down action games, shooters, and other games where characters move freely on the XY plane.
Example: Top-down movement
# Player.gd (Set Motion Mode to "Floating")
extends CharacterBody2D

@export var speed: float = 200.0

func _physics_process(delta):
    var direction = Input.get_vector("move_left", "move_right", "move_up", "move_down")
    velocity = direction * speed
    move_and_slide()
If Motion Mode isn't set correctly, you'll get unintended gravity or broken floor detection, so always verify this at the start of a project.
InputMap: Efficient Key Binding Management
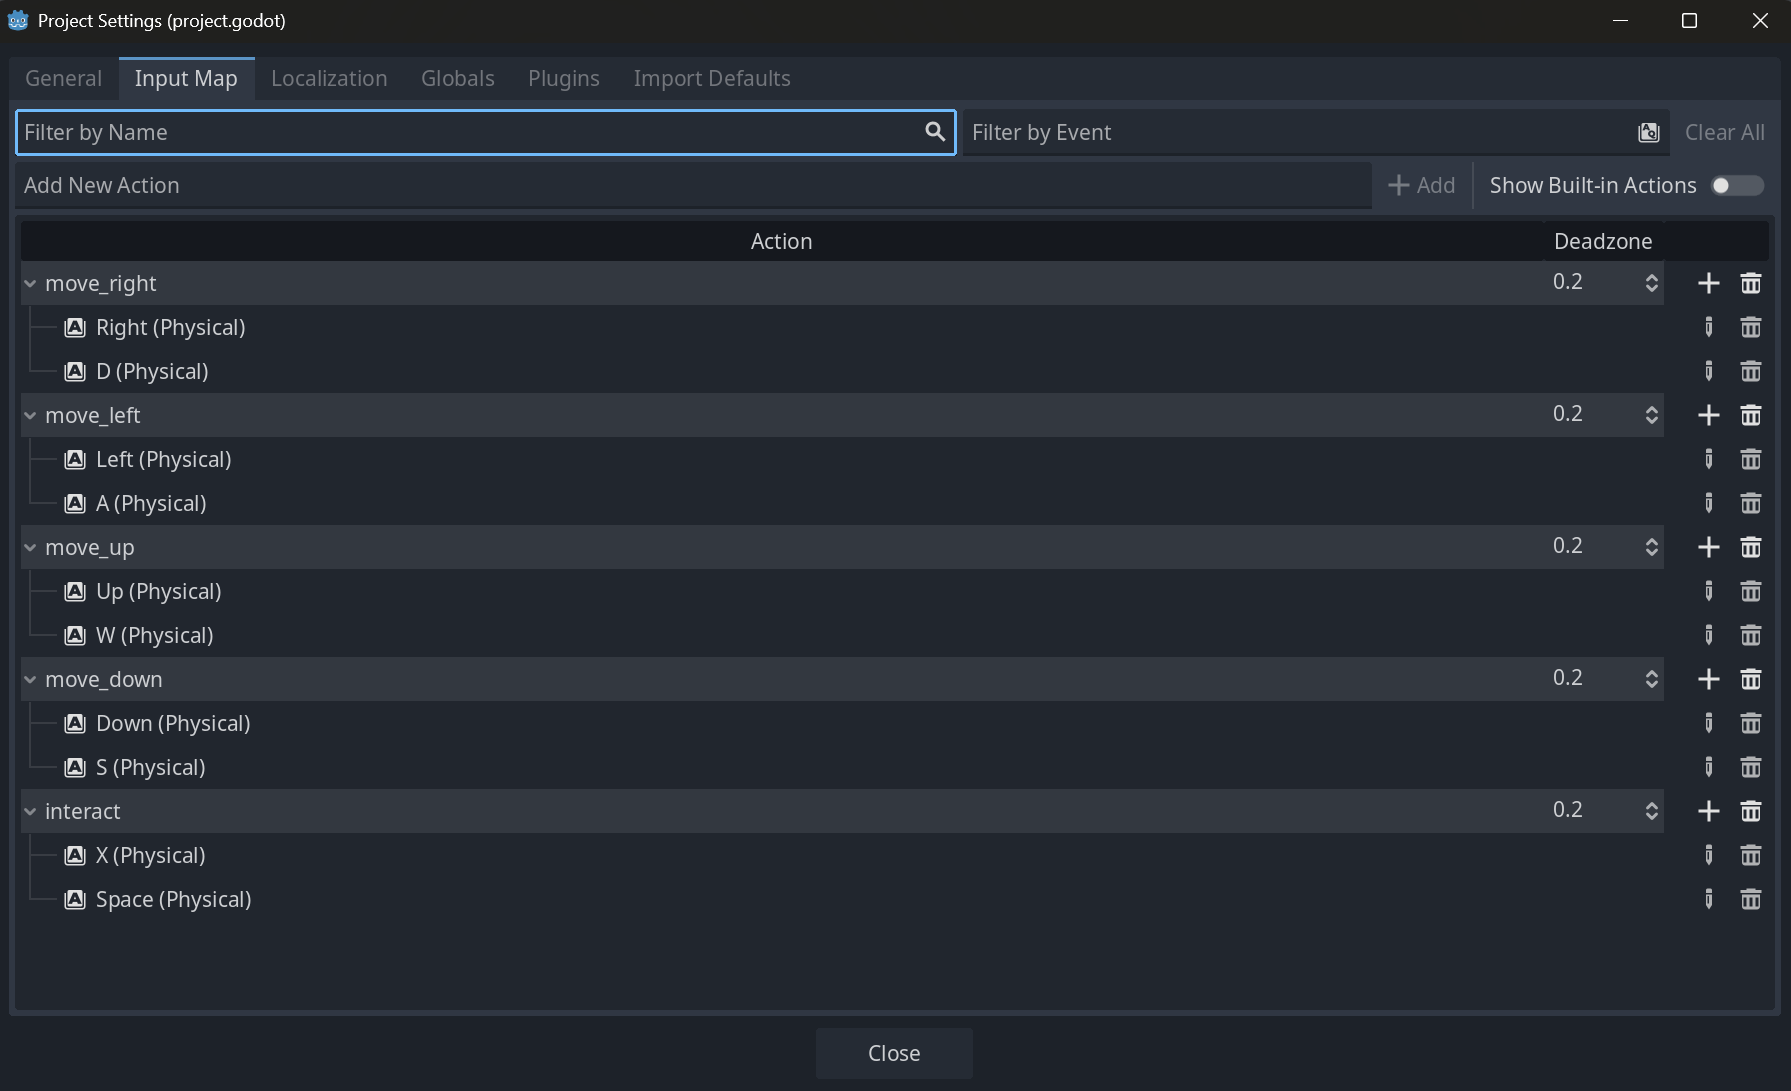
Godot's Input Map (Project Settings > Input Map) lets you assign "action names" to keyboard keys and gamepad buttons. This means your code uses abstract action names (like "move_left") rather than specific key names (like "A key").
Benefits:
- Multiple keys can map to the same action (e.g., both "A" and "Left Arrow" for "move_left")
- Makes key rebinding features much easier to implement
- Improves code readability
Example: Getting input using InputMap
func _process(delta):
    # One-shot input (the moment a button is pressed)
    if Input.is_action_just_pressed("interact"):
        open_chest()

    # Continuous input (while a button is held)
    if Input.is_action_pressed("dash"):
        speed = DASH_SPEED
    else:
        speed = NORMAL_SPEED

    # 2-axis analog input (extremely useful)
    var direction = Input.get_vector("move_left", "move_right", "move_up", "move_down")
    velocity = direction * speed
    move_and_slide()
Input.get_vector() is particularly useful — it returns a normalized Vector2 from four actions, making top-down movement code incredibly concise.
Basic Input Handling: just_pressed, pressed, and released
After defining actions in InputMap, you need to properly handle that input in your game. Godot provides multiple methods depending on the input state, and using the right one for each situation is important.
Input State Types
- is_action_just_pressed(): Returns true only at the moment a button is pressed
- is_action_pressed(): Returns true while a button is being held
- is_action_just_released(): Returns true only at the moment a button is released
Practical Usage Examples
func _process(delta):
    # One-shot actions (jump, attack, menu toggle, etc.)
    if Input.is_action_just_pressed("jump"):
        if is_on_floor():
            velocity.y = JUMP_VELOCITY

    if Input.is_action_just_pressed("attack"):
        perform_attack()

    if Input.is_action_just_pressed("pause"):
        toggle_pause_menu()

    # Continuous actions (movement, dash, charge, etc.)
    if Input.is_action_pressed("dash"):
        current_speed = dash_speed
    else:
        current_speed = normal_speed

    # Charge mechanic
    if Input.is_action_pressed("charge"):
        charge_power += charge_rate * delta
        charge_power = min(charge_power, max_charge)

    # Action on button release (firing a charged shot, etc.)
    if Input.is_action_just_released("charge"):
        fire_charged_shot(charge_power)
        charge_power = 0.0
Common Mistakes and Solutions
Example: Unintended continuous firing
# Bad: Using is_action_pressed() fires bullets every frame
func _process(delta):
    if Input.is_action_pressed("shoot"):  # Wrong
        fire_bullet()  # Runs every frame

# Good: Using is_action_just_pressed() fires once per press
func _process(delta):
    if Input.is_action_just_pressed("shoot"):  # Correct
        fire_bullet()  # Runs only on the frame the button is pressed
Advanced Input: get_action_strength() and Analog Input
For gamepad analog sticks and triggers that return values from 0.0 to 1.0, use get_action_strength().
func _process(delta):
    # Get analog input (0.0 to 1.0)
    var move_strength = Input.get_action_strength("move_forward")
    var brake_strength = Input.get_action_strength("brake")

    # Car acceleration example
    if move_strength > 0.0:
        velocity += forward_direction * acceleration * move_strength * delta

    # Braking example
    if brake_strength > 0.0:
        velocity = velocity.move_toward(Vector2.ZERO, brake_force * brake_strength * delta)
Input Function Selection Guide
| Use Case | Function | Examples |
|---|---|---|
| One-shot actions | is_action_just_pressed() | Jump, attack, menu toggle, item use |
| Continuous actions | is_action_pressed() | Movement, dash, charge, aim |
| On-release actions | is_action_just_released() | Charged attack release, long-press end |
| Analog input | get_action_strength() | Throttle, aim precision |
Understanding these distinctions lets you create controls that feel natural and responsive to players.
Movement Functions: move_and_slide vs move_toward
Godot provides many convenient movement functions, but understanding when to use move_and_slide() vs move_toward() is particularly important.
- move_and_slide(): The primary function for
CharacterBody2D. Moves the object based on its currentvelocity, automatically handles wall and floor collisions, and slides appropriately. This is the go-to for basic physics movement. - move_toward(target_velocity, delta): Gradually changes the current velocity toward a target velocity by a specified amount (delta). Useful for smooth acceleration/deceleration without sudden speed changes.
Why was move_toward needed to make movement and knockback work together?
When implementing knockback in the course, I needed movement and knockback to coexist. Initially, I set velocity directly, but the knockback effect would vanish instantly.
The role of move_toward's delta parameter
The second argument delta in move_toward(target_velocity, delta) specifies "how far to move from the current velocity toward the target velocity this frame." Typically used as acceleration * delta.
# Problematic code (direct assignment)
func move_player():
var move_vector = Input.get_vector("move_left", "move_right", "move_up", "move_down")
# Direct assignment: instantly reaches target speed when there's input
velocity = move_vector * move_speed
# After knockback, any input instantly cancels the knockback effect
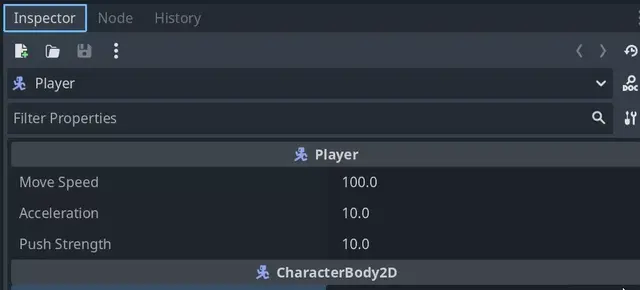
# Improved code: using move_toward
@export var acceleration: float = 500.0 # 500 pixels/sec per second of acceleration
func move_player():
var move_vector = Input.get_vector("move_left", "move_right", "move_up", "move_down")
var target_velocity = move_vector * move_speed
# Gradual change: smoothly transitions from current to target velocity
velocity = velocity.move_toward(target_velocity, acceleration * delta)
# Knockback handling
func apply_knockback(direction: Vector2, strength: float):
# Apply force directly to velocity
velocity += direction * strength
(See the course for detailed explanation)
Groups: Flexible Object Identification
Groups are like tags that can be assigned to any node. Very similar to Unity's Tag system, they let you flexibly identify object types. While Unity limits each GameObject to a single Tag, Godot groups allow multiple assignments for more flexible categorization.
For example, you can easily write logic like "is the object hit by the player's attack in the 'enemy' group?" This is more versatile than type checking like is Player and is used frequently in Godot development.
How to use:
- Select the node you want to tag (e.g., Slime), go to the Inspector's "Node" tab > "Groups," and add a group name like "enemies."
- Use the
is_in_group()method in code to check group membership.
Example: Checking objects in the player's attack range
# Function connected to the player's attack Area2D
func _on_sword_area_body_entered(body: Node2D):
    # If the contacted object is in the "enemies" group, deal damage
    if body.is_in_group("enemies"):
        body.take_damage(attack_power)

    # If it's in the "pushable" group, it's a pushable object
    elif body.is_in_group("pushable"):
        # ...push logic
        pass
Collision Layers/Masks: Organizing Collision Detection
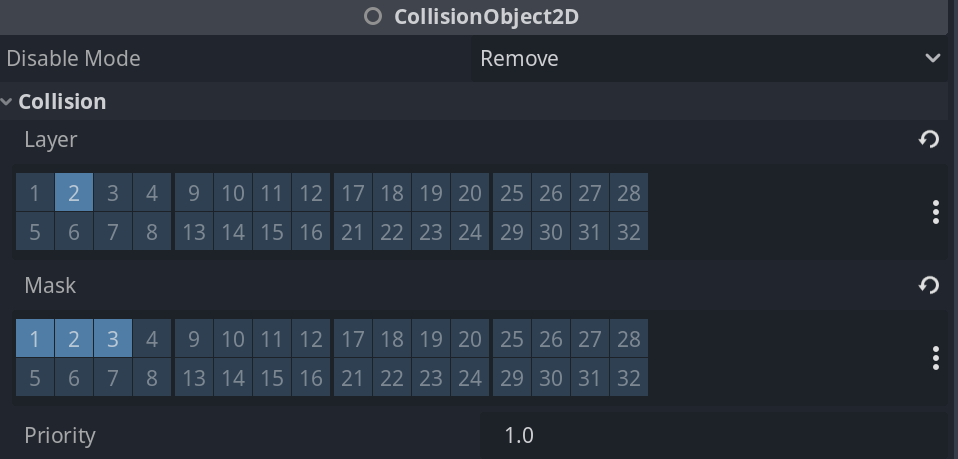
To organize collision detection, Godot provides Layers and Masks. Setting these correctly improves performance and prevents unintended collisions.
- Collision Layer: Which layer this object exists on.
- Collision Mask: Which layers this object should check for collisions.
Layer assignment example:
- Layer 1: Player — the player character
- Layer 2: Enemies — enemy characters
- Layer 3: Weapons — player weapons (attack hitboxes)
Mask settings by scenario:
Player (Layer 1): Wants to take damage from enemies, so set Mask to "Layer 2: Enemies."
Enemies (Layer 2): Want to damage the player but pass through each other, so set Mask to "Layer 1: Player" only.
Player Weapon (Layer 3): Should only hit enemies, so set Mask to "Layer 2: Enemies" only. Won't collide with the player.
# Code example: Using collision detection
func _on_weapon_area_body_entered(body):
    # Since the weapon's Area2D Mask only includes "Layer 2: Enemies,"
    # only enemies will trigger this function
    if body.is_in_group("enemies"):
        body.take_damage(attack_power)
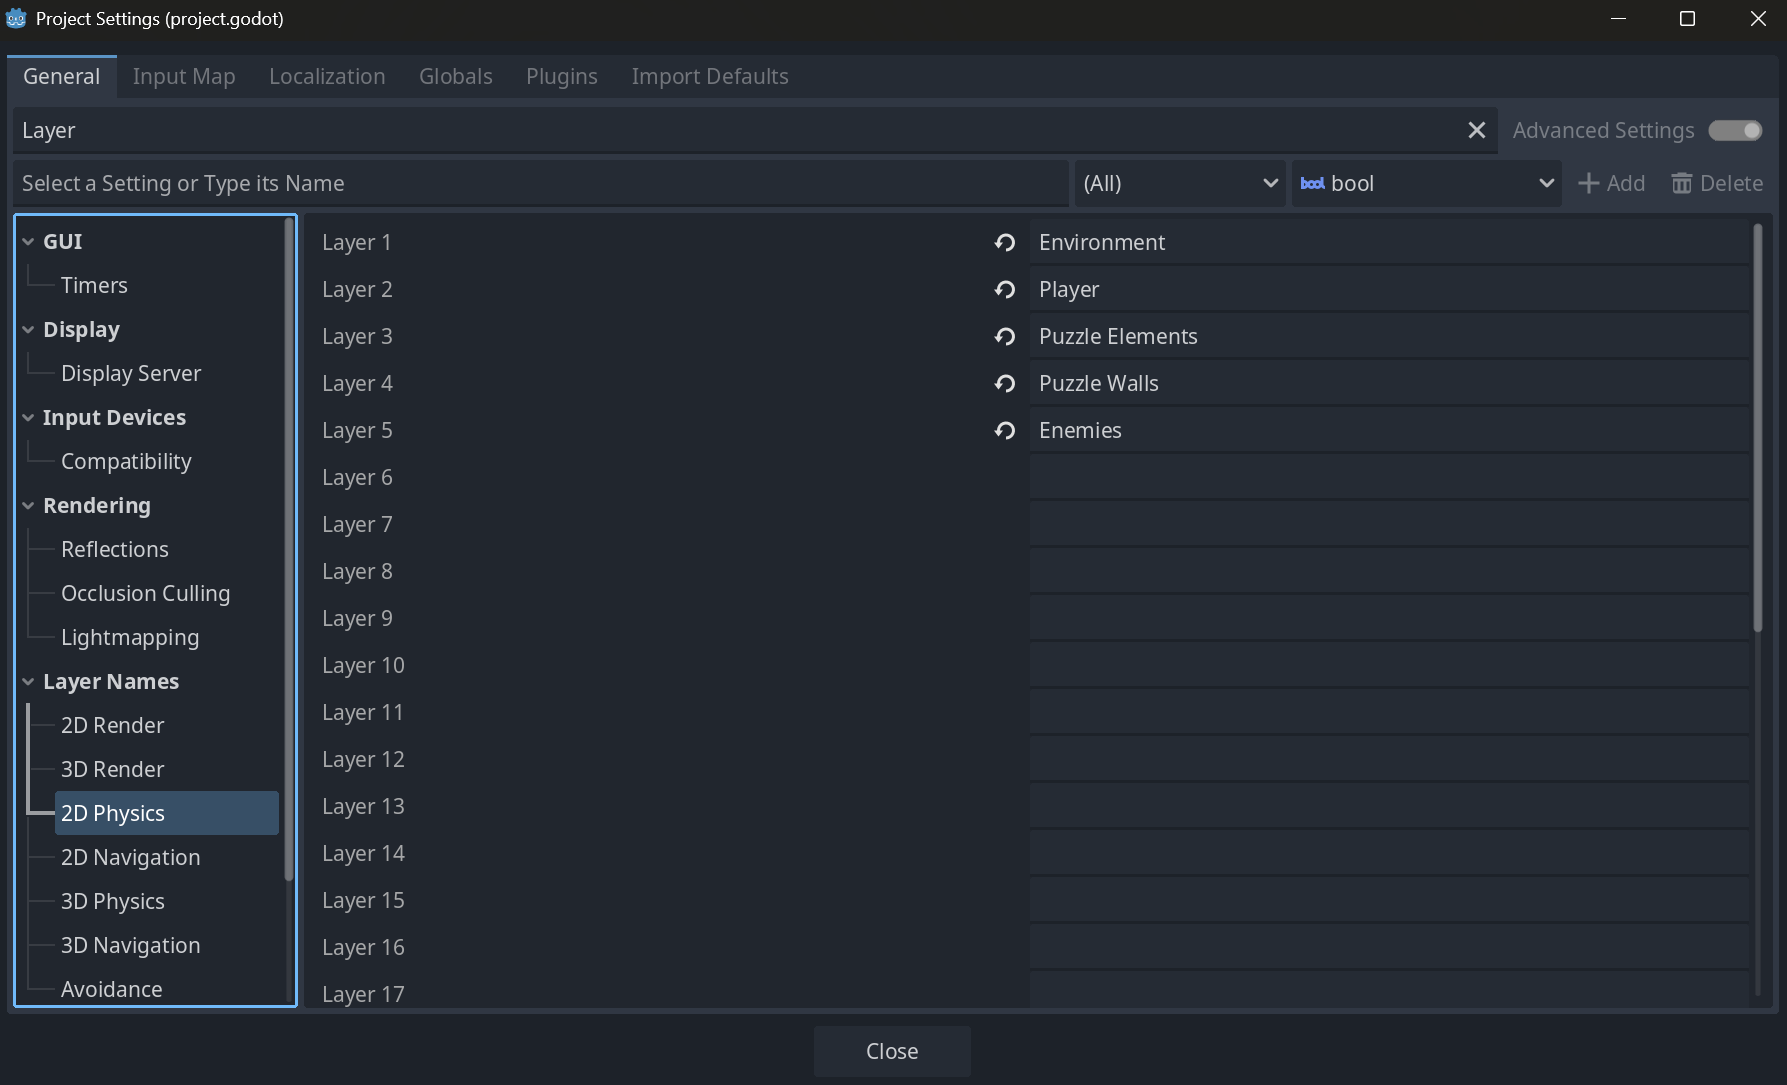
Naming each layer in "Project Settings" > "Layer Names" makes inspector configuration much more readable.
Terrains: RPG Maker-Level Auto-Tiling
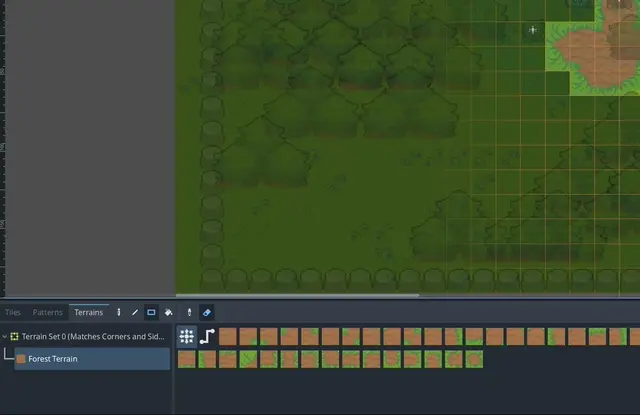
Godot's Terrains feature makes creating auto-tiles remarkably easy. If you've used Rule Tiles in Unity, you'll be amazed by how intuitive and simple the setup is.
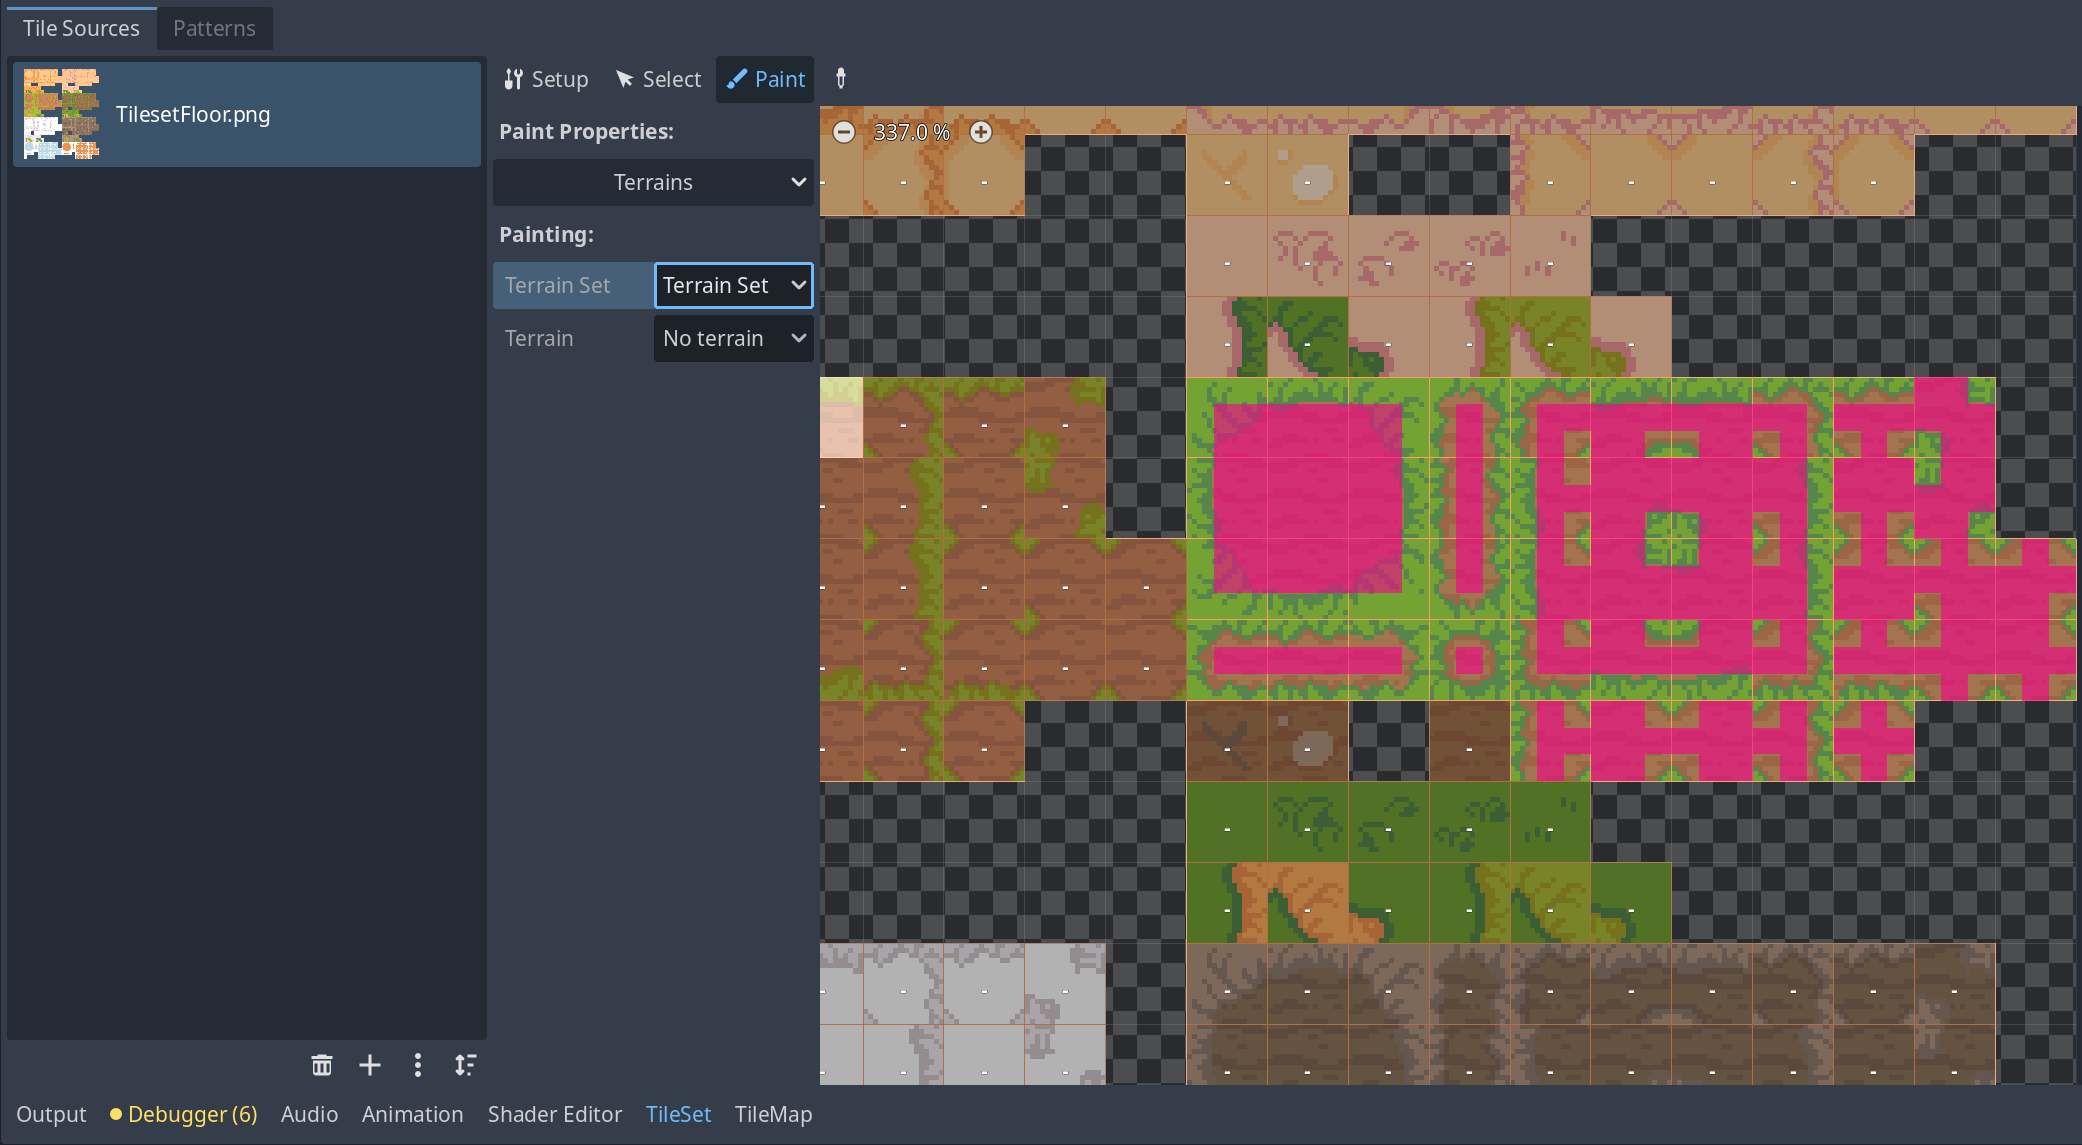
The basic process is to open the "Terrains" tab in a TileSet resource and visually paint which edge of each tile connects to which Terrain type (e.g., grass, dirt). Then use the brush tool in the TileMap editor, and it automatically determines boundaries and places the correct tiles.
Useful features:
- Random brush: Dice icon randomly selects from multiple tiles
- Probability control: Adjust the frequency of specific tiles
- Batch physics: "F" key applies collision detection to all tiles at once
Marker2D: The Ideal Manager Node
When you need a node with no physical presence but want to attach a script for management purposes (e.g., GameManager, PuzzleManager), Unity developers would use an empty GameObject. In Godot, Marker2D fills this role.
Marker2D is the lightest 2D node, holding only position (Transform) data. With zero rendering or physics overhead, it's perfect for housing "manager" scripts that control scene-wide events and data.
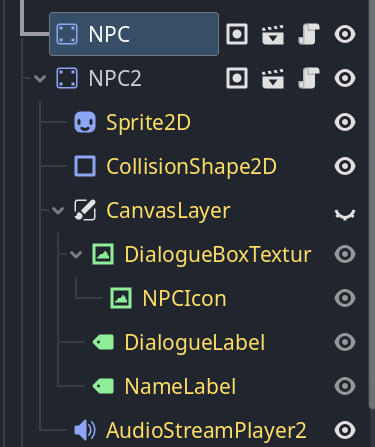
Editable Children and Scene Inheritance: Efficient NPC Creation
Godot offers two main approaches for creating variations from a base scene.
-
Editable Children: Right-click an instance placed in a scene and select "Editable Children" to directly edit its contents (sprites, collision shapes, etc.). Changes are saved only within that scene. Use case: Mass-placing mob NPCs that share functionality but differ in appearance or dialogue.
-
Scene Inheritance: Create a new scene (e.g., Shopkeeper.tscn) that inherits from a base scene (e.g., BaseNPC.tscn). The inherited scene keeps the parent's functionality while allowing new nodes and scripts for unique features. Use case: Creating a merchant NPC that has the basic "talk" function plus a unique "buy/sell items" feature.
Selection guide:
| Feature | Editable Children | Scene Inheritance |
|---|---|---|
| Best for | Villager A, Villager B (different looks/dialogue) | Merchant, Blacksmith (unique functionality) |
| Reusability | Low (local to that scene) | High (inherited scene can be placed anywhere) |
| Management | Simple (base scene only) | Systematic (files organized by feature) |
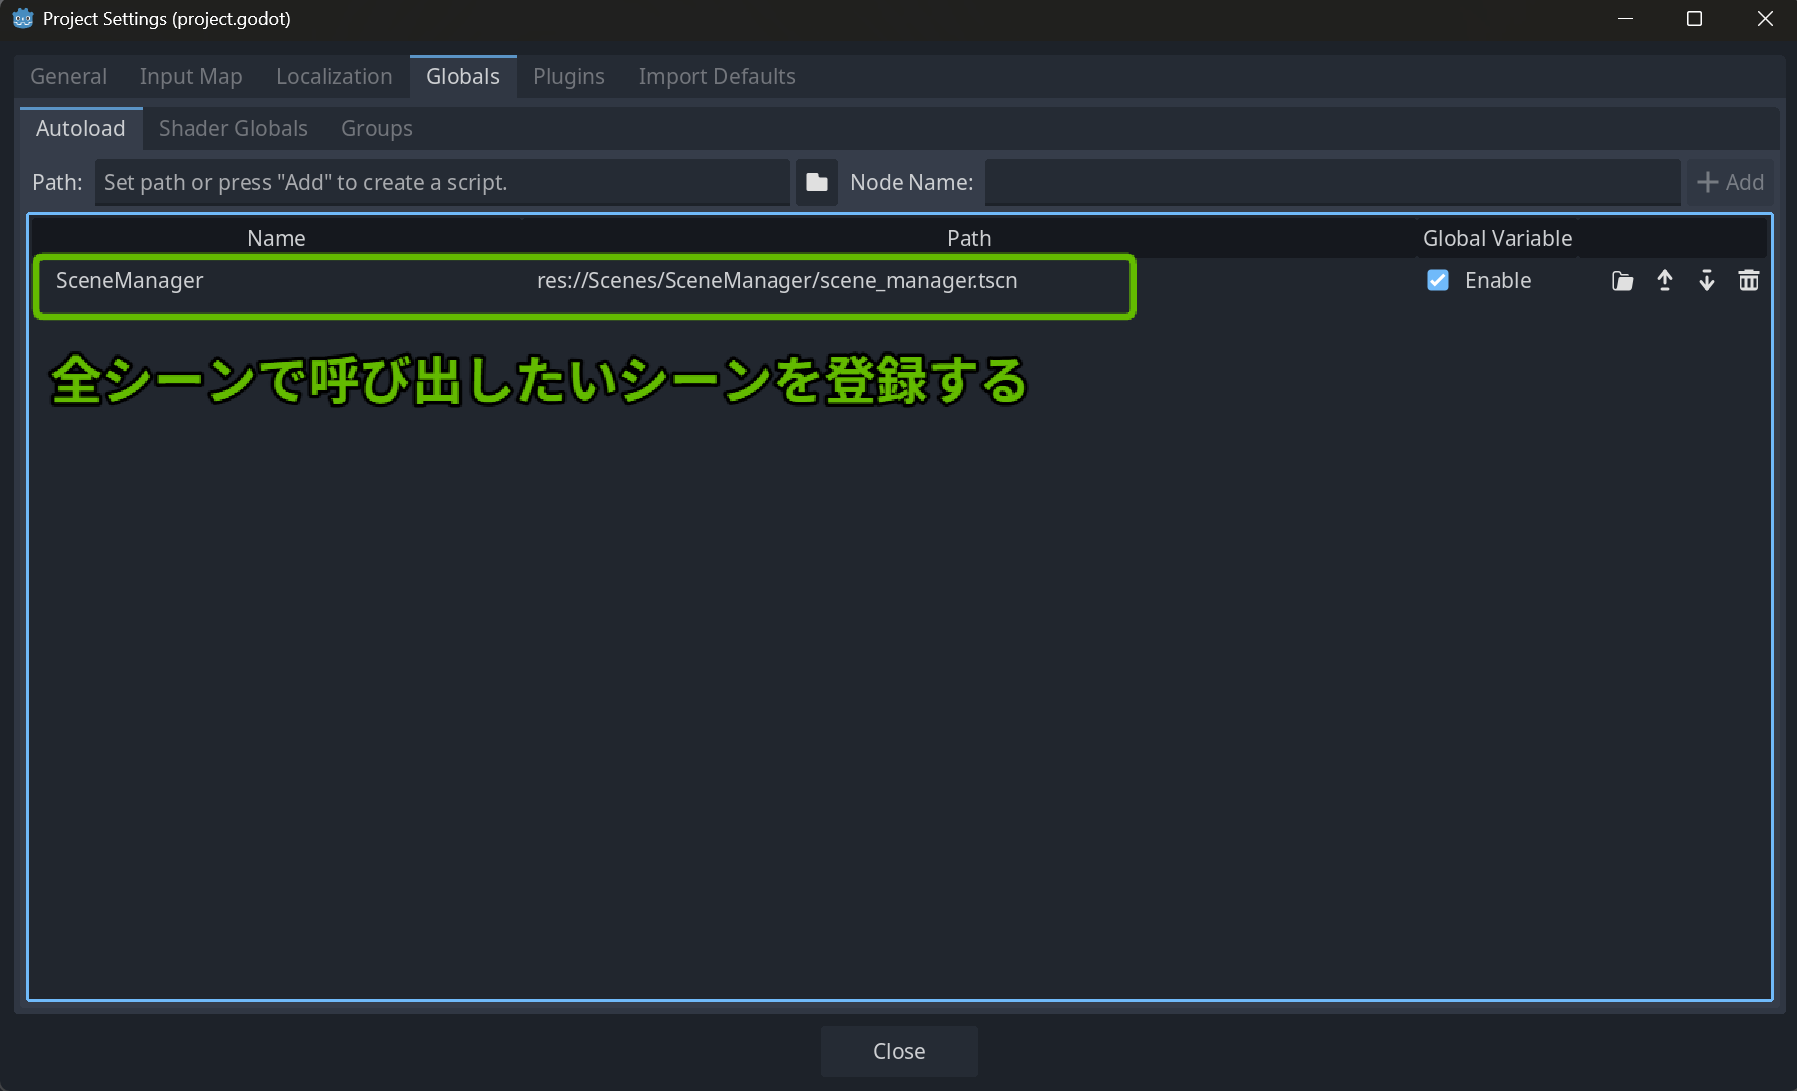
Autoload: Cross-Scene Data Management
Autoload is like combining Unity's DontDestroyOnLoad with the singleton pattern. When you register a script or scene as Autoload in project settings, it's automatically loaded at game startup and accessible as a global variable from any scene.
How to use:
- Create a global management script (e.g., GameManager.gd).
- Go to "Project Settings" > "AutoLoad" tab, register the script, and give it a global name (e.g., GameManager).
Example: Tracking opened treasure chests
# GameManager.gd (registered as AutoLoad)
extends Node

var opened_chests: Array[String] = []
var player_hp: int = 3
var player_spawn_position: Vector2

# ...other global data
# TreasureChest.gd
extends StaticBody2D

@export var chest_id: String # Set a unique ID in the inspector ("forest_chest_01", etc.)

func _ready():
    # If this chest's ID is already recorded, show it as opened
    if GameManager.opened_chests.has(chest_id):
        play_open_animation(false) # Just play the animation

func open_chest():
    # ...opening logic...
    GameManager.opened_chests.append(chest_id) # Record the ID
    play_open_animation(true)
This makes it easy to manage data that needs to persist across scenes: player health, score, inventory, quest progress, and more.
Visual Effects: White Flash with modulate
The "white flash" effect when a character takes damage can be easily implemented using the modulate property on CanvasItem (which Sprite2D, CharacterBody2D, etc. inherit from).
modulate is a color value that multiplies against the node and its descendants. The default is white (1, 1, 1), and changing it lets you easily tint the entire node.
modulate Properties
- Inheritance: Automatically inherited from parent to child nodes
- Multiplication: Applies as a color multiply on the original colors
- Range: 1.0 is the base; above 1.0 brightens, below darkens
Example: Damage flash
# Player.gd
func take_damage(amount):
    # ...damage calculation...

    # Trigger flash effect
    flash_effect()

func flash_effect():
    # Flash white (multiplying by values > 1 increases brightness)
    modulate = Color(2, 2, 2)

    # Wait 0.1 seconds (await enables concise async code)
    await get_tree().create_timer(0.1).timeout

    # Restore original color
    modulate = Color(1, 1, 1)
await get_tree().create_timer(0.1).timeout is a handy one-liner for temporary waits without adding a Timer node. Changing the modulate on CharacterBody2D automatically affects its child AnimatedSprite2D too, so you don't need to operate on sprites individually.
AnimatedSprite2D vs AnimationPlayer: Choosing the Right Animation System
Godot has two main 2D animation systems, and using the right one for each situation is important.
AnimatedSprite2D
- Purpose: Sprite frame animation
- Feature: Create animations directly from sprite sheets
- Use for: Character walking, attacking, idle animations
# Basic AnimatedSprite2D usage
if velocity.x > 0:
    $AnimatedSprite2D.play("move_right")
elif velocity.x < 0:
    $AnimatedSprite2D.play("move_left")
else:
    $AnimatedSprite2D.stop()
AnimationPlayer
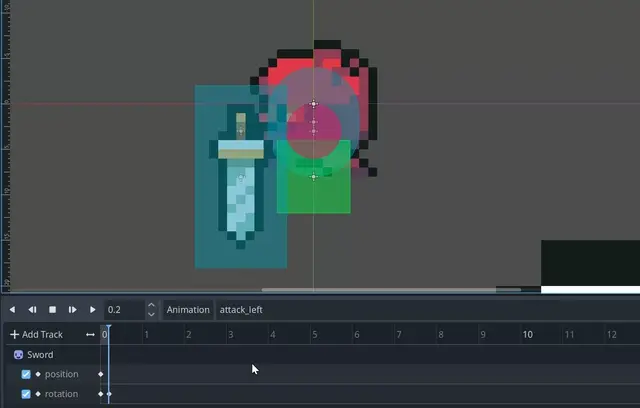
- Purpose: Complex animation control
- Feature: Simultaneously controls position, rotation, scale, and properties
- Use for: Sword swings, UI effects, camera work
# AnimationPlayer usage example (sword swing)
func attack():
    var player_animation: String = $AnimatedSprite2D.animation
    if player_animation == "move_right":
        $AnimatedSprite2D.play("attack_right")
        $AnimationPlayer.play("attack_right")  # Controls sword position and angle
Comparison with Unity's Animator
Unity Animator ≈ Godot AnimationPlayer
- In common: State transitions, blending, simultaneous multi-property control
- Difference: Godot's AnimationPlayer is more direct and simpler to set up
Unity's Animator is state-machine based, while Godot's AnimationPlayer lets you control animations more directly. For complex state transitions, use AnimationTree (Godot's advanced system).
Selection Guide
| Animation Type | Recommended System |
|---|---|
| Sprite frame switching only | AnimatedSprite2D |
| Position/rotation/scale changes | AnimationPlayer |
| Synchronizing multiple objects | AnimationPlayer |
| Complex state transitions | AnimationTree |
In practice, you'll often combine AnimatedSprite2D for character base animations with AnimationPlayer for weapon and effect animations.
Conclusion: Godot's True Strengths Revealed Through Practical Development
Through this practical course, I once again appreciated the elegance of Godot's design philosophy and its power for 2D game development. Many of Godot's advantages in actual development workflows only become apparent beyond basic learning.
Most Impressive Aspects
- Consistent design philosophy: Unified concepts across Process Mode, Motion Mode, Collision Layers, etc.
- Rich built-in features: move_and_slide(), Terrains, Y-Sorting, and more come standard
- Intuitive workflow: Editable Children, Autoload, await — all designed for development efficiency
- Balance of lightweight and extensible: Marker2D, Signal system — implement only what you need
The combination of node-based design and the signal system is particularly powerful, enabling loosely coupled inter-object communication while keeping development intuitive. The standard library of features like Terrains (auto-tiling), Y-Sort, and various built-in functions hits that sweet spot of "this is exactly what I needed."
Godot from a Unity Developer's Perspective
For Unity developers, Godot feels like an engine that's "easy to learn and comfortable to use." Rather than a complete switch, it's a strong candidate for project-by-project tool selection.
Areas where Godot particularly excels:
- 2D game development (highly refined features)
- Indie game development (lightweight engine, fast development cycles)
- Prototyping (intuitive workflow)
- Educational purposes (concepts are easy to grasp)
Compared to Unity, Godot can't yet match the scale of asset stores or available resources, but for 2D game development — especially pixel art games — I'm confident Godot is an extremely powerful choice. Combined with the engine's lightweight nature, it has the potential to support stress-free, rapid development cycles from prototyping to release.
Future Learning Plans
Having completed both the fundamentals and practical courses, I now have a solid understanding of Godot's basic development workflow. Going forward, I plan to explore:
- 3D game development: Exploring Godot's 3D capabilities
- Advanced systems: AnimationTree, VisualScript, GDExtension, etc.
- Performance optimization: Optimization techniques for large-scale projects
- Asset management: Efficient project structure and workflows
I'll continue studying Godot and exploring its 3D features and more advanced systems. I hope these learning notes are helpful for anyone starting game development with Godot, especially those considering a transition from Unity.