Overview
The most intuitive and fundamental way to trigger gimmicks in a world is through "buttons." When players click (Interact) a button, it can serve as a trigger for various actions—turning on lights, opening doors, starting games, and more.
This article combines all the knowledge covered so far to explain specific procedures for implementing interactive buttons in UdonSharp, broken down into several practical patterns.
- Local Button: The simplest button that only affects the player who pressed it.
- Synced Toggle Button: A button that switches ON/OFF with each press, with the state shared across all players.
- One-Time-Only Button: A button that triggers processing that should only execute once in the world.
Basic Unity Editor Setup (Common to All Patterns)
First, prepare a GameObject to function as a button in the Unity Editor. Here, we'll use a simple Cube as an example button.
- Create Object: Right-click in the Hierarchy window and select [3D Object] > [Cube] to create a cube. Rename it to something like "InteractiveButton" for clarity. Adjust the size and position as needed.
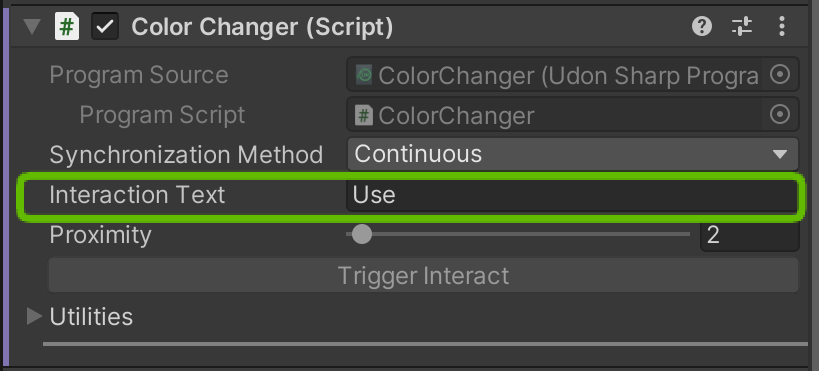
- Verify Collider: The created cube has a
Box Collidercomponent attached by default. This is required to detect player clicks. - Add Udon Behaviour: Select the button object and click [Add Component] in the Inspector window. Add an "Udon Behaviour."
- Assign Script: Create the corresponding UdonSharp script and drag & drop it onto the Udon Behaviour component's
Program Sourcefield. - Set Interaction Text: After assigning the script, an
Interaction Textfield appears in the Inspector. Enter text like "Press" or "Click" here. This becomes the tooltip displayed to players, and the Interact event will not fire without this setting.
Pattern 1: Local Button (Sound Playback Button)
A button that plays sound only on the client of the player who pressed it. It doesn't affect other players.
Script: LocalSoundButton.cs
using UdonSharp;
using UnityEngine;

public class LocalSoundButton : UdonSharpBehaviour
{
    [Tooltip("Assign the AudioSource to play when clicked.")]
    public AudioSource targetSound;

    public override void Interact()
    {
        // Only execute if targetSound is set
        if (targetSound != null)
        {
            targetSound.Play();
        }
        else
        {
            Debug.LogWarning("No sound is set to play.");
        }
    }
}
Unity Setup
- Create the
LocalSoundButton.csscript and assign it to the button object's Udon Behaviour. - Create an empty GameObject in the scene and name it something like "SoundPlayer." Add an
AudioSourcecomponent to this object. - Assign the audio file you want to play to the
AudioSourcecomponent'sAudioClipfield, and uncheckPlay On Awake. - Return to the button object's Inspector and drag & drop the GameObject containing the
AudioSourceonto theLocal Sound Buttoncomponent'sTarget Soundfield.
Now, only the player who clicks the button will hear the specified sound play.
Pattern 2: Synced Toggle Button (Room Light Switch)
A switch that toggles room lighting ON/OFF with each press, with the state synchronized across all players in the instance. This is a practical implementation of the basic network synchronization pattern.
Script: SyncedLightSwitch.cs
using UdonSharp;
using UnityEngine;
using VRC.SDKBase;

public class SyncedLightSwitch : UdonSharpBehaviour
{
    [Header("Settings")]
    [Tooltip("Assign the Light GameObject to toggle ON/OFF.")]
    public GameObject roomLight;

    // Variable to sync light state across all players
    [UdonSynced]
    private bool isLightOn = true; // Initial state is ON

    void Start()
    {
        // Reflect current sync state to light when joining world
        UpdateLightState();
    }

    public override void Interact()
    {
        // Request ownership of this object for yourself
        Networking.SetOwner(Networking.LocalPlayer, this.gameObject);

        // Toggle the light state
        isLightOn = !isLightOn;

        // Immediately reflect changed state on yourself
        UpdateLightState();

        // Notify all other players of the change
        RequestSerialization();
    }

    // Called when receiving data from other players
    public override void OnDeserialization()
    {
        // Reflect the latest synced state to the light
        UpdateLightState();
    }

    // Method that consolidates the processing to toggle the Light GameObject
    private void UpdateLightState()
    {
        if (roomLight != null)
        {
            roomLight.SetActive(isLightOn);
        }
    }
}
Unity Setup
- Create the
SyncedLightSwitch.csscript and assign it to the button object's Udon Behaviour. - Place a GameObject with a
Lightcomponent (e.g., Point Light) in the scene to serve as the lighting. - In the button object's Inspector, drag & drop the created light object onto the
Synced Light Switchcomponent'sRoom Lightfield.
Testing Tip: To easily verify light ON/OFF, it's effective to darken the scene.
- Open [Window] > [Rendering] > [Lighting] from the menu
- In the "Environment" tab, set Skybox Material to
None- Change Environment Lighting > Source to
Color- Set Ambient Color to black (#000000)
- Disable or delete the Directional Light in the scene
This makes the scene completely dark, making the light's effect easy to see.
Now, whenever anyone presses the button, the light will toggle ON/OFF in everyone's view within the instance.
Pattern 3: One-Time-Only Button (Game Start Button)
A button that triggers processing that should not be executed again once run, such as starting a game. Using synchronization, it becomes unpressable for all players once someone has pressed it once.
Script: OneTimeGameStartButton.cs
using UdonSharp;
using UnityEngine;
using VRC.SDKBase;

public class OneTimeGameStartButton : UdonSharpBehaviour
{
    [Header("Settings")]
    [Tooltip("MeshRenderer to display as button")]
    public MeshRenderer buttonRenderer;
    [Tooltip("Material after button is pressed")]
    public Material pressedMaterial;

    // Variable to sync whether button has already been pressed
    [UdonSynced]
    private bool isPressed = false;

    void Start()
    {
        // Check state on startup
        CheckButtonState();
    }

    public override void Interact()
    {
        // Only execute if not yet pressed
        if (!isPressed)
        {
            Networking.SetOwner(Networking.LocalPlayer, this.gameObject);
            isPressed = true;

            // Update state and notify of change
            CheckButtonState();
            RequestSerialization();

            // --- Write game start processing here ---
            Debug.Log("Starting the game!");
            // Example: Notify GameManager with SendCustomEvent, etc.
        }
    }

    public override void OnDeserialization()
    {
        // Receive info that someone else pressed it and update state
        CheckButtonState();
    }

    private void CheckButtonState()
    {
        // If already pressed
        if (isPressed)
        {
            // Disable interaction on the button
            this.DisableInteractive = true;
            // Change appearance to "after pressed" material
            if (buttonRenderer != null && pressedMaterial != null)
            {
                buttonRenderer.material = pressedMaterial;
            }
        }
    }
}
Unity Setup
- Create the
OneTimeGameStartButton.csscript and assign it to the button object's Udon Behaviour. - Create a separate
Materialasset for the button's post-press appearance (e.g., a darker material). - In the button object's Inspector, assign the button's own
MeshRenderertoButton Rendererand the created material toPressed Material.
Now, once anyone in the instance presses the button, it becomes non-interactable and its appearance changes. This allows all players to recognize that "this button has already been used."
Summary
- Buttons are fundamentally implemented using the
Interactevent as the starting point. - It's important to be conscious of whether processing is local or synced, and choose the appropriate implementation pattern.
- For synced buttons, you need to accurately implement the flow of "acquire ownership → change value → request serialization → receive and update."
- By combining the
DisableInteractiveproperty and material changes, you can visually communicate button state to players.
Buttons are simple gimmicks, but they contain all the fundamental elements of UdonSharp condensed together. By applying these patterns, you can build increasingly complex interactions.