While making a 2D game, you may have wanted an enemy to flash white for an instant when destroyed, a water surface to ripple and flow, or an enemy to dissolve away as it disappears, only to find that modulate and animation alone can't get you there.
Shaders are what make this kind of per-pixel visual control possible. A shader is a small program that runs on the GPU (graphics processing unit), and it lets your code decide the color of every single pixel on screen. This article focuses on the fragment shader, the part responsible for color, and takes you far enough to make that first step.
What You'll Learn
- What a shader is, and why heavy-looking visuals run cheaply on the GPU
- The basic structure of a Godot shader (
shader_typeandvertex/fragment/light)- Manipulating color in the
fragmentfunction withCOLOR,UV, andTEXTURE- Dynamic effects built from
UVandTIME(circular masks, scrolling, dissolves)- Performance essentials, such as avoiding
ifstatements
- What Is a Shader? How the CPU and GPU Draw Differently
- The Basic Structure of a Godot Shader
- Deciding Color in the fragment Function: COLOR and UV
- Animating with UV and TIME: Dynamic Effects
- Hands-On: Building a Hit Flash That Blinks White on Damage
- Performance and Optimization
- Common Mistakes and Best Practices
- Bonus: Good to Know for Later
- Summary
What Is a Shader? How the CPU and GPU Draw Differently
The first step to understanding shaders is knowing who is actually doing the drawing. A game's screen is built by coloring hundreds of thousands of pixels every frame, and the GPU is what does that coloring.
The game logic you normally write in GDScript (movement, collision, score) is handled by the CPU. The CPU is good at working through one task at a time. The GPU is good at finishing huge numbers of simple tasks all at once, which is exactly why it can fill hundreds of thousands of pixels in an instant.
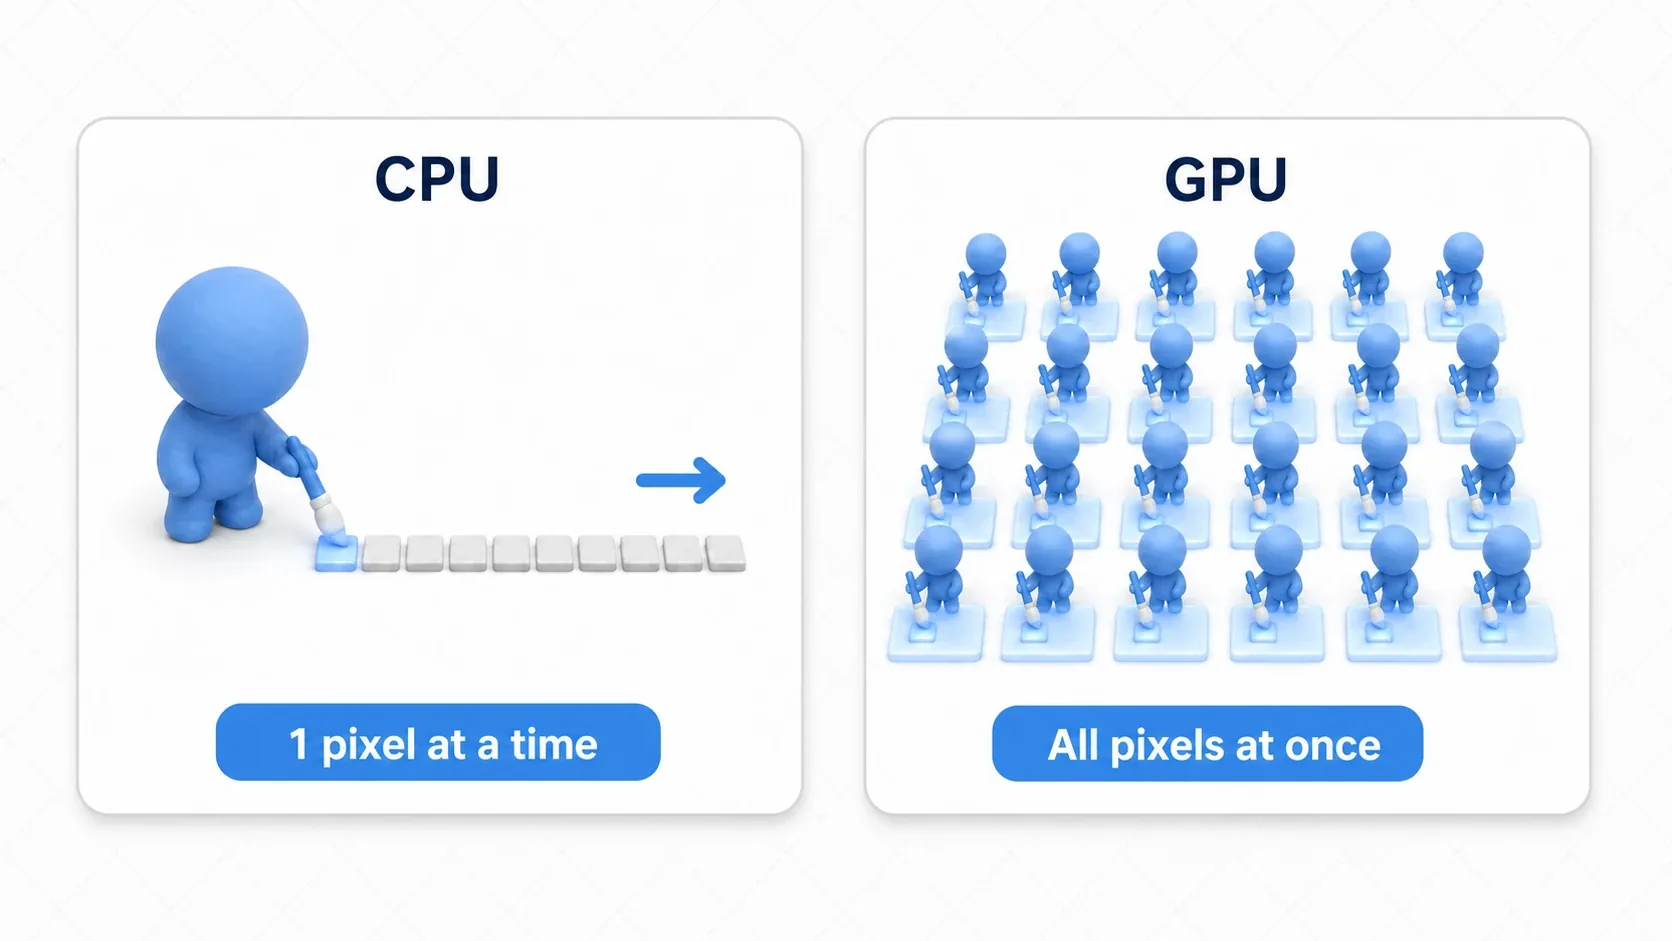
A shader is a small program that teaches the GPU how to color pixels. Because it rides on the GPU's parallel processing, expensive-looking visuals like fire, water, distortion, and full-screen transitions run smoothly without getting in the way of your game logic.
How It Differs from modulate: Uniform vs Per-Pixel
You might wonder whether the modulate property can handle color changes on its own. This is the important dividing line.
modulate: tints the entire object uniformly with one color. Good for simple cases like turning a character red.- Shader: runs a separate calculation for every pixel. Lets you build effects that vary by position, like glowing only at the edges, making only the top half transparent, or applying a radial gradient from the center.
So: modulate for uniform color changes, shaders for detailed effects that vary by position. For a simple blink, a white flash with modulate is sometimes the easier route.
The Basic Structure of a Godot Shader
Godot shaders are written in a custom language similar to GLSL ES 3.0. You write a shader in a .gdshader file (or inside a node's ShaderMaterial), and the first line declares what it applies to.
shader_type canvas_item; // Applies to 2D (sprites, UI, and other CanvasItem nodes)
// shader_type spatial;  // Use this one for 3D meshes
Specify canvas_item when building 2D effects. From there, a shader is made up of three main functions (entry points).
| Function | Role | When It Runs |
|---|---|---|
vertex | Manipulates vertices (positions). Deformation, waving, rotation | Once per vertex |
fragment | Calculates the color of a pixel (fragment). The core of color adjustment and effects | Once per pixel |
light | Calculates how light affects the object. Custom lighting | Once per light per pixel |
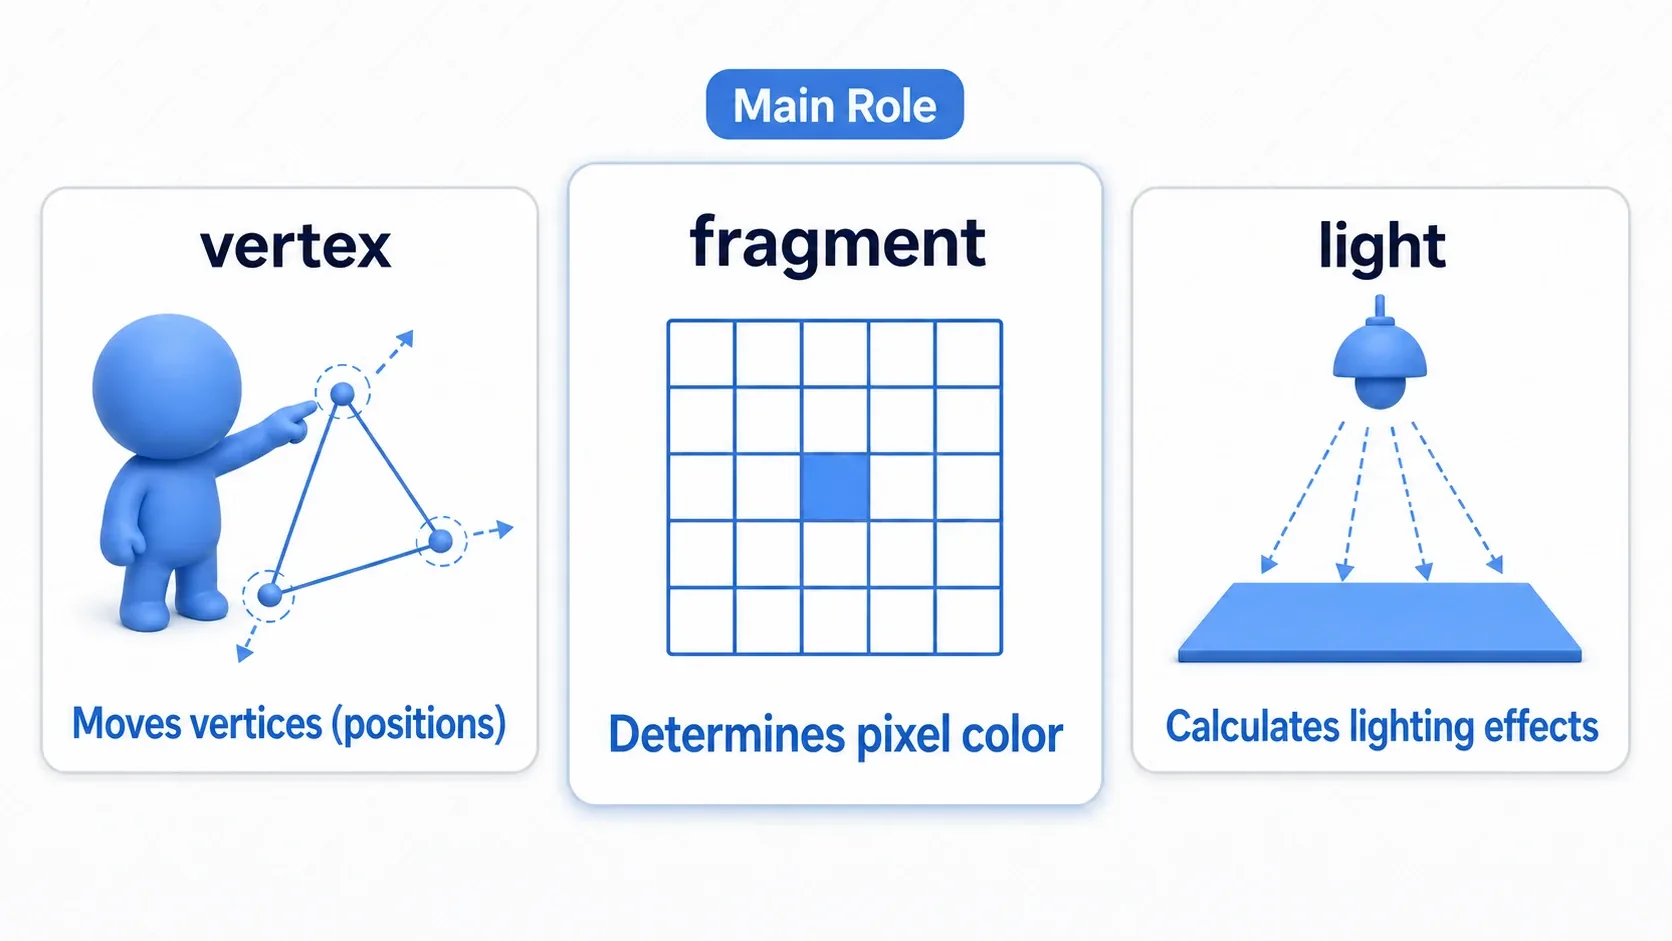
The star of this article is the fragment function. It runs once for every pixel on screen and decides that pixel's final color. Get comfortable with just this and you can build most color changes and effects.
Deciding Color in the fragment Function: COLOR and UV
The fragment function's job is to decide what color the pixel currently being painted should be. Two important built-in variables make that possible.
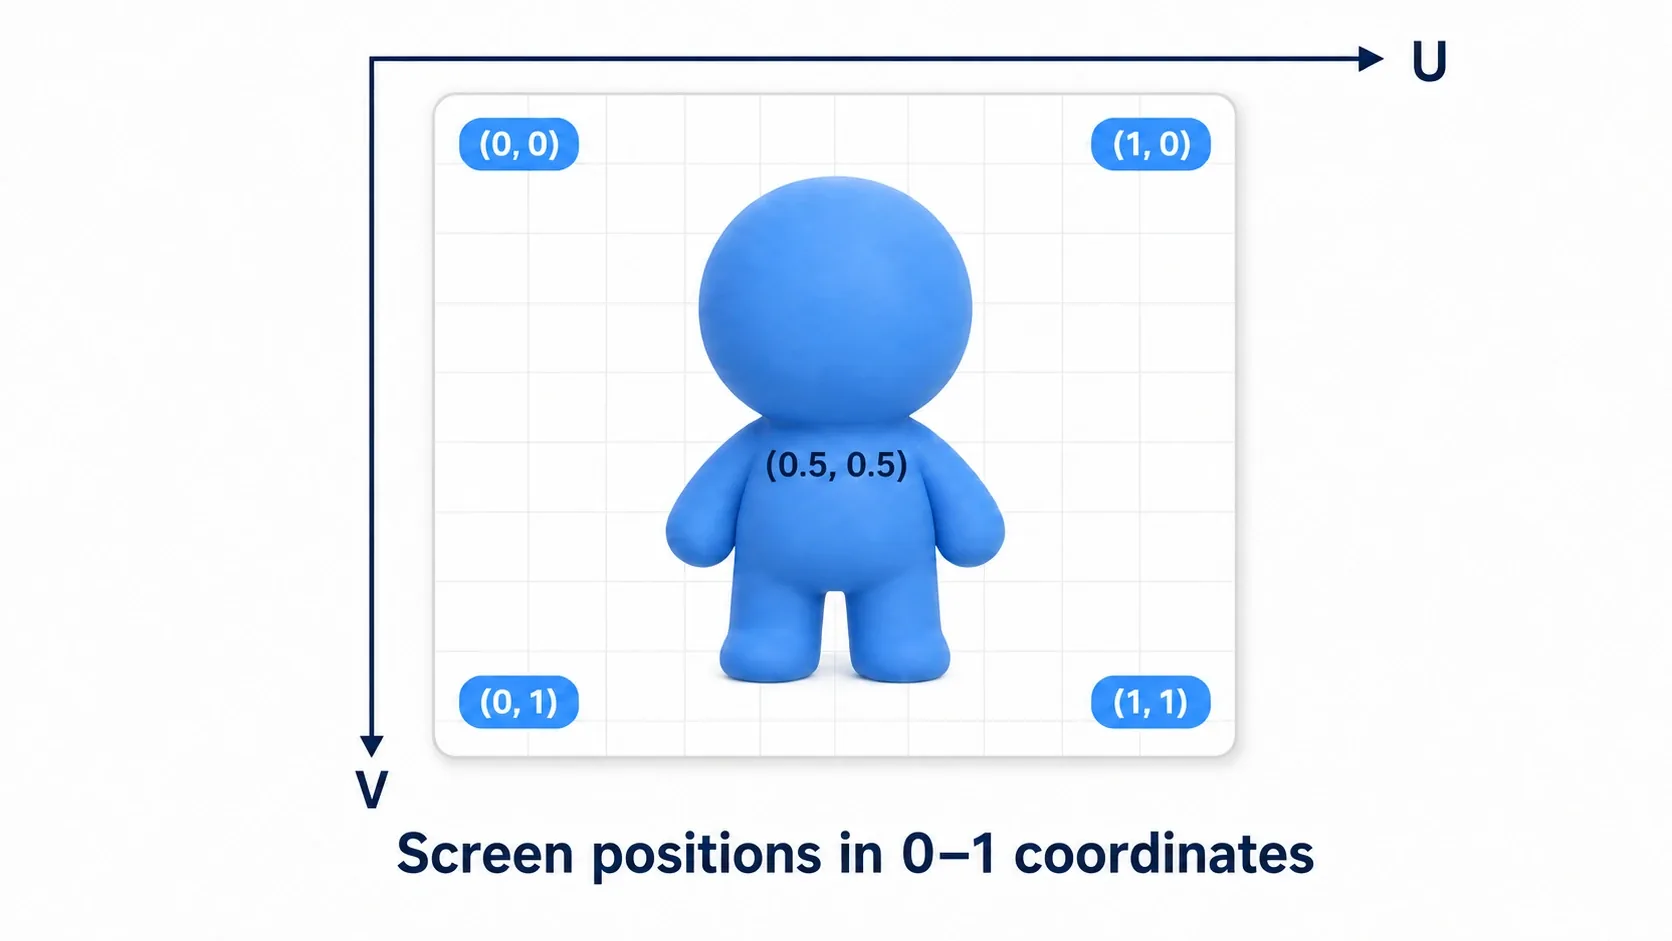
COLOR: the output. Assign a color invec4(R, G, B, A)form and the pixel becomes that color (each component ranges from0.0to1.0)UV: the input. Tells you where on the texture the pixel being processed is, in coordinates from0.0to1.0
UV treats the top-left of the texture as (0, 0) and the bottom-right as (1, 1). Each pixel gets a different UV, which makes it the reference for position-dependent processing such as "only the left half" or "based on distance from the center."
Example 1: Fill with a Solid Color
The simplest shader, which makes every pixel the same color.
shader_type canvas_item;

void fragment() {
    // Assign a color directly to COLOR. vec4(R, G, B, A), each component from 0.0 to 1.0
    COLOR = vec4(0.8, 0.2, 0.3, 1.0); // Opaque wine red
}
Example 2: Invert the Texture's Colors
Now let's process the original image instead of replacing it. The texture() function retrieves the current pixel's original color.
shader_type canvas_item;

void fragment() {
    vec4 tex = texture(TEXTURE, UV); // Get this pixel's original color
    vec3 inverted = vec3(1.0) - tex.rgb; // Invert RGB (subtract from 1.0)
    COLOR = vec4(inverted, tex.a); // Keep the original alpha (transparency)
}
texture(TEXTURE, UV) is the basic form of "read this sprite's color at this position." The key is carrying the original alpha through so you don't accidentally color the transparent parts (where tex.a is 0).
Example 3: A Sepia Filter
Something more practical: a filter that gives a photo a sepia tone. First compute brightness (luminance), then multiply by the sepia tint.
shader_type canvas_item;

void fragment() {
    vec4 tex = texture(TEXTURE, UV);
    float gray = dot(tex.rgb, vec3(0.299, 0.587, 0.114)); // Convert to luminance
    vec3 sepia = vec3(gray * 1.07, gray * 0.74, gray * 0.43); // The sepia tint
    COLOR = vec4(sepia, tex.a);
}
The same "read the color, process it, write it back" flow gives you grayscale, color correction, thresholding, and every other filter that shifts the screen's tone.
Animating with UV and TIME: Dynamic Effects
The real power of fragment shaders is that adding TIME (seconds elapsed since startup) to UV turns a still image into a moving effect. Let's look at three standard patterns.
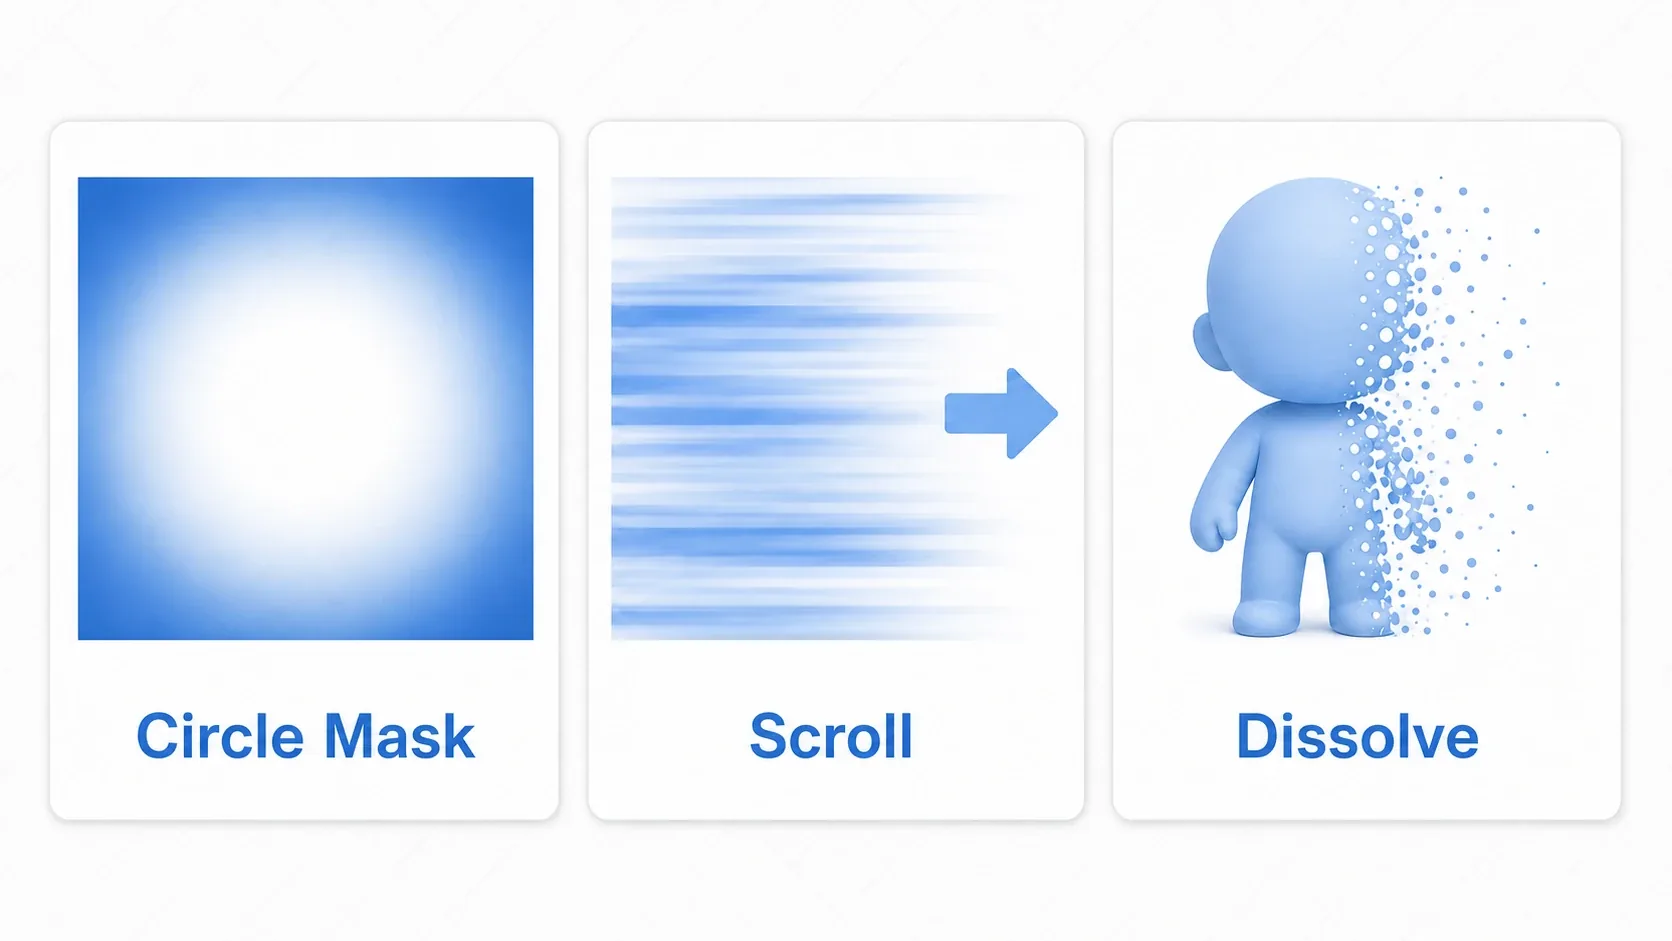
Example 4: A Circular Mask (Spotlight)
Measure the distance from UV to the center and make the outside transparent, and you get a spotlight-like circular mask.
shader_type canvas_item;

void fragment() {
    vec2 centered = UV - vec2(0.5);      // Shift the center to (0,0)
    float dist = length(centered);       // Distance from the center
    // Fade smoothly to transparent between radius 0.3 and 0.4 (soft edge)
    float mask = 1.0 - smoothstep(0.3, 0.4, dist);
    vec4 tex = texture(TEXTURE, UV);
    COLOR = vec4(tex.rgb, tex.a * mask);  // Multiply the mask into the original alpha
}
smoothstep() transitions smoothly instead of snapping at the boundary. As we'll see below, it's also friendlier to the GPU than writing "if the distance is 0.4 or more, be transparent" with an if.
Example 5: Scrolling over Time
Adding TIME to UV scrolls the texture automatically. Useful for flowing water, clouds, and conveyor belts.
shader_type canvas_item;

uniform float scroll_speed = 0.1; // The speed can be passed in from GDScript

void fragment() {
    vec2 uv = UV + vec2(TIME * scroll_speed, 0.0); // Shift along X
    uv = fract(uv);                    // Wrap into 0.0-1.0 (endless scrolling)
    COLOR = texture(TEXTURE, uv);
}
Wrapping the UV back into 0.0 to 1.0 with fract() (which extracts the fractional part) keeps the texture flowing endlessly without a seam.
Example 6: A Noise-Based Dissolve
With a noise texture you can make a character dissolve away organically. A staple for defeat animations and warps.
shader_type canvas_item;

uniform sampler2D noise_texture;                       // The noise image is passed in from outside
uniform float dissolve : hint_range(0.0, 1.0) = 0.0;   // Progress (0 = normal, 1 = fully gone)

void fragment() {
    float noise = texture(noise_texture, UV).r; // Noise intensity (0 to 1)
    if (noise < dissolve) {
        discard;                                // Don't draw this pixel (erase it)
    }
    COLOR = texture(TEXTURE, UV);
}
Animate dissolve from 0.0 to 1.0 from GDScript with a Tween and holes open up starting from the thinnest parts of the noise, giving you a gradual melt.
Hands-On: Building a Hit Flash That Blinks White on Damage
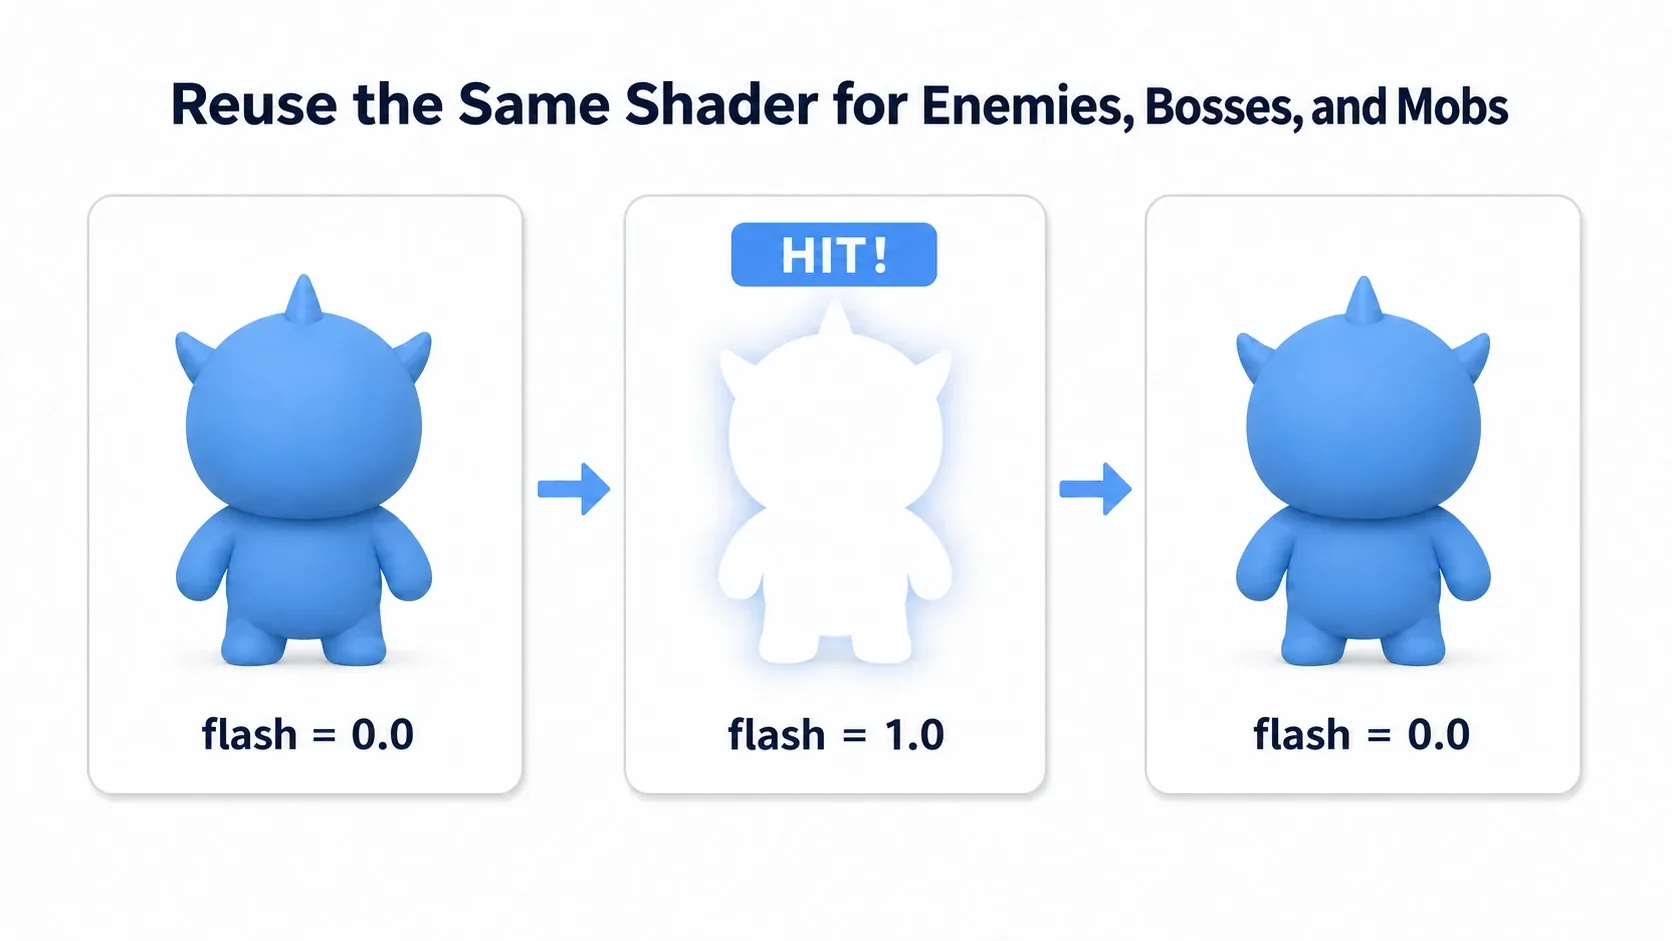
Let's turn everything we've covered about reading and processing color into the effect you'll use most often in an actual game: a hit flash that blinks pure white the instant an enemy takes a hit.
Enemy formations in a shmup, a boss in an action RPG, mooks in a beat 'em up. Regardless of genre, this is the go-to way to sell the feel of a hit, and the nice part is that one shader works for every character.
The Shader: Push the Original Color Toward White
What it does is simple. Take a flash_amount (how white to go) from the outside and push the original color toward white by that amount. The key is using mix() (which blends two values by a ratio) instead of an if.
shader_type canvas_item;

// "How white to go," passed from GDScript as 0.0 to 1.0
uniform float flash_amount : hint_range(0.0, 1.0) = 0.0;

void fragment() {
    vec4 tex = texture(TEXTURE, UV);              // The original color
    // Push the original color toward white (1,1,1) by flash_amount
    vec3 rgb = mix(tex.rgb, vec3(1.0), flash_amount);
    COLOR = vec4(rgb, tex.a);                     // Alpha stays original, so the shape is preserved
}
At flash_amount of 0.0 you get the original look, and at 1.0 a pure white silhouette. Because the alpha is left untouched, the character's shape (the transparent margins) stays intact and only the color blows out to white.
GDScript: Flash on Hit and Fade Back
All that's left is setting flash_amount to 1.0 when damage lands and returning it to 0.0 quickly with a Tween.
extends Sprite2D  # Works the same on AnimatedSprite2D

func flash() -> void:
    var mat := material as ShaderMaterial
    mat.set_shader_parameter("flash_amount", 1.0)   # Snap to pure white
    var tween := create_tween()
    # Ease back over 0.15 seconds (this is the afterglow of the flash)
    tween.tween_property(mat, "shader_parameter/flash_amount", 0.0, 0.15)

func take_damage(amount: int) -> void:
    hp -= amount
    flash()          # Flash as part of handling damage
Call flash() from whatever detects the hit (a collision signal or your take_damage() call) and you're done.
There are two points to take away.
- One shader, any number of characters: assign the same
ShaderMaterialto your enemy, boss, and mook sprites and they all flash the same way. Their individual appearance (the original texture) doesn't matter. - GDScript decides the timing: the shader only draws "how white it is right now." When and how fast it fades back is controlled by the
Tweenduration. Shorten0.15for a sharper pop, lengthen it for a softer glow.
For a plain white flash, modulate can get you close. But once you want to grow it into something more advanced, like glowing only at the edges or lighting up part of the sprite with a gradient, that's shader territory.
Performance and Optimization
Shaders are powerful, but the fragment function runs per pixel, so a small amount of waste multiplies hundreds of thousands of times across the screen. These three points matter most.
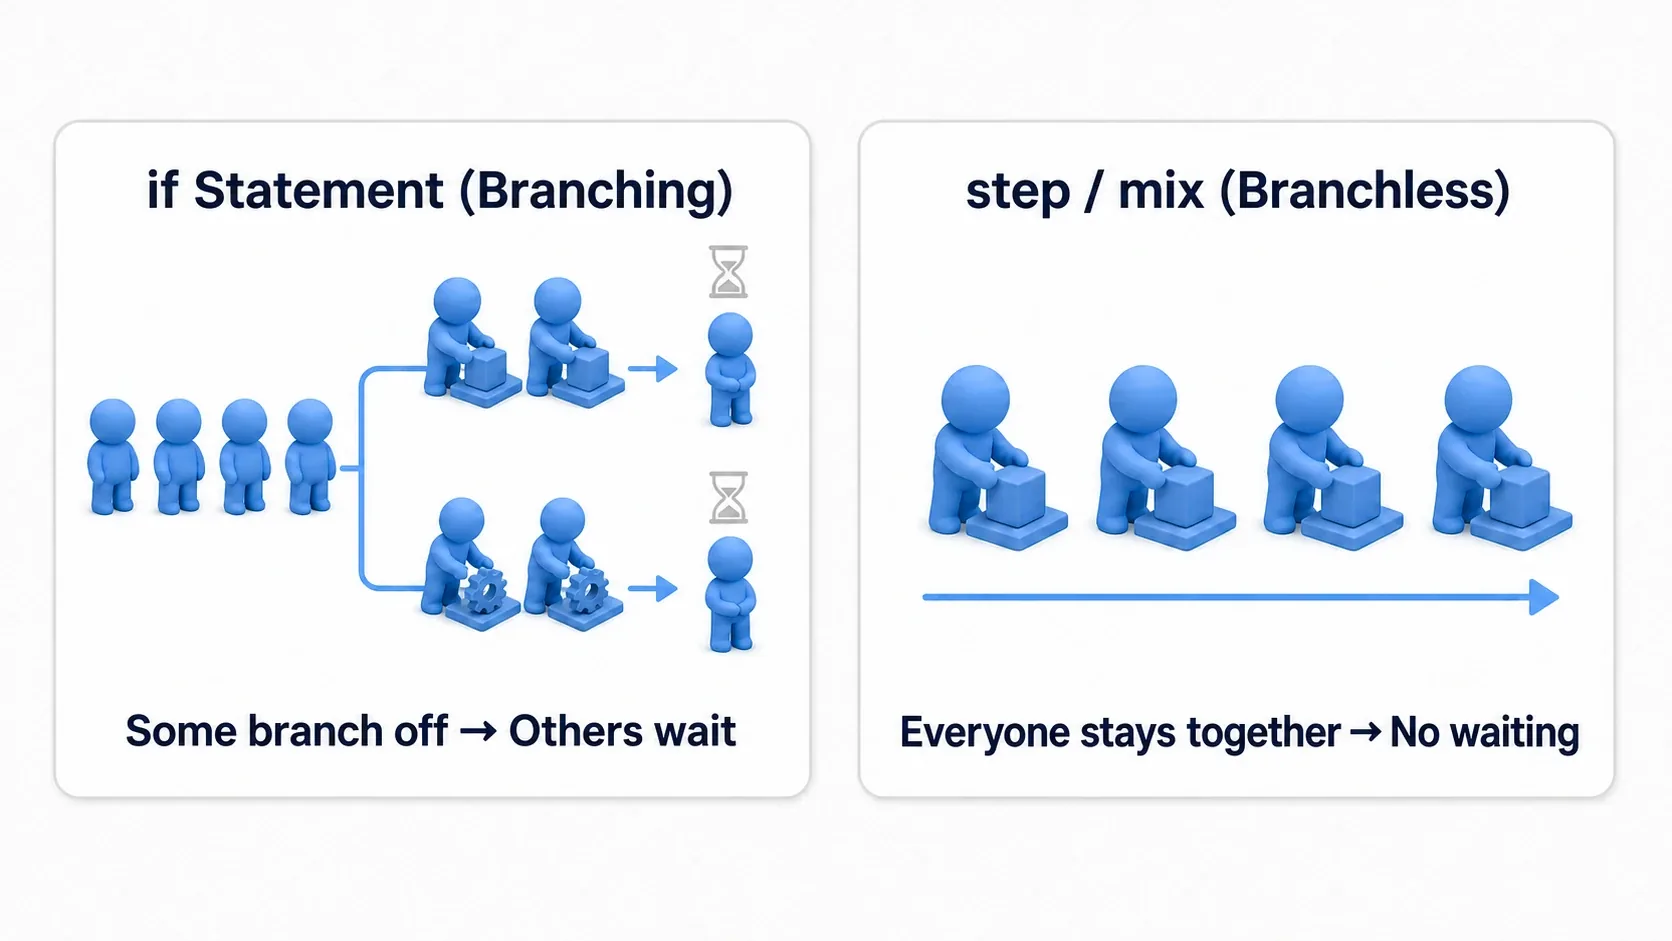
- Avoid
ifstatements: the GPU processes many pixels in lockstep. Anifbranch sends some threads down a different path while the others wait (thread divergence). The standard fix is replacing the branch with arithmetic usingstep(),smoothstep(), andmix(). - Move heavy math to
vertex: calculations that don't vary per pixel (likesin/cosbased onTIME) can be computed once in thevertexfunction and passed tofragmentthrough avaryingvariable, which slashes the work. - Reduce
texture()calls: reading a texture is relatively expensive. If you read the same texture multiple times, store the result in a variable and reuse it.
"Get it working first, then kill the if statements if it's slow" is the right level of concern. There's no need to obsess over optimization from the start.
Common Mistakes and Best Practices
Here are the mistakes people commonly hit with fragment shaders, and how to handle them.
| Common Mistake | Best Practice |
|---|---|
Overusing if statements | Replace conditions with arithmetic using step(), smoothstep(), and mix() |
| Changing the color also changes the shape | Carry the original texture's alpha (.a) through to COLOR. Don't paint the transparent margins |
Assuming UV is always 0 to 1 | It goes out of range with tiling and similar setups. Get in the habit of normalizing with fract() or mod() |
Overusing discard | Handy, but it blocks depth optimization on some GPUs. Consider zeroing the alpha instead |
| Using a shader when GDScript would do | For a uniform color change across the whole object, modulate is simpler and cheaper |
Bonus: Good to Know for Later
Once you can write a basic fragment function, these are the next things that widen your range considerably. There's no need to learn them all right now.
- Pass values from GDScript with
uniform: a variable declared likeuniform float flash_amount;can be controlled from a script withset_shader_parameter("flash_amount", value). The "progress" values in the hit flash and the dissolve both work this way. - Visual Shader (building shaders from nodes): there's also a feature that lets you build shaders visually by connecting nodes instead of writing code. It's handy for getting a feel for how the math flows.
- Full-screen effects: reading the already-rendered screen with
hint_screen_texturelets you build post-processing such as blur, chromatic aberration, and screen transitions. When you want to apply it only to a specific area, combine it with SubViewport. - Layer with particles and light: instead of a shader alone, layering it with particles from GPUParticles2D and light from 2D lighting makes an effect much more convincing.
Summary
- A shader is a small program that runs on the GPU. It decides color per pixel and creates position-dependent effects that
modulatecan't reach - The
fragmentfunction is the star. Output toCOLOR, read the original color withtexture(TEXTURE, UV), handle position withUVand time withTIME - Dynamic effects come from combining
UVandTIME. Masks, scrolling, and dissolves are the standards - Optimization starts with avoiding
ifand replacing it withstep/mix
Start by assigning a ShaderMaterial to a sprite you already have and trying the color inversion from Example 2. Just tweaking the value you assign to COLOR gives you a feel for changing screen colors in real time. Add a hit flash on top and your game's feel improves noticeably.
Further Reading
- White Flash with modulate: a comparison with the simpler, shader-free damage effect
- Smooth Animation with Tween: the foundation for animating
flash_amountanddissolvesmoothly - Effects with GPUParticles2D: combining particle effects with shaders
- Introduction to 2D Lighting: adding depth to effects with light and shadow
- Making Use of SubViewport: turning the screen into a texture for full-screen effects
- Godot Official Docs: Shading language: primary reference for built-in variables and functions