Tested with: Unity 6 (6000.x)
"I want to show a private variable in the Inspector—how do I do that?" "My fields keep piling up and the Inspector has turned into one long, flat list..."
This is where attributes come in. Attributes are C# metadata markers—think of them as "instruction labels you stick onto your code." Just place one above a variable or class declaration in the form [...], and Unity will give it special behavior.
[HideInInspector]
public float strength;

What You'll Learn
- Go-to attributes that make the Inspector cleaner and safer (
SerializeField,Header,Range, etc.)- The exact difference between
HideInInspectorandNonSerialized- What class-level attributes like
RequireComponentandCreateAssetMenudo- How to build a custom attribute with a PropertyDrawer (and the Editor folder rules)
The 7 to Learn First: Making Weapon Data Hard to Break
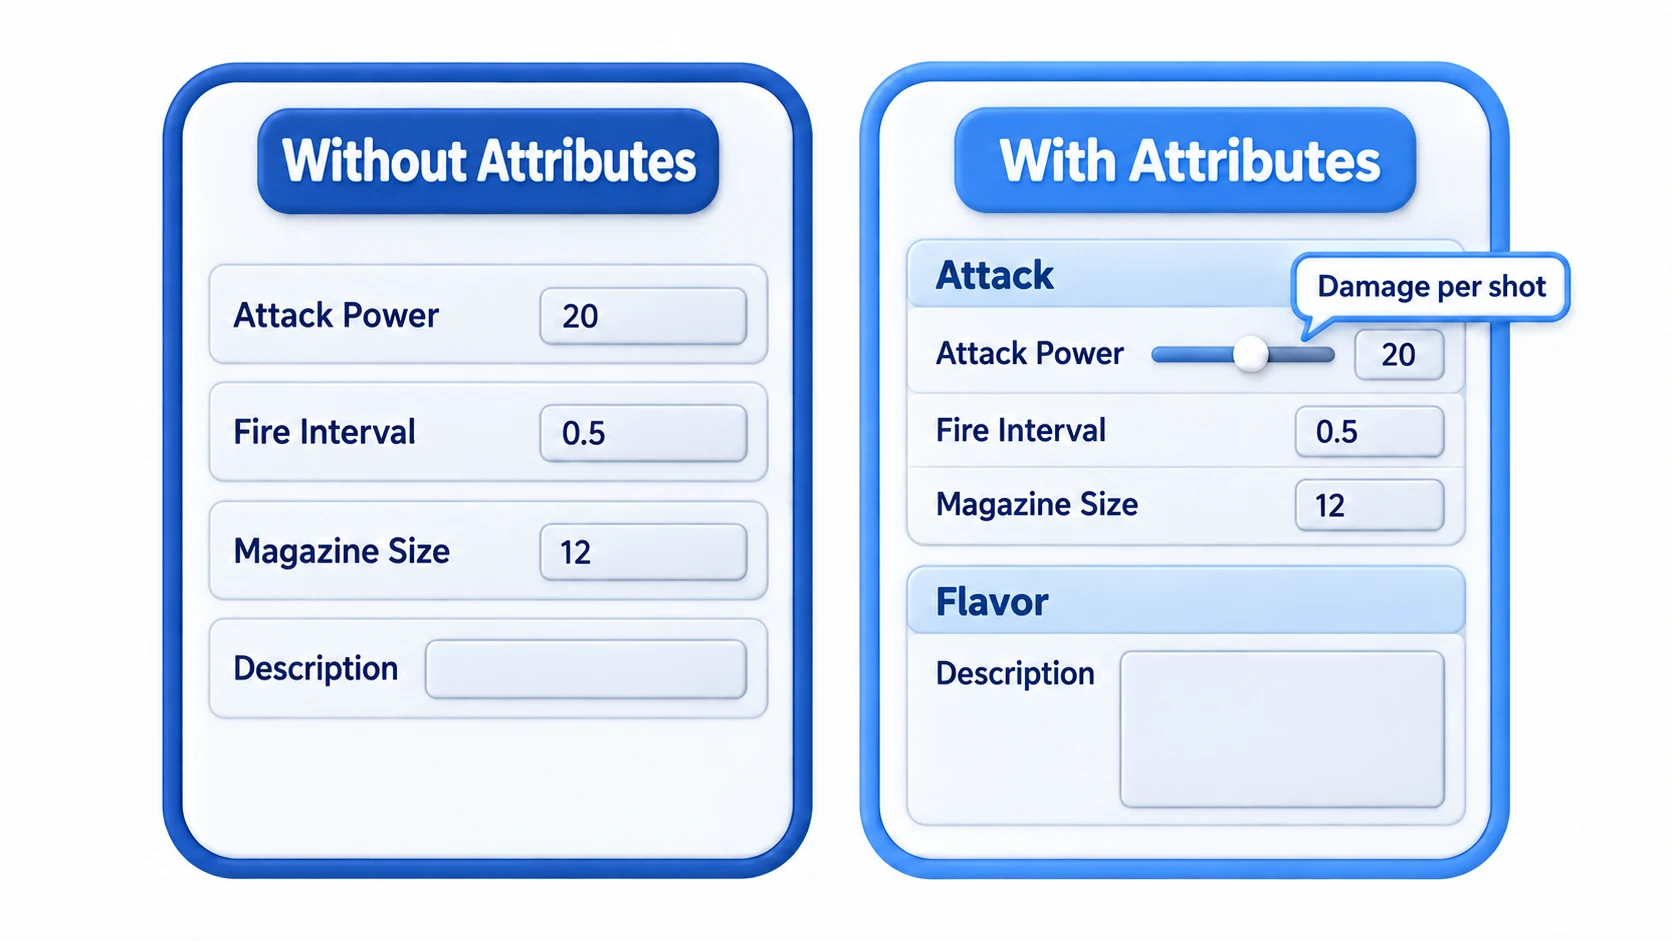
There are a lot of attributes, but you'll use about 7 of them daily. Learn just these and you can build a genuinely practical Inspector. Our subject: weapon parameters — a WeaponConfig with attack power, fire interval, magazine size, and a description, hardened against typos and bad input.
// File name: WeaponConfig.cs — parameters for one weapon
using UnityEngine;

public class WeaponConfig : MonoBehaviour
{
    [Header("Attack Settings")]
    [Tooltip("Damage per shot")]
    [Range(1, 100)]
    [SerializeField] private int attackPower = 20;

    [Tooltip("Seconds between shots. Smaller = faster")]
    [Min(0.05f)]
    [SerializeField] private float fireInterval = 0.5f;

    [Tooltip("Magazine size")]
    [Min(0)]
    [SerializeField] private int magazineSize = 12;

    [Header("Flavor")]
    [TextArea(3, 6)]
    [SerializeField] private string description;

    [ContextMenu("Test Fire")]
    private void TestFire()
    {
        Debug.Log($"{name}: power {attackPower} / every {fireInterval}s / {magazineSize} rounds");
    }
}
Just 30 lines, but all seven attributes are pulling their weight:
| Attribute | Role | Its job on this weapon |
|---|---|---|
[SerializeField] | Show a private variable in the Inspector | Tweakable while encapsulation stays intact |
[Header] | Group fields under a heading | The "Attack Settings" / "Flavor" dividers |
[Tooltip] | Show an explanation on hover | Ends the "seconds or milliseconds?" confusion |
[Range] | Slider + range limit | Makes a typo like attack power 9999 physically impossible |
[Min] | Minimum value limit | Prevents negative ammo and a 0-second fire interval |
[TextArea] | Multi-line text input | Frees the description from a cramped one-line field |
[ContextMenu] | Run a method from the right-click menu | Test-fire from the Inspector without pressing Play |
Compare the Inspector before and after: the flat wall of fields becomes a control panel with headings, sliders, and explanations.
Note (attributes are not an all-purpose shield):
RangeandMinonly restrict input from the Inspector. AssigningattackPower = 9999;from script sails right through (guard the code side withMathf.Clamp), and they can't stop an empty description either. For "forgot to fill this in" checks, the handy tool isOnValidate, which the editor calls whenever a value changes:void OnValidate() { if (string.IsNullOrEmpty(description)) Debug.LogWarning($"{name}: description is empty", this); }
As a final test, hand WeaponConfig's Inspector to an imaginary teammate who's not great with numbers. Values outside the slider can't get in, and an empty description raises a warning — if it has become that kind of hard-to-break control panel, this article's main goal is met. From here on, treat the rest as a reference to pull up when you need it.
Attributes for the Inspector (Reference)
From here on, this is reference material — the full picture of Inspector attributes, including the seven above.
SerializeField: Show Private Variables in the Inspector
[SerializeField]
private float speed = 5.0f;
Designers and planners can tweak the value while your encapsulation stays intact.
Values shown in the Inspector are saved in the scene or Prefab. So if you later change the initial value in code (= 5.0f), objects you've already placed keep their old value. To change them, edit them in the Inspector, or choose Reset from the component's "⋮" menu.
field: SerializeField: Serialize a Property
This is the modern way to expose a C# auto-property in the Inspector.
[field: SerializeField] public float Speed { get; private set; } = 5.0f;
It gives you a concise design: read-only from outside code, editable from the Inspector.
HideInInspector: Hide a Variable from the Inspector
[HideInInspector]
public float currentHealth;
The field is still serialized, so its value is saved.
NonSerialized: Disable Serialization
[System.NonSerialized]
public float tempValue;
| Attribute | Serialized | Shown in Inspector |
|---|---|---|
HideInInspector | Yes | No |
NonSerialized | No | No |
Which to use: Use
NonSerializedfor temporary variables whose values shouldn't be saved, andHideInInspectorwhen you want the value saved but not editable.
Header: Display a Heading
[Header("Movement Settings")]
[SerializeField] private float moveSpeed = 5.0f;
[SerializeField] private float jumpForce = 10.0f;

[Header("Attack Settings")]
[SerializeField] private float attackPower = 20.0f;
Tooltip: Display a Tooltip
[Tooltip("Movement speed (in m/s)")]
[SerializeField] private float moveSpeed = 5.0f;
Range: Display a Slider
[Range(0, 100)]
[SerializeField] private float volume = 50.0f;
Note:
Rangeonly restricts input in the Inspector. If you assign a value directly from a script, out-of-range values can still get through. To enforce the range in code as well, combine it withMathf.Clamp. Also, lowering the upper limit later doesn't fix out-of-range values that are already saved just by displaying them.
Min: Set a Minimum Value
[Min(0)]
[SerializeField] private float health = 100.0f;
Space: Add Spacing
[SerializeField] private float moveSpeed = 5.0f;
[Space(20)]
[SerializeField] private float attackPower = 20.0f;
TextArea: Multi-Line Text Input
[TextArea(3, 10)]
[SerializeField] private string description;
Attributes for Methods
ContextMenu: Add a Method to the Inspector's Context Menu
[ContextMenu("Restore Full Health")]
private void ResetHealth()
{
    currentHealth = maxHealth;
    Debug.Log("Health fully restored");
}
Right-click the component's header (the bar with its name) in the Inspector, or click the "⋮" at its top right, and the menu item appears. It works without entering Play mode.
MenuItem: Add a Method to the Unity Editor Menu
Important: Scripts that use
[MenuItem]must be placed inside an Editor folder. TheUnityEditornamespace is editor-only, so placing the script outside an Editor folder will cause build errors.
// Editor/MyEditorTools.cs
using UnityEditor;
using UnityEngine;

public class MyEditorTools
{
    [MenuItem("Tools/Reset All Objects")]
    private static void ResetAllObjects()
    {
        Debug.Log("All objects have been reset");
    }
}
RuntimeInitializeOnLoadMethod: Initialize on Game Startup
using UnityEngine;

public class GameInitializer
{
    [RuntimeInitializeOnLoadMethod]
    private static void Initialize()
    {
        Debug.Log("Game started");
    }
}
This works even in static classes that don't inherit from MonoBehaviour.
Attributes for Classes
RequireComponent: Specify Required Components

[RequireComponent(typeof(Rigidbody))]
public class PlayerController : MonoBehaviour
{
    private Rigidbody rb;

    void Start()
    {
        rb = GetComponent<Rigidbody>();
    }
}
Attaching PlayerController automatically attaches a Rigidbody as well. On top of that, the Rigidbody can't be removed while PlayerController is attached, so the whole class of "someone removed a required component and now GetComponent returns null" accidents is prevented by design. Note that if you add the attribute later, objects already placed in scenes or Prefabs don't get the component automatically (see the GetComponent article).
DisallowMultipleComponent: Prevent Attaching the Same Component Twice
[DisallowMultipleComponent]
public class GameManager : MonoBehaviour
{
}
ExecuteAlways: Run in Edit Mode Too
[ExecuteAlways]
public class GridGenerator : MonoBehaviour
{
    void Update()
    {
        // Branch between edit mode and play mode
        if (Application.isPlaying)
        {
            // Logic while playing
        }
        else
        {
            // Logic while editing (e.g., visualization in the Scene view)
        }
    }
}
Note: With
[ExecuteAlways],Updateruns every frame even in edit mode. Heavy logic will slow down the editor, so either branch onApplication.isPlayingor keep the work lightweight.
CreateAssetMenu: Add a Creation Menu for ScriptableObjects
[CreateAssetMenu(fileName = "NewWeapon", menuName = "MyGame/Weapon")]
public class WeaponData : ScriptableObject
{
    public string weaponName;
    public int damage;
}
Attributes for Serialization
Serializable: Serialize a Custom Class
To display a custom class (one that isn't a MonoBehaviour or ScriptableObject) in the Inspector, you need [Serializable].
[System.Serializable]
public class EnemyData
{
    public string name;
    public int hp;
    public float speed;
}

public class EnemySpawner : MonoBehaviour
{
    [SerializeField] private EnemyData[] enemies;
}
SerializeReference: Polymorphic Serialization
Lets a base class or interface field hold instances of derived classes.
public interface ISkill
{
    void Execute();
}

[System.Serializable]
public class FireSkill : ISkill
{
    public float damage;
    public void Execute() { /* Fire attack */ }
}

[System.Serializable]
public class IceSkill : ISkill
{
    public float slowDuration;
    public void Execute() { /* Ice attack */ }
}

public class Player : MonoBehaviour
{
    [SerializeReference] private ISkill skill;  // Can hold a FireSkill or IceSkill
}
Note: To pick the concrete type in the Inspector with
SerializeReference, you need a custom editor or an asset like Odin Inspector.
Creating Custom Attributes
Defining a Custom Attribute
To create a custom attribute that affects the Inspector, inherit from PropertyAttribute.
using UnityEngine;

[System.AttributeUsage(System.AttributeTargets.Field)]
public class ReadOnlyAttribute : PropertyAttribute
{
}
Note: You must inherit from
UnityEngine.PropertyAttribute, notSystem.Attribute. If you inherit fromSystem.Attribute, it won't work with PropertyDrawers.
Pairing It with an Editor Extension
The PropertyDrawer must be placed inside an Editor folder.
Assets/
├── Scripts/
│   └── ReadOnlyAttribute.cs    // Attribute definition
└── Editor/
    └── ReadOnlyDrawer.cs       // PropertyDrawer (inside the Editor folder)
// Editor/ReadOnlyDrawer.cs
using UnityEditor;
using UnityEngine;

[CustomPropertyDrawer(typeof(ReadOnlyAttribute))]
public class ReadOnlyDrawer : PropertyDrawer
{
    public override void OnGUI(Rect position, SerializedProperty property, GUIContent label)
    {
        GUI.enabled = false;
        EditorGUI.PropertyField(position, property, label);
        GUI.enabled = true;
    }
}
Important: Placing a PropertyDrawer outside an Editor folder causes build errors. The
UnityEditornamespace is editor-only and cannot be included in builds.
Practical Example
using UnityEngine;

[RequireComponent(typeof(Rigidbody))]
[RequireComponent(typeof(CapsuleCollider))]
public class PlayerController : MonoBehaviour
{
    [Header("Movement Settings")]
    [Tooltip("Movement speed (in m/s)")]
    [SerializeField] private float moveSpeed = 5.0f;

    [Tooltip("Jump force")]
    [SerializeField] private float jumpForce = 10.0f;

    [Space(20)]

    [Header("Attack Settings")]
    [Range(10, 100)]
    [SerializeField] private float attackPower = 20.0f;

    [Min(0)]
    [SerializeField] private float attackRange = 2.0f;

    [Space(20)]

    [Header("Status")]
    [HideInInspector]
    public float currentHealth;

    [SerializeField] private float maxHealth = 100.0f;

    [ContextMenu("Restore Full Health")]
    private void ResetHealth()
    {
        currentHealth = maxHealth;
    }
}
Best Practices
- Combine SerializeField with private - Tweak values in the Inspector while keeping encapsulation
- Use Header and Space for readability - Group variables to keep the Inspector organized
- Add descriptions with Tooltip - Makes fields easier for teammates to understand
- Set sensible limits with Range and Min - Prevents invalid values from being entered
- Declare dependencies with RequireComponent - Makes required components explicit
Bonus: Good to Know for Later
Once you're comfortable with attributes, these are the next things worth knowing.
-
[FormerlySerializedAs]— stop losing values when you rename a variable: If you rename a serialized variable, the values set in the Inspector disappear because they're tied to the old name. Add[FormerlySerializedAs("oldName")]when renaming, and the old data carries over to the new name (requiresusing UnityEngine.Serialization;). This is essential knowledge for renaming in team projects. To see it happen, enter a value that differs from the initial value (like47) in the Inspector, then rename the variable: the value falls back to the initial one.using UnityEngine.Serialization; // Carry over the value saved under the old name "speed" to "moveSpeed" [FormerlySerializedAs("speed")] [SerializeField] private float moveSpeed = 5.0f; -
[DefaultExecutionOrder]— pin down script execution order: Adding[DefaultExecutionOrder(-100)]to a class lets you specify the Script Execution Order setting in code. Handy when manager classes need to initialize first (for execution-order issues, see pitfall 2 in the Singleton article). -
Editor extensions beyond PropertyDrawer: When custom attributes aren't enough, the next step is CustomEditor, which lets you rebuild the entire Inspector. Take that step with the intro to editor extensions. An example that lets you grab and move a patrol route in the Scene view is in Unity Custom Inspectors.
Summary
Attributes are C# metadata markers that give your code special behavior.
- SerializeField - Show private variables in the Inspector
- Header, Space - Improve Inspector readability
- Range, Min - Constrain value ranges
- RequireComponent - Auto-attach required components
- ContextMenu - Run methods from the editor
Put attributes to work, and your code will become more readable and easier to maintain.
Further Reading