"What is the player looking at right now?" "What's under the mouse cursor?" "Is the character standing on the ground?" — game development constantly demands answers to these kinds of "questions about space."
The tool that answers them is Physics.Raycast, provided by Unity's physics engine. It shoots an invisible ray from a point in the game world toward a given direction, and tells you whether that ray hit an object with a Collider — and if it did, what it hit, where, and at what distance.
In this article, we'll cover the basics of Physics.Raycast, the two classic recipes — click selection and ground checks — and how to use layer masks, the single biggest stumbling block for beginners, all with practical C# code.
What You'll Learn
- The core concepts of a Ray (origin + direction) and
RaycastHit(hit information)- The simplest way to write a Raycast, plus visualization with
Debug.DrawRay- Two classic recipes: selecting objects with a mouse click and ground checks
- How to specify layer masks — the root of most confusion — and the inversion idiom
- A complete shooting example: enemy, wall, or empty air, all branched from one Ray
- Raycast Fundamentals: Rays and Hit Information
- The Simplest Raycast Implementation
- Classic Recipe 1: Selecting Objects with a Mouse Click
- Classic Recipe 2: Ground Checks
- Where Beginners Stumble: Using Layer Masks
- How to Ignore Specific Layers
- Hands-On: One Ray, Three Outcomes — Enemy, Wall, or Miss
- Bonus: Good to Know for Later
- Summary
Raycast Fundamentals: Rays and Hit Information
Physics.Raycast does exactly what the name says: it casts a ray and checks whether that ray intersects any object with a Collider. There are only two players involved.
What Is a Ray?
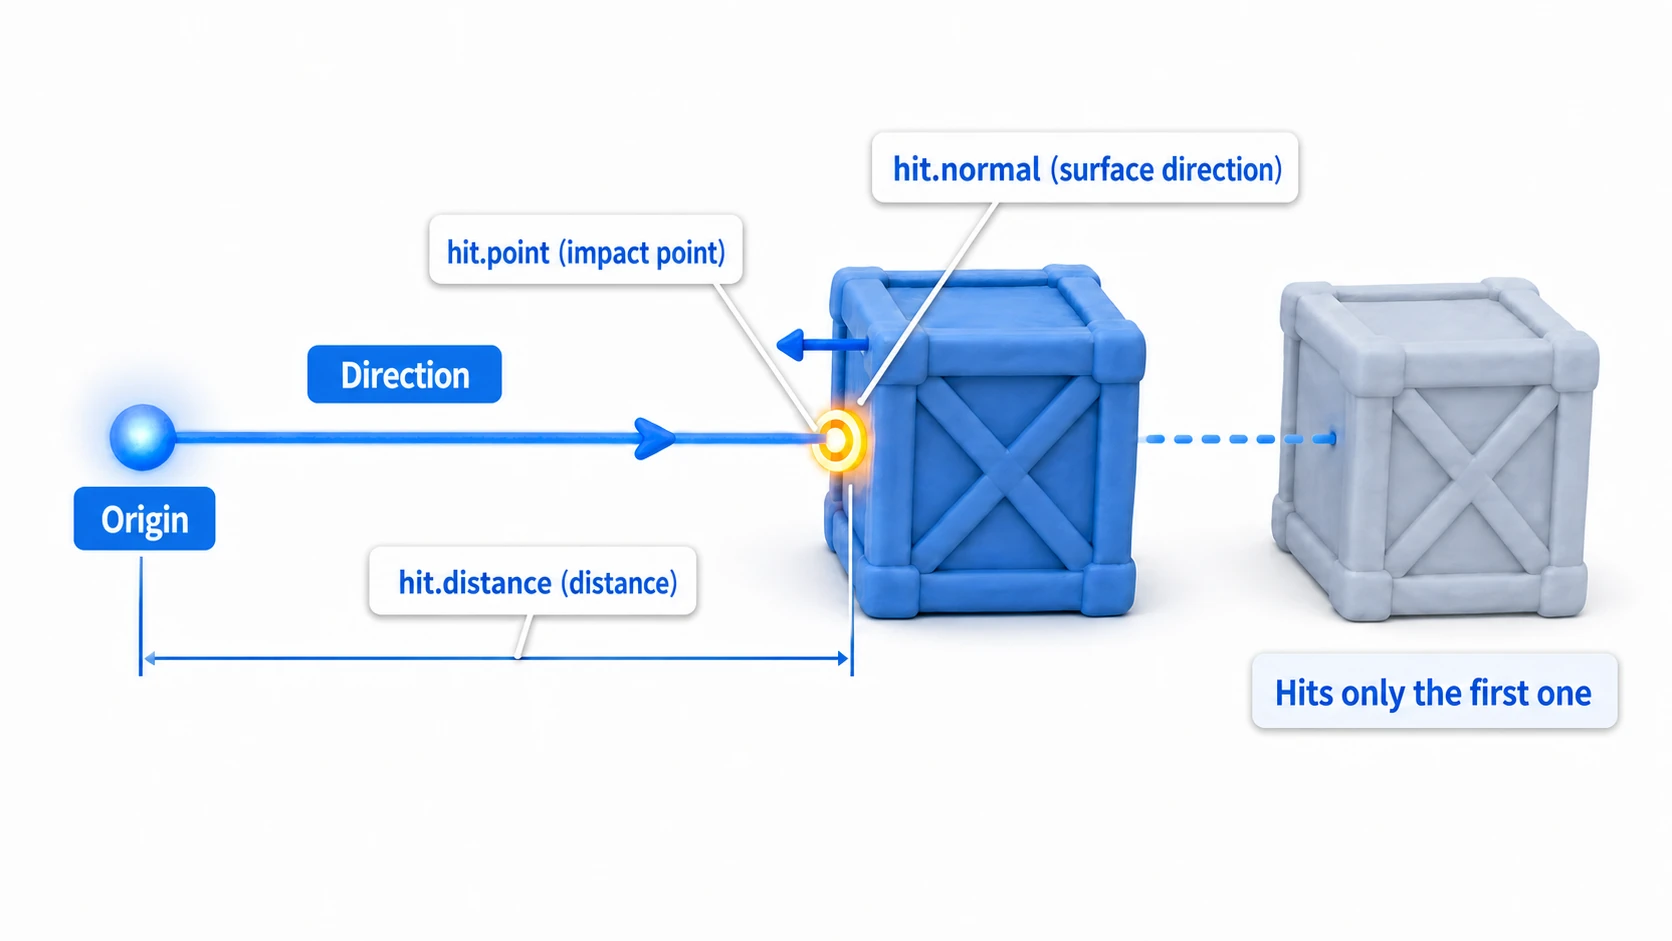
A Ray is defined by two things: an origin and a direction. "From the camera's position, facing forward" or "from the character's feet, straight down" — decide where from and which way, and you have a Ray.
What Is RaycastHit?
When a Ray hits an object, the details are stored in a struct called RaycastHit. These are the fields you'll use most:
hit.collider: the Collider that was hit (from here you can access itsgameObjectand other components)hit.point: the world position of the hit (e.g., where to spawn an impact effect)hit.normal: the normal vector of the surface that was hit (e.g., orienting a bullet hole to the surface)hit.distance: the distance from the origin to the hit point
The Simplest Raycast Implementation
The most basic usage is to shoot a Ray forward from the center of the camera and check whether it hits anything. This is exactly the FPS pattern of "find out what the crosshair is pointing at."
using UnityEngine;

public class SimpleRaycaster : MonoBehaviour
{
    void Update()
    {
        // Origin: the main camera's position
        Vector3 origin = Camera.main.transform.position;
        // Direction: the main camera's forward
        Vector3 direction = Camera.main.transform.forward;
        // Max distance: 100 meters
        float maxDistance = 100f;

        // Perform the Raycast and check whether it hit anything
        if (Physics.Raycast(origin, direction, out RaycastHit hit, maxDistance))
        {
            Debug.Log("Hit an object: " + hit.collider.gameObject.name);
        }

        // Draw the ray's path in the Scene view (for debugging)
        Debug.DrawRay(origin, direction * maxDistance, Color.red);
    }
}
Physics.Raycast returns a boolean. true means there was a hit, and the hit details are written into the variable you passed via out hit.
Tip: When debugging a "my Raycast never hits" bug, the fastest route is to make the ray visible with
Debug.DrawRay. Causes like a reversed direction, insufficient length, or a ray starting from the wrong place become obvious at a glance. For editor visualization in general, see the Gizmos guide.
Classic Recipe 1: Selecting Objects with a Mouse Click
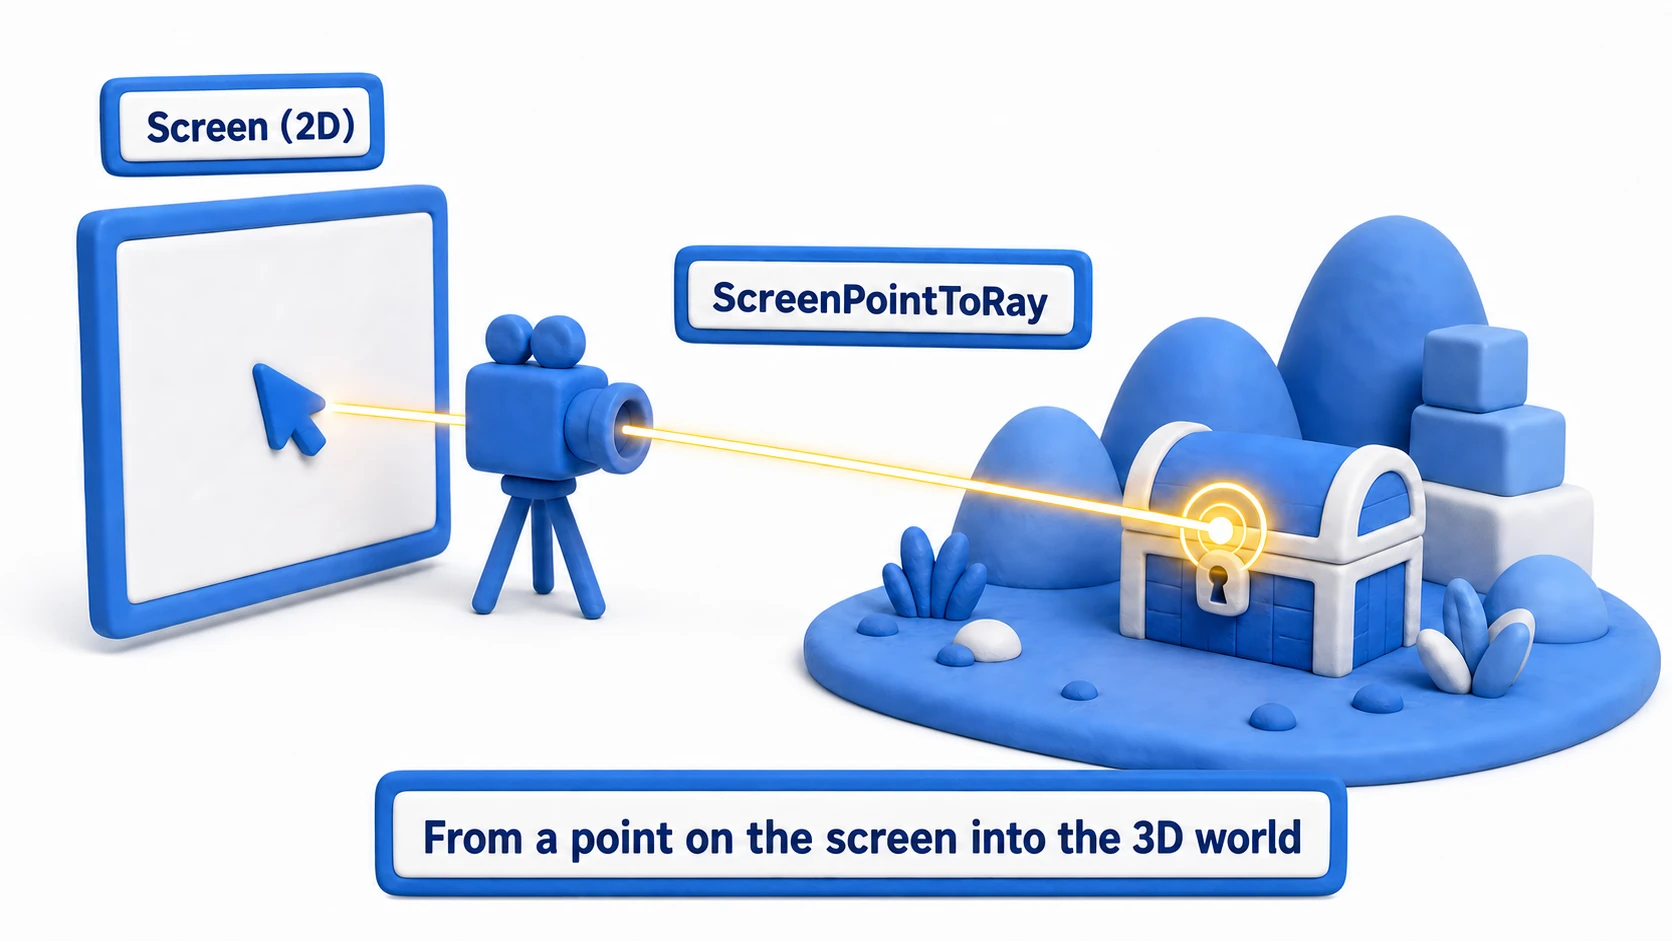
The most common real-world use of Raycast is "get the object I clicked on." The key is to create a Ray from the mouse's screen position into 3D space using ScreenPointToRay. The screen is 2D and the world is 3D, so think of it as converting "this point on the screen" into "a line extending into the depths behind it."
using UnityEngine;

public class ClickSelector : MonoBehaviour
{
    void Update()
    {
        // Only check on the frame the left button is pressed
        if (Input.GetMouseButtonDown(0))
        {
            // Create a Ray from the mouse's screen position into 3D space
            Ray ray = Camera.main.ScreenPointToRay(Input.mousePosition);

            if (Physics.Raycast(ray, out RaycastHit hit, 100f))
            {
                Debug.Log("Clicked object: " + hit.collider.gameObject.name);
                // Spawn an effect at hit.point, mark it as selected, etc.
            }
        }
    }
}
Selecting units in an RTS, picking up puzzle pieces, pressing buttons in a 3D scene — the applications are endless. For the fundamentals of mouse input, see the input handling article.
Classic Recipe 2: Ground Checks
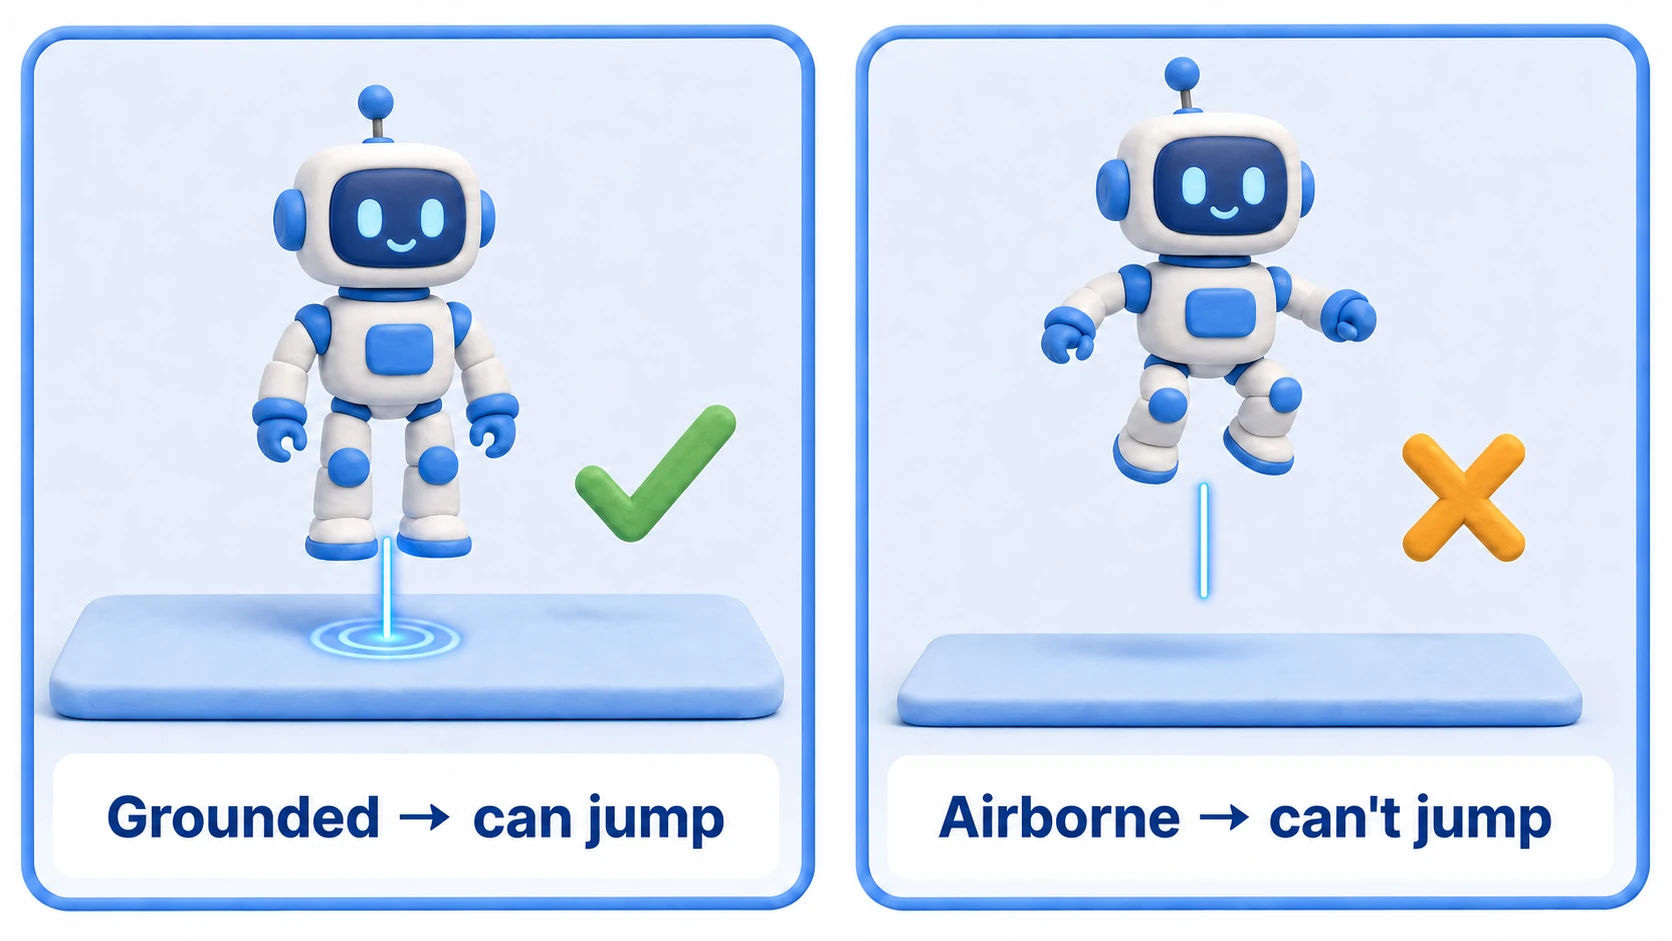
The ground check — "you can only jump while on the ground" — is another Raycast classic. Shoot a short Ray straight down from the character's feet and check whether it hits the ground layer.
using UnityEngine;

public class GroundChecker : MonoBehaviour
{
    [SerializeField] private LayerMask groundLayer;  // Only target the ground layer
    [SerializeField] private float checkDistance = 0.2f;

    public bool IsGrounded()
    {
        // Shoot a short Ray straight down from slightly above the feet
        Vector3 origin = transform.position + Vector3.up * 0.1f;
        return Physics.Raycast(origin, Vector3.down, checkDistance + 0.1f, groundLayer);
    }

    void Update()
    {
        if (IsGrounded() && Input.GetKeyDown(KeyCode.Space))
        {
            Debug.Log("Jump!");
        }
    }
}
The key detail here is that we specify groundLayer. Without it, the Ray hits the character's own Collider and reports "always grounded" — which brings us to the star of the next section: layer masks.
Where Beginners Stumble: Using Layer Masks
When working with Raycast, the concept that confuses beginners most is the layer mask (LayerMask).
The Problem: Hitting Unintended Objects
By default, Physics.Raycast targets every Collider in the scene. The player itself, invisible triggers, visual effects — when the Ray hits things you never meant to target, you get unintended behavior like "my bullets hit myself" or "the ground check is always true."
The Solution: Filter Targets with a LayerMask
Physics.Raycast accepts an optional layerMask argument. Think of it as attaching a filter to the Ray that says "only hit things on these layers."
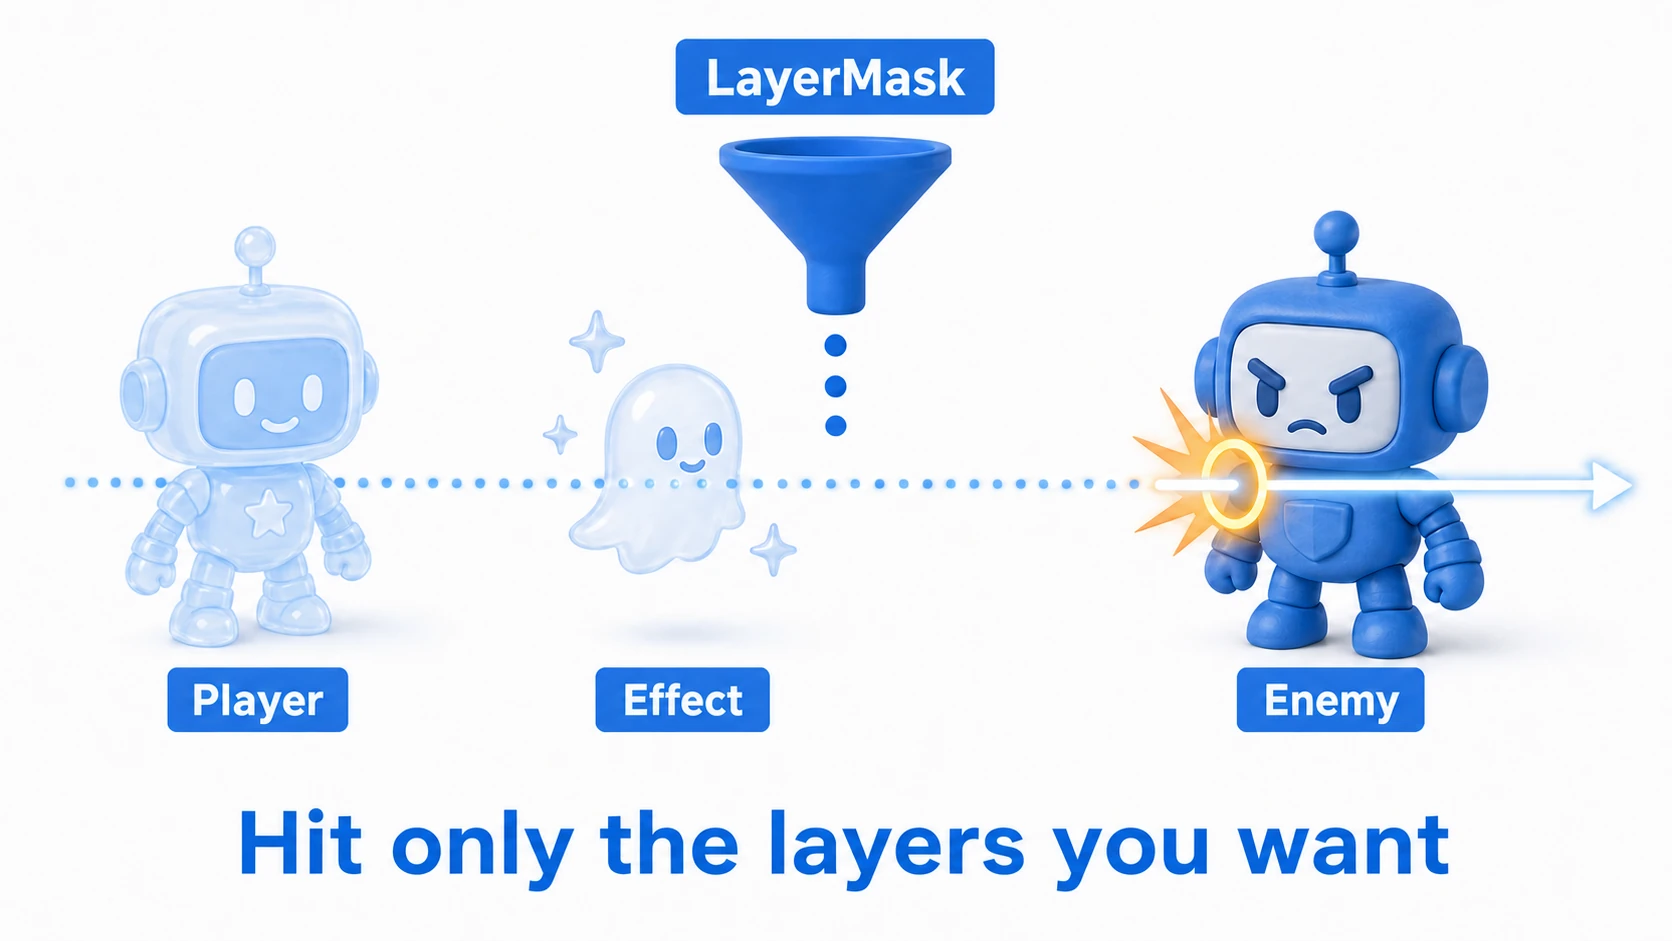
using UnityEngine;

public class LayerMaskRaycaster : MonoBehaviour
{
    // Defined with SerializeField so it can be set from the Inspector
    [SerializeField]
    private LayerMask targetLayer;

    void Update()
    {
        Vector3 origin = Camera.main.transform.position;
        Vector3 direction = Camera.main.transform.forward;
        float maxDistance = 100f;

        // Pass the LayerMask as the final argument
        if (Physics.Raycast(origin, direction, out RaycastHit hit, maxDistance, targetLayer))
        {
            Debug.Log("Hit an object on the target layer: " + hit.collider.gameObject.name);
        }
    }
}
If you declare a LayerMask variable with [SerializeField], choosing the target layers is just a dropdown in the Inspector. Since this keeps layer names out of your code, make this your default approach (the layer system itself is covered in the layers and tags article).
Practical Examples by Genre: Layer Design in Real Games
Here's how layer masks work in actual games. Try mapping these onto your own genre.
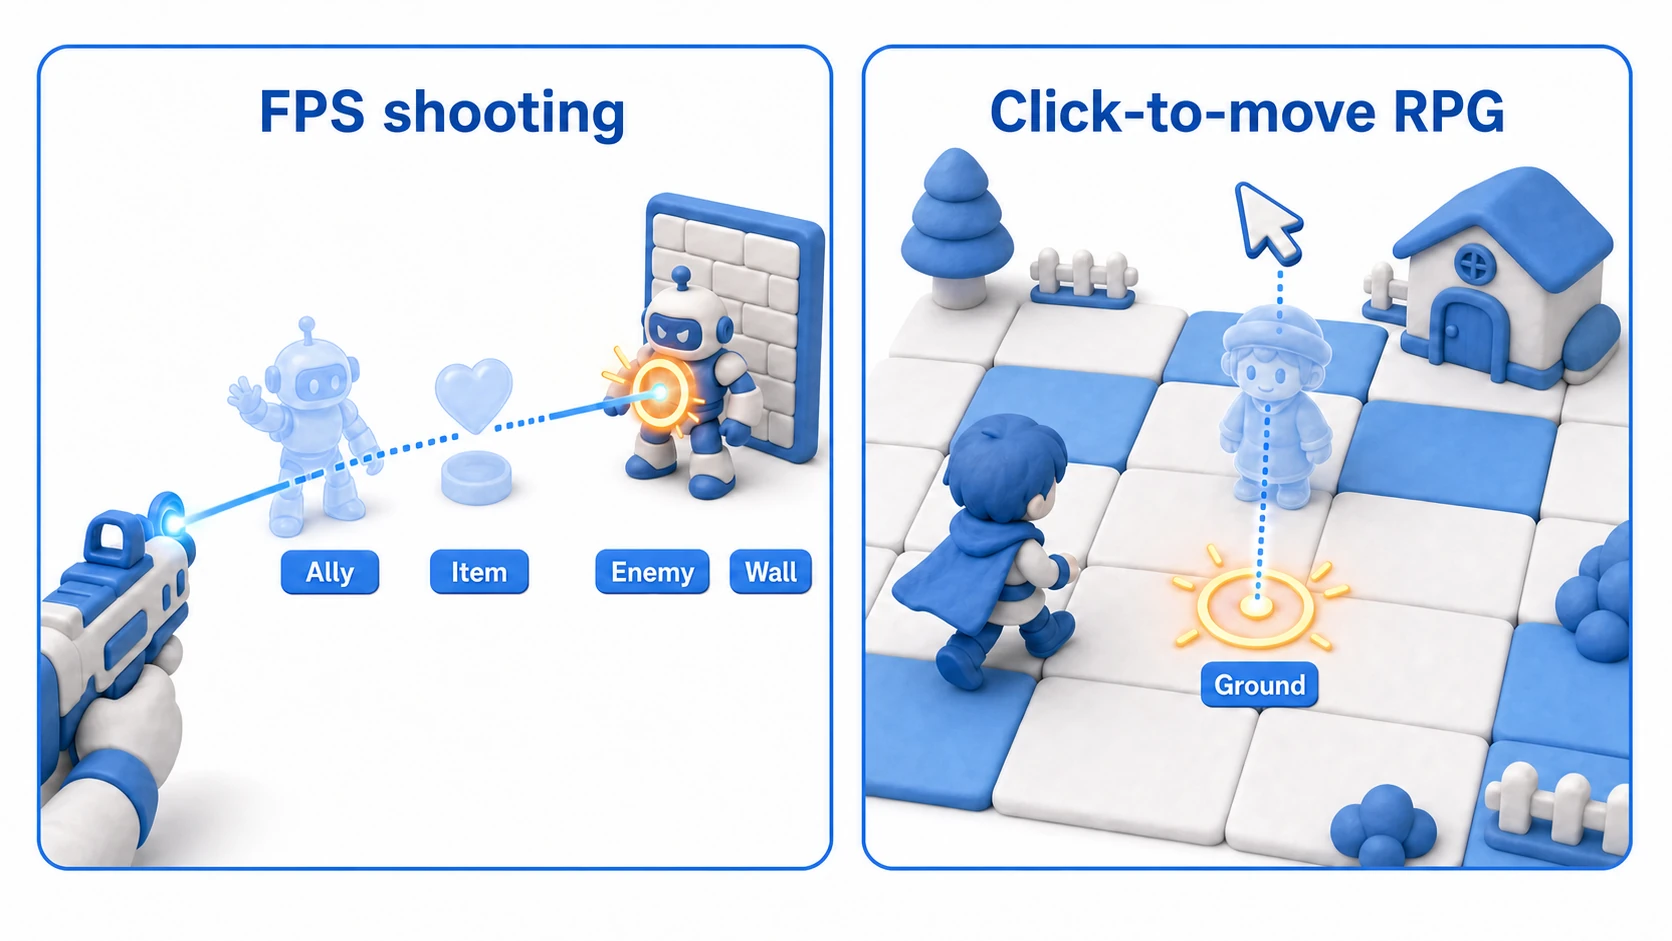
- FPS/TPS shooting: The bullet's Ray should only hit
EnemyandWall. If allies, healing items, and decorative particles in the line of fire aren't passed through, you end up with a game where "bullets get absorbed by invisible somethings" - Click-to-move (RPG/RTS): Destination picking should only hit the
Groundlayer. Even if the player clicks on top of an enemy or NPC, the Ray passes straight through the character and hits the ground at their feet, giving you the correct destination - Enemy AI line-of-sight (stealth games): Shoot a Ray from the enemy toward the player, including the
Walllayer in the check. If the Ray hits a wall first, the player is "hidden by an obstacle"; if it reaches the player, they're "spotted" — this is the very definition of staying hidden
What all these examples share is that the game's rules decide what the Ray should hit. If you think of layer design as designing the rules of your hit detection, the choices become much less confusing.
How to Ignore Specific Layers
Sometimes you want the opposite: to target everything except a specific layer (e.g., the player itself or invisible walls). In that case, use bitwise operators to invert the layer mask.
For example, to ignore the "Ignore Raycast" layer, use the following code.
using UnityEngine;

public class IgnoreLayerRaycaster : MonoBehaviour
{
    void Update()
    {
        // Get the number of the layer to ignore
        int ignoreLayer = LayerMask.NameToLayer("Ignore Raycast");

        // "Set only that layer's bit, then invert the whole thing" = everything else
        int layerMask = ~(1 << ignoreLayer);

        Vector3 origin = transform.position;
        Vector3 direction = transform.forward;
        float maxDistance = 10f;

        // Apply the inverted LayerMask
        if (Physics.Raycast(origin, direction, out RaycastHit hit, maxDistance, layerMask))
        {
            Debug.DrawRay(origin, direction * hit.distance, Color.green);
            Debug.Log("Hit an object outside the ignored layer: " + hit.collider.gameObject.name);
        }
        else
        {
            Debug.DrawRay(origin, direction * maxDistance, Color.white);
        }
    }
}
The ~(1 << ignoreLayer) expression is an extremely common idiom when working with LayerMasks in Unity, so it's well worth memorizing.
Hands-On: One Ray, Three Outcomes — Enemy, Wall, or Miss
To finish, let's assemble the pieces — the contents of RaycastHit, layer masks, visualization — into a single shot. An FPS or TPS gun, a soulslike's ranged attack, a sci-fi laser pointer: under the hood, they're all this shape. The goal: hit an enemy and its HP drops with a spark; hit a wall and a bullet hole appears; hit nothing and nothing happens — all branched from one Ray.
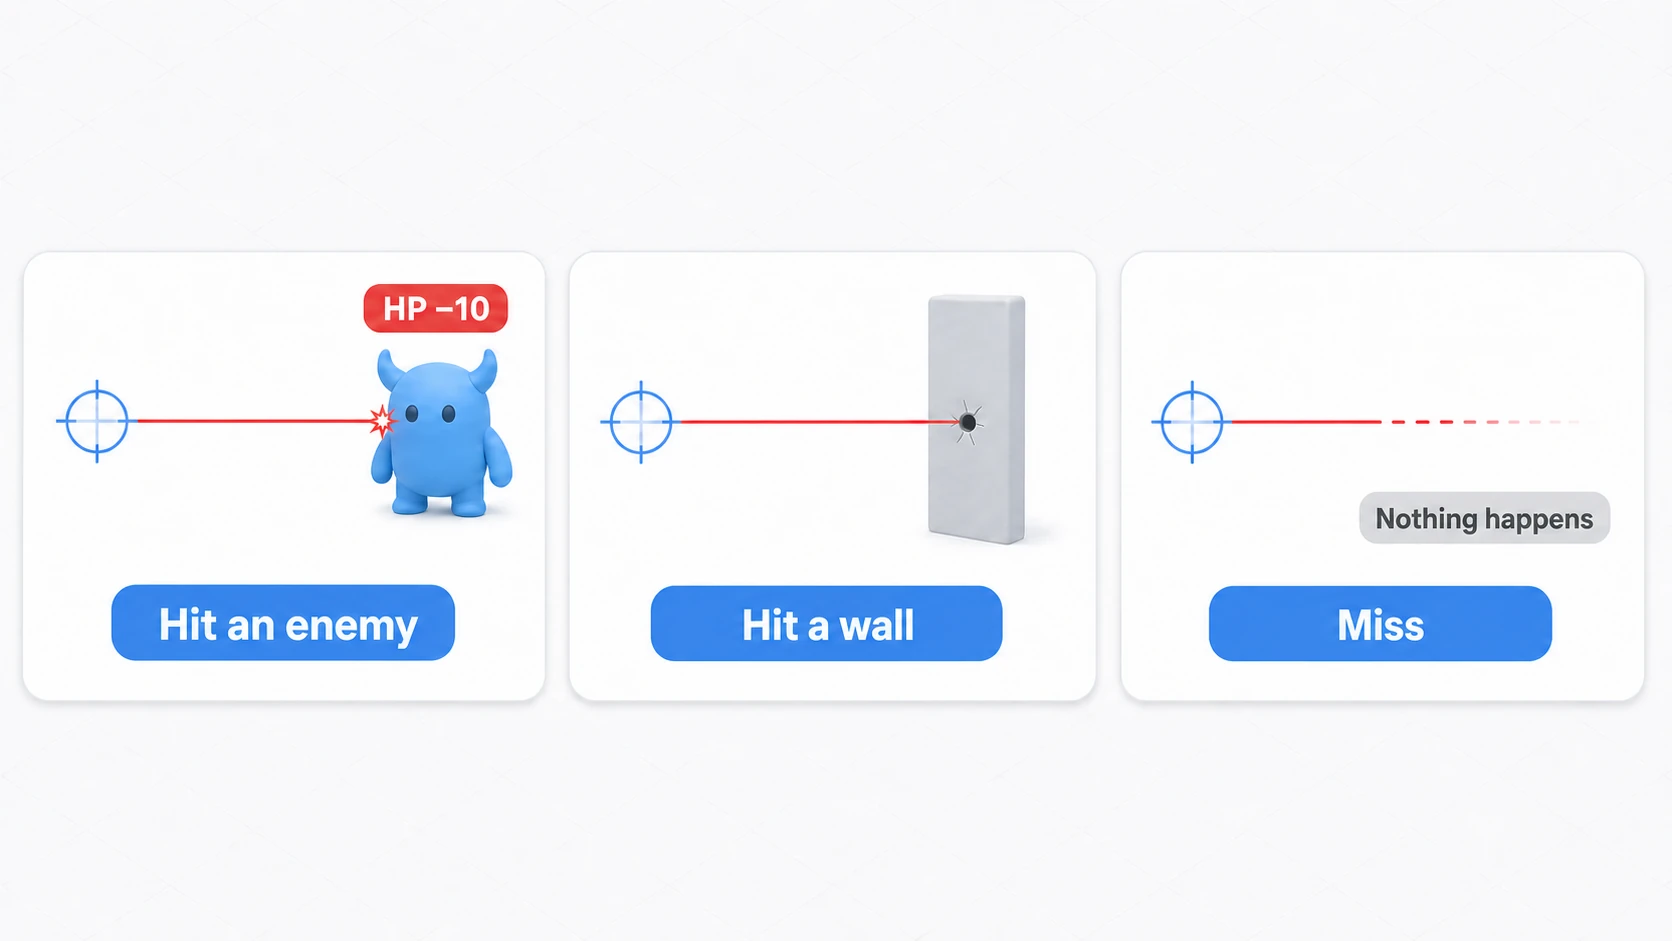
using UnityEngine;

public class HitscanShooter : MonoBehaviour
{
    [SerializeField] private LayerMask hitLayers;        // Only Enemy and Wall go in here
    [SerializeField] private GameObject enemyHitEffect;  // Sparks, hit markers, etc.
    [SerializeField] private GameObject wallHitEffect;   // Bullet holes, dust, etc.
    [SerializeField] private float range = 50f;
    [SerializeField] private int damage = 10;

    void Update()
    {
        if (Input.GetMouseButtonDown(0)) Shoot();
    }

    void Shoot()
    {
        // One ray, straight ahead from the center of the screen (the crosshair)
        Ray ray = new Ray(Camera.main.transform.position, Camera.main.transform.forward);

        // Miss: if we hit nothing, do nothing and return
        if (!Physics.Raycast(ray, out RaycastHit hit, range, hitLayers,
                QueryTriggerInteraction.Ignore))
        {
            return;
        }

        if (hit.collider.TryGetComponent(out EnemyHealth enemy))
        {
            // Enemy: reduce HP and spawn the enemy-hit effect
            enemy.TakeDamage(damage);
            Instantiate(enemyHitEffect, hit.point, Quaternion.LookRotation(hit.normal));
        }
        else
        {
            // Wall: place the bullet hole aligned to the surface
            Instantiate(wallHitEffect, hit.point, Quaternion.LookRotation(hit.normal));
        }
    }
}
Three things worth noticing:
- One
TryGetComponentdoes the branching: if the thing we hit has anEnemyHealth, it's an enemy; otherwise it's a wall. Deciding "enemy or wall" by component presence instead of tag-string comparison means nothing needs rewriting when new enemy types arrive hit.normalfinally pays off: the surface normal introduced at the start shines here.Quaternion.LookRotation(hit.normal)makes the bullet hole sit flush against the surface, even on slanted wallsQueryTriggerInteraction.Ignore: bullets pass straight through invisible triggers like healing zones. Remove it, and you've built the classic "my bullets get swallowed by something invisible" mystery bug
Break It on Purpose, Then Fix It
This shooter doubles as a lab for Raycast's classic accidents.
- Remove
EnemyfromhitLayers: bullets pass through enemies and only leave holes in the wall behind them. When something "won't get hit," the prime suspect is always the layer mask - Move the origin from the camera to the gun muzzle: the muzzle sits right next to (or inside) the player's own collider, so depending on your mask, you shoot yourself. This is exactly why FPS games split it in two: aim from the camera center, draw the effects from the muzzle
- Shrink
rangeto 5f: distant enemies stop taking hits. Add one line —Debug.DrawRay(ray.origin, ray.direction * range, Color.red, 0.5f)— and "the ray was too short" becomes obvious at a glance
Press Play: shoot an enemy and its HP drops with a spark, shoot a wall and a hole appears flush with the surface, shoot the sky and nothing happens. When one Ray splits cleanly into those three outcomes, you're done — and this same branching shape carries straight over to line-of-sight checks and item inspection.
Bonus: Good to Know for Later
Once you're comfortable with Raycast, its siblings start coming into view.
- Want every hit? Use
RaycastAll:Physics.Raycastonly hits the first thing. For piercing bullets or "how many enemies are behind that wall," usePhysics.RaycastAll, which returns every hit along the ray as an array. - Need thickness? Use
SphereCast: a Ray is a zero-width line, so it slips through narrow gaps. Switching toPhysics.SphereCast— imagine rolling a sphere forward — gives you ground checks and hit detection that account for the character's width. - Don't want to hit triggers?: Pass
QueryTriggerInteraction.Ignoreas an argument to skip Colliders markedIs Trigger(the default follows the "Queries Hit Triggers" project setting). - In 2D games, use
Physics2D.Raycast: 2D Colliders need the dedicated 2D API. Its shape differs too — it returns aRaycastHit2Ddirectly — so check the Rigidbody2D and Collider2D article alongside this one.
Summary
Physics.Raycast is a foundational technique for implementing interaction in Unity.
- Raycast is hit detection via a "ray": shoot a Ray with an origin and direction, and check for collisions with Colliders.
- Hit details are stored in
RaycastHit: you get the target (collider), position (point), surface normal (normal), and distance (distance). - Click selection uses
ScreenPointToRay: the standard pattern for converting the mouse's screen position into a Ray in 3D space. - Ground checks are "a short Ray straight down from the feet" plus a ground layer mask.
- Narrow the targets with a LayerMask: without one, the Ray hits the character itself. To exclude a layer, use the bit-inversion idiom
~(1 << layer). - Visualize with
Debug.DrawRay: for "it never hits" bugs, looking at the Ray with your own eyes is the fastest fix. - Branch with
TryGetComponent: split the outcome by whether the hit object carries a component, and place effects usinghit.pointandhit.normal.
With these concepts and code examples in hand, the precision of your object interaction and line-of-sight checks should improve dramatically.