You move your character and it sinks into a wall. You speed up a bullet and it passes right through. You rewrite your movement code and everything starts jittering—most physics trouble happens when you mix transform with physics without knowing how the physics engine expects to work.
At the center of it all is Rigidbody. It's the component that places a GameObject under the control of Unity's physics engine (NVIDIA PhysX) and makes it behave as an object that obeys the laws of physics. In this article, we'll cover what Rigidbody does, how to choose between it and transform, and how to move objects with forces and velocity.

What You'll Learn
- What happens when you add a
Rigidbody(gravity, forces, collisions, damping)- The critical difference between moving via
transformand viaRigidbody- When to use
AddForcevslinearVelocity, plus the 4ForceModeoptions- Practical uses for key properties like
Is KinematicandConstraints- API renames in Unity 6 (
velocity→linearVelocity, etc.)
Tested with: Unity 6 (6000.x)
What Rigidbody Does
When you add a Rigidbody component to a GameObject, the object is treated as a body with mass and starts responding to physics in the following ways.
- Gravity: With
Use Gravityenabled, the object is automatically pulled downward (negative Y by default) and falls. - Forces and torque: Apply a force from script with
AddForceto accelerate it, or apply torque (rotational force) withAddTorqueto spin it. - Collisions: It collides with other objects that have a
RigidbodyorCollider, producing realistic bounces and pushes based on mass and velocity. - Damping:
Linear Damping(movement decay) andAngular Damping(rotation decay) let you control how quickly motion dies down.
Note (renamed in Unity 6): These two used to be called
DragandAngular Drag. In Unity 6 (6000.0 and later), both the Inspector labels and API names changed toLinear Damping(linearDamping) andAngular Damping(angularDamping). For other renames, see the Unity 6 API migration guide.
transform vs Rigidbody: How to Move Objects
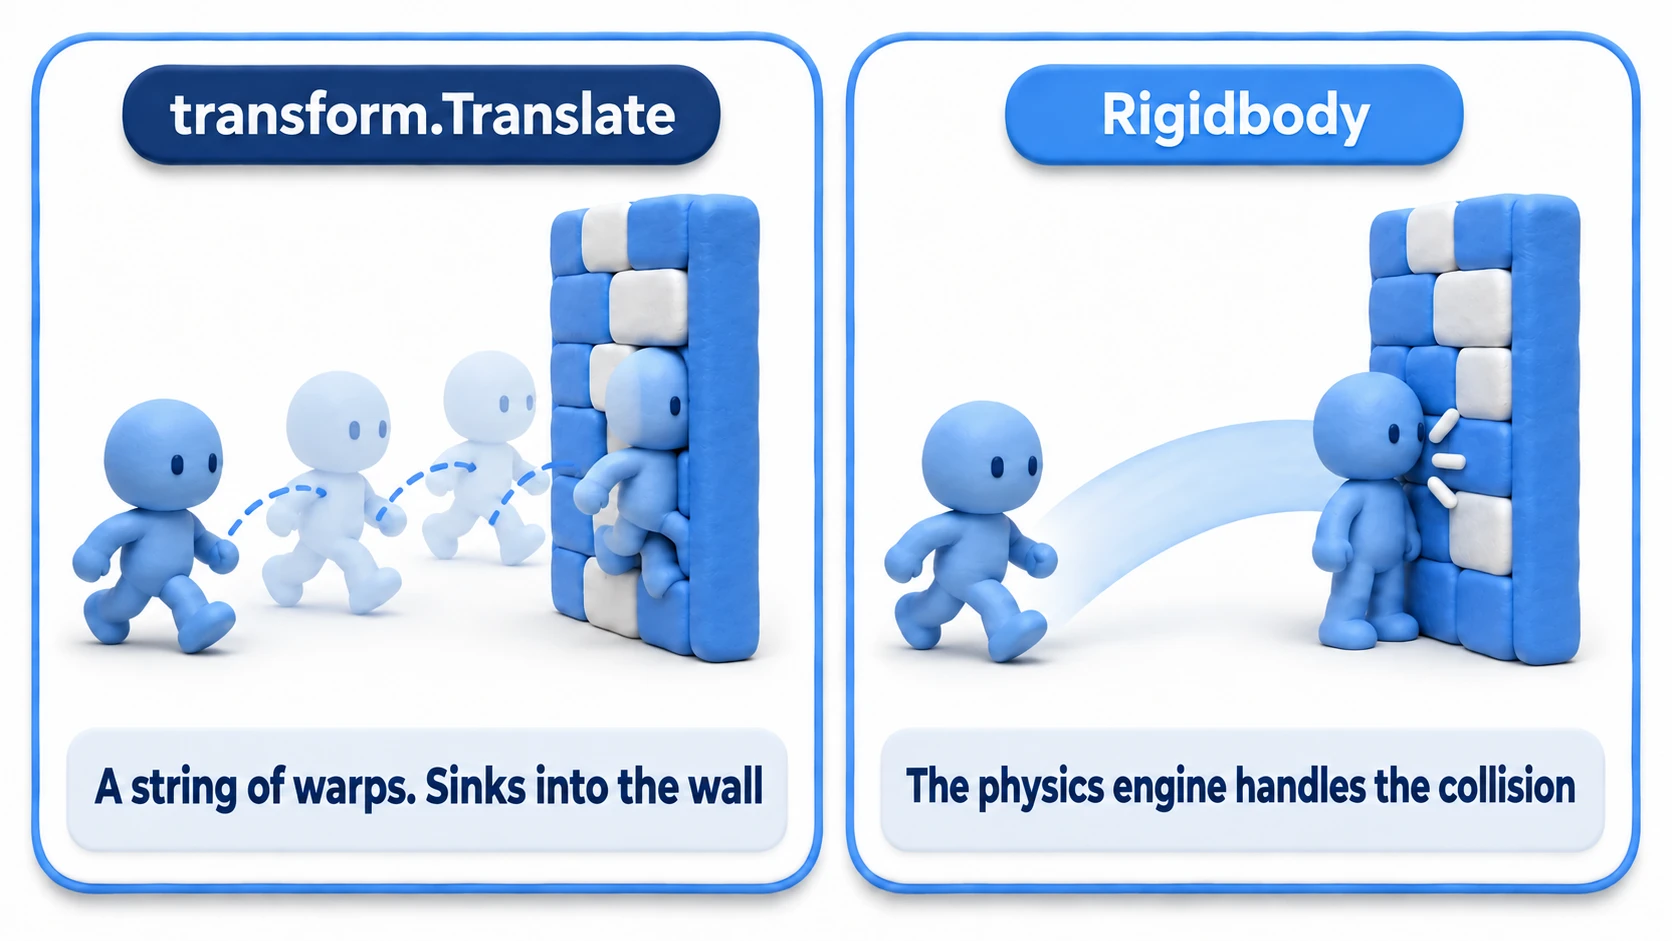
The thing beginners find most confusing is the difference between moving objects with transform.Translate() and moving them via Rigidbody. In a nutshell, it's the difference between "teleporting" and "physically moving".
-
transform.Translate(): This essentially "teleports" the object from its current position by the specified amount. It completely ignores physics, so the object can sink into walls or pass through other objects. It's suited to simple movement that doesn't need physical interaction, or objects you want to keep outside the physics engine's control (e.g., moving a camera). -
Moving via
Rigidbody: You move the object by applying forces or setting its velocity directly. All movement is computed and managed by the physics engine, so realistic collisions and interactions happen with other objects. Any object that should behave physically must be moved via itsRigidbody.
Warning: Directly manipulating the
transformof an object that has aRigidbodyconflicts with the physics engine's calculations and causes unexpected behavior like teleporting and unnatural collisions. Most of the "sinking" and "jittering" mentioned at the start comes from mixing the two. Keep them separate.
Moving Objects with Rigidbody
To work with a Rigidbody, first grab a reference with GetComponent<Rigidbody>(), then do your physics work inside FixedUpdate(). The physics engine runs on its own fixed rhythm, separate from rendering (Update), so physics operations need to follow that rhythm. Input reading is the exception—read it in Update() and use the stored value in FixedUpdate() (reading input in FixedUpdate can miss presses; see the Update vs FixedUpdate article for details).
1. Applying Force with AddForce()
AddForce() is the most common way to accelerate an object by continuously applying force. It's close to a real-world "push," producing realistic movement with inertia.
using UnityEngine;

[RequireComponent(typeof(Rigidbody))]
public class PlayerController : MonoBehaviour
{
    public float moveForce = 10f;
    private Rigidbody rb;
    private Vector3 moveInput;

    void Start()
    {
        rb = GetComponent<Rigidbody>();
    }

    void Update()
    {
        // Read input in Update and store it in a variable
        float moveHorizontal = Input.GetAxis("Horizontal");
        float moveVertical = Input.GetAxis("Vertical");

        // Clamp the vector's length to 1 so diagonal input isn't faster
        moveInput = Vector3.ClampMagnitude(
            new Vector3(moveHorizontal, 0.0f, moveVertical), 1f);
    }

    void FixedUpdate()
    {
        // Use the stored input, applying force on the physics rhythm
        rb.AddForce(moveInput * moveForce);
    }
}
Two small but important details are baked in here. First, the "read input in Update, use it in FixedUpdate" split—the standard shape for physics movement. Second, Vector3.ClampMagnitude: diagonal input produces a vector like (1, 0, 1) with a length of about 1.4, so using it raw creates the classic bug where diagonal movement is 1.4× faster. Clamping the length to 1 keeps every direction at the same speed. Note that Input.GetAxis belongs to the old Input Manager. If it throws in a new Unity 6 project, set Active Input Handling under Project Settings > Player to Both (this restarts the editor).
AddForce takes an optional ForceMode argument that specifies how the force is applied. There are 4 modes, combining "continuous vs instant" × "mass-dependent vs mass-independent".
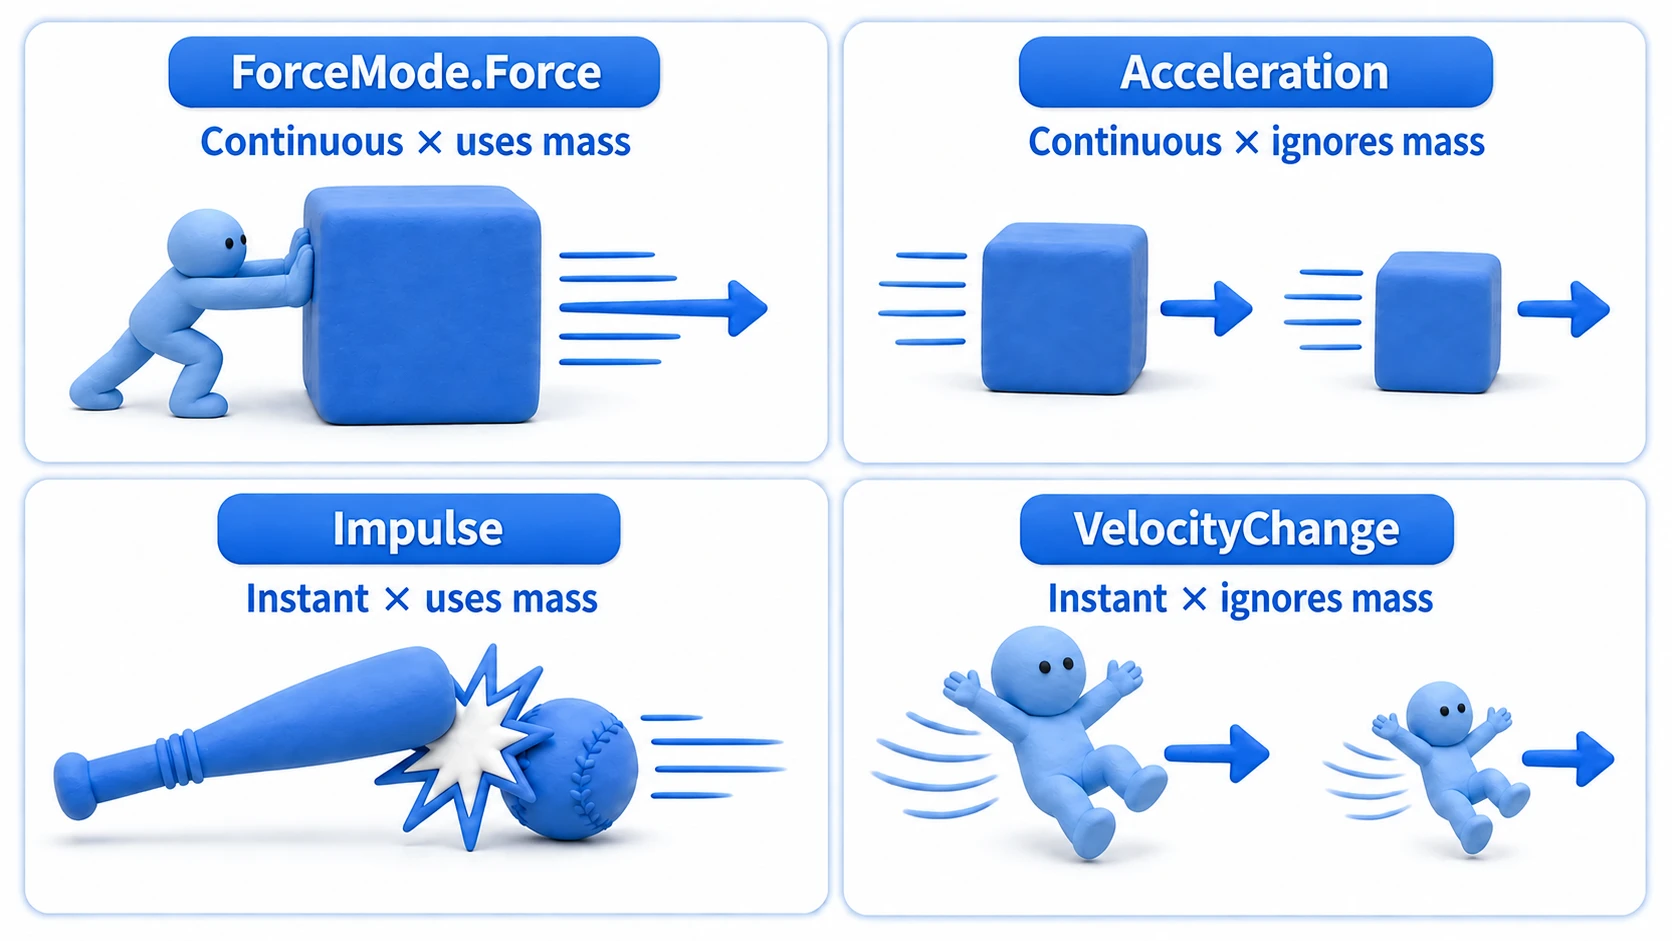
ForceMode.Force: Continuous force that accounts for mass (the default). Think engine thrustForceMode.Acceleration: Continuous acceleration that ignores mass. Use when you want the same acceleration regardless of weightForceMode.Impulse: Instant impulse that accounts for mass. Jumps, explosions, hitting with a batForceMode.VelocityChange: Adds straight to the velocity, ignoring mass. Handy when you want the knockback's strength to be consistent regardless of weight
If in doubt, remember Force for sustained pushes, Impulse for one-shot hits—that covers most cases.
2. Setting Velocity Directly with linearVelocity
By assigning to the rb.linearVelocity property, you can set the object's velocity instantly. The object starts moving at the target speed without waiting to accelerate, which is great for snappy, responsive character controls.
private Vector3 moveInput;

void Update()
{
    // Same split here: read in Update, use in FixedUpdate
    float moveHorizontal = Input.GetAxis("Horizontal");
    float moveVertical = Input.GetAxis("Vertical");
    moveInput = Vector3.ClampMagnitude(
        new Vector3(moveHorizontal, 0.0f, moveVertical), 1f);
}

void FixedUpdate()
{
    // Set X and Z velocity while preserving the current Y velocity (falling, etc.)
    rb.linearVelocity = new Vector3(moveInput.x * speed, rb.linearVelocity.y, moveInput.z * speed);
}
Note (mapping from the old API): This property used to be
rb.velocity. Unity 6 renamed it tolinearVelocity(if you copied code from an older tutorial and got a warning, this is why).
The decision comes down to one line: do you want physics-like inertia, or controls that stick to your fingers? For the former, use AddForce; for the latter, linearVelocity.
Key Properties
- Mass: The object's mass. Heavier objects are harder to move and hit other objects harder in collisions.
- Linear Damping: Movement decay (formerly Drag). Higher values make the object slow down faster.
- Angular Damping: Rotation decay (formerly Angular Drag). Higher values make rotation stop sooner.
- Use Gravity: Whether the object is affected by gravity.
- Is Kinematic: When enabled, the object no longer receives forces from the physics engine (gravity, collision responses, etc.). However, if you move it with
MovePosition/MoveRotationinFixedUpdate(or with animation), it can still push other Rigidbodies (ones with Is Kinematic off). Used for animated characters and moving platforms you want to control precisely from script. - Constraints: Lets you freeze (lock) movement or rotation along specific axes.
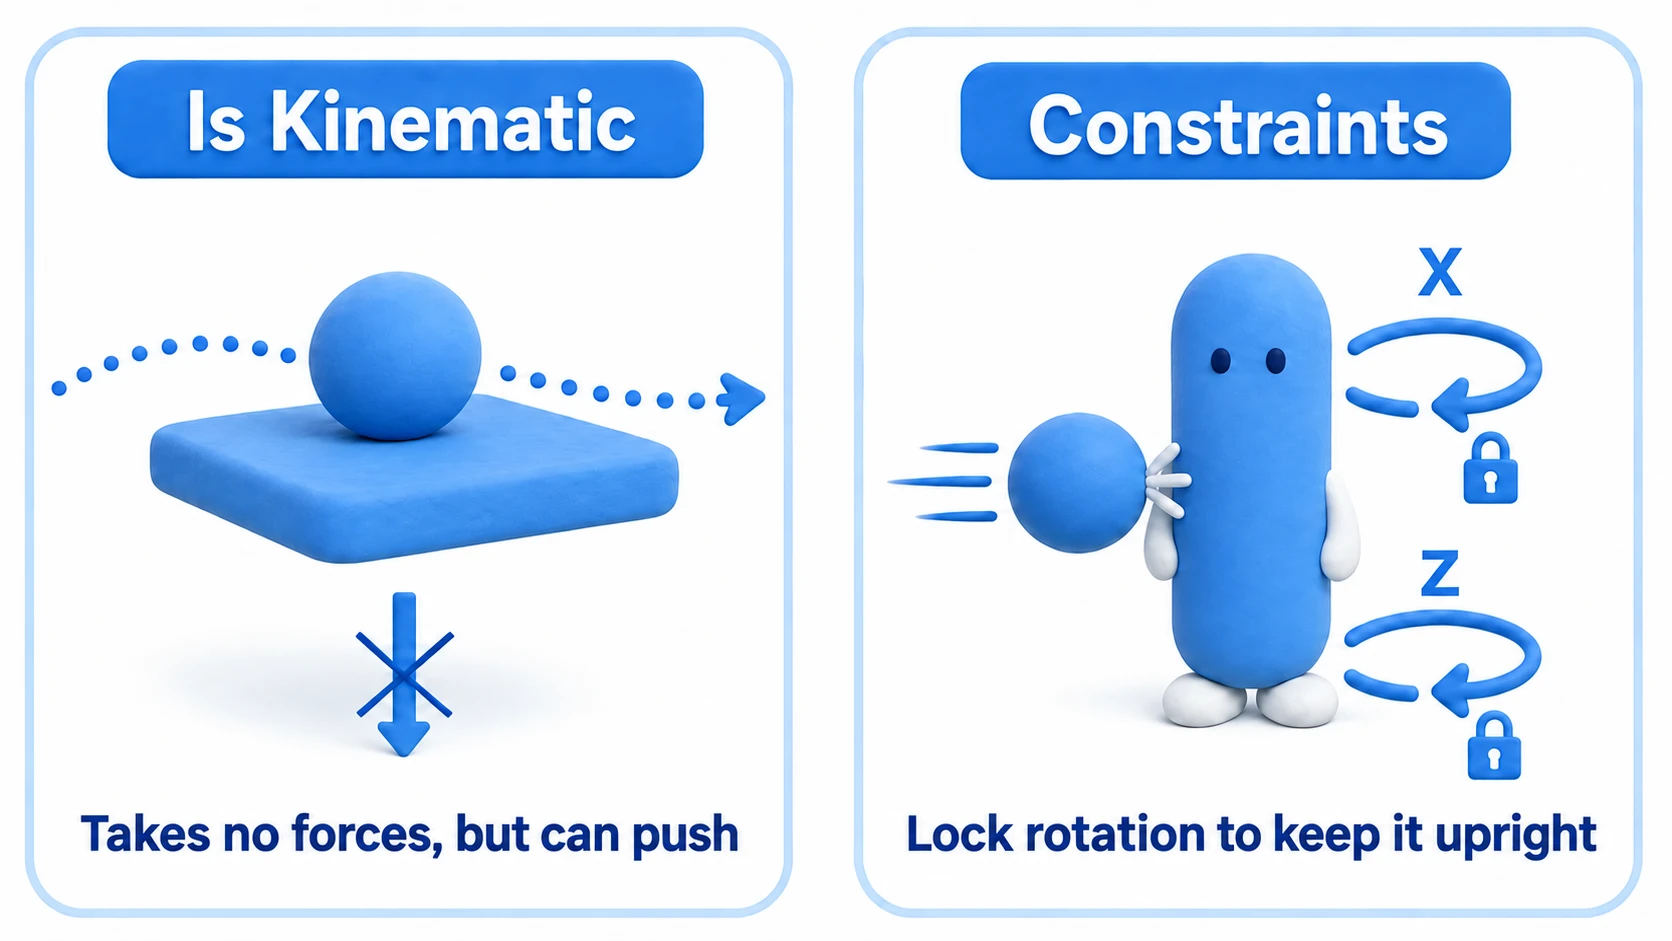
The classic use for Constraints is preventing characters from tipping over. A capsule-shaped character will topple from the slightest collision, so the standard fix is to freeze X and Z under Freeze Rotation to keep it upright. Using Freeze Position Z in 2D-style games is another common pattern.
Bonus: Good to Know for Later
Once things are moving with physics, these are the troubleshooting topics you'll likely run into next.
- Fast bullets tunnel through walls → Collision Detection: Physics is computed in fixed "frames," so an object moving too fast can pass a wall entirely between two frames. Changing the Rigidbody's Collision Detection to
Continuous(on the moving object) orContinuous Dynamicmakes it check the path traveled between frames as well. - Movement looks choppy → Interpolate: Physics updates (FixedUpdate) and rendering (Update) don't run in step, so a physics-driven object followed by the camera can look choppy. Setting the Rigidbody's Interpolate option to
Interpolatesmooths the position to match render frames. - Reacting to collisions: Logic like dealing damage or picking up items on contact goes in
OnCollisionEnter/OnTriggerEnter. We break this down in the OnTrigger vs OnCollision article. - Making a 2D game?: 2D has its own
Rigidbody2D/Collider2D(mixing them with 3D components means no collisions). See the Rigidbody2D and Collider2D article.
Summary
Rigidbody is the star of Unity's physics world.
- Adding a
Rigidbodymakes an object obey the laws of physics. - Move physics-driven objects via
Rigidbody, nottransform. Mixing the two causes sinking, tunneling, and jitter. - Use
AddForce()for continuous force,linearVelocity(formerly velocity) for direct speed control.ForceModehas 4 options along "continuous vs instant × mass-dependent or not". - Physics operations go in
FixedUpdate(), input reading goes inUpdate(). "Read in Update, use in FixedUpdate" is the standard shape. Is Kinematicis a mode that affects others without receiving forces itself, andConstraintslocks axes—handy for things like fall prevention.
Mastering Rigidbody is the key to creating realistic, convincing interactions.