You write jump with Input.GetKey(KeyCode.Space), and the jump fires repeatedly the whole time the key is held. You fix that, and then the moment you install the Input System package, Input.GetKey starts throwing exceptions—input handling is the "first code you ever write," yet it's surprisingly full of pitfalls.
This article is a textbook-style guide to input handling with Unity's long-standing built-in Input Manager (the Input class). Let's be clear about its role up front: this is a guide for reading, running, and eventually migrating away from code in older projects and tutorials. If you're starting a new project today, your entry point should be the New Input System introduction. That said, the vast majority of tutorials and existing assets out there are written with the legacy Input class — being able to read it remains an essential skill.
What You'll Learn
- How Unity's two input systems relate, and what this article covers
- Exactly when to use
GetKeyDown/GetKey/GetKeyUp("moment" vs. "duration")- Why virtual axes exist, and the difference between
GetAxisandGetAxisRaw- How to read mouse input
- Criteria for deciding when to migrate to the new Input System
Tested with: Unity 6 (6000.x)
Unity Has Two Input Systems
Let's start with the big picture. Unity has two input mechanisms living side by side.
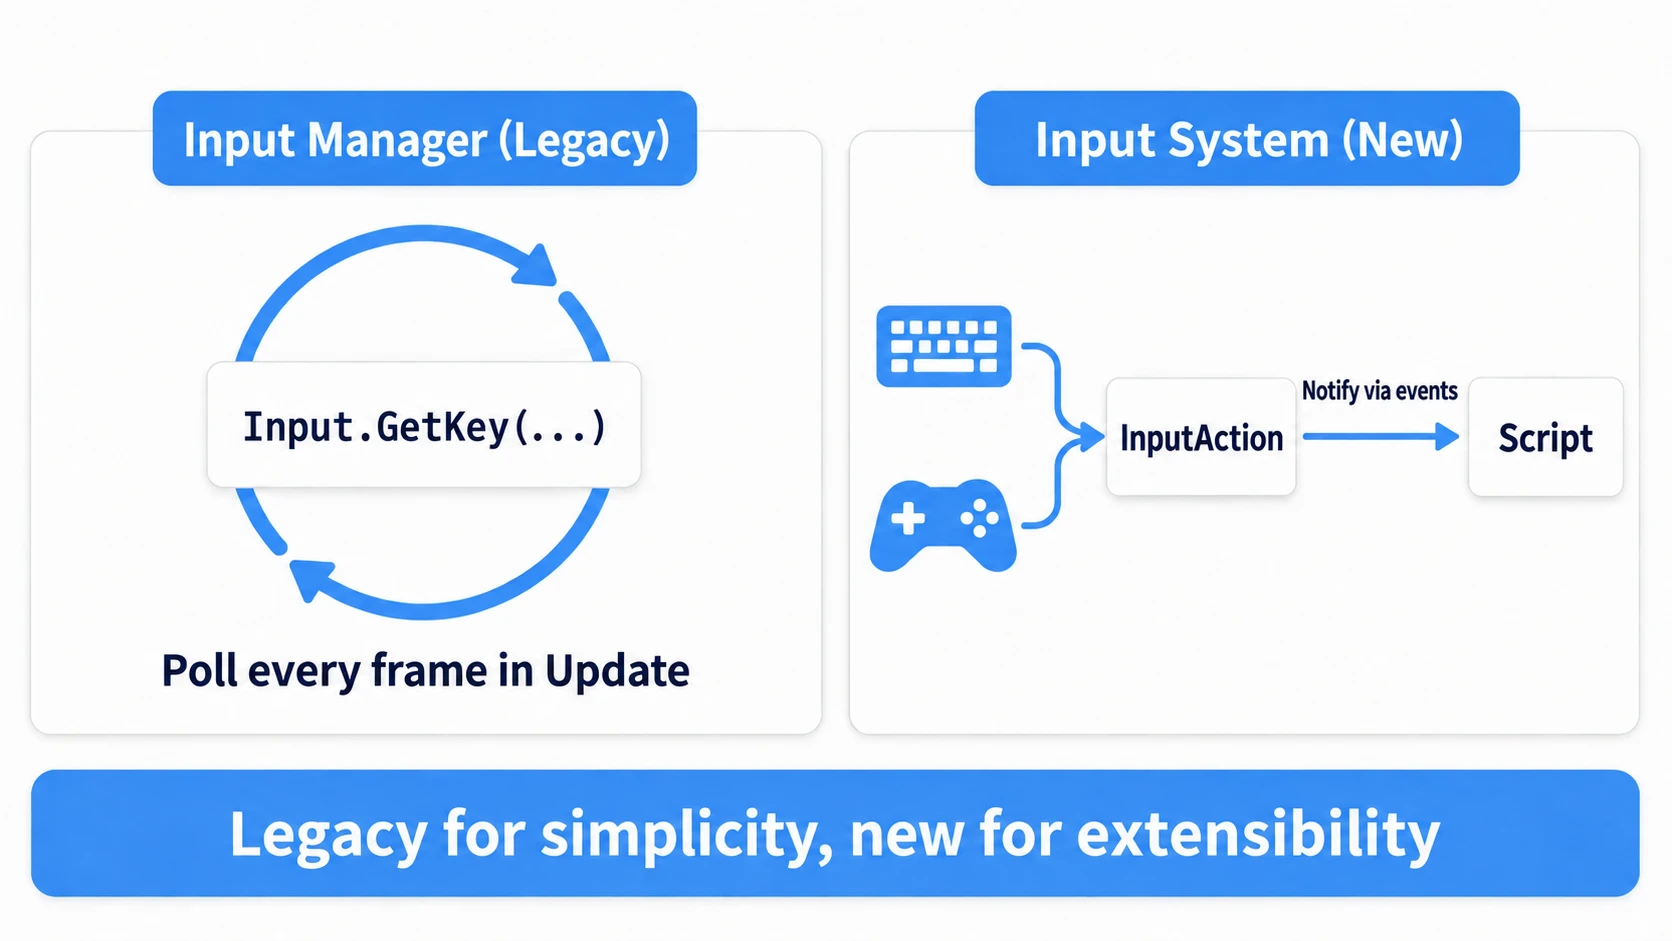
- Input Manager (legacy, built-in): You query it every frame inside
Update, likeInput.GetKey(...)(polling style). No extra installation needed—you can start with a single line of code - Input System (new, package): You define actions like "Jump" or "Move" and receive them as events. Strong for key rebinding and multi-device support (see Intro to the New Input System)
This article is a textbook for the former, the Input Manager. It has a low learning curve and is still a perfectly valid choice for prototypes and small games.
Note (a classic gotcha): When you install the Input System package, a confirmation dialog switches Active Input Handling to "Input System Package (New)", and the legacy
Inputclass starts throwingInvalidOperationException. If you want to use both, change "Edit > Project Settings > Player > Other Settings > Active Input Handling" to Both and restart the editor. New Unity 6 projects often start out on "Input System Package (New)". If input that "worked fine yesterday" suddenly starts throwing exceptions, check here first.
Input Manager Basics: The Virtual Axis Concept
You can view the Input Manager's settings under "Edit > Project Settings > Input Manager". It comes pre-populated with Virtual Axes like Horizontal, Vertical, Jump, and Fire1.
Why bother going through an "axis" instead of reading keys directly? To decouple your code from specific keys.
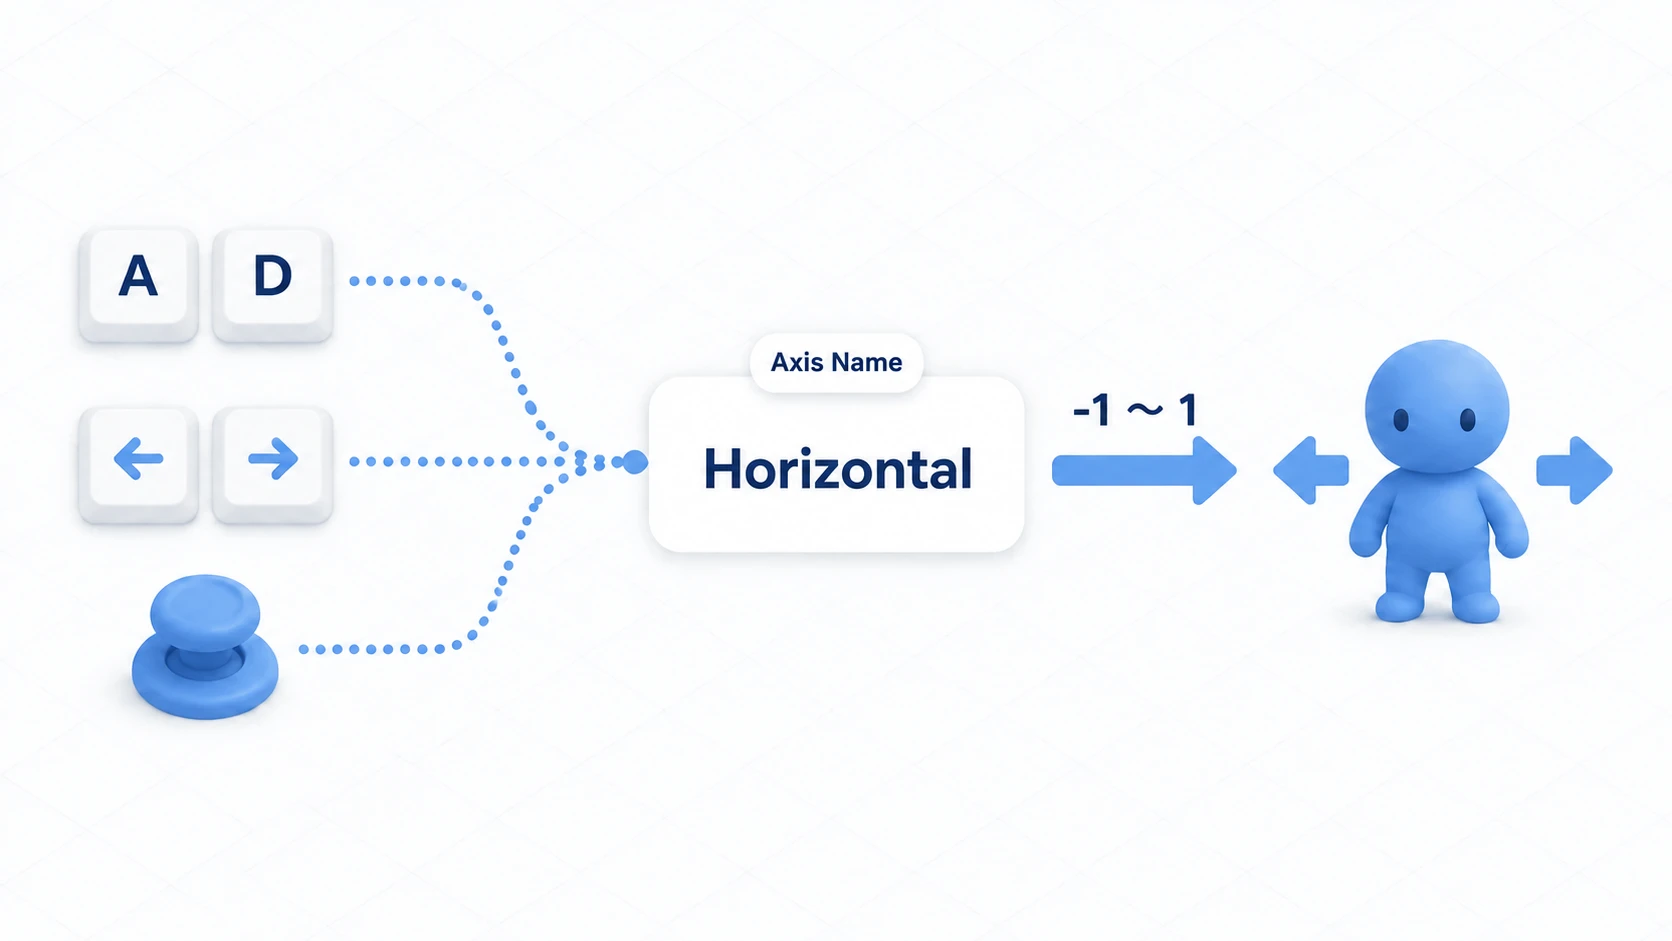
For example, the Horizontal axis bundles the a/d keys, the left/right arrow keys, and the gamepad stick all together. On the code side, you just write Input.GetAxis("Horizontal") and receive "left/right input" without caring which input source it came from. This abstraction saves you from the classic disaster: writing keyboard-only code, then being asked to "add gamepad support" and having to rewrite everything.
Reading Keyboard Input
Keyboard input is read with three methods on the Input class. The key distinction is the moment vs. the duration.
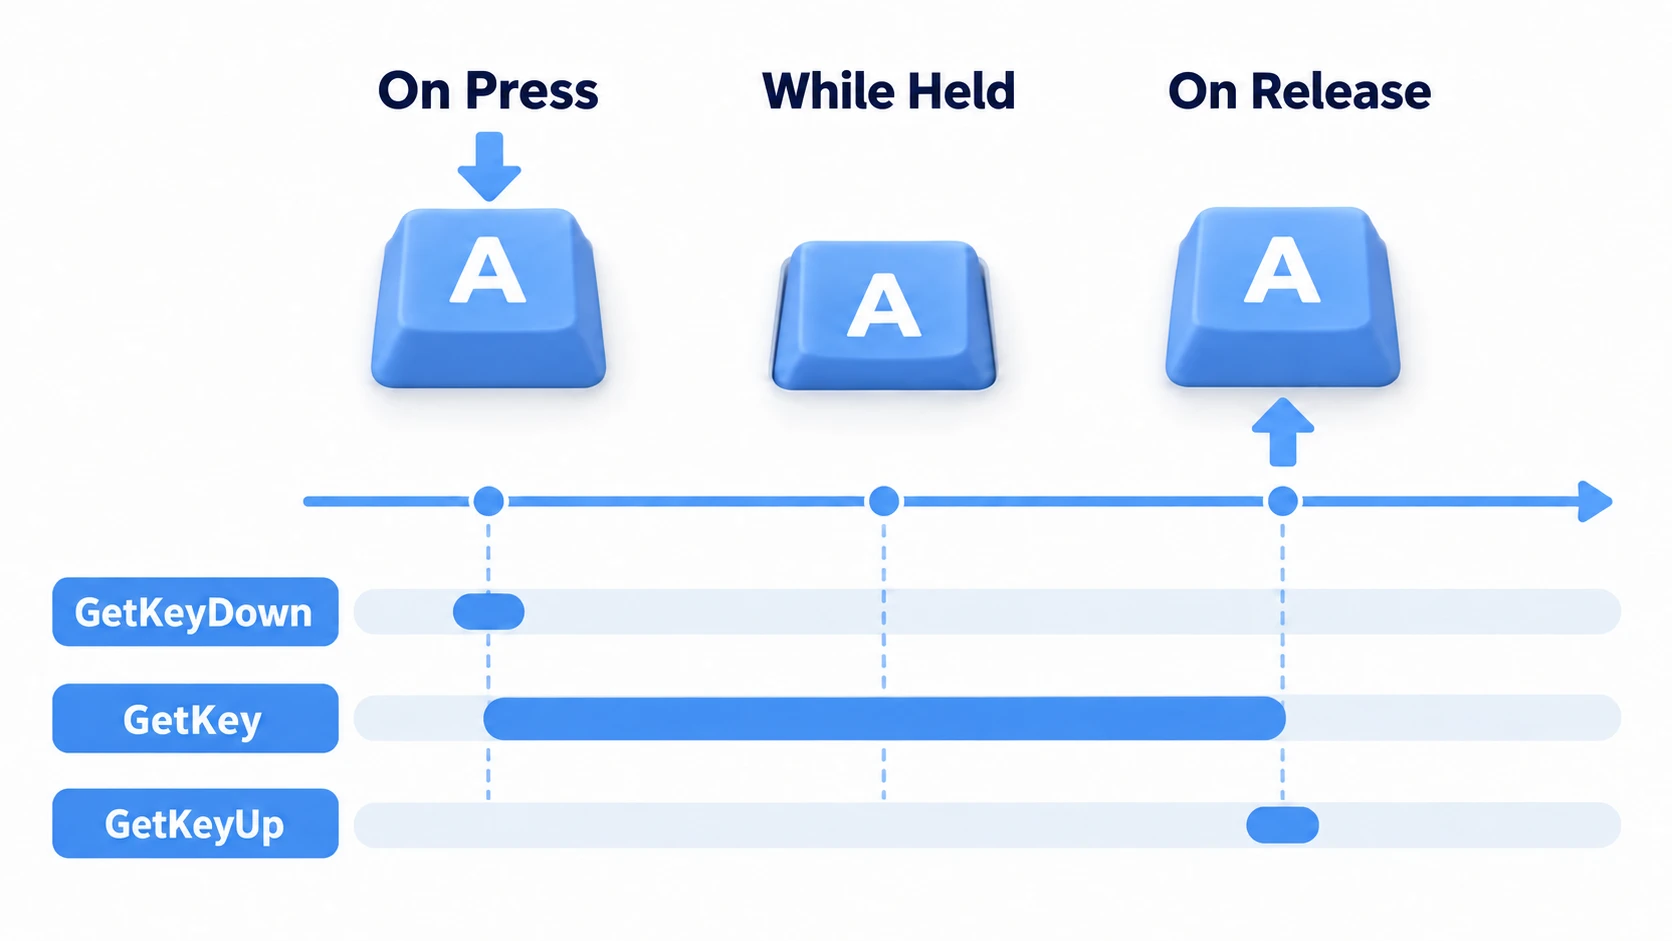
| Method | When It Responds | Typical Uses |
|---|---|---|
Input.GetKeyDown(KeyCode) | Only the single frame the key is pressed | One-shot actions like jumping, shooting, confirming |
Input.GetKey(KeyCode) | The entire time the key is held | Charging, dashing, hold-to-move |
Input.GetKeyUp(KeyCode) | Only the single frame the key is released | Releasing a charged shot, ending a long press |
Here's the culprit behind the "jump spamming" bug from the intro. GetKey returns true every frame while the key is held, so using it for jump means holding the key for one second triggers dozens of jumps. One-shot actions should always use GetKeyDown.
KeyCode is an enum that defines the keys (e.g. KeyCode.Space, KeyCode.W, KeyCode.Return).
using UnityEngine;

public class KeyboardInputExample : MonoBehaviour
{
    void Update()
    {
        // Jump the moment the space key is pressed (only once)
        if (Input.GetKeyDown(KeyCode.Space))
        {
            Debug.Log("Jump!");
        }

        // While the R key is held down, reloading
        if (Input.GetKey(KeyCode.R))
        {
            Debug.Log("Reloading...");
        }

        // Close the pause menu the moment the Escape key is released
        if (Input.GetKeyUp(KeyCode.Escape))
        {
            Debug.Log("Closing pause menu");
        }
    }
}
tips: Always check input in
Update.FixedUpdateis not guaranteed to run every frame, so it can miss "true for one frame" inputs likeGetKeyDown. See the Update vs FixedUpdate article for details.
Reading Input via Virtual Axes
Input that has "direction and magnitude," like movement, is read through virtual axes. There are two similar-looking methods, and the difference is how the input value changes.
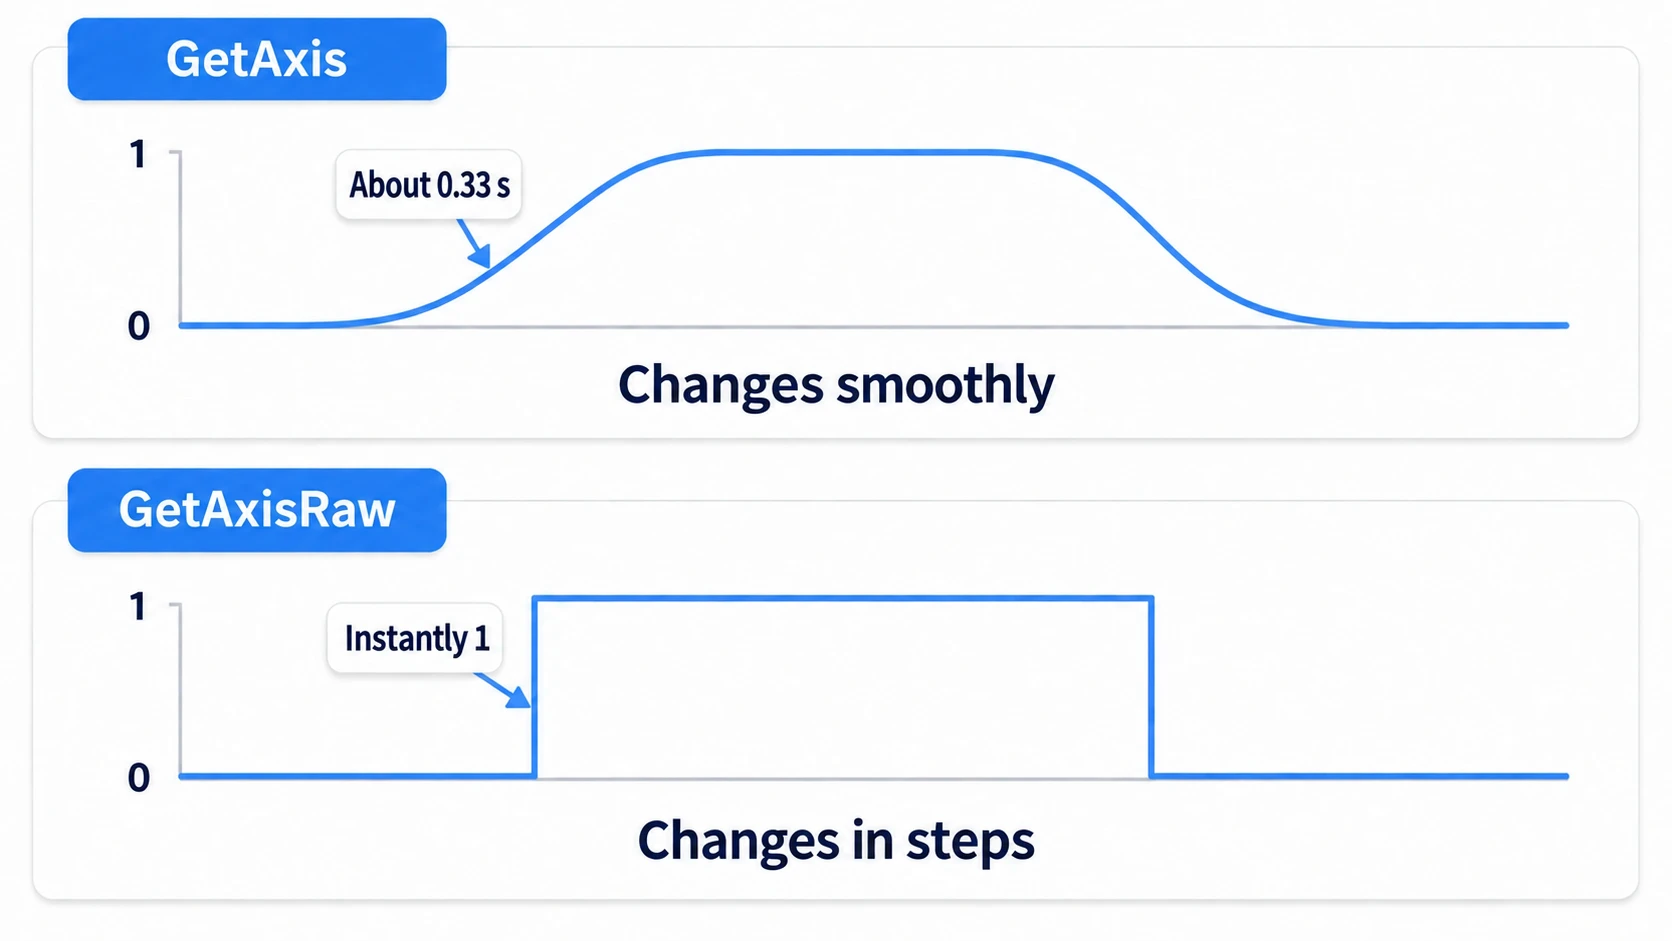
Input.GetAxis(string): Returns a value from -1.0 to 1.0 that changes smoothly. Even with a keyboard, interpolation is applied internally, so the value ramps gradually from 0 to 1 when a key is pressed. Suited for smooth movement with a sense of inertiaInput.GetAxisRaw(string): Returns -1, 0, or 1 immediately, with no interpolation. You move at full speed the instant the key is pressed—great for snappy 2D action games
Note that with a gamepad stick, both methods return intermediate values based on how far the stick is tilted (like 0.3 or 0.7). The interpolation difference mainly matters for keyboard input.
using UnityEngine;

public class AxisInputExample : MonoBehaviour
{
    public float speed = 10f;

    void Update()
    {
        // Get the value of the "Horizontal" axis (A/D keys, arrow keys, gamepad stick)
        float horizontalInput = Input.GetAxis("Horizontal");

        // Move left/right using the input value
        transform.Translate(Vector3.right * horizontalInput * speed * Time.deltaTime);
    }
}
A practical way to choose: if the controls feel sluggish, switch to GetAxisRaw; if the movement starts too abruptly, switch to GetAxis. Let the feel decide.
Reading Mouse Input
Mouse clicks and position are also available through the Input class.
Input.GetMouseButtonDown(int button): The moment a button is pressed.0is left,1is right,2is the middle buttonInput.GetMouseButton(int button): While a button is held downInput.GetMouseButtonUp(int button): The moment a button is releasedInput.mousePosition: Returns the cursor's screen coordinates (in pixels, origin at bottom-left) as aVector3. The Z coordinate is always 0
using UnityEngine;

public class MouseInputExample : MonoBehaviour
{
    void Update()
    {
        // When left-clicked
        if (Input.GetMouseButtonDown(0))
        {
            // Get the mouse's screen coordinates
            Vector3 mousePos = Input.mousePosition;
            Debug.Log("Left click! Position: " + mousePos);
        }
    }
}
Since mousePosition is a pixel coordinate on the screen, to find out "which object was clicked" in 3D space, you cast a Ray from that coordinate. This classic pattern is covered in detail in the Physics.Raycast article.
Hands-On: Reading and Running Legacy 2D Move + Jump Code
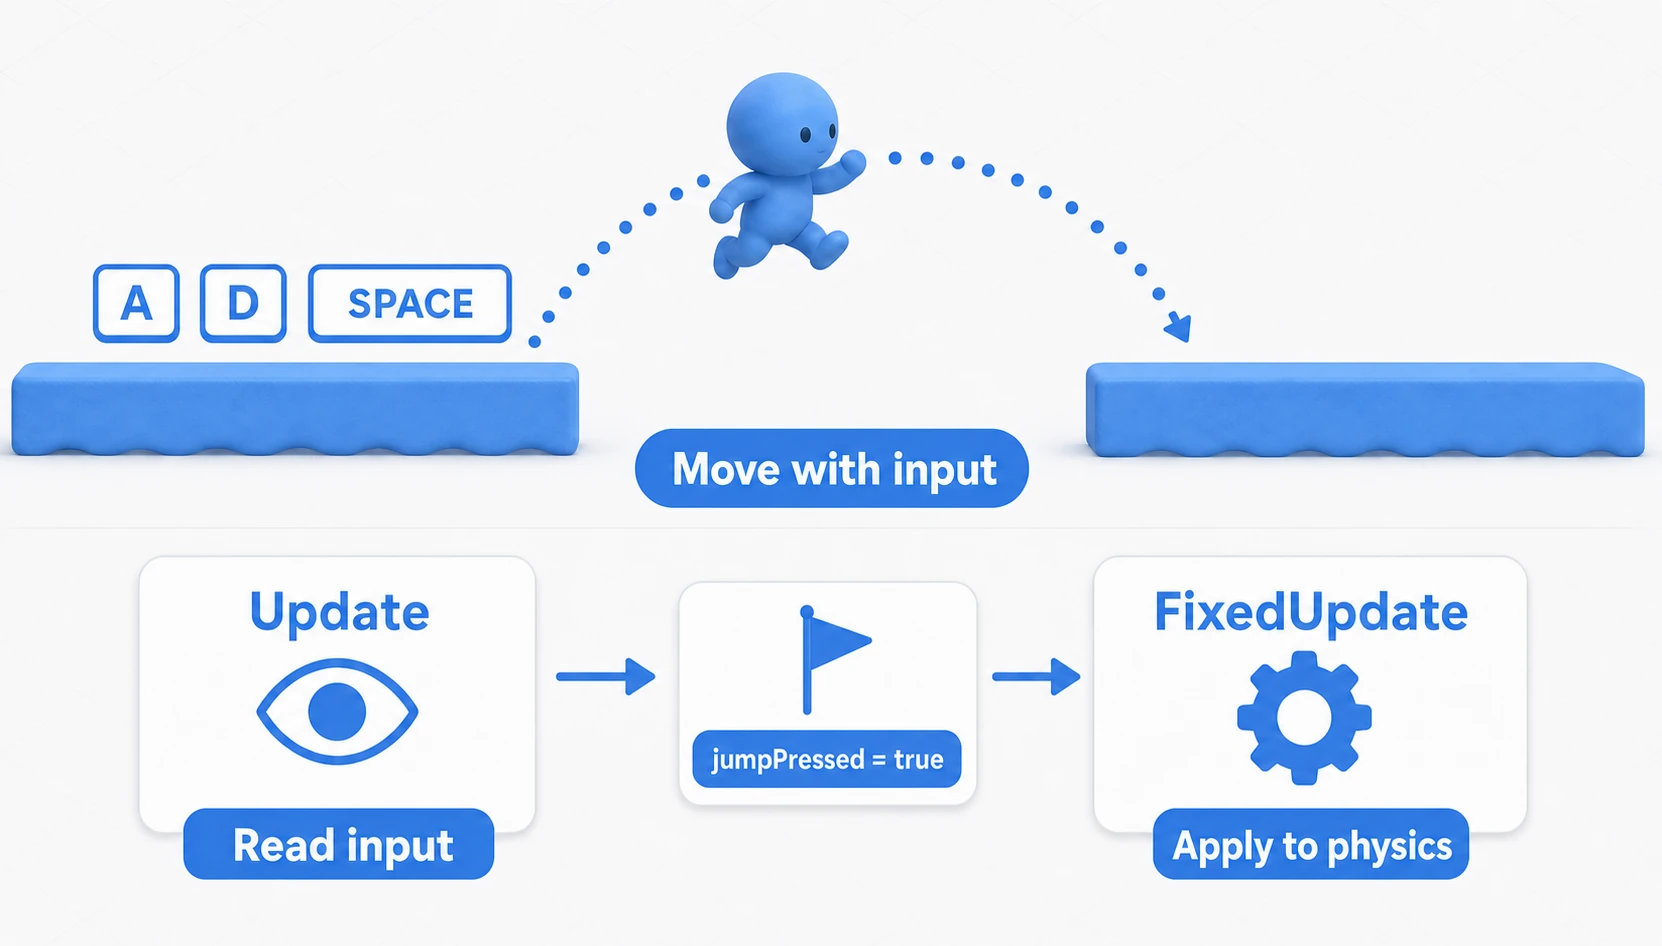
To finish, let's build the most common shape you'll see in older tutorials — 2D movement plus jump — following this series' policy: read input in Update, apply physics in FixedUpdate. Once you can read this shape, you can read almost any legacy Input code in the wild.
// File name: LegacyPlayerMove.cs — the classic legacy Input pattern
using UnityEngine;

[RequireComponent(typeof(Rigidbody2D))]
public class LegacyPlayerMove : MonoBehaviour
{
    public float moveSpeed = 6f;
    public float jumpForce = 12f;

    private Rigidbody2D rb;
    private float moveInput;
    private bool jumpPressed;

    void Awake() { rb = GetComponent<Rigidbody2D>(); }

    void Update()
    {
        // Read input in Update (never miss GetButtonDown's single true frame)
        moveInput = Input.GetAxisRaw("Horizontal");
        if (Input.GetButtonDown("Jump")) jumpPressed = true; // Bank it in a flag
    }

    void FixedUpdate()
    {
        // Apply to physics in FixedUpdate
        rb.linearVelocity = new Vector2(moveInput * moveSpeed, rb.linearVelocity.y);

        if (jumpPressed)
        {
            jumpPressed = false; // Always consume the flag (or you'll auto-jump after landing)
            rb.AddForce(Vector2.up * jumpForce, ForceMode2D.Impulse);
        }
    }
}
Note: Older code writes
rb.velocity, which Unity 6 renamed torb.linearVelocity(see the API migration guide). Also, callingGetButtonDowndirectly insideFixedUpdatecan miss presses — the heart of this pattern is read in Update, bank into a flag, consume in FixedUpdate.
One more crucial reading skill: the strings "Horizontal" and "Jump" depend on that project's axis names in Project Settings > Input Manager. Delete or rename an axis on the settings side, and perfectly correct code fails at runtime with something like ArgumentException: Input Axis Horizontal is not setup. When "I copied just the code and it doesn't work," check here first.
It works the other way too: change the settings and the controls change without touching the code. In the Input Manager, switch Jump's Positive Button from space to e, and you'll jump with the E key without changing a single character of the script (switch it back to space when you're done).
Migration Table to the New Input System
When the day comes to migrate this code, translate it with the following correspondences (implementation steps are in the New Input System introduction):
| Legacy Input Manager | New Input System |
|---|---|
Input.GetAxisRaw("Horizontal") | The Move action's (Vector2) ReadValue<Vector2>().x |
Input.GetButtonDown("Jump") | The Jump action's performed callback (or WasPressedThisFrame()) |
| Defined in: Project Settings > Input Manager | Defined in: an Input Actions asset |
| New device = editing the settings | New device = adding a Binding (no code change) |
To finish, tap jump in quick short bursts (this code has no ground check, so you can jump in midair too; jumping only when grounded is covered in the 2D physics article). If not a single press gets dropped, "read in Update, store in a flag" is doing its work. And if an ArgumentException sends your eyes straight to the axis names in Project Settings instead of the code — then the world's legacy Input code is now a language you can read.
Caveats: When to Move On from the Input Manager
Simplicity is the Input Manager's strength, but its limits show as your project grows.
- Key rebinding is hard to build: Virtual axis assignments can't be changed at runtime, so building your own "key settings screen" is a serious undertaking
- Serious multi-device support gets painful: Handling keyboard + gamepad + touch cleanly in one codebase means an ever-growing pile of conditionals
- Input logic gets scattered: Polling in
Updateis convenient, but your input definitions end up buried throughout the code
When these requirements appear, it's time to consider migrating to the event-based new Input System. Key rebinding in particular can be implemented with the official rebinding API in the new Input System (see the Key Rebinding Implementation Guide).
The decision comes down to one line: "Do you want players to remap their keys, or do you need serious multi-device support?" When either answer becomes Yes, that's your cue to migrate to the new Input System. Conversely, a fixed-key small PC game or a prototype can ride the Input Manager all the way to the finish line. Keep in mind, though, that the legacy Input Manager is deprecated, and the Unity 6.3 manual announces its future removal. For a project you'll keep growing, moving early is the safer bet.
Bonus: Good to Know for Later
Once you can handle the basics of input, these topics come into view next.
- Input and pausing: Even while paused with
Time.timeScale = 0, input keeps working. That's precisely why you can still accept the unpause command. The mechanics are laid out in the Pause Implementation Guide. - Conflicts with UI clicks: If clicking a button also fires your in-game shooting, the standard fix is to check
EventSystem.current.IsPointerOverGameObject()and ignore input when the pointer is over UI. - Touch input on mobile:
Input.GetMouseButtonDown(0)works with touch too, but if you need multi-touch (like pinch gestures), useInput.touches—and for full-fledged support, that's the new Input System's job.
Summary
Input handling is the first interface connecting the player to your game world.
- Unity has two systems: the legacy Input Manager and the new Input System. If the legacy
Inputthrows exceptions after installing the Input System package, set Active Input Handling to Both. GetKeyDownis the moment of press,GetKeyis the duration,GetKeyUpis the moment of release. Writing one-shot actions withGetKeygives you the rapid-fire bug.- Virtual axes decouple your code from specific keys.
GetAxisis smooth,GetAxisRawis instant—choose by feel. - For the mouse, use
GetMouseButtonDownandmousePosition. To click 3D objects, Raycast frommousePosition. - When you need key rebinding or serious multi-device support, migrate to the new Input System.
Start by enjoying how good it feels to move a character with the Input Manager, and move to the new Input System when your project's requirements grow—that's the steady path forward, even if it looks like a detour.