An RPG's belongings, a survival game's carried items, a crafting game's materials — an inventory is a system essential to many games. Yet when you try to build one, defining items, managing counts, stacking, and updating the UI tangle together and you're unsure where to start. Here too the key is separating data from UI. Split "what and how many you hold (data)" from "how to arrange and show it (UI)," and it becomes surprisingly clean.
This article assembles the foundation of an extensible inventory. Define items with a ScriptableObject, design the slot data structure, handle add/remove/stack, reflect it in a grid UI, and save. An RPG's inventory, a survival backpack, a roguelike's belongings — all built from this design.
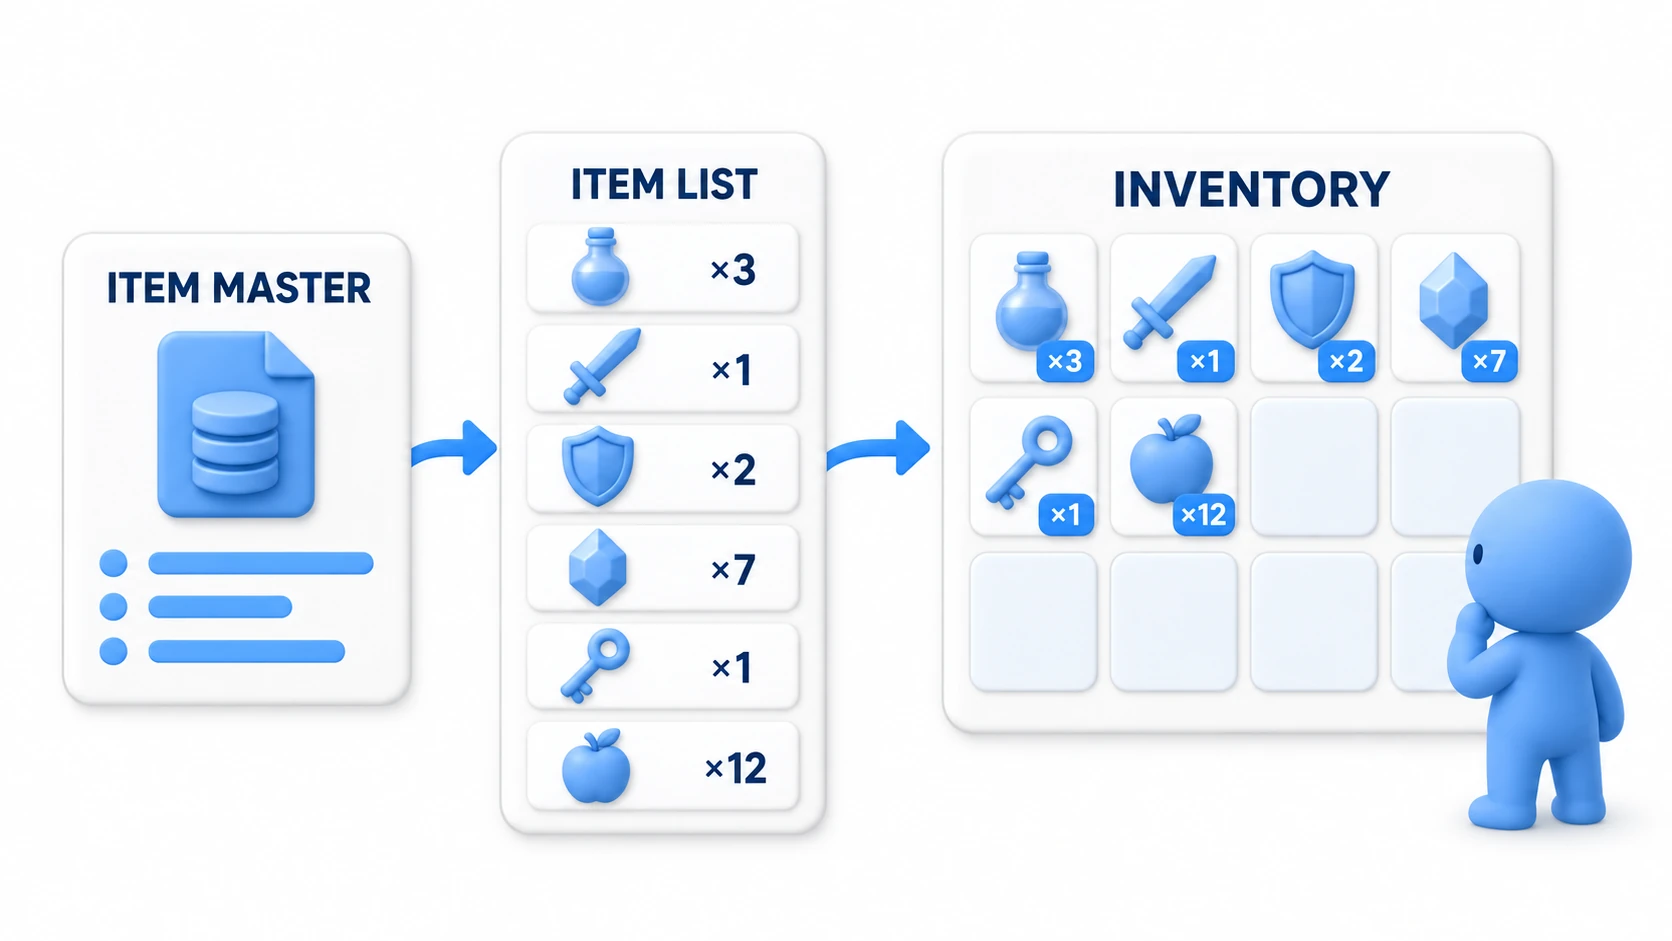
What you'll learn
- Defining items with a ScriptableObject (item master)
- The inventory data structure (a list of slots)
- Add / remove / stack handling
- Reflecting into a grid UI (Layout Group)
- Practice: an inventory that picks up, uses, and arranges
Tested on: Unity 6 (6000.x)
Separate data from UI
The first thing to decide when building an inventory is to clearly separate "the belongings data" from "the display UI." Mix them up and you end up editing UI code every time you pick up a single item.
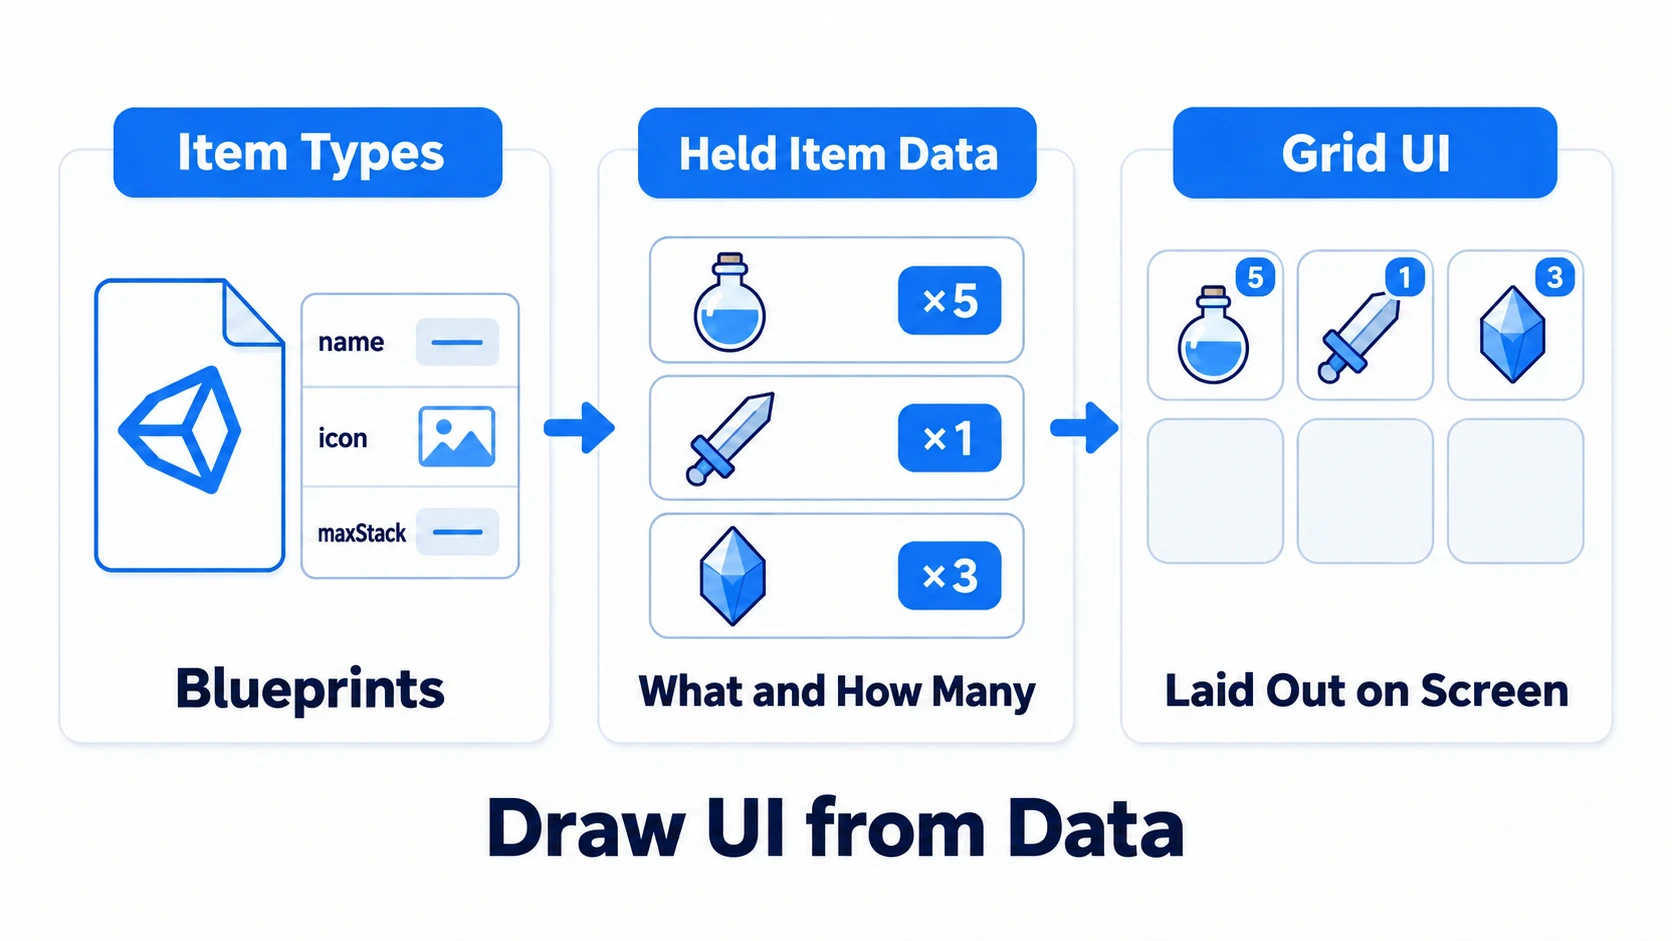
The structure splits into three layers.
| Layer | Role |
|---|---|
| Item master (ScriptableObject) | The item's "blueprint." Name, icon, max stack — one per type |
| Inventory data (list of slots) | What the player "holds and how many." A collection of item references + counts |
| Grid UI (Canvas) | Reads data and arranges icons and counts in a grid |
The important thing is a one-way flow: redraw the UI when data changes. Operations like "pick up" and "use" change only the data, and the UI just redraws based on it. This separation pays off later when you add stacking and reordering.
Define items with a ScriptableObject
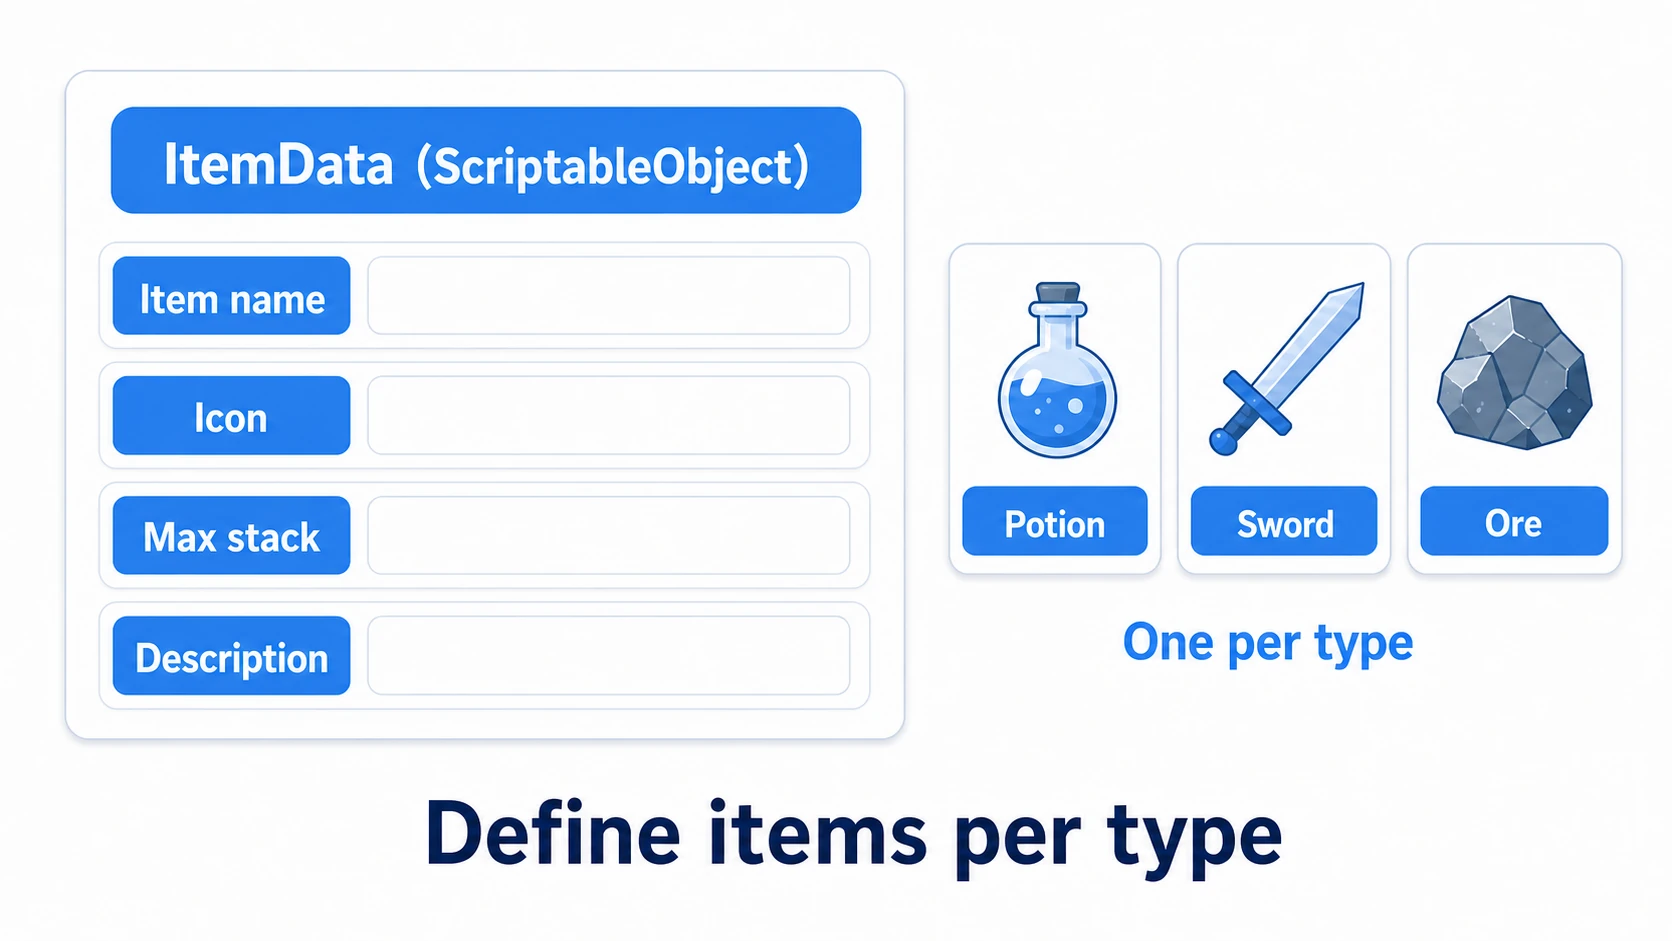
First, define the item's "blueprint" with a ScriptableObject. Make one asset per item type, like "Potion" or "Iron Sword."
using UnityEngine;

[CreateAssetMenu(fileName = "NewItem", menuName = "Inventory/Item Data")]
public class ItemData : ScriptableObject
{
    public string itemName;         // Item name
    public Sprite icon;             // Icon image
    [TextArea] public string description;
    public int maxStack = 99;       // Max count stackable in one slot
}
With [CreateAssetMenu] you can create items from Create > Inventory > Item Data. Give per-type traits to the asset: maxStack = 99 for a potion, maxStack = 1 (unstackable) for a sword. This ItemData is the item type itself — "master data" shared across all players and all drops. The player only holds this reference + count.
The slot list and stacking
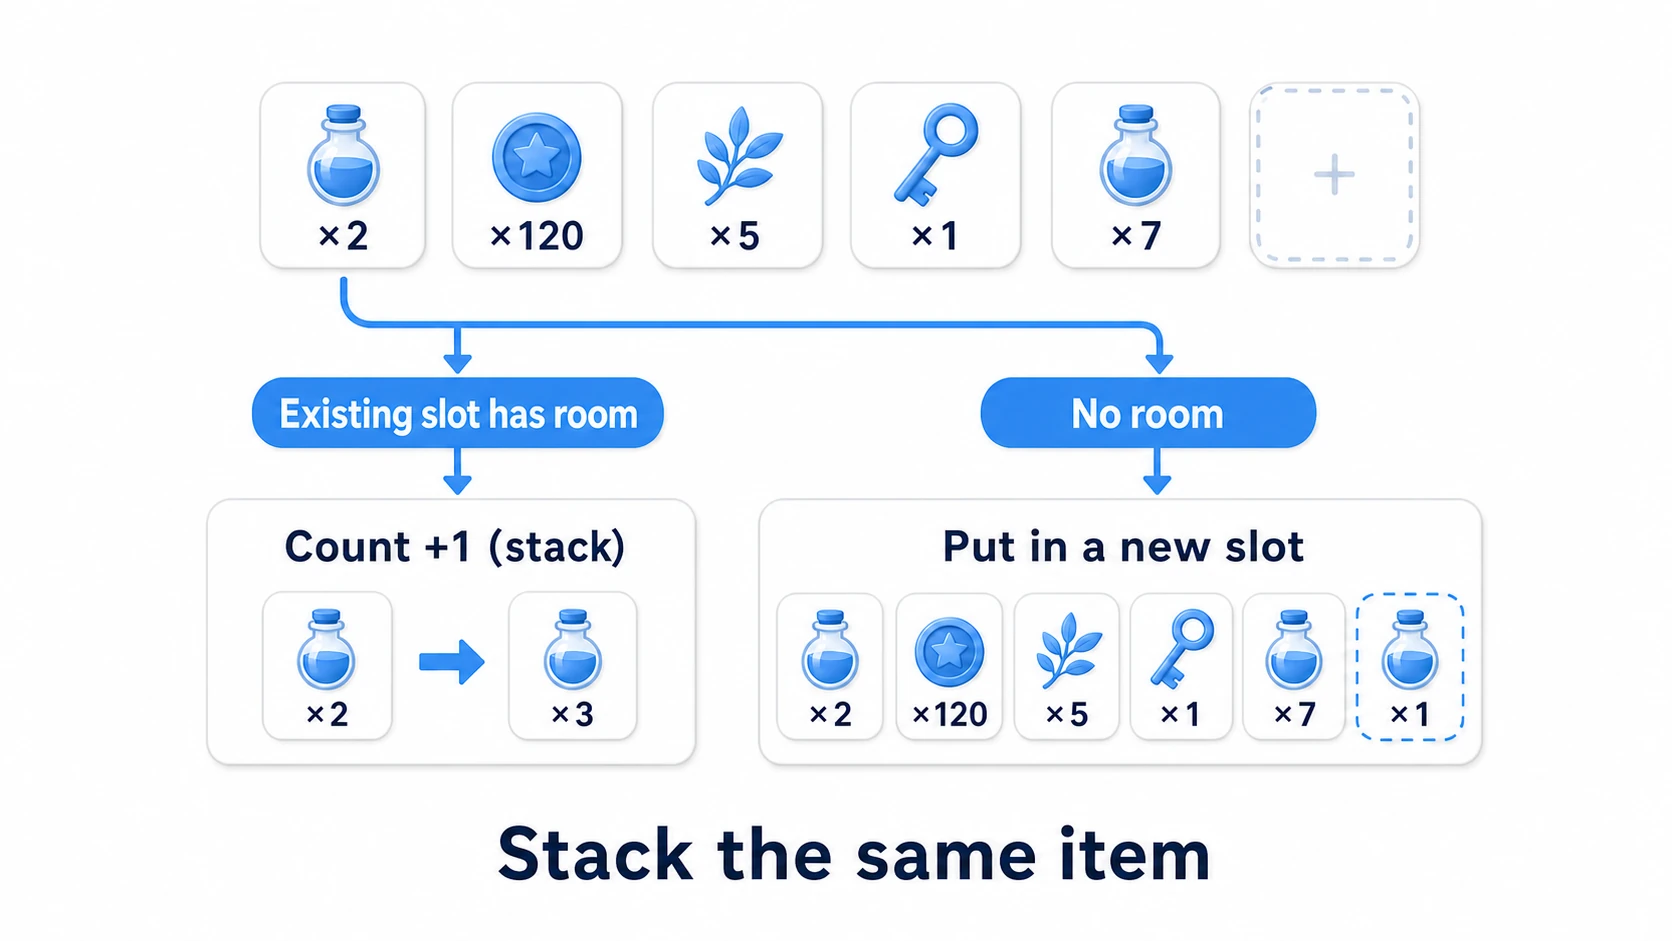
The player's belongings are represented by a list of slots. Each slot holds "which item, and how many."
using System.Collections.Generic;
using UnityEngine;

[System.Serializable]
public class InventorySlot
{
    public ItemData item;  // Which item (reference to the type)
    public int count;      // How many held
}

public class Inventory : MonoBehaviour
{
    public List<InventorySlot> slots = new();
    public int maxSlots = 20; // Maximum number of inventory slots

    // Add an item (with stacking)
    // Returns: how many didn't fit (0 means everything fit)
    public int AddItem(ItemData item, int amount = 1)
    {
        // Ignore bad calls (zero or fewer, or a maxStack of 0); otherwise counts go down or empty slots pile up
        if (item == null || amount <= 0 || item.maxStack < 1) return amount;

        // 1. Fill existing slots of the same item, but only "as much as fits"
        foreach (var slot in slots)
        {
            if (slot.item == item && slot.count < item.maxStack)
            {
                int space = item.maxStack - slot.count;   // Room left in this slot
                int moved = Mathf.Min(space, amount);     // Move only the smaller of room vs amount
                slot.count += moved;
                amount -= moved;
                if (amount == 0) break;
            }
        }

        // 2. If any remains, open new slots (as long as slots are available)
        while (amount > 0 && slots.Count < maxSlots)
        {
            int moved = Mathf.Min(item.maxStack, amount);
            slots.Add(new InventorySlot { item = item, count = moved });
            amount -= moved;
        }

        RefreshUI();      // Data changed, so update the UI
        return amount;    // Non-zero means "couldn't carry it all"
    }

    // Redraw the UI (fill this in with the steps in the next section)
    void RefreshUI() { }
}
The key is the stack check. When adding an item, if a slot of the same type already exists, increase its count only by the available room, and spill the remainder into the next slot. Skip the "only as much as fits" part and write slot.count += amount, and adding 20 to a slot with room for just 9 more (90/99) leaves it at 110—blowing straight past maxStack. The one extra step of Mathf.Min(room, amount) prevents this classic bug.
The second trick is returning the count that didn't fit. A non-zero return value means the inventory was full, so the caller can show "Inventory full!" or leave the unclaimed items on the field. Removal is the reverse: decrease the count, and remove the whole slot when it hits 0. Being comfortable with arrays and List makes this smooth.
Reflect into a grid UI
Once you have the data, arrange it in a grid UI. Here uGUI's Layout Group shines.
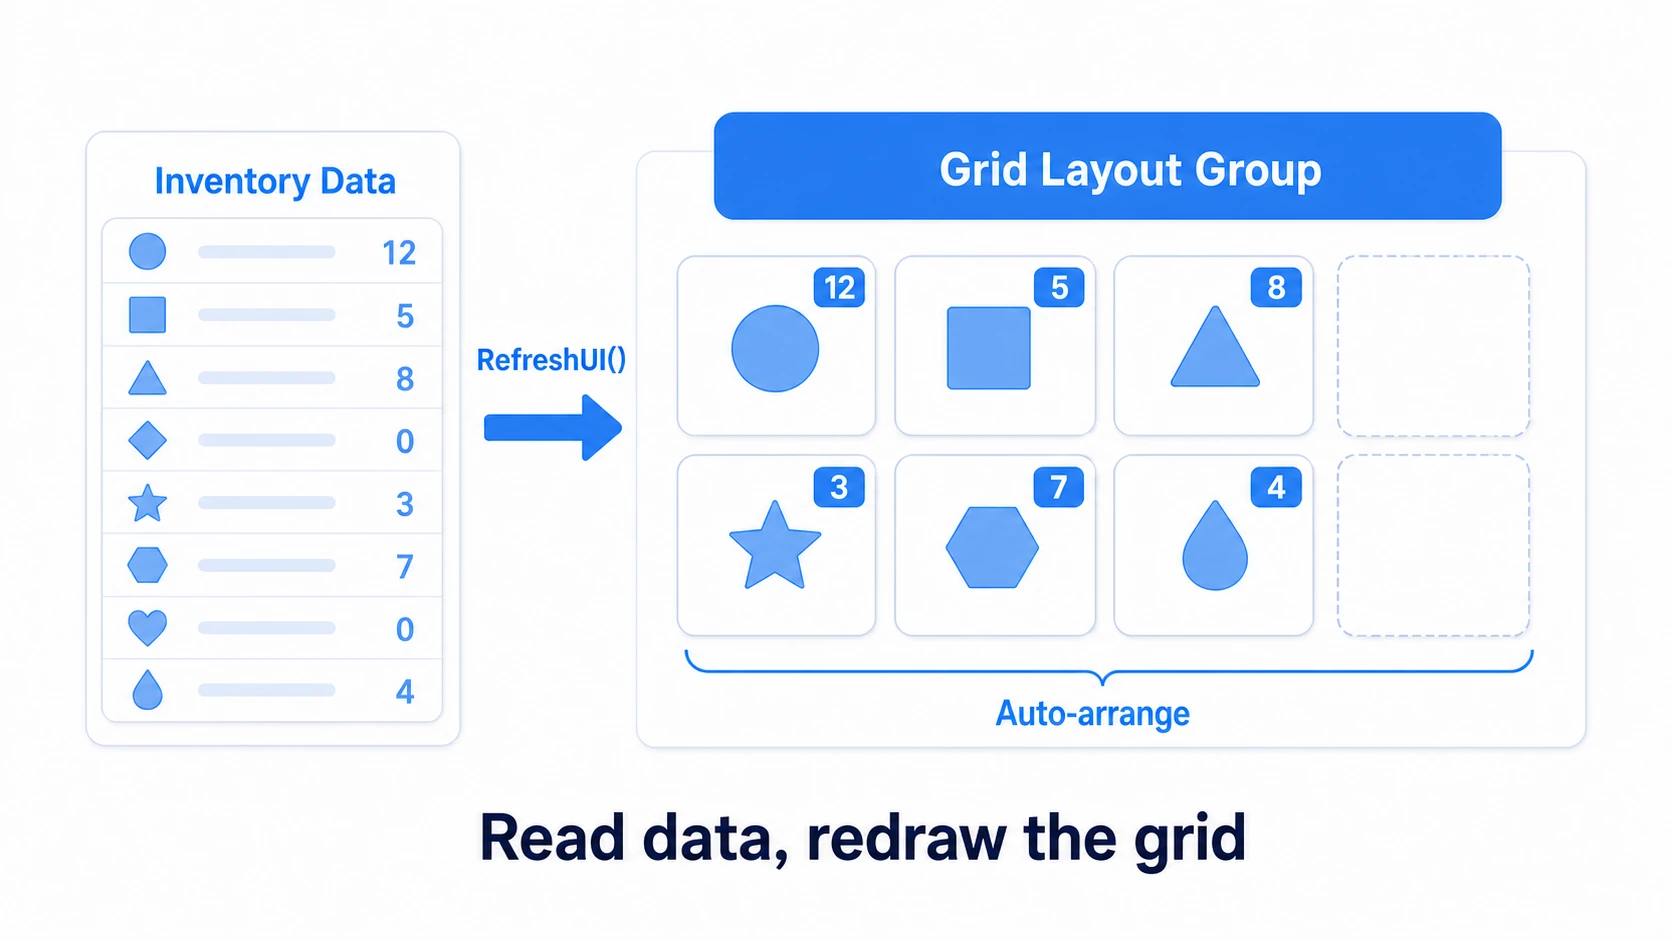
Placing slot UIs (icon image + count text) under a parent with a Grid Layout Group component auto-arranges them in a grid. Cell size and spacing are also set in the component — no manual coordinate math needed.
UI updates happen in the earlier RefreshUI(). The flow is simple.
- Look at each of the inventory's
slots - Set the slot UI's
item.icon(icon) andcount - Clear the icon on empty slots (set the icon
Image'senabledtofalse; just removing thespritecan leave a white square)
Just "read data and redraw the UI." Whether data grows or shrinks, calling RefreshUI() syncs the display. The trick is keeping the relationship UI is a mirror of the data.
Practice: pick up, use, arrange
Combining the above, let's complete an inventory that grows when you pick up and shrinks when you use. An RPG's belongings, a survival backpack, a roguelike's items — all the same foundation.
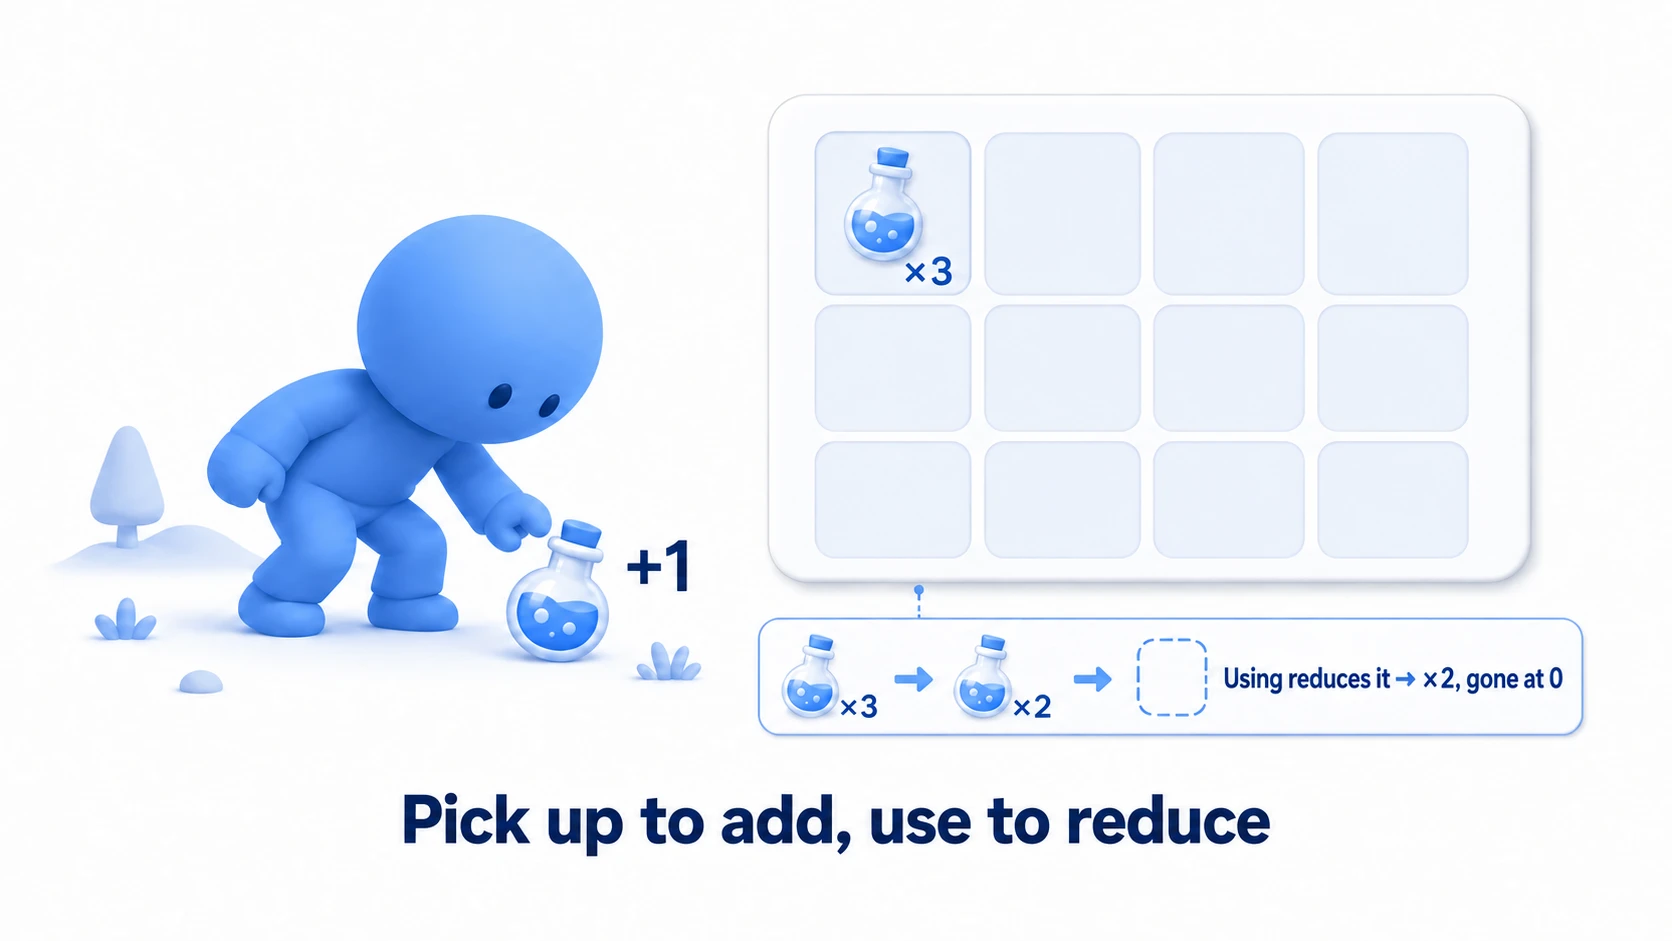
The overall flow:
- Touch a field item (holding
ItemData) → callinventory.AddItem(itemData). A non-zero return value means the inventory is full, so show "Can't carry any more!" AddItemchecks stacking, updates data, and redraws the grid withRefreshUI()- Click a slot UI →
inventory.UseItem(slot)triggers the effect and decreases the count by 1 - When the count hits 0, remove the slot and redraw
// Use an item (decrease count, remove at 0)
public void UseItem(InventorySlot slot)
{
    // Do nothing for an empty slot or one that isn't in this inventory (so the effect doesn't fire on its own)
    if (slot == null || slot.count <= 0 || !slots.Contains(slot)) return;

    // Trigger the effect here (heal, equip, etc.)
    ApplyEffect(slot.item);

    slot.count--;
    if (slot.count <= 0) slots.Remove(slot); // Remove the slot when used up
    RefreshUI();
}
ApplyEffect is a method you write yourself, holding each item's effect (healing, equipping, and so on).
Two points: "operations change only data" (pick up, use, drop only rewrite slots; don't touch the UI) and "call RefreshUI on every change" (always redraw the UI after changing data; this habit prevents display desync). Equipment, currency, and crafting materials can be extended with the same mechanism by adding a type (enum) or extra parameters to ItemData. Saving the contents with save & load carries them over on the next launch.
Good to know first
- Save by "ID," not "reference": the
ItemData(ScriptableObject) itself can't be saved to JSON. On save, give each item a unique ID (string) and save "ID and count." On load, look theItemDataback up from the ID. See save & load for details. - Drag-and-drop reordering: swapping slots is just swapping
slotselements and callingRefreshUI(). Implement UI dragging with interfaces likeIBeginDragHandler. - Color-code by item type: give
ItemDataa type (weapon, consumable, material) and change the slot UI's border color — it instantly feels like game UI. - Weight and count limits: capping the slot count or limiting by total item weight creates survival-style tension. Both are implemented with checks on the data side.
- Use collected items for quests: to track progress on requests like "bring me three herbs," see quests and objectives
Summary
- An inventory splits into three layers: item master (ScriptableObject), data (list of slots), and UI (grid)
- Define items with a ScriptableObject per type. Give traits like max stack to the asset
- Belongings are a list of slots (item reference + count). Add "only as much as fits into existing room → spill the rest into new slots," and return what didn't fit
- The UI auto-arranges with Grid Layout Group. Read data and redraw with
RefreshUI() - Operations change only data, and redraw the UI on every change. The UI is a mirror of the data
Start by displaying a small inventory of just "holding 3 potions" with a list of slots and a grid UI. Build it to grow on pickup and shrink on use, and you already have a proper belongings system. What treasures will your game's player stuff into their bag?
Further reading
- Data-Driven Design with ScriptableObject — the foundation of the item master
- C# Arrays and List — manipulating the slot list
- Auto-Layout with uGUI Layout Group — building the grid UI
- Save & Load (JSON) — saving belongings (ID-based)
- Unity Manual: ScriptableObject — the primary source on data assets