"The reference I got in Start is suddenly null." "My physics movement is weirdly jittery." Many of the bugs that plague Unity beginners can be avoided simply by knowing when and in what order your scripts run. That sequence is called the "lifecycle."
Unity scripts follow a fixed order of event functions that are called automatically, from an object's birth to its destruction. This article walks through the most important ones—Awake, Start, Update, FixedUpdate, and LateUpdate—with diagrams showing what each is for and when to use which.

What You'll Learn
- The overall lifecycle flow (one-time processing vs. per-frame processing)
- How to use
AwakeandStartcorrectly- The differences between
Update,FixedUpdate, andLateUpdate, with real examples- How to keep these functions from hurting performance
Tested with: Unity 6 (6000.x) / Input System
Lifecycle Events Overview
Unity scripts have "event functions" that are automatically called when specific events occur. These functions execute in a defined order, from when an object is loaded into a scene until it's destroyed. The main event functions run in this order:
-
Initialization
Awake(): Called once, immediately after the object is loaded. Within that script, it runs before any other function.OnEnable(): Called the moment the object becomes active. UnlikeAwake, it fires every time the object is re-enabled withSetActive(true).Start(): Called once, just before the first frame'sUpdate.
-
Physics
FixedUpdate(): Called at fixed time intervals. Suited to physics processing.
-
Game Logic
Update(): Called every frame. This is where main game logic and input handling live.LateUpdate(): Called every frame, after allUpdatefunctions have run. Used for camera follow logic and the like.
-
Rendering
OnRenderObject()etc.: Processing related to drawing the object.
-
Teardown
OnDisable(): Called the moment the object becomes inactive.OnDestroy(): Called just before the object is destroyed.
Here is the whole flow as a diagram. FixedUpdate, Update, and LateUpdate repeat every frame, while Awake, Start, and OnDestroy run only once per object. The ones to watch are OnEnable and OnDisable: these two fire again and again, every time the object is enabled or disabled (we'll verify this in the hands-on section later).
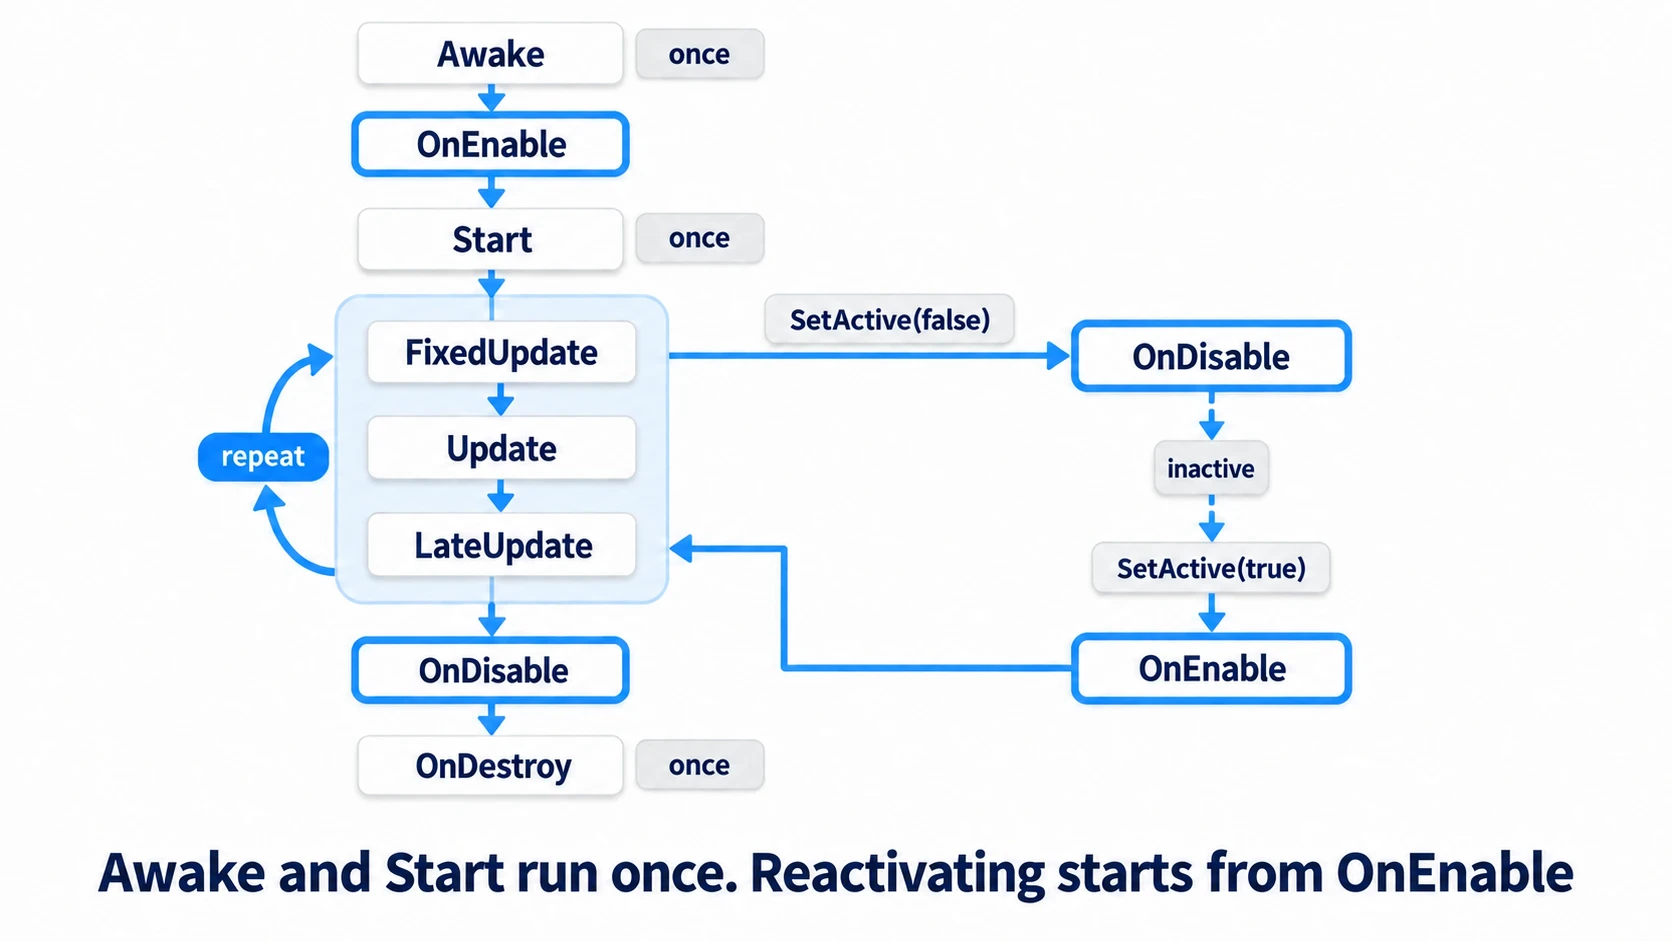
Note: When multiple objects exist, the order in which their
Awake()calls run is not guaranteed. Never assume "A's Awake runs before B's Awake." If you truly need to control the order, you can specify it explicitly underEdit > Project Settings > Script Execution Order.
Key Event Functions in Detail
Initialization: Awake() vs Start()
Both Awake() and Start() are used for initialization, but there's an important difference in when they run.
| Function | Execution Timing | Primary Use |
|---|---|---|
Awake() | Immediately after the script instance loads. Always before Start(). | Getting references to your own components; initialization that doesn't depend on other objects' state. |
Start() | Just before the first frame's Update(). After Awake(). | Initialization that assumes other objects' Awake() has already completed. |
The crucial point is that, for objects present at scene load, every object's Awake() completes before any object's Start() is called. So when scripts need to pass references to each other, it's safest to acquire references in Awake() and then use them in Start().
That guarantee only covers objects that already exist when the scene loads, though. An object created at runtime with Instantiate() runs its Awake() immediately, right inside that call (we'll see this for ourselves in the hands-on section).
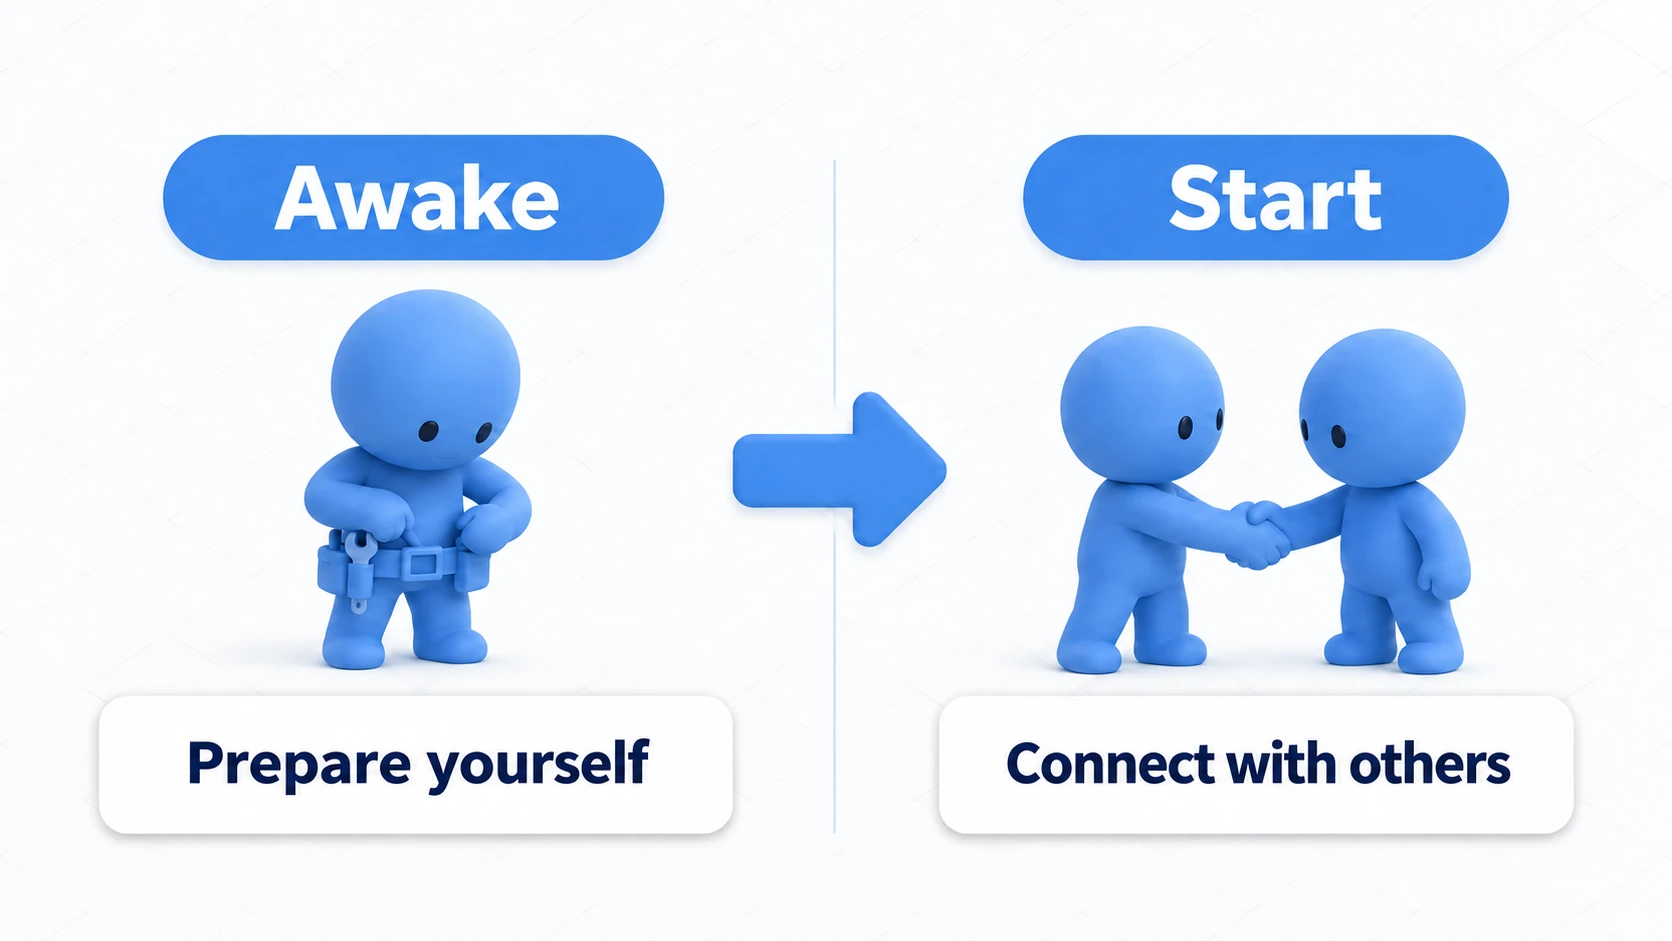
Think of it this way: Awake is when everyone gets themselves ready, and Start is when everyone—now prepared—begins coordinating with each other.
using UnityEngine;

public class PlayerController : MonoBehaviour
{
    private Rigidbody rb;
    private GameManager gameManager;

    // Get your own components in Awake
    void Awake()
    {
        rb = GetComponent<Rigidbody>();
        Debug.Log("Awake: Got Rigidbody.");
    }

    // Logic that assumes other objects are initialized goes in Start
    void Start()
    {
        gameManager = FindFirstObjectByType<GameManager>();
        gameManager.RegisterPlayer(this);
        Debug.Log("Start: Registered player with GameManager.");
    }
}
Note:
FindObjectOfType<T>()used to be the go-to here, but it's been deprecated since Unity 2023.1 (including Unity 6), and its successor isFindFirstObjectByType<T>(). If any match will do, the fasterFindAnyObjectByType<T>()is also available. Keep this in mind when following older articles or sample code.
Updates: Update() vs FixedUpdate() vs LateUpdate()
These functions are called every frame, or at a similar frequency, but their purposes are clearly distinct.
| Function | Execution Timing | Primary Use |
|---|---|---|
FixedUpdate() | Fixed time intervals (default 0.02 seconds). Independent of frame rate. | Physics using Rigidbody (applying forces, etc.). |
Update() | Every frame. The interval varies with frame rate. | Input handling, time-based movement, general game logic. |
LateUpdate() | After all Update() calls complete. | Camera follow, character IK (Inverse Kinematics), etc. |
The difference is easiest to see on a timeline of when each is called.
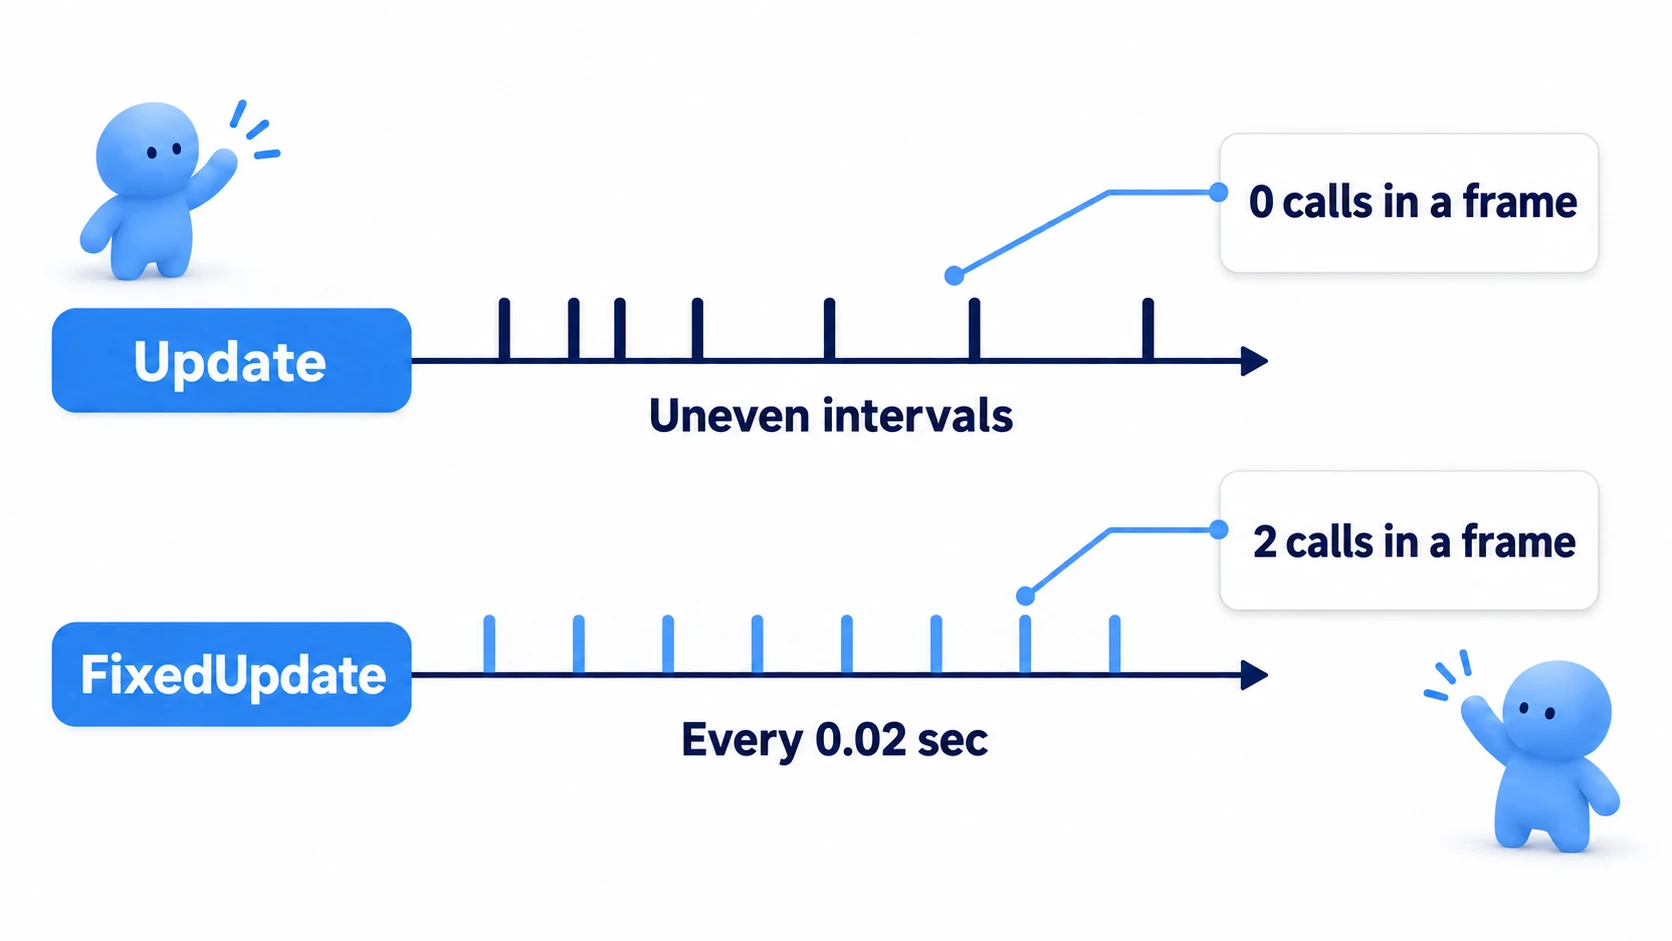
FixedUpdate() is synchronized with the physics engine's update timing, so physics operations like applying forces to a Rigidbody must always happen there. Update(), on the other hand, runs once per frame, making it the right place for input detection, visual updates, and anything else not directly tied to physics. Multiply by Time.deltaTime to keep movement consistent regardless of frame rate fluctuations.
Note: It's not "one
Updateand oneFixedUpdateper frame." At high frame rates, some frames will pass withFixedUpdate()not being called at all; at low frame rates it can run multiple times in a single frame. This is exactly why the standard pattern is "detect input inUpdate(), apply physics movement inFixedUpdate()"—readingInput.GetKeyDownand the like insideFixedUpdate()can cause you to miss inputs.
Mapping this to real development scenarios: anything that concerns what the player sees and does goes in Update, and anything you hand off to the physics engine goes in FixedUpdate. Remember it that way and you'll rarely go wrong.
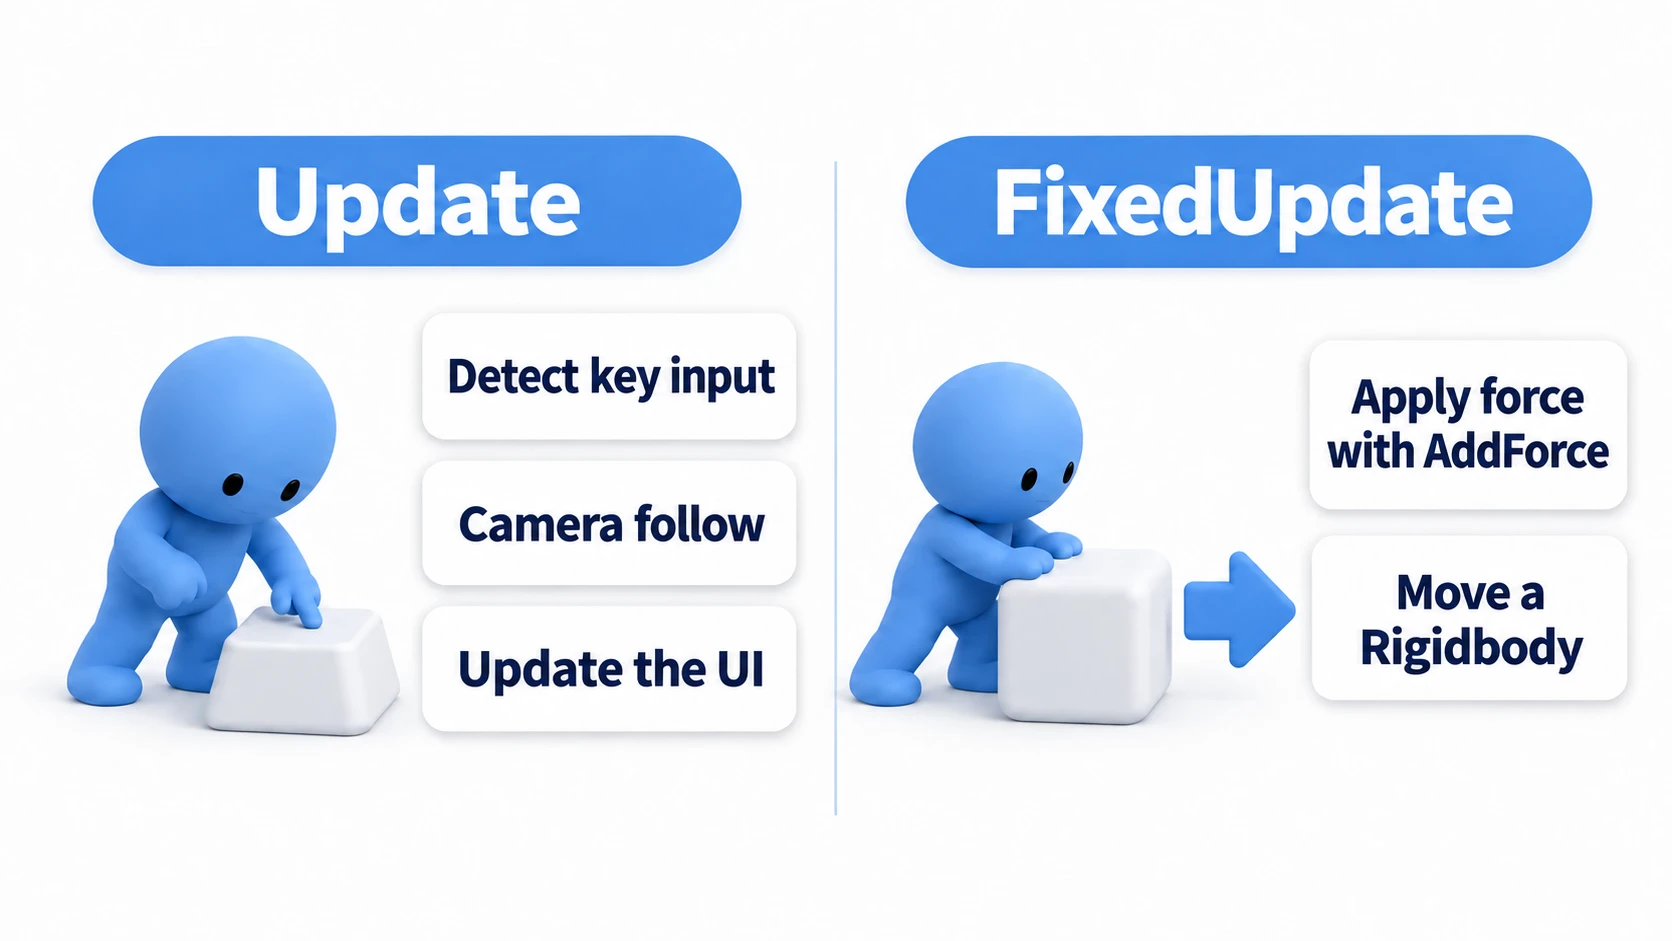
LateUpdate() is for logic that should run after every other object's Update() movement has finished. A classic example: the player character moves in Update(), then the camera follows the player in LateUpdate(). This lets the camera use the player's position after it has moved.
using UnityEngine;

public class CameraFollow : MonoBehaviour
{
    public Transform target;
    public Vector3 offset;

    // Update the camera position after the target has finished moving
    void LateUpdate()
    {
        if (target != null)
        {
            transform.position = target.position + offset;
        }
    }
}
Hands-On: Watching the Call Order in Three Cases
Rather than memorizing a table, watching the order in the Console makes it stick for good. Here we observe three situations that come up daily in any genre—enemies in an action game, NPCs in an RPG, bullets in a shooter—all with a single script.
- Case 1: Scene load—how do objects placed in the scene from the start get initialized?
- Case 2: SetActive on/off—what gets called when a pause menu opens and closes, or an object is shown and hidden?
- Case 3: Instantiate at runtime—what happens the instant you spawn a bullet or an enemy?
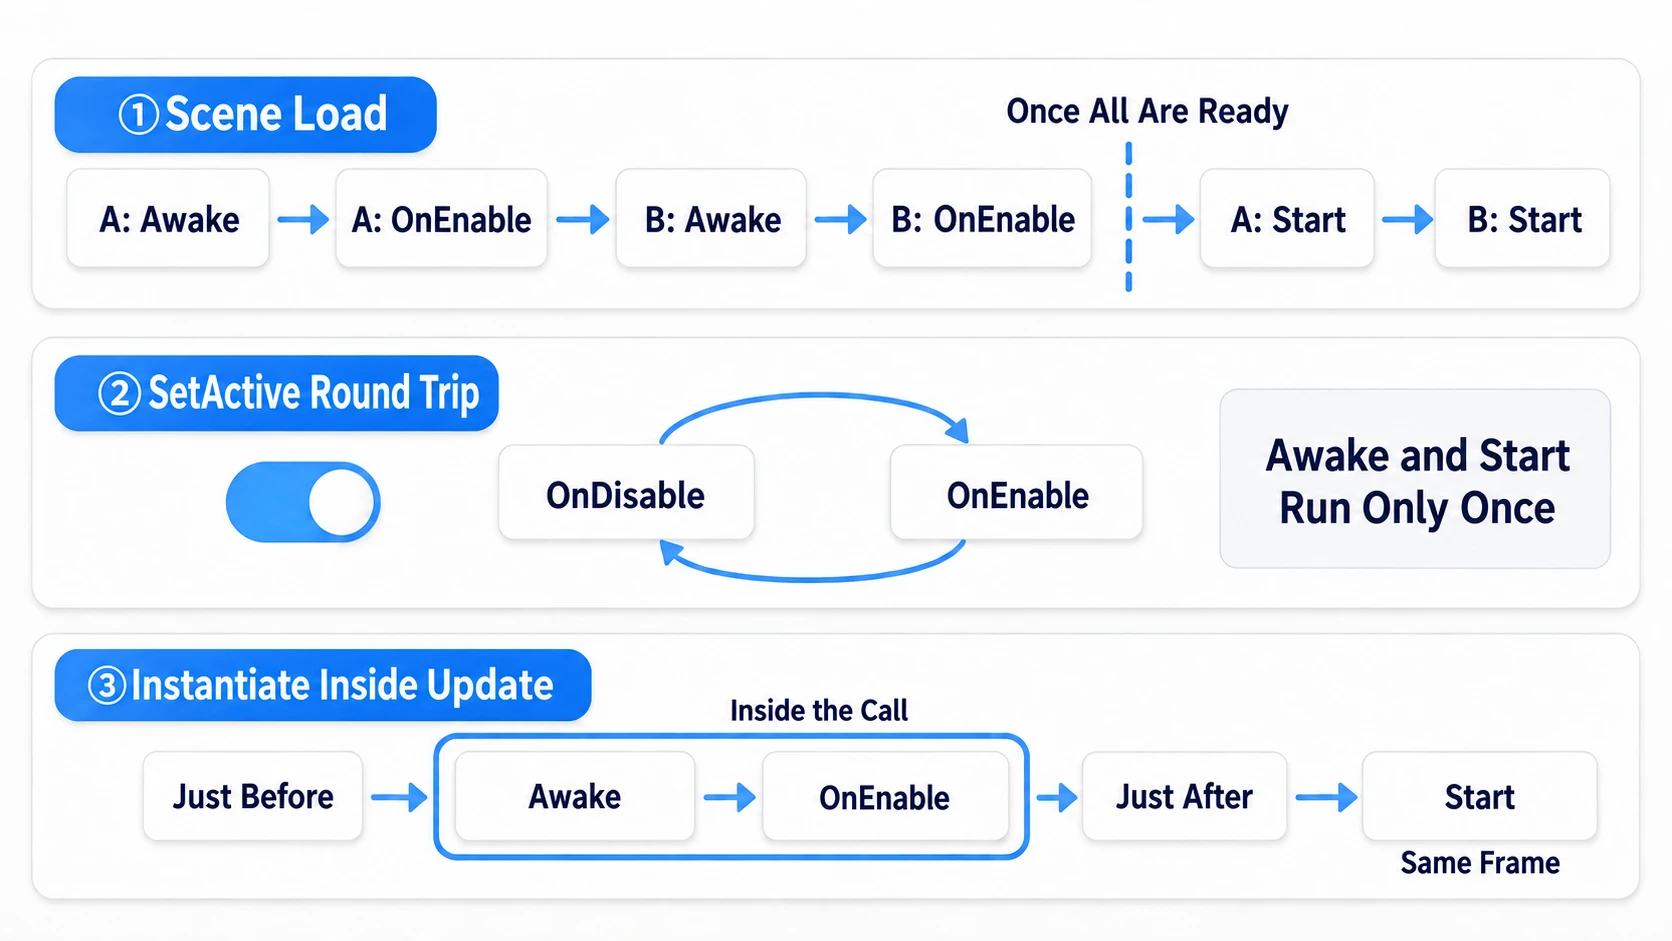
The observer script is just this. Attach it to an empty GameObject:
using UnityEngine;

public class LifecycleLogger : MonoBehaviour
{
    void Awake()     { Debug.Log($"{name}: Awake"); }
    void OnEnable()  { Debug.Log($"{name}: OnEnable"); }
    void Start()     { Debug.Log($"{name}: Start"); }
    void OnDisable() { Debug.Log($"{name}: OnDisable"); }
    void OnDestroy() { Debug.Log($"{name}: OnDestroy"); }
}
For Case 1, place two objects with this script in the scene—EnemyA and EnemyB—and press Play. You'll see EnemyA: Awake → EnemyA: OnEnable → EnemyB: Awake → EnemyB: OnEnable → (only after everyone's Awake is done) EnemyA: Start → EnemyB: Start. All the Awakes finish before any Start begins. Which of A and B goes first isn't fixed, so they may appear in the opposite order.
For Case 2, while the game is running, uncheck EnemyA in the Inspector and check it again. The only log lines are OnDisable and OnEnable—Awake and Start fire only the very first time. The classic bug of "I put my re-initialization code in Start, and it never runs when the object comes back" comes from not knowing this difference.
For Case 3, use the following script to spawn a bullet while the game is running. Attach Spawner to an empty GameObject and drag a bullet Prefab that has LifecycleLogger on it into the Bullet Prefab field. During Play, click inside the Game view once, then press Space. The key is read with the Input System (Keyboard.current), the standard in Unity 6.
using UnityEngine;
using UnityEngine.InputSystem;

public class Spawner : MonoBehaviour
{
    [SerializeField] private GameObject bulletPrefab;

    void Update()
    {
        if (Keyboard.current != null && Keyboard.current.spaceKey.wasPressedThisFrame)
        {
            Debug.Log("--- Before Instantiate ---");
            Instantiate(bulletPrefab);
            Debug.Log("--- After Instantiate ---");
        }
    }
}
The log order is: "Before" → Awake → OnEnable → "After" → Start. In other words, by the time the Instantiate() line finishes, the new object's Awake has already run—but its Start comes later than the Instantiate line (still within the same frame). If a bullet uses speed in its Awake to set how fast it launches, assigning speed = 20 right after Instantiate comes too late: the bullet has already launched at its original speed. Code that tries to use the results of the spawned object's Start immediately after spawning it simply won't work. A huge share of spawn-related bugs are born right here.
Two takeaways: the "everyone's Awake, then everyone's Start" guarantee applies at scene load, and OnEnable/OnDisable are the only ones that fire again and again. Verify both with your own eyes once, and you'll diagnose initialization bugs far faster.
Performance Considerations
Update() and FixedUpdate() are called extremely frequently, so heavy processing inside them can seriously hurt your game's overall performance. Watch out for the following:
- Don't overuse
Update(): Anything that doesn't need to run every frame should be moved out ofUpdate(). For logic that only runs when a condition is met, consider event-driven design or coroutines. - Cache
GetComponentresults: CallingGetComponent<T>()insideUpdate()every frame adds up. Retrieve the components you need once inAwake()orStart()and store (cache) them in variables. - Custom update managers: When hundreds or thousands of objects each have their own
Update(), the call overhead between Unity's native code and C# can become a problem. In such cases, a singleton class (a custom update manager) that calls each object's update method itself can improve performance.
Bonus: Good to Know for Later
Once you've got the lifecycle down, these topics are the natural next steps. For now, just knowing they exist is enough.
- There are more event functions: Beyond the ones covered here, there are physics event functions like
OnTriggerEnter/OnCollisionEnter, called the instant objects collide. See the OnTrigger and OnCollision article for details. - Coroutines excel at time-based logic: For things like "run this in 3 seconds" or "fade out gradually," coroutines are much simpler than hand-rolling timers in
Update. See the coroutines article. Updategets expensive at scale: Once you have thousands of objects, the overhead of theUpdatecalls themselves becomes significant. The fix is the technique covered in the custom update manager article.- Want to check the C# basics first: classes, variables, and methods are covered in C# Basics for Unity Developers.
Summary
Understanding Unity's lifecycle is essential knowledge for every Unity developer, from beginner to professional. Knowing when and why each event function is called lets you write more reliable, better-performing code.
- Initialization: Get yourself ready in
Awake(), then start coordinating with other objects inStart(). - Updates: Physics goes in
FixedUpdate(), input and logic inUpdate(), follow behavior inLateUpdate(). - Performance: Avoid heavy processing inside
Update()and always cache your components.
Master these fundamentals and take your first step toward efficient Unity development.