You add "patrol," "chase," and "attack" states to your enemy AI, and before long the Update method has turned into an if-else labyrinth—everyone who builds stateful characters eventually wanders into this "nesting hell." Once you pass five states or so, even you can't read your own code anymore.
The classic—and still the strongest—tool for taming this chaos is the State Pattern (state machine). The core idea is a single sentence: turn the state itself into a class. In this article, we'll use an enemy AI as our example and walk through implementing a clean state machine with an IState interface.
What You'll Learn
- Why
if-elsebloat happens and what the State Pattern solves- The three building blocks: Context / IState / concrete state classes
- How to implement an enemy AI state machine with
OnEnter/OnUpdate/OnExit- Why adding a state doesn't mean rewriting the existing states—the real source of extensibility
Tested with: Unity 6 (6000.x)
Nesting Hell and How the State Pattern Fixes It
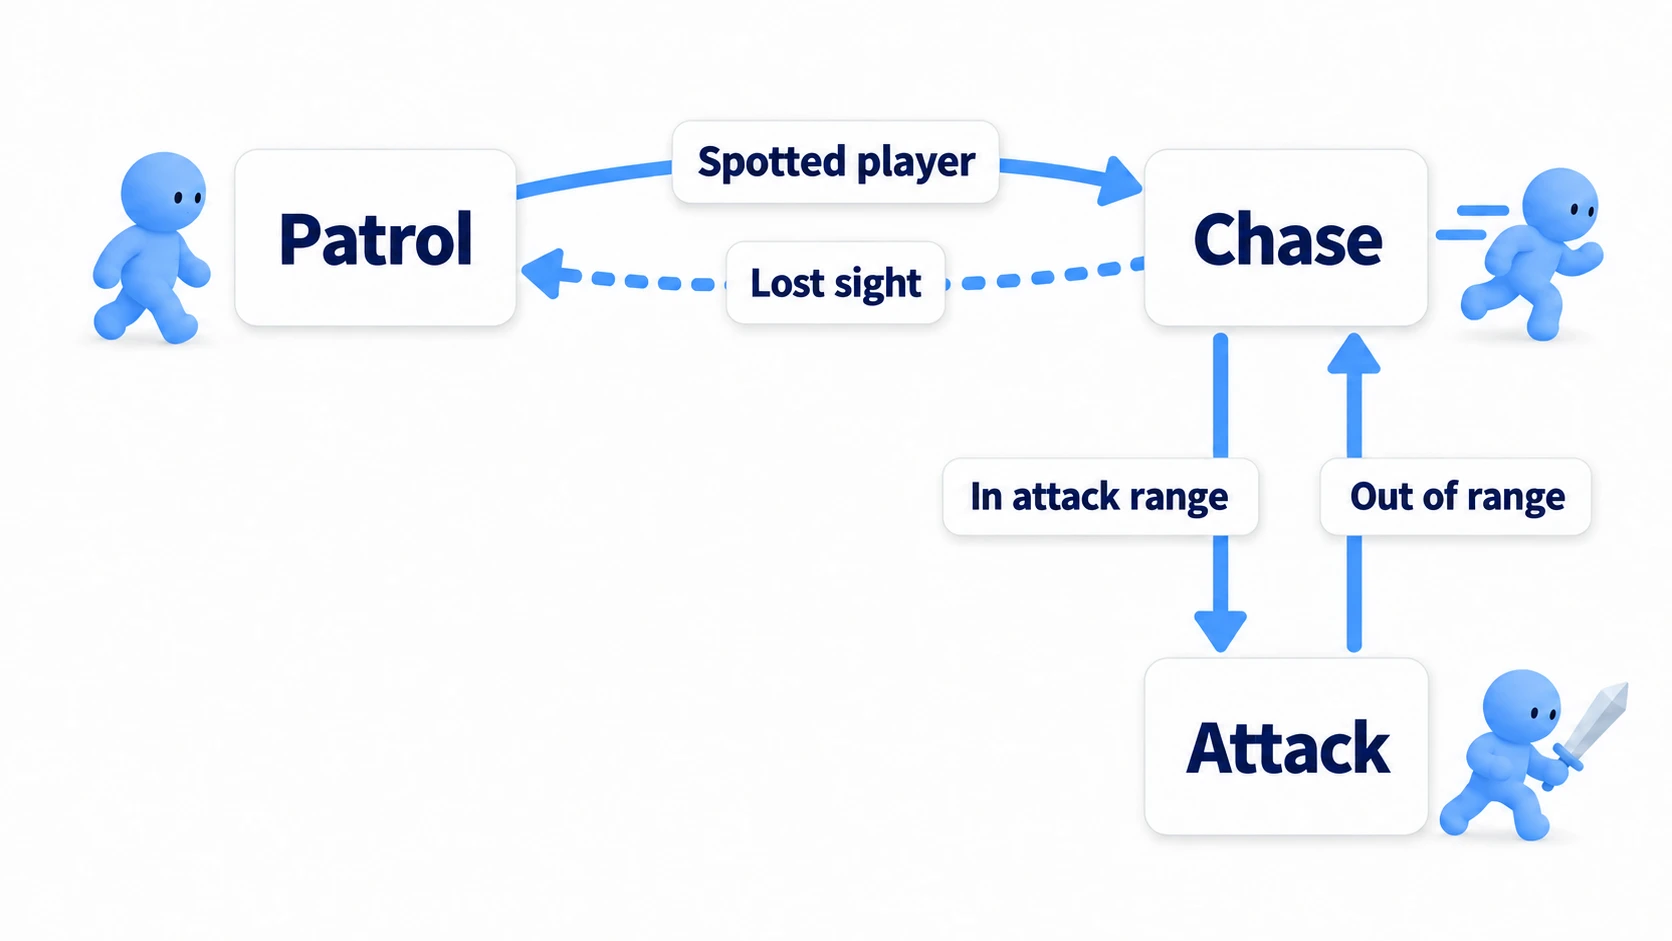
Player characters and enemy AI take on various "states" depending on what's happening in the game. An enemy AI, for example, acts by switching between states like "patrolling," "chasing the player," "attacking," "idle," and "fleeing." First, compare the structure of writing this with if-else versus writing it with the State Pattern.
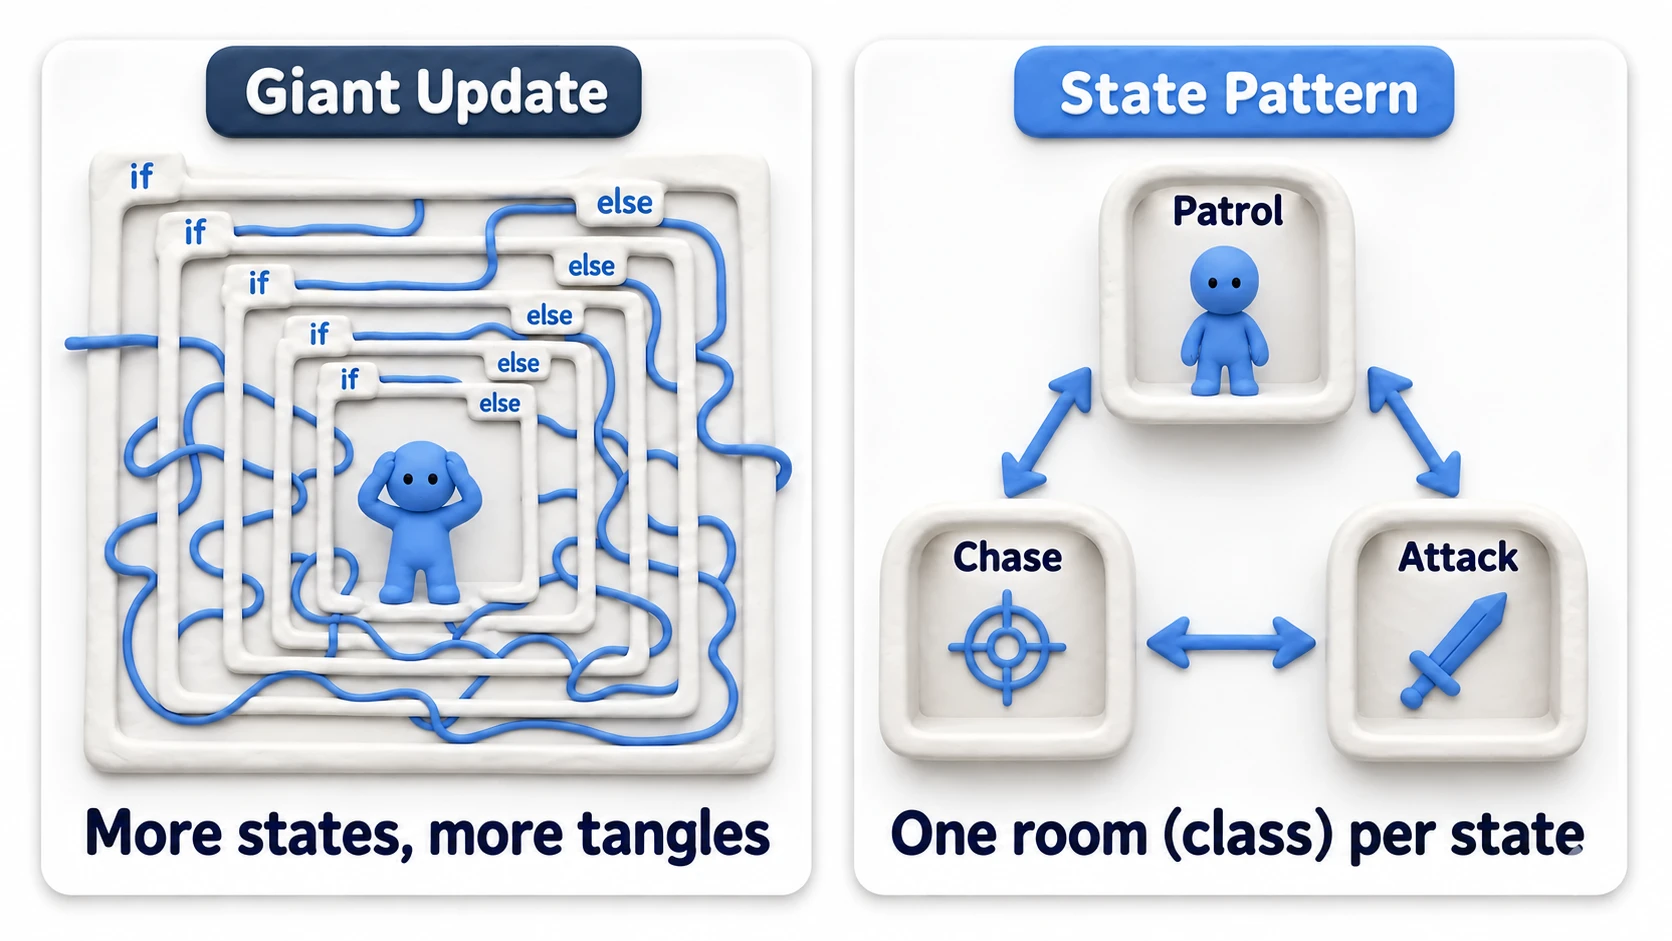
The left-hand approach is the infamous "giant Update."
// Bad example: a giant Update method
void Update()
{
    if (state == "Patrol")
    {
        // Patrol logic
        if (CanSeePlayer())
        {
            state = "Chase";
        }
    }
    else if (state == "Chase")
    {
        // Chase logic
        if (IsInAttackRange())
        {
            state = "Attack";
        }
        else if (!CanSeePlayer())
        {
            state = "Patrol";
        }
    }
    else if (state == "Attack")
    {
        // Attack logic
        if (!IsInAttackRange())
        {
            state = "Chase";
        }
    }
    // ... and more states keep piling on
}
Every new state stretches the else if chain, transition conditions tangle together, and fixing one spot starts breaking other states.
The State Pattern is what manages this kind of "behavior that varies by state" elegantly. The core idea: represent the "state" itself as a class, and implement each state's behavior as methods on that class. The state-holding entity (the Context) keeps a reference to the current state object and "delegates" its processing to it.
Components of the State Pattern
The State Pattern consists of three main elements.
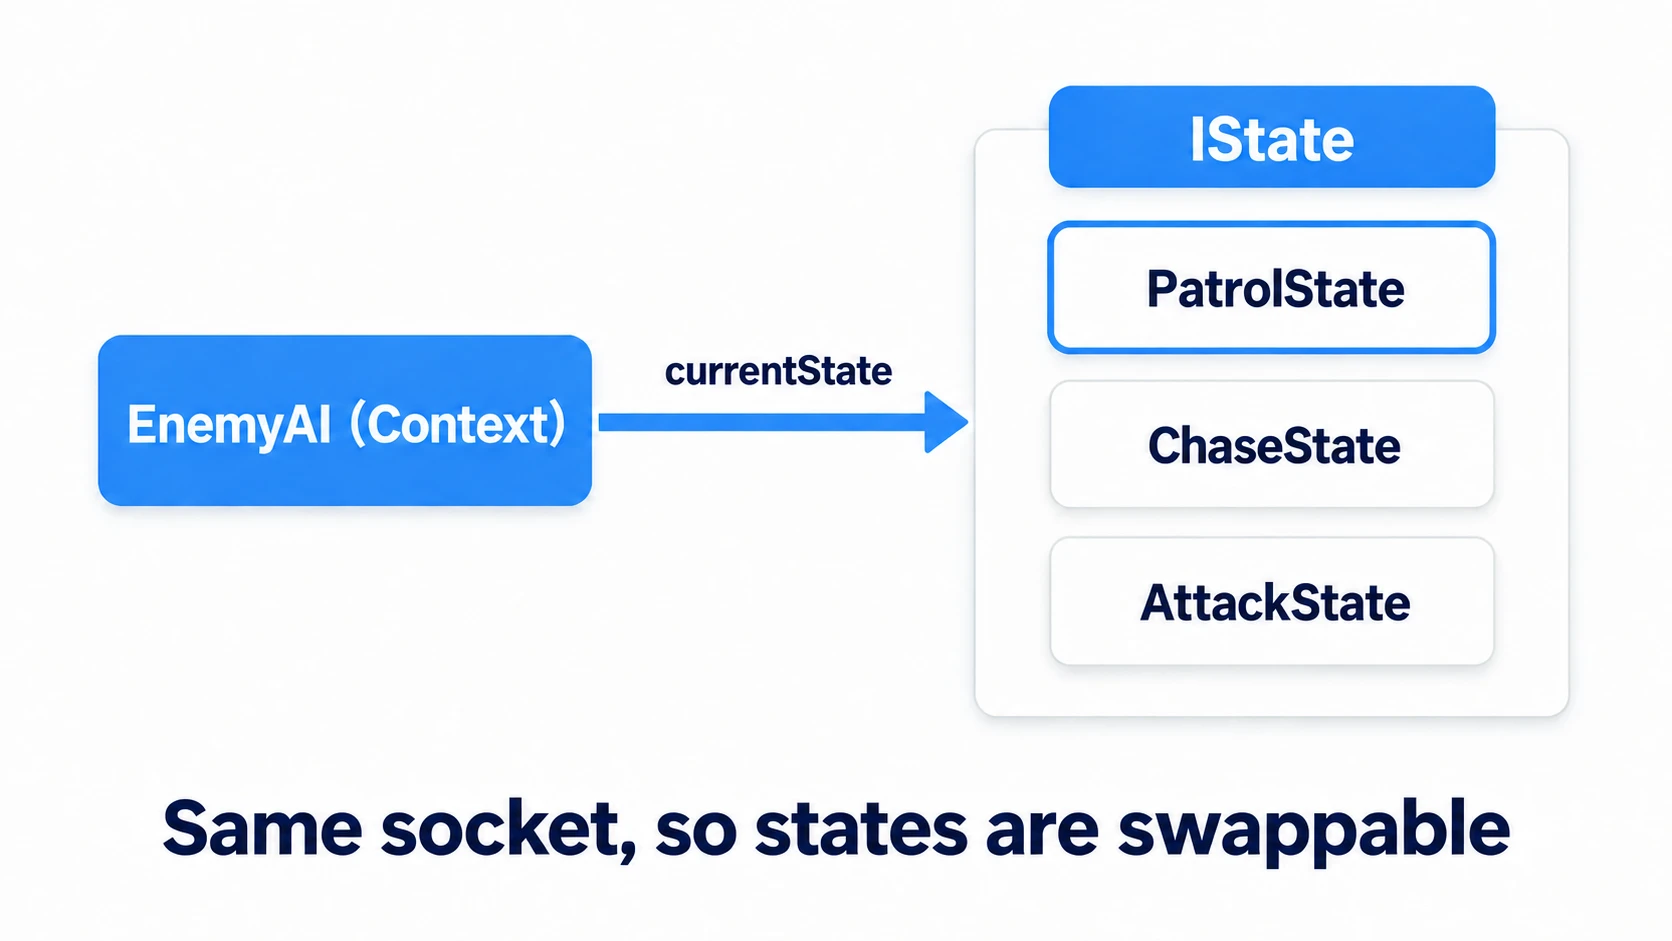
- Context: The entity that holds the state. In this example, the enemy AI character. It keeps a reference to the current state object (
IState) and is responsible for state transitions. - IState (Interface): Defines the common interface every state class must implement. For example, it declares methods like
OnEnter()(runs when entering the state),OnUpdate()(runs every frame while in the state), andOnExit()(runs when leaving the state). - Concrete State: The specific state classes that implement the
IStateinterface—PatrolState,ChaseState,AttackState, and so on. Each class implements the concrete behavior for its state.
Note: The
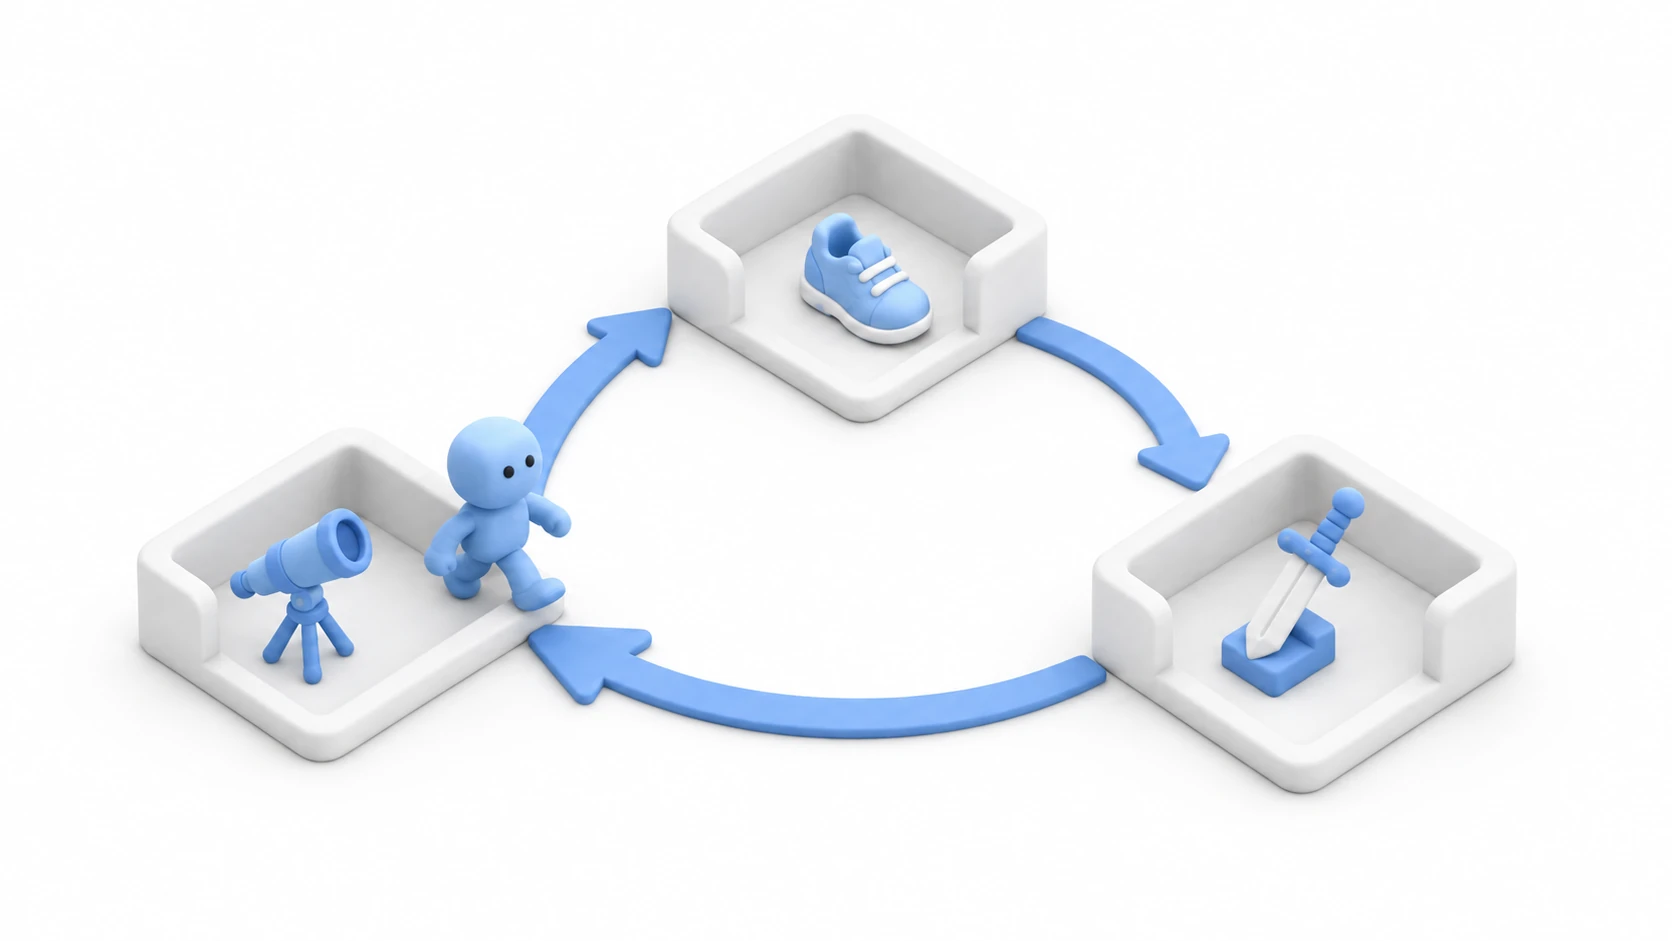
OnEnter→OnUpdate→OnExittrio is easy to remember as "entering the room, being in the room, leaving the room." Starting an animation goes at entry, movement logic runs while inside, and effect cleanup happens on the way out—the right place for each piece of logic falls out naturally.
Unity Implementation Example: Enemy AI State Machine
From here, let's build an enemy AI that actually works. Here's the big picture of the finished result.
Step 1: Define the IState Interface
First, define the interface that serves as the blueprint for every state class.
// IState.cs
public interface IState
{
    // Called once when entering this state
    void OnEnter(EnemyAI context);

    // Called every frame while in this state
    void OnUpdate();

    // Called once when leaving this state
    void OnExit();
}
Step 2: Implement the Concrete State Classes
Next, create each concrete state class. Each state class implements its own logic and checks the conditions for transitioning to other states.
// PatrolState.cs
using UnityEngine;

public class PatrolState : IState
{
    private EnemyAI enemy;

    public void OnEnter(EnemyAI context)
    {
        this.enemy = context;
        Debug.Log("Entering patrol state");
        // Start the patrol animation, etc.
    }

    public void OnUpdate()
    {
        // Implement patrol logic here

        // If the player is spotted, transition to the chase state
        if (enemy.CanSeePlayer())
        {
            enemy.ChangeState(new ChaseState());
        }
    }

    public void OnExit()
    {
        // Stop the patrol animation, etc.
    }
}

// ChaseState.cs
using UnityEngine;

public class ChaseState : IState
{
    private EnemyAI enemy;

    public void OnEnter(EnemyAI context)
    {
        this.enemy = context;
        Debug.Log("Entering chase state");
    }

    public void OnUpdate()
    {
        // Implement chase logic (pursue the player) here

        // If within attack range, transition to the attack state
        if (enemy.IsInAttackRange())
        {
            enemy.ChangeState(new AttackState());
        }
        // If the player is lost, return to the patrol state
        else if (!enemy.CanSeePlayer())
        {
            enemy.ChangeState(new PatrolState());
        }
    }

    public void OnExit() { }
}

// AttackState, etc... implemented the same way
Step 3: Implement the Context Class
Finally, implement the EnemyAI class, the entity that manages the states. This class holds the current state and delegates its Update processing to the current state object.
// EnemyAI.cs
using UnityEngine;

public class EnemyAI : MonoBehaviour
{
    private IState currentState;

    void Start()
    {
        // Set the initial state
        ChangeState(new PatrolState());
    }

    void Update()
    {
        // Call the current state's update logic
        if (currentState != null)
        {
            currentState.OnUpdate();
        }
    }

    // Method for switching states
    public void ChangeState(IState nextState)
    {
        // If there is a current state, call its exit logic
        if (currentState != null)
        {
            currentState.OnExit();
        }

        // Switch to the new state and call its initialization
        currentState = nextState;
        currentState.OnEnter(this);
    }

    // Helper methods used by the state classes
    // These are stubs to show the skeleton — we replace them with the real thing in the hands-on section below
    public bool CanSeePlayer() { /* Logic to check if the player is visible */ return false; }
    public bool IsInAttackRange() { /* Logic to check if within attack range */ return false; }
}
Notice how EnemyAI's Update shrank to a few lines that "just hand everything off to the current state." All the per-state complexity is now contained inside each state class.
Benefits of the State Pattern
The biggest payoff of this pattern is that adding a state doesn't mean rewriting the existing states' behavior.
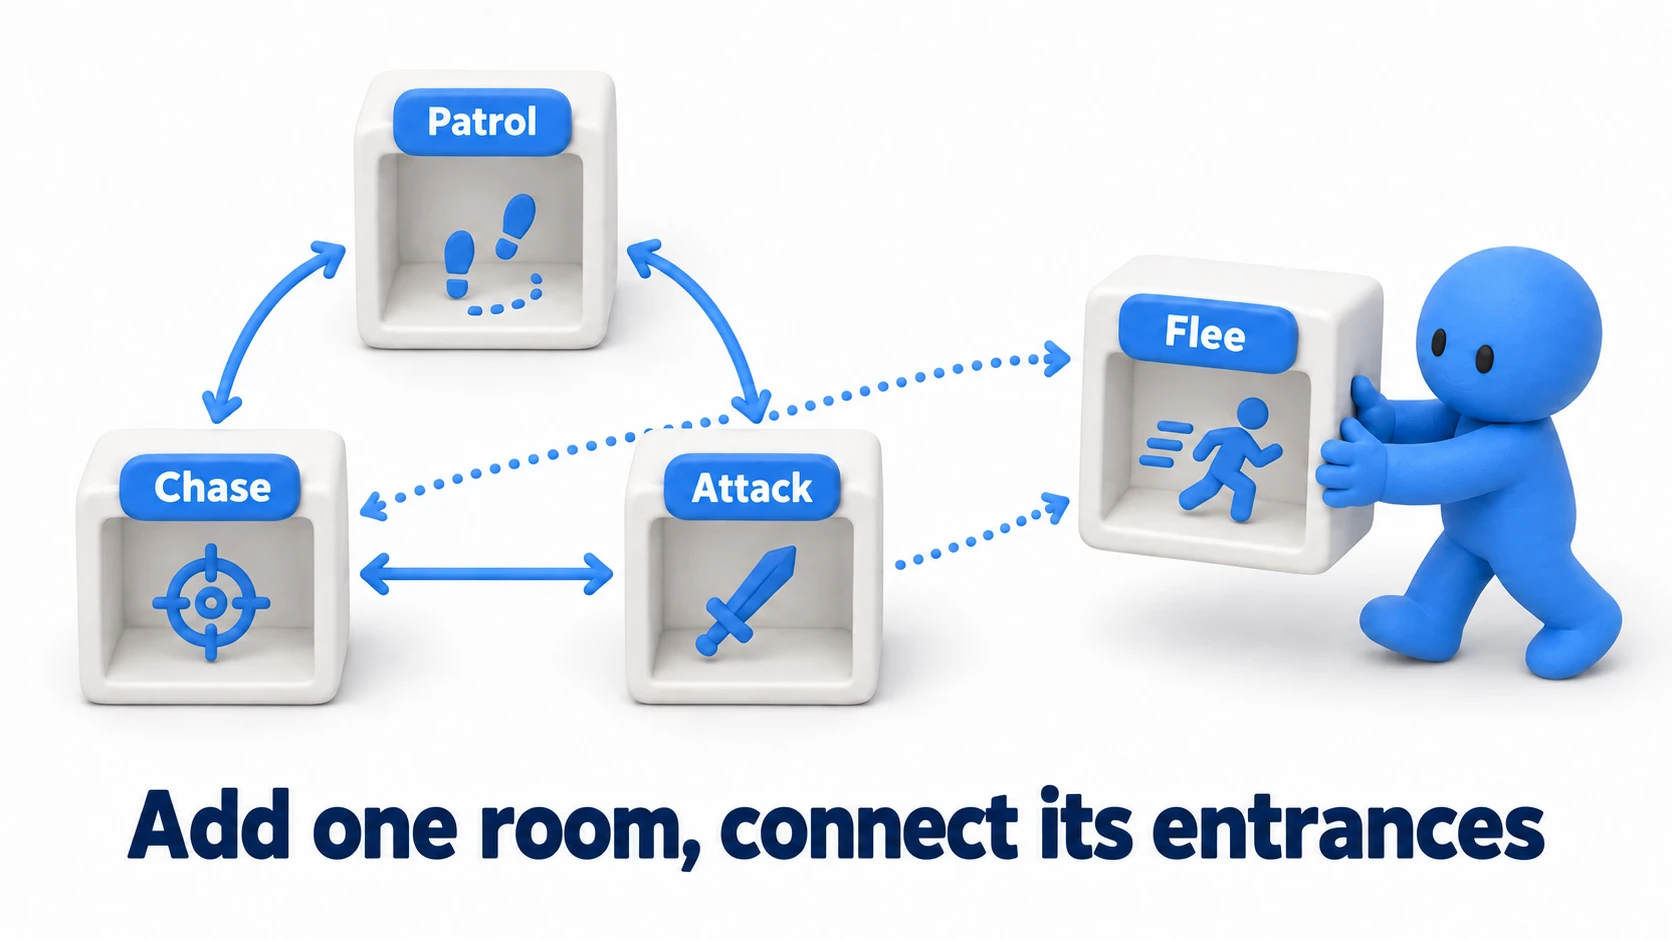
- Separation of concerns: Each state's logic is fully isolated in its own class. The
EnemyAIclass no longer needs to know the detailed behavior of each state. - Extensibility: To add a new state (e.g.,
FleeStatefor fleeing), you create a new class implementingIStateand add the conditions for which states move into it (its entry conditions). The existing states' behavior stays untouched, which keeps the impact to a minimum. - Readability and maintainability: The nested
if-elsehell disappears and the code becomes remarkably clean and readable. To change a state's behavior, you only edit the corresponding class.
Hands-On: A Guard AI That Patrols, Spots, Chases, and Loses You
With the skeleton in place, let's make CanSeePlayer() real and complete a working guard. A stealth-game sentry, a horror-game stalker, an action-game patrol soldier — they're all variations of this one character. The target behavior: patrol → spot the player → chase → hang on for 2 seconds after losing sight → investigate the last known position → return to patrol if no one's there.
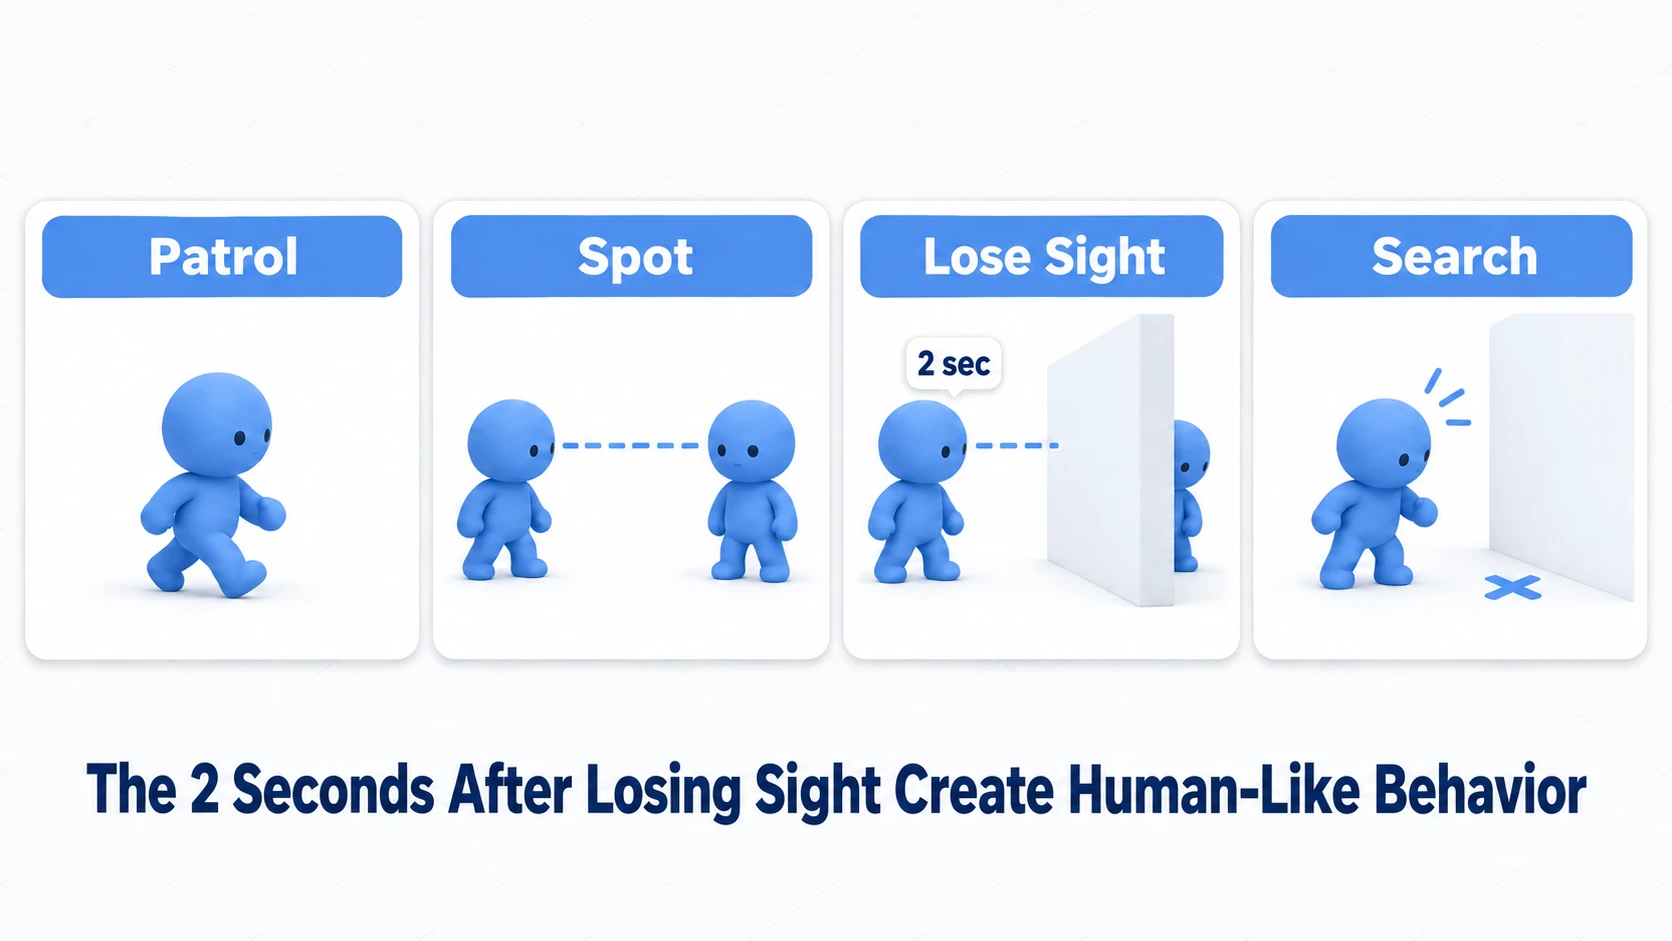
First, the finished EnemyAI. Two things matter here — a minimal "distance + occlusion raycast" vision check, and reusing state instances (no new on every transition; each enemy builds its own set in Awake).
// EnemyAI.cs (complete version)
using UnityEngine;

public class EnemyAI : MonoBehaviour
{
    [Header("Detection settings")]
    public Transform player;
    public float sightRange = 8f;      // How far it can notice you
    public LayerMask obstacleMask;     // Layer for walls and other occluders

    [Header("Movement settings")]
    public float moveSpeed = 2f;       // Patrol / search speed
    public float chaseSpeed = 4f;      // Chase speed

    // "Last seen position" used by chase and search
    public Vector3 LastKnownPosition { get; set; }

    // Create one set of states up front and reuse them (no new each time)
    public PatrolState Patrol { get; private set; }
    public ChaseState Chase { get; private set; }
    public SearchState Search { get; private set; }

    private IState currentState;

    void Awake()
    {
        Patrol = new PatrolState();
        Chase = new ChaseState();
        Search = new SearchState();
    }

    void Start() { ChangeState(Patrol); }

    void Update() { currentState?.OnUpdate(); }

    public void ChangeState(IState nextState)
    {
        currentState?.OnExit();
        currentState = nextState;
        currentState.OnEnter(this);
    }

    // The real vision check: visible if "within range" AND "no wall in between"
    public bool CanSeePlayer()
    {
        Vector3 toPlayer = player.position - transform.position;
        if (toPlayer.magnitude > sightRange) return false;

        // Blocked by a wall means not visible
        if (Physics.Raycast(transform.position, toPlayer.normalized,
                toPlayer.magnitude, obstacleMask)) return false;

        LastKnownPosition = player.position; // Keep updating while visible
        return true;
    }

    // Helper to make the current state visible as a color (call from each state's OnEnter)
    public void SetStateColor(Color color)
    {
        GetComponentInChildren<Renderer>().material.color = color;
    }
}
Next, the stars of this article: a ChaseState that "hangs on after losing sight" and a SearchState that "goes to investigate."
// ChaseState.cs (with a lose-sight grace period)
using UnityEngine;

public class ChaseState : IState
{
    private EnemyAI enemy;
    private float lostTimer; // Time since losing sight

    public void OnEnter(EnemyAI context)
    {
        enemy = context;
        lostTimer = 0f; // We reuse instances, so always reset on entry
        enemy.SetStateColor(Color.red);
    }

    public void OnUpdate()
    {
        if (enemy.CanSeePlayer())
        {
            lostTimer = 0f; // Reset the grace while the player is visible
        }
        else
        {
            // Don't give up the instant you lose sight. Hang on for 2 seconds
            lostTimer += Time.deltaTime;
            if (lostTimer >= 2f)
            {
                enemy.ChangeState(enemy.Search);
                return;
            }
        }

        // Head for the last seen position (keep running during the grace period too)
        enemy.transform.position = Vector3.MoveTowards(
            enemy.transform.position, enemy.LastKnownPosition,
            enemy.chaseSpeed * Time.deltaTime);
    }

    public void OnExit() { }
}
// SearchState.cs — investigate the last seen position, then return to patrol
using UnityEngine;

public class SearchState : IState
{
    private EnemyAI enemy;
    private float searchTimer;

    public void OnEnter(EnemyAI context)
    {
        enemy = context;
        searchTimer = 0f;
        enemy.SetStateColor(Color.yellow);
    }

    public void OnUpdate()
    {
        // Re-spotted the player on the way? Back to chasing
        if (enemy.CanSeePlayer())
        {
            enemy.ChangeState(enemy.Chase);
            return;
        }

        // Move to the last seen position, then look around for 3 seconds
        enemy.transform.position = Vector3.MoveTowards(
            enemy.transform.position, enemy.LastKnownPosition,
            enemy.moveSpeed * Time.deltaTime);

        if (Vector3.Distance(enemy.transform.position, enemy.LastKnownPosition) < 0.1f)
        {
            searchTimer += Time.deltaTime;
            if (searchTimer >= 3f) enemy.ChangeState(enemy.Patrol);
        }
    }

    public void OnExit() { }
}
For PatrolState, just add enemy.SetStateColor(Color.white) to the Step 2 version's OnEnter and change its transition to enemy.ChangeState(enemy.Chase) (movement between patrol points works the same way with MoveTowards). Drag the player into player and place a Cube as a wall. Put the Cube on a new layer called Obstacle and select Obstacle in obstacleMask (left at Nothing, the enemy sees right through walls). During Play, drag the player around in the Scene view.
The enemy starts acting out its drama — white → red → yellow → white — spotting, chasing, searching, and returning. Note that MoveTowards doesn't avoid walls; it passes right through them. To make the guard go around walls, switch to the NavMeshAgent from the NavMesh article. When you want to upgrade the vision to a proper cone (FOV), the parts in the FOV detection article slot right in.
For the final check, press Play and duck behind a wall mid-chase. The guard doesn't give up instantly — it hangs on for two seconds, comes to investigate the last place it saw you, then drifts back to patrol as if nothing happened. If you can see that little piece of humanity, the AI is complete. What makes an enemy look smart isn't how fast it chases; it's those two seconds after losing you and the SearchState that comes to check the last place it saw you. And if three guards each move on their own timing, your state reuse is working too.
Bonus: Good to Know for Later
Once you can build a state machine, these topics come into view next.
- The Animator is a state machine too: Unity's
Animator Controlleris a state machine for animation. The ideas in this article map directly onto its GUI—see the Animator Controller article. Aligning your "logic state machine" with your "animation state machine" tightens up your design. - Game-wide state management: State at the whole-game level—"title → playing → game over," rather than per-character—is covered in the GameManager pattern article. A practical, staged approach: use
enum+switchfor small state sets, and graduate to the State Pattern when things get complex. - Notifying on state transitions: For hookups like "flash the UI the moment we enter the attack state," notify via events instead of touching the UI directly from a state class—it keeps your state classes loosely coupled.
- Behavior Trees for growing interrupts: once interrupts like "flee at low HP no matter what" pile up, the switching code spreads across every state. Choosing actions by priority is covered in the Behavior Tree article.
Summary
The State Pattern is an extremely powerful design pattern for implementing the behavior of objects with complex state transitions in an organized, extensible, and maintainable way.
- Represent each state as a class and encapsulate state-specific behavior inside it.
- The Context (the entity) holds a reference to the current state object and delegates processing to it.
- Each state class manages its own transition logic.
- The
OnEnter(entering) /OnUpdate(inside) /OnExit(leaving) trio makes the right home for each piece of logic obvious. - Adding a state means adding one class and writing its entry conditions. Extensibility that leaves existing states' behavior intact is this pattern's greatest weapon.
It applies to all sorts of game development scenarios: character AI, complex player actions (normal, swimming, climbing a ladder, etc.), managing UI modal windows, and more. When your Update method starts bloating with if and switch statements, that's a good sign it's time to consider the State Pattern.