Once your character can walk, run, and jump, the next thing you want is attacks. But add an Attack state to your State Machine and it gets unwieldy fast. How do you detect that the attack finished? What happens when it interrupts movement? How do you build combos? The more transition lines you add, the less the graph reads as a picture.
UE has a separate system for these one-shot actions: the Animation Montage. This article covers how it splits work with the State Machine, the Slot node that's the usual reason a Montage doesn't show up, and Anim Notify for timing your attack hitbox.
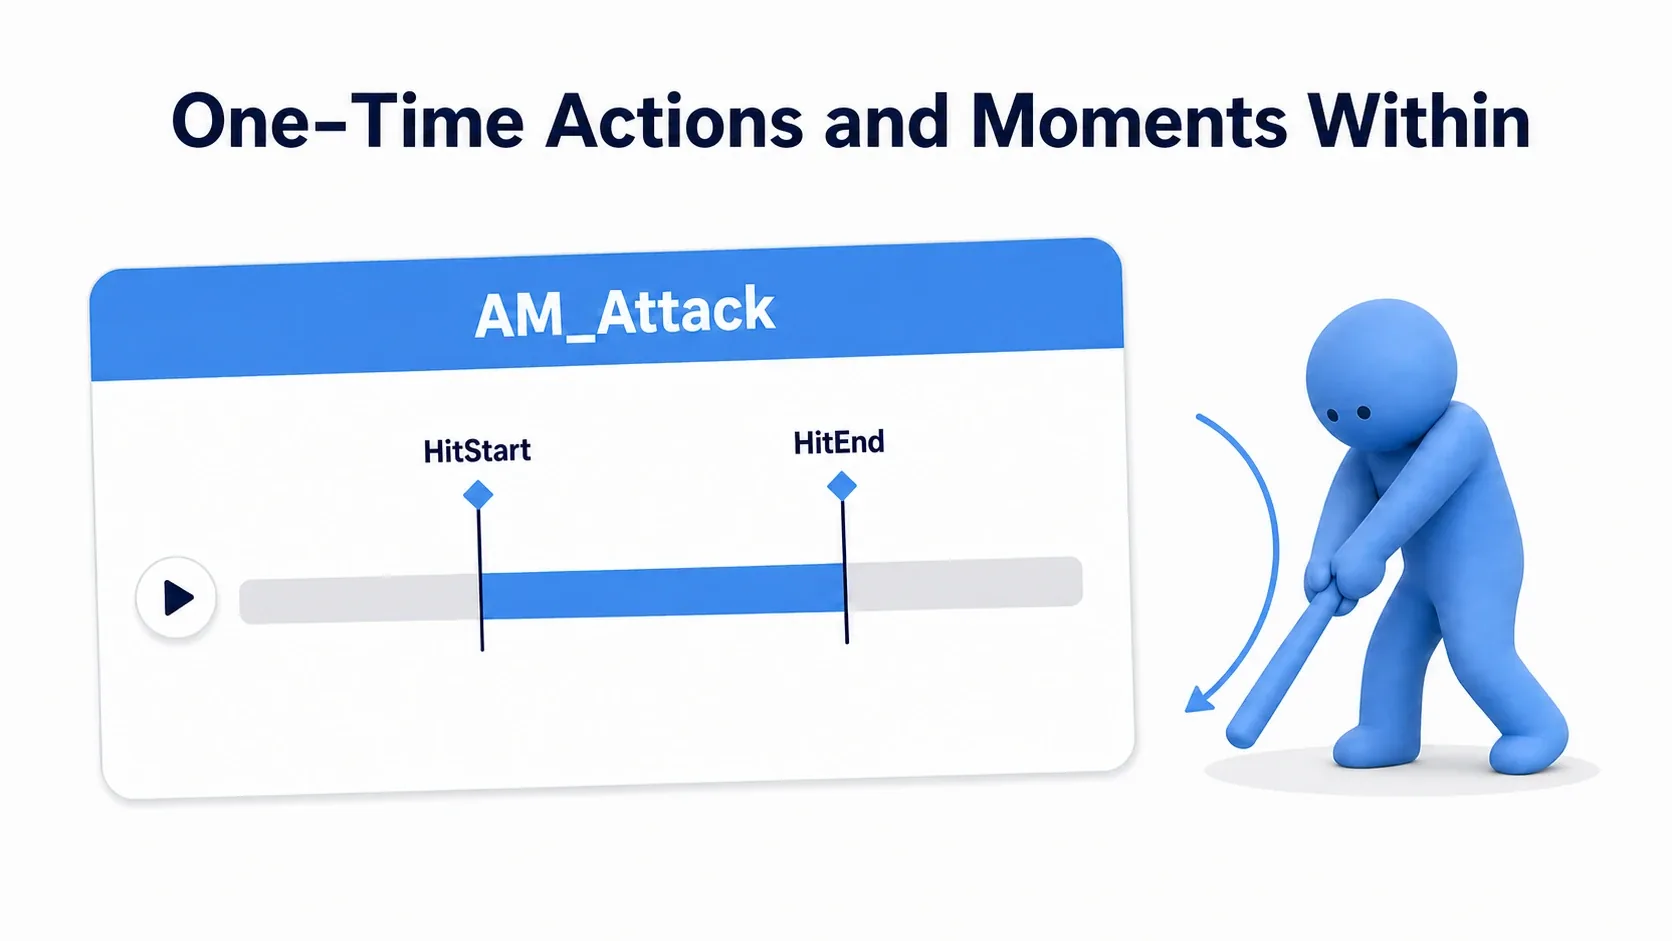
What You'll Learn
- Repeating states go in the State Machine, one-shot interruptions go in a Montage
- The #1 reason a Montage doesn't show is forgetting the Slot node
- Use the output pins on
Play Montageto catch completion, interruption, and notifies- Use Anim Notify to mark "the moment the hitbox turns on"
- Hands-on: a sword slash that misses during the windup and only connects on the downswing
How State Machine and Montage Split the Work
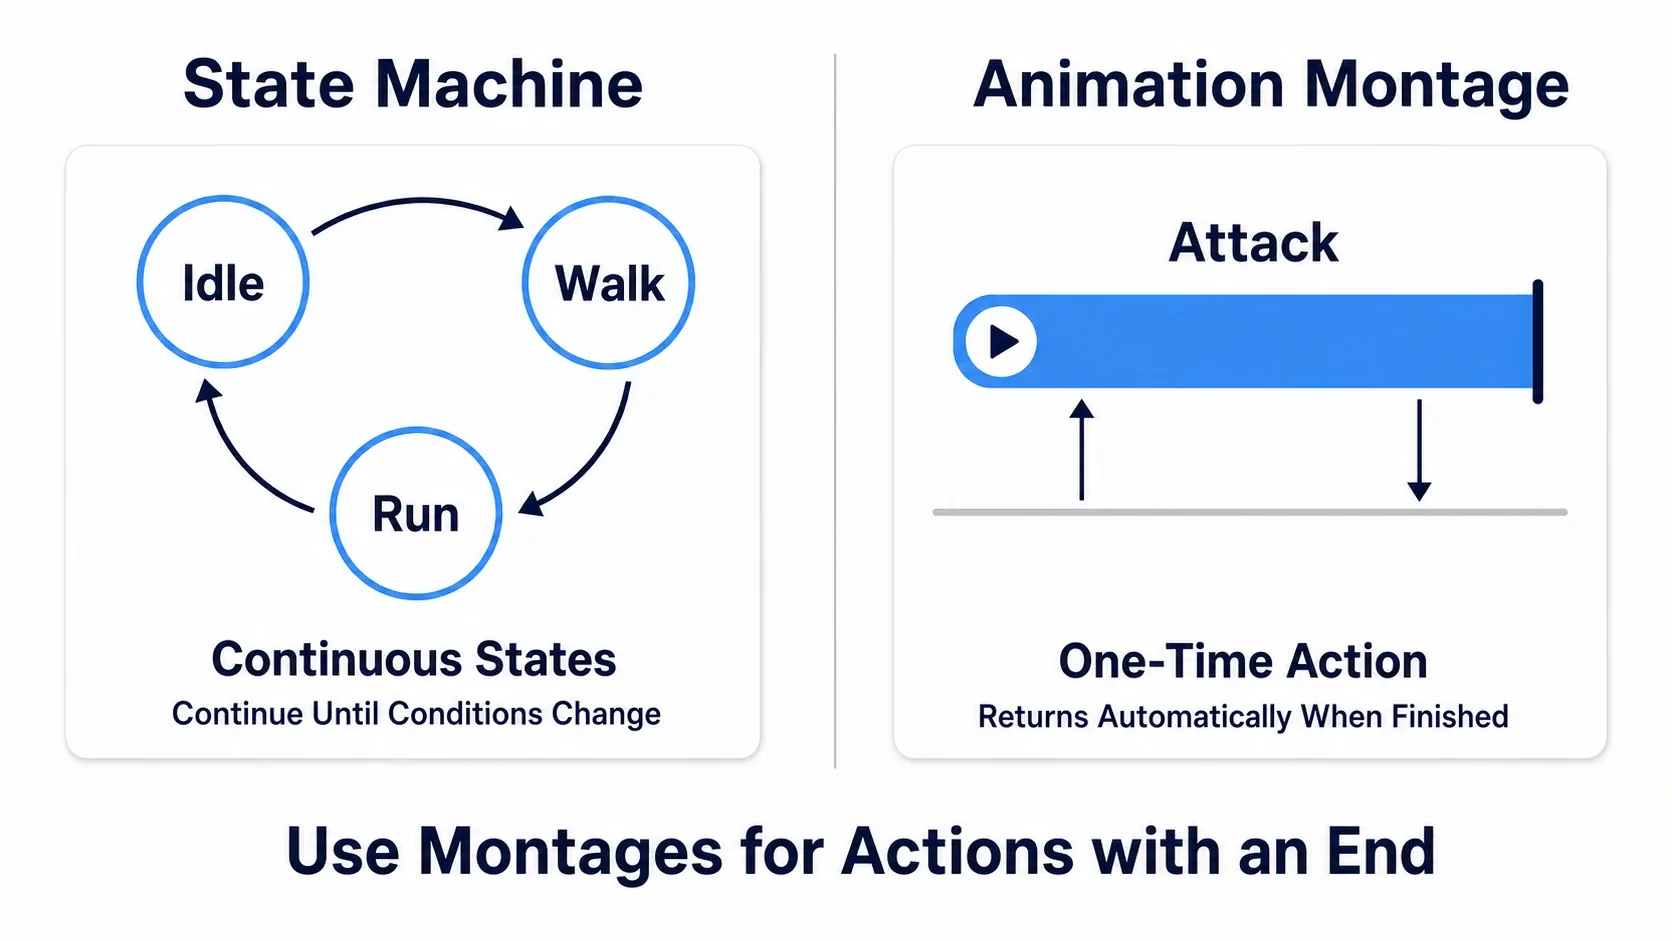
Both play animations, but what they're suited for is clearly divided.
| State Machine | Animation Montage | |
|---|---|---|
| Handles | Ongoing states | One-shot actions |
| Examples | Idle, walk, run, fall | Attack, hit reaction, dodge, open a door |
| How it ends | Continues until conditions change | Returns on its own once playback finishes |
| Trigger | Variable changes (bIsInAir, etc.) | Explicitly played from Blueprint |
| Where you write it | Anim Graph (in the asset) | Blueprint on the game side |
The test is "does it decide its own ending?" Running has no ending. It continues until you release the stick. A sword swing, on the other hand, always finishes in 1.0 seconds. Think of it as actions with an ending belong in a Montage.
Add attacks to a State Machine and you end up checking "is the attack animation done" every frame and writing that into a transition rule. With a Montage, the system already holds that answer.
The movement animation foundation itself is covered in the State Machine and Blend Space article. This article is the follow-up about interrupting it with attacks.
Creating a Montage
There are two ways to make one, but if you already have an animation asset the first is faster.
Method 1: from an AnimSequence. Right-click your attack Animation Sequence in the Content Browser and choose Create > Create AnimMontage. You get a Montage with the same contents.
Method 2: from scratch. Right-click > Animation > Animation Montage and pick a skeleton. Once it opens, drag Animation Sequences onto the Montage track at the bottom.
Open the Montage editor and you'll see tracks stacked at the bottom. Three of them matter first.
| Track | Contents |
|---|---|
| Montage | The animations laid out. You can chain several |
| Sections | Names for regions. There's one Default by default |
| Notifies | Where you place notifies fired mid-playback. The star of this article |
Blend In and Blend Out in the details panel control how smoothly playback enters and exits. The default of around 0.25 seconds looks natural, but for a fast attack, tightening it to about 0.1 seconds makes it feel more responsive.
Inserting the Slot Node
This is the first and biggest stumble with Montages.
Playing a Montage does nothing unless the Animation Blueprint has somewhere to receive it. A Montage doesn't put itself on screen. It works by injecting a pose at a designated place in the Anim Graph. That place is the Slot.
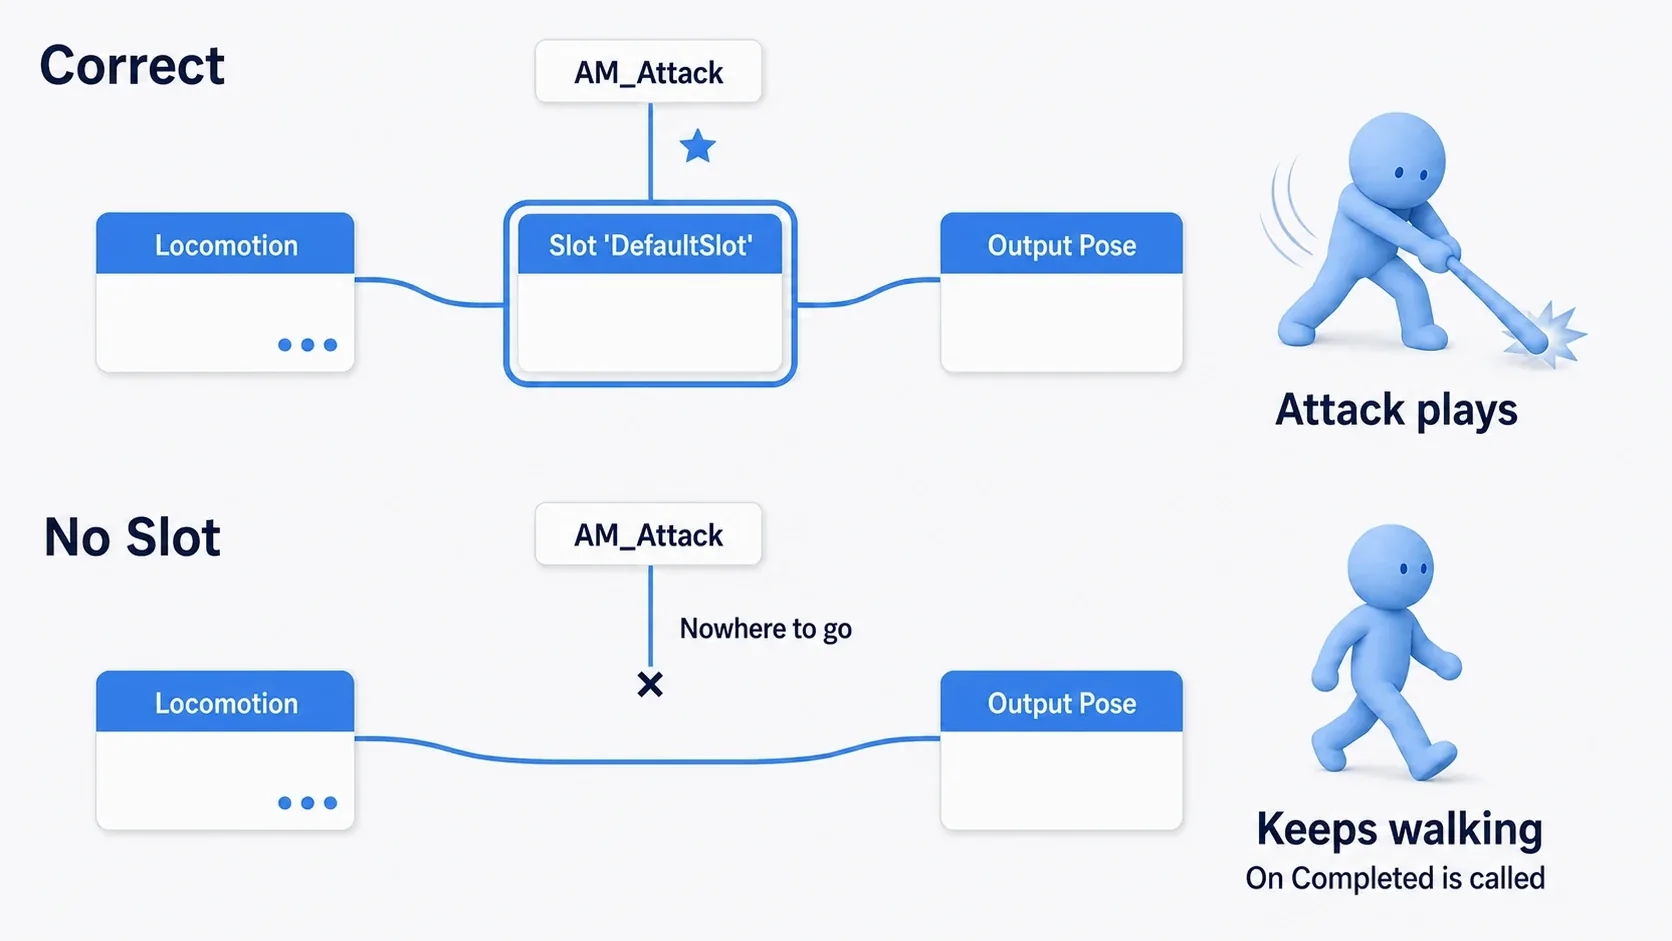
Open your Animation Blueprint and wire the Anim Graph like this.
Locomotion (State Machine)
  → Slot 'DefaultSlot'      ← right-click and search for "Slot"
  → Output Pose
The default slot name is DefaultSlot, and Montages use it by default too. If you haven't changed any settings, inserting this one node is all it takes.
The symptom when it's missing is distinctive. The Montage does play, and On Completed on Play Montage fires correctly, yet the character just keeps walking. Logs make it look like everything is working, which is what makes the cause hard to find.
When you add more Slots: if you want to split by body part, like "attack with the upper body while running," add a Slot such as
UpperBodyand combine it withLayered blend per bone. Add and manage Slots from Window > Anim Slot Manager, then choose which Slot to use in the Montage's details panel.
Playing It with Play Montage
There are several playback nodes with similar names, which makes them easy to confuse.
| Node | Target | Characteristics |
|---|---|---|
| Play Montage | Skeletal Mesh Component | Delivers completion, interruption, and notifies via output pins. Good for Blueprints |
| Play Anim Montage | Character | Convenient. Returns only the play length (seconds) |
| Montage Play | Anim Instance | Low level. Returns only the play length |
If you're building in Blueprints, pick Play Montage. It lets you write "when the attack ends, do the next thing" without any extra checks.
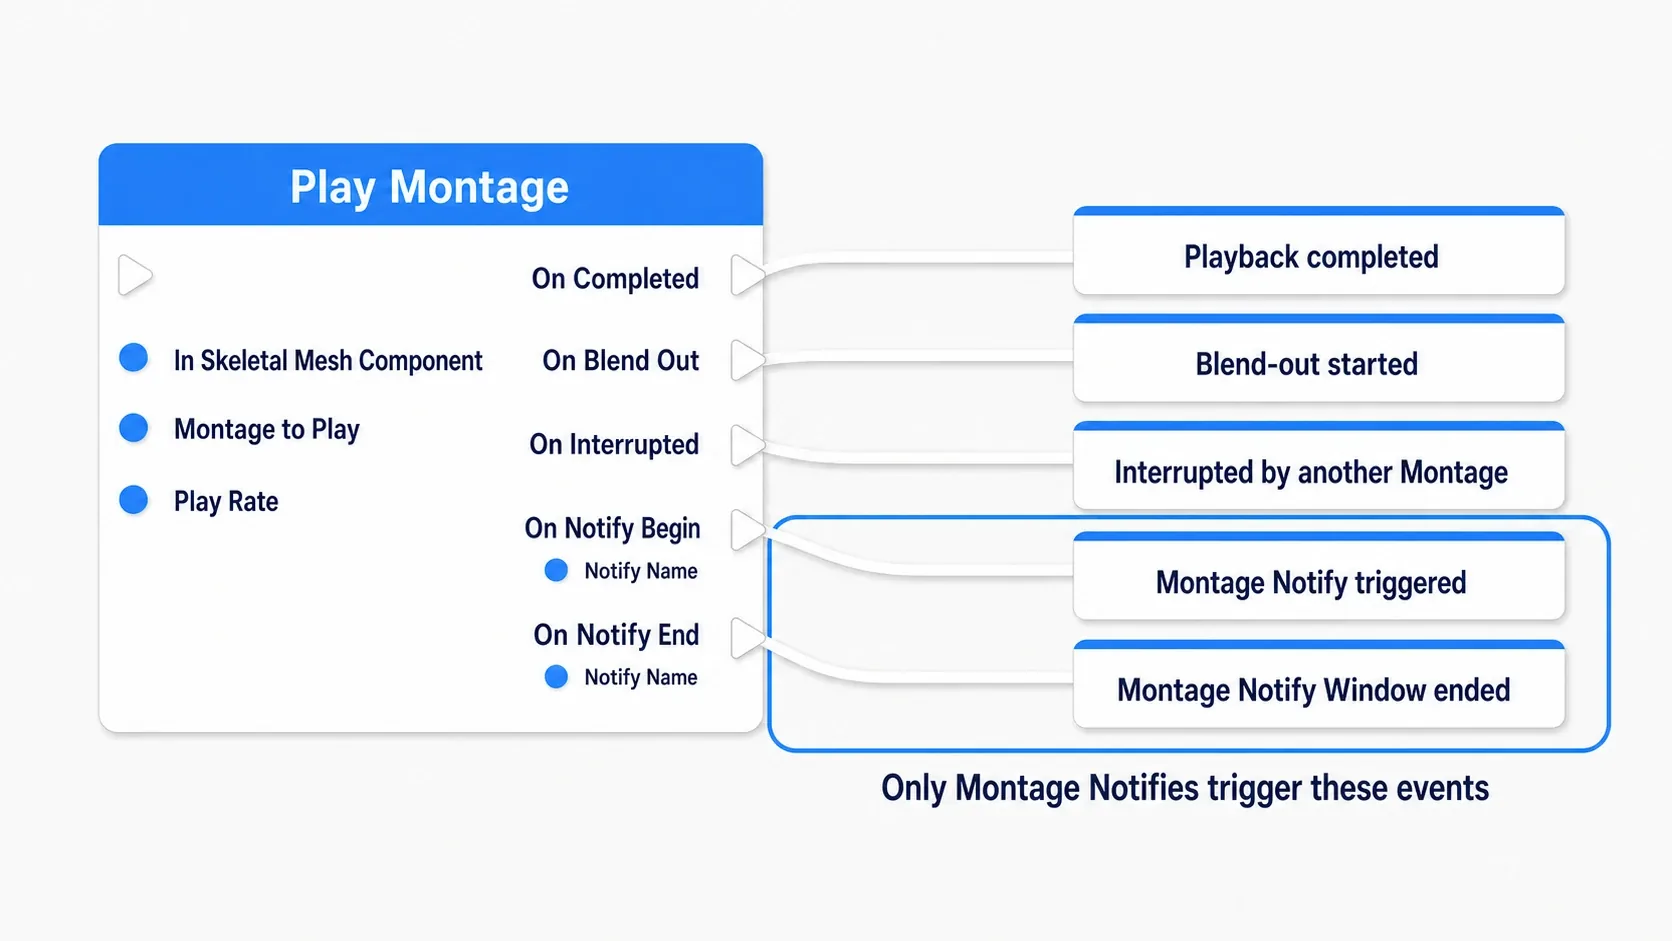
There are five output pins.
| Pin | When it fires | Use it for |
|---|---|---|
| On Completed | When playback reaches the end | Clearing the attacking state, accepting the next input |
| On Blend Out | When the exit blend begins | Cleanup slightly earlier than On Completed |
| On Interrupted | When another Montage interrupts | Cutting a combo short, interruption from a hit |
| On Notify Begin | When a Montage Notify arrives | Hitbox on, effects, sound |
| On Notify End | When a Montage Notify Window ends | Hitbox off |
On Notify Begin and On Notify End output a Notify Name. When you place multiple notifies, route on that name with Switch on Name.
Important limitation:
On Notify Begin/On Notify Endonly respond toMontage NotifyandMontage Notify Window. Place a regular Anim Notify and these pins stay silent. The next section explains why.
Timing Things with Anim Notify
An Anim Notify is a marker you place on a specific frame of an animation. The instant playback passes that point, an event fires.
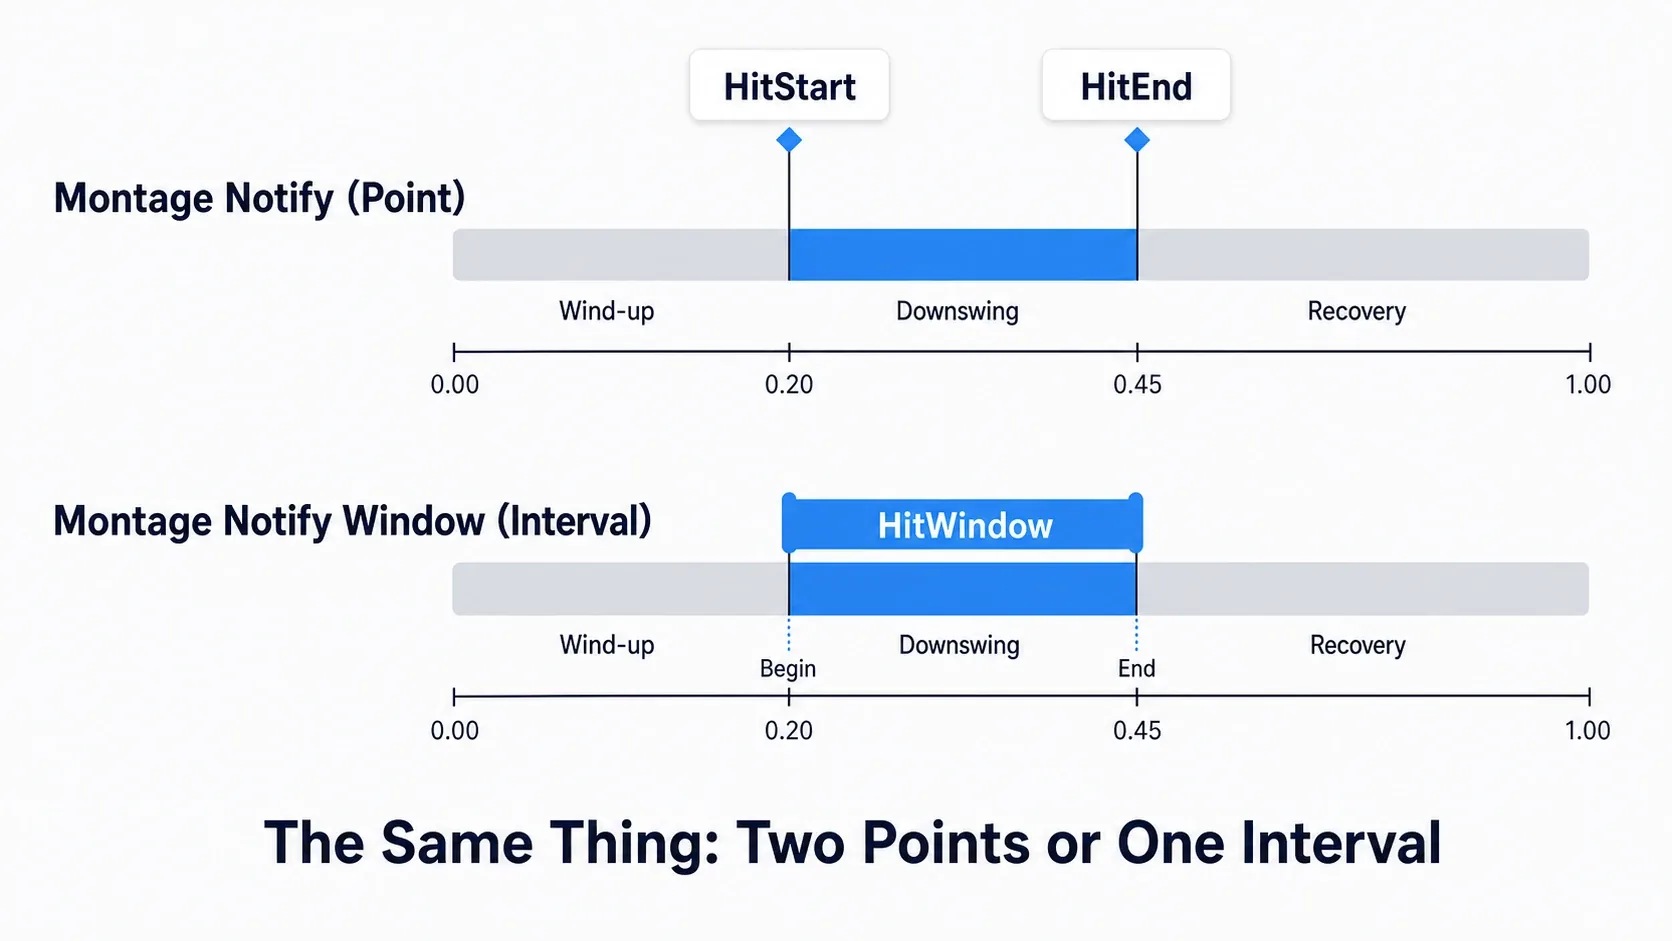
"From which frame of the attack does the hitbox turn on" is decided by this marker. Right-click on the Notifies track where you want it and pick a type from Add Notify.
There are two broad families.
| Type | Shape | How you receive it |
|---|---|---|
| Montage Notify | Instant (a point) | On Notify Begin on Play Montage |
| Montage Notify Window | Region (has width) | On Notify Begin and On Notify End |
| New Notify (regular) | Instant (a point) | The AnimNotify_Name event in the Animation Blueprint |
| Anim Notify State (custom) | Region | Notify Begin / Notify Tick / Notify End on your custom class |
The top two are Montage-only and come back directly to the Blueprint that played it. For things like hitboxes, where the one who played the Montage wants to receive it, these are the easy choice.
The bottom two are notifies bound to the animation itself. They suit things like footsteps and effects, where the same thing should happen no matter who plays it. In that case, right-click in the Animation Blueprint's Event Graph and add an event named something like AnimNotify_Footstep (the event name is generated automatically as AnimNotify_ plus the notify's name).
Region, or two points? A hitbox is "turn on, then turn off," so either works. Placing a single Montage Notify Window is more reliable since the start and end can't drift apart. Placing two points, on the other hand, makes it easier to move the on and off timings independently later.
To build a custom Anim Notify State, right-click in the Content Browser > Blueprint Class, pick AnimNotifyState as the parent, and override Received Notify Begin and Received Notify End. Reuse like "drop this on any animation and it grants invincibility frames" works well in this form.
Extending into Combos with Sections
A Section divides a Montage into named regions. Picture lining up a three-hit combo in one Montage and naming them Attack1, Attack2, and Attack3.
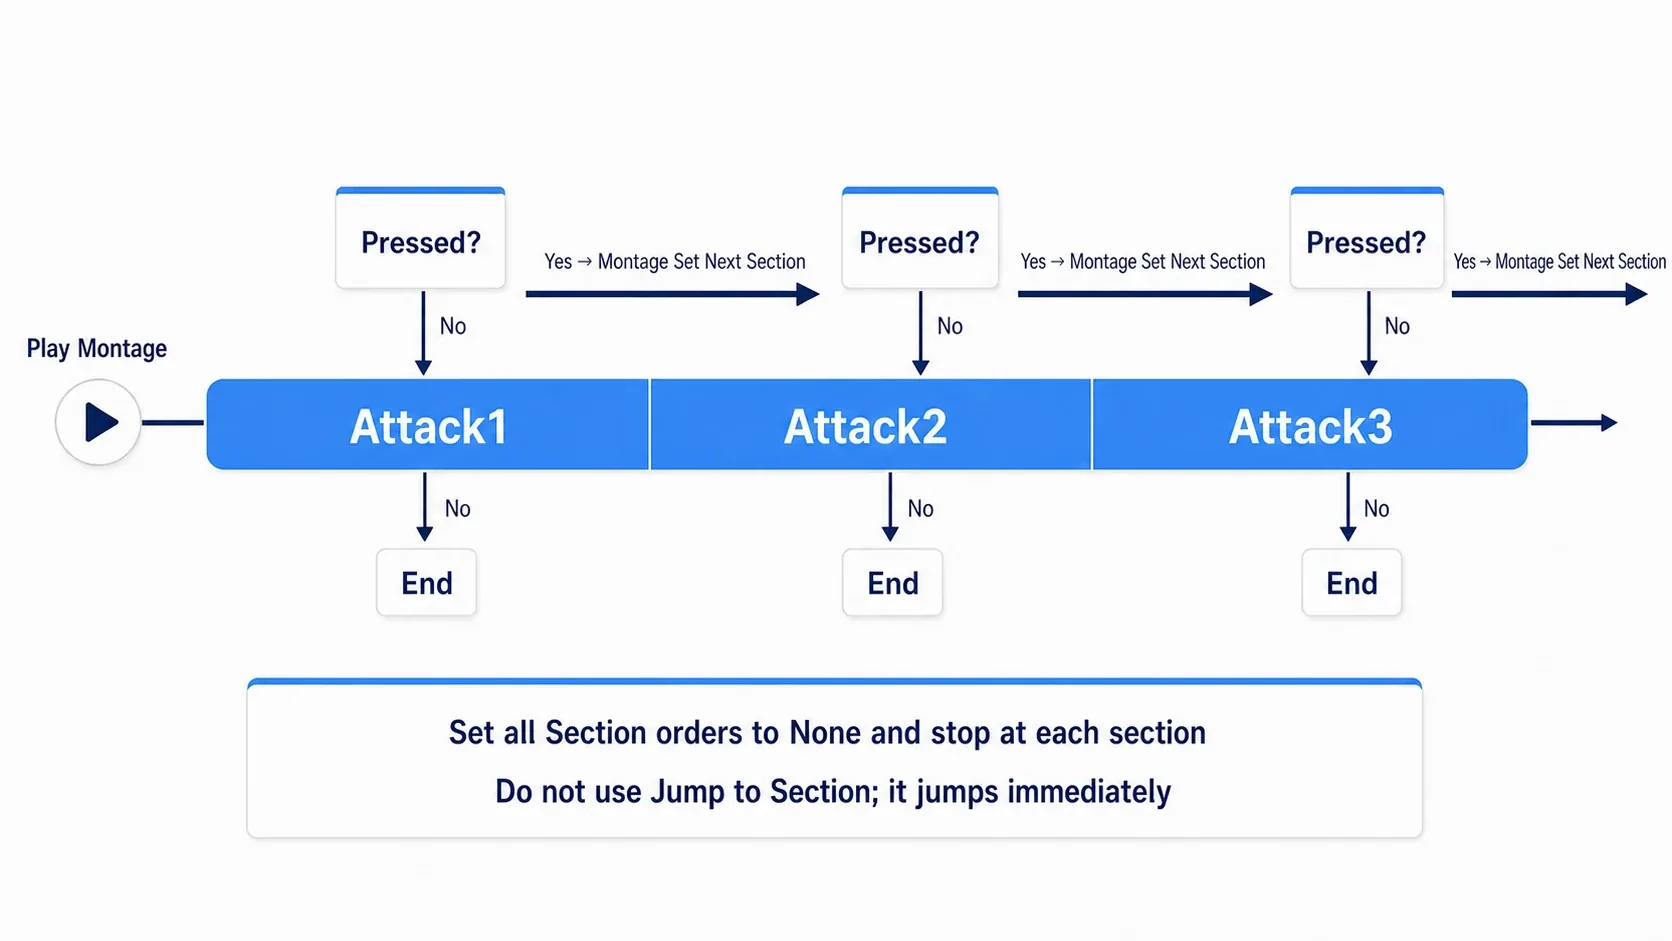
Right-click on the Sections track to add one, then use the section order in the details panel to set which region follows which. Leave it unset (None) and the Montage ends when that region finishes.
The basic combo shape is this.
- Set every section order to
Noneso it stops at each region - Play
Attack1 - If attack is pressed again within the input window, use
Montage Set Next Section(Anim Instance) to setAttack1's next section toAttack2 - If it isn't pressed,
Attack1finishes and the Montage ends
Montage Jump to Section jumps immediately on the spot, so it isn't suited for combos. You want to finish playing to a clean break before moving on, so use Montage Set Next Section.
"Are we within the input window" is built with Notifies. Place ComboWindowStart and ComboWindowEnd and raise a variable that accepts input only in between. It's exactly the same structure as the hitbox we build in this article's hands-on section.
Hands-On: A Slash That Only Hits on the Downswing
Punches in a beat-'em-up, a sword in a top-down ARPG, melee in a 2D action game. "No hit during the windup, only during the downswing" is what decides how an attack feels, regardless of genre. Here we'll build the minimal version of it.
The Finished Result
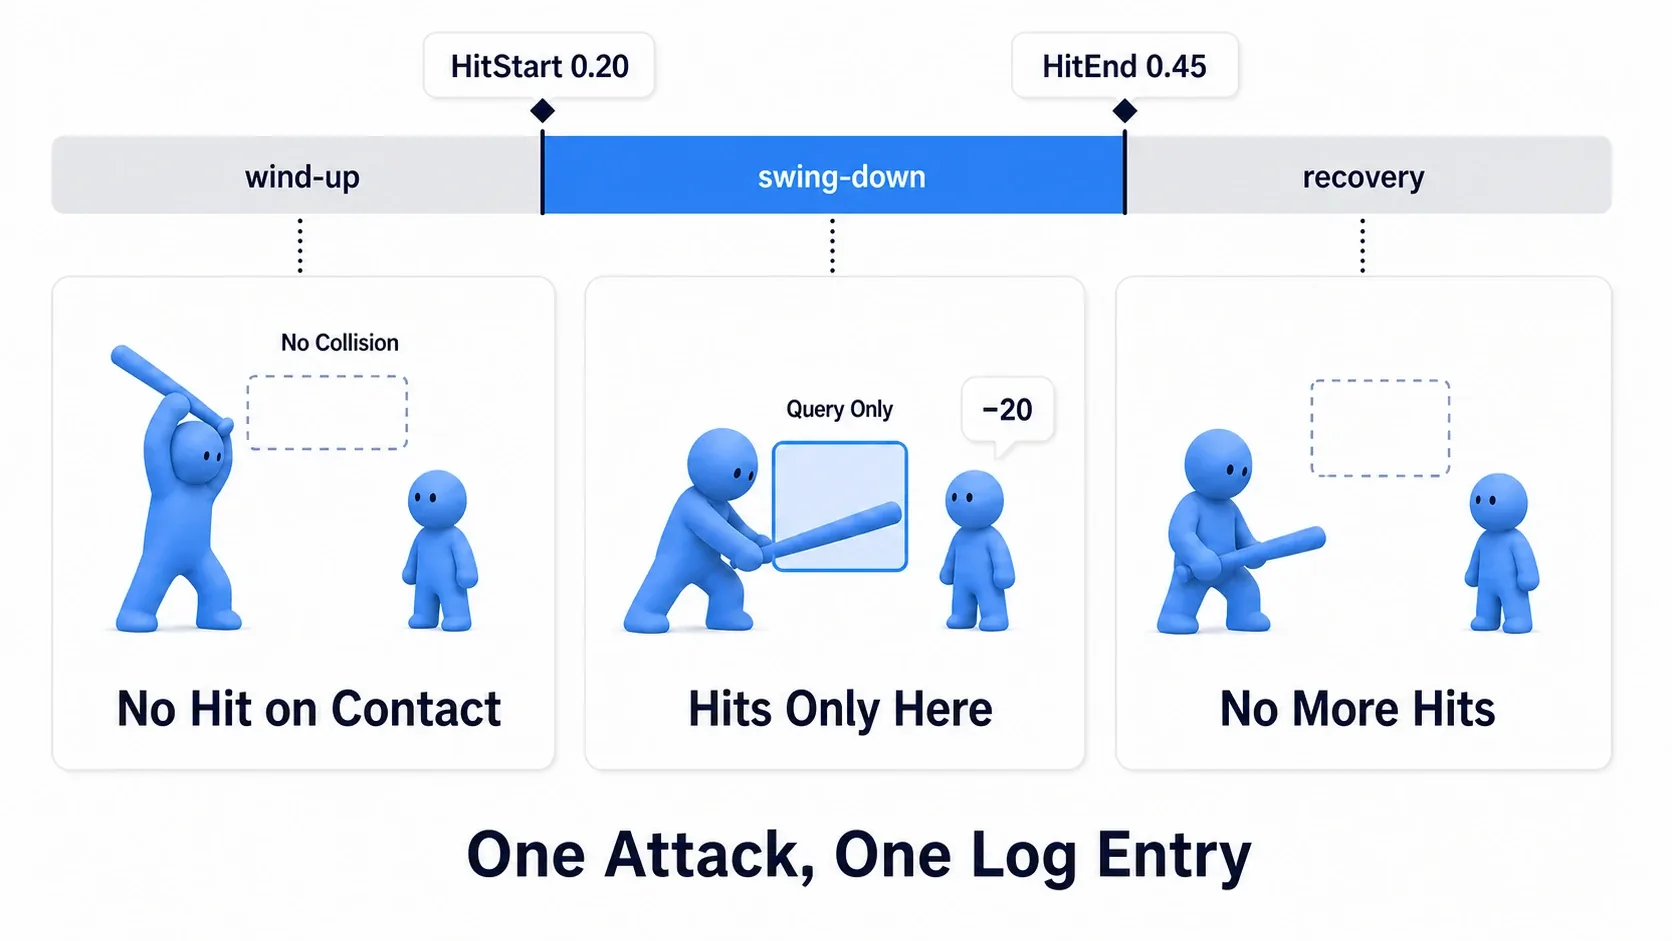
Press the attack button and the character swings a sword. Touching an enemy during the windup deals no damage; damage only lands the instant the downswing begins. And the same swing never damages the same enemy twice.
Setup to Follow Along
Create a new project from the Third Person template and prepare the following. For the attack animation, import a free marketplace asset or something from Mixamo.
| Type | Name | Settings |
|---|---|---|
| Animation Montage | AM_Attack | Created from the attack animation. Total length about 1.0 second |
AM_Attack notify | HitStart (Montage Notify) | Position 0.20 sec (the instant the downswing begins) |
AM_Attack notify | HitEnd (Montage Notify) | Position 0.45 sec (the instant the swing completes) |
| Animation Blueprint | ABP_Player | With Slot 'DefaultSlot' inserted in the Anim Graph |
| Input Action | IA_Attack | Digital (Bool). Bound to the left mouse button in IMC_Default |
BP_ThirdPersonCharacter component | WeaponCollision (Box Collision) | Placed at the sword. Collision Presets set to OverlapAllDynamic, Collision Enabled set to No Collision |
BP_ThirdPersonCharacter variable | HitActors (array of Actor) | Default empty |
BP_ThirdPersonCharacter variable | bIsAttacking (Boolean) | Default false |
If your character holds a sword, attach WeaponCollision to the socket. If not, placing it about 80cm in front of the character is plenty for testing.
The key is setting Collision Enabled to No Collision from the start. Leave it at the default and you'll hit enemies just by standing there.
If you want to separate channels and handle this strictly, see the collision channel article. Here we'll stick with the existing presets.
Step 1: Play the Attack
Build this in the BP_ThirdPersonCharacter event graph.
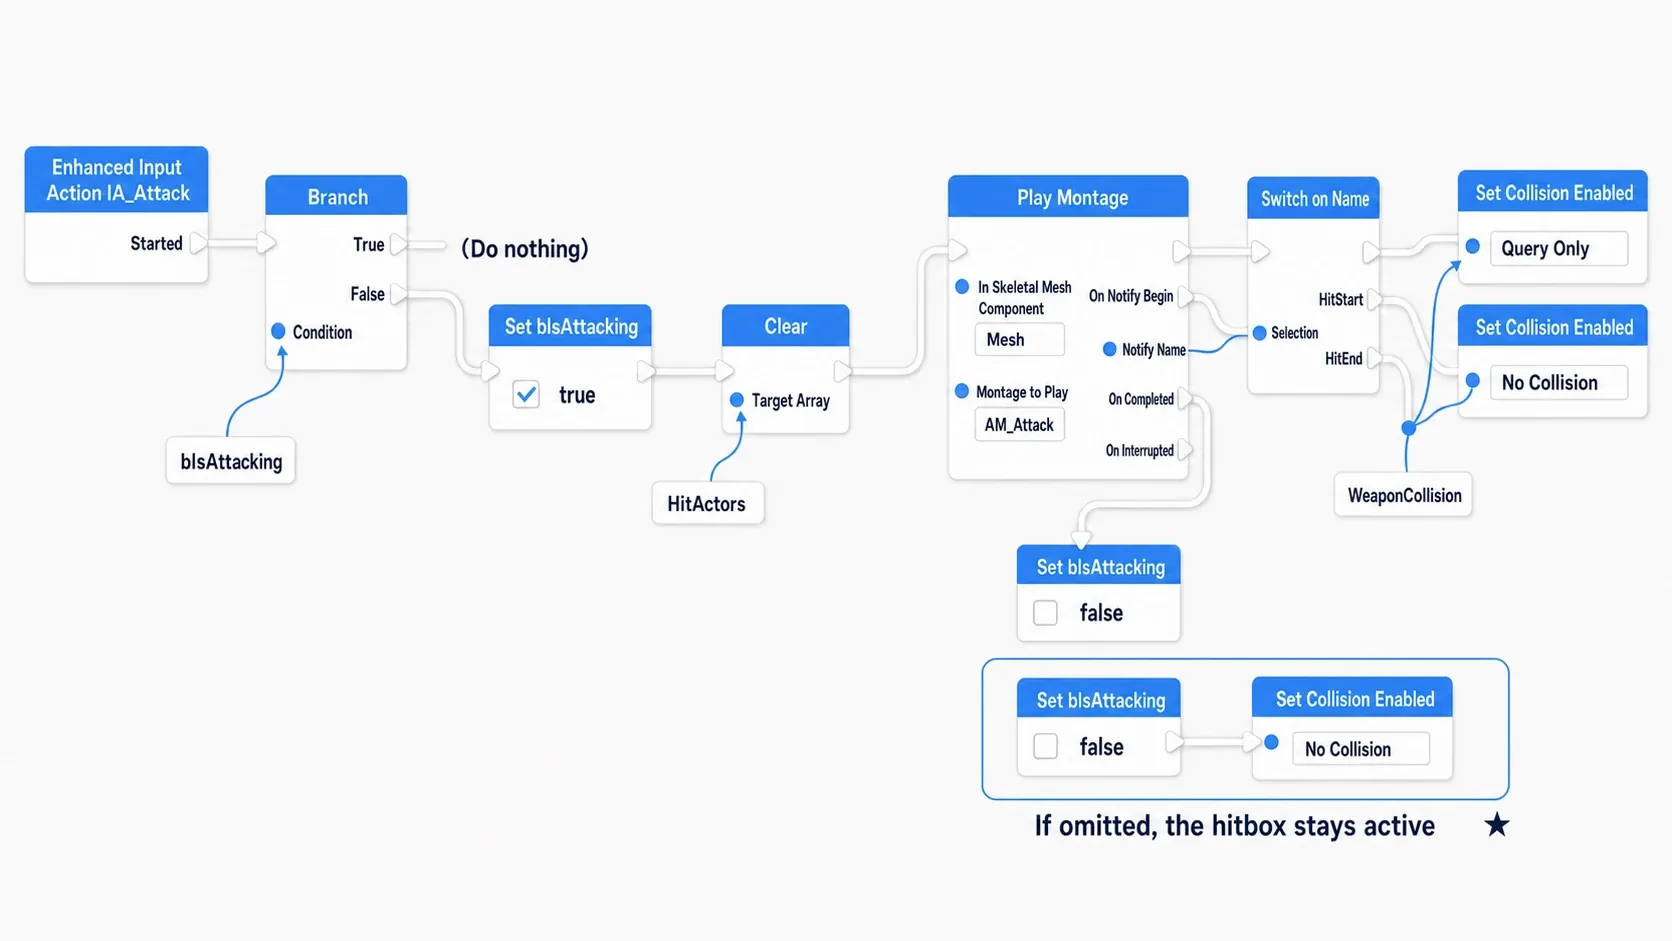
Enhanced Input Action IA_Attack
  Started
    → Branch (Condition: bIsAttacking)
        True  → (do nothing; ignore mashing)
        False
          → Set bIsAttacking (true)
          → Clear (Target: HitActors)        ← wipe the previous record
          → Play Montage
               In Skeletal Mesh Component : Mesh
               Montage to Play             : AM_Attack
Without the bIsAttacking guard, every mashed input restarts the Montage, and the next HitStart arrives before HitEnd, leaving the hitbox stuck on.
Step 2: Catch the Notifies and Toggle the Hitbox
Continue from the output pins of Play Montage.
Play Montage
  On Notify Begin (Notify Name)
    → Switch on Name (Target: Notify Name)
        HitStart → Set Collision Enabled (WeaponCollision, Query Only)
        HitEnd   → Set Collision Enabled (WeaponCollision, No Collision)

  On Completed   → Set bIsAttacking (false)
  On Interrupted → Set bIsAttacking (false)
                 → Set Collision Enabled (WeaponCollision, No Collision)
Turning the hitbox off in On Interrupted matters. If the attack is interrupted, by a hit reaction for example, HitEnd never arrives. Forget this and the hitbox stays on forever after.
Step 3: Handle the Hit
Select WeaponCollision and add On Component Begin Overlap from the details panel.
On Component Begin Overlap (WeaponCollision)
  Other Actor
    → Branch (Condition: Not of Other Actor == Self)   ← exclude yourself
    → Contains (Array: HitActors, Item: Other Actor)
    → Branch (Condition: Not of the Contains result)
        True
          → Add (Array: HitActors, Item: Other Actor)
          → Apply Damage (Damaged Actor: Other Actor, Base Damage: 20.0)
Recording into HitActors and checking it first means the same swing can't hit the same enemy twice. Overlaps can fire every time the target moves while the hitbox is enabled. The receiving side of damage is covered in the health and damage article.
Verify It
Place one Actor as a stand-in enemy that just receives Apply Damage and prints with Print String, then hit Play.
Stand right next to the enemy, press attack, and you should see nothing during the windup, then exactly one log line the instant the sword swings down. One line per attack is your answer key.
Next, move HitStart in AM_Attack from 0.20 sec to 0.00 sec. Now it connects from the moment the windup starts. You can feel that the notify's position is the attack's feel.
Here's how to narrow things down when it doesn't work.
- No swing motion at all →
Slot 'DefaultSlot'isn't inserted in the Anim Graph - Motion plays but no log →
WeaponCollisiondoesn't reach the enemy, orGenerate Overlap Eventsis off On Notify Beginnever fires → the notify is a regular Notify instead of aMontage Notify- Several log lines per attack → the
HitActorscheck is missing - Hits land when you aren't attacking →
Collision Enabledwasn't set toNo Collisioninitially - Hits keep landing after one attack →
HitEndisn't placed, or theOn Interruptedhandling is missing - Mashing leaves the hitbox on → there's no
bIsAttackingguard against re-triggering
There are two key points.
- The animation owns turning the hitbox on and off: write "enable the hitbox 0.2 seconds later" with a timer and it drifts the instant you swap animations. With a Notify, the marker lives in the asset, so changing the motion only means moving the marker
- Build the "off" path first: that means
On Interruptedand theClearat the start. Attack bugs come from things that won't turn off far more than things that won't turn on. The moment you write the ON, fill in every OFF path
To extend to a three-hit combo, keep this structure and add Montage Set Next Section. To tighten the hit feel further, adding a sound effect and camera shake at the notify's position is the easiest place to start (hitstop, camera shake, and knockback are collected in Making Hits Feel Good).
Bonus: Good to Know for Later
- Decide up front whether you're using Root Motion: a lunging slash feels more natural if the animation carries the movement (Root Motion). To use it, turn on
Enable Root Motionon the Animation Sequence and set the Animation Blueprint'sRoot Motion ModetoRoot Motion from Montages Only. If you're not using it, drive movement from Blueprint the way the Character Movement article describes - If you want to stop movement while a Montage plays: when walking during an attack bothers you, put
bIsAttackingin front of your movement logic to reject it, or stop it temporarily withSet Movement Mode. You don't need an attack state in the State Machine - Find notify positions in slow motion: drag the Montage editor's timeline and visually hunt for the frame where you want the hitbox. Slowing playback down makes it easy to pin the exact start of the downswing
AnimNotify_events appear in the Animation Blueprint: trying to catch a regular Notify in the character Blueprint won't show anything. You catch it in the Animation Blueprint and pass it along to the character. If you want a single place to receive them, the approach in the Event Dispatcher article works- Montages on the same Slot can't play simultaneously: play a hit-reaction Montage during an attack and the attack stops with
On Interrupted. That's the intended behavior. If you don't want it overridden, put them on separate Slots - When you can't tell whether it's running, add one log: insert a
Print StringonOn Notify Beginand wire inNotify Name. If names are streaming past, the Montage side is fine and the problem is on the collision side (see Checking Values with Print String)
Summary
A Montage fills in exactly the part State Machines are bad at.
| What you want to do | What to use |
|---|---|
| Switch between ongoing actions | State Machine |
| Interrupt with a one-shot action | Animation Montage |
| Get the Montage on screen | Slot 'DefaultSlot' in the Anim Graph |
| Catch completion and interruption | Output pins on Play Montage |
| Grab a mid-playback moment | Anim Notify |
| Split into regions for combos | Montage Section |
And when you get stuck, you know exactly where to look first: if it doesn't show, check the Slot; if the timing won't fire, check the notify type. Those two explain nearly every Montage problem.
At what point in your attack motion does the hit feel best? Place one notify and hunt for it while it's running.