You got your enemy patrolling. But when the player walks right past it, nothing happens. You tweak the settings and now the opposite happens: the enemy makes a beeline for a player who's supposedly behind a wall.
UE5 has an AI Perception Component dedicated to this "noticing" part. You don't need to compute distances and angles yourself, and you don't need to write traces for walls blocking line of sight. This article covers sight and hearing settings, how to receive detection and loss, and the setting that most often causes detection to silently fail.
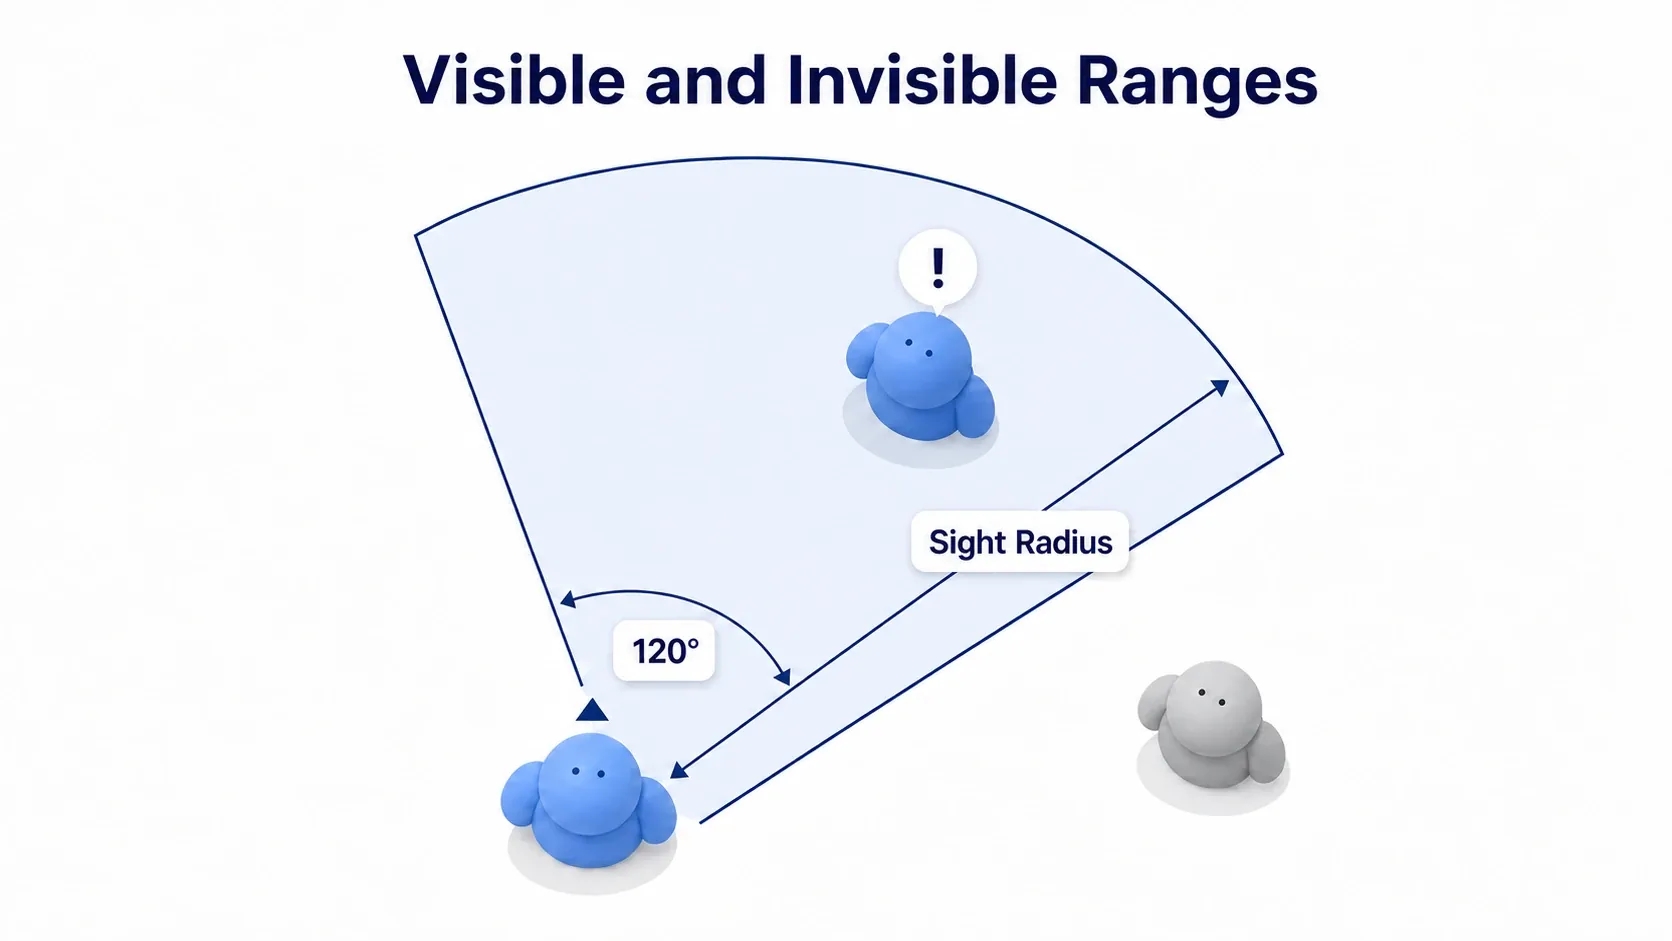
What You'll Learn
- Perception is a pairing of the sensing side (AI Perception) and the sensed side (Stimuli Source)
- Sight's three radii and angle (
Sight Radius/Lose Sight Radius/Peripheral Vision Half Angle)- The usual cause of nothing being detected is
Detection by Affiliation- Hearing means building the side that makes the noise with
Report Noise Event- Hands-on: a guard that searches the last known spot for 5 seconds and returns to patrol
- How This Splits with Behavior Trees
- The Sensing Side and the Sensed Side
- Sight Settings: How Far and at What Angle
- The Biggest Reason Nothing Gets Detected
- Receiving Detection and Loss
- Hearing Means Building the Noise Maker
- Hands-On: A Guard That Searches the Last Known Spot for 5 Seconds
- Bonus: Good to Know for Later
- Summary
How This Splits with Behavior Trees
Building enemy AI brings in two systems, which is easy to muddle. Their responsibilities are cleanly separated.
| System | Responsibility | In a word |
|---|---|---|
| AI Perception | Senses the surroundings | Do I notice? |
| Behavior Tree | Chooses actions based on what was sensed | What do I do? |
| Blackboard | The memory connecting the two | What to remember |
AI Perception decides no behavior at all. It only reports "this Actor came into view" and "it left view." You take that, write it to the Blackboard, and the Behavior Tree reads the value to pick a branch.
This article focuses on the perception side. Reading the Behavior Tree article first makes the hands-on section here a direct continuation of it.
The Sensing Side and the Sensed Side
Perception only works when both pieces are in place. One alone does nothing.
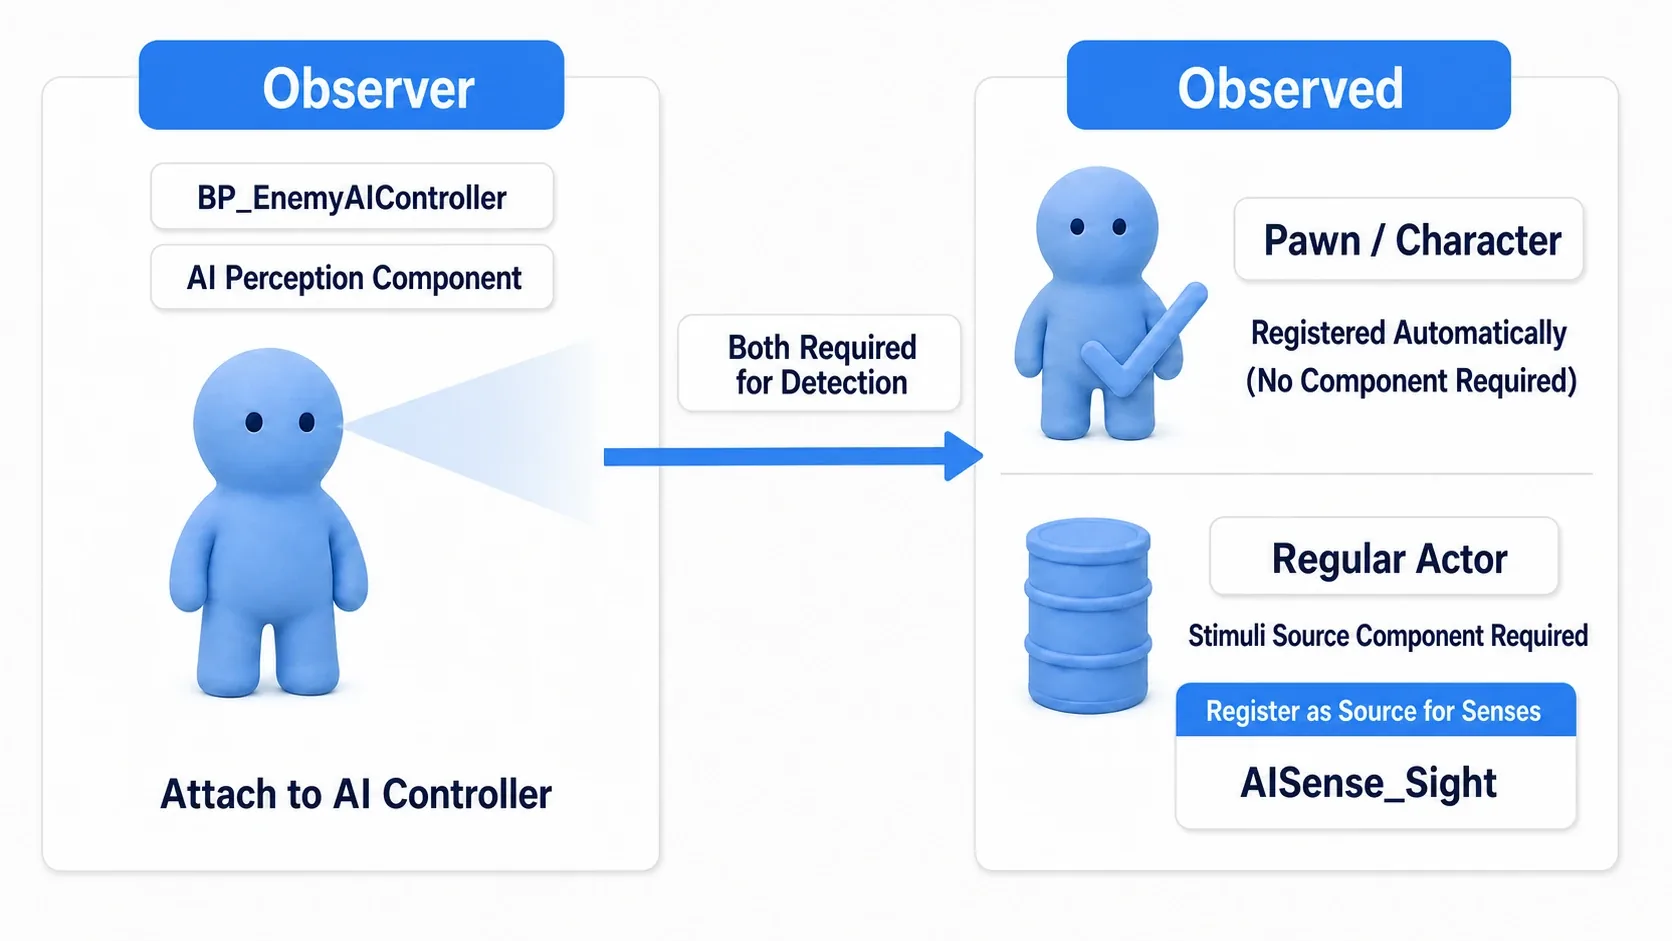
| Piece | Attach to | Role |
|---|---|---|
| AI Perception Component | The AI Controller | The sensing side. Holds sight and hearing settings |
| AI Perception Stimuli Source Component | The Actor being perceived | Registers "there's something perceivable here" |
You can attach an AI Perception Component to a Pawn, but attaching it to the AI Controller is standard, because the AI's decision-making stays on the Controller even when the Pawn is swapped.
For the sensed side, there's one behavior worth knowing. Pawns (including Characters) are registered as sources automatically. So if all you want is to detect the Third Person player character, you don't need a Stimuli Source component.
You need it when you want to perceive a regular Actor that isn't a Pawn: a breakable barrel, a dropped piece of gear, a glowing marker. In that case, add the component and configure it in the details panel.
| Setting | Value |
|---|---|
| Auto Register as Source | Check it |
| Register as Source for Senses | Add AISense_Sight to the array (or AISense_Hearing for hearing) |
Register as Source for Senses is empty by default. Leave it empty and the component registers with no sense at all, so it's never detected. When something other than a Pawn refuses to be perceived, look here first.
Sight Settings: How Far and at What Angle
Select AIPerception on the AI Controller and add AI Sight config to Senses Config in the details panel. That's the actual field of view.
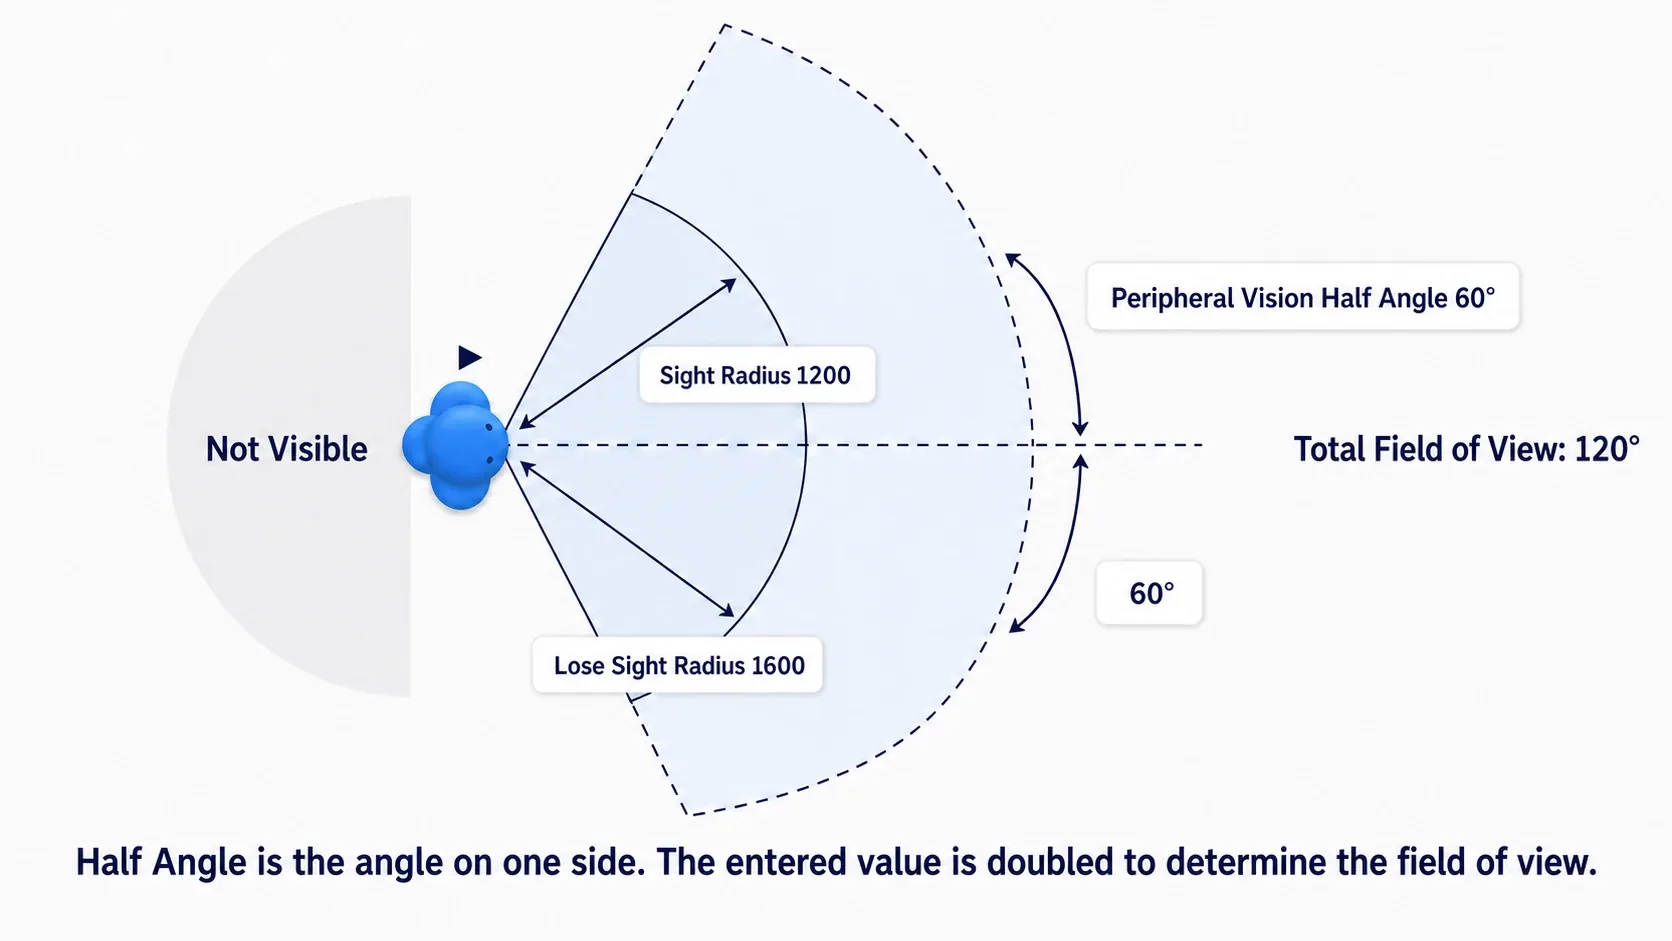
| Setting | Meaning |
|---|---|
| Sight Radius | The distance at which it can spot you. Nothing is found beyond it |
| Lose Sight Radius | The distance at which it loses you. Make it larger than Sight Radius |
| Peripheral Vision Half Angle | The angle to one side of forward (degrees). Default is 90, giving a 180-degree field of view |
| Auto Success Range from Last Seen Location | Once seen, a target stays visible within this distance regardless of cover or angle. Default -1.0, disabled |
| Max Age | How many seconds perceived information is retained. 0 means no expiry |
There are two radii to prevent flickering at the boundary. With only one, a player pacing back and forth across that distance triggers "found" and "lost" alternating at high speed. Making the losing side wider, like Sight Radius 1200 / Lose Sight Radius 1600, gives you an AI that clings persistently once it spots someone.
Note that Peripheral Vision Half Angle is half the angle. Enter 60 and the field of view is 120 degrees total. Enter 90 and it's 180 degrees, meaning it can see straight out to the sides.
Line-of-sight blocking is handled automatically. A line is drawn between the AI and the target, and if it's blocked, the target counts as unseen. The channel used for that check is Default Sight Collision Channel under Project Settings > Engine > AI System (default Visibility). When enemies spot you through walls, check whether that wall's collision blocks this channel (see the collision profile article).
The Biggest Reason Nothing Gets Detected
You entered all the settings correctly and nothing happens. Almost always the cause is Detection by Affiliation.
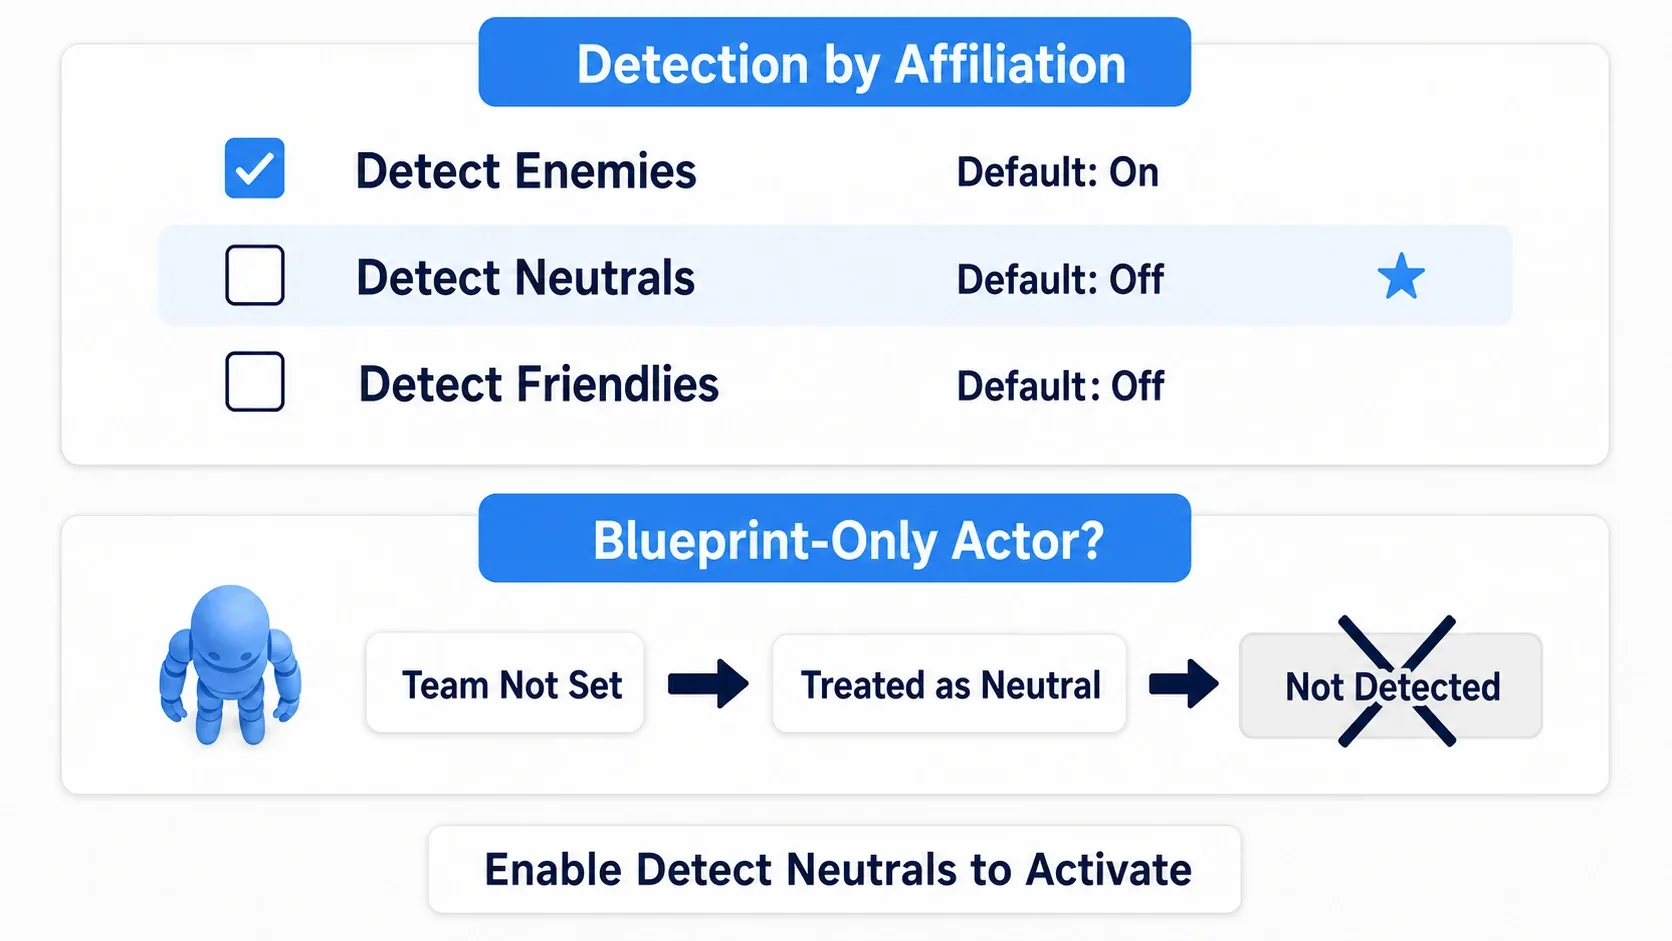
Three checkboxes inside AI Sight config decide which factions get perceived.
| Setting | Default | Meaning |
|---|---|---|
| Detect Enemies | On | Perceive hostiles |
| Detect Neutrals | Off | Perceive neutrals |
| Detect Friendlies | Off | Perceive allies |
And the important part is how teams are determined. UE treats Actors implementing IGenericTeamAgentInterface as having a team, and that isn't configurable from Blueprint by default.
The upshot is that every Actor built purely in Blueprint is treated as neutral. Since Detect Neutrals is off by default, nothing happens even when they walk into view.
While you're testing in Blueprint, check Detect Neutrals. That alone gets things moving.
But left like that, enemies detect each other too. If you want them to target only the player, you need to filter by Tag or class after you receive the perceived Actor. That's covered in the next section.
Receiving Detection and Loss
Add the On Target Perception Updated event from the bottom of the AI Perception Component's details panel. It fires only the moment perception state changes.
It has two pins.
| Pin | Type | Contents |
|---|---|---|
| Actor | Actor | The one whose state changed |
| Stimulus | AIStimulus (struct) | Details of what happened |
Stimulus is a struct, so pull its contents out with Break AIStimulus. Three members see the most use.
| Member | Contents |
|---|---|
| Successfully Sensed | true means perceived, false means lost |
| Stimulus Location | Where the perceived target was. On loss, this holds the last confirmed position |
| Tag | The name attached to the stimulus. Set it via Report Noise Event |
In other words, this single event delivers both detection and loss.
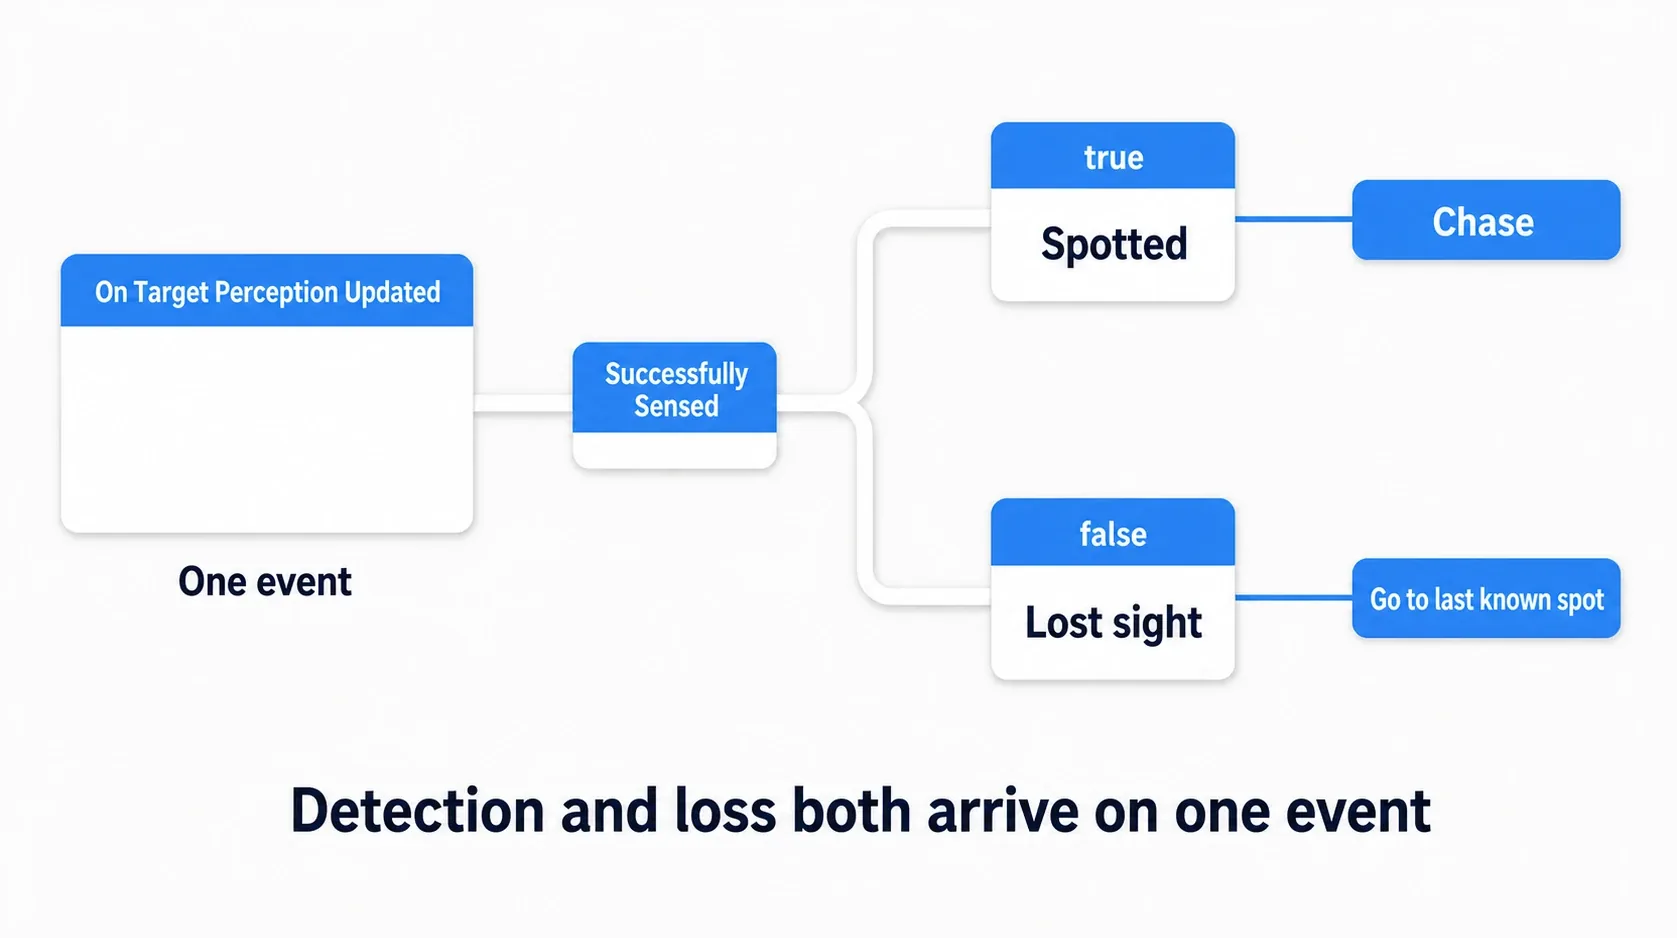
Event On Target Perception Updated (Actor, Stimulus)
  → Break AIStimulus (Stimulus)
  → Branch (Condition: Successfully Sensed)
      True  → (found them)
      False → (lost them. Stimulus Location is the last seen position)
The handy part is that Stimulus Location works as "the last seen position." You don't need to fire a separate trace the moment you lose them.
Hearing Means Building the Noise Maker
Unlike sight, hearing doesn't work just because a sound plays. Sound coming out of your speakers and sound the AI hears are entirely separate systems (see the 3D sound article).
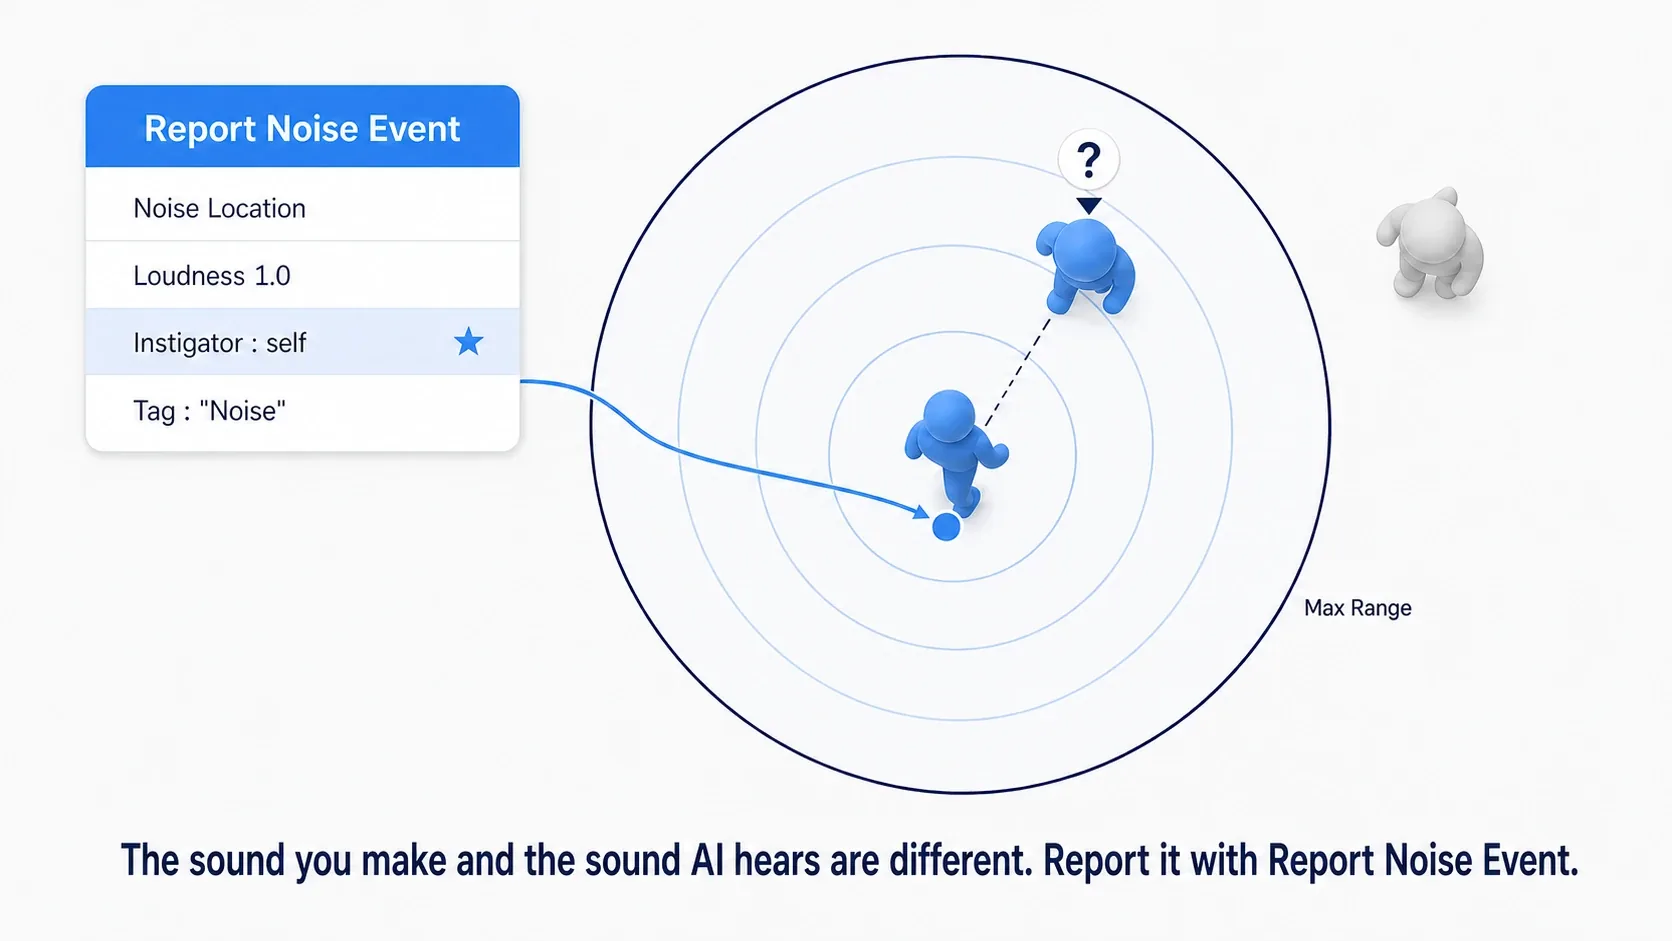
On the listening side, add AI Hearing config to Senses Config.
| Setting | Meaning |
|---|---|
| Hearing Range | How far it can hear |
| Detection by Affiliation | Same as Sight. Detect Neutrals is needed here too |
On the emitting side, call the Report Noise Event node. Run it whenever you want the AI to notice: footsteps, gunshots, something breaking.
| Argument | Meaning |
|---|---|
| Noise Location | Where the sound occurred |
| Loudness | A multiplier on volume. Scales the distance it carries |
| Instigator | The Actor that made the noise. The AI receives this Actor as the perception target (don't omit it) |
| Max Range | Maximum distance it carries. 0 leaves it to the listener's Hearing Range |
| Tag | The name to attach to this sound |
(while running, on every footfall)
  → Report Noise Event (Noise Location: own location, Loudness: 1.0,
                        Instigator: self, Max Range: 0.0, Tag: "Noise")
Always fill in Instigator. Leave it empty and the hearing event may not be processed correctly. Don't think of it as "arrives without knowing whose sound it was." Assume it doesn't arrive at all, and always pass the Actor that made the noise.
Attaching a Tag lets the receiving side tell sight and hearing apart. Stimuli perceived by sight have an empty Tag, so branching on Tag == "Noise" separates "saw it" from "heard it." The hands-on section uses this.
Note: Actors also have a
Make Noisenode, which likewise takesLoudnessandTag. But it's a system that includes compatibility with the older Pawn Noise Emitter / Pawn Sensing path, which makes the route harder to follow. For delivering straight to AI Perception,Report Noise Eventis the more direct choice.
Hands-On: A Guard That Searches the Last Known Spot for 5 Seconds
A guard in a stealth game, a wanderer in a horror game, a field monster in an action RPG. "Chase when you spot them, investigate where they were last seen, give up and return to patrol" is standard enemy AI behavior across genres.
An AI that only chases the moment it spots you goes right back to patrolling as if nothing happened the instant you step behind cover. Whether that "investigation time" exists changes how the AI feels enormously.
The Finished Result
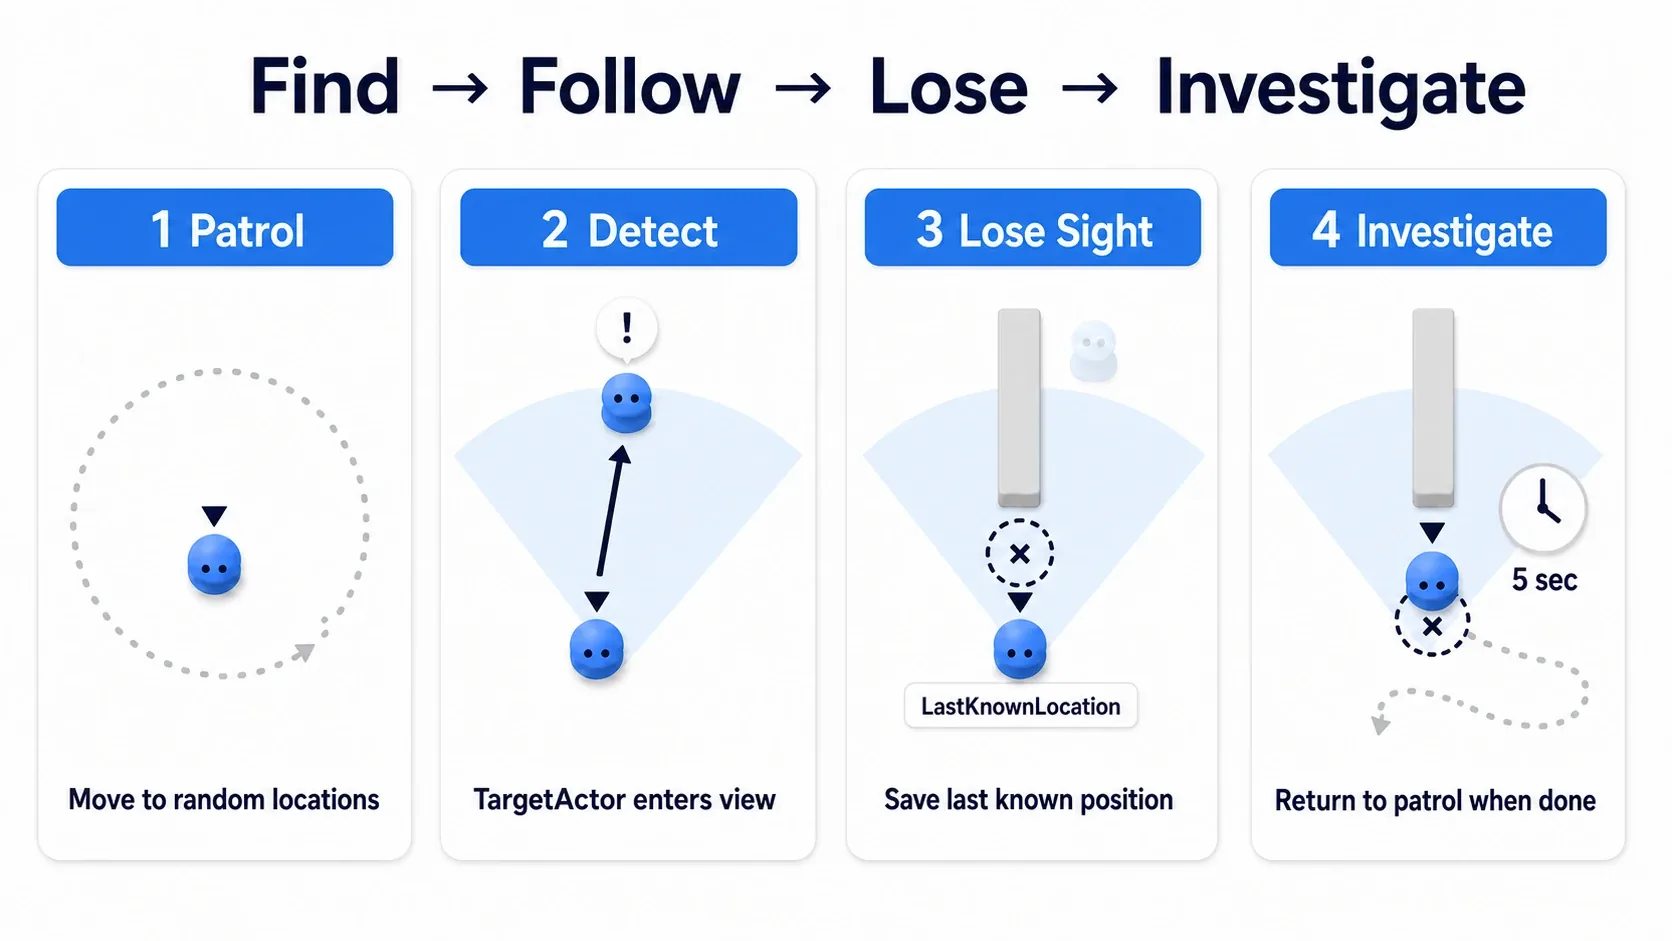
The enemy patrols within an area, and chases when the player enters its forward 120 degrees within 12m. Hide behind a pillar and it walks over to near the spot where the player was last seen, stays for 5 seconds, then returns to patrol.
The 5 seconds is a wait after arriving. It isn't 5 seconds including travel time. And since Acceptable Radius: 100 is specified, it stops within 1m rather than exactly on the point.
Setup to Follow Along
Create a new project from the Third Person template.
Prerequisite: this hands-on builds on the setup from the Behavior Tree article. Start from a working patrol-only enemy (including
BTT_FindPatrolLocation). Here we only cover adding the "noticing" branch.
You can create the Blackboard and Behavior Tree from right-click in the Content Browser → Artificial Intelligence.
| Type | Name | Settings |
|---|---|---|
| Character | BP_Enemy | AI Controller Class set to BP_EnemyAIController, Auto Possess AI set to Placed in World (use Placed in World or Spawned if you also spawn at runtime) |
| AIController | BP_EnemyAIController | Add an AIPerception Component |
| Blackboard | BB_Enemy | Three keys (table below) |
| Behavior Tree | BT_Enemy | Blackboard Asset set to BB_Enemy |
| BTTask | BTT_ClearLastKnown | Create via Blueprint Class → All Classes → BTTask_BlueprintBase (you can't make it from the Artificial Intelligence menu) |
| Level | Nav Mesh Bounds Volume | Sized to cover the floor. Press P and confirm it turns green |
| Level | Pillar or wall Static Meshes | Something to block sight. Their collision must block Visibility |
| Player | BP_ThirdPersonCharacter | Add Player to Actor Tags |
To also test hearing, you need something on the player side that makes noise. For testing, adding this to BP_ThirdPersonCharacter's event graph is the easy route.
N (Keyboard Event)
  → Report Noise Event (Noise Location: Get Actor Location, Loudness: 1.0,
                        Instigator: self, Max Range: 0.0, Tag: "Noise")
Now pressing N generates a noise at your position. To tie it to footsteps, call the same node from an Animation Notify.
There are three Blackboard keys.
| Key name | Type | Default | Purpose |
|---|---|---|---|
TargetActor | Object (Base Class: Actor) | Empty | Who to chase |
LastKnownLocation | Vector | Empty | Where they were last seen |
PatrolLocation | Vector | Empty | The next patrol point |
Step 1: Configure Sight and Hearing
Select AIPerception on BP_EnemyAIController and add two entries to Senses Config.
AI Sight config
| Setting | Value |
|---|---|
| Sight Radius | 1200.0 (12m) |
| Lose Sight Radius | 1600.0 |
| Peripheral Vision Half Angle | 60.0 = a 120-degree field of view |
| Auto Success Range from Last Seen Location | -1.0 (leave disabled) |
| Detect Neutrals | Checked |
AI Hearing config
| Setting | Value |
|---|---|
| Hearing Range | 2000.0 (20m) |
| Detect Neutrals | Checked |
Detect Neutrals is needed on both. Checking only one and then puzzling over "it reacts to sound but can't see me" is a common pattern.
Step 2: Receive Perception and Write to the Blackboard
Add On Target Perception Updated to BP_EnemyAIController's event graph and build the following. This is the heart of the article.
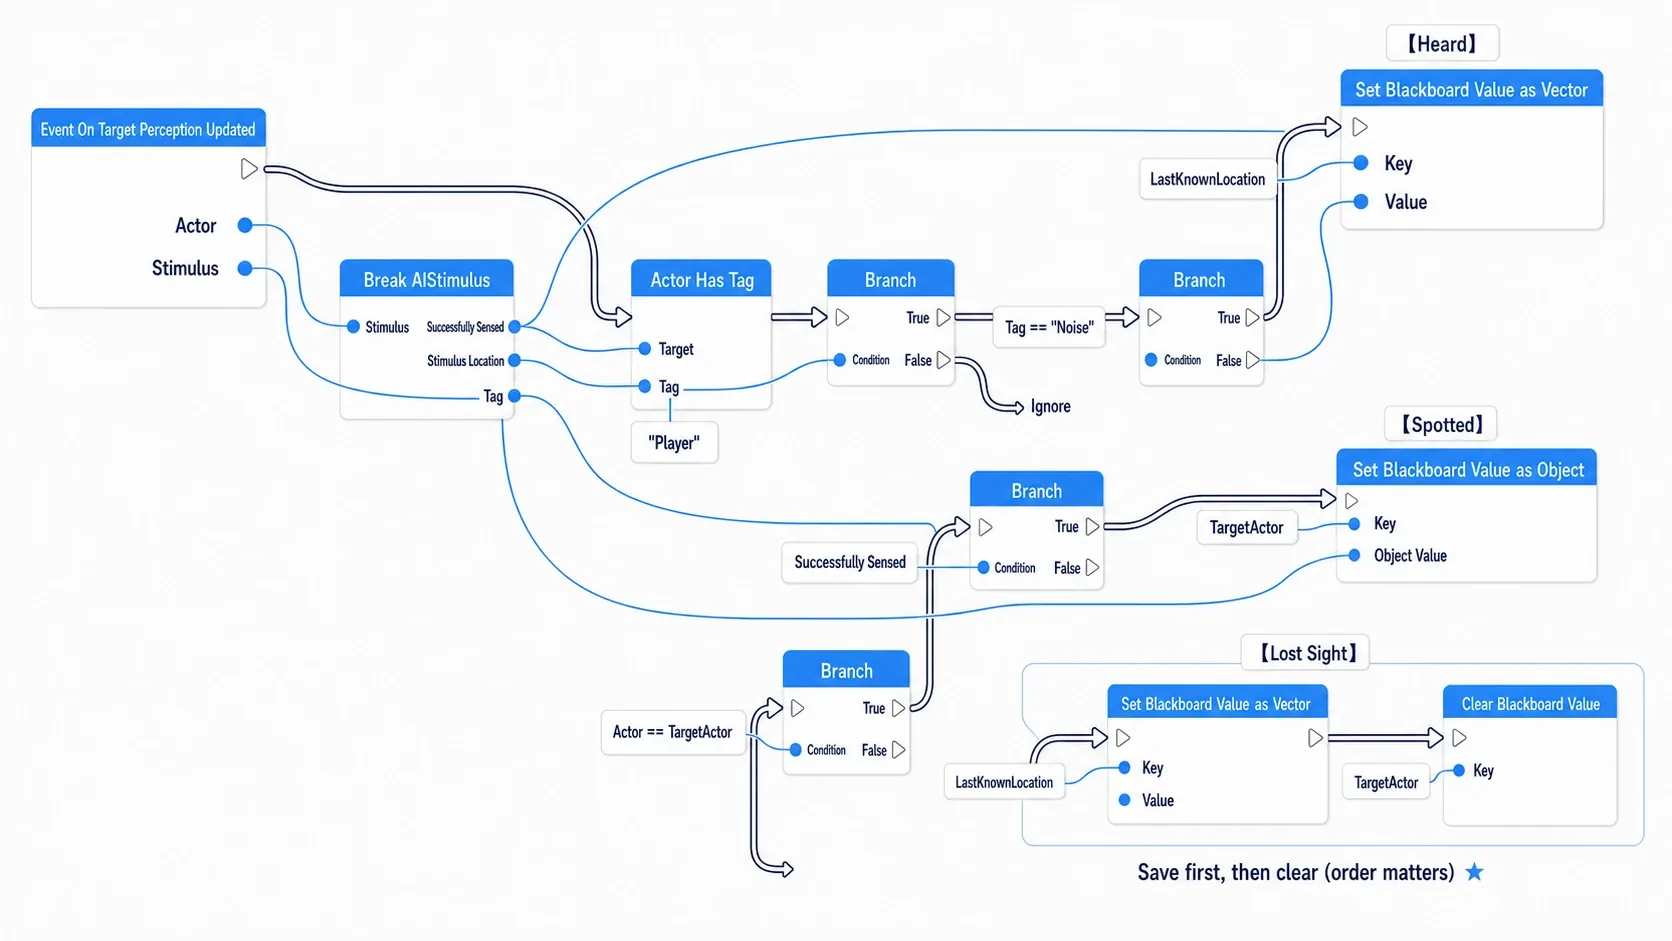
Event On Target Perception Updated (Actor, Stimulus)
  → Break AIStimulus (Stimulus) → Successfully Sensed / Stimulus Location / Tag
  → Actor Has Tag (Target: Actor, Tag: "Player")
  → Branch
      False → (do nothing)                          ← ignore anything but the player
      True  → Branch (Condition: Tag == "Noise")
          True  → Branch (Condition: Successfully Sensed)
              True → Set Value as Vector (Key Name: LastKnownLocation)  ← [heard it]
                       (Key: LastKnownLocation, Value: Stimulus Location)
          False → Branch (Condition: Successfully Sensed)
              True  → Set Value as Object (Key Name: TargetActor)    ← [spotted them]
                        (Key: TargetActor, Object: Actor)
              False → Branch (Condition: Actor == Get Blackboard Value as Actor (TargetActor))
                  True → Set Value as Vector (Key Name: LastKnownLocation) ← [lost them]
                           (Key: LastKnownLocation, Value: Stimulus Location)
                       → Clear Value (Key Name: TargetActor)
The crux is that there are three distinct writes.
- Spotted them: put the target in
TargetActor. Chasing begins - Lost them: save the last coordinates to
LastKnownLocationfirst, then clearTargetActor. Reverse the order and the chase stops with nowhere to search - Heard it: write only
LastKnownLocationand don't touchTargetActor. A sound doesn't mean you can see them, so not chasing directly is the natural behavior
Successfully Sensed is checked on the hearing path too because a notification also arrives when a stimulus expires. Skip it and the AI keeps heading back to the position of an old sound.
The Actor == TargetActor check on the loss path is there to prevent losing sight of some unrelated Actor from wiping your target.
Watch out: the nodes involved here come in two families.
| Where you use it | Node | How the key is specified |
|---|---|---|
| Operating from the AI Controller | Set Value as Object / Set Value as Vector / Clear Value | Key Name (a string) |
| Operating inside a BTTask Blueprint | Set Blackboard Value as ... / Clear Blackboard Value | A Blackboard Key Selector variable |
We're writing in the AI Controller here, so use the former. Wire the return value of Get Blackboard into the Target pin. Leave it empty and nothing gets written, with no error.
Typing "Set Blackboard Value" in the search box surfaces the latter family first, so always confirm that the Target pin is a Blackboard Component.
Don't forget to start the tree.
Event On Possess (BP_EnemyAIController)
  → Run Behavior Tree (BTAsset: BT_Enemy)
Step 3: Add the Search Branch to the Behavior Tree
Give BT_Enemy three branches. Left means higher priority.
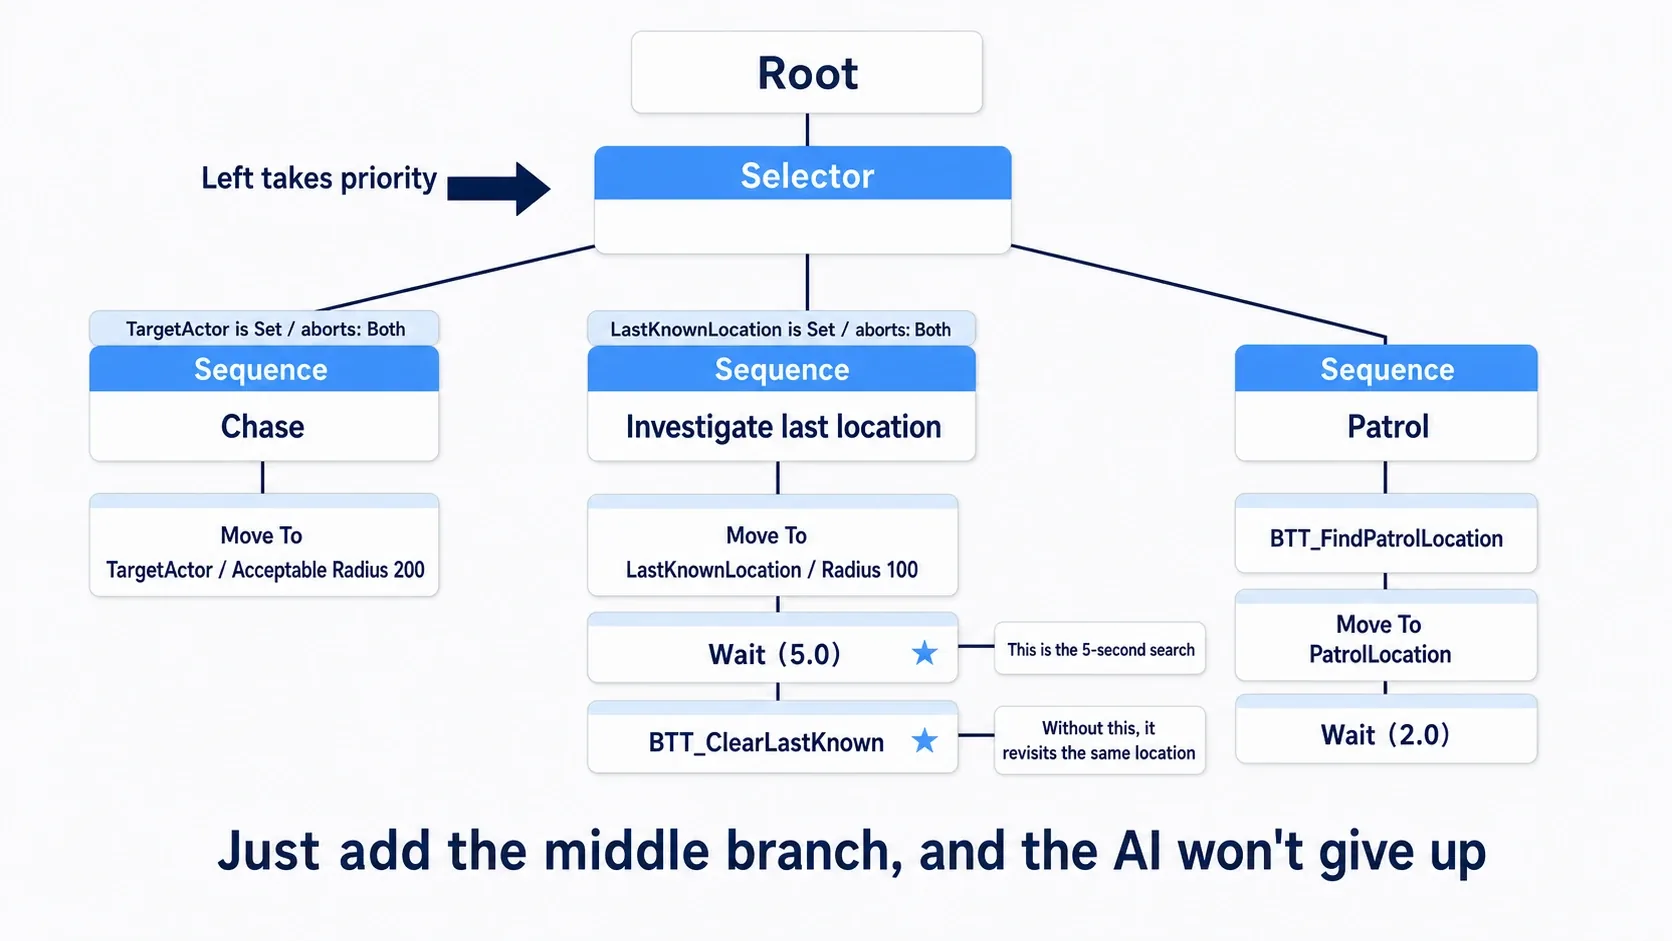
Root
└─ Selector
   ├─ Sequence "Chase"
   │   ⚑ Decorator: Blackboard (TargetActor is Set / Observer aborts: Both)
   │   └─ Task: Move To (Blackboard Key: TargetActor, Acceptable Radius: 200)
   │
   ├─ Sequence "Investigate the last spot"
   │   ⚑ Decorator: Blackboard (LastKnownLocation is Set / Observer aborts: Both)
   │   ├─ Task: Move To (Blackboard Key: LastKnownLocation, Acceptable Radius: 100)  ← stops within 1m, not exactly on the point
   │   ├─ Task: Wait (Wait Time: 5.0)          ← this is the "search for 5 seconds"
   │   └─ Task: BTT_ClearLastKnown              ← done investigating, so forget it
   │
   └─ Sequence "Patrol"
       ├─ Task: BTT_FindPatrolLocation
       ├─ Task: Move To (Blackboard Key: PatrolLocation)
       └─ Task: Wait (Wait Time: 2.0)
The middle branch is what we're adding. Putting BTT_ClearLastKnown at the end matters. Without it, LastKnownLocation sticks around and the enemy paces back to the same spot forever.
BTT_ClearLastKnown is three nodes.
Variable: TargetKey (Blackboard Key Selector type, Instance Editable)

Event Receive Execute AI
  → Clear Blackboard Value (Key: TargetKey)
  → Finish Execute (Success: true)
Select this Task in the Behavior Tree and assign LastKnownLocation to Target Key in the details panel.
BTT_FindPatrolLocation is the same one from the Behavior Tree article: a Task that finds a point with Get Random Reachable Point in Radius and writes it to PatrolLocation.
Don't forget to set the Decorators' Observer aborts to Both. Leave it at None and spotting the player does nothing until the patrol's Wait finishes.
Verify It
Place BP_Enemy in the level, hit Play, and try these in order.
- Approach from behind the enemy. Even within 12m, nothing happens. The field of view is 120 degrees forward, so directly behind is blind
- Circle around to the front. The moment you're within 12m, the enemy stops patrolling and comes at you
- Step behind a pillar. The enemy walks to the spot where the player was last visible, stays there for 5 seconds, then goes back to random patrolling
- Peek out from the other side of the pillar during those 5 seconds. It spots you again and the chase resumes
Play with the Behavior Tree open and the executing node lights up, while the Blackboard panel lets you follow the contents of TargetActor and LastKnownLocation. Watching the moment values are written and cleared tells you immediately where things are stalling.
Here's how to narrow things down when it doesn't work.
- Nothing happens when you walk into view →
Detect Neutralsisn't checked. This is the first thing to suspect TargetActorin the Blackboard stays empty → the player's Actor Tag isn'tPlayer, or it's misspelled- Spots you through walls → that wall's collision doesn't block the
Visibilitychannel - Spots you from directly behind →
Peripheral Vision Half Angleis still the default90(a 180-degree view) - Keeps chasing after losing you →
Lose Sight Radiusis too large, or you entered a value inAuto Success Range from Last Seen Location - Paces back to the same spot forever →
BTT_ClearLastKnownis missing, orTarget Keyis unassigned - Enemies chase each other → you aren't running the Tag check
- Doesn't move at all → Nav Mesh Bounds Volume (check with
P) andAuto Possess AI
Once you have it moving, try entering 400 in Auto Success Range from Last Seen Location. Once spotted, you stay visible within 4m even behind a pillar. That closing tension of "once they've noticed you, you can't fully hide up close" comes from this one setting.
There are two key points.
- Always translate perception results into Blackboard values: driving the character directly from AI Perception means managing state in two places alongside the Behavior Tree's decisions. Splitting it so Perception only writes and the tree alone decides behavior keeps things intact when you add branches later
- Don't treat "saw" and "heard" the same: sound doesn't put eyes on the target, so it lands in
LastKnownLocationinstead ofTargetActor. That distinction alone gives you the natural behavior of "go look toward the noise"
When you're ready to tune chase speed and attack spacing, see NavMesh settings. If you want to compare against building sight yourself, see the Line Trace article.
Bonus: Good to Know for Later
Change the music on detection. On Target Perception Updated doesn't only drive enemy behavior — it's also a natural hook for the soundtrack. Stack a combat layer on detection and pull it back on loss, all from one float (→ Interactive Music).
See the field of view you configured. How far Sight Radius and Peripheral Vision Half Angle actually reach isn't knowable until you draw them. Adding a Draw Debug Sphere and Draw Debug Cone, or rewinding in Visual Logger, answers it instantly (→ Draw Debug and Visual Logger).
- See the field of view with the Gameplay Debugger: press
'(apostrophe) during Play to open the Gameplay Debugger, and switch categories with the number keys. Displaying the Perception category draws the sight range and currently perceived targets in the viewport. Look at it before you start guessing at numbers (see the debug display article) Dominant Senseis "the preferred sense when queried": set it toAISense_Sightand sight information is prioritized when you ask the Perception Component for a target's location. However, it has no effect in a setup like ours, where you writeStimulus Locationto the Blackboard yourself per event. You have to decide the priority on the writing side- Tune
Max Ageto your use case: how many seconds perceived information is retained.0means no expiry. Short if you want it forgotten in a few seconds, long if you want it remembered once noticed - There's a damage sense too: add
AI Damage sense configand the AI can react to being shot from behind. The damaging side needs to callReport Damage Event(see the damage handling article) - The sensing and sensed sides use different reference points: the sensing side (the AI) uses the position and direction based on
Get Actor Eyes View Point. The sensed side, by default, uses the Actor's location. To handle crouching and cover precisely, implementIAISightTargetInterfaceon the sensed side to specify the test points - Proper team assignment requires C++: implementing
IGenericTeamAgentInterfacecan't be done in Blueprint alone. When you want to seriously separate enemies, allies, and neutrals, implementing it on the AI Controller in C++ is the standard route (see First Steps into C++)
Summary
AI Perception has plenty of settings, but the skeleton you need to grasp is small.
| Element | Role |
|---|---|
| AI Perception Component | Attached to the AI Controller. The sensing side |
| Stimuli Source Component | Attached to the sensed side. Not needed for Pawns, which register automatically |
| AI Sight config | Two distances (Sight / Lose Sight) plus the half-angle |
| AI Hearing config | A distance. The emitting side uses Report Noise Event |
| Detection by Affiliation | Defaults to Detect Enemies only. Use Detect Neutrals while testing in BP |
| On Target Perception Updated | Delivers both detection and loss. Split them with Successfully Sensed |
And one design guideline: Perception only writes, and the Behavior Tree decides behavior. Hold that boundary and adding behaviors like "search for the hiding player" or "alert nearby allies" only means touching the tree.
How long do you want your enemies to keep looking after they lose the player?