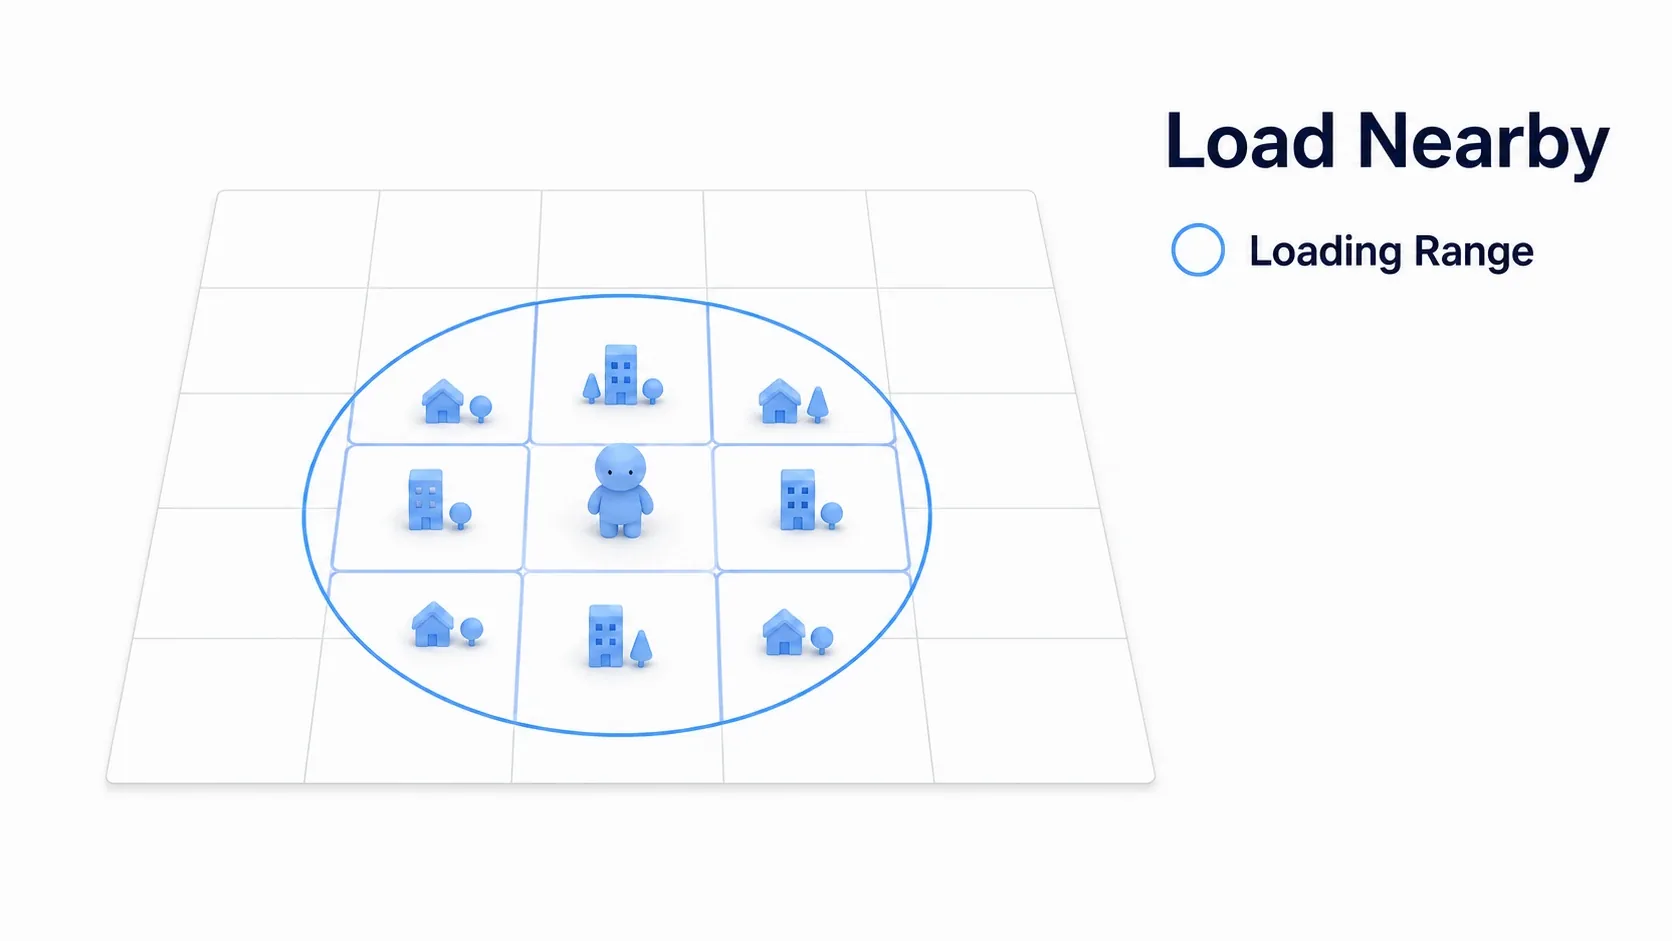
As your map grows, editor startup slows down and the wait before play gets longer. The cause is straightforward: the entire level is being loaded into memory at once. The player is standing in one corner, but the town and the forest on the far side are all in memory too.
There's only one direction for a fix. Load only what's nearby and discard the rest. UE5 gives you World Partition, which does this automatically, and Level Streaming, which lets you switch on your own timing. This article covers where both stand in UE5, when to use which, and how to build a transition from outdoors into a building interior.
What You'll Learn
- Where UE5 stands today: World Partition is the default for large maps
- How World Partition works ( divide into a grid, load only what's near )
- Using Data Layers to swap content by time of day or event
- Where manual Level Streaming is still the right tool
- Hands-on: streaming in a building interior as the player enters
- Why Split at All: Memory and CPU, Not Draw
- Where UE5 Stands: World Partition Is the Default
- How World Partition Works
- Actors Work Differently: OFPA and Always-Loaded
- Data Layers: Switching by Something Other Than Distance
- Where Manual Level Streaming Still Wins
- Hands-On: Streaming In a Building Interior
- Bonus: Good to Know for Later
- Summary
Why Split at All: Memory and CPU, Not Draw
The previous article, LOD, Culling, and Occlusion, covered techniques for not drawing things that are in your level. Culled objects aren't rendered, but they're still in memory.
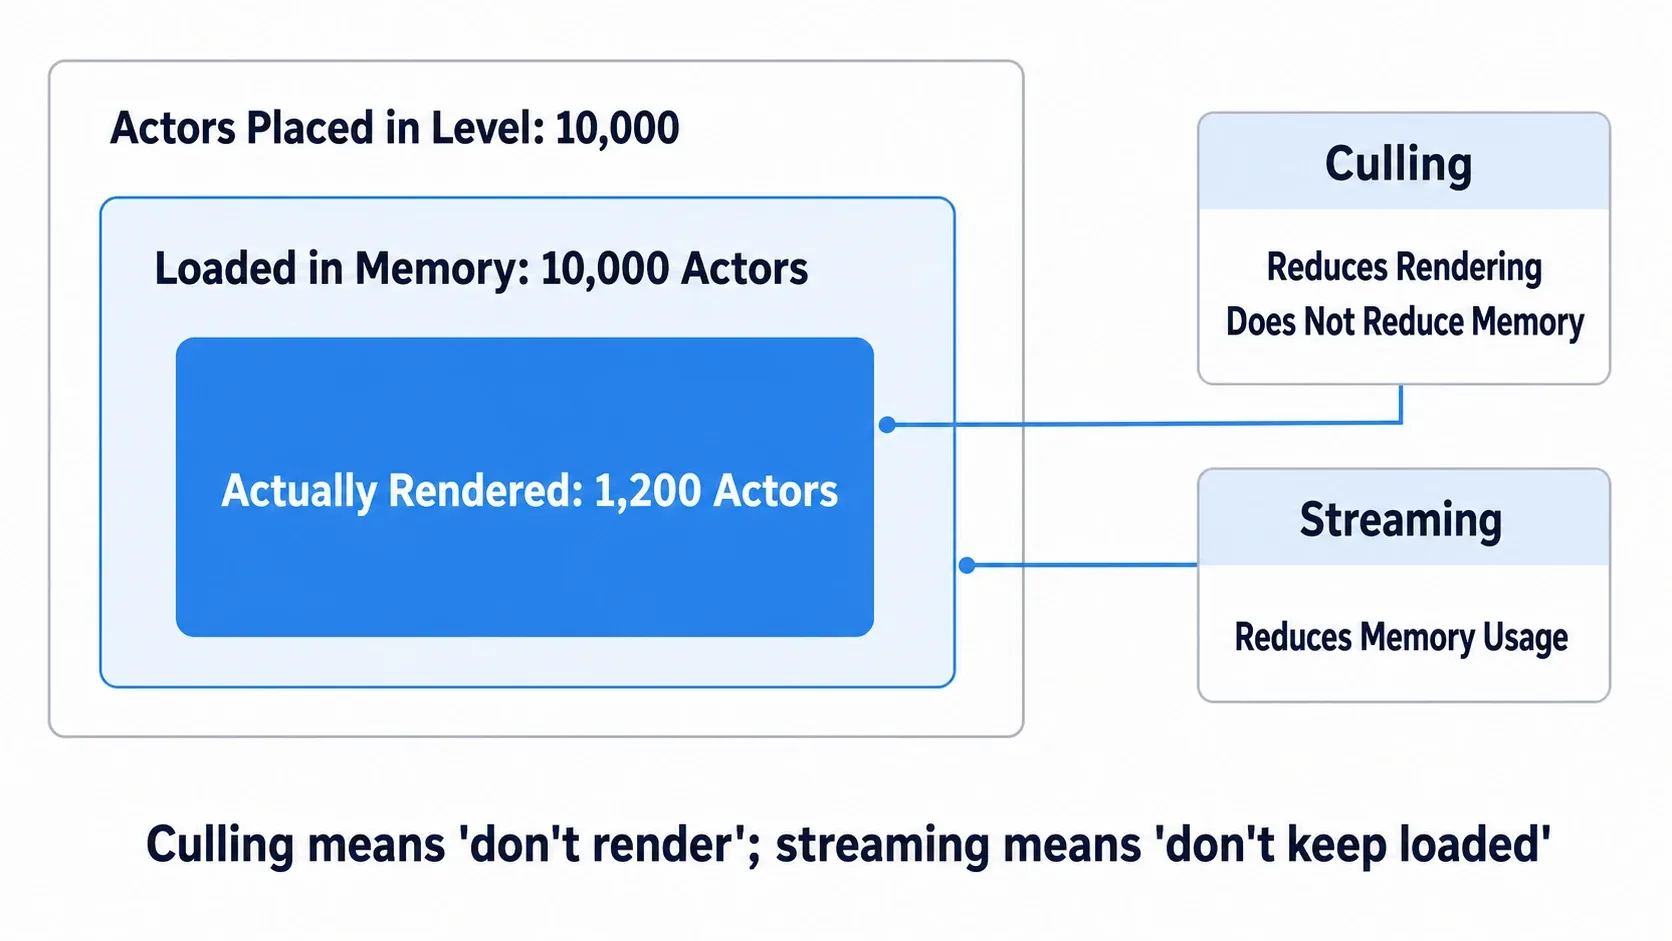
Keeping everything loaded leaves these costs on the table.
| Remaining cost | What it means |
|---|---|
| Memory | Meshes, textures, and materials all stay resident |
| CPU | Ticking actors keep running even offscreen |
| Initial load time | Everything has to finish loading before play starts |
| Editor sluggishness | Every actor loads each time you open the level |
Streaming addresses all four. If culling means "don't draw it," streaming means "don't hold it." They cover different ground, so neither substitutes for the other.
Where UE5 Stands: World Partition Is the Default
There's a lot of outdated information floating around here, so let's get it straight first.
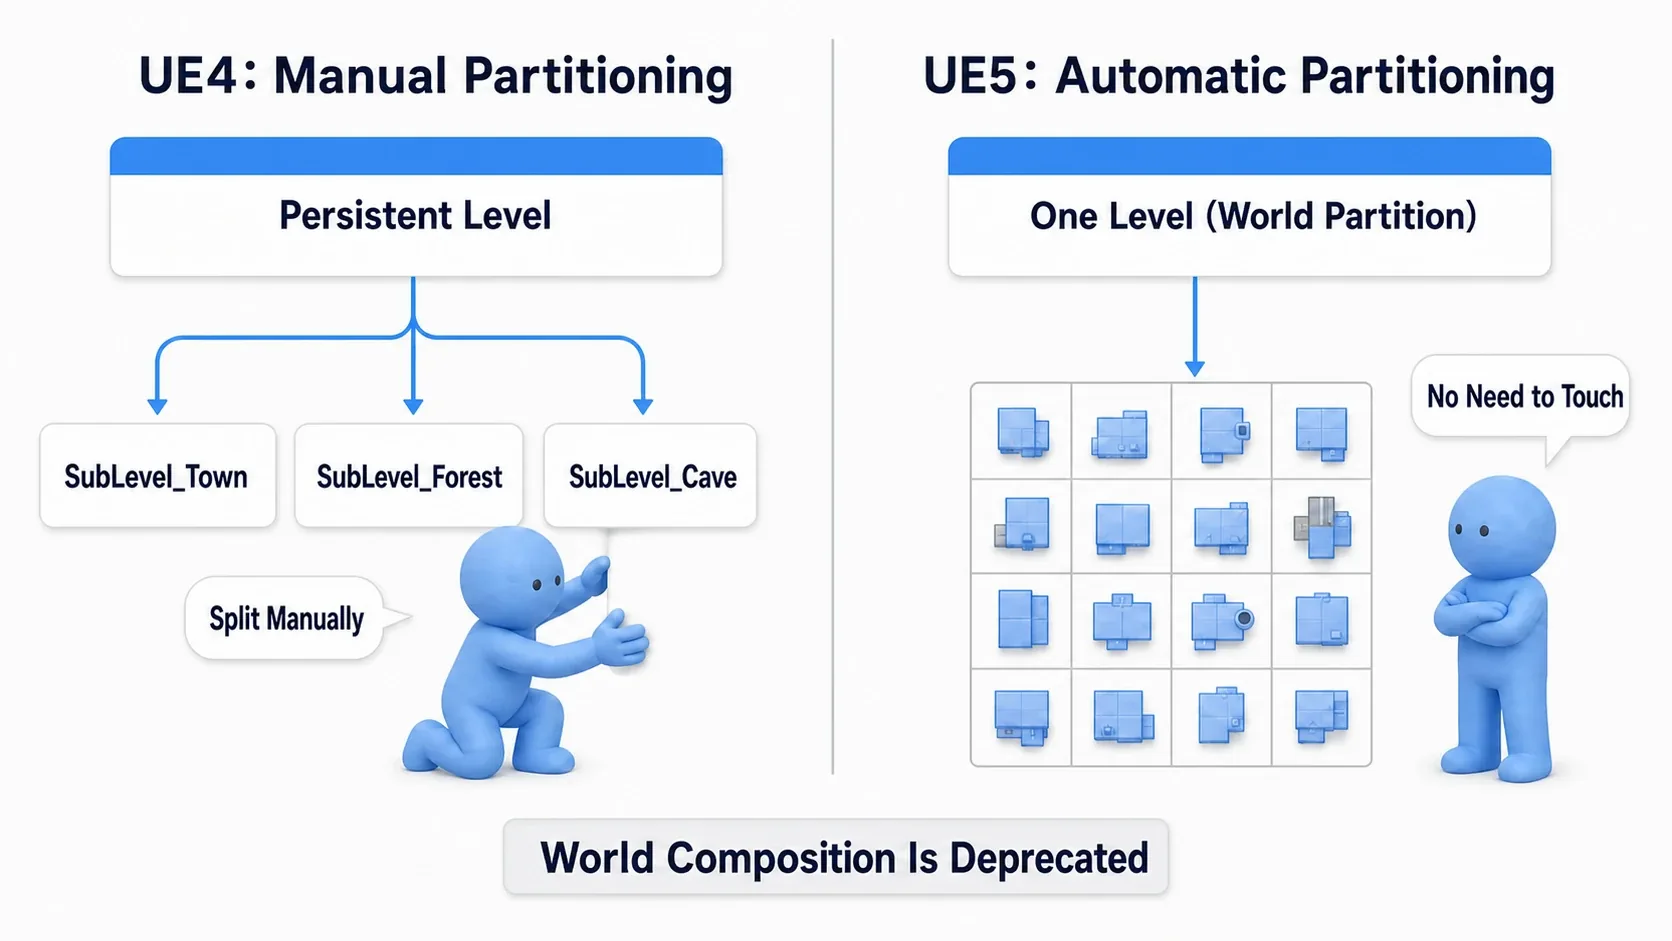
In UE4, handling a large map meant either World Composition (tiling levels side by side) or manual Level Streaming (loading sublevels yourself). Both assume a human splits the level by hand.
UE5.0 introduced World Partition, and that assumption changed. You keep the level as a single unit, and the engine handles the splitting. World Composition was deprecated, and World Partition became the standard way to build large maps.
When creating a new level from File → New Level, choosing Open World or Empty Open World gives you World Partition enabled. Basic and Empty Level do not.
| Template | World Partition |
|---|---|
| Open World | Enabled (with landscape and lighting) |
| Empty Open World | Enabled (empty contents) |
| Basic | Disabled |
| Empty Level | Disabled |
And there's one important restriction. In a World Partition level, the traditional Levels panel workflow for managing sublevels is unavailable. You can't use Window → Levels to attach sublevels to a persistent level.
What you use instead is Level Instance (placing a level inside a level like an actor) and Data Layers, covered next. You can't mix both approaches in one level, so decide which way you're going before you start building the map.
How World Partition Works
World Partition divides the level into a grid and loads only the cells near the player.
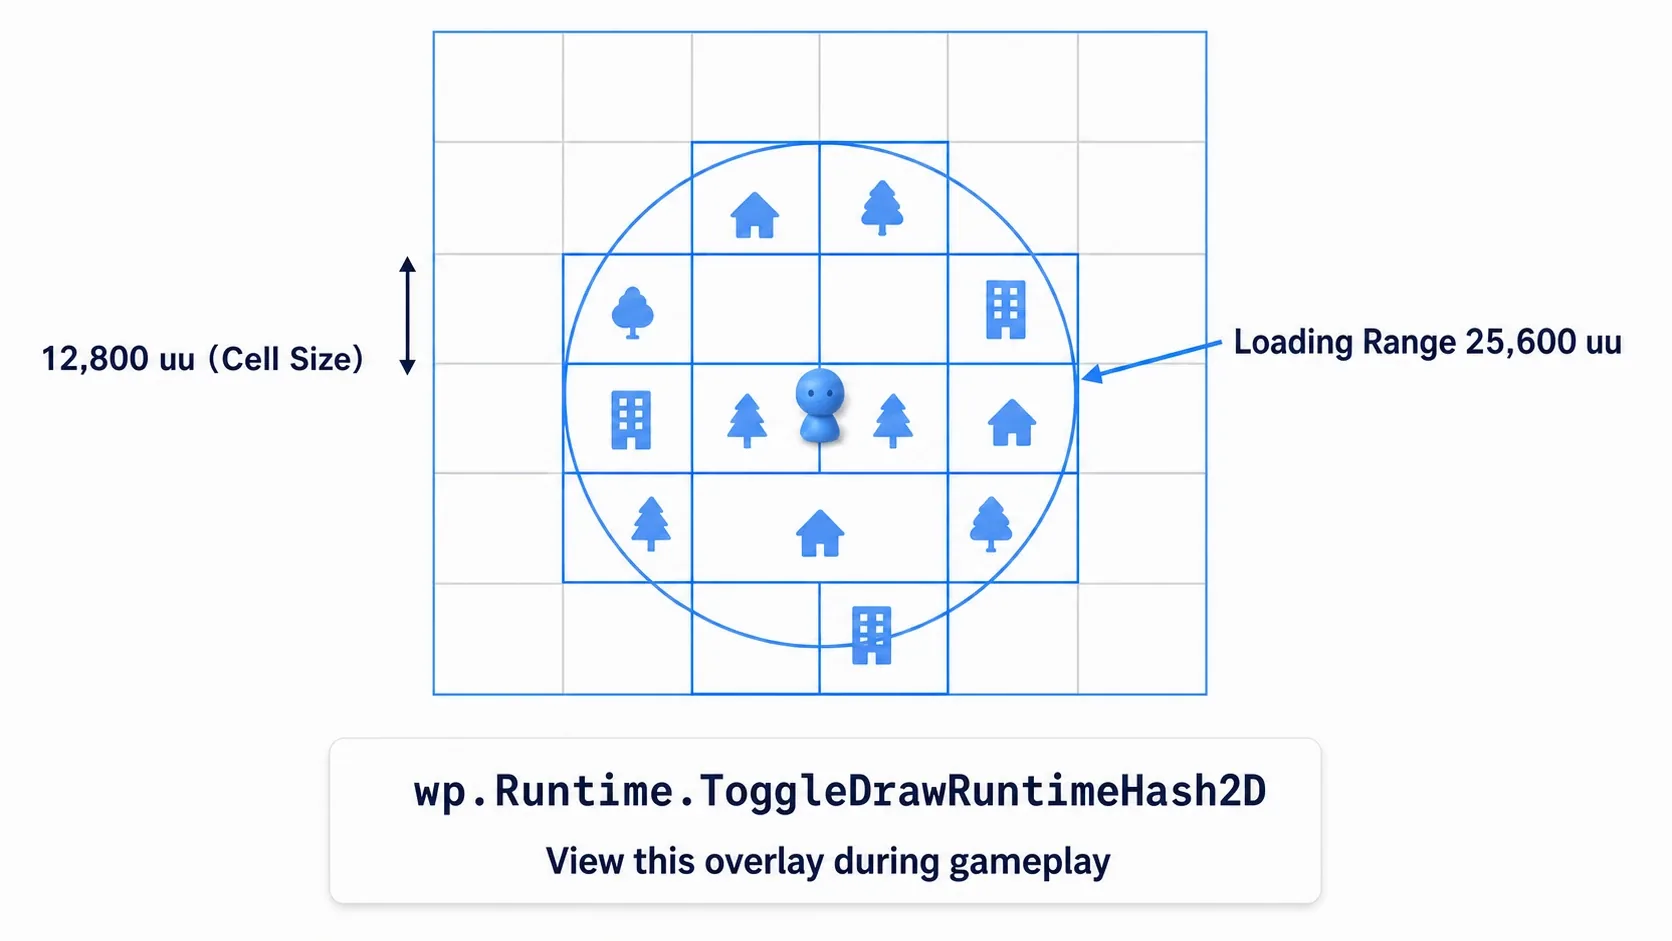
The mechanics are simple.
- Divide the whole level into fixed-size cells (default 12,800uu per side, or 128 meters)
- Each actor belongs to the cell it sits in
- Take a
Loading Rangearound the player (default 25,600uu, or 256 meters) - Load only the cells that range touches, and discard the rest
You can check the settings under World Partition Setup in World Settings. Smaller cells mean finer-grained loading and less memory, but more frequent swapping. Start with the defaults and only tune once memory becomes a problem.
Watching It Work
You can visualize the grid and loading state during play. Run this in the console.
wp.Runtime.ToggleDrawRuntimeHash2D
A top-down grid appears on screen, with loaded cells colored and unloaded cells darkened. Walk around and you'll see cells swap in and out as they follow the player. Watching this display for one minute is the fastest way to understand what World Partition is actually doing.
Run the same command again to hide it.
Loading in the Editor
World Partition levels behave the same way in the editor. When you open the level, no actors are loaded by default. Pick the region you want to work in via the World Partition editor (Window → World Partition), right-click, and choose Load Selected Cells.
"I opened the level and nothing showed up" isn't a bug. It's the design. It's also why a huge map opens in a couple of seconds.
Actors Work Differently: OFPA and Always-Loaded
World Partition also changes how actors are saved. This matters directly for collaborating over Git and for anything you want to keep resident.
One File Per Actor (OFPA)
In a World Partition level, each actor placed in the level gets saved to its own separate file (in the __ExternalActors__ folder). Traditionally every actor was packed into a single large .umap. This is an editor-side, source-control-friendly storage format; at cook time everything gets bundled back into the level.
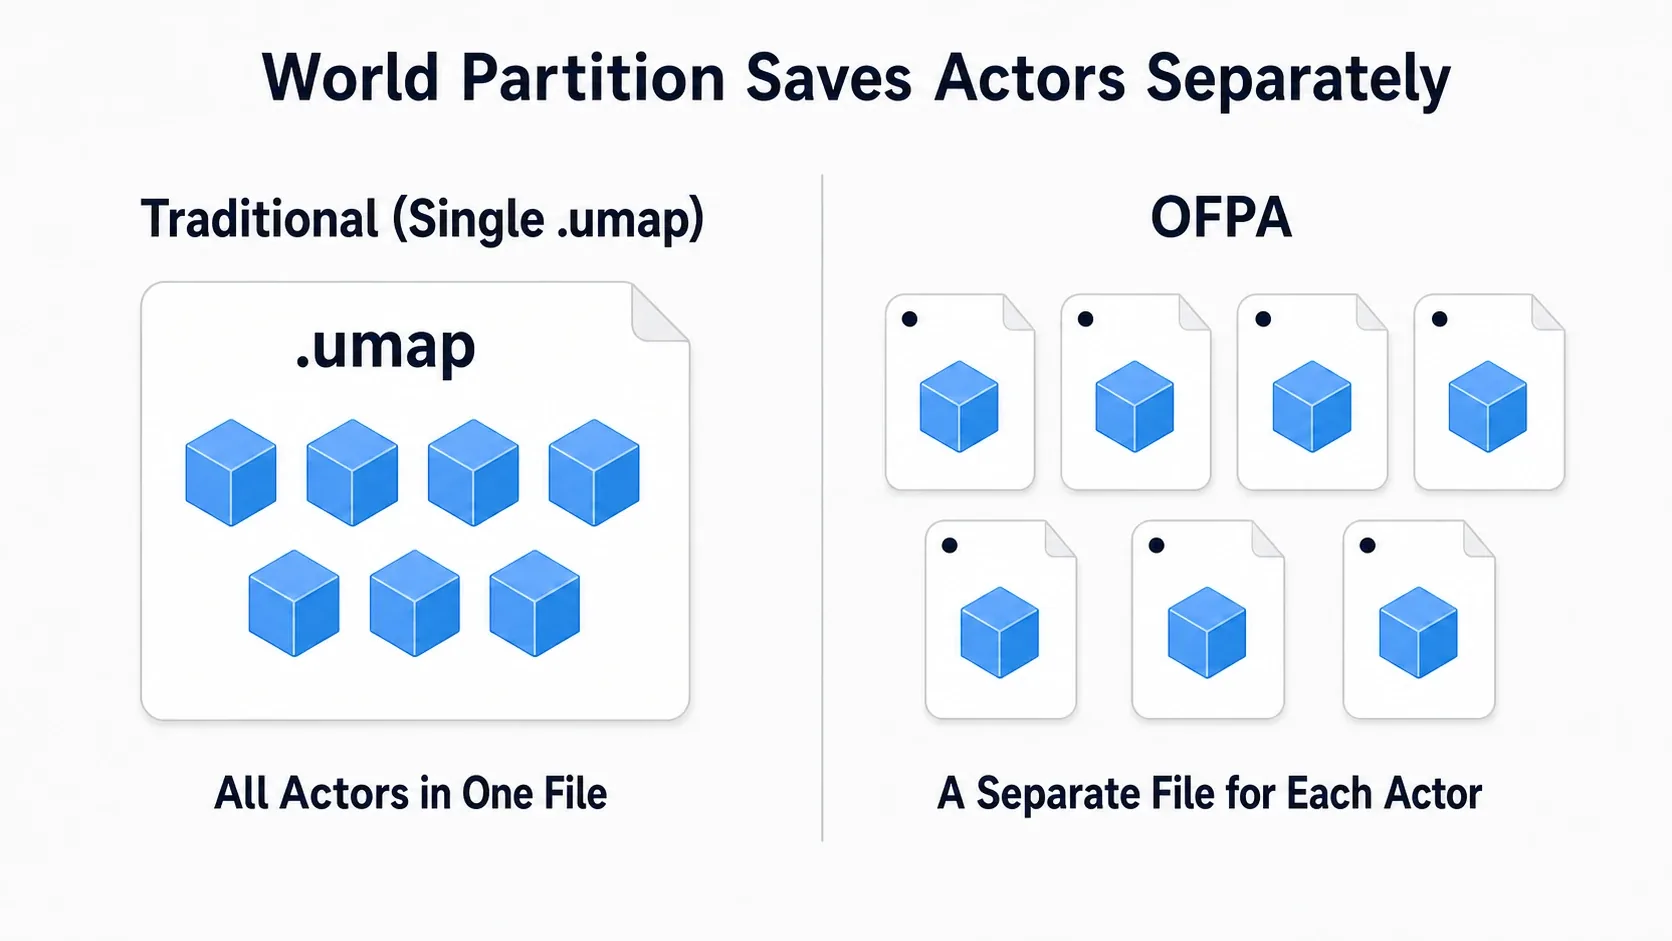
The payoff shows up in team development. Instead of everyone fighting over one .umap, files don't collide as long as people are touching different actors. But since actors become a large number of small files, set up your .gitignore and LFS configuration properly if you're managing this with Git.
Things You Want Always Loaded
World Partition streams actors in and out by distance. But some things need to be present regardless of distance: a manager that runs the whole game, an actor holding the score, an actor playing background music. It's a problem if these unload every time you walk away.
For those actors, turn off Is Spatially Loaded in the details panel (World Partition category). That removes them from the grid's distance streaming and keeps them permanently loaded. GameMode and GameState aren't affected since they're spawned at play start rather than placed in the level, but when you place your own manager Actor in a level, forgetting this gives you a "manager that sometimes disappears" and a bug that's hard to trace.
Data Layers: Switching by Something Other Than Distance
The grid decides loading by distance. But some content needs to swap on criteria distance can't express. A town that looks different by day and night, rubble that appears as the story progresses, a special stage that only exists during an event.
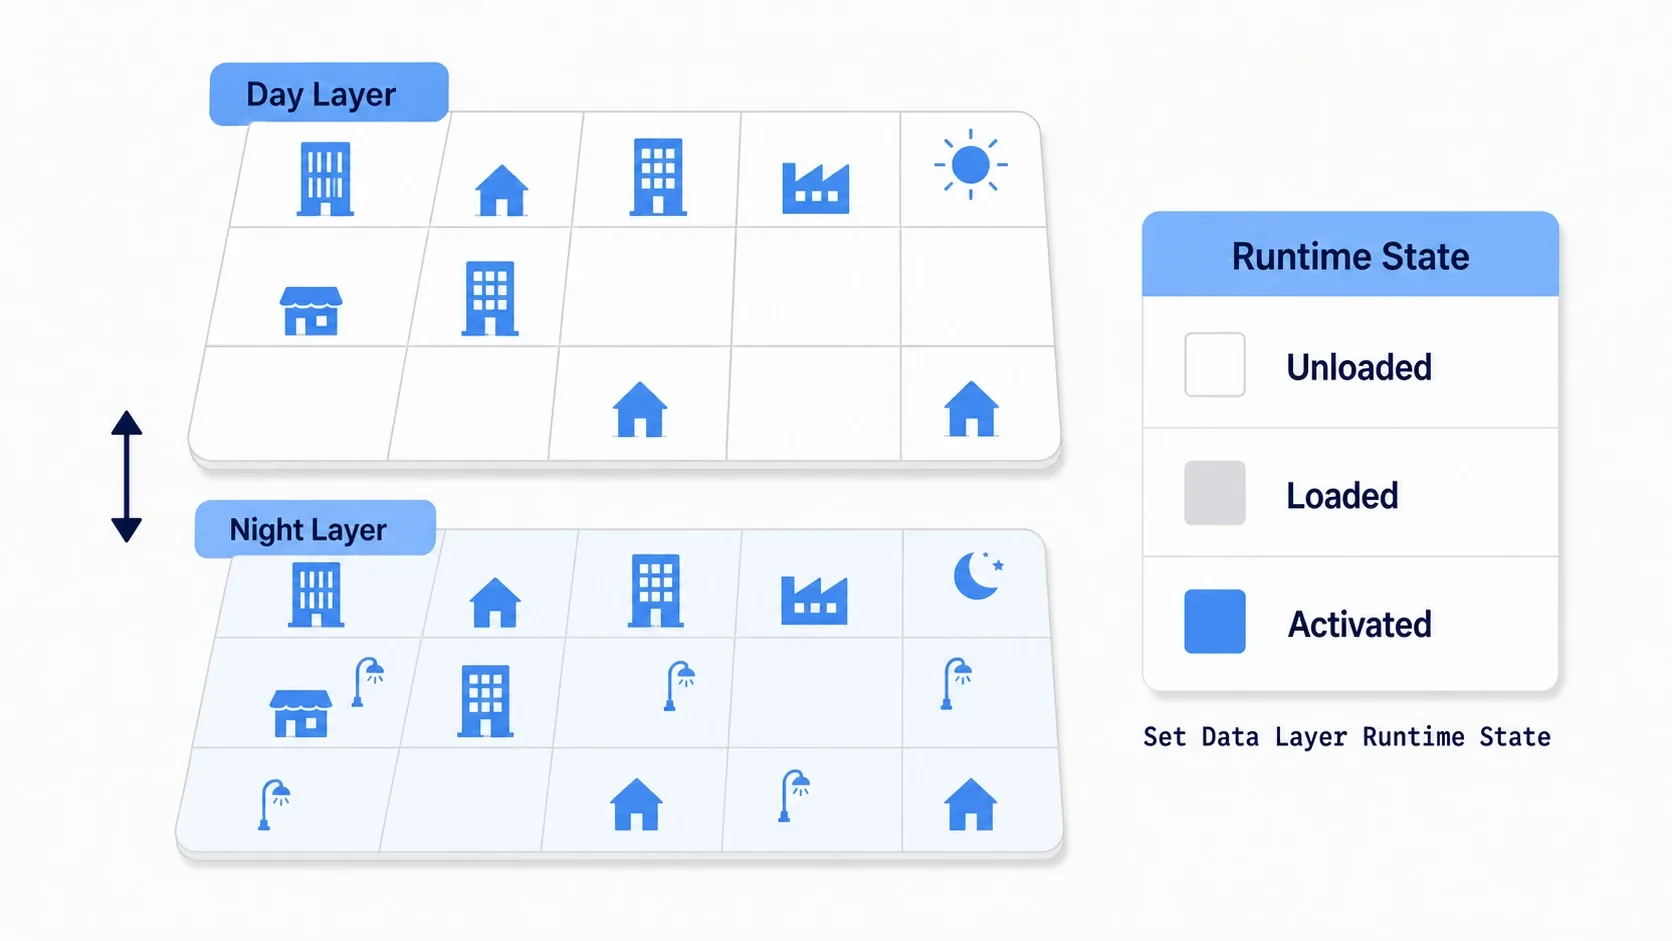
Data Layers group actors along an axis separate from distance and let you switch their load state as a group. Create them from Window → World Partition → Data Layers and assign actors in your level.
There are two kinds.
| Kind | Purpose |
|---|---|
| Editor Data Layer | Editor visibility organization only. No effect on the game |
| Runtime Data Layer | Load state can be changed at runtime |
If you want to switch during gameplay, create a Runtime Data Layer. It has three runtime states.
| State | Meaning |
|---|---|
| Unloaded | Not loaded |
| Loaded | In memory, but not participating in the game |
| Activated | Loaded and running in the game |
Switch states from Blueprint with the Set Data Layer Runtime State node. Going through Loaded first and then to Activated lets you finish loading in advance and reveal everything at the exact moment you need it. That's the trick when you want to avoid a hitch right as an event starts.
Where Manual Level Streaming Still Wins
Even with World Partition as the default, manual Level Streaming hasn't gone away. They're good at different things.
| Situation | Better approach |
|---|---|
| Roaming a large outdoor area | World Partition (automatic, by distance) |
| Entering and exiting buildings or dungeons | Manual Level Streaming |
| Swapping an area as the story progresses | Manual Level Streaming or Data Layers |
| Full map transition behind a loading screen | Open Level (not streaming) |
The deciding factor is clear. If the trigger is distance, use World Partition. If it's an event, go manual. Walking through a door, hitting a switch, defeating a boss. A grid can't express any of those.
In the manual approach, you attach sublevels that stream in and out to a resident Persistent Level.
- Create the level you want as a sublevel (for example,
SubLevel_Interior) - Open the persistent level and open the Levels panel via
Window → Levels - Add the sublevel with
Levels → Add Existing - Right-click the sublevel and choose
Change Streaming Method → Blueprint
With Blueprint, nothing loads until you call Load Stream Level yourself. The other option, Always Loaded, keeps it loaded permanently and doesn't function as streaming.
To repeat: this workflow only works in levels where World Partition is disabled.
Hands-On: Streaming In a Building Interior
Entering an inn in an RPG, stepping through a mansion door in a horror game, descending into a dungeon entrance in an exploration game. "Go from outside to inside and the interior loads" shows up in every genre. Here we'll build one, from the trigger in front of the door all the way through.
Setting Up the Repro
This hands-on uses a level with World Partition disabled (the Basic template), because the Levels panel isn't available in World Partition levels.
| Item | Setting |
|---|---|
| Persistent level | Create with File → New Level → Basic, save as L_Outdoor |
| Sublevel | Create the same way, save as SubLevel_Interior |
| Sublevel contents | 1,200 Static Meshes of furniture and props (roughly 2,000 triangles each) |
| Persistent level side | The building exterior, plus one Box Collision at its entrance |
| Trigger size | Box Extent = X:200 / Y:400 / Z:150 (large enough to cover the entrance) |
Step 1: Register the Sublevel
Open L_Outdoor and open the Levels panel via Window → Levels.
Choose SubLevel_Interior from Levels → Add Existing.... Once added, right-click → Change Streaming Method → Blueprint.
If you play now, the 1,200 interior meshes aren't loaded.
Step 2: Build the Trigger Actor
Create a new Actor Blueprint (BP_LevelStreamTrigger) and add a Box Collision component. Set Box Extent to the values above in the details panel, and set Collision Presets to OverlapAllDynamic.
Add one variable.
| Variable | Type | Default |
|---|---|---|
TargetLevelName | Name | SubLevel_Interior |
The type is Name because the Level Name pin on Load Stream Level takes a Name. Making it a variable lets you reuse the same Blueprint for other buildings.
Step 3: Wire Up the Load
Build the following graph in BP_LevelStreamTrigger's event graph.
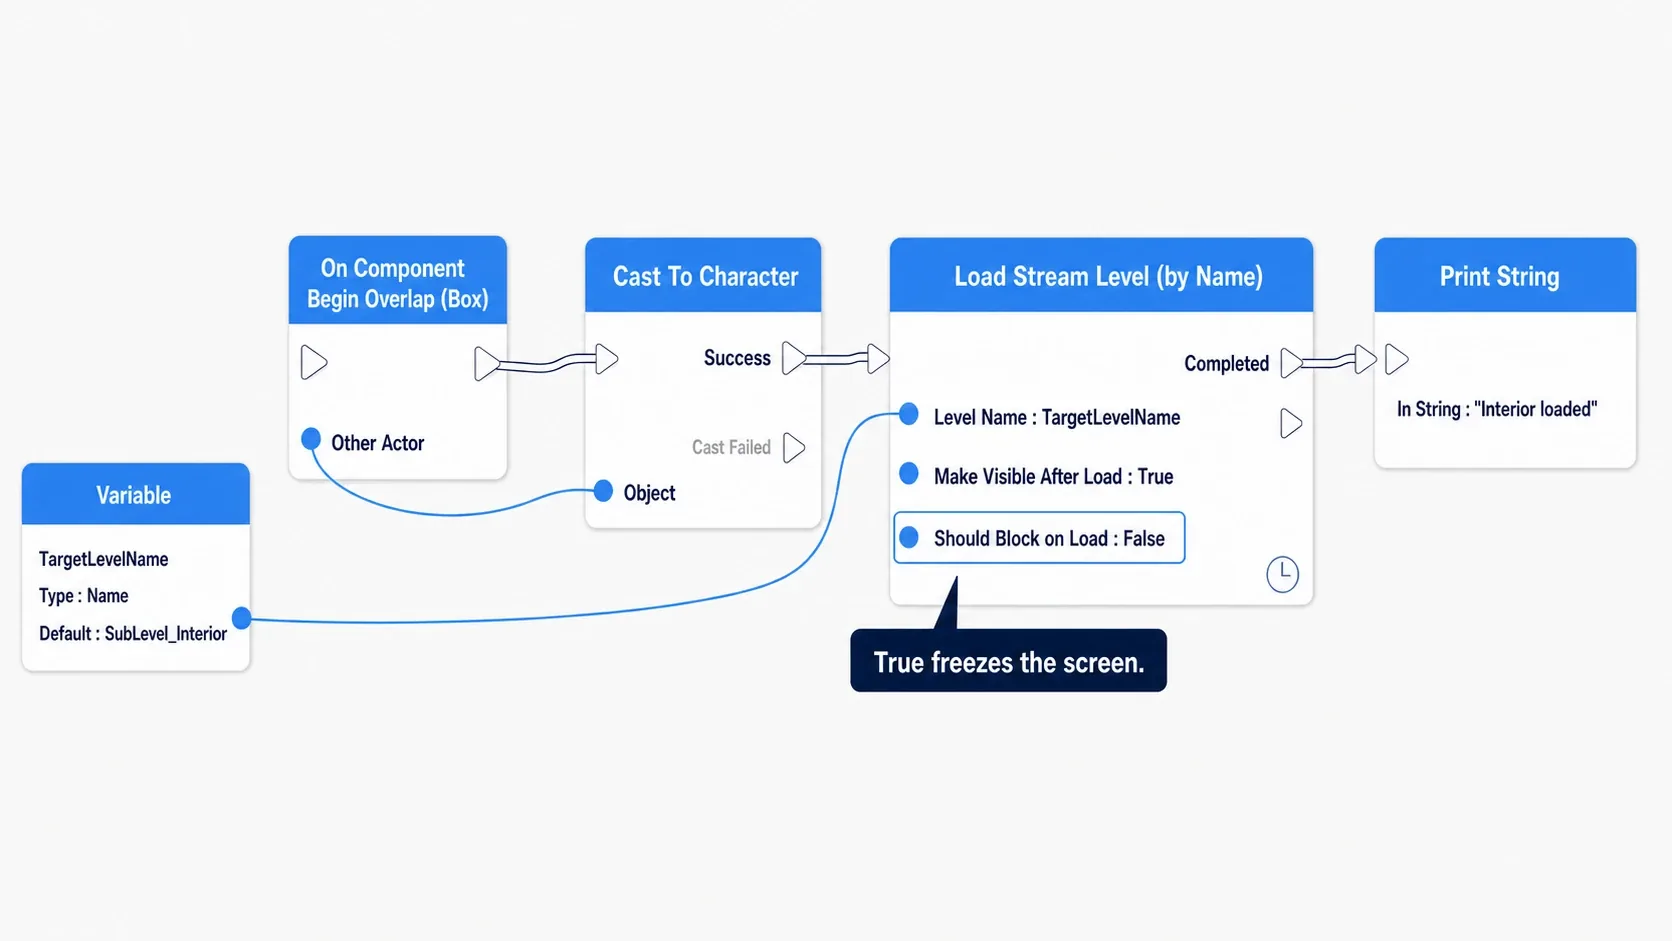
BP_LevelStreamTrigger (Event Graph)

On Component Begin Overlap (Box)
  → Cast To Character from Other Actor
  → (success) Load Stream Level (by Name)
       Level Name          : TargetLevelName
       Make Visible After Load : True
       Should Block on Load    : False
  → Completed → Print String "Interior loaded"

On Component End Overlap (Box)
  → Cast To Character from Other Actor
  → (success) Unload Stream Level
       Level Name          : TargetLevelName
       Should Block on Unload : False
Load Stream Level is a latent node. It has a clock icon in its lower-right corner and doesn't finish immediately when executed. The Completed pin fires when loading finishes. Wire your door-opening animation or arrival notification from that pin.
Setting Should Block on Load to False is the key. With True, the entire game halts until loading finishes, freezing the screen for as long as those 1,200 meshes take. Use False for anything outside a loading screen.
Drag your finished BP_LevelStreamTrigger into L_Outdoor and place it at the building entrance.
Step 4: Measure and Confirm
Launch with Standalone Game and run stat levels in the console. You get a list of loaded levels and their states (Loaded / Visible / Unloaded).
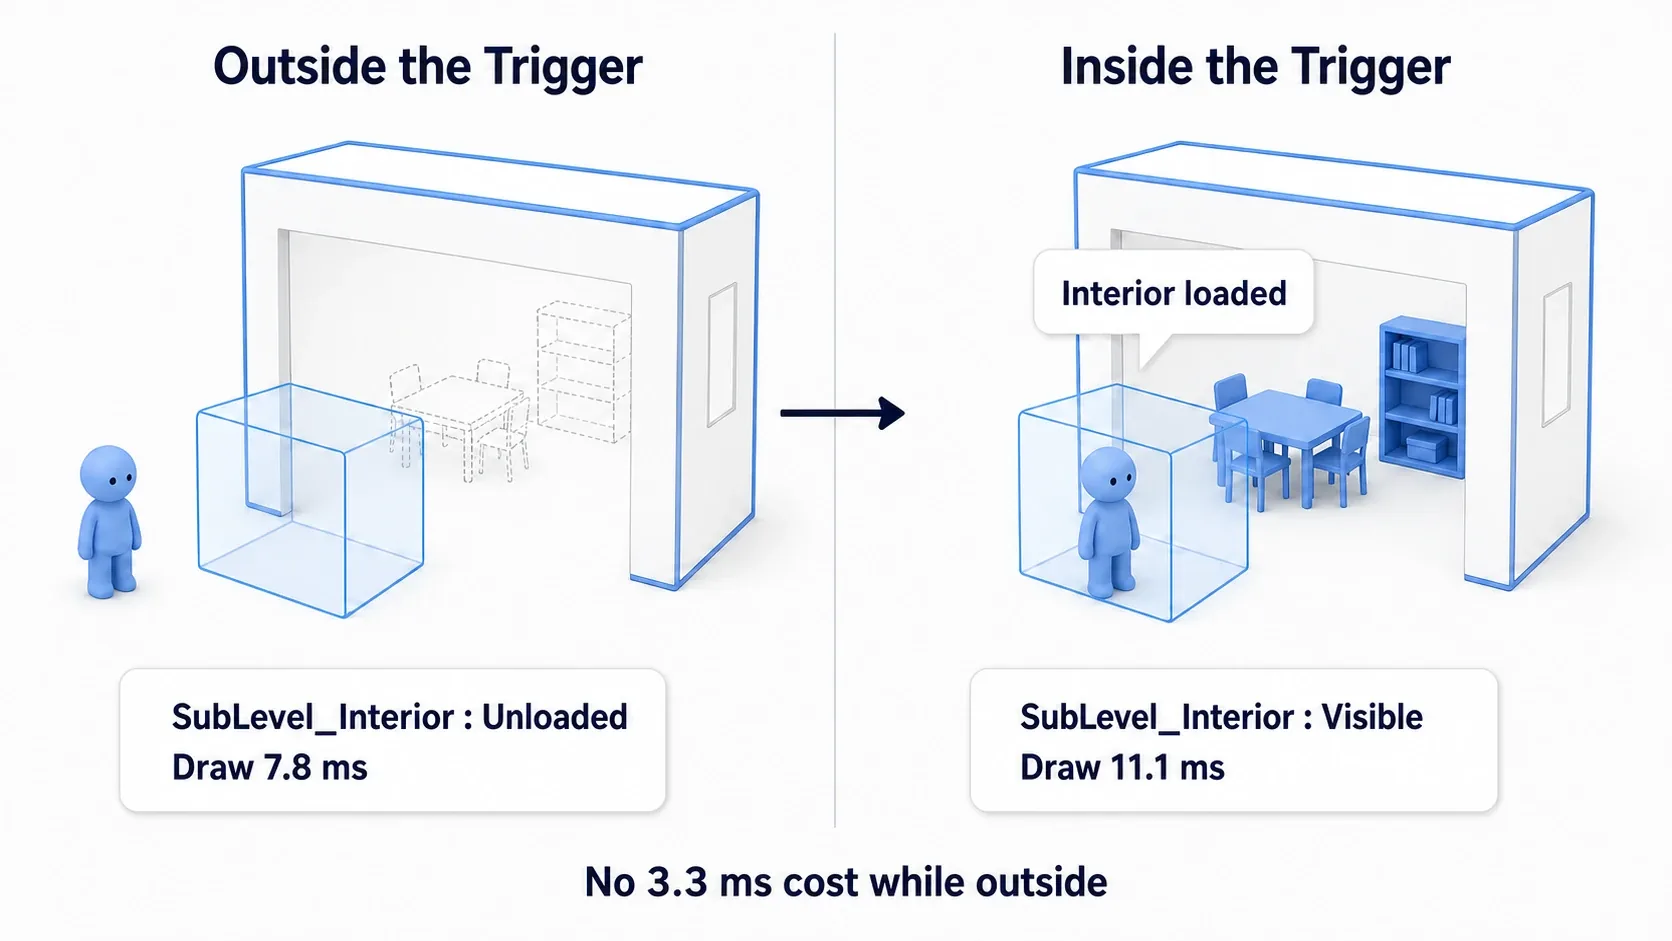
Away from the building, SubLevel_Interior either doesn't appear or shows as Unloaded. Check stat unit here.
Frame:   8.20 ms
Game:    2.10 ms
Draw:    7.80 ms
GPU:     6.40 ms
Enter the trigger and Print String shows Interior loaded, with SubLevel_Interior becoming Visible in stat levels. Measure again inside:
Frame:  11.60 ms
Game:    2.40 ms
Draw:   11.10 ms
GPU:     8.20 ms
Draw rose from 7.80ms to 11.10ms. That's not a failure. The 1,200 interior meshes are loaded and actually being drawn. What matters is that you weren't paying that 3.3 milliseconds while outside the building. With ten buildings, the gap against a load-everything-always setup is tenfold.
Leave the trigger and SubLevel_Interior returns to Unloaded, with Draw back around 7.80ms.
If it isn't working, here's how to narrow it down.
Load Stream Leveldoes nothing →Level Namedoesn't match the actual asset name. Enter just the asset name (SubLevel_Interior), not a pathChange Streaming Methodisn't in the Levels panel → that level has World Partition enabled. Rebuild it from theBasictemplate- It loads but nothing is visible →
Make Visible After LoadisFalse. Set it toTrue, or callMake Visibleseparately - The screen freezes the moment you enter →
Should Block on LoadisTrue - The trigger doesn't respond → check
Collision Presetson theBox Collision. It needs to beOverlapAllDynamic
Two things to take away.
- Put the trigger well before the door: loading takes time. Put the trigger right at the door and the room is still empty when it opens. Place it a few seconds of walking ahead to buy yourself the margin
- Be careful with unloading: a player pacing back and forth in front of the door causes repeated load and discard cycles. Instead of unloading straight from
End Overlap, insert a few seconds ofDelay, or make the unload trigger larger than the load trigger
Building post-load logic off the Completed pin follows the same "announce what happened" thinking as Event-Driven Design with Event Dispatchers. It pays off when you want to initialize loaded actors in a loosely coupled way.
Bonus: Good to Know for Later
Learning Level Instance early pays off. When you want to place the same building ten times, it lets you author one level and place it like an actor. It works in World Partition levels too, and editing one updates all of them. Think of it as applying the same idea as reusing functionality with Blueprint Components, but at the level scale.
World Partition generates HLODs automatically. Nothing is displayed in cells that aren't loaded, which would leave a blank horizon, so World Partition builds HLODs (simplified meshes merged from multiple actors) to fill in the distance. Build them from Build → Build HLODs. If your distant scenery is missing, suspect this first.
Unloading doesn't immediately free memory. It's retained until garbage collection runs. If stat levels says Unloaded but memory hasn't dropped, that's just the delay. Nothing is wrong.
Open Level isn't streaming. It moves to an entirely different map and discards the current level completely. It's for things like going from the title screen into the game. It isn't suited to seamless transitions. How to insert a loading screen, and where the data that gets discarded goes, are covered in Open Level, Loading Screens, and Where Your Data Goes.
Editor measurements aren't reliable. How streaming feels depends heavily on disk speed, and the editor caches assets so it looks faster than reality. If you need numbers close to the target hardware, measure in a packaged build (see Finding Performance Bottlenecks with stat unit).
Summary
| Approach | Where it fits | Switching trigger |
|---|---|---|
| World Partition | Large outdoor maps. UE5's default | Distance (automatic) |
| Data Layers | Day/night, progression, events | State (Set Data Layer Runtime State) |
| Manual Level Streaming | Interiors, dungeons, area swaps | Events (Load Stream Level) |
| Open Level | Title screen into the game | Full map transition |
Three things to hold onto.
- For a large map in UE5, start with World Partition. Create a new level from the
Open WorldorEmpty Open Worldtemplate and it's enabled - World Partition and traditional sublevel management can't coexist. Pick one before you start building the map
- Manual Level Streaming is still current. Switches that distance can't express (walking through a door, an event firing) are its territory
And a note on measurement. Streaming mainly affects memory and initial load time, and won't necessarily show up immediately in stat unit's Draw or GPU. To confirm it's working, check load states with stat levels first, then look at how stat unit changed. Judge with both steps.
That completes the trio: measure, draw less, load less. When you first ran stat unit, which number was largest? That's what decides where you go next.