You can build game logic just fine, but the moment you get to UI, everything stalls. In UMG the usual walls are "I made a Widget but nothing appears" and "I changed the resolution and everything shifted." Both take seconds to fix once you know the cause, and block you completely until you do.
This article breaks getting an HP bar on screen into two stages, make the Widget and put it on screen, then explains how anchors work and how to build a lightweight HP bar that only updates when you take damage.
What You'll Learn
- UI doesn't appear just because you made it. It takes
Create WidgetplusAdd to Viewport- The split of responsibilities: Designer tab for looks, Graph tab for behavior
- Resolution breakage comes from anchors, the setting for which part of the screen you measure from
- Binding is easy but runs constantly. An Event Dispatcher runs only on change
- Hands-on: an HP bar that updates only when you take damage
Widgets Take Two Steps: Make and Place
This is the first wall. Creating a Widget Blueprint puts nothing on screen.
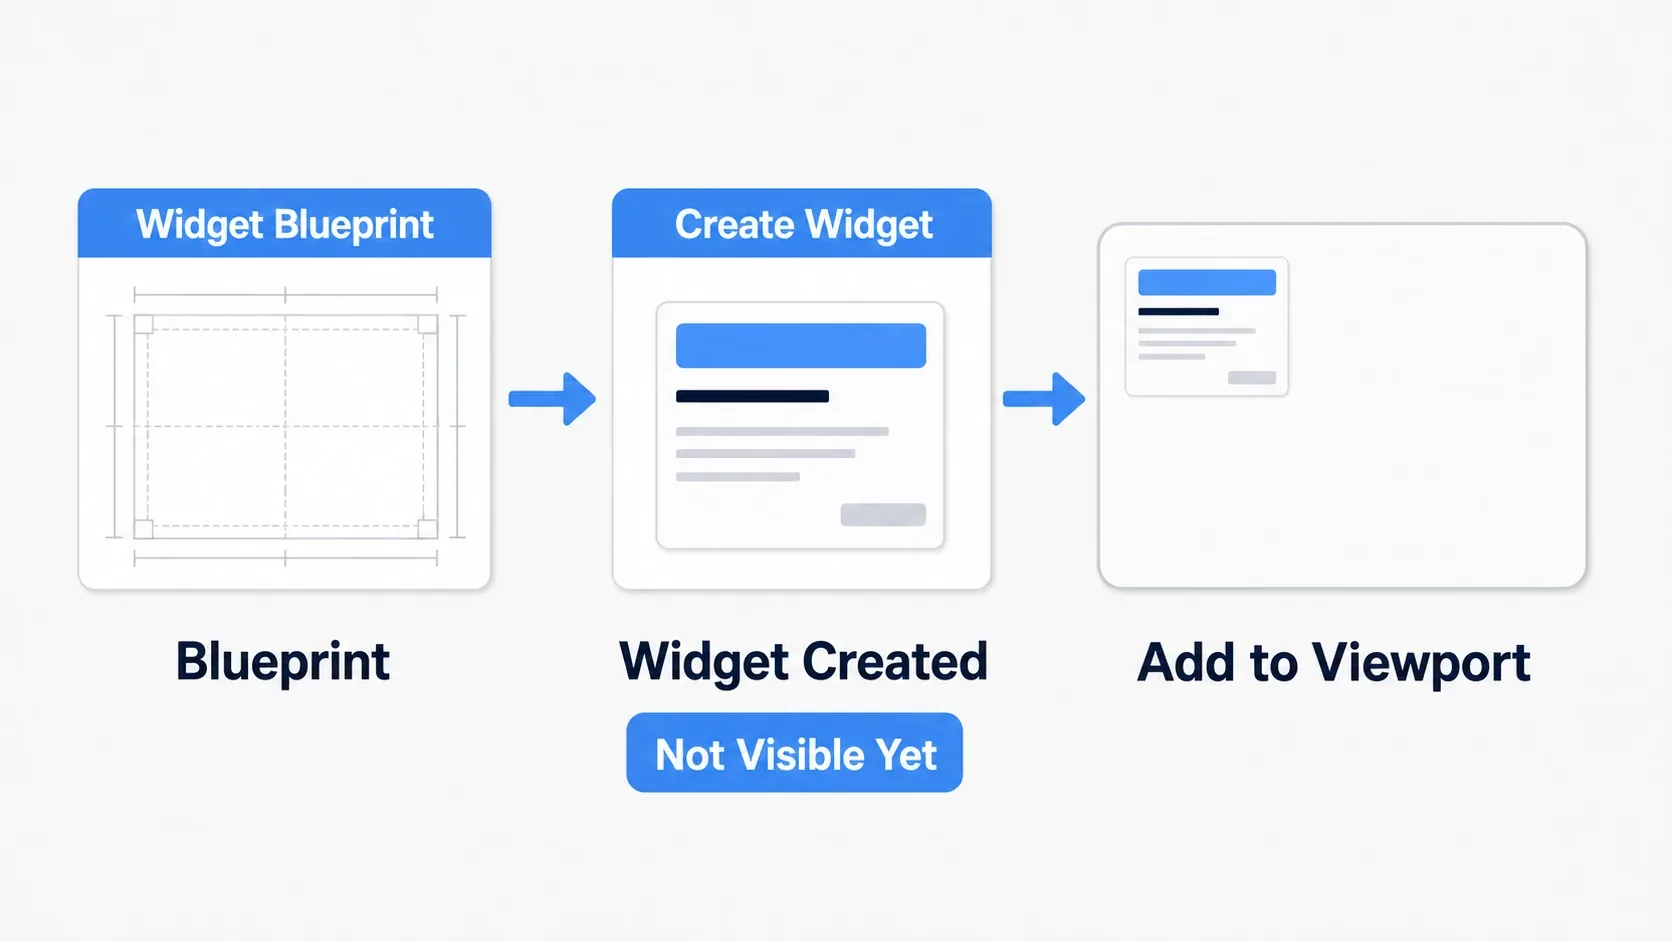
A Widget Blueprint is a design. From that design, Create Widget produces an instance, and Add to Viewport places it on screen. Only then is it visible.
Event BeginPlay (Player Controller)
  → Create Widget (Class: WBP_PlayerHUD, Owning Player: Self)
  → Set HUDRef (keep the created instance in a variable)
  → Add to Viewport (Target: HUDRef)
The trick is to save the instance in a variable. Later, when you want to update the HP bar or close a menu, it's awkward to operate on it without a reference.
To remove it, use Remove from Parent. It's the inverse of Add to Viewport, taking the widget off the screen.
Add to Viewportis only for widgets you display on their own. Child widgets you placed inside a parent in the Designer show up automatically when the parent goes on screen, so you don't call it individually.
Where to write it: for UI that's on screen for the whole game, like a HUD, the Player Controller's
BeginPlayis the standard place. Put it on the character and the UI gets rebuilt every time the character dies and respawns. For the bigger picture of how these roles divide up, see GameMode / GameState / PlayerState.
The Designer Tab and the Graph Tab
Open a Widget Blueprint and you'll see a Designer / Graph toggle in the top right. Their roles are cleanly separated.
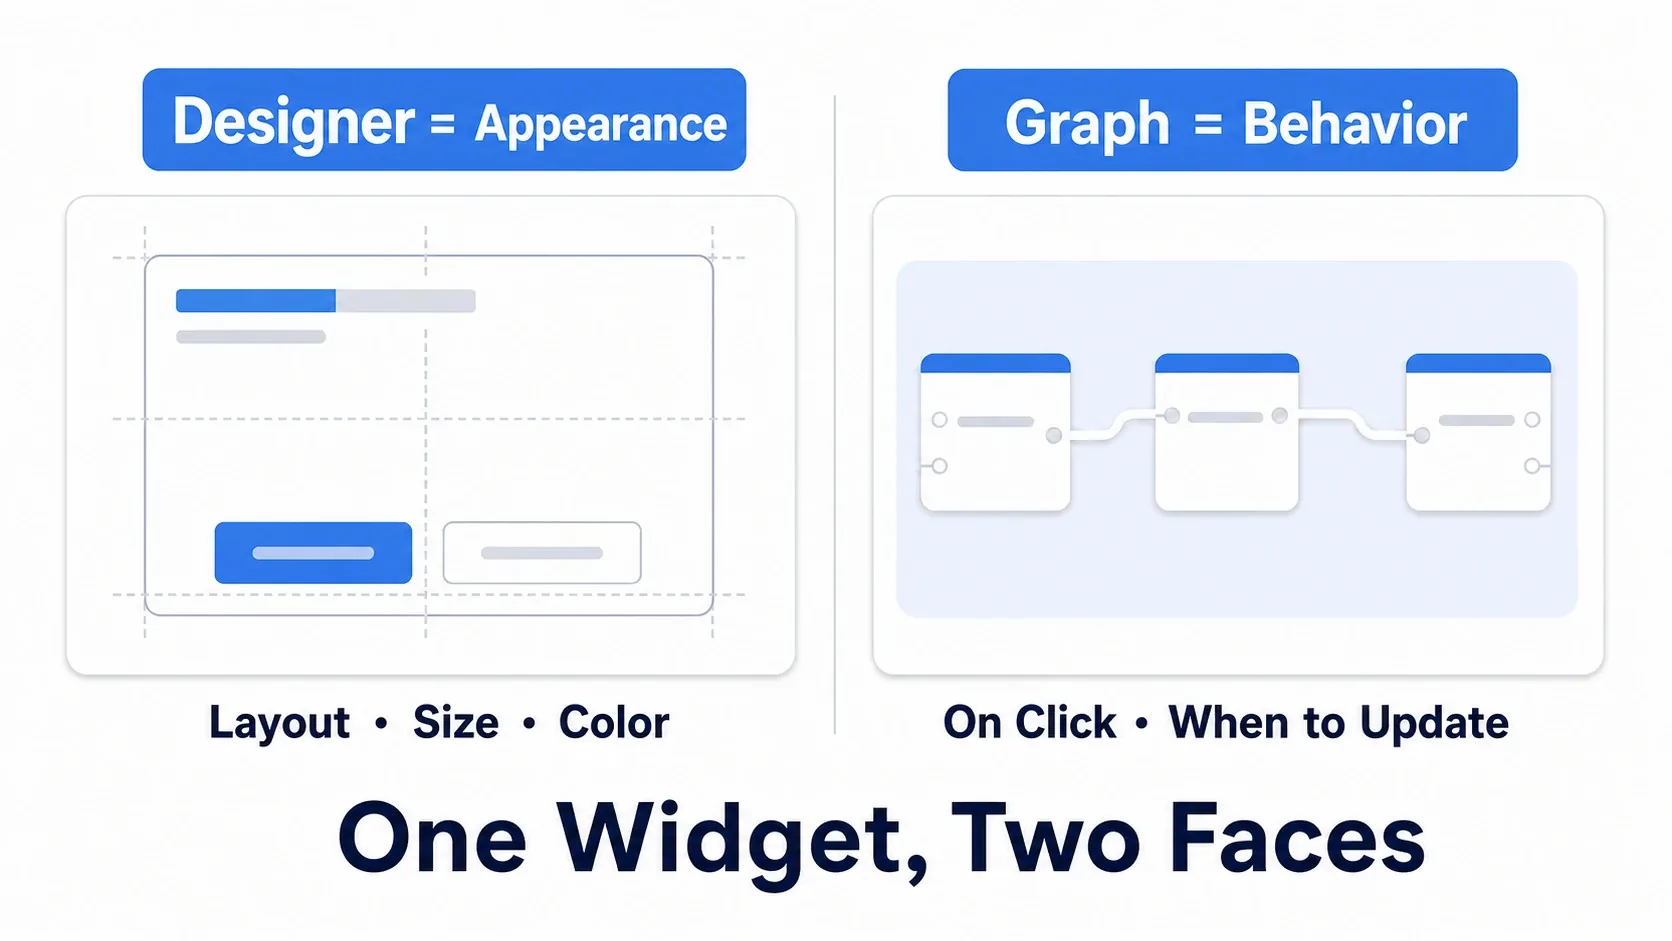
| Tab | What it's for | What you touch |
|---|---|---|
| Designer | Building the look: arranging, sizing, coloring | Palette (available parts), Hierarchy (parent/child), Details |
| Graph | Building the behavior: what happens on press, when to update | The same node graph as any Blueprint |
The parts you place in the Designer come in roughly two kinds.
- Display parts:
Text,Image,Progress Bar,Button, and anything else actually drawn on screen - Layout parts (containers):
Canvas Panel,Horizontal Box,Vertical Box, and others that decide how their contents are arranged
Beginners struggle with the second kind. In particular, without knowing that Canvas Panel allows free positioning while Horizontal Box / Vertical Box auto-arrange their contents, you'll run into "I can't move this where I want."
A reliable default: make the root a
Canvas Panel, putHorizontal BoxorVertical Boxinside it, and put your parts inside those. Free positioning for the broad layout, auto-arrangement for the fine details holds up well.
Anchors: Which Part of the Screen You Measure From
"It looked perfect on my monitor, then I changed resolution and everything moved." That's the single most common UMG accident, and it comes from not understanding anchors.
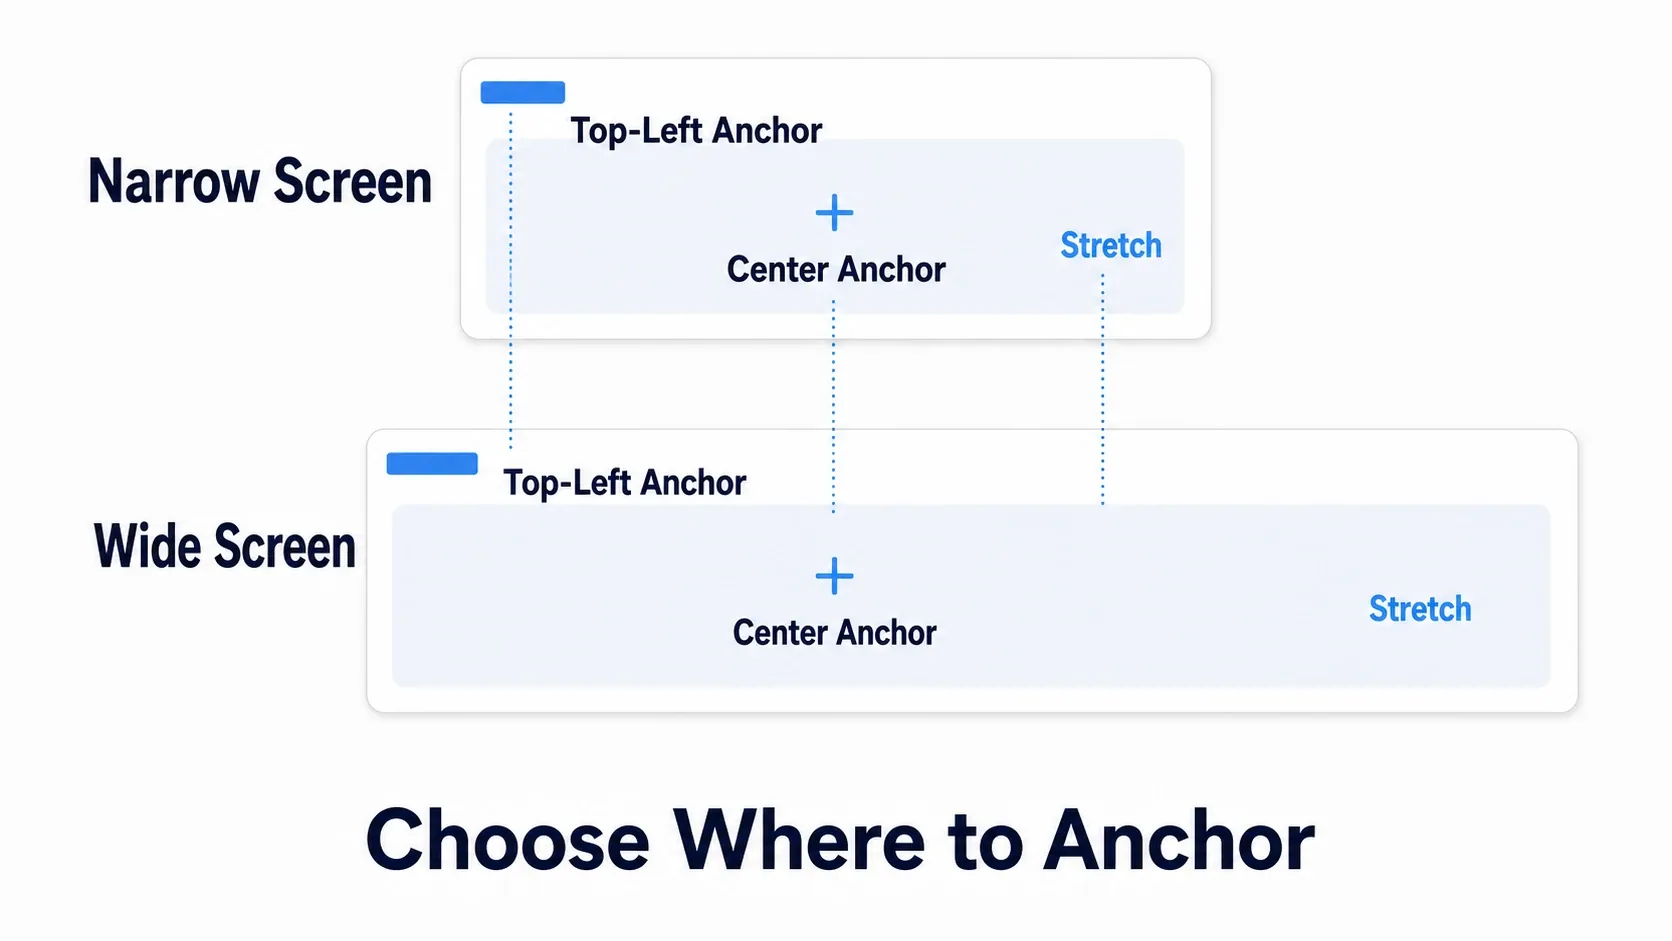
An anchor specifies which part of the parent Canvas Panel a part measures its position from. The root Canvas Panel fills the screen, so in practice it becomes "which part of the screen you measure from."
You can only set it on direct children of a Canvas Panel. Select a part inside a Horizontal Box and Anchors won't appear, so remember that the thing you anchor is the container placed directly on the Canvas Panel.
| Anchor | Measured from | UI it suits |
|---|---|---|
| Top-left | Distance from the top-left of the screen | Status displays like health and stamina |
| Top-right / bottom-right | Distance from that corner | Minimaps, clocks, ammo counters |
| Center | Offset from the screen center | Crosshairs, damage numbers |
| Stretch to fill | Follows all four edges (the size scales) | Background dimmers, full-screen menus |
The question to ask is "when the screen gets wider, where should this part be?" If it should stay in the top-left, anchor it top-left. If it should always be centered, anchor it center.
If it's slightly off-center when you wanted it centered, check
Alignment. The anchor decides the reference point;Alignmentdecides which part of the widget lines up with that point. For exact centering, setAlignmentto(0.5, 0.5).
There's a way to check your work, too. Use the resolution dropdown at the top of the Designer tab (Screen Size / Preview Size) to switch to a different device or aspect ratio, and broken parts show up immediately. You catch them before ever testing on hardware.
Two Ways to Get Values into the UI
You want the HP bar to track health. There are two approaches, and which you pick changes the performance cost.
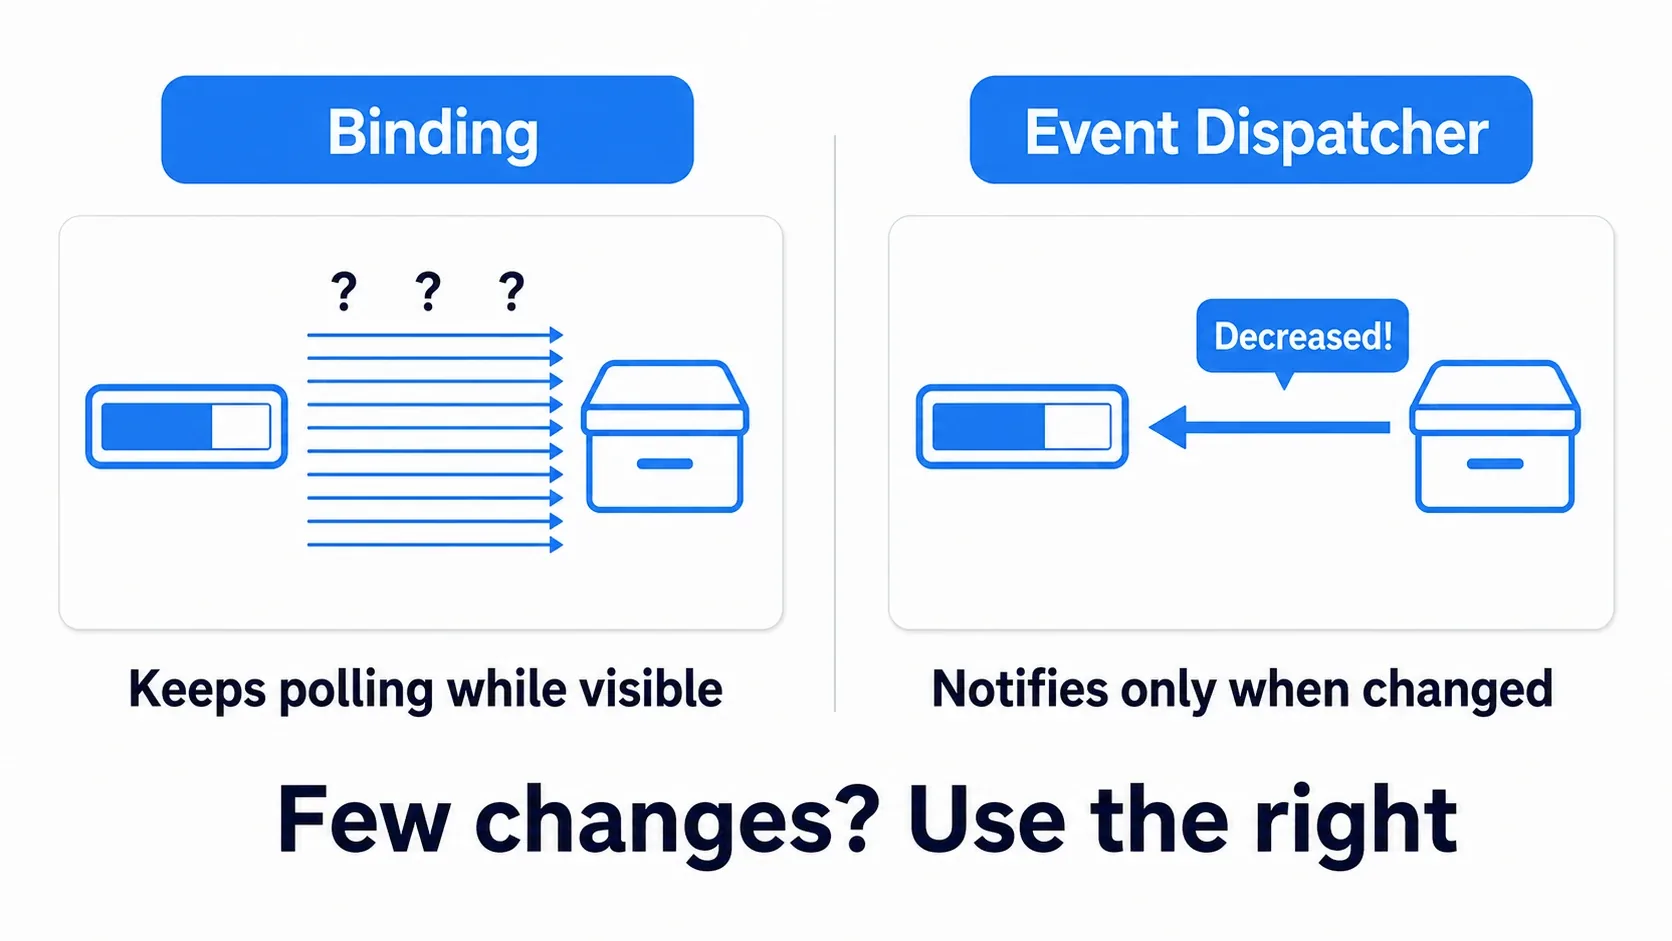
Approach 1: Binding
Create a function from the Bind button next to a Progress Bar's Percent, and UMG calls that function every Tick for as long as the widget is alive to fetch the value.
- Upside: a few clicks, and you can never forget to update
- Watch out: it keeps getting called the entire time the UI is visible. Put a
Castor a search in there and it runs endlessly - Delete it when you switch: if you later move to updating with
Set Percent, delete the Binding first. Leave it in place and the value you set gets overwritten by the Binding's return value
Approach 2: Event Dispatcher (announce only on change)
The side that loses health broadcasts "I took damage," and the UI updates only when it hears that.
- Upside: it only runs when something changed. For a value that changes once in a hundred frames, that's one hundredth of the cost
- Watch out: setting up the broadcast takes a bit of work (→ how to use Event Dispatchers)
Besides these two, there's also calling Set Percent directly from outside (with something like the Player Controller responsible for updates). Here we're comparing the two most common options.
The deciding factor is how often the value changes. Things that move every frame (a speedometer, health in a game where it's constantly fluctuating) suit Binding; things that change occasionally (HP, score, money, ammo) suit an Event Dispatcher. When in doubt, build it with Binding first and move it once it gets heavy is the practical answer.
Hands-On: An HP Bar That Updates Only on Damage
An action RPG's health gauge, a shooter's shield meter, a survival game's hunger bar. "Show a number as a bar" shows up in every genre. Here we'll build an HP bar that updates only at the moment you take damage.
HP isn't a value that changes constantly; it moves only at the moment you take damage. That fits the guideline from the previous section (rarely-changing values suit an Event Dispatcher), so this article skips Binding and builds it with an Event Dispatcher from the start.
Here's what it looks like when it runs. The HP bar in the top-left stays full until damage lands. Only the instant a hit connects does the bar slide down to match the current value.
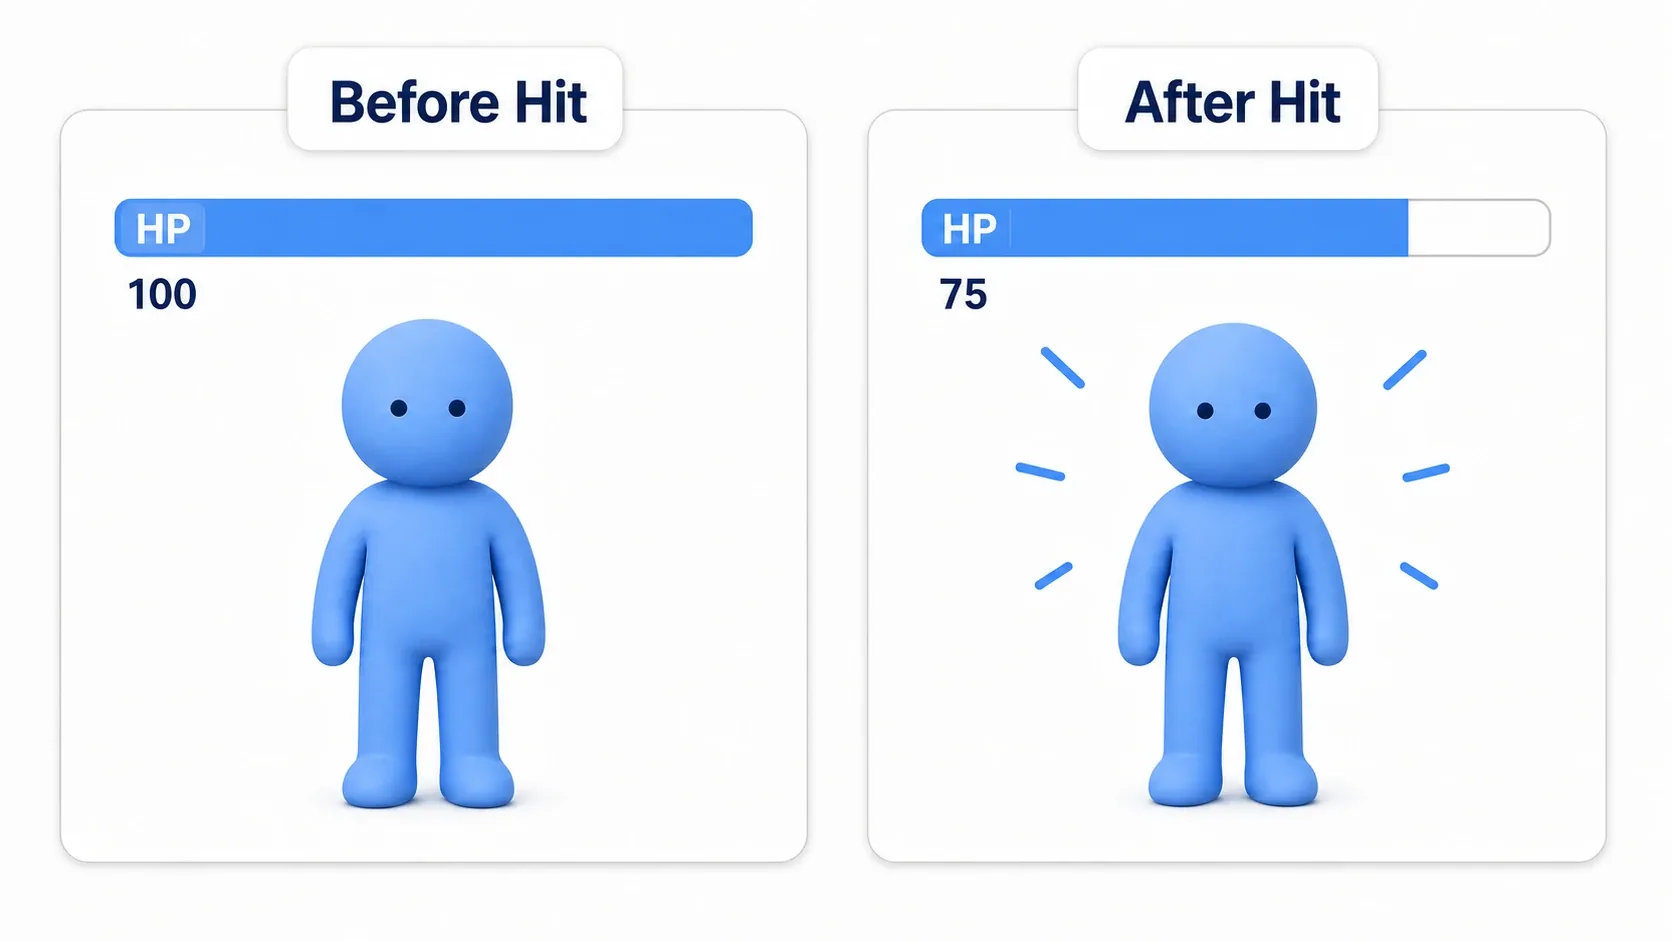
What you'll need: prepare the following.
| Location | Name | Type / setting |
|---|---|---|
BP_Player (inherits Character) | MaxHealth | Float / 100.0 |
BP_Player | CurrentHealth | Float / 100.0 |
BP_Player | OnHealthChanged | Event Dispatcher. Add one input, NewPercent (Float) |
WBP_PlayerHUD | HealthBar | Progress Bar. Check Is Variable |
BP_PlayerController (inherits PlayerController) | HUDRef | A variable of type WBP_PlayerHUD |
Create the Widget Blueprint by right-clicking in the Content Browser → User Interface → Widget Blueprint → choose User Widget as the parent class.
Do this first: creating BP_PlayerController doesn't mean it gets used. Open your GameMode (BP_GameMode or similar) and set Player Controller Class to BP_PlayerController and Default Pawn Class to BP_Player. Skip this and BeginPlay never even runs, leaving you stuck on "nothing appears" indefinitely.
Step 1: Build the HUD layout. In WBP_PlayerHUD's Designer tab, place a Horizontal Box inside the Canvas Panel, and inside it put a Text (reading "HP") and a Progress Bar (HealthBar).
Two settings matter. Select the Horizontal Box and anchor it top-left, then position it in the screen's top-left corner. And set HealthBar's Slot Size to Fill (the default Auto makes the bar almost invisibly narrow).
Step 2: Put the HUD on screen. Create and place it in BP_PlayerController's BeginPlay.
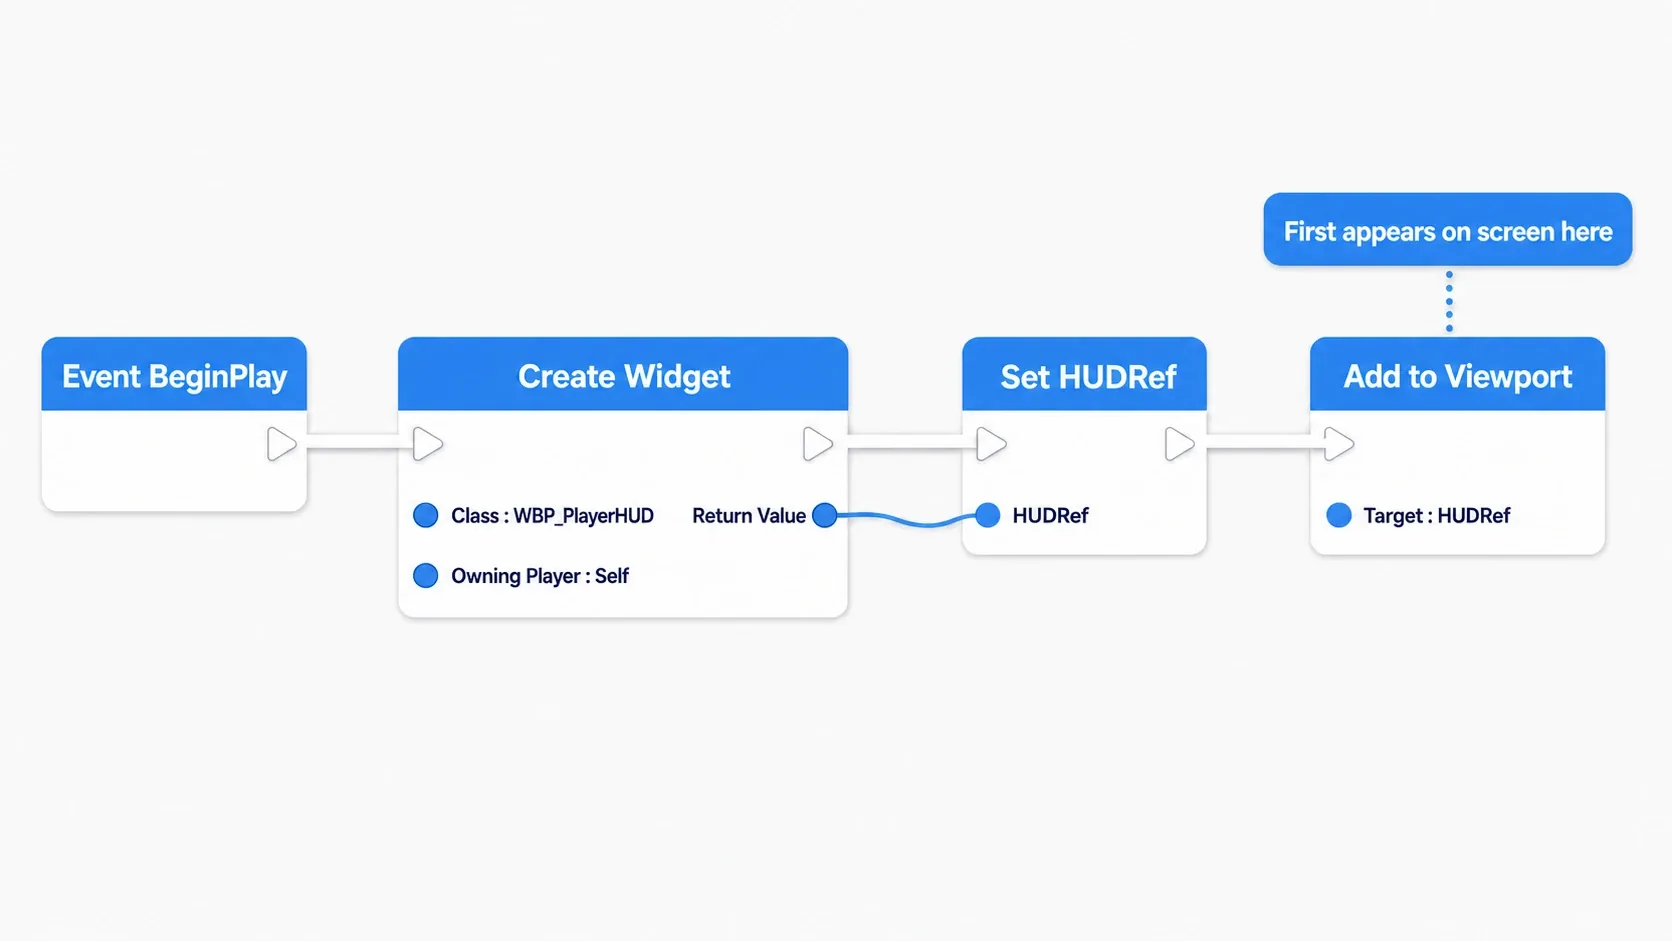
Event BeginPlay (BP_PlayerController)
  → Create Widget (Class: WBP_PlayerHUD, Owning Player: Self)
  → Set HUDRef
  → Add to Viewport (Target: HUDRef)
Press Play once here. If "HP" and a full bar appear in the top-left, the first half works. If nothing appears, check the GameMode settings or Add to Viewport; if the bar is too thin, check Size = Fill.
Step 3: Broadcast when health drops. Add a function to BP_Player that reduces health and fires OnHealthChanged the moment it changes.
Name the function ReduceHealth. ApplyDamage collides with a built-in engine node of the same name and makes node searches confusing. To evolve this into enemy attacks that drain health through Apply Damage → Event Any Damage, head to health and damage with Apply Damage.
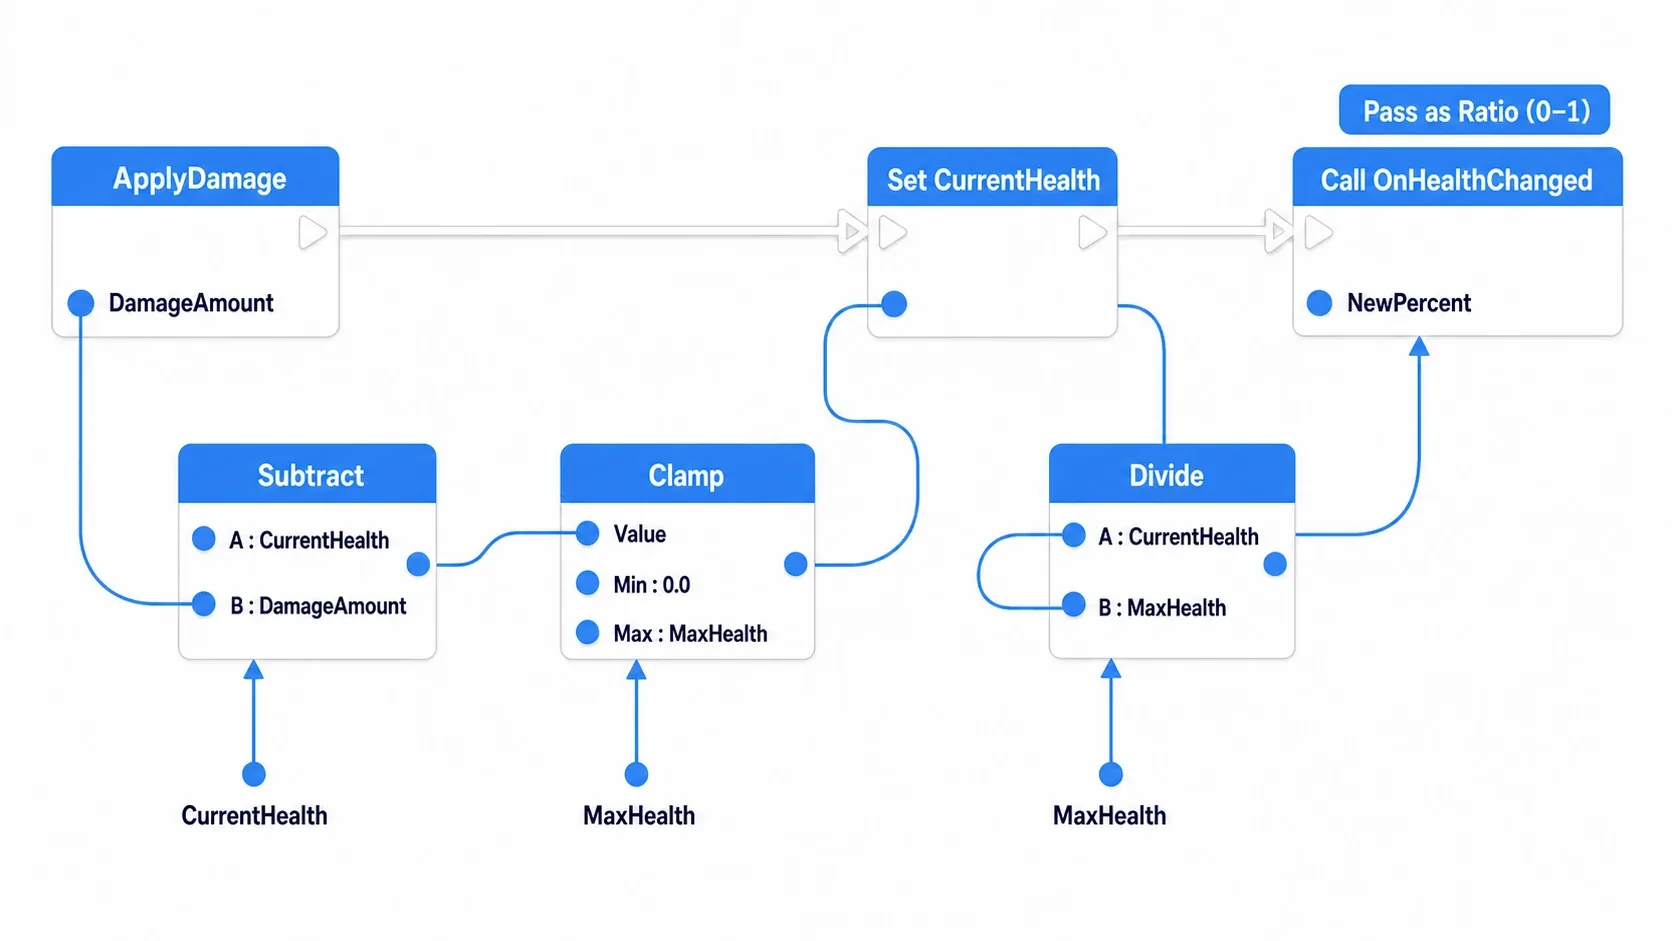
Function: ReduceHealth (input: DamageAmount / Float)
  → Set CurrentHealth
      = Clamp (Value: Subtract (A: CurrentHealth, B: DamageAmount), Min: 0.0, Max: MaxHealth)
  → Call OnHealthChanged (NewPercent: Divide (A: CurrentHealth, B: MaxHealth))
Percent is a ratio from 0.0 to 1.0, so pass CurrentHealth ÷ MaxHealth. Pass the raw value and the bar sits pinned at full with 100 HP and never moves.
Add a test hook while you're here. In BP_Player's event graph, calling ReduceHealth (DamageAmount: 25.0) from any key input is enough. That lets you verify everything before building an enemy.
Step 4: Receive it on the UI side. Add a custom event in WBP_PlayerHUD that listens for the broadcast.
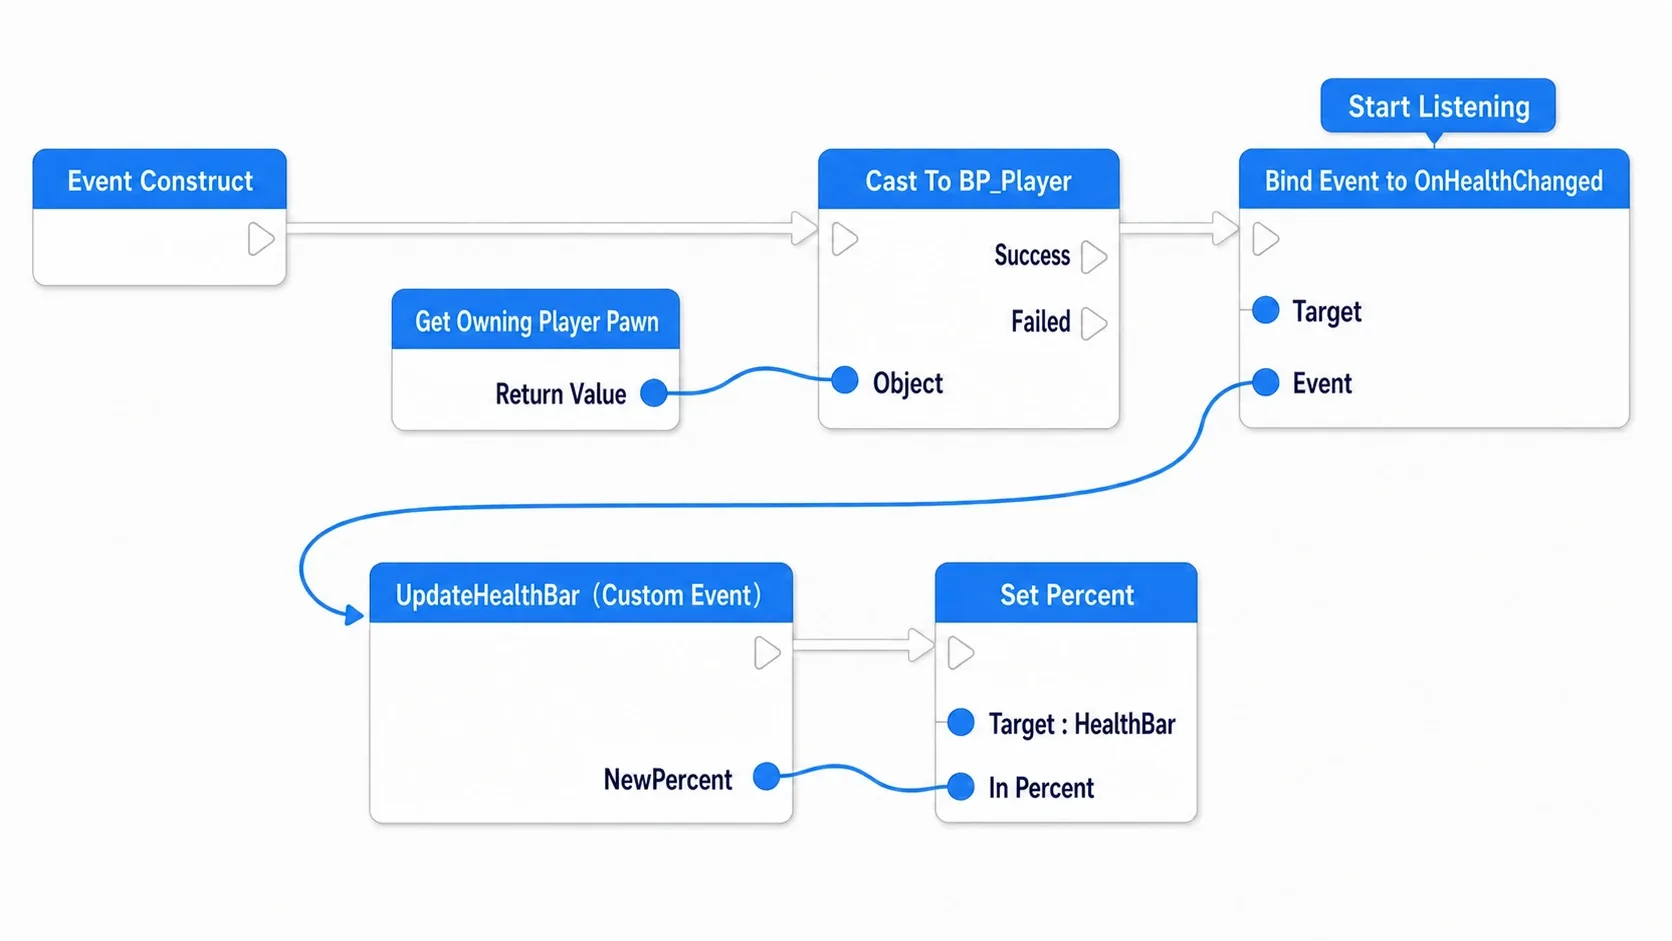
WBP_PlayerHUD's Event Construct
  → Get Owning Player Pawn
  → Cast To BP_Player
      Success → Bind Event to OnHealthChanged (Target: the Cast's As BP Player)
                Event pin ← Custom Event: UpdateHealthBar (input: NewPercent / Float)
          → Set Percent (Target: HealthBar,
                         In Percent: Divide (A: As BP Player's CurrentHealth, B: MaxHealth))  ← ★ syncing the initial value

UpdateHealthBar
  → Set Percent (Target: HealthBar, In Percent: NewPercent)
The ★ line is the important one. An Event Dispatcher won't tell you about changes that happened before you bound to it. Without reading the current value yourself right after binding, you end up with a UI that joined late and sits at full health.
Don't forget to wire the Cast result (As BP Player) into Bind Event to OnHealthChanged's Target. Choosing Add Custom Event for Dispatcher from the Event pin creates an event with matching parameter types automatically.
Press Play and hit your test key. 75% on the first press, 50% on the second, empty after four means it works. Note that UpdateHealthBar is never called except at the moment health drops. That's the whole point of building it this way.
If something's off, work from the symptom.
- The bar doesn't move →
Bind Event'sTargetis empty, or it isn't wired toEvent Construct Cast To BP_Playerfails → the GameMode'sDefault Pawn Classis wrong, or possession hasn't happened yet. Moving the widget creation later in the Player Controller'sBeginPlaymakes it stable- The bar starts empty or stays full → the ★ initial value sync is missing
Two things to take away.
- Let the UI handle display only:
BP_Playercalculates health,WBP_PlayerHUDdisplays it. Decide up front that no game logic runs inside the UI, and rebuilding the UI never breaks your rules - Always read the current value once, right after binding: a Dispatcher doesn't report past changes. You need something that tells whoever joined mid-way what the situation is now
Once it works, deliberately break it once to cement the idea. Add a Bind to HealthBar's Percent with a function that always returns 1.0, and press Play. No matter how many times you call ReduceHealth, the bar snaps back to full, because the Binding overwrites the value you set with Set Percent every frame. This is exactly why the earlier section said to delete the Binding when you switch. Delete the Bind again once you've seen it.
To animate the gauge draining smoothly, either push the value you pass into Set Percent toward the target with FInterp To, or use UMG's Animation feature. Once you have enough UI that it starts feeling heavy, move on to UMG performance optimization.
Bonus: Good to Know for Later
You can put the game world itself on the UI. An Image's Brush takes a texture — and that texture can be a live camera feed (a Render Target). Minimaps and character-select previews are built this way (→ Minimaps with Render Targets).
"The mouse cursor doesn't appear when I open a menu" is a missing setting. You need two things on the Player Controller: Set Show Mouse Cursor (true) and Set Input Mode UI Only (or Game and UI). When closing, revert both. Set Input Mode Game Only alone leaves the cursor visible, so remember to call Set Show Mouse Cursor (false) too.
Event Construct isn't necessarily once. Remove a widget from the screen and add it back, and it fires again each time. For work that should only initialize once, Event On Initialized is safer.
If you're building the same part repeatedly, turn the widget into a component. For things like inventory item slots, where you line up identical visuals, make a dedicated Widget Blueprint (say, WBP_ItemSlot) and place it inside the parent widget. It's the same idea as componentizing a Blueprint, and fixes only need to happen in one place.
When Text Block text gets cut off, start with the width. The cause is one of: Auto Wrap Text disabled (UMG Text doesn't wrap by default), the parent Slot being too narrow, the Clipping setting, or the font size being too large. For long passages, use Auto Wrap Text; to keep it on one line, adjust the parent's width or use a Size Box.
What this looks like in C++. The standard approach is to build the UI itself in Widget Blueprints and keep the C++ side to passing values in and receiving events. Create a class inheriting UUserWidget and use BlueprintImplementableEvent to call "please update," and visual tweaks stay entirely on the designer's side.
// Written inside a Player Controller (this becomes the Owning Player)
if (UUserWidget* HUD = CreateWidget<UUserWidget>(this, HUDClass))
{
    HUD->AddToViewport();
}
This does exactly what Blueprint's Create Widget plus Add to Viewport does. The first argument is the Owning Player, so inside a Player Controller you pass this (passing GetWorld() changes the ownership relationship).
Summary
UMG problems mostly boil down to these three.
| Symptom | Cause | Fix |
|---|---|---|
| Nothing on screen | You made it but never placed it | Create Widget plus Add to Viewport |
| Breaks at other resolutions | No anchors set | Decide by "where should this be when the screen gets wider?" |
| Heavy | Too much logic stuffed into a Binding | Move rarely-changing values to an Event Dispatcher |
And there's one design principle. Keep the UI focused on display. Holding values and calculating them is the game logic's job. Hold that line and rebuilding the UI never breaks the game.
That HUD you're building right now: is it calculating any game values inside itself?