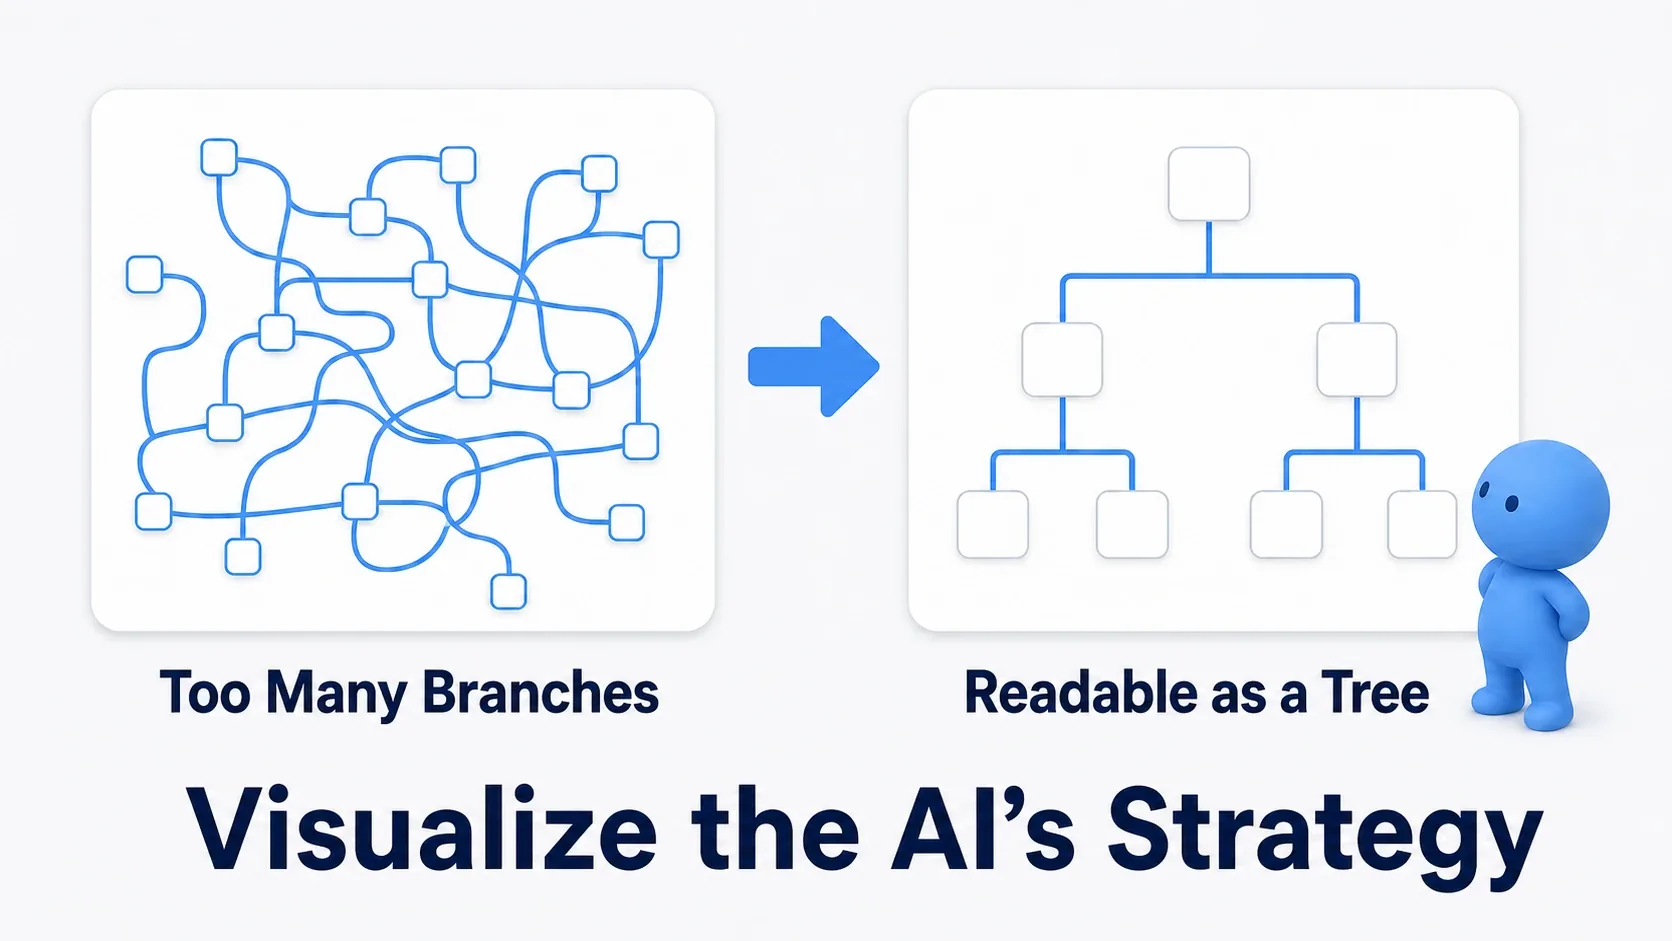
Everyone building enemy AI walks the same path. You write "chase the player when you see them" with a Branch, add "attack when in range," then add "return to patrolling when you lose them." Before long you have a giant graph of nested branches.
A Behavior Tree is a system for writing that decision-making as a tree. "Which action takes priority" is expressed vertically, and "in what order" horizontally, so the AI's plan reads as a diagram. This article covers the core difference between Selector and Sequence, then walks through building a patrol → detect → chase → attack enemy from scratch.
What You'll Learn
- AI runs on a set of three (AI Controller, Behavior Tree, Blackboard)
- Selector = priority (any one) / Sequence = procedure (all of them)
- Task = action, Decorator = condition, Service = periodic monitoring
- Handing detection to AI Perception gets you sight and sound for free
- Hands-on: building a patrol → detect → chase → attack enemy
The Three Parts That Drive AI
A Behavior Tree doesn't run on its own. The standard setup combines these three.
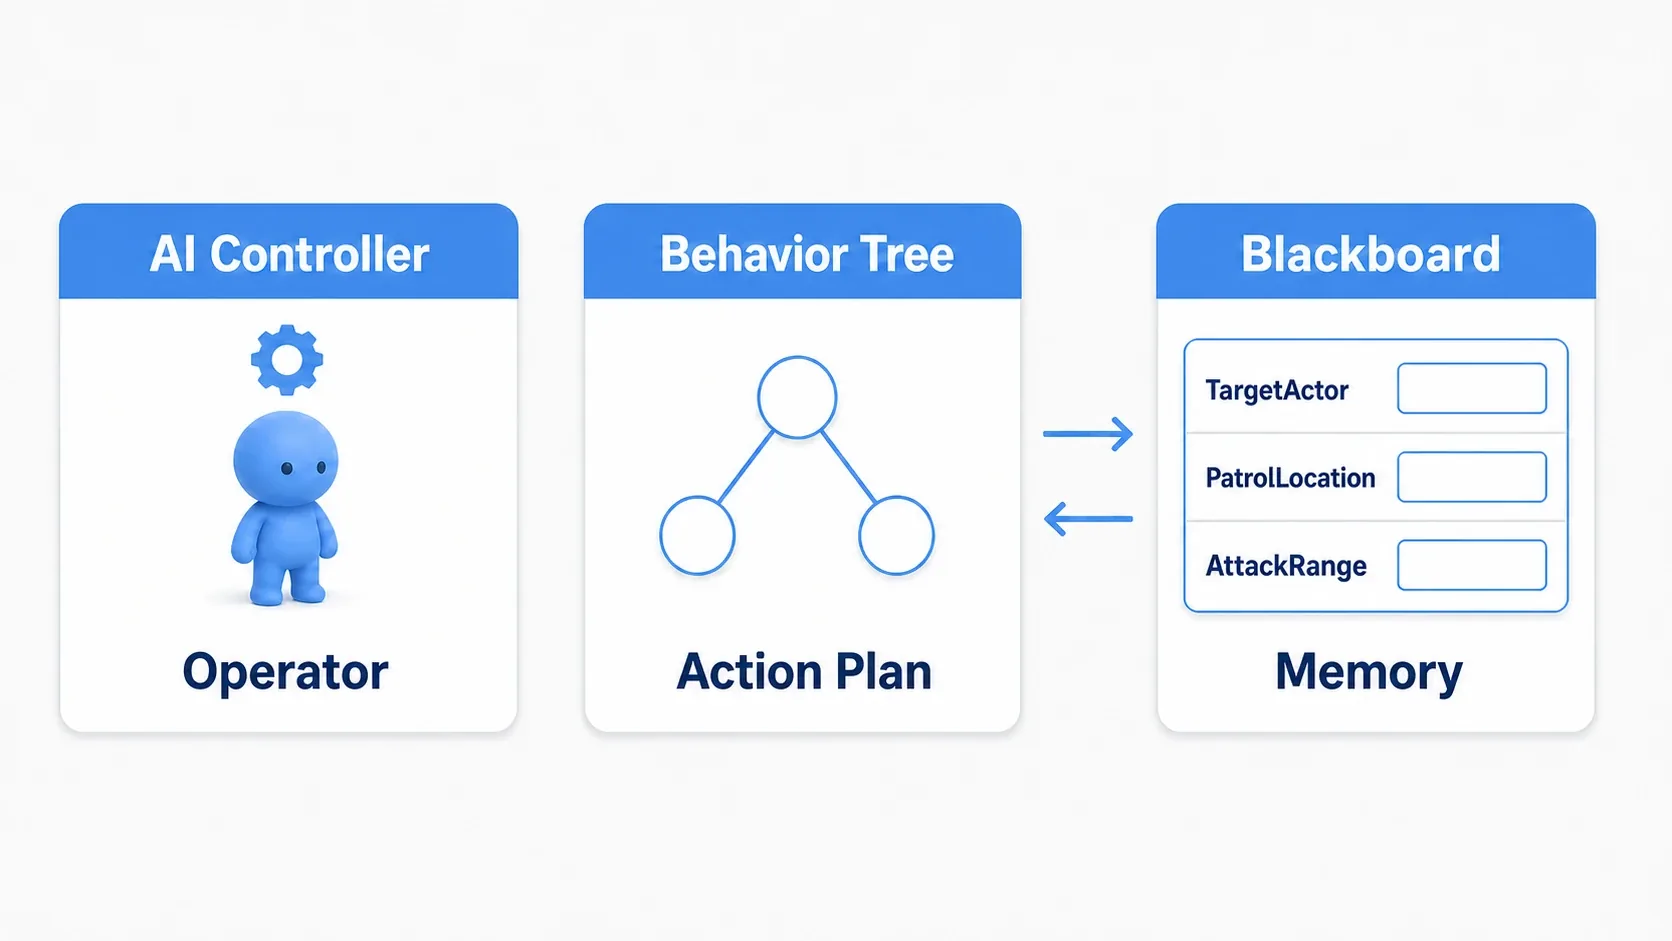
| Part | Role | In a word |
|---|---|---|
| AI Controller | Drives the Pawn. Starts the BT | The one inside |
| Behavior Tree | The tree that decides "what next" | The plan of action |
| Blackboard | Where the AI stores values it remembers | Memory (a notepad) |
The Blackboard matters most. It holds the decision-making data you want shared between nodes, like "who am I chasing right now" and "where am I headed." (Tasks also call Pawn functions and move things directly, so the Blackboard isn't the only mechanism at work.)
Why create a shared place at all? Because if nodes pass data directly to each other, swapping one node means fixing its neighbors too. Having everyone look at the same notepad makes adding and replacing nodes safe.
Selector and Sequence: How to Read the Tree
Whether you can read a Behavior Tree comes down to whether you understand these two.
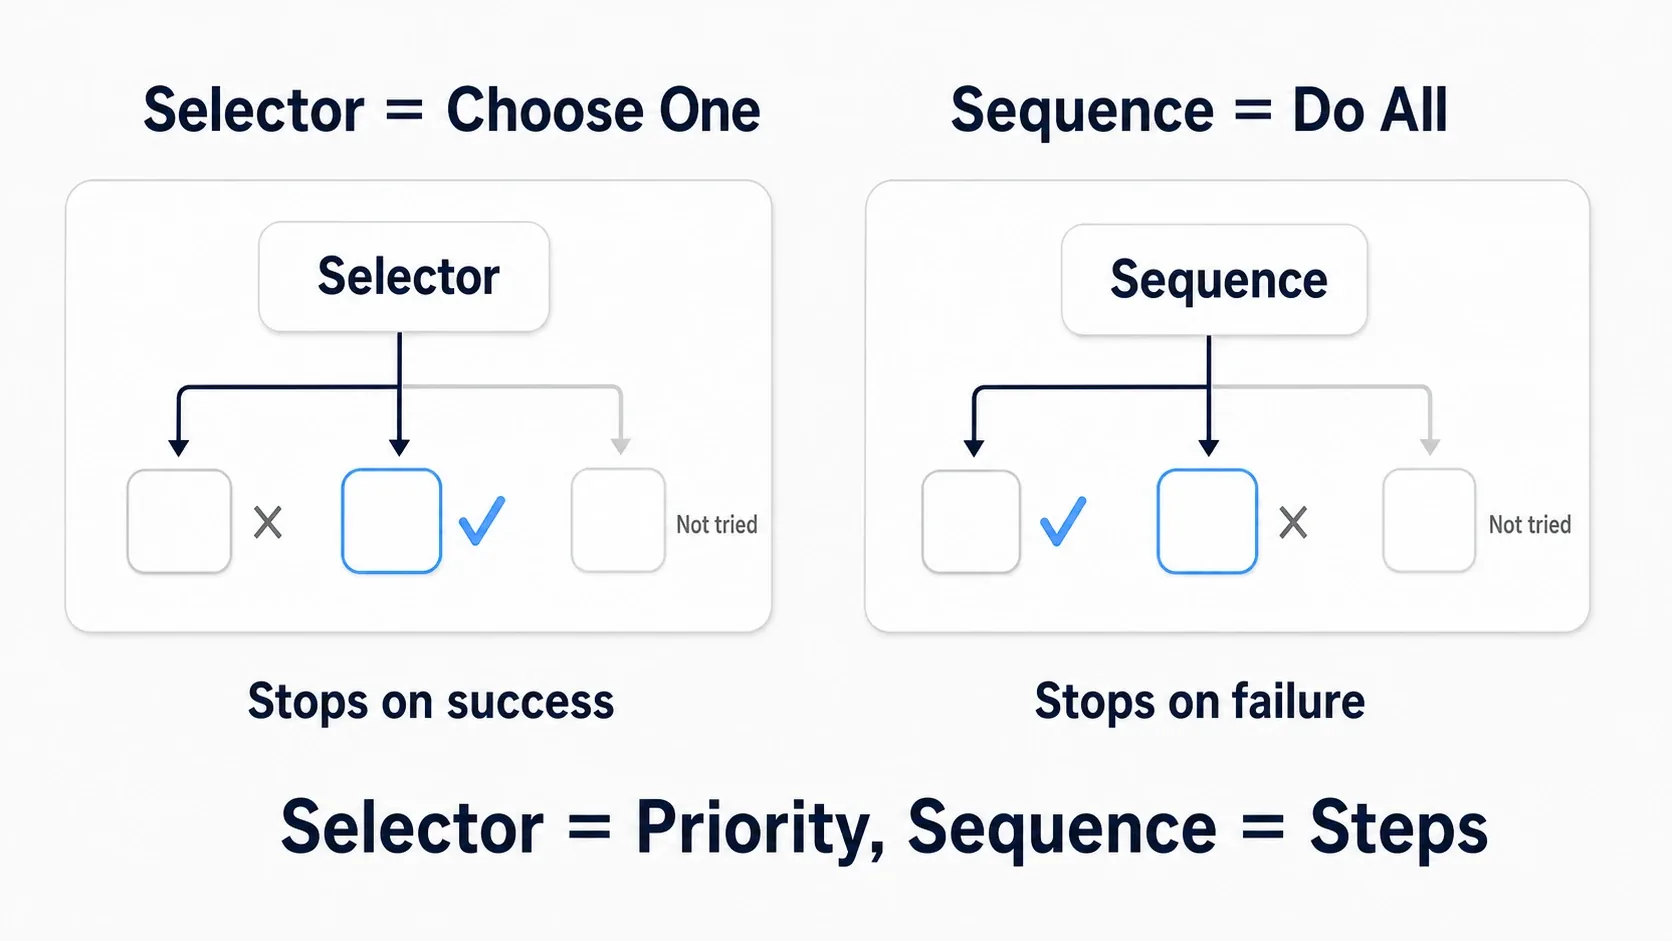
Both try their children left to right. What differs is when they stop.
| Behavior | What it means | Think of it as | |
|---|---|---|---|
| Selector | Stops on success (succeeds if any one child succeeds) | Priority | "Try top to bottom and take the first one that works" |
| Sequence | Stops on failure (succeeds only if all children succeed) | Procedure | "Abort if any single step trips" |
Let's think through an example. Put a Selector at the root of an enemy AI, with children ordered left to right as "attack," "chase," and "patrol."
- Able to attack → attack and stop (the children to the right are never tried)
- Can't attack but can chase → chase and stop
- Neither works → patrol
That's priority. Further left reads as higher priority.
Meanwhile, the inside of "chase" is a Sequence, because "move to the target" → "face them" is a procedure to run in order. If a step fails partway, there's no point doing the rest.
A way to remember it: Selector is close to "or," and Sequence is close to "and" (not as a strict logical operation, but as an approximation for grasping how results propagate). Pick based on whether any one will do or you need all of them.
Task, Decorator, and Service
There are three kinds of building blocks, and not mixing their roles is the trick to keeping things readable.
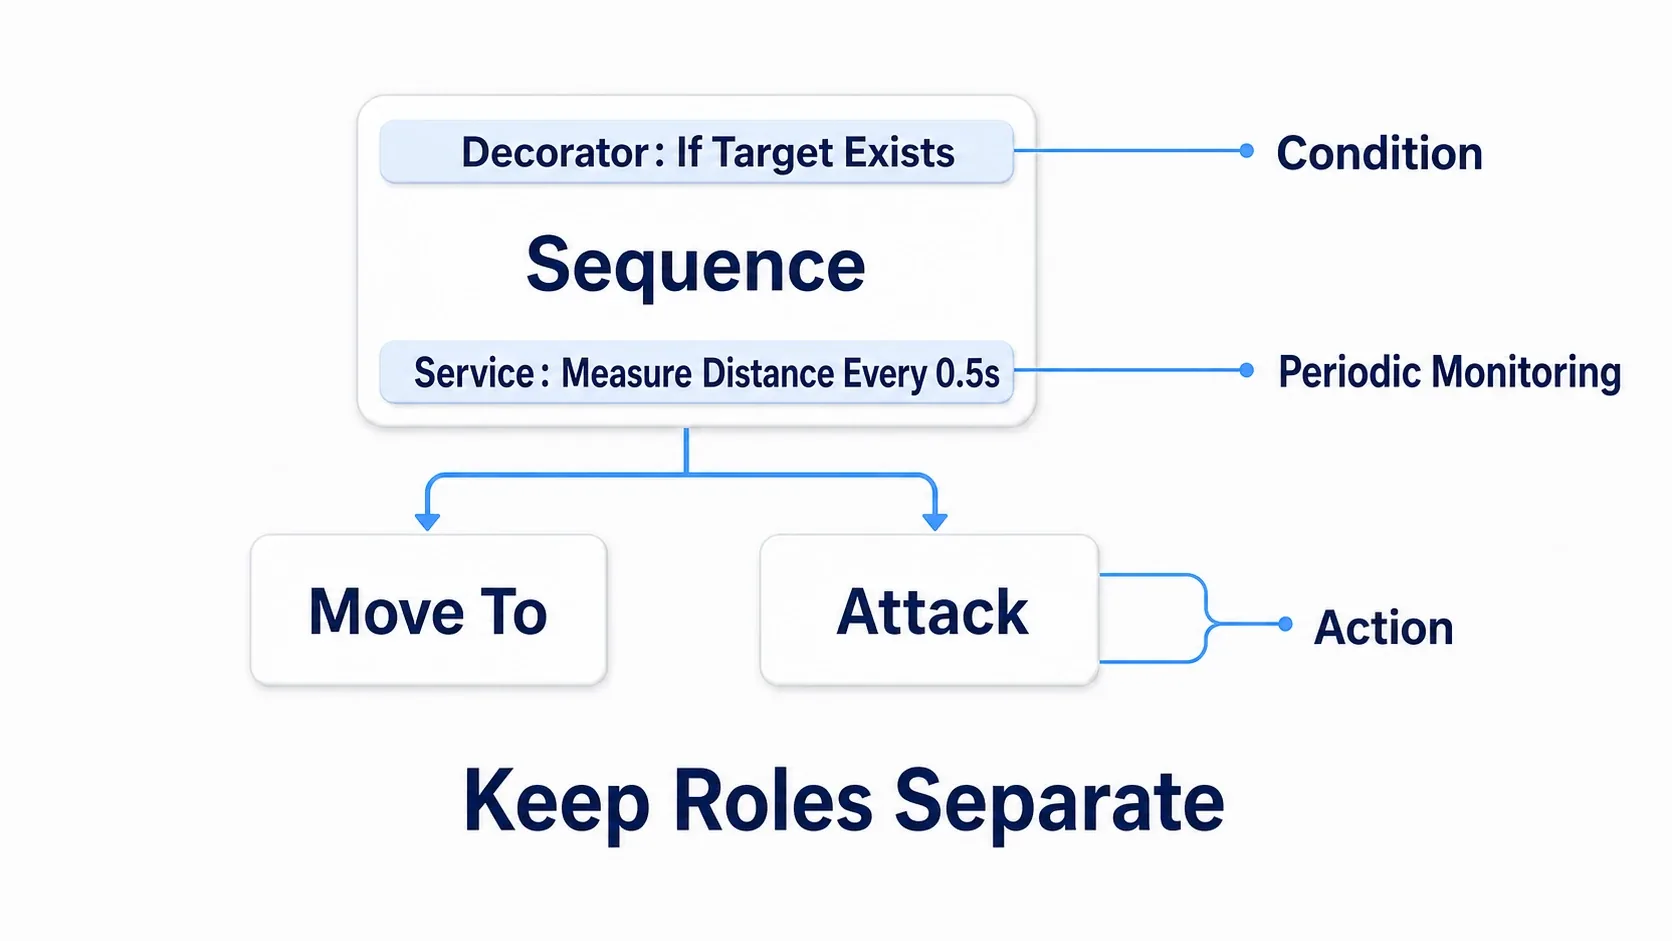
| Kind | Role | Appearance | Examples |
|---|---|---|---|
| Task | Acts (the leaves) | Purple-ish node | Move To, Wait, attack |
| Decorator | Decides whether to let flow through (a gate) | Band attached above a node | "Let through if there's a target" |
| Service | Checks periodically while that branch is active | Band attached below a node | Measure distance and write it to the Blackboard |
As a rule, splitting things like this keeps them readable (this is a design guideline, not an engine constraint).
- Tasks handle actions: leave "am I in attack range" to a Decorator. That said, a Task checking its preconditions at runtime and returning failure is a perfectly normal usage
- Decorators handle decisions: keep them to reading conditions and don't have them rewrite Blackboard values. Side effects make it impossible to trace why something passed through
One thing to watch with Services: they only run while the branch they're attached to is executing. If you want to monitor the whole AI at all times, you need to attach it to a branch near the root.
Draw these lines and just looking at the tree tells you "under what conditions does this AI do what."
Let AI Perception Handle Detection
You can implement "did I spot the player" by measuring distance inside a Service every tick. But for anything serious, the AI Perception Component is a better fit.
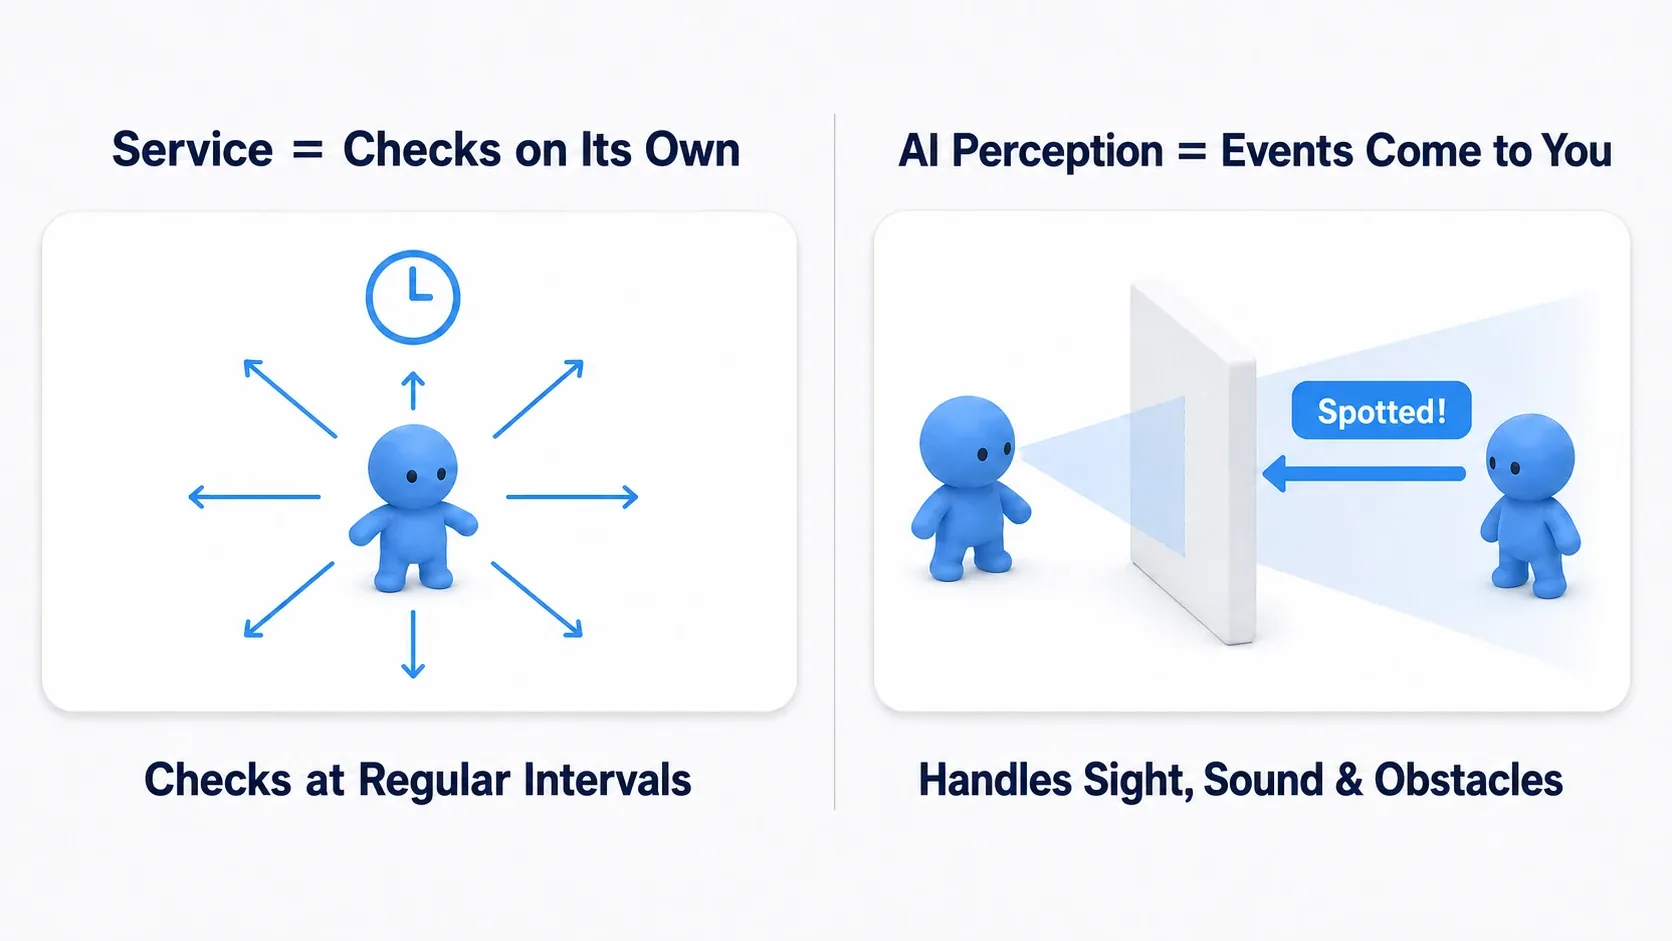
| Service approach | AI Perception approach | |
|---|---|---|
| How it works | Polls on your own at a fixed interval | Notifies you when perception state changes |
| What it handles | Only the checks you write | Sight (angle, distance), sound, damage |
| Obstacles | You have to write traces yourself | Line-of-sight checks are built in |
| Ease | Quick to write | Many settings to configure |
With AI Perception, obvious behaviors like "can't see the player through a wall" and "can't see behind you" come mostly from settings (whether a wall blocks sight assumes that wall's collision settings respond to the line-of-sight trace). That's a surprisingly annoying thing to write yourself.
The hands-on section uses AI Perception. Services are better suited to supplementary monitoring like "measure the distance to the target and write it to the Blackboard." To add hearing on top of sight, or to nail down what happens after losing the target, see Getting Enemies to Notice You with AI Perception.
Hands-On: Making a Patrolling Enemy Spot the Player
A guard in a stealth game, a wandering enemy in a horror game, a field monster in an action RPG. "Patrol normally, chase when you spot someone, attack when close" is the basic form of AI. Let's build it from scratch.
Setup to follow along: prepare the following. You can create these from right-click → Artificial Intelligence.
| Type | Name | Settings |
|---|---|---|
| Character | BP_Enemy | AI Controller Class set to BP_EnemyAIController, Auto Possess AI set to Placed in World or Spawned |
| AIController | BP_EnemyAIController | Add an AIPerception Component |
| Blackboard | BB_Enemy | Two keys (table below) |
| Behavior Tree | BT_Enemy | Blackboard Asset set to BB_Enemy |
| Level | Nav Mesh Bounds Volume | Sized to cover the floor. Press P and confirm it turns green |
| Player | BP_ThirdPersonCharacter | Add Player to Actor Tags (used to identify the perception target) |
Forget Auto Possess AI and the enemy you placed in the level never gets an AI Controller, so nothing moves.
There are two Blackboard keys.
| Key name | Type | Purpose |
|---|---|---|
TargetActor | Object (Base Class: Actor) | Who to chase |
PatrolLocation | Vector | The next patrol point to head to |
Step 1: Configure AI Perception. Select AIPerception on BP_EnemyAIController and add AI Sight config to Senses Config.
| Setting | Value |
|---|---|
| Sight Radius | 1500.0 |
| Lose Sight Radius | 1800.0 (larger than Sight Radius) |
| Peripheral Vision Half Angle | 60.0 = 60 degrees to each side of forward (about a 120-degree field of view) |
| Detection by Affiliation → Detect Neutrals | Checked |
Checking Detect Neutrals is the key part. Actors without a Team are treated as neutral, so this alone is enough to test with.
Step 2: Confirm what you perceived is actually the player. This is the easiest place to get it wrong. AI Perception hands you any Actor it perceives, so dropping that straight into TargetActor makes the enemy start chasing other enemies and NPCs too.
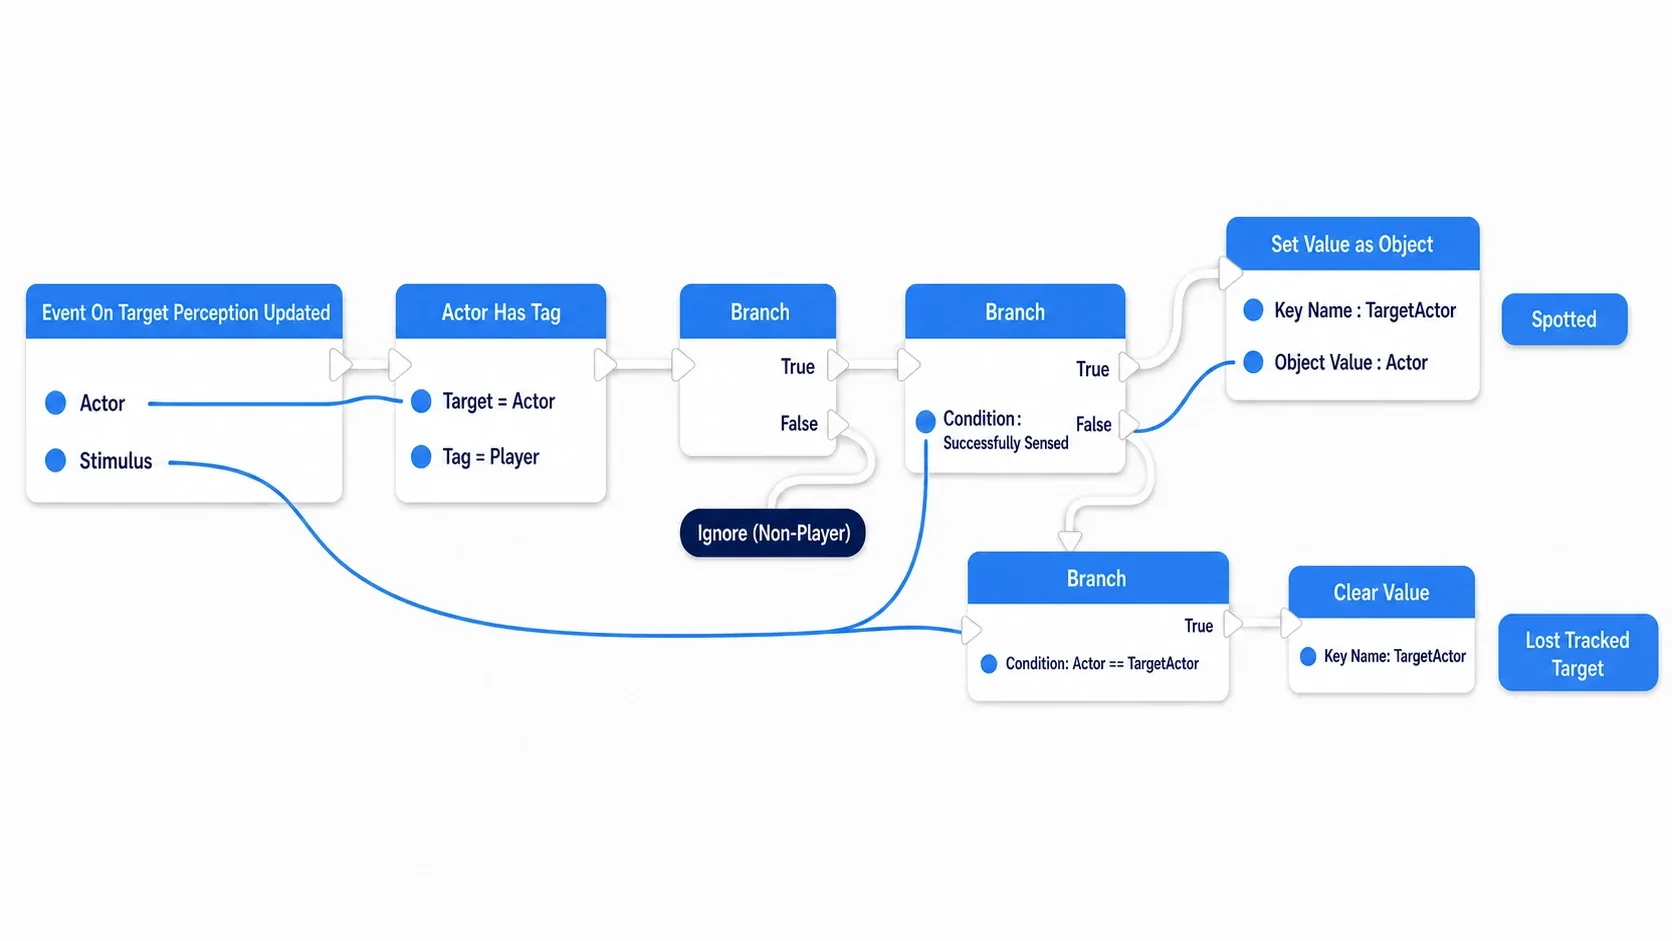
Event On Target Perception Updated (AIPerception)
  → Actor Has Tag (Target: Actor, Tag: "Player")
  → Branch
      False → (do nothing)                                  ← ignore anything but the player
      True  → Branch (Condition: Successfully Sensed on Stimulus)
          True  → Get Blackboard → Set Value as Object
                    (Key Name: TargetActor, Object Value: Actor)      ← spotted them
          False → Branch (Condition: Actor == Get Blackboard Value as Actor (TargetActor))
              True → Get Blackboard → Clear Value (Key Name: TargetActor) ← lost the one we were chasing
Notice there are two checks in there.
- Check the Tag to confirm it's the player: without it, chasing starts the instant a friendly NPC comes into view
- Confirm the one you lost is the one you're currently chasing: an unconditional
Clear Valuemeans losing sight of some unrelated Actor wipes your target
Wire the return value of Get Blackboard (an AI Controller function) into the Target pins of Set Value as Object and Clear Value. Leave that empty and nothing is written.
Step 3: Start the Behavior Tree. Kick off the tree in Event On Possess.
Event On Possess (BP_EnemyAIController)
  → Run Behavior Tree (BTAsset: BT_Enemy)
Using On Possess rather than BeginPlay is the reliable choice, because it starts once the Pawn being controlled is settled. The official workflow uses this form too.
Step 4: Build the tree. Open BT_Enemy and assemble it like this. Left means higher priority.
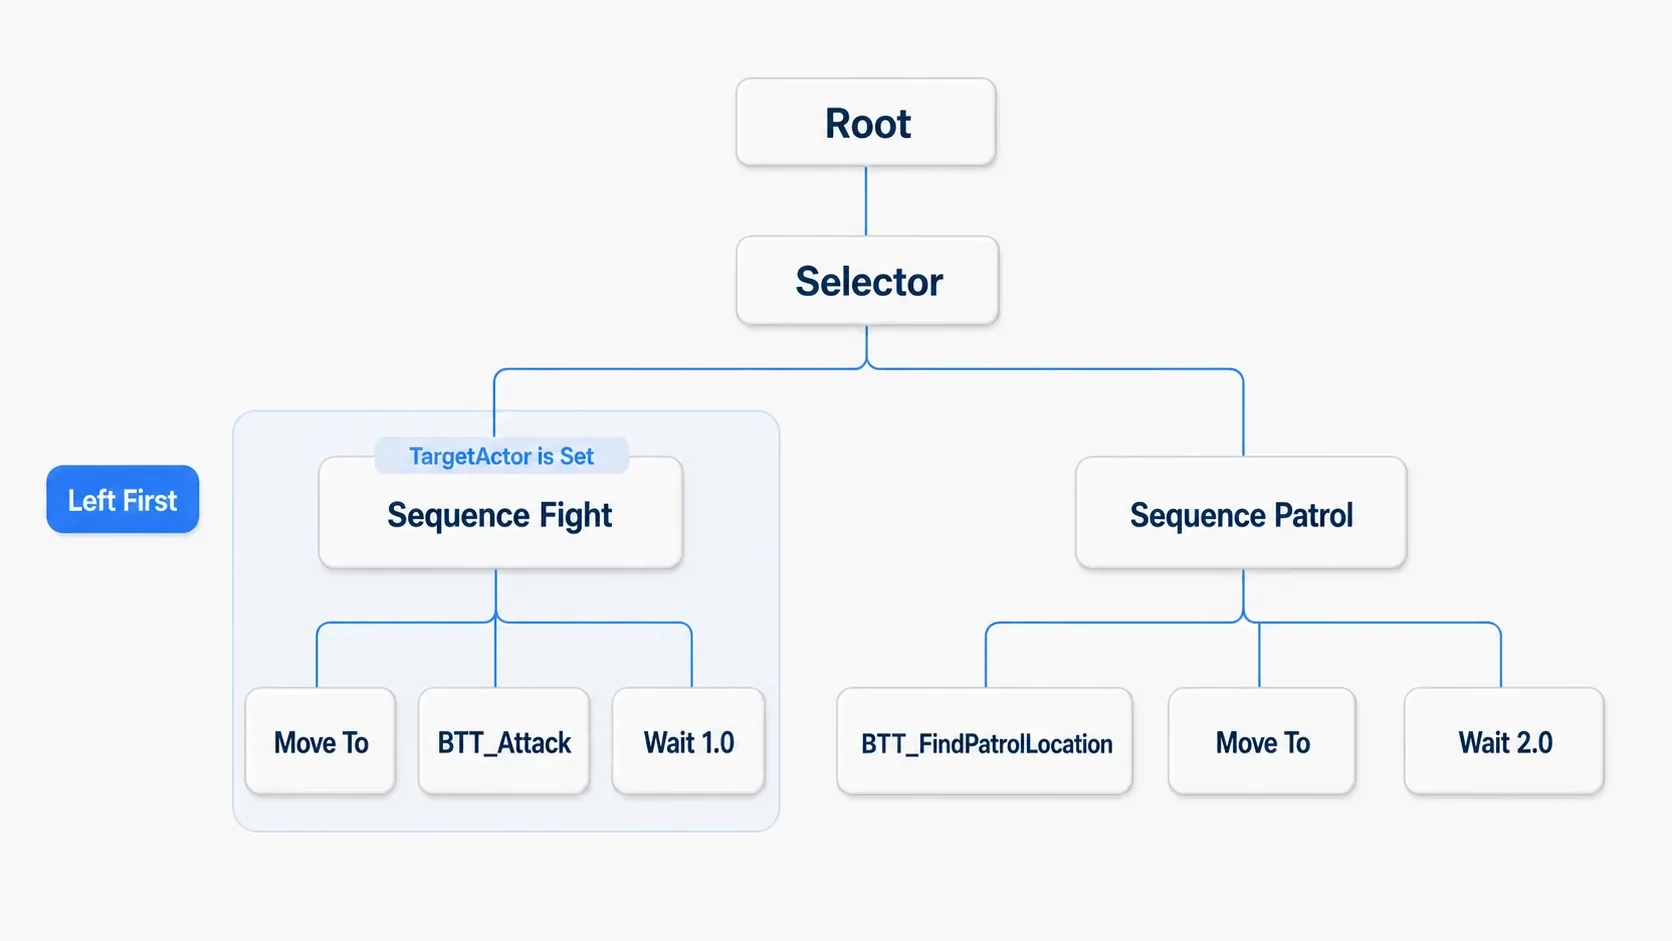
Root
└─ Selector                              ← any one of these will do
   ├─ Sequence "Fight"                   ← on the left, so higher priority
   │   ⚑ Decorator: Blackboard (TargetActor is Set / Observer aborts: Both)
   │   ├─ Task: Move To (Blackboard Key: TargetActor, Acceptable Radius: 200)
   │   ├─ Task: BTT_Attack
   │   └─ Task: Wait (Wait Time: 1.0)      ← attack interval. Without it, attacks fire nonstop
   └─ Sequence "Patrol"                   ← only reached when there's no target
       ├─ Task: BTT_FindPatrolLocation
       ├─ Task: Move To (Blackboard Key: PatrolLocation)
       └─ Task: Wait (Wait Time: 2.0)
Three settings matter here.
- Set the Decorator's
Observer abortstoBoth: this is what makes spotting the player mid-patrol abort the patrol and switch to chasing immediately. Leave it atNoneand nothing happens until the patrol finishes - Put a
Waitin the fight branch too: if Tasks keep returning success instantly, the tree spins at full speed and attacks fire nonstop Acceptable RadiusonMove To: too small and the AI never reaches its goal, walking forever
Step 5: Build the Task that picks a patrol point. Derive BTT_FindPatrolLocation from BTTask_BlueprintBase.
The standard approach is receiving the destination key through a variable of type Blackboard Key Selector. That way you can pick the key from the details panel when you select the Task in the Behavior Tree, and reuse the same Task with a different key.
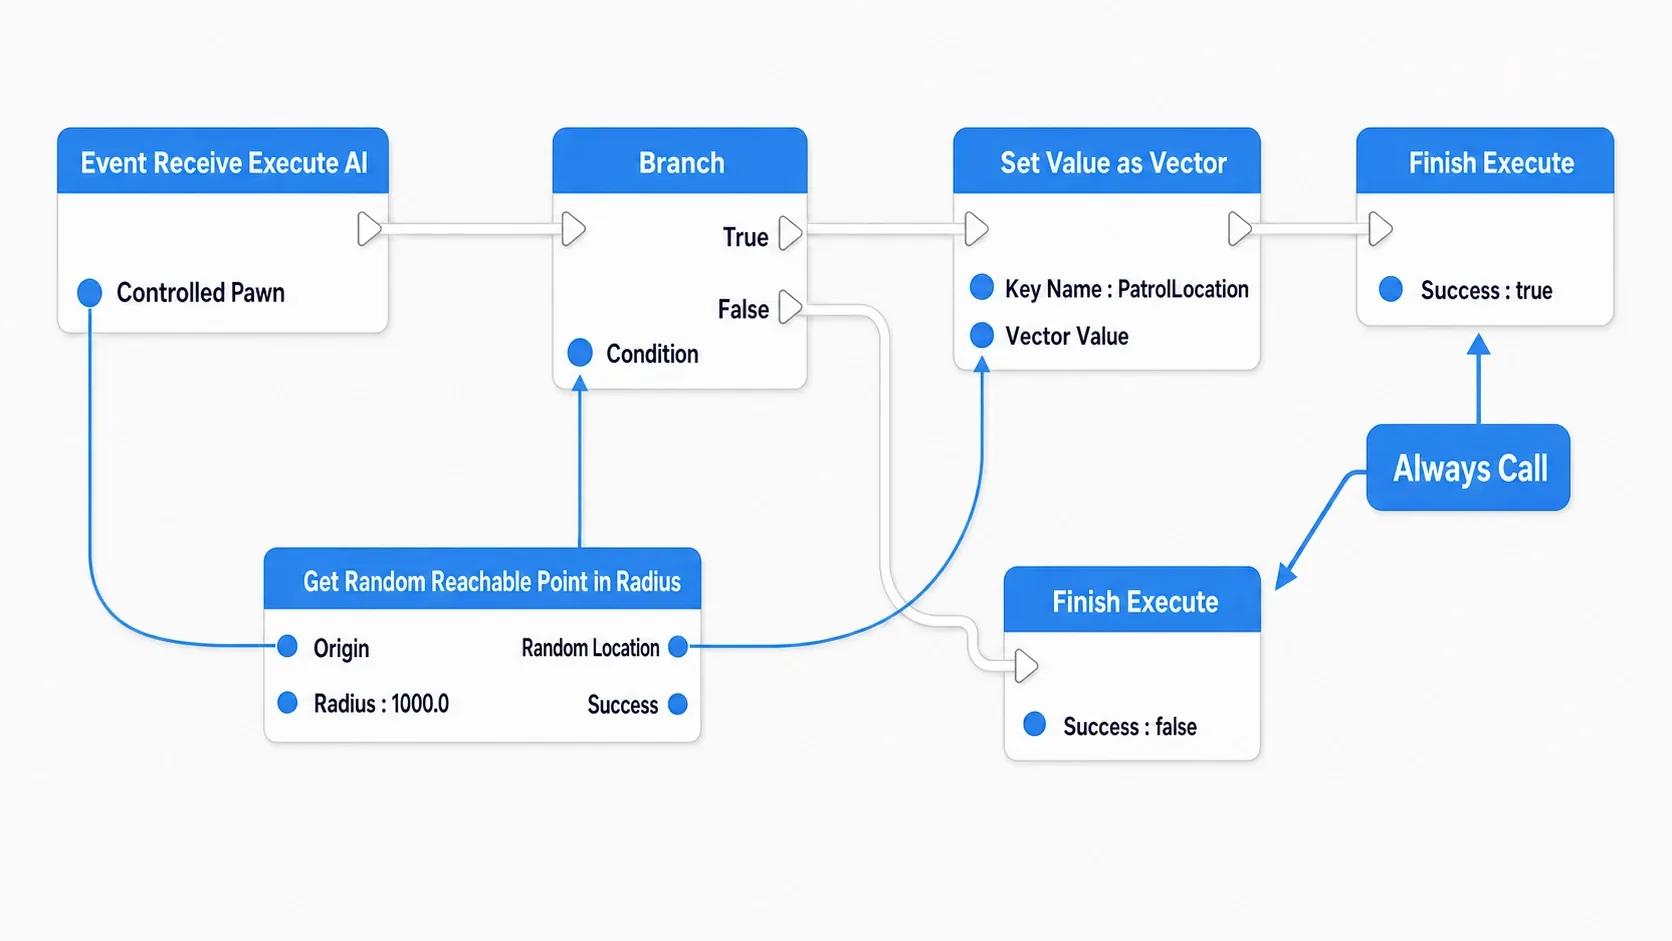
Variable: PatrolKey (Blackboard Key Selector type, Instance Editable)

Event Receive Execute AI (Controlled Pawn)
  → Get Random Reachable Point in Radius (Origin: Controlled Pawn's location, Radius: 1000.0)
  → Branch (Condition: whether the return value succeeded)
      True  → Set Blackboard Value as Vector (Key: PatrolKey, Value: the point found)
            → Finish Execute (Success: true)
      False → Finish Execute (Success: false)
Select this Task in the Behavior Tree and assign PatrolLocation to Patrol Key in the details panel.
Build BTT_Attack the same way, returning Finish Execute (Success: true) after the attack logic. A Print String is fine as the entire contents at first.
Step 6: Place it in the level and run it. Drag BP_Enemy into the level and hit Play.
The enemy wanders randomly within its radius, turns toward you the instant you enter its view, and once close, prints an attack log once per second. Hide behind cover and it returns to patrolling. If you see that, it works.
When it doesn't, keep the Behavior Tree open while you Play and the currently executing node lights up. You can check values in the Blackboard panel, and with multiple enemies you pick the target from Debug Object at the top of the editor.
- Doesn't move at all → Nav Mesh Bounds Volume (check with
P),Auto Possess AI,AI Controller Class - Patrols but never chases → check
TargetActorin the Blackboard panel. If it's empty, the problem is on the AI Perception side or the Tag spelling - Chases other enemies → the Tag check is missing
- Never returns to patrolling once it starts chasing → check the condition on
Clear Value - Attack logs stream past at high speed → the
Waitin the fight branch is missing - Freezes on one node → that Task never calls
Finish Execute
There are two key points.
- Express priority through the Selector's left-to-right order: instead of adding conditional branches, express priority with the order of the branches. To make "do nothing when stunned" the top priority, you just add it as the leftmost branch
- Always filter the Actors you perceive: AI Perception hands you anything it sees. Confirm once, via Tag or class, that it's a target you care about. Skip that and you get the strange AI where enemies chase each other
When you want smarter choices about "where to flee" or "which enemy to target," EQS (Environment Query System) is the next step. If movement itself is unstable, check NavMesh settings first.
Bonus: Good to Know for Later
The default way to debug a Behavior Tree is to Play with the editor open. The executing node is highlighted, and you can see current Blackboard values in the Blackboard panel. Seeing visually "why is it doing this" is one of BT's biggest advantages. Look at the tree before you start planting Print String calls.
Don't leave Service intervals at their defaults. Services let you set an Interval, and leaving it at the default across many AIs adds up. For something like a distance check, 0.3 to 0.5 seconds is plenty. Adding a bit of Random Deviation avoids every AI's work landing on the same frame.
A Task that keeps returning Success makes the tree spin at full speed. That's why the patrol Sequence has a Wait. When "the AI isn't doing anything but it's heavy," suspect a branch looping at extreme speed somewhere.
Holding the AI's "state" as an Enum on the Blackboard keeps things organized. Keep the broad categories, like patrolling, alerted, and in combat, as an Enum key, and have each branch's Decorator read it. The tree structure gets much easier to read. Think of it as bringing state-machine thinking into a BT.
StateTree is another option. In the UE5 era, StateTree — which turns states and transitions directly into a diagram — is showing up more and more in official samples. Behavior Tree is still very much alive and has far more material available, so nothing in this article goes to waste. That said, when you build a new AI, it's worth comparing first: StateTree if the states are clearly defined, Behavior Tree if priority juggling is the heart of it (see Introduction to StateTree).
Summary
Behavior Trees have a lot of parts to learn, but the skeleton you need is simple.
| Element | Role | When to use it |
|---|---|---|
| Selector | Any one succeeding is enough | When you want to express priority |
| Sequence | All must succeed | When you want to express a procedure |
| Task | Acts | Anything you'd phrase as "do X" |
| Decorator | Decides whether to let through | Anything you'd phrase as "if X" |
| Service | Checks periodically | Anything you want to "keep an eye on" |
| Blackboard | Holds memory | Values you want shared between nodes |
And one design guideline: conditions in Decorators, actions in Tasks, memory in the Blackboard. Just keeping those three separate keeps your AI extensible later.
After your enemy loses sight of the player, how do you want it to behave?