Right after you get a character moving, most people hit the same wall. The idle animation snaps to the walk animation instead of blending. You try to fix it by adding Branch nodes, and before long the Event Graph is a maze of branches.
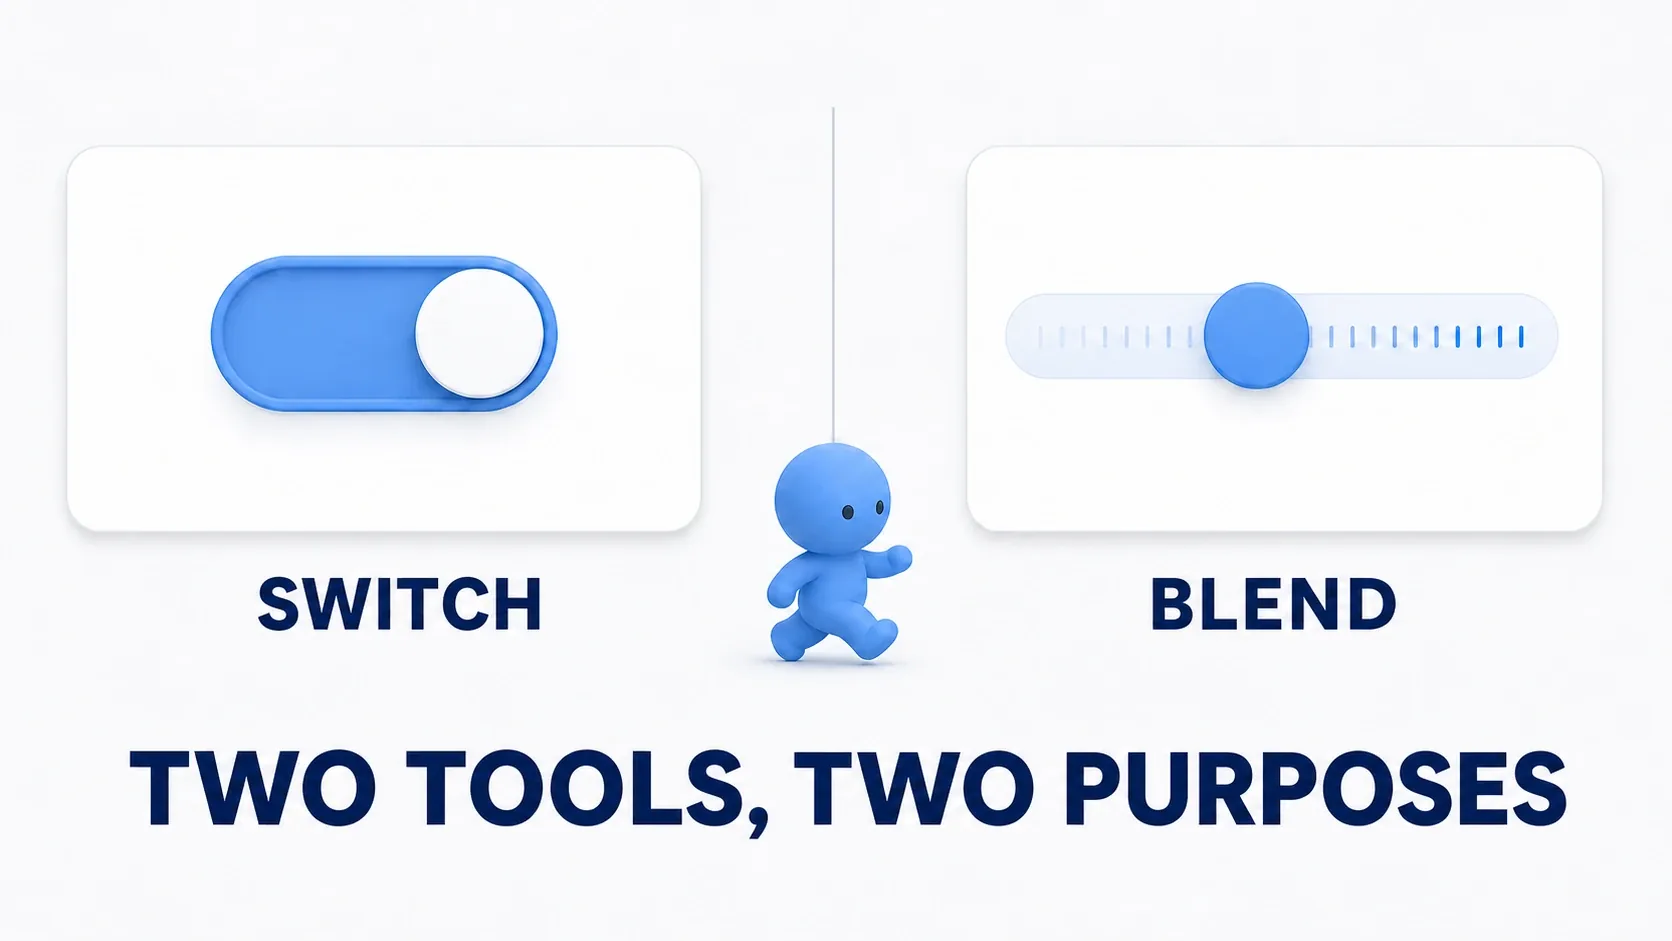
One common cause is trying to handle every animation switch with a single tool. UE gives you two tools with different jobs: the State Machine switches to a different action, and the Blend Space mixes within the same action. This article explains how the two split the work, then walks through building an Idle/Walk/Run setup with jumping from scratch.
What You'll Learn
- An AnimBP gathers values in the Event Graph and decides the pose in the Anim Graph
- State Machine = switching to a different action (ground vs. air)
- Blend Space = mixing within the same action (idle to walk to run)
- The standard setup is to put a Blend Space inside a State Machine state
- Hands-on: combining Idle/Walk/Run and jumping into a single AnimBP
The Two Graphs in an AnimBP
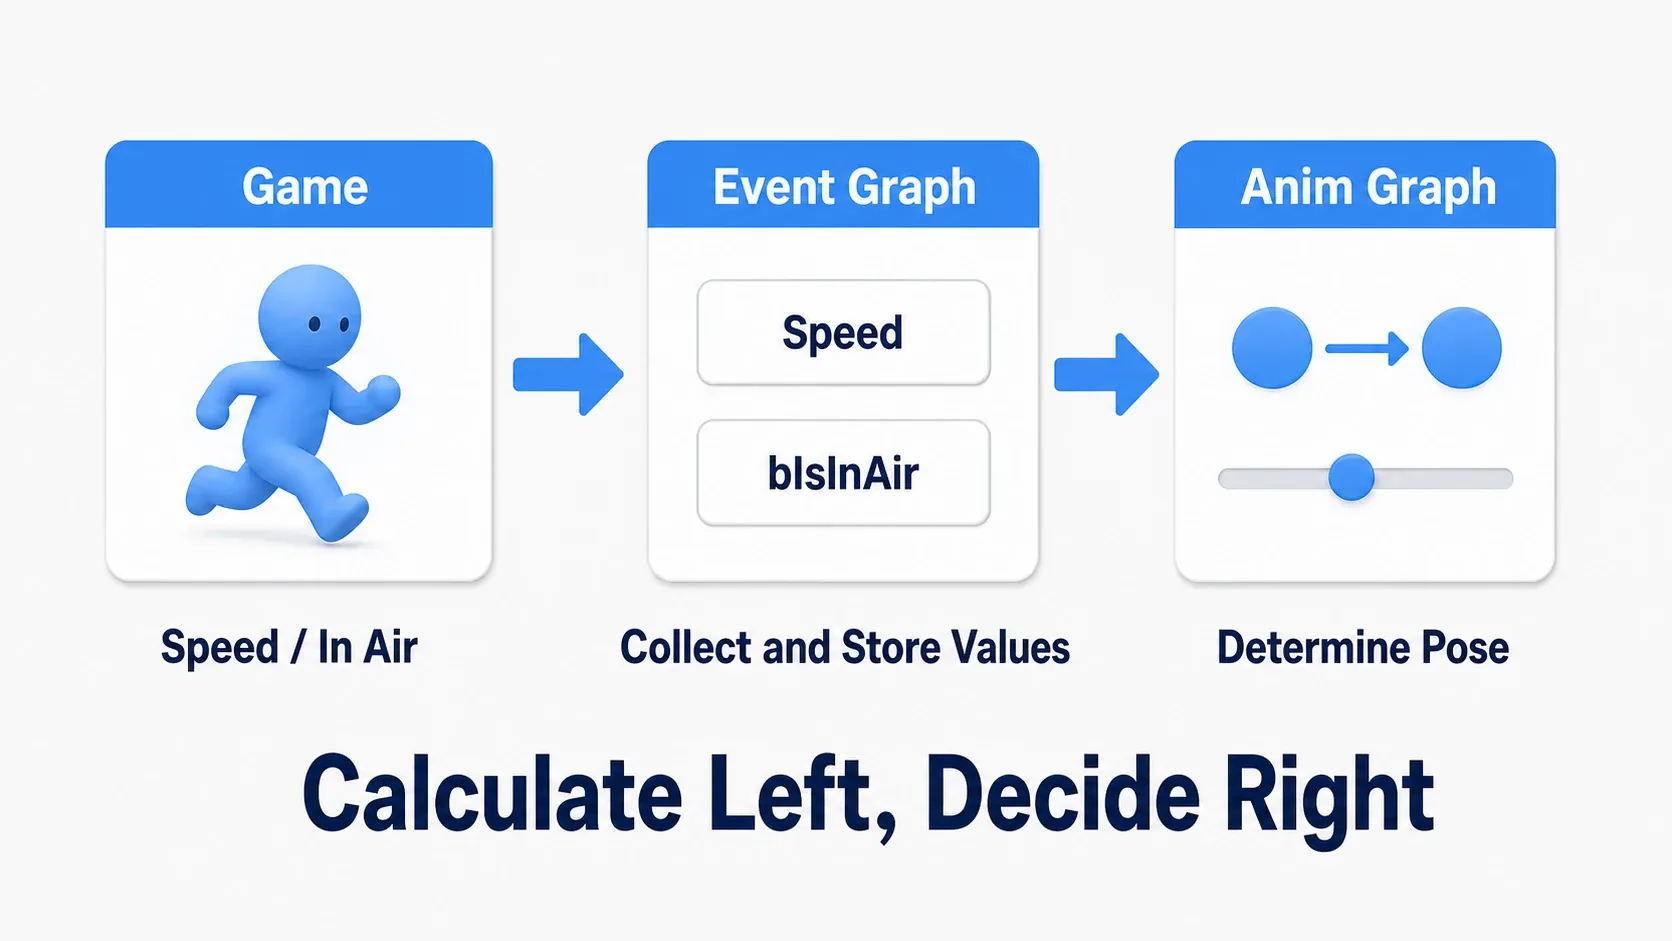
Open an Animation Blueprint and you'll find two graphs: the Event Graph and the Anim Graph. How they split the work is also your design guideline.
| Graph | Job | Examples |
|---|---|---|
| Event Graph | Gather values from the game and store them in variables | Speed, whether in the air, whether crouching |
| Anim Graph | Use those values to decide the final pose | State Machine, Blend Space, blend nodes |
Keeping this split intact directly affects readability. The moment you start doing complex math inside the Anim Graph (in transition rules, for example), it becomes unreadable. Calculate in the Event Graph, decide in the Anim Graph. Keep transition rules to just reading a simple variable like bIsInAir.
There's also a way to update values using
Blueprint Thread Safe Update AnimationwithProperty Access. It performs better, but I'd recommend grasping the structure with the easier-to-read Event Graph approach first.
State Machine: Switching
A State Machine manages "which action is the character doing right now." States are drawn as circles and transitions as arrows.
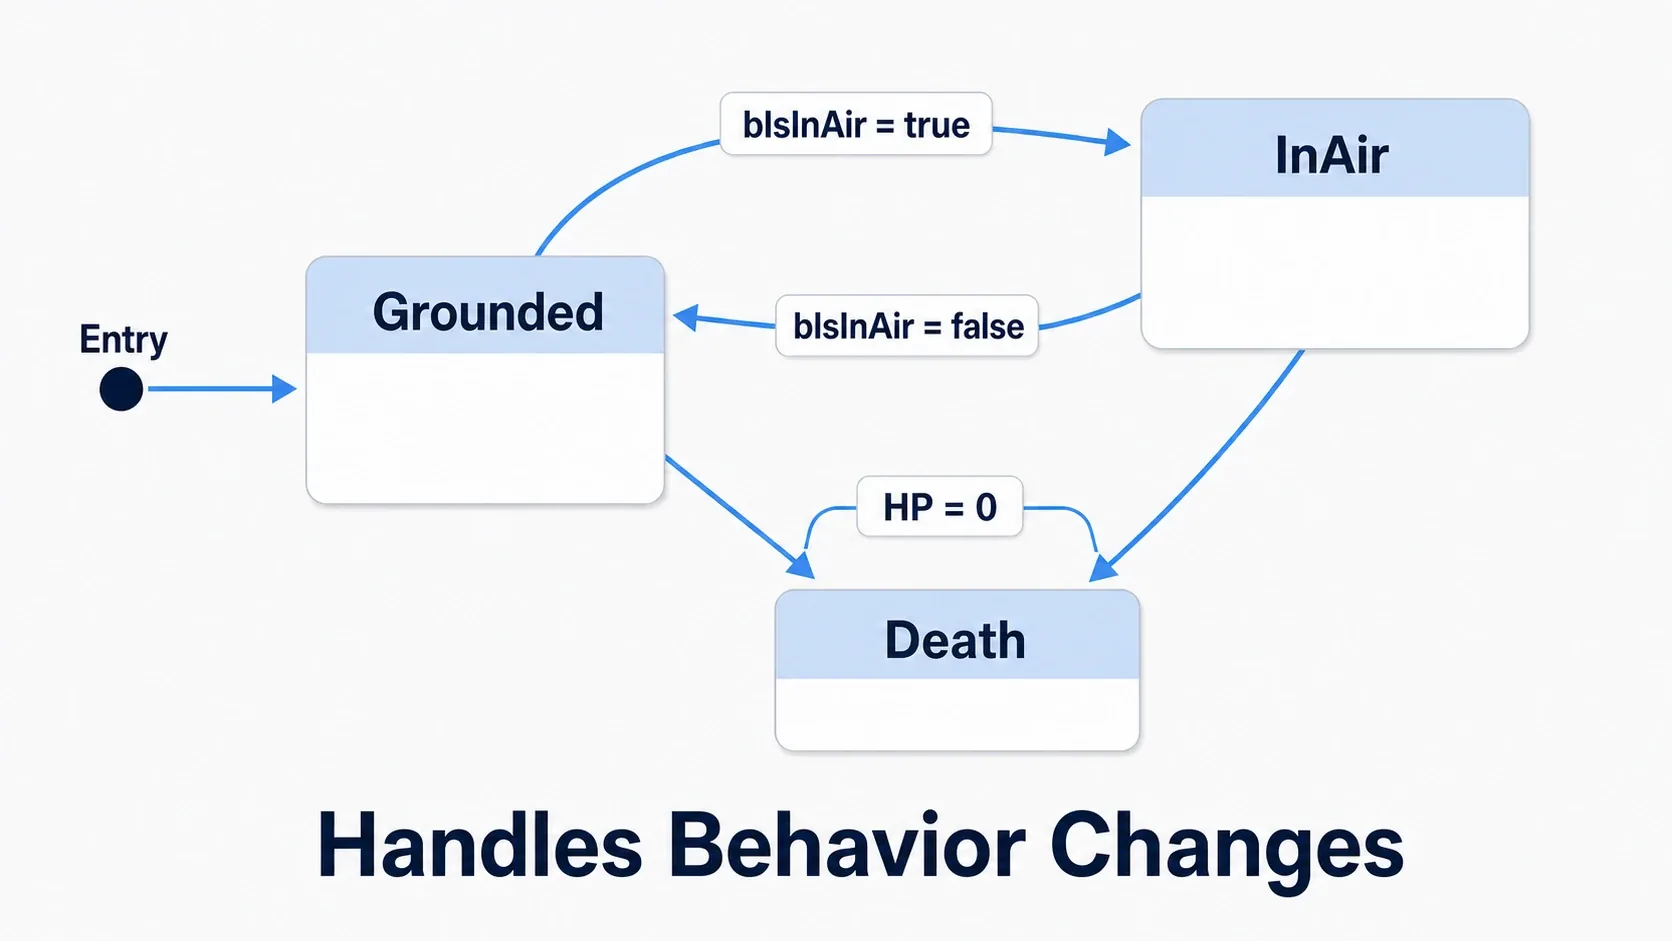
Its job is handling moments when the nature of the motion fundamentally changes.
| Transition | Why a State Machine |
|---|---|
| Ground movement → jump | Ground and air follow different rules of motion. Mixing them makes no sense |
| From any state → death | Should interrupt and switch immediately |
| Movement → crouch | The rules of movement themselves change |
Each transition carries a condition. This is the fix for the "maze of branches" problem from the intro: instead of stacking up Branch nodes, you put the condition on the arrow, and the flow becomes readable as a diagram.
Snapping is a transition setting. When a switch feels instant and unnatural, click the transition line in the State Machine and check
Blend Settings(Duration) in the details panel. If it's 0, the switch really is instantaneous. Even a big switch like ground-to-air needs a short blend, and something around 0.15 to 0.25 seconds usually looks natural.
Blend Space: Mixing
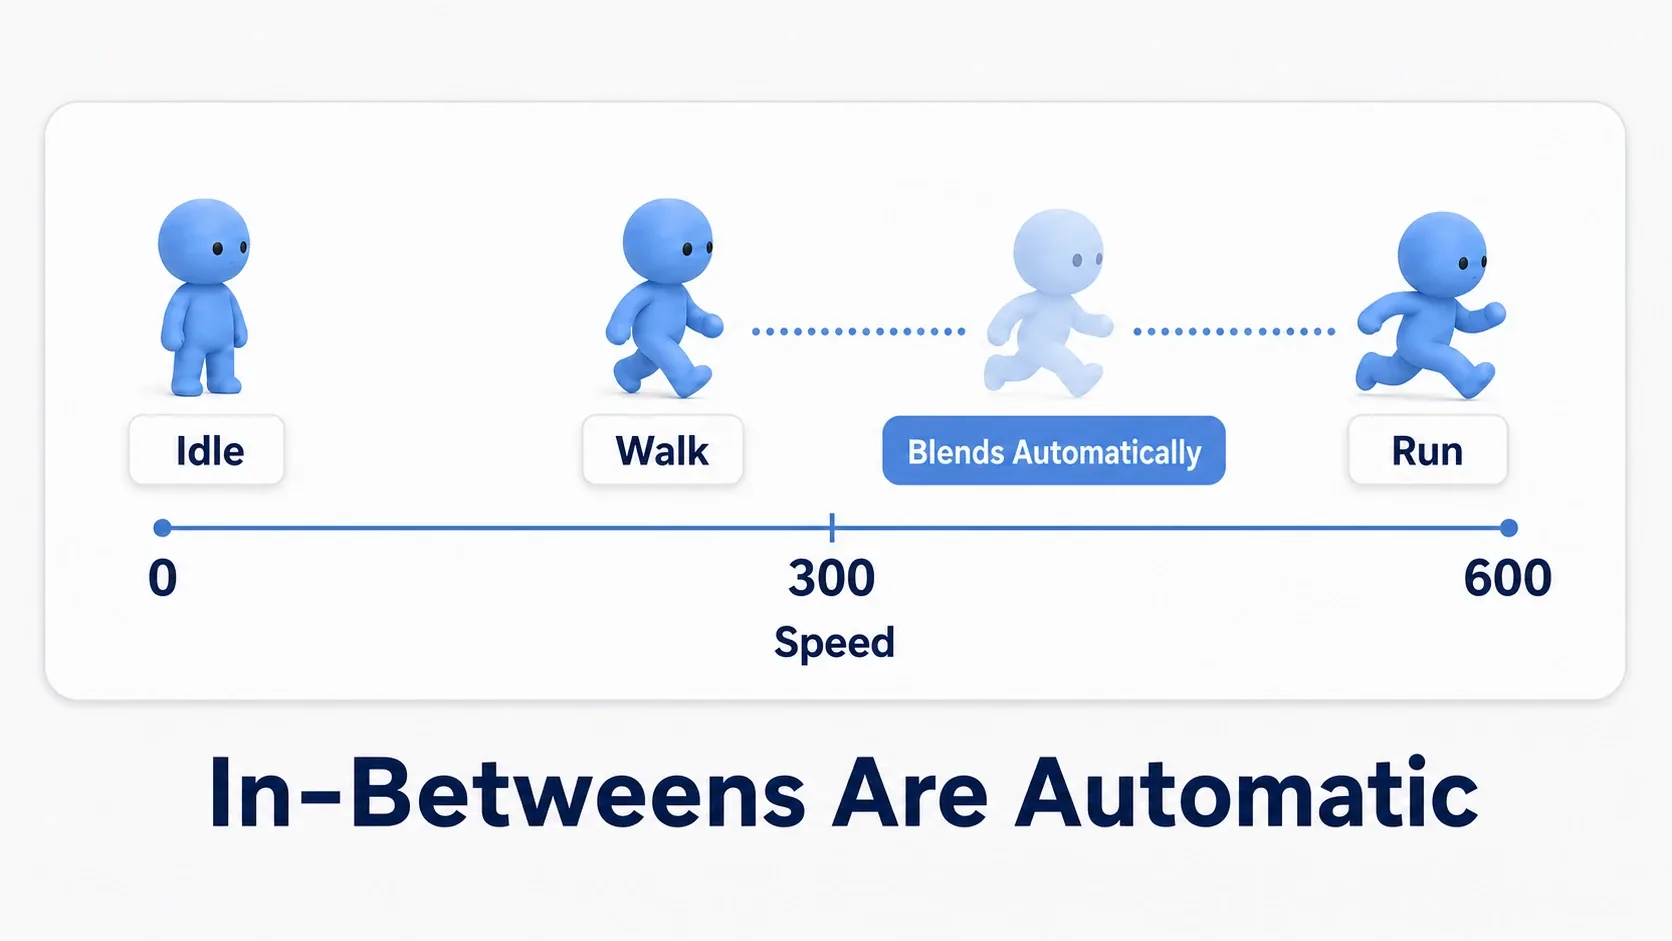
A Blend Space is an asset that mixes multiple animations based on a numeric value. Where a State Machine manages "which state am I in" using conditions, a Blend Space decides the mix ratio from continuous numbers. (A State Machine does blend two poses during a transition, too. The difference isn't "does it blend," it's what triggers the switch.)
There are two kinds.
- Blend Space 1D: one parameter. Changing Idle → Walk → Run based on speed is the most common use
- Blend Space (2D): two parameters. Speed and direction for 8-way movement, or Pitch and Yaw for aim offsets
Building one is intuitive: you just drop animations onto coordinates in the graph. Place Idle at 0, Walk at 300, and Run at 600, and speeds in between automatically produce a mixed pose. At speed 450, Walk and Run mix at roughly 50/50.
If you use direction in 2D, use
Calculate Direction. Feed it Velocity and the character's Rotation, and it returns the movement direction from -180 to 180 degrees. And if you want the character's facing and movement direction to be independent (strafing), you need to turn offOrient Rotation to Movementon the Character Movement Component. Leave it on and the character always faces the direction of travel, so side-stepping and back-stepping never happen.
Combining Them Is the Standard
The two aren't competing. Nesting them is the standard approach.
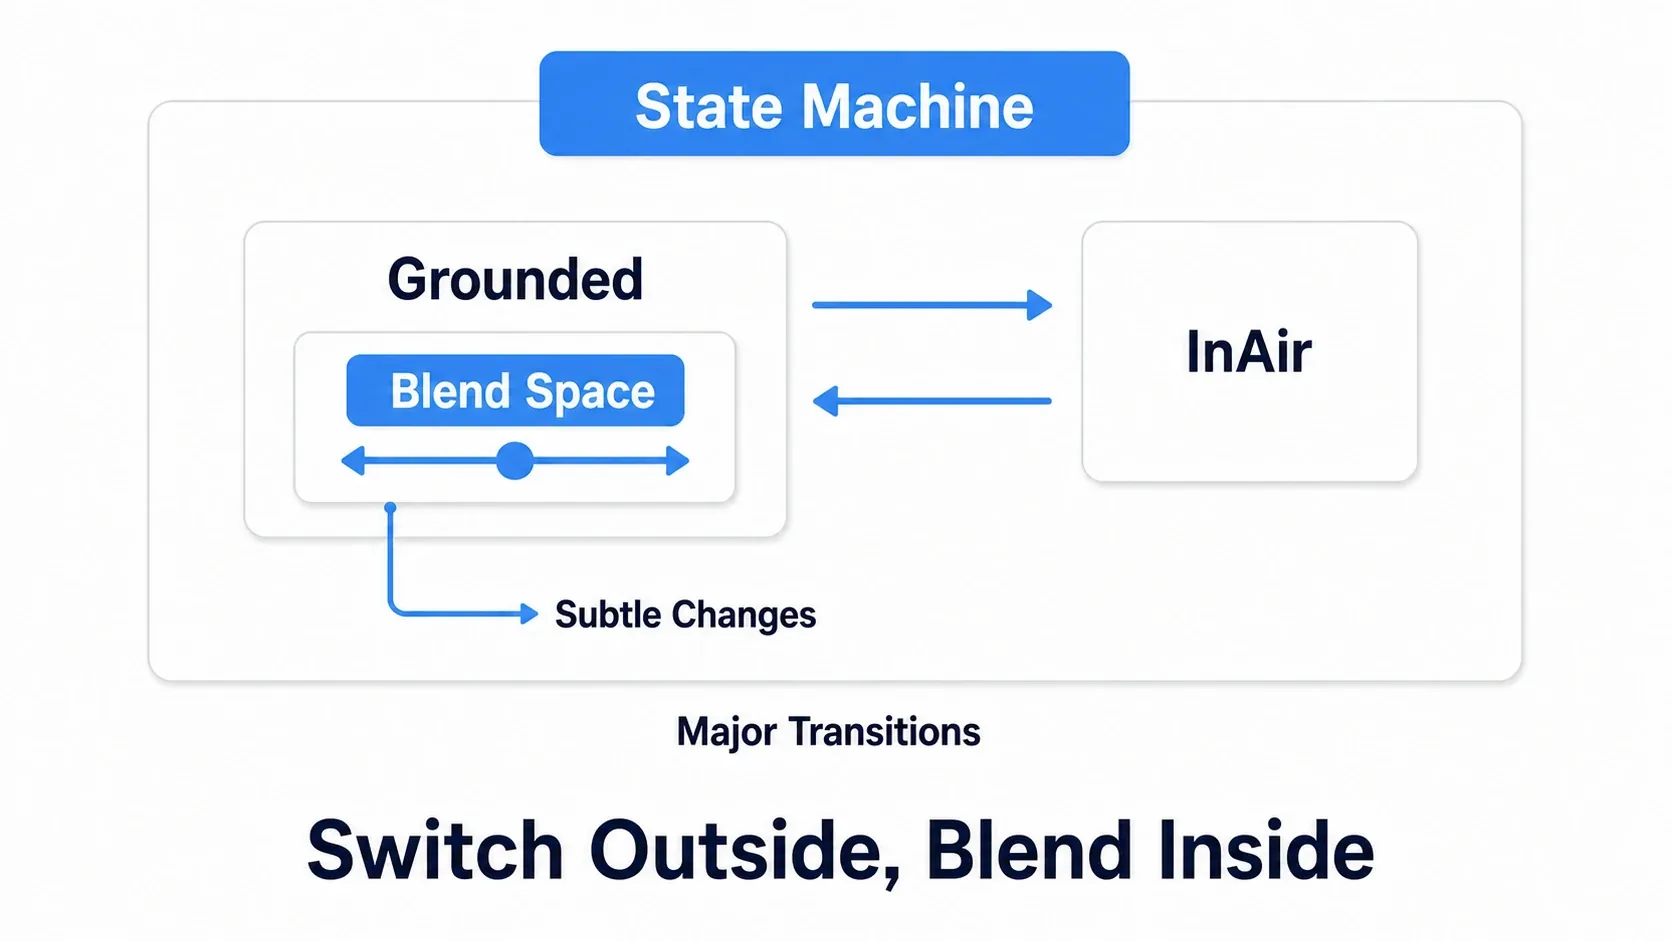
- Outside (State Machine): on the ground, in the air, or dead. The big switches
- Inside (Blend Space): while on the ground, how fast are you moving. The fine-grained changes
This way each tool handles only what it's good at. The instant a state switches is smoothed by the outer transition blend, while speed changes within the same state are handled by the inner Blend Space. When in doubt, go back to "sharp switches on the outside, continuous changes on the inside."
Hands-On: Building Idle/Walk/Run and Jumping
An action game protagonist, a top-down ARPG character, footstep sync in a first-person horror game: "stand, walk, run, jump" is a foundation every game needs. Here we'll build the minimal version of it.
Setup to follow along: create a new project from the Third Person template. The default character is BP_ThirdPersonCharacter, and the animations live in Characters/Mannequins/Animations.
| Type | Name | Contents |
|---|---|---|
| Blend Space 1D | BS_Locomotion | Horizontal axis Speed (0 to 500). Idle / Walk / Run placed on it |
| Animation Blueprint | ABP_Player | Parent class AnimInstance, skeleton set to the mannequin's |
ABP_Player variable | Speed (Float) | Default value 0.0 |
ABP_Player variable | bIsInAir (Boolean) | Default value false |
Check the character side first. Open BP_ThirdPersonCharacter and look at Max Walk Speed on the Character Movement component. That value is the top speed you'll actually reach, and your Blend Space axis should match it. (The template default is around 500. If yours differs, substitute your value for 500 below.) The 0/300/600 from the previous section were just examples to explain the mechanism; in practice you place samples to match this Max Walk Speed, so this hands-on uses 500 as the maximum.
Step 1: Create the Blend Space. In the Content Browser, right-click → Animation → Blend Space 1D. Choose the mannequin skeleton and name it BS_Locomotion.
Under Asset Details → Axis Settings, name the horizontal axis Speed and set Maximum Axis Value to 500. Then drag animations onto it.
| Position | Animation to place |
|---|---|
| 0 | MM_Idle |
| 150 | MM_Walk_Fwd (walk) |
| 500 | MM_Run_Fwd (run) |
Once placed, hold Ctrl and move the mouse left and right in the preview window. The preview won't respond without Ctrl. You can check the blending right there.
Step 2: Gather values in the Event Graph. Open ABP_Player and build the following in the Event Graph.
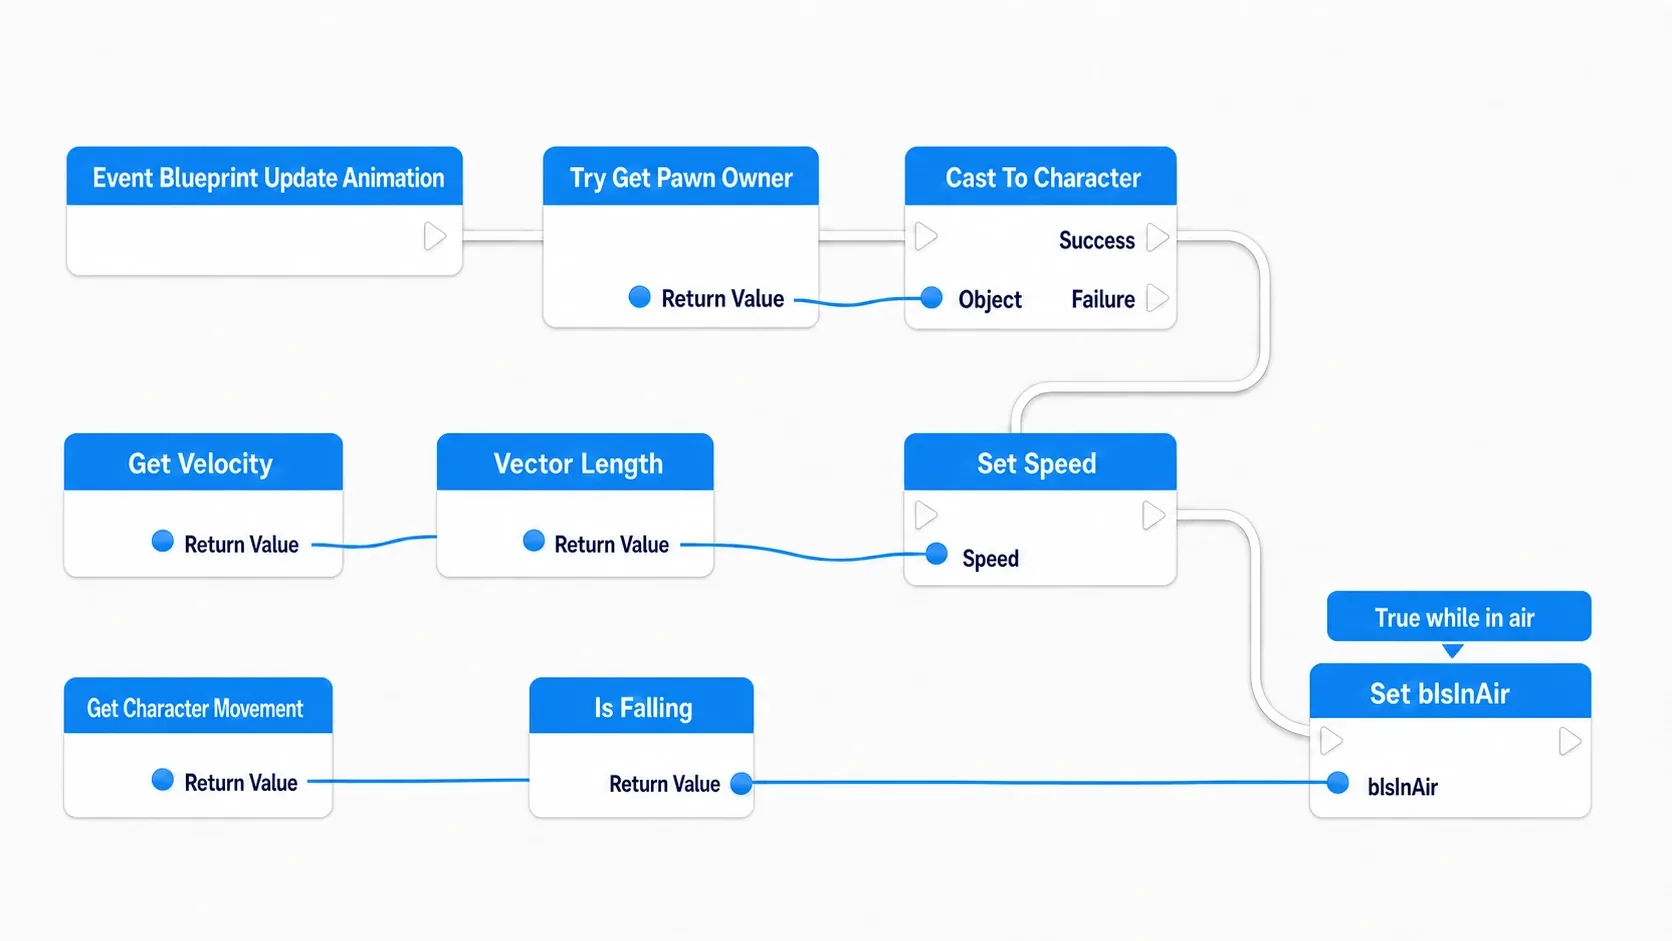
Event Blueprint Update Animation
  → Cast To Character (Object: return value of Try Get Pawn Owner)
      Success → Set Speed (Vector Length (Get Velocity))
          → Set bIsInAir (Get Character Movement → Is Falling)
Try Get Pawn Owner is a Pure node with no execution pin. Wire the execution line to Cast To Character, and pass the return value of Try Get Pawn Owner to the Object pin as a data connection. Get this wrong and nothing connects.
Using Cast To Character means this works as-is with the template character or your own Character class.
Step 3: Add a State Machine to the Anim Graph. In the Anim Graph, right-click → State Machines → Add New State Machine. Name it Locomotion.
Then connect the output of that Locomotion node to Output Pose. Forget this and either compilation fails or your character stays in a T-pose.
Step 4: Create states and transitions. Double-click Locomotion to go inside.
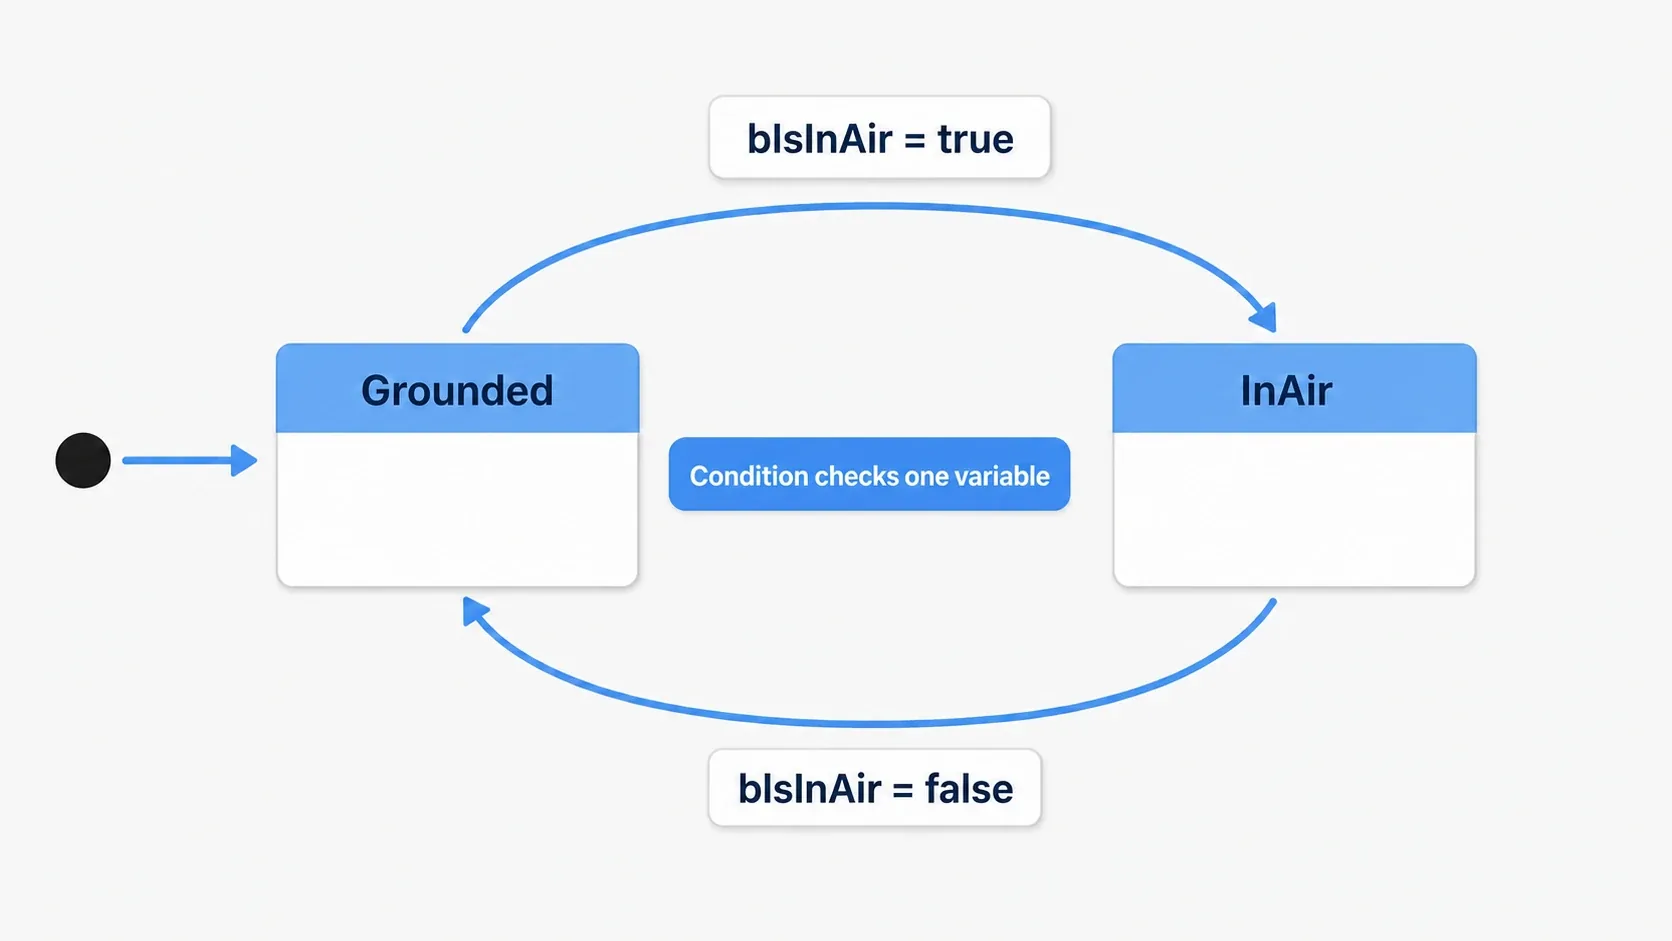
- Right-click →
Add Stateto createGroundedandInAir - Drag from
EntrytoGroundedto connect them - Drag from the edge of
GroundedtoInAirto create a transition arrow. Do the same in the opposite direction - Double-click the circular icon on the arrow to open its rule graph. Wire the variable into
Can Enter Transition
| Transition | Condition |
|---|---|
Grounded → InAir | Connect bIsInAir directly |
InAir → Grounded | Connect bIsInAir through a Not node |
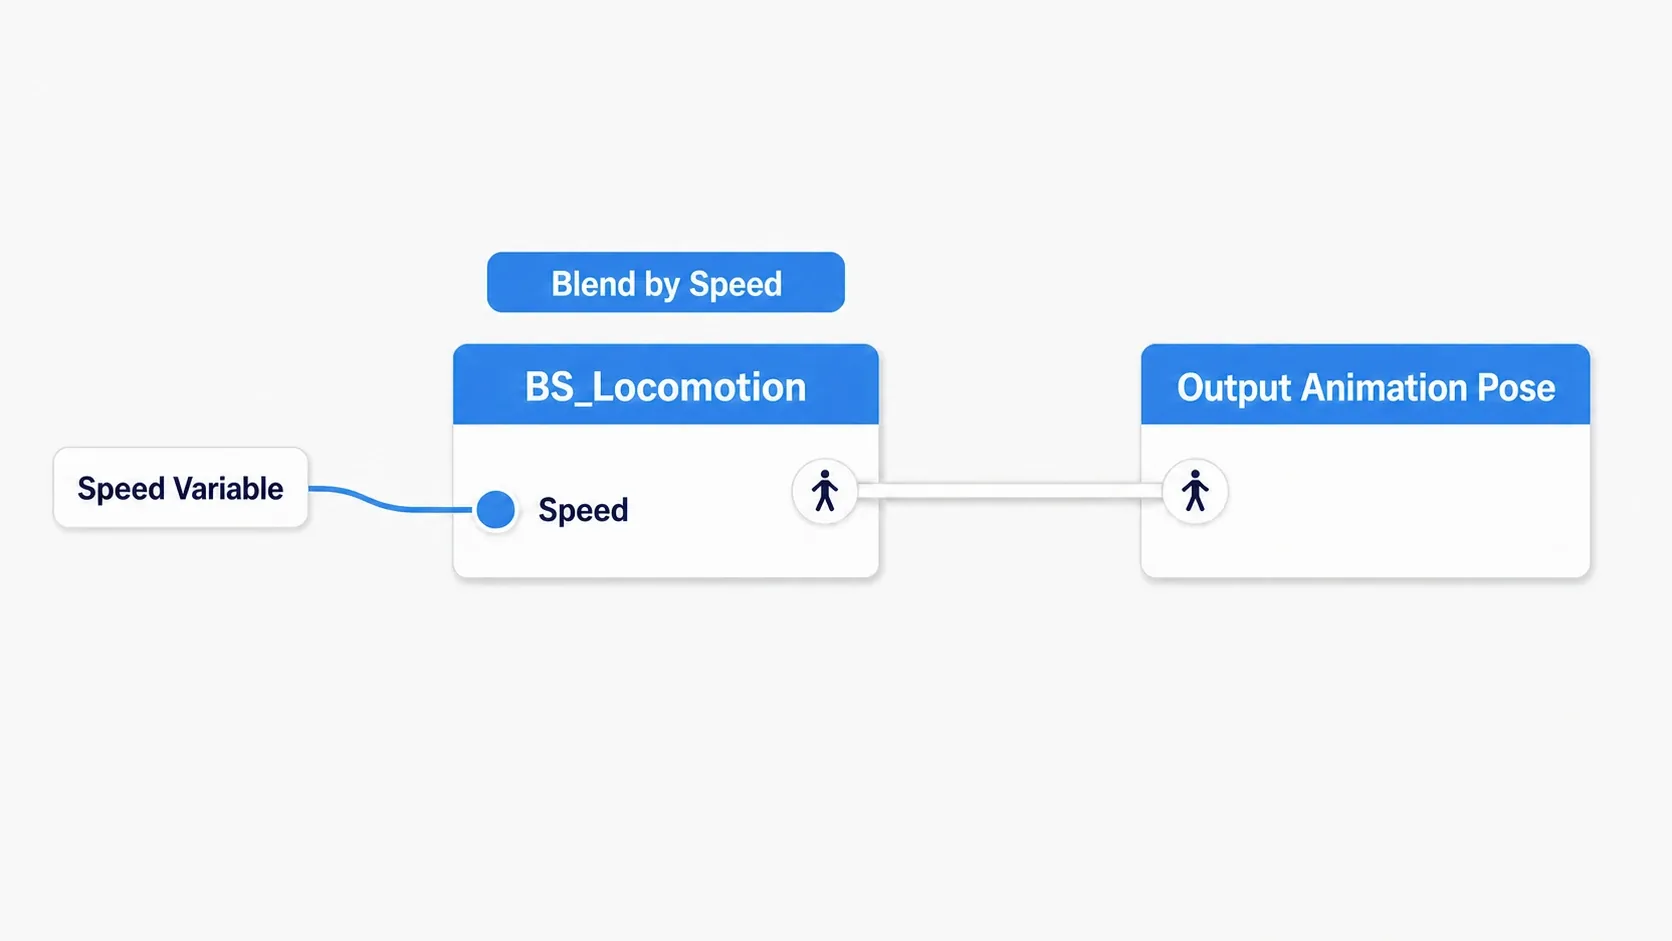
Step 5: Fill in the states. Double-click Grounded to go inside. Place BS_Locomotion, wire the Speed variable into its input, and connect the output to Output Animation Pose.
Inside InAir, place a looping falling animation such as MM_Fall_Loop. If you place a short animation like a jump start, it will freeze on the final frame. Select the node you placed and check that Loop Animation is enabled.
Step 6: Assign it to the character and compile. Select the Mesh component on BP_ThirdPersonCharacter, then in the details panel set Animation Mode to Use Animation Blueprint and Anim Class to ABP_Player.
Then compile and save both ABP_Player and the character BP before you hit Play.
Play and move around. Walking slowly plays Walk, pushing the stick all the way transitions smoothly into Run, and jumping switches to the falling animation and returns on landing. If you see that, it works.
Once it works, try dropping Max Walk Speed to 250 and keep running. Even at top speed you never reach Run, so a mixed pose between Walk and Run stays on screen. It's an experiment that lets you feel the Blend Space interpolating, frozen in a still frame. Set it back to 500 once you've seen it.
Here's how to narrow things down when it doesn't.
- Stuck in a T-pose →
Locomotionisn't connected toOutput Pose,Anim Classisn't set, or you forgot to compile - Stays in Idle no matter the speed →
Speedis still 0. Check that theCastin the Event Graph is succeeding - Never reaches Run, stops at Walk → your actual speed never reaches Run's position (500). Check
Max Walk Speed - Pose freezes in the air → the
InAiranimation isn't looping - Switches snap → select the transition line and set
DurationunderBlend Settingsto around 0.2 seconds
There are two key points.
- Transition rules should only read variables: do the math on the Event Graph side and pass only the result to the Anim Graph. Just holding this line keeps things from falling apart as states pile up
- Place samples to match the speeds you actually reach: if sprinting leaves you stuck between Walk and Run, your real speed isn't reaching Run's position. Use
Print Stringto read the actualSpeedvalue and adjust the placement
For actions that interrupt temporarily, like attacks and hit reactions, an Anim Montage is easier to manage than adding more states to the State Machine (see Animation Montage Basics: Timing Hitboxes with Notifies for how to build one). If you're at the stage of building the AI behavior itself, head to Building Enemy AI with Behavior Trees.
Bonus: Good to Know for Later
Anim Montage is the tool for interrupting with temporary actions. You can build attack motions as State Machine states, but the more states you add, the harder transitions are to manage. A Montage is a single asset you can handle on its own.
That said, creating and playing a Montage isn't enough to see it. You need to place a Slot node in the Anim Graph and wire it into the existing pose chain. To split by body part, like "attack with the upper body while running," combine Slot with Layered blend per bone. From creating a Montage to timing hitboxes, Animation Montage Basics: Timing Hitboxes with Notifies covers it.
Use a State Alias when many states jump to the same place. For a transition like "death from any state," drawing arrows from every state turns into a spider web. Right-click inside the State Machine → Add State Alias, then enable Global Alias in the details panel, and one arrow is all you need.
The Blend Space preview is trustworthy, but in-game speed is a separate matter. Even if it looks great in the preview, it means nothing if your character's real speed never lands in that range. The reliable check is to Print String the actual Speed value and confirm it matches your Blend Space axis range (see Checking Values with Print String).
An AnimBP runs every frame. Event Blueprint Update Animation runs at the same frequency as Tick, so heavy work here multiplies with every character on screen. The rule is to keep it to fetching values and storing them in variables.
There's another approach to locomotion animation. Motion Matching picks, every frame, whichever pose out of a large animation set best fits your current speed and direction, and you can start from Epic's published sample (GASP). Learn the foundations with State Machines and Blend Spaces first, and it becomes clear what Motion Matching is automating for you (see Motion Matching and the Game Animation Sample).
Summary
The difference between the two tools comes down to one line.
| State Machine | Blend Space | |
|---|---|---|
| Role | Switch to a different action | Mix within the same action |
| Good for | Ground↔air, alive↔dead, normal↔attacking | Idle↔walk↔run, aim offsets |
| Input | Conditions (Boolean) | Numbers (speed, angle) |
| Placement | Placed in the Anim Graph | Placed inside a State Machine state |
And one design guideline: calculate in the Event Graph, decide in the Anim Graph. When transition rules start swelling into formulas, that's your sign to move them to the Event Graph.
Does your character connect smoothly the moment it breaks into a run?