You play footsteps with Play Sound 2D and they're just as loud whether the enemy is across the map or standing on your toes. You try to add a music volume slider to the options screen, and the only way you can see is handing every sound source its own Volume Multiplier, adding more wiring with every new sound.
In UE5, both of these are solved outside of Blueprint. Distance falloff belongs in a Sound Attenuation asset, and volume grouping belongs in Sound Classes. This article covers the difference between 2D and 3D playback, distance falloff settings, volume management with Sound Class and Sound Mix, and finally Submix and reverb.
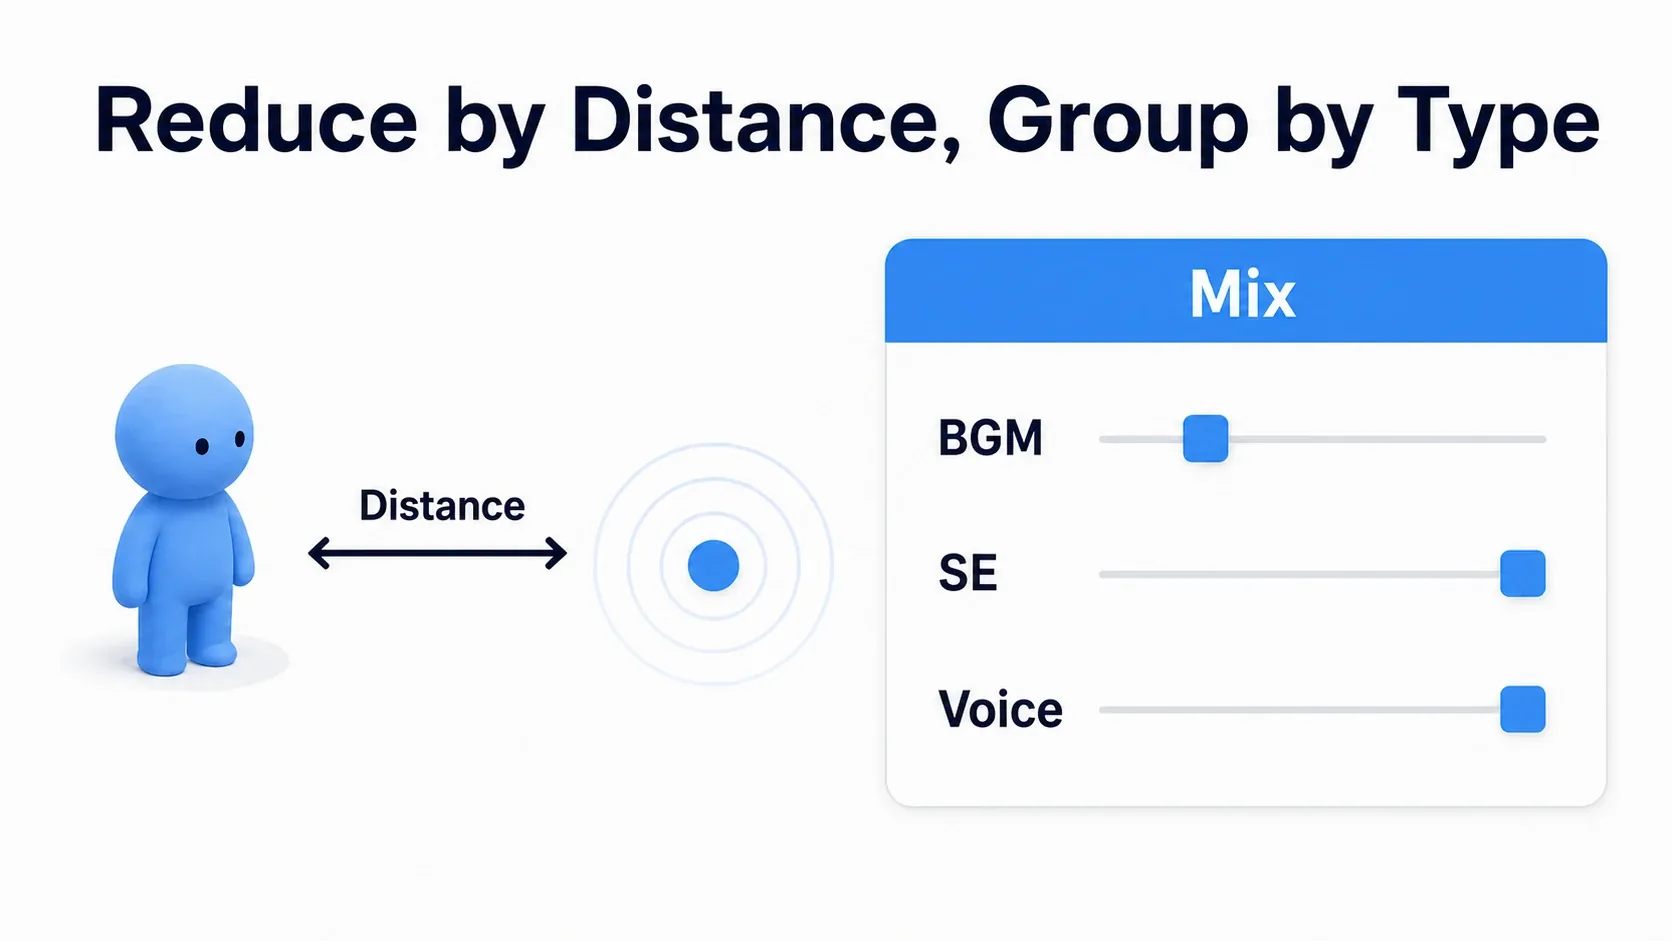
What You'll Learn
- The difference between 2D and 3D playback and the nodes for each
- Distance falloff is decided by a Sound Attenuation asset (
Inner RadiusandFalloff Distance)- Group music, SFX, and voice with Sound Class, then duck them with Sound Mix
- Build spatial ambience with Submix / Audio Volume
- Hands-on: an audio settings screen and ambience that fades out with distance
Separating 2D and 3D Playback
The first thing to decide about any sound is whether it has a place where it's coming from.
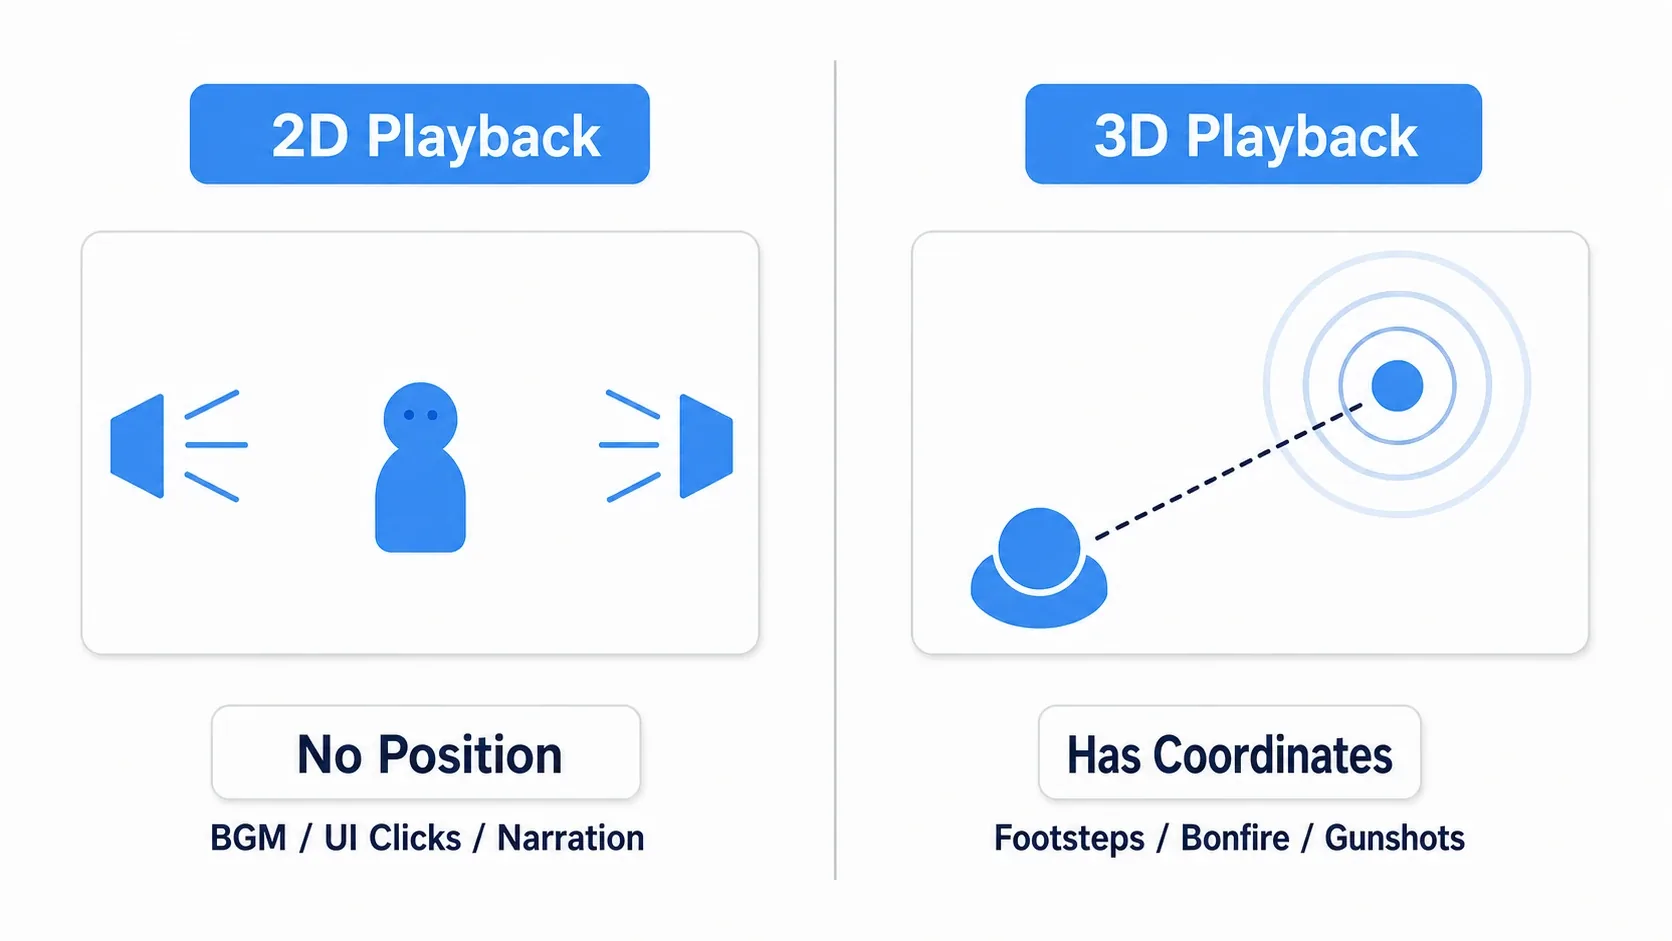
| 2D Playback | 3D Playback | |
|---|---|---|
| Position | None | Has world coordinates |
| Fades with distance? | No | Yes, depending on Attenuation |
| Pans left/right? | No | Yes |
| Good for | Music, UI clicks, narration | Footsteps, campfires, gunshots, enemy growls |
Four playback nodes are enough to cover everything.
| Node | Position | Return Value | When to Use It |
|---|---|---|---|
| Play Sound 2D | None | None | UI sounds, one-shot notifications |
| Play Sound at Location | Given coordinate | None | Explosions, impacts, and other fire-and-forget one-shots |
| Spawn Sound 2D | None | Audio Component | Music and other 2D sounds you want to stop later |
| Spawn Sound at Location | Given coordinate | Audio Component | Sounds you want to stop or adjust later |
| Spawn Sound Attached | Follows the Actor it's attached to | Audio Component | Sound from moving objects (engines, torches) |
The easy thing to miss here is whether there's a return value. Nodes that start with Play are fire-and-forget and don't return an Audio Component, which means you can never stop them. Play looping ambience or music with a Play node and you've created a sound that runs until the player leaves the level. Use the Spawn Sound family for anything you might want to stop. The same applies when you want to send parameters at runtime: you need that returned Audio Component (see the MetaSounds article).
For ambience that just sits in the level, you don't need Blueprint at all. Drop an Ambient Sound actor from the Place Actors panel, set its Sound, and it plays continuously at that location.
Note: In-game audio and what AI "hears" are two separate systems. AI doesn't listen to your speakers. You tell its hearing sense separately via
Report Noise Event(see the AI Perception article).
Distance Falloff Lives in an Asset
Playing a sound in 3D isn't enough to make it fade with distance. You need a blueprint describing how it falls off, which is the Sound Attenuation asset.
Create one with right-click → Sounds → Sound Attenuation. Naming it something like ATT_Ambient keeps things readable.
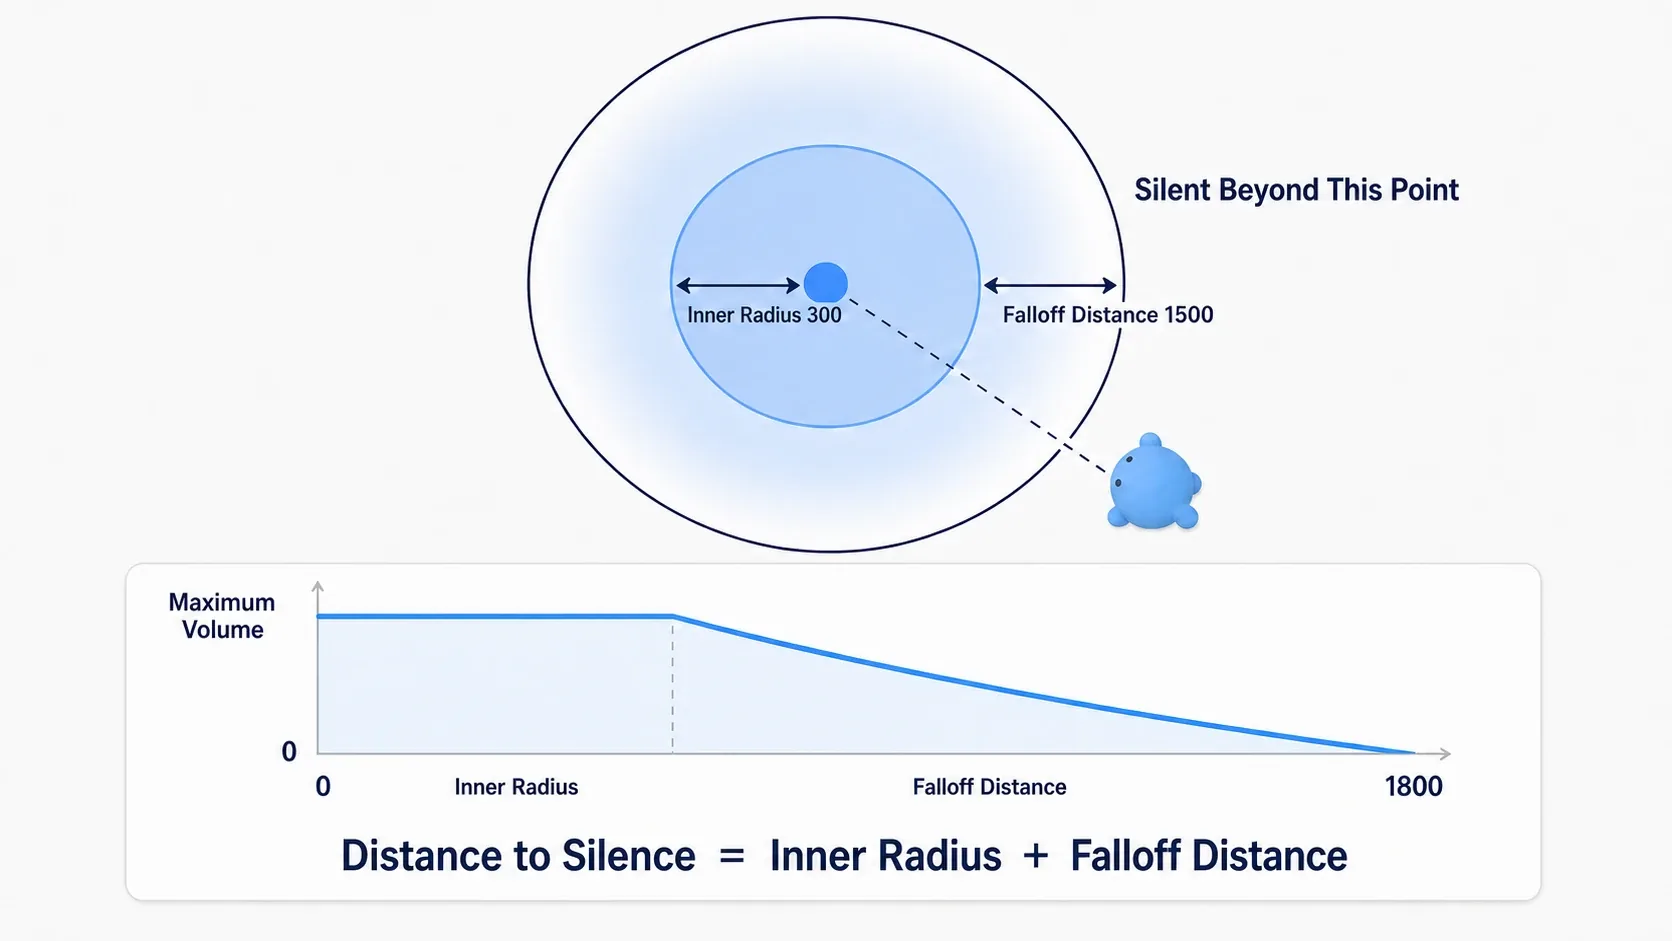
The asset has a long list of properties, but at first you only touch three of them, all under Attenuation (Volume).
| Property | Meaning | What You're Deciding |
|---|---|---|
| Attenuation Shape | Shape of the falloff region | Usually leave it on Sphere |
| Inner Radius | Full volume out to this distance | The range where the sound reads as "close" |
| Falloff Distance | Distance beyond Inner Radius over which volume reaches zero | How far the sound carries |
The key point is that these two add together.
Distance where it goes silent = Inner Radius + Falloff Distance
With Inner Radius 300 and Falloff Distance 1500, you get full volume within 3 m, a fade out to 18 m, and complete silence past 18 m (one UE unit is 1 cm).
The shape of the falloff is chosen with Attenuation Function.
| Type | Character |
|---|---|
| Linear | Straight-line falloff. Easy to reason about, but sluggish up close |
| Logarithmic | Drops off sharply near the source |
| Inverse | Closest to real-world physics |
| Natural Sound | A curve tuned to feel natural to the ear |
| Custom | Draw your own curve |
When in doubt, start with Natural Sound. It rarely produces extreme results.
Assign the finished asset in one of these places.
| Where You Assign It | Scope |
|---|---|
Attenuation Settings on a Sound Wave / Sound Cue | Applies wherever that sound is played |
Attenuation Settings on an Audio Component / Ambient Sound | Applies to that one placement |
The Attenuation Settings pin on Play Sound at Location | Applies to that single playback |
Share one Attenuation asset across sounds of the same kind. If footsteps, shell casings, and small prop sounds all point at ATT_SmallSFX, then when you decide "SFX don't carry far enough," there's exactly one place to fix it.
Spatialization and Stereo Sources
Enable Spatialization, under Attenuation (Spatialization) in the same asset, controls whether the sound pans left and right. It's independent of distance falloff, and you can enable one without the other.
Watch out for stereo sources. A spatialized stereo sound is treated as two point sources separated by the width you set in 3D Stereo Spread. Add Attenuation to music you authored with a wide stereo image and you get exactly that treatment, which wrecks the intended sound stage. Keep music and narration on 2D playback.
Grouping Sounds with Sound Class
Try to solve "turn down just the music" with per-source Volume Multiplier values and your settings grow every time you add a sound. UE handles this with categories instead.
Create them with right-click → Sounds → Sound Class, one per kind of sound.
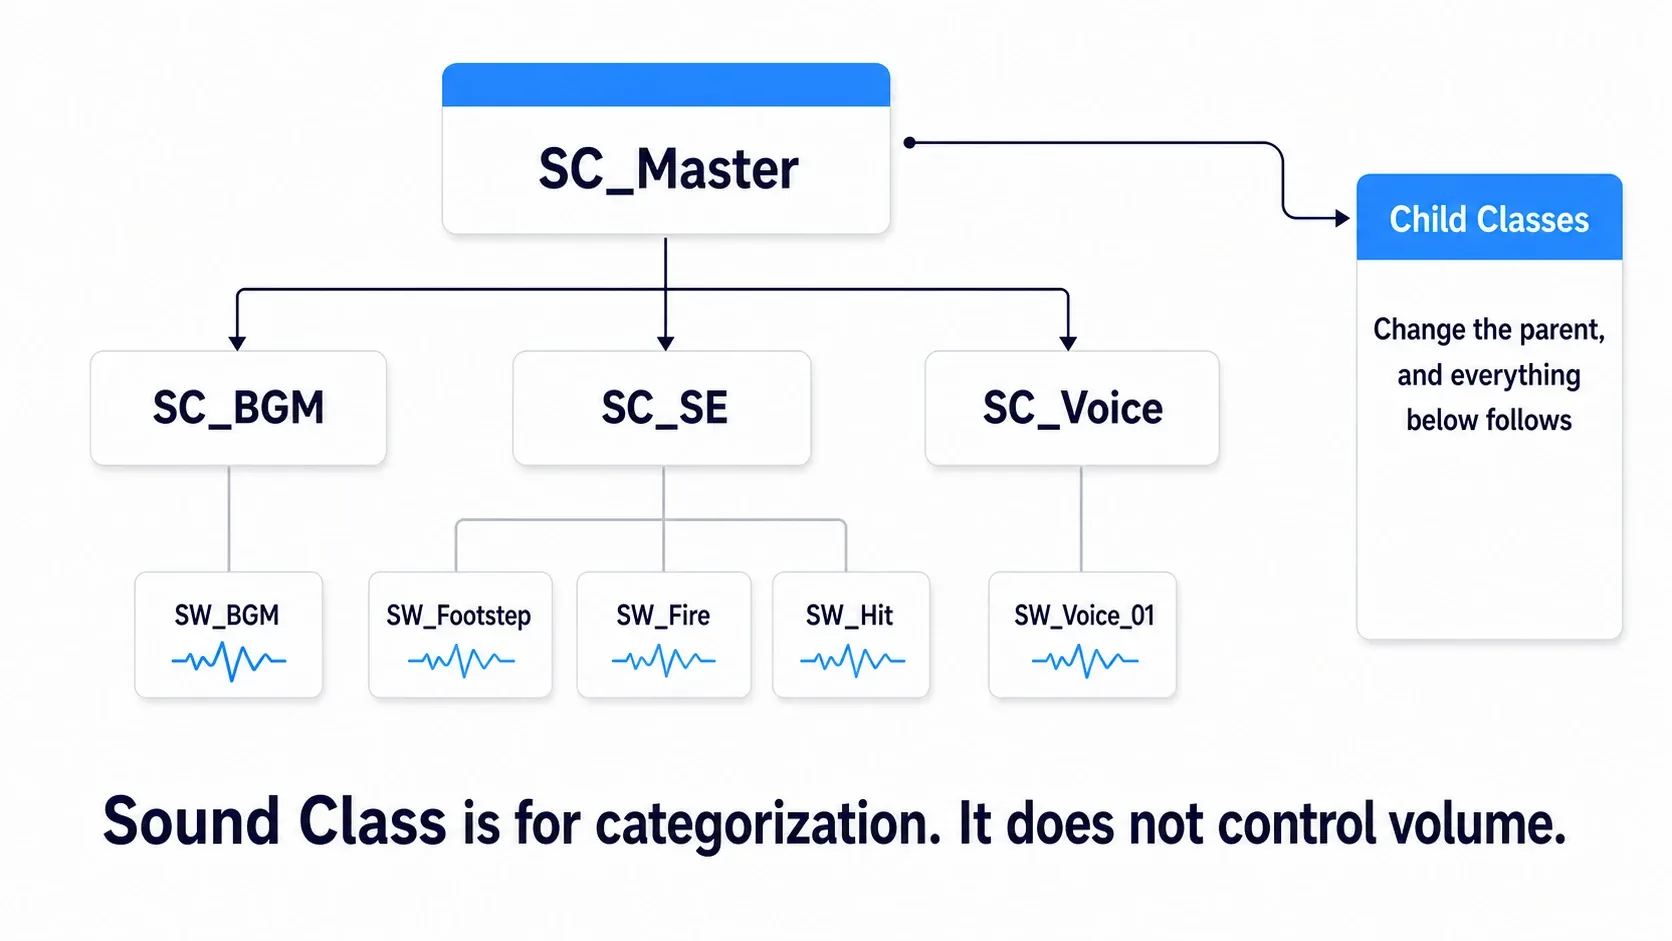
Sound Classes support parent-child relationships. Open a parent Sound Class and add children under Child Classes to build a hierarchy.
SC_Master
├─ SC_BGM
├─ SC_SE
└─ SC_Voice
With this in place, changing the volume of SC_Master moves everything. A master volume slider is just that one parent.
Assignment happens on the sound side. Open a Sound Wave or Sound Cue and set Sound Class in the Details panel.
What happens if you leave it unset? A sound with an empty
Sound Classbelongs to no category at all. Build a "lower only SFX" control and that one sound won't respond. Make assigning a Sound Class when you add a sound a habit.
Ducking Temporarily with Sound Mix
Sound Class is classification, and by itself it doesn't change any volume. The asset that says which class changes by how much is a Sound Mix (right-click → Sounds → Sound Mix).
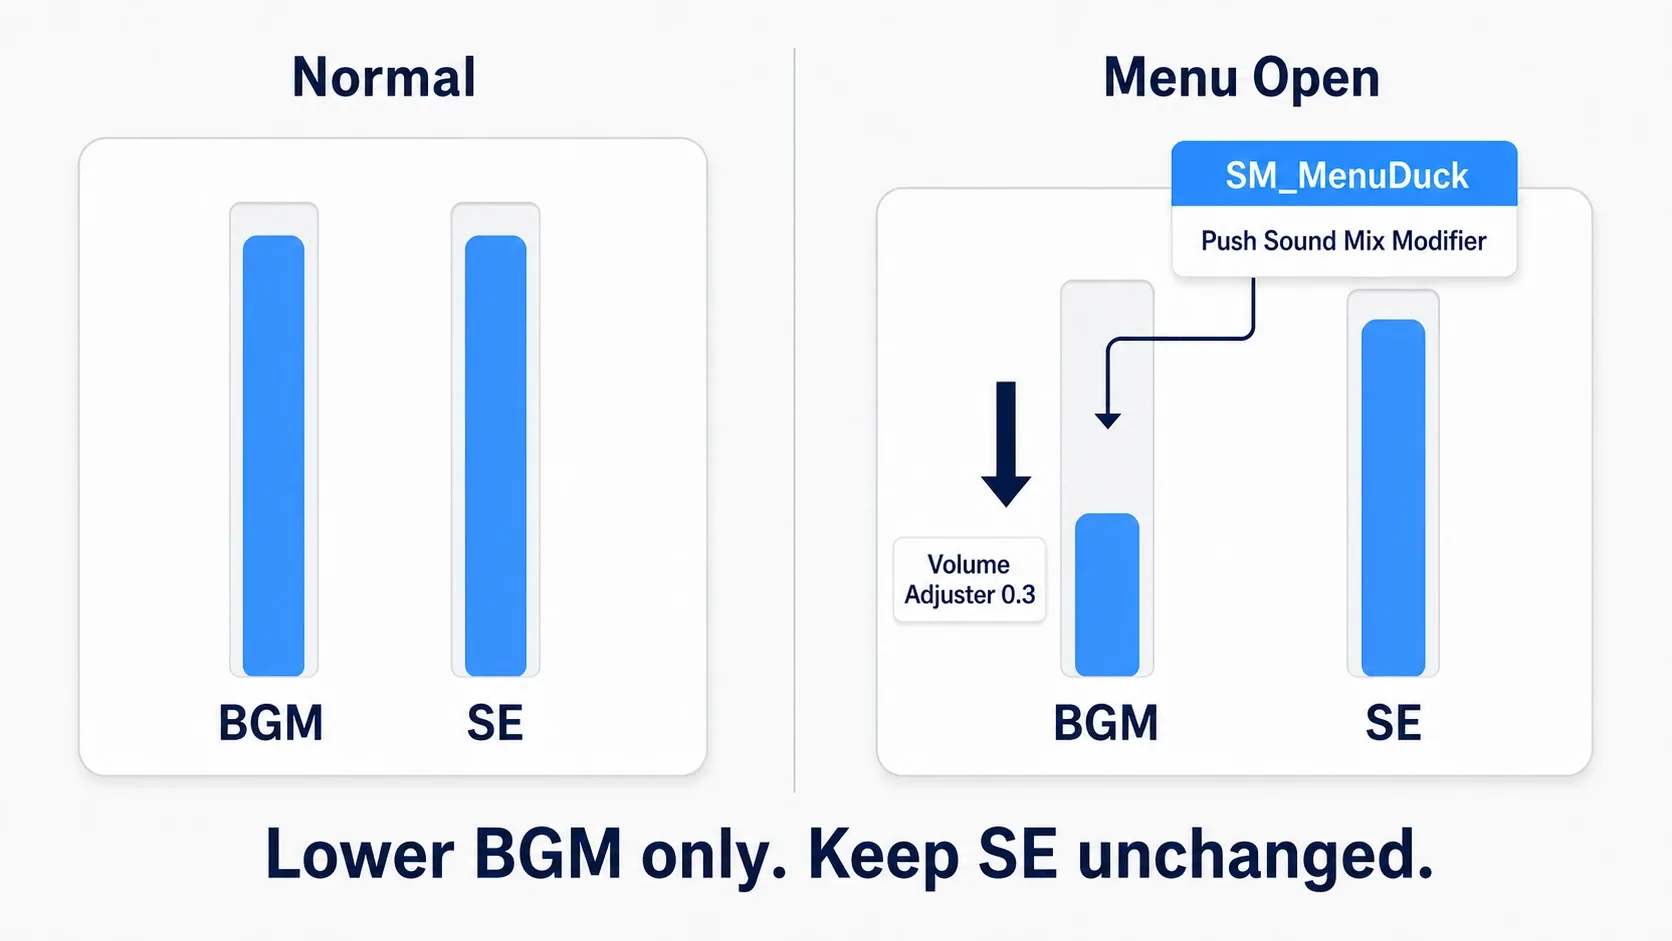
Open a Sound Mix and you'll find a Sound Class Effects array. Each entry specifies the following.
| Property | Meaning |
|---|---|
| Sound Class Object | The target Sound Class |
| Volume Adjuster | Volume multiplier (1.0 is unchanged) |
| Pitch Adjuster | Pitch multiplier |
| Apply to Children | Whether child classes are affected too |
For example, a single entry in SM_MenuDuck reading "SC_BGM, Volume Adjuster 0.3" gives you a mix that drops music to 30% while leaving SFX alone.
Applying and clearing it takes two Blueprint nodes.
| Node | Argument | Behavior |
|---|---|---|
| Push Sound Mix Modifier | In Sound Mix Modifier | Activates that mix |
| Pop Sound Mix Modifier | In Sound Mix Modifier | Deactivates that mix |
(Menu opens)  → Push Sound Mix Modifier (In Sound Mix Modifier: SM_MenuDuck)
(Menu closes) → Pop Sound Mix Modifier  (In Sound Mix Modifier: SM_MenuDuck)
That's "music pulls back while paused," done (see the pause menu article).
The Node for Slider-Driven Volume
A volume slider on an options screen, on the other hand, changes continuously. For that, use Set Sound Mix Class Override.
| Argument | Meaning | Practical Value |
|---|---|---|
| In Sound Mix Modifier | The Sound Mix to write into | SM_UserAudio |
| In Sound Class | The target Sound Class | SC_BGM |
| Volume | Volume multiplier | The slider value (0.0–1.0) |
| Pitch | Pitch multiplier | 1.0 |
| Fade In Time | Seconds the change takes | 0.1 (default is 1.0) |
| Apply to Children | Whether child classes are affected too | true |
There's one trap. An override does nothing unless that Sound Mix is active. Push the mix once at game start with Push Sound Mix Modifier, and have the slider call only Set Sound Mix Class Override. This is almost always the reason "moving the slider does nothing."
Fade In Time defaults to 1.0 second. On a slider that feels like a full second of lag, so drop it to around 0.1.
Adding Space with Submix and Audio Volume
Everything so far has been about volume. Processing like reverb and EQ travels a different path.
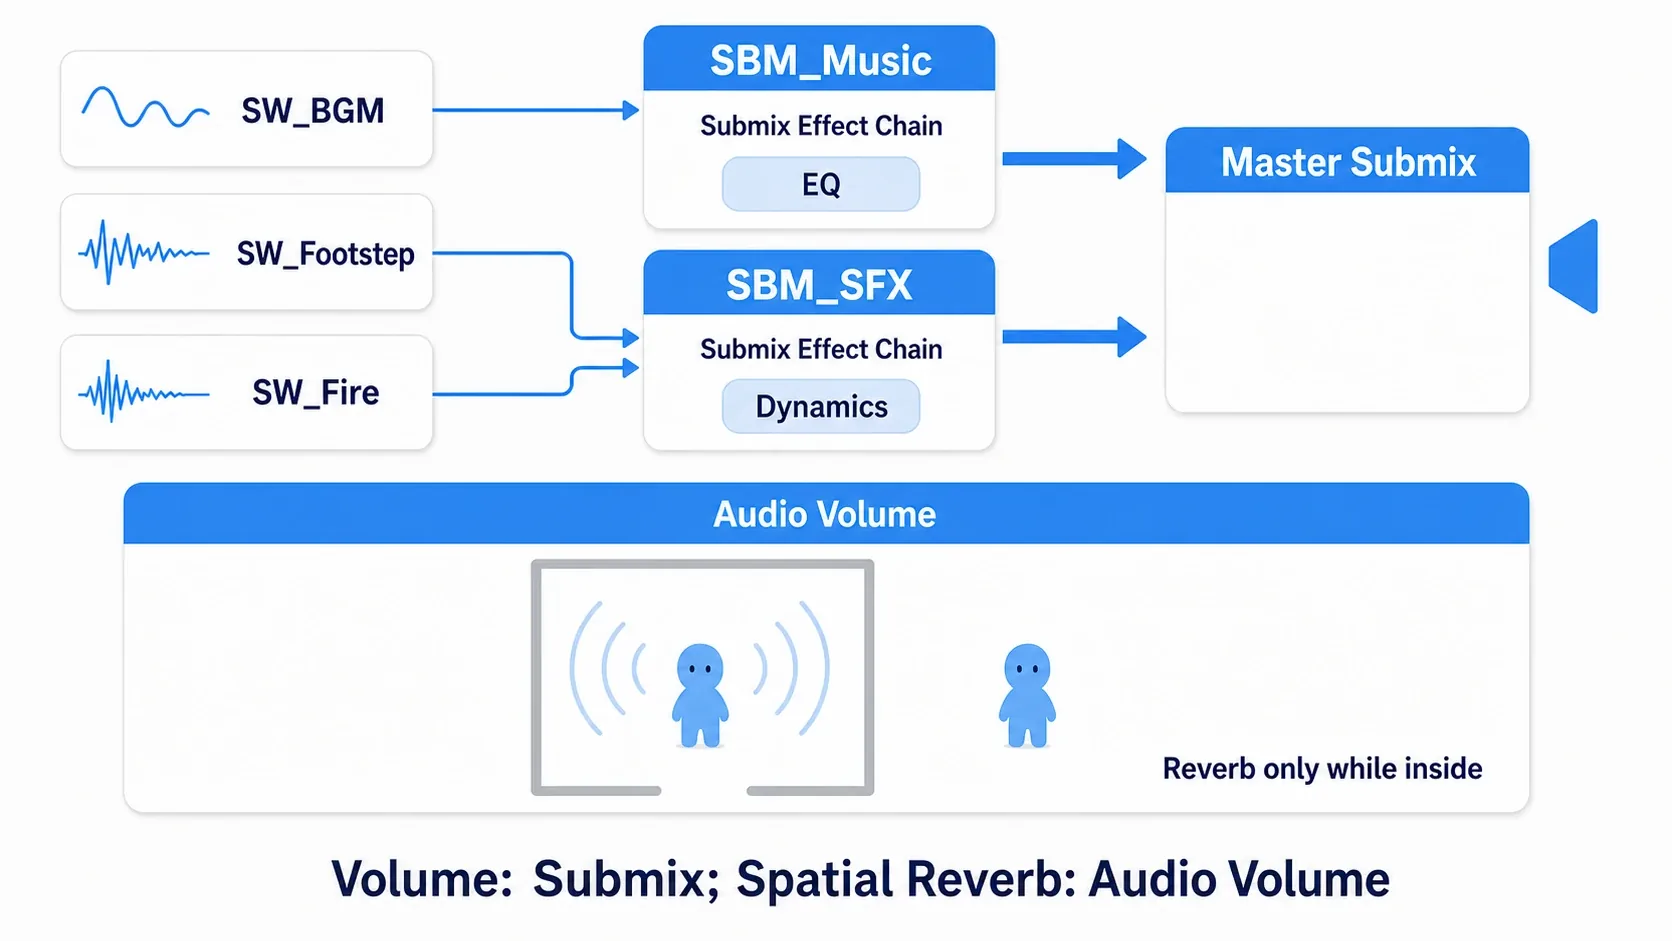
All audio eventually flows into the Master Submix. Insert your own Sound Submix along the way and you can apply effects to everything passing through it.
| System | What It Affects | Example |
|---|---|---|
| Source Effect | Individual sound sources | Making one voice sound like a radio |
| Sound Submix | All audio routed through that Submix | Compressor across the whole music bus |
| Audio Volume | Sound while you're inside that space | Cave reverb |
Create a Submix with right-click → Sounds → Sound Submix, then add effect presets (Submix Effect Dynamics Processor, Submix Effect Submix EQ, and so on) to its Submix Effect Chain. On the sound side, pick the destination with Sound Submix in a Sound Wave's or Sound Cue's Details panel.
If you just want to change volume at runtime, call Set Submix Output Volume on the Submix.
Per-Space Ambience Belongs to Audio Volume
"Echo only inside the cave" is the job of an Audio Volume, not a Submix. Place one from the Place Actors panel, scale it to cover the cave, and configure it under Reverb in the Details panel.
| Property | Contents |
|---|---|
| Apply Reverb | Check it |
| Reverb Effect | A Reverb Effect asset (create via right-click → Sounds → Reverb Effect) |
| Volume | Strength of the reverb |
| Fade Time | Seconds the transition takes when entering or leaving |
The sounds themselves need no configuration. Step inside the volume and things echo; step out and they don't. The same footstep sounds dry outdoors and reverberant in the cave.
There's one spec here that catches people out. Reverb is fed through Attenuation's Reverb Send. As a result, 2D sounds with no Attenuation never receive Audio Volume reverb. If a footstep you believe is 3D isn't echoing, check whether it actually has an Attenuation asset assigned.
Hands-On: An Audio Settings Screen and Distance-Faded Ambience
An RPG options screen, horror game ambience, a campfire in an exploration game. "Music and SFX adjust separately" and "the source fades out as you walk away" are things every genre eventually needs. Let's build both at once.
The Finished Result
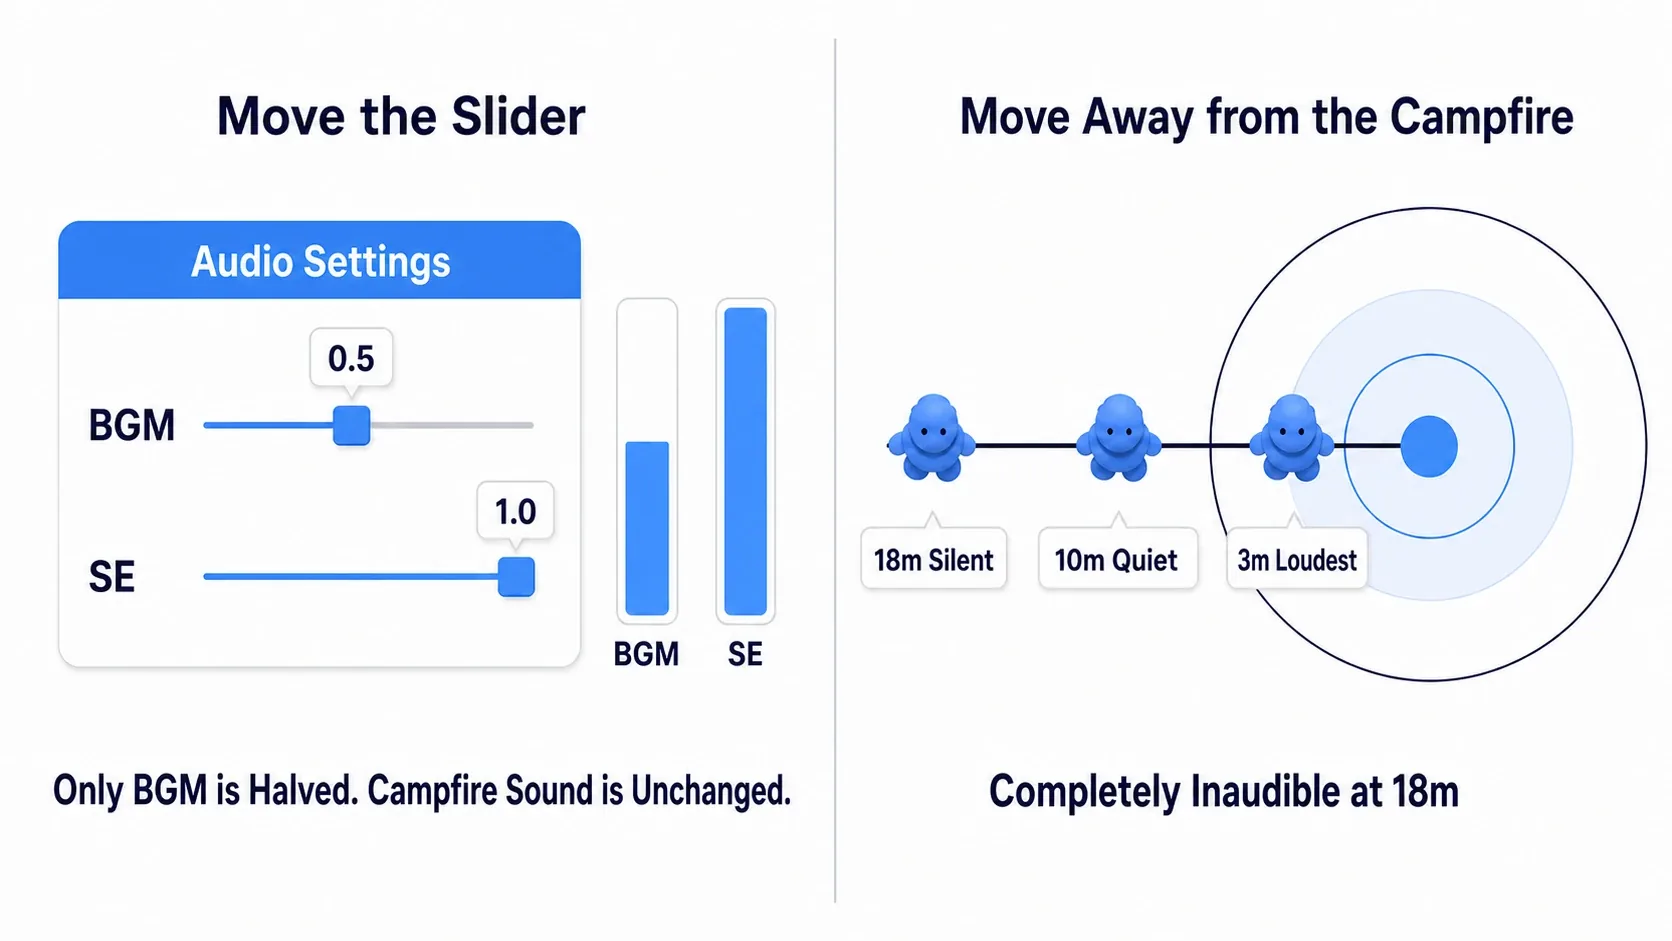
Halving the music slider lowers only the music, leaving the campfire untouched. And walking away from the campfire, the sound disappears entirely at 18 m.
Reproduction Setup
Create a new project from the Third Person template and set up the following. For audio, a looping music track and one campfire-style ambience file are enough.
| Type | Name | Settings |
|---|---|---|
| Sound Wave | SW_BGM | Looping on, Sound Class set to SC_BGM |
| Sound Wave | SW_Fire | Looping on, Sound Class set to SC_SE, Attenuation Settings set to ATT_Ambient |
| Sound Class | SC_Master | Add SC_BGM and SC_SE to Child Classes |
| Sound Class | SC_BGM / SC_SE | Just create them |
| Sound Mix | SM_UserAudio | Two entries in Sound Class Effects (table below) |
| Sound Attenuation | ATT_Ambient | Inner Radius 300.0 / Falloff Distance 1500.0 / Attenuation Function Natural Sound |
| Widget Blueprint | WBP_AudioSettings | Place Slider_BGM and Slider_SE |
| Level | Ambient Sound actor | Sound set to SW_Fire, placed a short walk from the player start |
SM_UserAudio needs two Sound Class Effects entries.
| # | Sound Class Object | Volume Adjuster | Apply to Children |
|---|---|---|---|
| 0 | SC_BGM | 1.0 | true |
| 1 | SC_SE | 1.0 | true |
Both sliders in WBP_AudioSettings get these initial values.
| Property | Value |
|---|---|
Min Value | 0.0 |
Max Value | 1.0 |
Value | 1.0 |
Is Variable | Checked (so Blueprint can reference them) |
Step 1: Push the Mix at Startup
Open BP_ThirdPersonGameMode and wire the following onto Event BeginPlay. The music starts here too.
Event BeginPlay (BP_ThirdPersonGameMode)
  → Push Sound Mix Modifier (In Sound Mix Modifier: SM_UserAudio)
  → Play Sound 2D (Sound: SW_BGM)
  → Create Widget (Class: WBP_AudioSettings) → Add to Viewport
Push Sound Mix Modifier comes first. Without that one node, the override in the next step does nothing at all.
Playing the music with Play Sound 2D is deliberate. It bypasses Attenuation, so distance has no effect and the stereo image stays intact. Here the track just runs for the whole level, so fire-and-forget is enough — but if you ever want to stop or swap tracks, switch to Spawn Sound 2D and keep the returned Audio Component.
Step 2: Write Volume from the Sliders
In the WBP_AudioSettings graph, create an On Value Changed event for each slider. Select the slider in the Designer and hit + next to On Value Changed in the event list at the bottom of the Details panel.
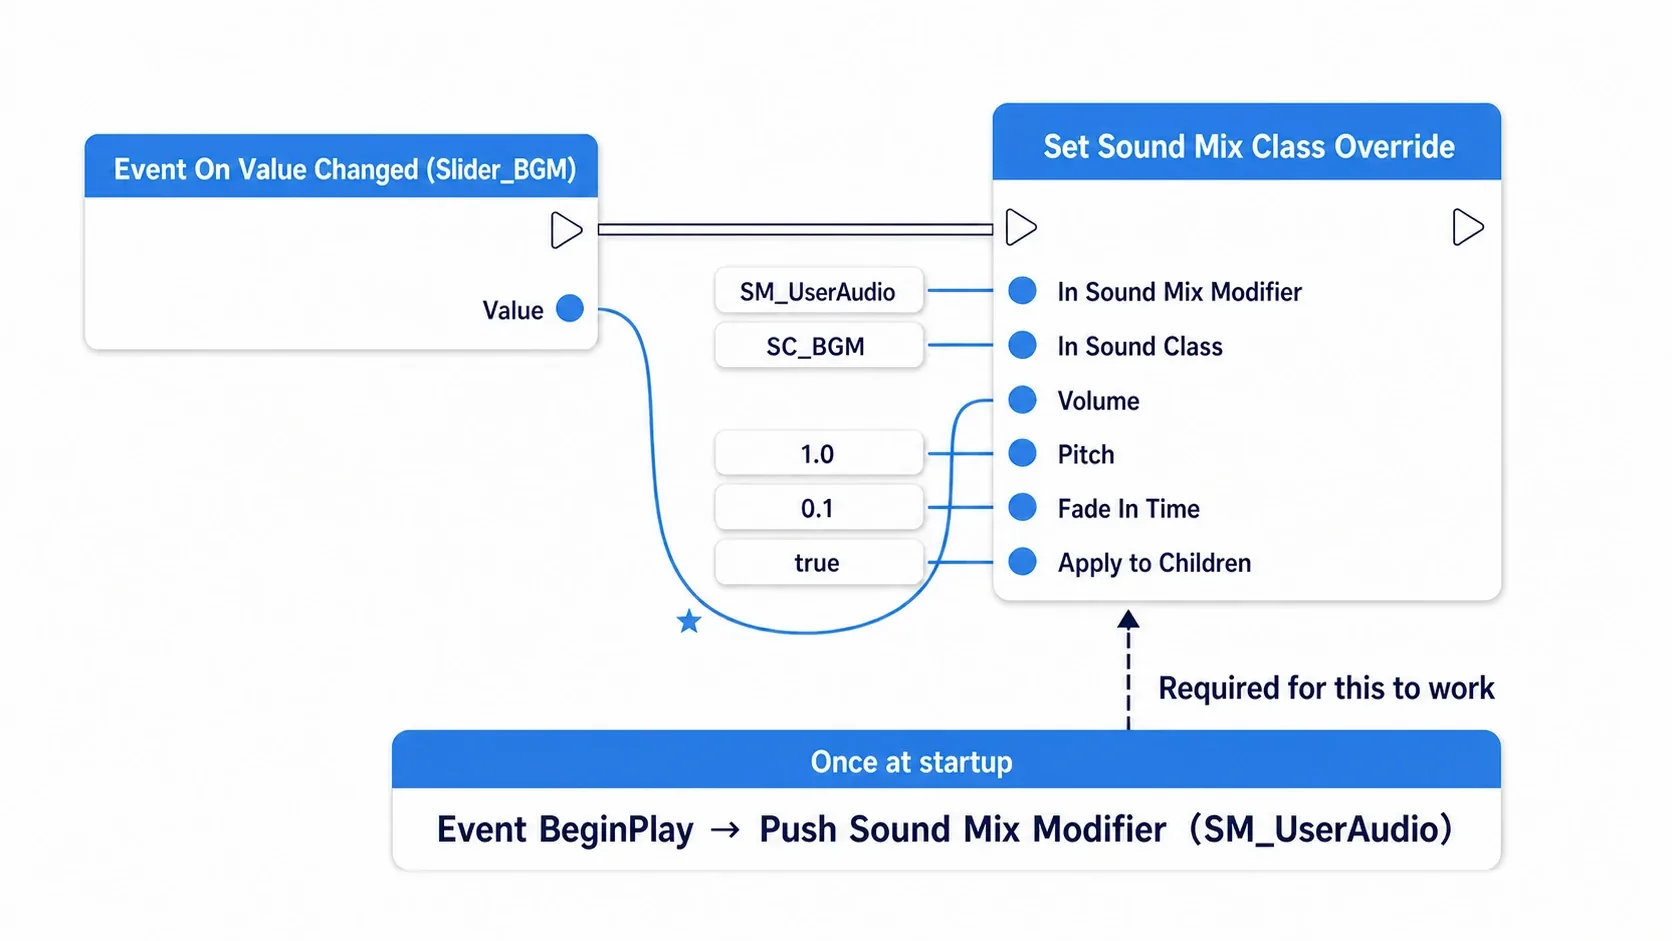
Event On Value Changed (Slider_BGM)  ── Value ─┐
  → Set Sound Mix Class Override               │
      In Sound Mix Modifier : SM_UserAudio     │
      In Sound Class        : SC_BGM           │
      Volume                : ←───────────────┘  (wire Value directly)
      Pitch                 : 1.0
      Fade In Time          : 0.1
      Apply to Children     : true

Event On Value Changed (Slider_SE)  ── Value ─┐
  → Set Sound Mix Class Override              │
      In Sound Mix Modifier : SM_UserAudio    │
      In Sound Class        : SC_SE           │
      Volume                : ←──────────────┘
      Pitch                 : 1.0
      Fade In Time          : 0.1
      Apply to Children     : true
Both chains are identical except for In Sound Class. Adding voice or UI sliders later just means one more Sound Class and one more slider each.
Step 3: Enable the Mouse
The Third Person template doesn't show a cursor, so you can't grab the sliders. Add this to BeginPlay in BP_ThirdPersonGameMode.
→ Get Player Controller → Set Show Mouse Cursor (true)
Verify It
Hit Play and check these three things in order.
- Move the music slider to the middle (0.5). Music drops to half volume and the campfire doesn't change at all
- Move the SFX slider to 0. The campfire goes silent and the music keeps playing
- Return both to 1.0 and walk away from the campfire. Volume holds steady out to 3 m, then fades, reaching complete silence at 18 m
Eyeballing that third distance is fine, but if you want to be precise, print the distance between the campfire Actor and the player with Print String (see the Print String article).
If something's off, here's how to narrow it down.
- Nothing changes when you move a slider → You haven't called
Push Sound Mix Modifier. Overrides only work while the mix is active - Lowering music also lowers the campfire →
SW_Firehas noSound Classset, or it's sitting directly underSC_Master - Volume doesn't change with distance → The Ambient Sound's
Attenuation Settingsis empty, or you assigned it onSW_Firebut the actor is overriding it - Goes silent immediately / never goes silent → The audible distance is the sum of
Inner RadiusandFalloff Distance. 300 + 1500 is 18 m - The campfire doesn't pan and sits in the center → That source file is stereo. Use mono source audio for 3D ambience
Now try changing SW_Fire's Sound Class to SC_BGM. Move the music slider and the campfire drops with it. Doing this once makes it obvious that volume management is decided entirely by Sound Class assignment.
Two things to take away.
- Group volume with Sound Class and change it in one place with a Mix: Spread
Volume Multiplieracross sources and you'll miss one every time you add a sound. Keep it to assign a Sound Class when you create a sound and the slider side never grows - Consolidate distance falloff into Attenuation assets: Share one asset across sounds of the same character. When "SFX carry too far" bothers you, there's one place to fix it
To keep volume settings after the game closes, write the slider values into save data and call the same nodes once on startup (see the save/load article). A GameInstance Subsystem is a good home for the settings themselves.
Bonus: Good to Know for Later
- Cap simultaneous sounds with Sound Concurrency: Twenty enemies all producing footsteps turns into a clipping mush. A
Sound Concurrencyasset lets you set "at most 4 of this kind" and "stop the oldest when exceeded." Worth configuring for noisy incidental SFX - Don't push
Volume Multiplierabove 1.0: A playback node'sVolume Multiplierabove 1.0 causes clipping. If something is too quiet, fix it at the source file or via Sound Class - Attenuation
Shapeisn't limited to Sphere:Capsulesuits a sound running along a corridor, andBoxsuits a whole room. Still, build withSpherefirst and change it when you actually need to, since tuning goes faster that way - Occlusion (muffling through walls) costs performance: Enabling
Enable Occlusionin Attenuation muffles sounds behind walls, but it runs a trace per sound source. Don't apply it everywhere, limit it to the sounds that matter - When you hear nothing in the editor, check the top right of the viewport: Even during
Play, editor settings or window focus can leave audio muted. Also check whether UE5 is muted in your OS mixer
Summary
Each part of shaping audio has its own home.
| What You Want to Decide | What You Use |
|---|---|
| Whether it has a position | Choice of playback node (2D / at Location / Spawn Attached) |
| How it falls off with distance | Sound Attenuation (Inner Radius + Falloff Distance) |
| Which group it belongs to | Sound Class |
| How loud that group is right now | Sound Mix + Set Sound Mix Class Override |
| How the whole bus is processed | Sound Submix |
| How a space reverberates | Audio Volume |
And one practical rule: never let Blueprint hold volume numbers. Volume goes in Sound Class, distance in Attenuation, ambience in Audio Volume. Hand each one to its asset and adding a new sound means touching only that sound's asset.
In your game, which sound will make a player reach for the volume control first?