The character in the Third Person template turns its camera smoothly as you move the mouse, and the camera never goes inside a wall when you get close to one. But if you build your own character by simply adding a single Camera component to a Pawn, the camera stays stuck to the head and happily passes through walls.
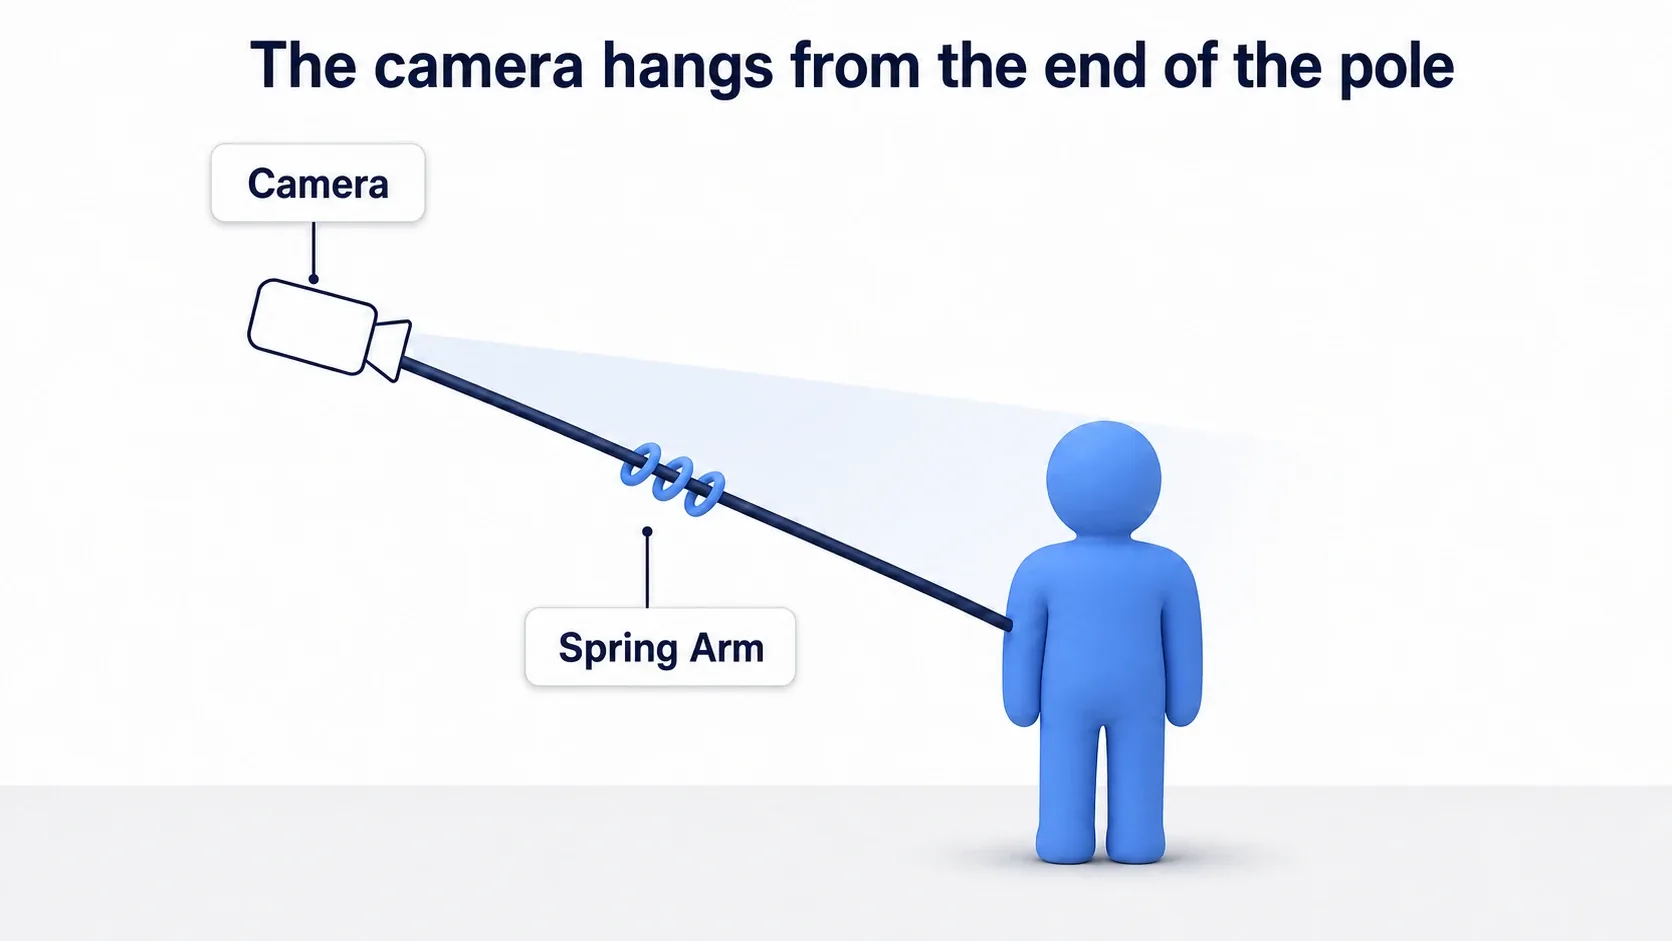
The difference comes from the Spring Arm Component. Instead of attaching the camera directly to the character, you attach it to the end of a pole that can extend and retract. This article covers what each Spring Arm parameter controls, how wall clipping is prevented, and the three flags that separate "which way the body faces" from "which way the camera faces."
What You'll Learn
- Spring Arm is an extendable pole, and the camera hangs off its end
- The difference between Target Arm Length / Socket Offset / Target Offset
- How
Do Collision Testprevents wall clipping, and why it sometimes doesn't- The three flags that own rotation, which confuse every beginner
- Hands-on: build a camera that pulls in over the shoulder, and keep it out of walls in a narrow corridor
Spring Arm Is an Extendable Pole
Open the Components tab of BP_ThirdPersonCharacter and you'll find the camera hanging like this.
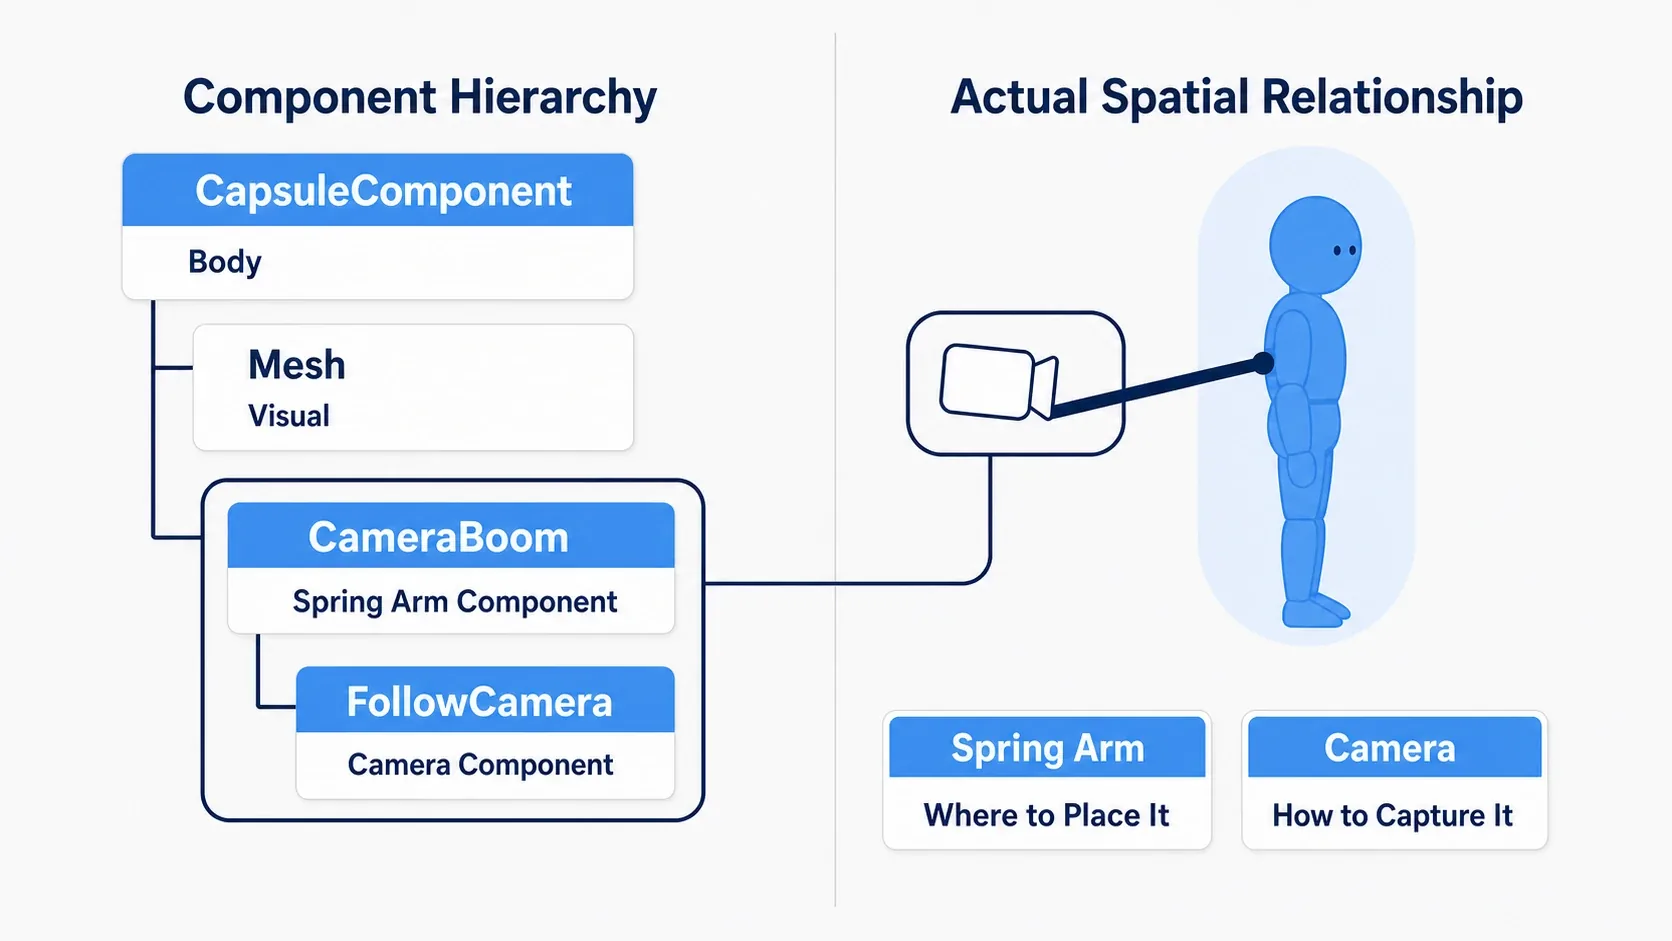
CapsuleComponent (the body)
├─ Mesh (the visuals)
└─ CameraBoom (Spring Arm Component)
   └─ FollowCamera (Camera Component)
CameraBoom is the pole, and FollowCamera is the camera attached to its end. Their roles are cleanly split.
| Component | What it handles |
|---|---|
| Spring Arm | Where to put the camera. Distance, offsets, rotation, obstacle avoidance |
| Camera | How to shoot from there. Field of View, depth of field |
Nearly every adjustment to camera position happens on the Spring Arm side. If you find yourself wanting to move the camera's position on the Camera component, you've usually overlooked a Spring Arm setting.
The name "Spring" comes from the fact that this pole isn't rigid, it stretches and shrinks depending on the situation. It shortens when something is in the way, and it catches up slightly late when the character moves suddenly. Those two behaviors are the heart of Spring Arm.
Three Offsets That Decide Position
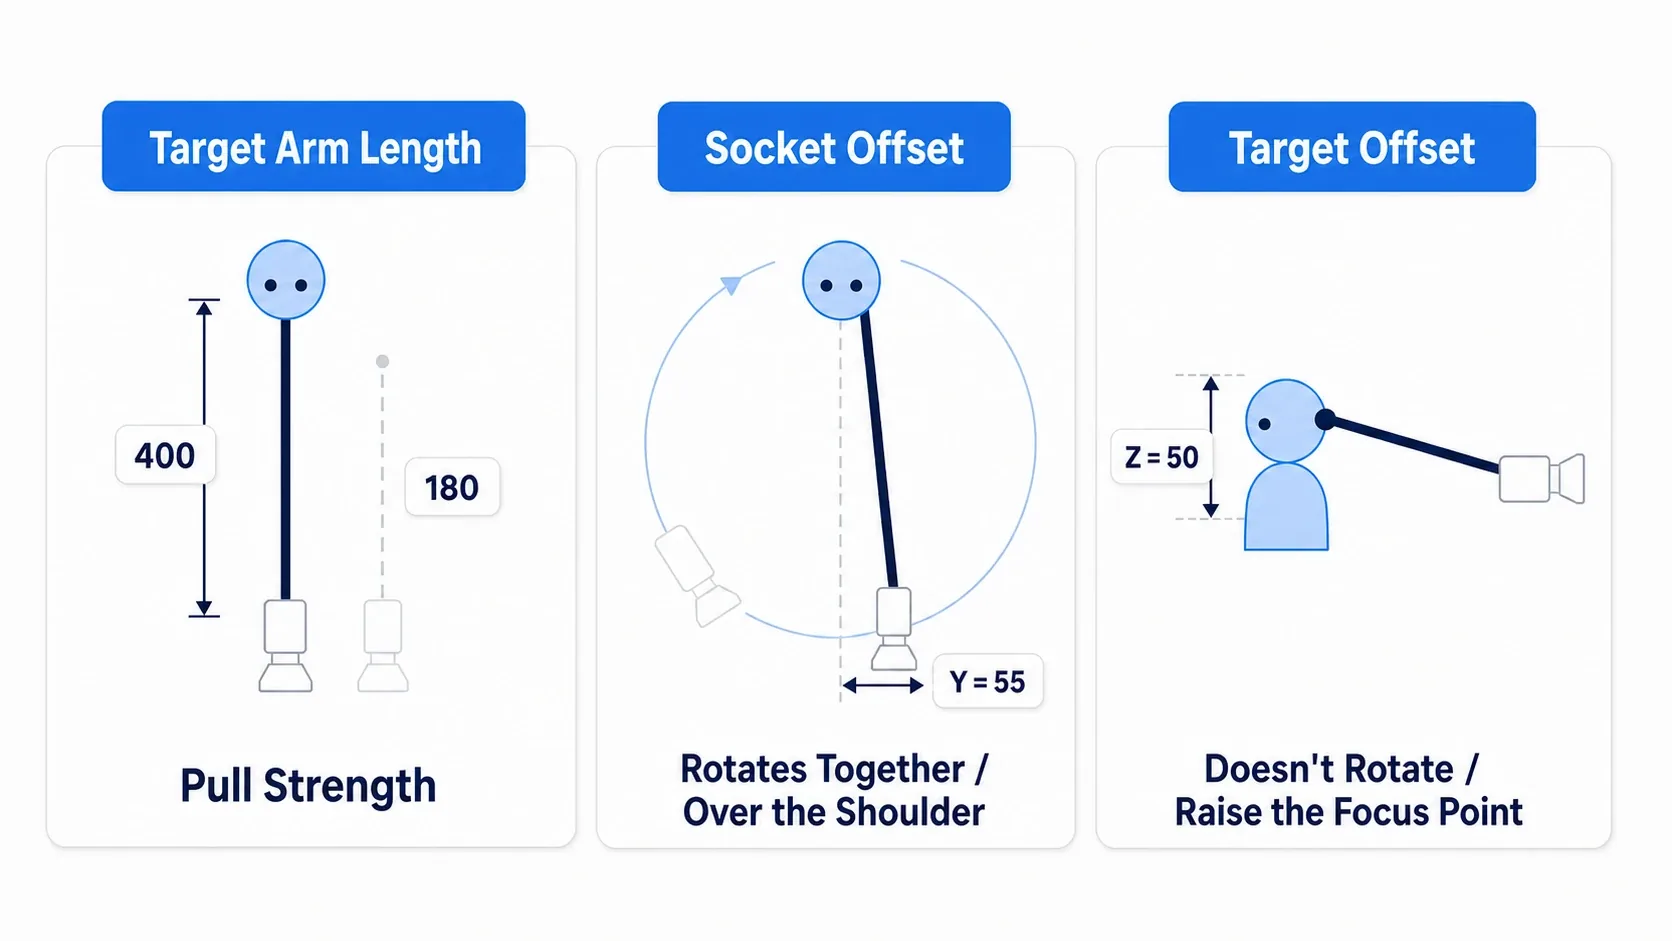
The Spring Arm details panel has three position-related settings lined up. The names are similar enough to get mixed up, but they act in completely different places.
| Setting | Default | Where it acts | When to use it |
|---|---|---|---|
| Target Arm Length | 300.0 | The pole's length itself | How far back you sit. Pull in or push out |
| Socket Offset | (0, 0, 0) | Shifts the camera end. Rotates with the pole | Over-the-shoulder. Shifting sideways |
| Target Offset | (0, 0, 0) | Shifts the pivot end. Stays in world space, doesn't rotate | Raising the look-at point. Looking above the head |
In the Third Person template, Target Arm Length is set to 400.0, pulled back a bit from the class default of 300.
The difference between the two offsets comes down to whether they rotate along with the camera.
- Socket Offset rotates with the camera. Put
60into Y and the camera stays "above the character's right shoulder" whether you turn right or left. That's over-the-shoulder - Target Offset does not rotate. Put
50into Z and the camera always looks 50cm higher, regardless of which way it faces
If you want a slightly top-down look, raise Target Offset's Z. If you want a TPS-style over-the-shoulder look, use Socket Offset's Y. Remember it that way and you won't get lost.
Do Collision Test Prevents Wall Clipping
Do Collision Test is on by default. This single checkbox solves the most annoying problem in third-person cameras.
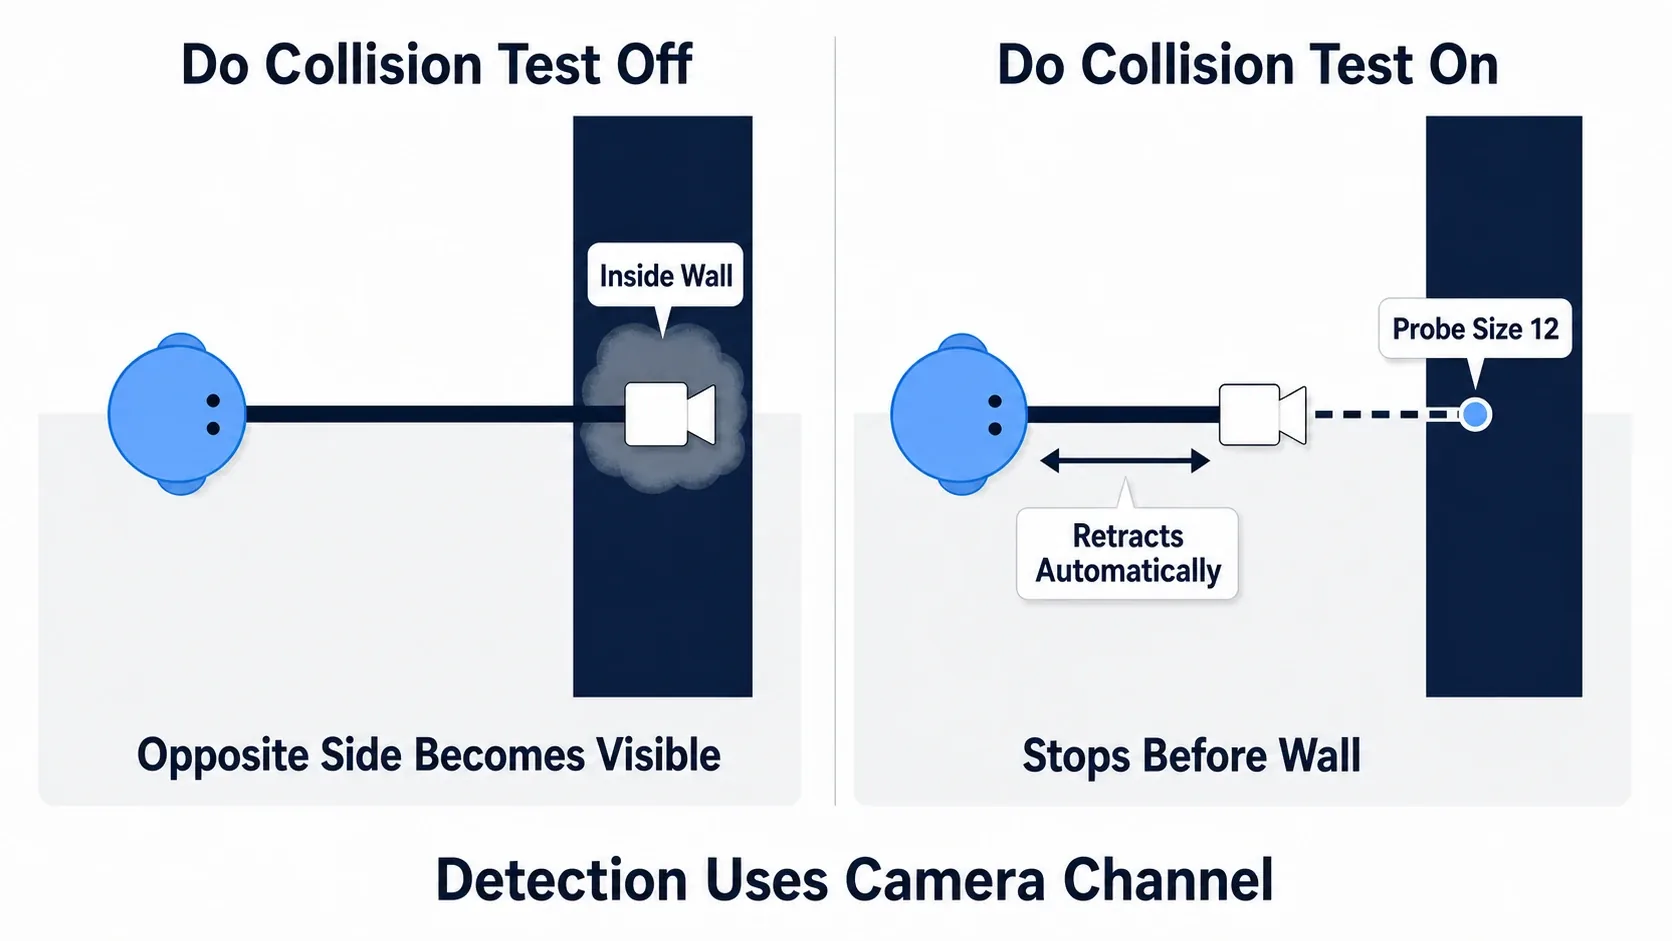
The mechanism is simple. Every frame, the Spring Arm sweeps a sphere from the pivot toward the camera position. If it hits something along the way, the arm only extends up to that point.
| Setting | Default | Meaning |
|---|---|---|
| Do Collision Test | On | Whether to check for obstacles at all |
| Probe Size | 12.0 | Radius of the sweeping sphere. Larger stops further from the wall |
| Probe Channel | Camera | Which channel the test runs on |
The easy thing to miss here is Probe Channel. The test uses the Camera channel, not regular collision, so if the wall's Collision Preset doesn't Block Camera, the camera passes right through. BlockAll and BlockAllDynamic are fine, but check any custom presets you're using (→ Collision Profile article).
The reverse case is also useful: some things should let the camera through. Grass in the foreground, fences, transparent barriers. Set Camera alone to Ignore in those actors' Collision Presets, and they'll still block the player while the camera ignores them.
Raising Probe Size makes the camera stop well before the wall. If you're seeing through thin walls to the other side, try bumping this from 12 up to around 20 first.
The Three Flags That Own Rotation
This is the biggest stumbling block in third-person cameras. UE has separate settings for rotating the character's body and rotating the camera, and they're spread across three different places.
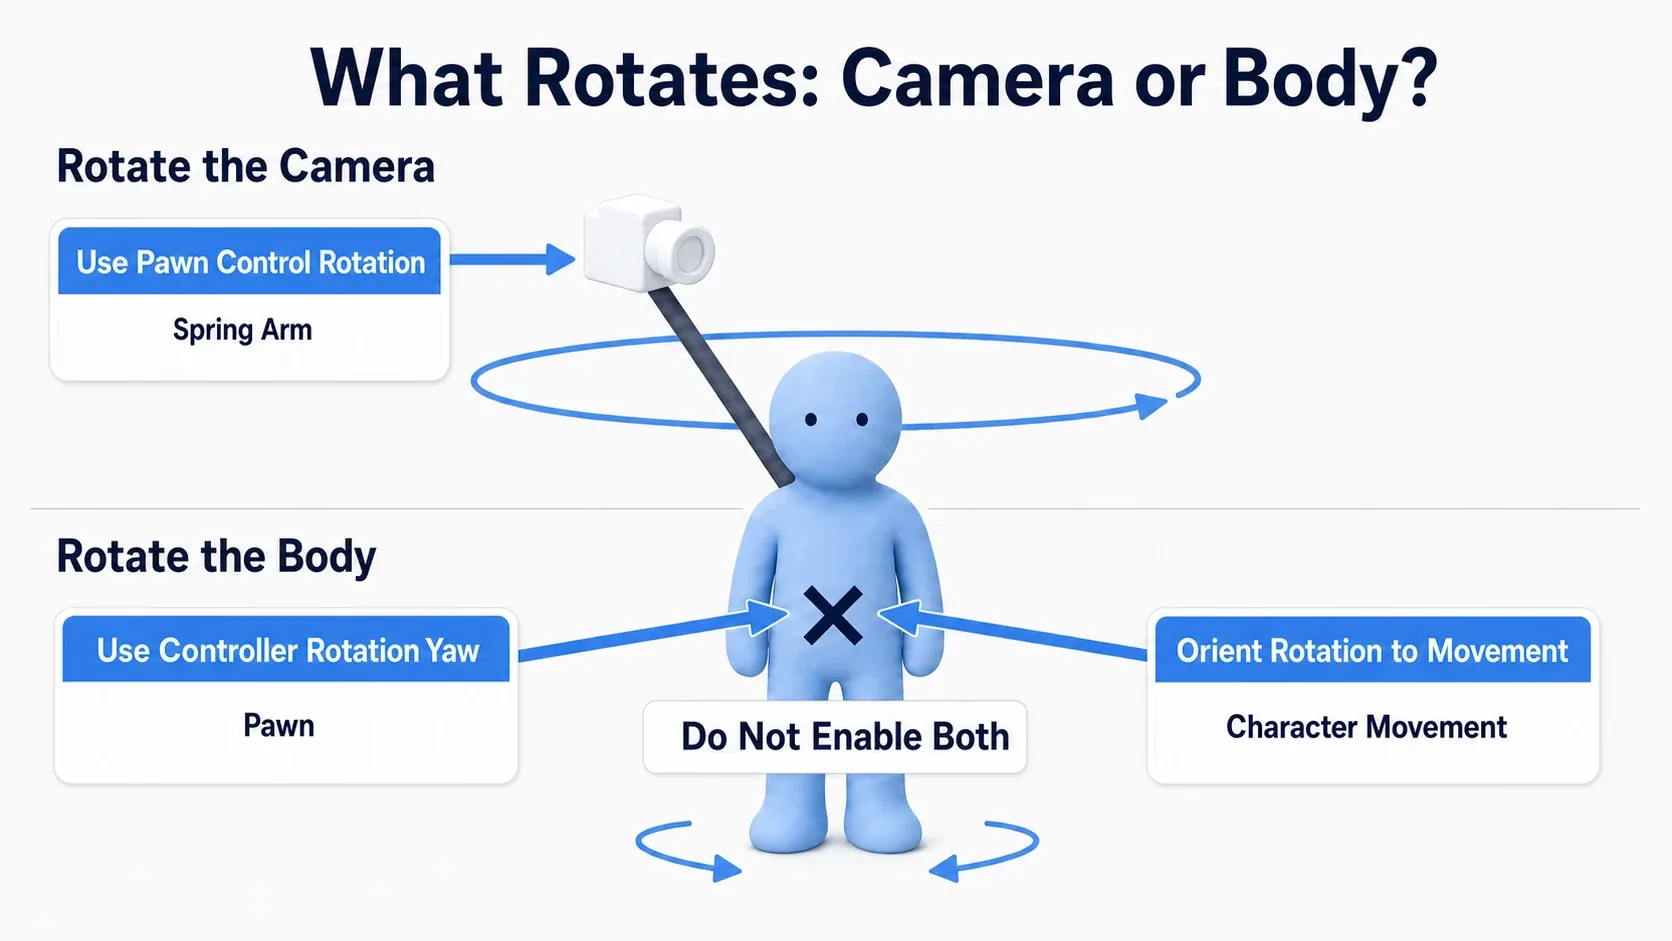
| Flag | Where it lives | What it rotates |
|---|---|---|
| Use Pawn Control Rotation | Spring Arm | Aligns the camera with the controller's direction (mouse) |
| Use Controller Rotation Yaw | Pawn (Character details panel) | Aligns the body with the controller's direction |
| Orient Rotation to Movement | Character Movement | Turns the body toward the direction of travel |
The bottom two both rotate the body. Turn both on and they fight each other, making the character jitter or refuse to face the direction of travel. Always turn on exactly one of them.
That leaves two practical combinations.
Pattern A: The Body Faces Where It Moves (Action Games)
| Flag | Value |
|---|---|
| Spring Arm: Use Pawn Control Rotation | On |
| Pawn: Use Controller Rotation Yaw | Off |
| CMC: Orient Rotation to Movement | On |
This is the Third Person template's default. Spinning the camera with the mouse leaves the character facing forward, and pressing W starts a run in the camera's direction with the body turning to match. It's the standard setup for action games and action RPGs.
How fast the body turns is set by the Z (Yaw) of CMC's Rotation Rate. The template uses 500.0.
Pattern B: The Body Always Faces the Camera (TPS)
| Flag | Value |
|---|---|
| Spring Arm: Use Pawn Control Rotation | On |
| Pawn: Use Controller Rotation Yaw | On |
| CMC: Orient Rotation to Movement | Off |
Turn the camera and the body turns with it. Sideways input makes the character strafe while facing forward. This is what you want for a gun-toting TPS, or melee combat with a lock-on.
When you switch to Pattern B, your animation setup also needs strafe and backpedal motions. Directional movement animations are handled with Blend Spaces (→ Anim BP article).
Note:
Use Pawn Control Rotationon Spring Arm is off in the class defaults. The template'sCameraBoomhas it switched on. If you add a Spring Arm to a Pawn yourself, the mouse won't rotate the camera until you turn this on.
Softening the Follow with Camera Lag
By default, the Spring Arm follows the character without a single frame of delay. That's accurate, but the motion looks stiff.
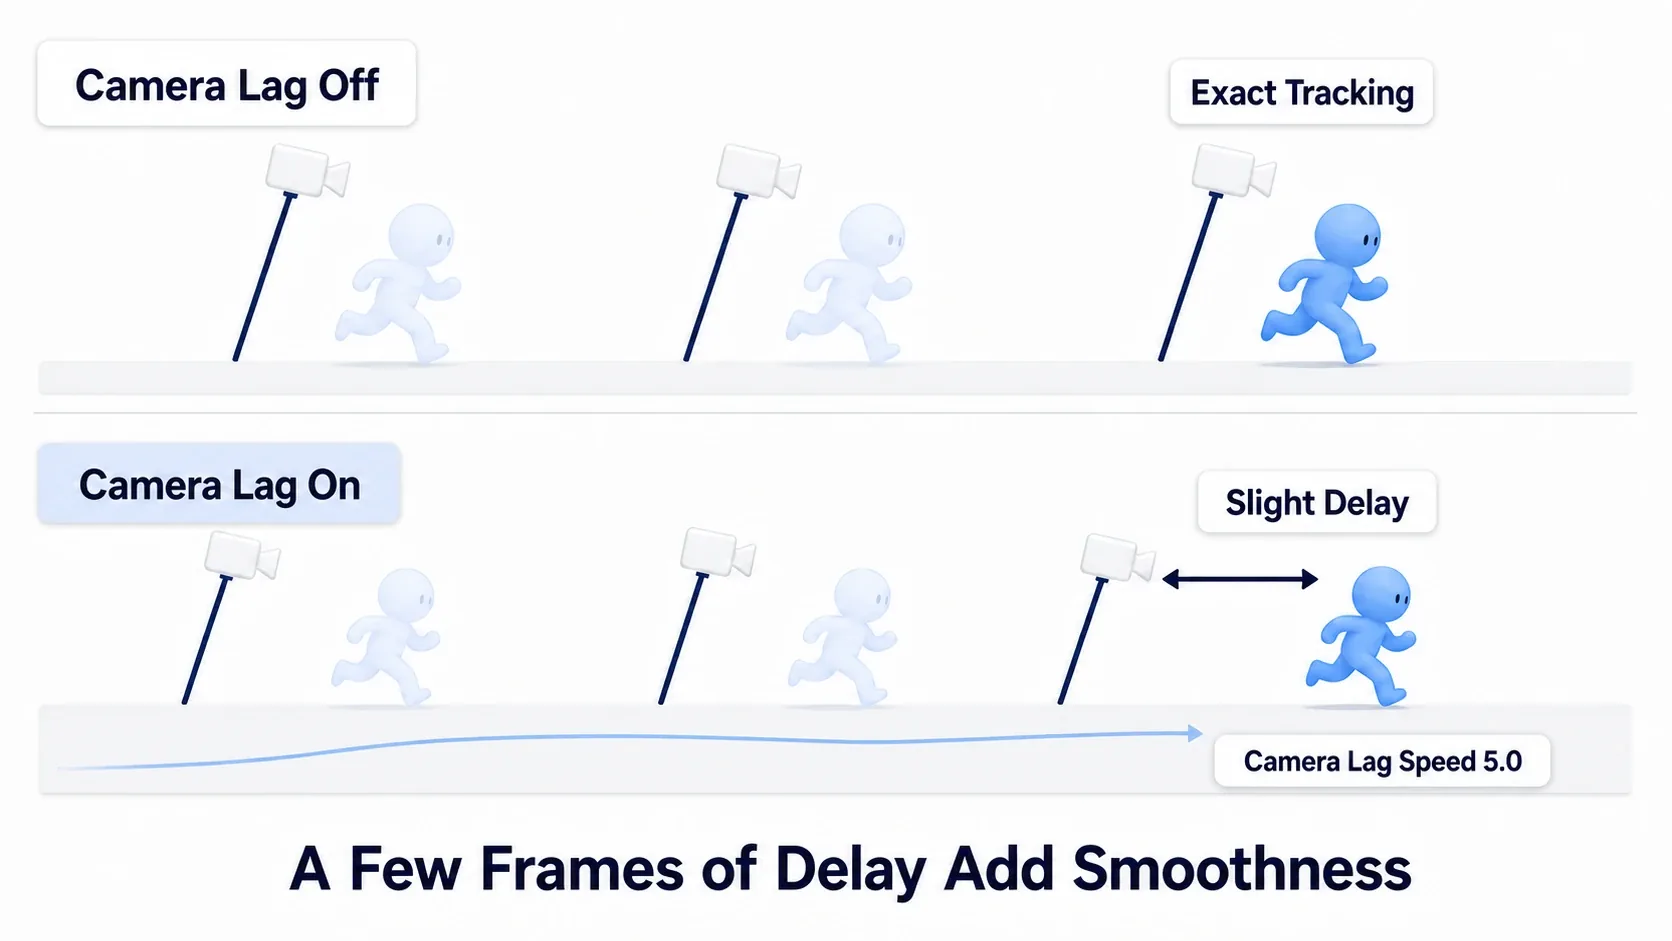
| Setting | Default | Effect |
|---|---|---|
| Enable Camera Lag | Off | Delays position tracking |
| Camera Lag Speed | 10.0 | How fast it catches up. Lower is more relaxed |
| Enable Camera Rotation Lag | Off | Delays rotation tracking |
| Camera Rotation Lag Speed | 10.0 | Same as above |
| Camera Lag Max Distance | 0.0 | Cap on how far behind it can fall. 0 is unlimited |
Turn on Enable Camera Lag and drop Camera Lag Speed to 5.0, and the camera falls slightly behind as you start running, then eases in when you stop. It's only a few frames of delay, but it changes how good the motion feels.
This Lag Speed works the same way as Interp Speed on Blueprint's VInterp To / RInterp To: higher closes in faster, and it decelerates as it approaches. If you want to build the same following yourself, see Rotation and Interpolation Basics.
That said, too much rotation lag makes people motion sick. A gap between mouse movement and what's on screen registers far more sharply than a gap in position. The safe move is to turn on position lag only and leave rotation alone.
For fast-moving characters, putting around 100 into Camera Lag Max Distance keeps the delay from growing without bound.
Hands-On: A Camera That Pulls In Over the Shoulder
Raising a gun in a TPS, locking onto an enemy in an action RPG, stepping into a narrow hallway in a horror game. The genres differ, but the motion is the same: pull in, and go over the shoulder. Here we'll build a camera that moves over the shoulder while a button is held, and confirm it doesn't clip into walls in a narrow corridor.
The Finished Result
Pressing a key pulls the camera in over 0.25 seconds and shifts it above the character's right shoulder. Releasing returns it. In that state, entering a narrow corridor still keeps the camera out of the walls.
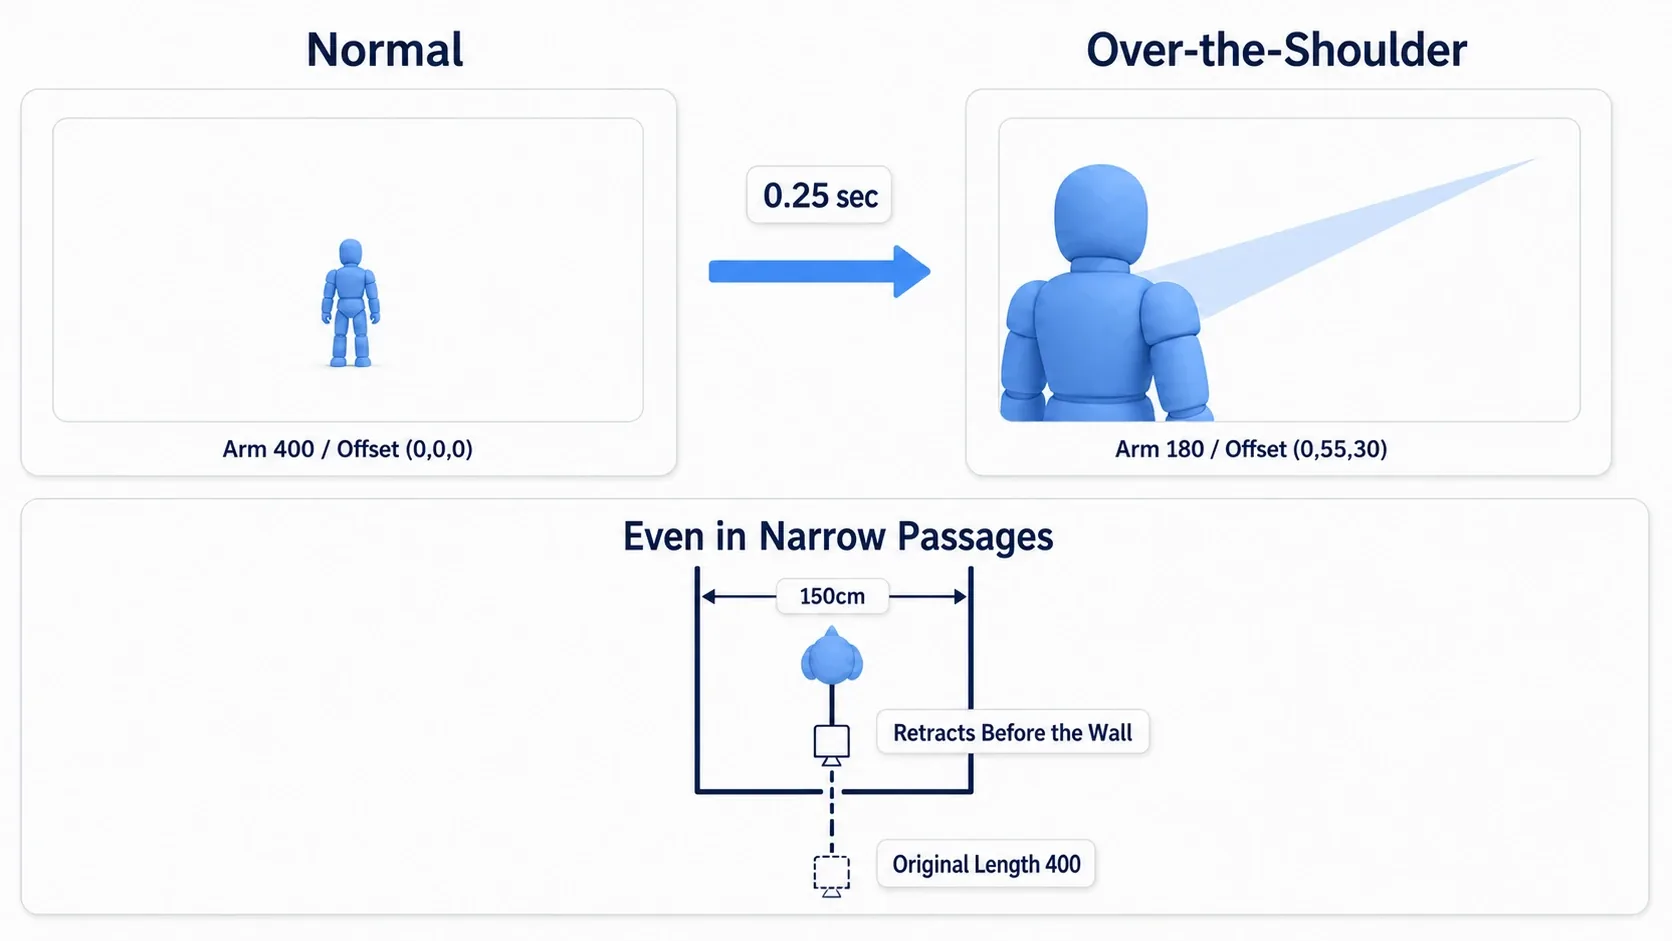
Setup
Open Content/ThirdPerson/Blueprints/BP_ThirdPersonCharacter in the Third Person template. Selecting CameraBoom in the Components tab shows this starting state.
| Parameter | Initial value |
|---|---|
| Target Arm Length | 400.0 |
| Socket Offset | (0, 0, 0) |
| Do Collision Test | On |
| Probe Size | 12.0 |
| Use Pawn Control Rotation | On |
In the level, build a corridor about 150cm wide. Stretching a floor Cube into a long strip and standing Cubes on both sides as walls is enough. Leave the walls' Collision Preset at the default BlockAll.
Add these variables to the Blueprint.
| Variable | Type | Default | Purpose |
|---|---|---|---|
DefaultArmLength | Float | 400.0 | Arm length in normal view |
AimArmLength | Float | 180.0 | Arm length when over the shoulder |
DefaultSocketOffset | Vector | (0, 0, 0) | Offset in normal view |
AimSocketOffset | Vector | (0, 55, 30) | Offset over the shoulder (55 right, 30 up) |
For input, create IA_Aim (Value Type: Digital / Bool) and bind it to the right mouse button in IMC_Default (→ Enhanced Input article).
Step 1: Create the Timeline
Right-click in the Event Graph, choose Add Timeline..., and name it AimBlend. Double-click to open it and set it up as follows.
| Setting | Value |
|---|---|
| Track | Add one Float Track named Alpha |
| Keys | Value 0.0 at time 0.0, value 1.0 at time 0.25 |
| Length | 0.25 |
That gives you "a number that moves from 0 to 1 over 0.25 seconds." You'll use that value to blend between the normal and over-the-shoulder values.
Step 2: Build the Nodes
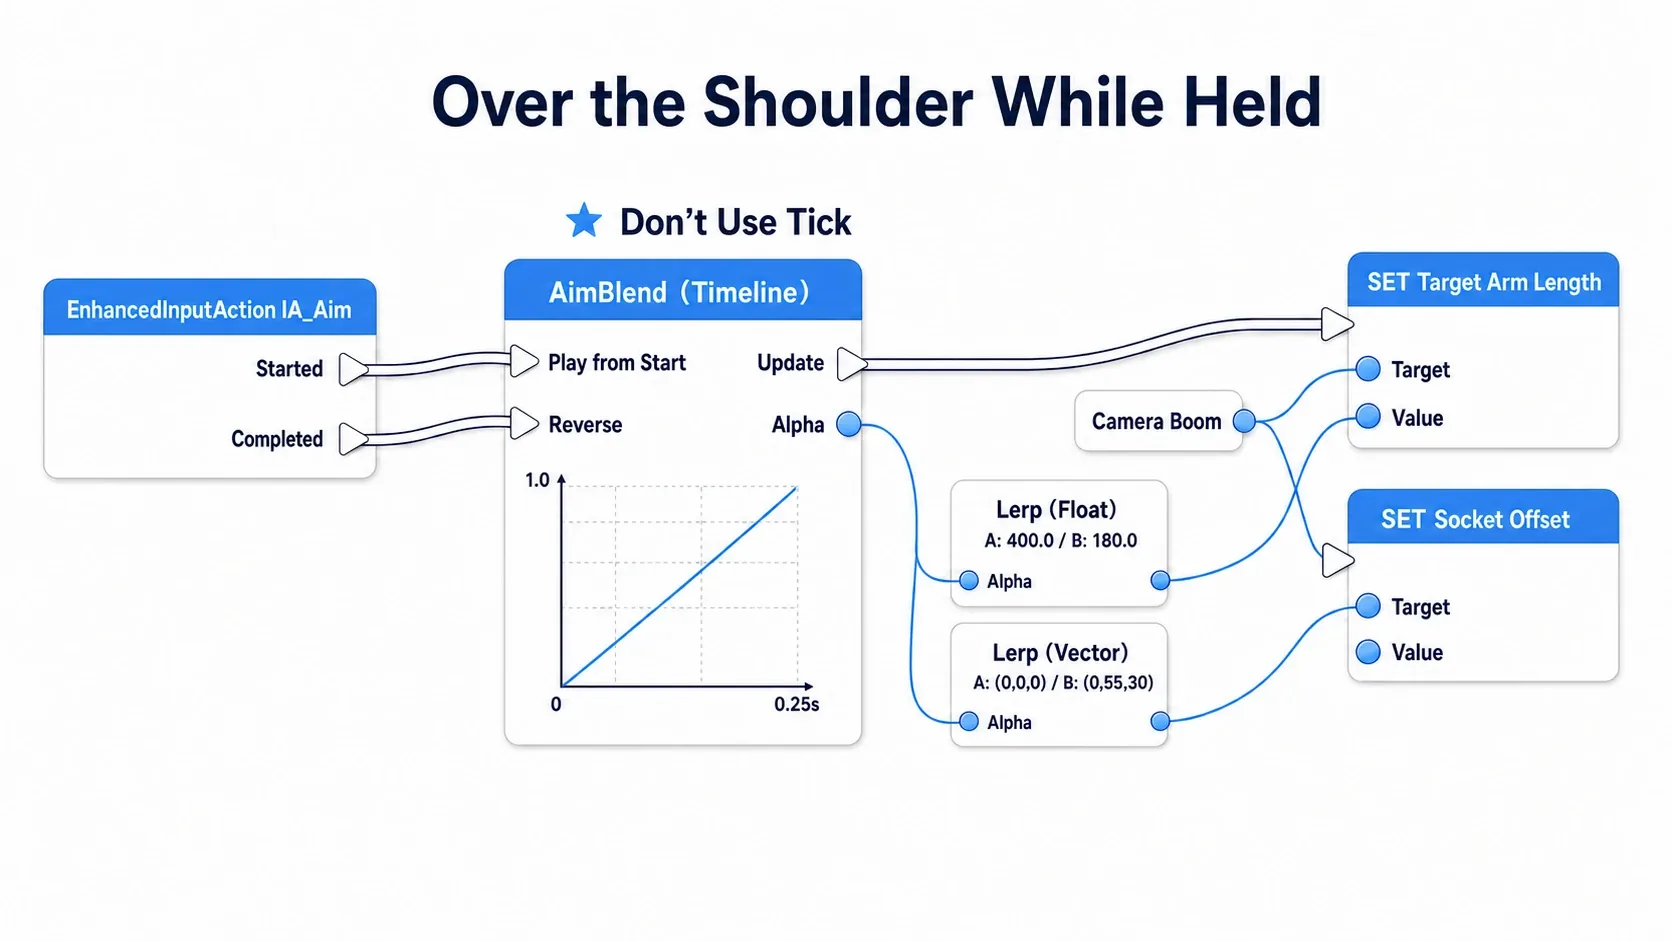
Event: EnhancedInputAction IA_Aim
  ├ [Started]   → AimBlend (Timeline) Play from Start pin
  └ [Completed] → AimBlend (Timeline) Reverse pin

AimBlend (Timeline)
  └ [Update] ─┬→ Set Target Arm Length
              │    Target: Camera Boom
              │    Target Arm Length ← Lerp (Float)
              │        A: DefaultArmLength (400.0)
              │        B: AimArmLength (180.0)
              │        Alpha: AimBlend's Alpha output
              │
              └→ Set Socket Offset
                   Target: Camera Boom
                   Socket Offset ← Lerp (Vector)
                       A: DefaultSocketOffset (0, 0, 0)
                       B: AimSocketOffset (0, 55, 30)
                       Alpha: AimBlend's Alpha output
To get Set Target Arm Length and Set Socket Offset, drag CameraBoom from the Components tab into the Event Graph and search from the pin you drag off it.
Started fires once the instant you press the button, and Completed fires once the instant you release. Just wiring them to the Timeline's Play from Start and Reverse means that releasing mid-blend smoothly returns from wherever it was.
Note that Tick isn't involved. A Timeline only runs while it's playing, and stops when it's done (→ Designing without Tick).
Step 3: Verify in the Narrow Corridor
Hit Play and check three things.
- Holding right-click pulls the camera in over 0.25 seconds, putting the character on the left side of the screen. Releasing returns it over the same duration
- Entering the 150cm corridor makes the camera pull in automatically, with nothing visible through the wall
- Exiting the corridor extends the camera naturally back out to
400
If you want to confirm with numbers, run Camera Boom → Get Target Arm Length into a Print String. Inside the corridor it should read lower than 400.
When it doesn't work, narrow it down by symptom.
- Camera goes into walls → The wall's Collision Preset doesn't Block Camera (suspect
NoCollisionor a custom preset) - Do Collision Test is on but it still clips → The wall is too thin. Raise
Probe Sizefrom12to20 - Camera snaps in instantly → You wired the Timeline's
Finishedinstead ofUpdate - It doesn't return on release → You wired
CompletedtoStopinstead ofReverse - No over-the-shoulder, just a vertical shift → You put the value in Socket Offset's Z instead of Y (Y is left/right)
Two things to take away.
- Build the "pull in" with the pole's length: Shorten
Target Arm Lengthinstead of moving the camera itself. That wayDo Collision Testkeeps working, so wall detection stays alive even in the pulled-in state. Move the camera directly and you lose all of that - Over-the-shoulder lives in Socket Offset's Y: Socket Offset rotates with the pole, so it holds "above the right shoulder" no matter which way you point the camera. Do it with Target Offset instead and the relationship breaks the moment you turn
Once you're fighting with a pulled-in camera, the next thing is the impact of a landed hit. How to build that sense of impact with hitstop and camera shake is in Hitstop, Camera Shake, and Knockback, and shifting the whole screen's color is covered in the Post Process Volume article.
Switching to First Person
First person is easiest to think about not as throwing away the Spring Arm, but as setting its length to 0 and moving it to head height.
| Task | Setting |
|---|---|
| 1. Shrink the pole | Set the Spring Arm's Target Arm Length to 0.0 |
| 2. Raise to eye level | Set the Spring Arm's Location Z to around 60 (capsule center to head) |
| 3. Align body to camera | Turn on the Pawn's Use Controller Rotation Yaw, and turn off CMC's Orient Rotation to Movement |
| 4. Hide your own body | Turn on Owner No See in the Mesh details panel |
Skip step 4 and your own neck, chest, and the inside of your eyelids will fill the view. Owner No See only hides the mesh from the owning player, so in multiplayer other players still see it normally.
If you want to show just the arms, add a second Skeletal Mesh Component for an arms-only model and set that one to Only Owner See.
Bonus: Good to Know for Later
When you want a camera feed on UI or a mesh. For minimaps, security monitors, and rear-view mirrors — showing what a camera sees somewhere else — you use Scene Capture Component 2D rather than a Camera (→ Minimaps and Security Cameras with Render Targets).
- Switch cameras with Set View Target with Blend: To cut to a security camera or a cutscene view, use the Player Controller's
Set View Target with Blend. Specifying aBlend Timetransitions smoothly over that duration - Inherit Pitch / Yaw / Roll: These three Spring Arm checkboxes control how much of the parent's (the character's) rotation gets inherited. All are on by default, but controller rotation takes priority when
Use Pawn Control Rotationis on - Field of view lives on the Camera: To change the sense of perspective, use
Field of View(default90.0). Widening it slightly while sprinting adds a strong sense of speed - Spring Arm + Camera is a model of component design: Because the "pole" and the "camera" are separate, you can port both as a set to another Pawn. That way of thinking leads into component reuse
- If the camera jitters, suspect a rotation conflict: First check whether
Use Controller Rotation YawandOrient Rotation to Movementare both turned on
Summary
- Spring Arm is an extendable pole. Position tweaks belong on the Spring Arm, not the Camera
- Target Arm Length sets how far back you sit, Socket Offset gives over-the-shoulder, Target Offset moves the look-at point
Do Collision Testruns on the Camera channel. If the wall's preset doesn't block it, the camera passes through- Two flags rotate the body, and
Use Controller Rotation YawandOrient Rotation to Movementmust never both be on - Build the pull-in effect by shortening the pole. Moving the camera directly kills wall detection
In the game you're building now, is the player steering by the character's back or by the camera's direction? Answer that, and the answer for the three flags follows.