One tree in your level ran fine. Three thousand trees, and the frame rate tanks. You run stat unit and Draw is the biggest number. That means the CPU is writing 3,000 draw commands every single frame.
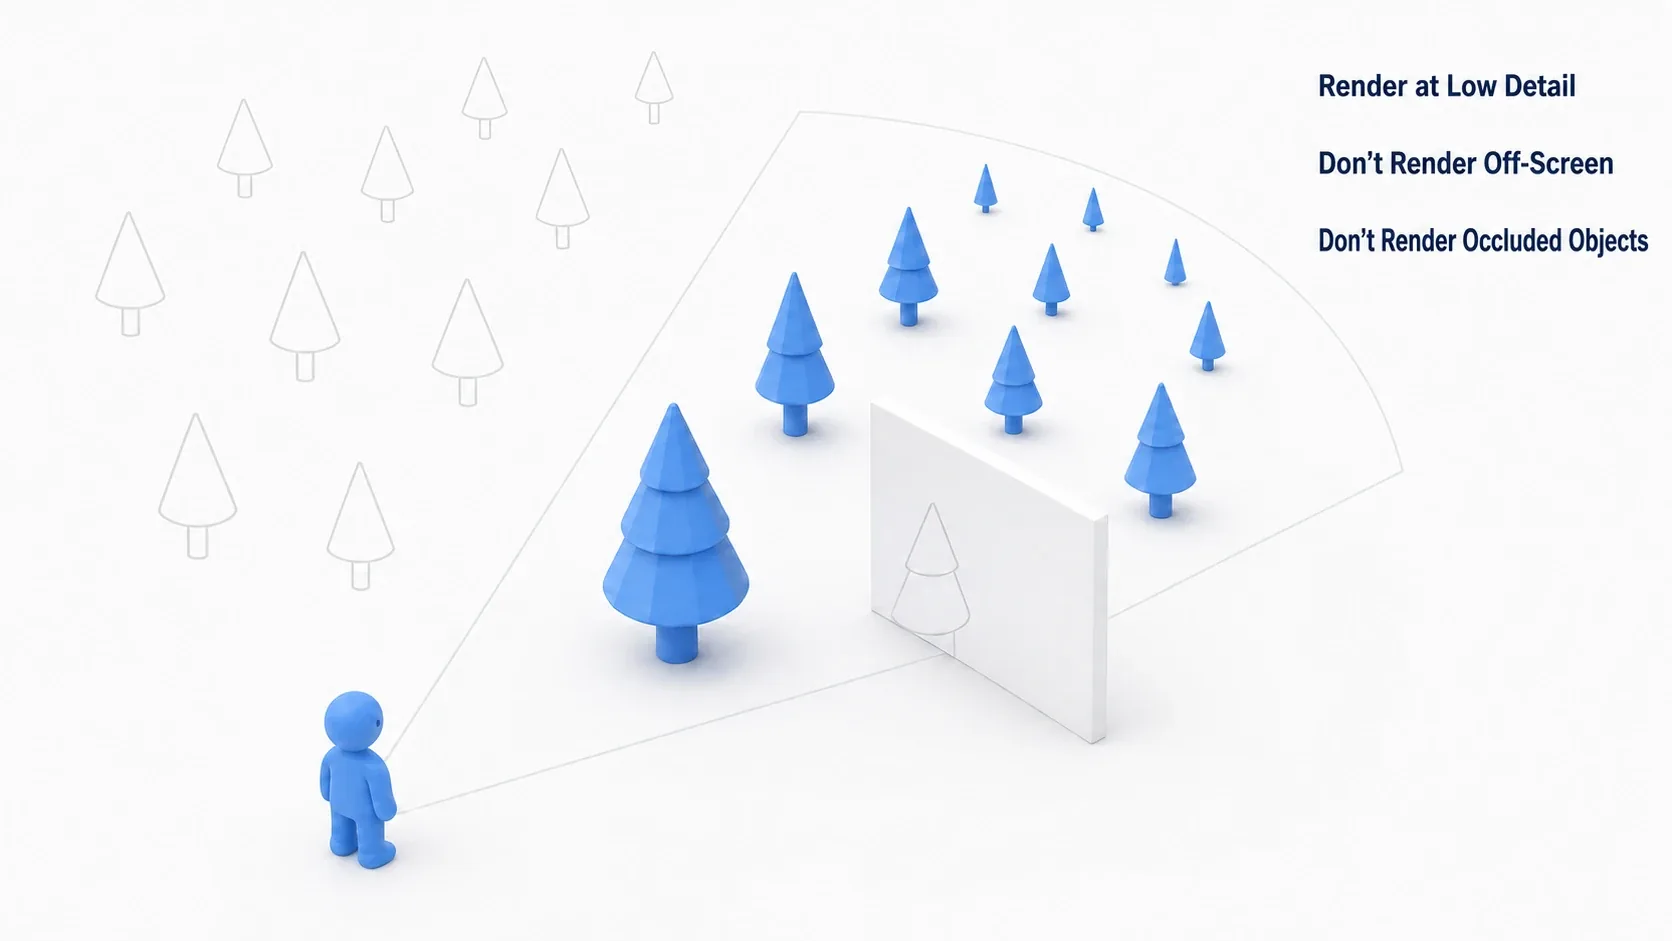
The fix is to reduce how much you draw in the first place. Draw distant objects coarsely, and don't draw things that are offscreen or hidden behind walls at all. This article covers four techniques (LOD, frustum culling, occlusion culling, and distance culling) and explains which stat unit number each one actually moves.
What You'll Learn
- The idea all four techniques share: cut corners on anything far away or invisible
- How to set up LOD and tune the switching distance
- Frustum culling and occlusion culling (both automatic)
- Cutting by distance with Cull Distance Volume
- Using
Freeze Rendering(Ctrl + Shift + O) to see culling with your own eyes- Hands-on: cutting Draw in a scene with 3,000 trees
The Shared Idea: Don't Draw Everything Faithfully
In the previous article, Finding Performance Bottlenecks with stat unit, we established that Draw is the time the CPU spends assembling draw commands. That number scales almost directly with how many things you're drawing.
So there are only two ways to bring it down: draw fewer things, or make each thing cheaper.
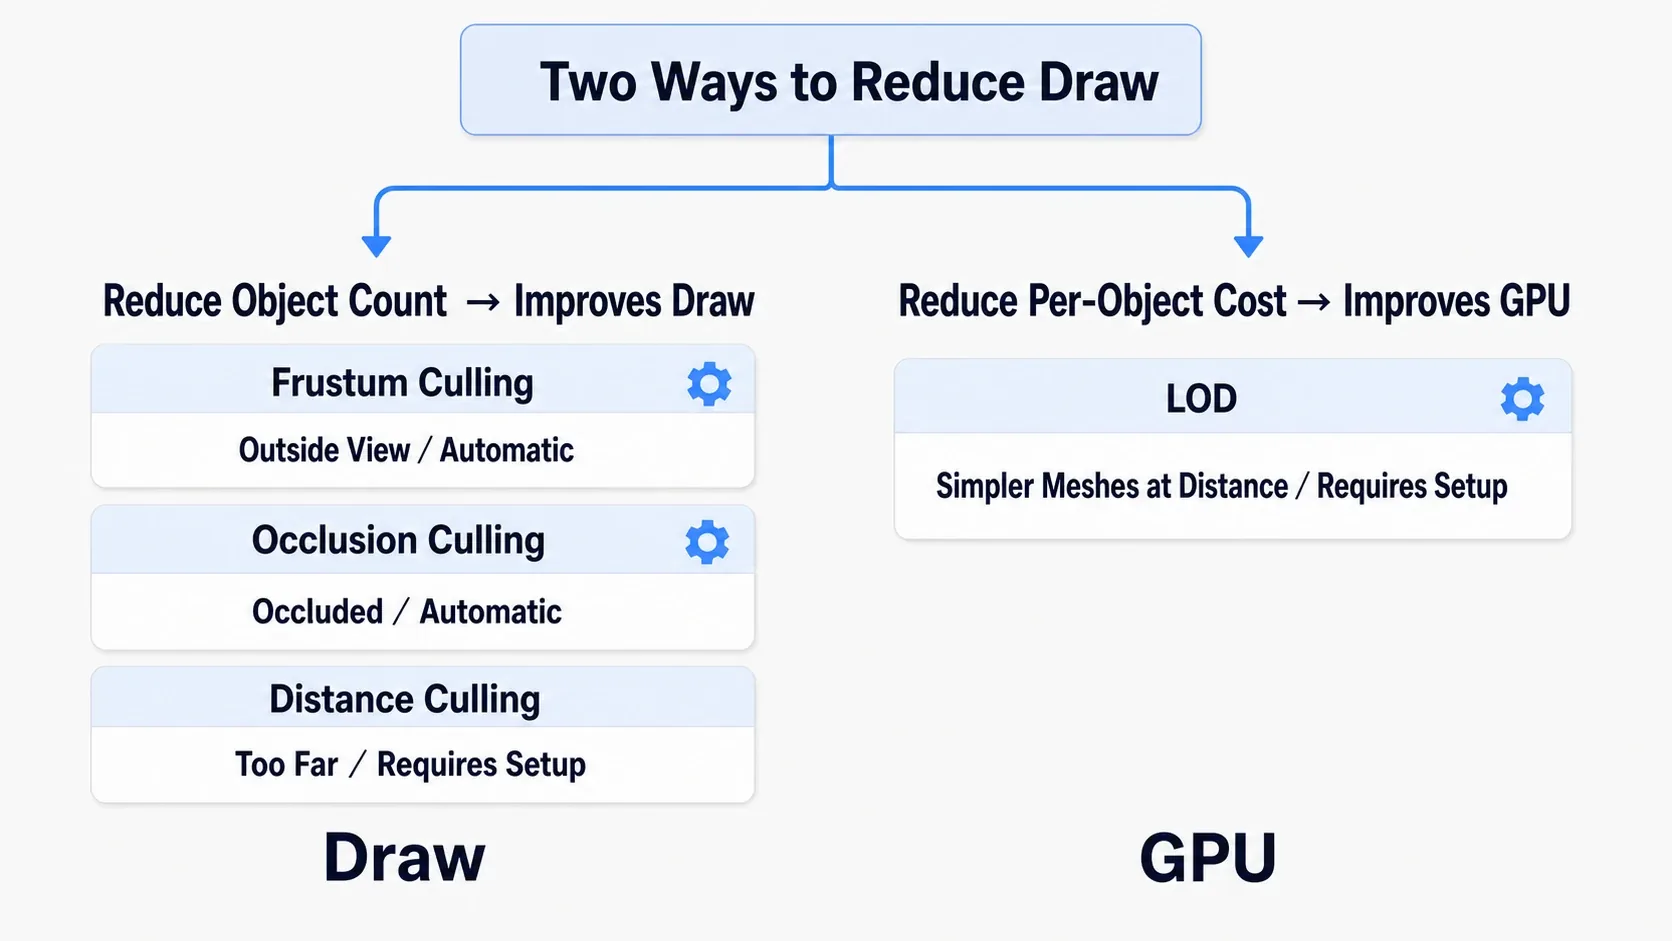
| Technique | What it does | Number it moves | Automatic? |
|---|---|---|---|
| LOD | Swaps distant objects for simpler meshes | GPU (fewer triangles) | Needs setup |
| Frustum culling | Excludes anything outside the camera view | Draw | Automatic |
| Occlusion culling | Excludes anything hidden behind geometry | Draw | Automatic (PC/console) |
| Distance culling | Excludes anything past a set distance | Draw | Needs setup |
In practice, the only two you configure yourself are LOD and distance culling. The engine handles the other two for you, so your job there is to confirm they're actually working.
LOD: Draw Distant Objects Coarsely
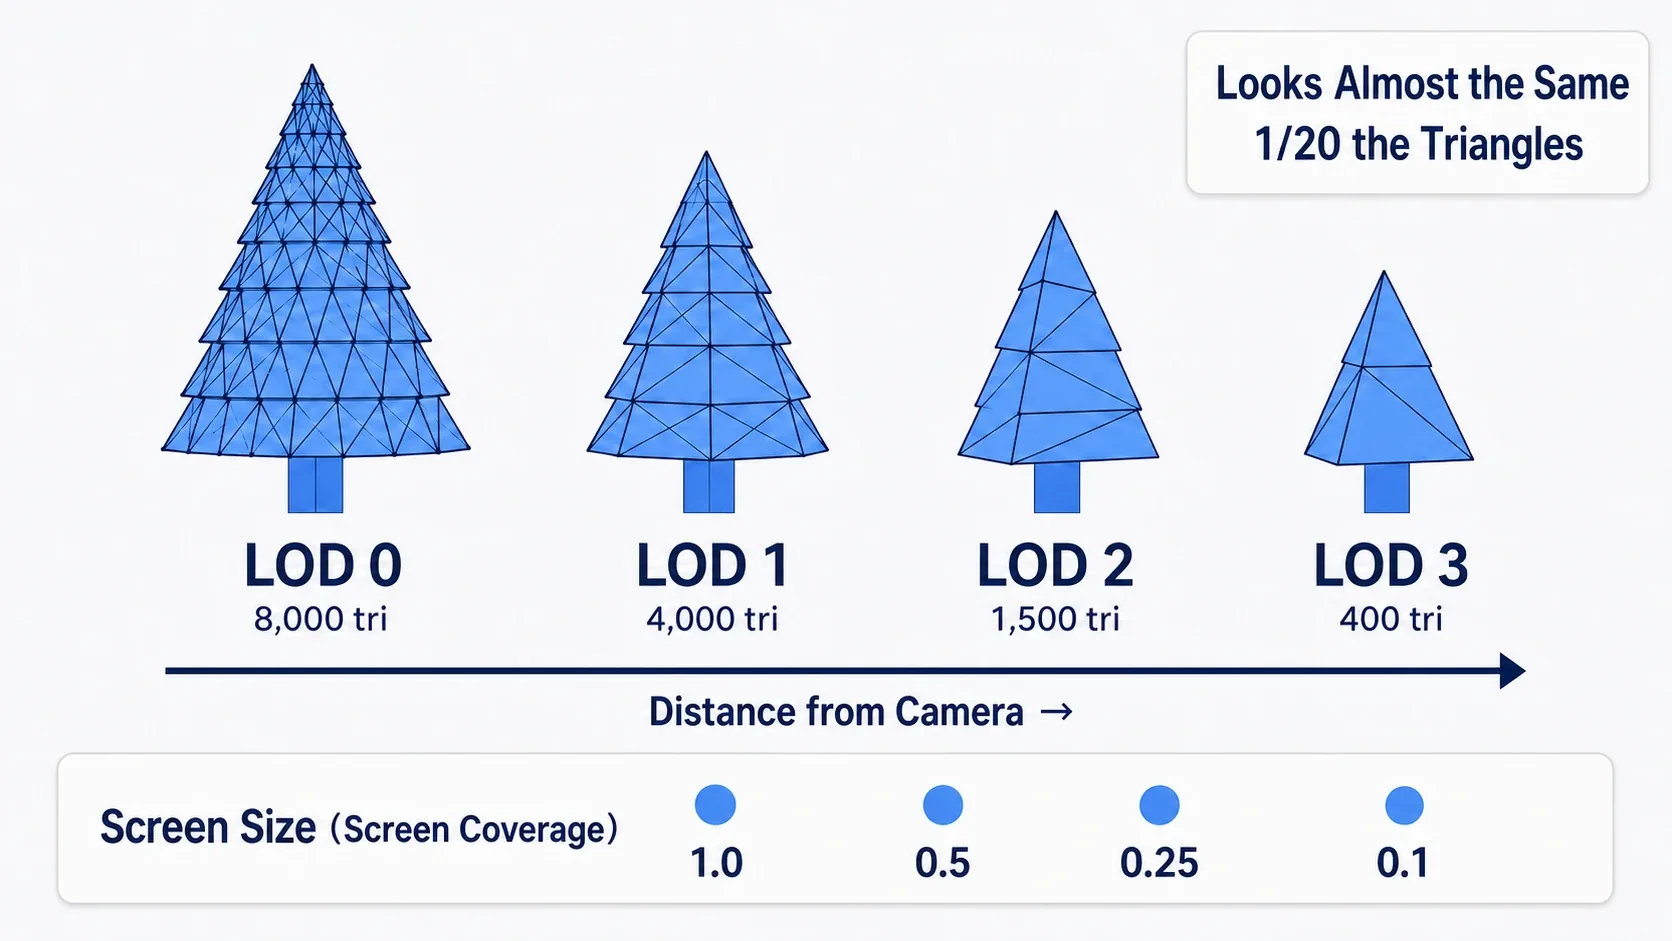
LOD (Level of Detail) swaps in simpler meshes based on distance from the camera. A tree in the distance doesn't need 10,000 triangles. If it only covers 20 pixels on screen, 500 triangles looks identical.
Generating LODs
Open the Static Mesh Editor and use LOD Settings in the details panel on the right.
- Enter the number of levels in
Number of LODs(3 to 4 is a good target for background assets) - Press
Apply Changesand the engine generates the simplified versions from the source mesh
An even easier option is LOD Group. Just pick a preset like SmallProp or LargeProp and you get level counts and distances appropriate for that category in one shot. Try this before hand-tuning anything.
Tuning the Switching Distance
Each LOD has a Screen Size value. This isn't a distance. It's the fraction of the screen that mesh occupies. A Screen Size of 0.25 means the switch to the next LOD happens once the mesh shrinks to roughly a quarter of the screen's width and height.
Using screen coverage instead of raw distance means the setup doesn't fall apart when the field of view or resolution changes.
| Asset type | Approach |
|---|---|
| Things the player examines up close (weapons, hero gear) | Keep LOD0 longer (set the next Screen Size lower) |
| Background assets placed in bulk (rocks, trees, rubble) | Switch early (set Screen Size higher) |
Checking Your Work
You can see which LOD level is currently displayed. In the viewport's View Mode dropdown (default Lit), pick Level of Detail Coloration → Mesh LOD Coloration to color-code each LOD level. Move the camera back and forth to confirm the switching distances are what you intended.
Culling: Don't Draw It At All
If LOD is "draw it coarsely," culling is "don't spend a single millisecond on it." The impact is bigger, and most of it happens automatically.
Frustum Culling
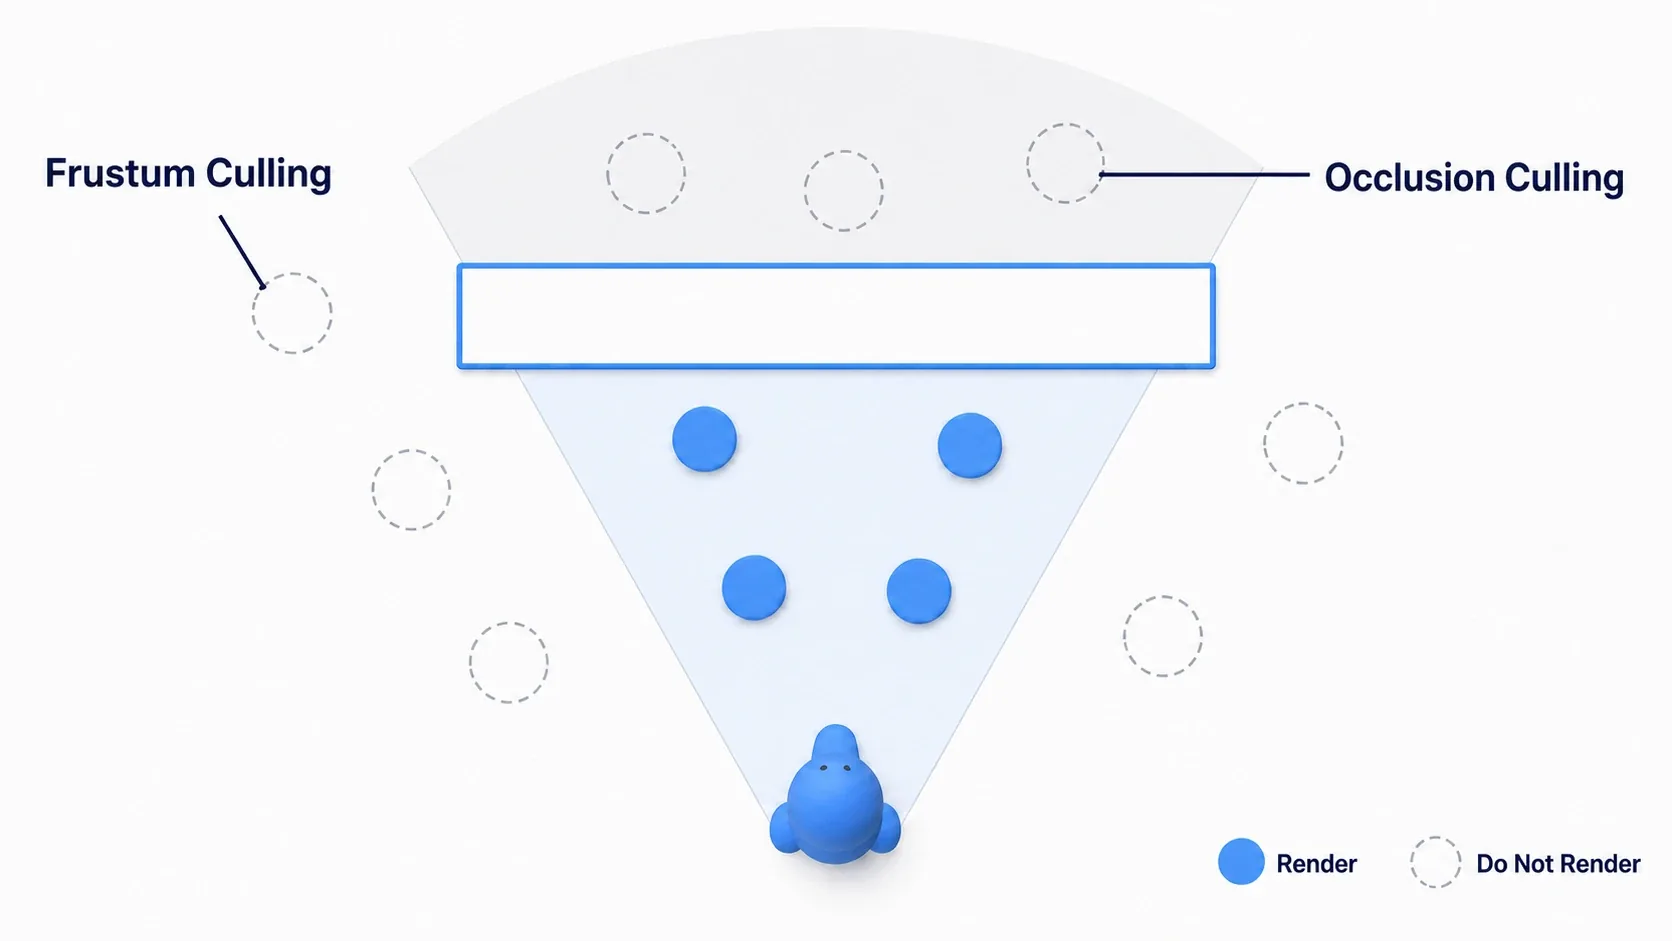
This skips anything outside the camera's view volume (the frustum). UE does it constantly and automatically.
There's almost nothing to configure, but one fact is worth knowing. The test uses the actor's bounds (its bounding box), not the mesh itself. An actor with unnaturally large bounds won't be culled even when it leaves the screen. This tends to happen when you manually expand bounds for a material that uses World Position Offset.
Occlusion Culling
This skips anything fully hidden behind something closer to the camera. Behind walls, inside buildings, over the far side of terrain. Objects there cost nothing to render.
On PC and console, UE5 enables GPU-based hardware occlusion (Hierarchical Z-Buffer) by default. No special setup required. Just confirm that Occlusion Culling is checked under Project Settings → Engine → Rendering → Culling.
It does have two quirks worth knowing.
- It's one frame behind: the test uses depth information from the previous frame, so swinging the camera quickly can briefly draw things that should be hidden
- The test itself costs something: with tens of thousands of objects, the occlusion test starts showing up in
Draw. At that point, combine it with distance culling and instancing
For mobile, there's a separate CPU-based software occlusion path. If you use it, set LOD for Occluder Mesh on the meshes that act as occluders to specify a simplified mesh for the test.
Building large occluders is worth thinking about. A single large wall hides everything behind it far better than a row of thin pillars. Placing "big surfaces that block sightlines" during level design alone cuts your render count substantially.
Cull Distance Volume: Cut by Distance
When automatic culling isn't enough, you can explicitly declare "don't draw anything past this distance." There are two ways.
For individual actors, select the actor and set Desired Max Draw Distance in the Rendering section of the details panel, in Unreal Units (1uu = 1cm). Enter 10,000 and it disappears at 100 meters.
For bulk setup, drag a Cull Distance Volume into your level from the Place Actors panel. It applies size-based cull distances to every actor it encloses.
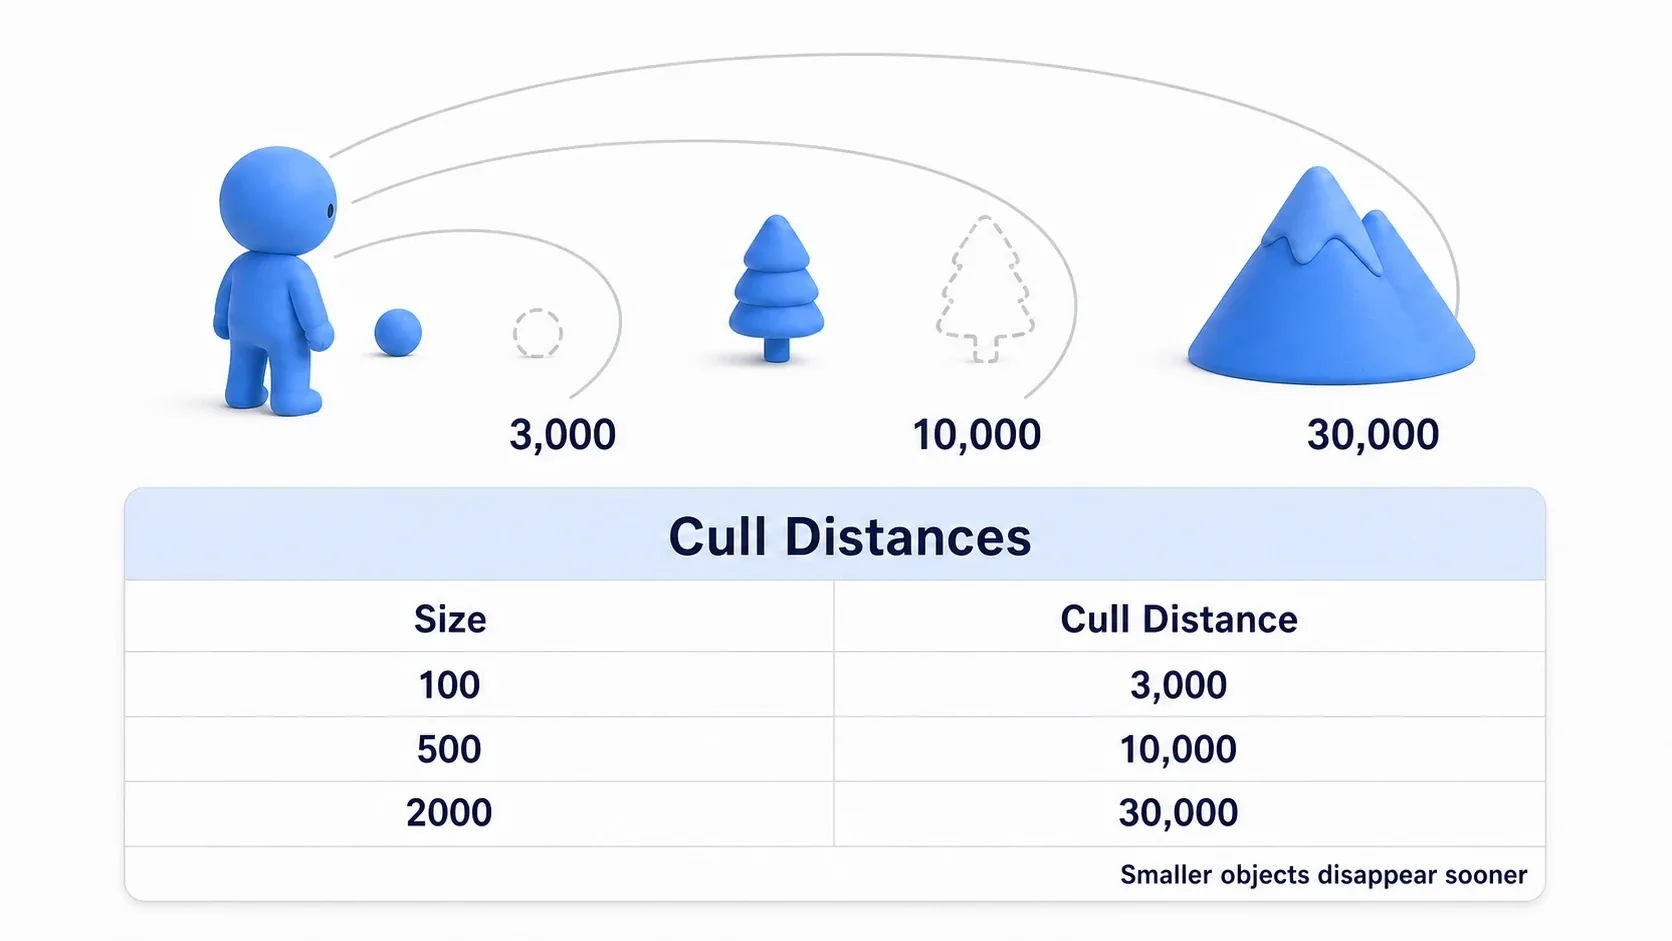
The volume's Cull Distances property in the details panel is an array of Size and Cull Distance pairs.
| Size (object size) | Cull Distance (vanishes at) |
|---|---|
| 100 | 3,000 |
| 500 | 10,000 |
| 2000 | 30,000 |
The engine looks at each actor's bounds size and picks the closest matching row. One volume gives you small things disappearing up close and large things persisting into the distance. Nobody notices a pebble vanishing at 100 meters, but everyone notices a mountain vanishing. Cull Distance Volume is that intuition turned into a table.
Push the distances too tight and objects pop into existence in front of you as you walk (pop-in). Walk around, and if it bothers you, extend the distance. Iterating like that is the practical approach.
Freeze Rendering: See Culling in Action
The annoying thing about culling is that you can't tell from the screen whether it's working. Even when things are correctly excluded, they weren't visible anyway, so nothing looks different.
Freeze Rendering lets you peek inside. Press Ctrl + Shift + O during play and the list of things being rendered freezes at that instant. Typing FreezeRendering in the console does the same thing.
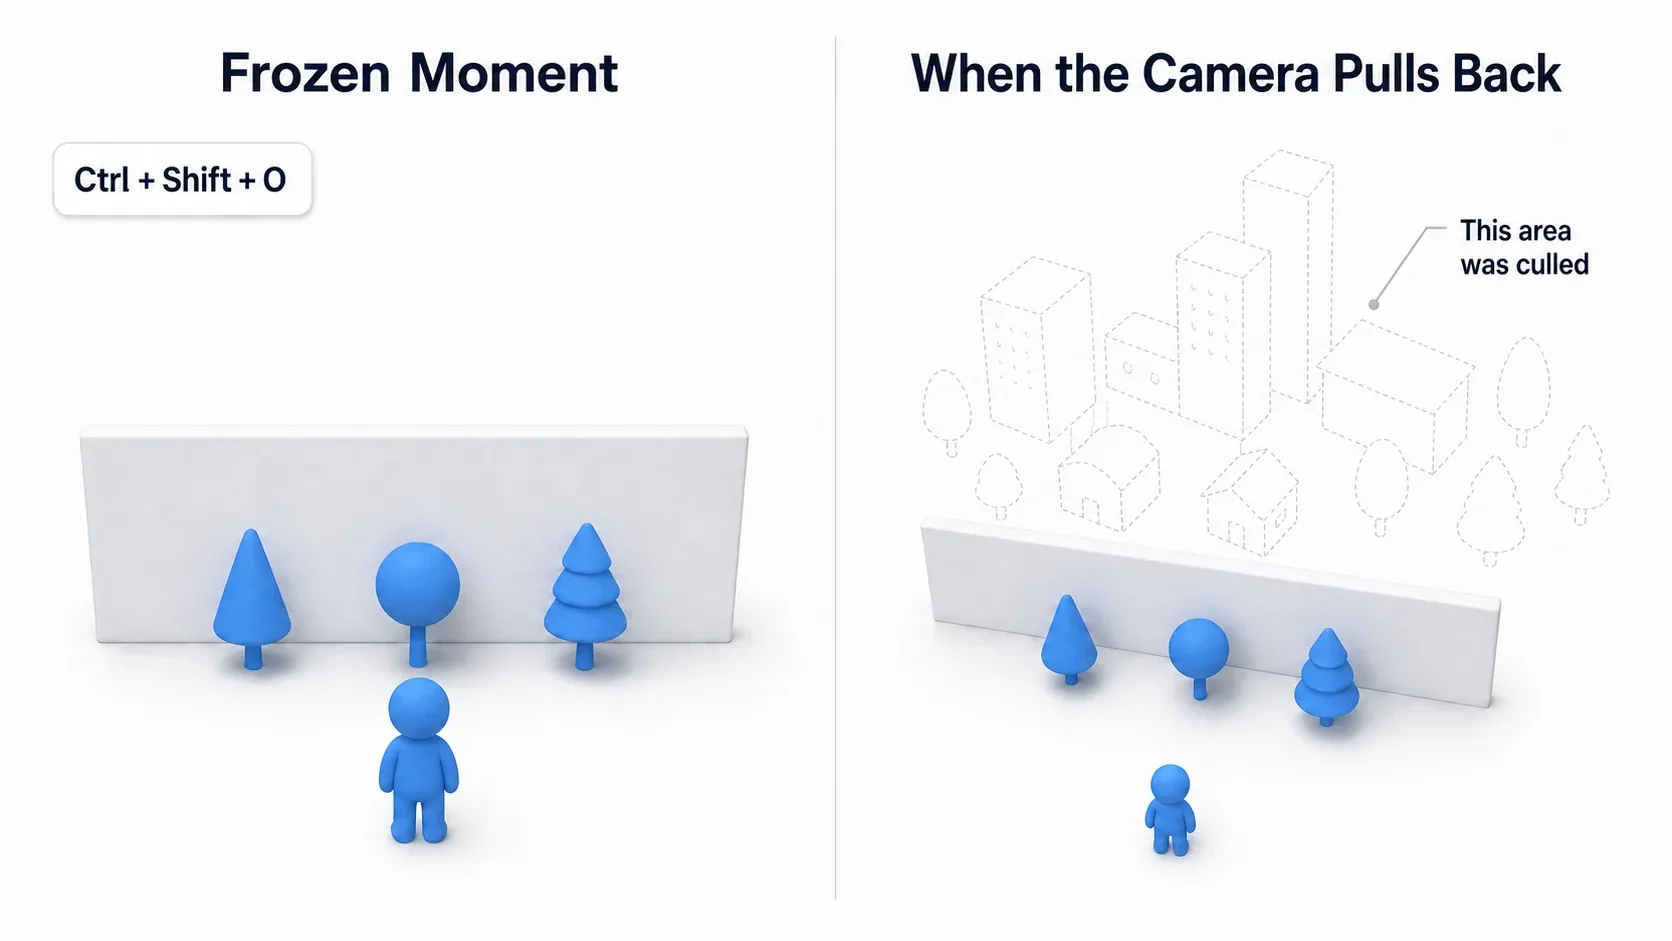
Pull the camera back while frozen and only what was being rendered at freeze time remains; everything else is blank. You should see objects behind walls simply missing. That's occlusion culling doing its job.
Press Ctrl + Shift + O again to unfreeze.
For the numeric view, use stat initviews. It shows how many primitives were processed in a frame and how many were excluded by frustum and occlusion tests. Look at Frustum Culled Primitives and Occluded primitives. If the excluded percentage is low, it's time to revisit your occluder placement or add distance culling.
How Nanite Fits In
In UE5, Nanite takes over part of this story. But it doesn't replace all of it, and misreading that gap leaves gaps in your setup.
| Item | Does Nanite handle it? |
|---|---|
| LOD for Static Meshes | Yes (no manual LOD authoring needed) |
| LOD for Skeletal Meshes | Support improved in 5.5, but traditional LODs are still the norm |
| Meshes with translucent materials | No (not Nanite-compatible; needs LODs) |
| Frustum culling | Yes (Nanite culls internally at cluster granularity) |
| Occlusion culling | Yes (same) |
| Cull Distance Volume / draw distance | No. You decide the display distance yourself |
In other words, enabling Nanite doesn't take distance culling off your plate. And characters and foliage (translucent or masked) still need traditional LODs. Nanite's mechanics and limitations are covered in detail in Handling High-Poly Meshes with Nanite.
Hands-On: Cutting Draw in a 3,000-Tree Scene
An open-world forest, a large RTS map, a survival game base. Placing the same asset in bulk shows up in every genre. Here we'll build a heavy forest and actually bring Draw down.
Setting Up the Repro
| Item | Setting |
|---|---|
| Level | File → New Level → Basic |
| Mesh to place | One Static Mesh with roughly 8,000 triangles (start with no LODs and Nanite off) |
| Count | 3,000 instances |
| Placement area | Randomly within a circle of radius 20,000uu (200 meters) |
The fastest way to place them is a Spawn Actor from Class loop running 3,000 times from BeginPlay in the Level Blueprint. Leave Nanite off deliberately (turning it on hides the effects this article demonstrates).
Step 1: Measure the Current State
Launch with Standalone Game, position yourself so the forest is in view, and run stat unit.
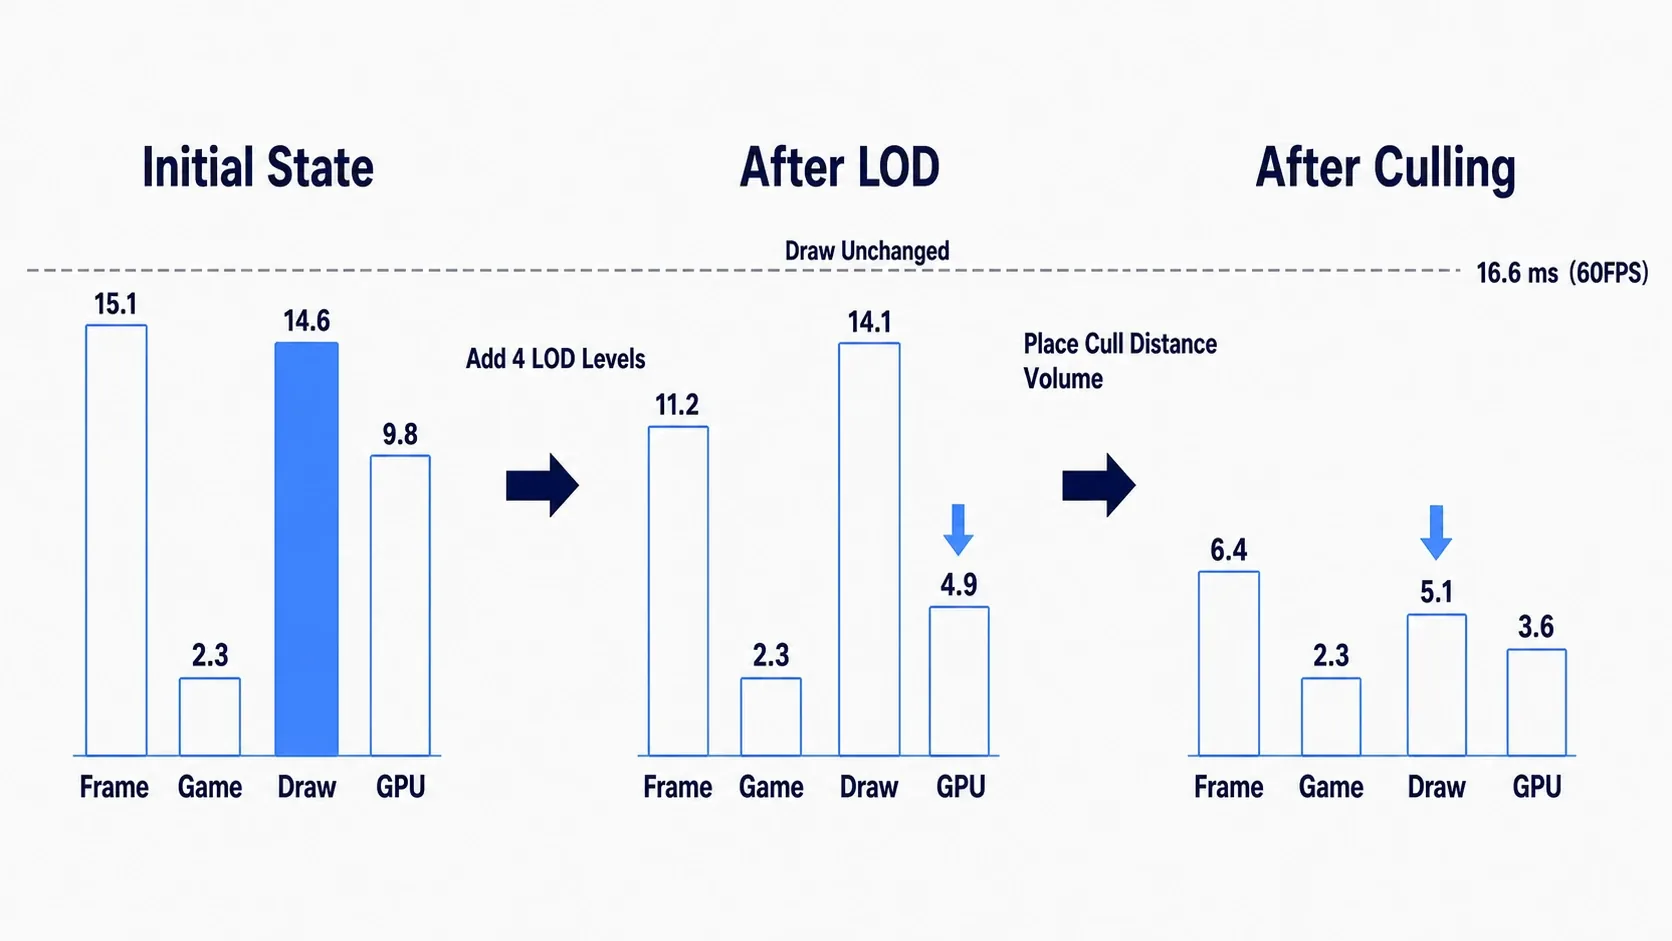
Frame:  15.10 ms
Game:    2.30 ms
Draw:   14.62 ms
GPU:     9.80 ms
Draw at 14.62ms is the largest. The CPU is writing 3,000 draw commands, which is exactly the symptom of too many things to draw.
Also run stat scenerendering and note the Mesh draw calls count. It should be around 3,000.
Step 2: Add LODs
Open that mesh in the Static Mesh Editor, set Number of LODs to 4 under LOD Settings, and press Apply Changes.
Measure again in Standalone Game.
Frame:  11.20 ms
Game:    2.28 ms
Draw:   14.10 ms
GPU:     4.90 ms
GPU dropped by half, from 9.80ms to 4.90ms. Distant trees were replaced with simplified meshes, so there are fewer triangles to shade.
Meanwhile Draw barely moved (14.62 → 14.10ms). LOD reduces triangles, but it doesn't reduce the number of draw commands. There are still 3,000 trees, and all of them are still being drawn. That's LOD's limit, and why you need the next fix.
Step 3: Place a Cull Distance Volume
In the Place Actors panel (Window → Place Actors), search for "Cull" and drag a Cull Distance Volume into the level.
Scale the volume so it encloses the whole forest (set X / Y / Z in Brush Settings to around 45,000 each) and add this single row to Cull Distances in the details panel.
| Size | Cull Distance |
|---|---|
| 500 | 12000 |
The trees have bounds of roughly 500uu, so this drops them from rendering at 120 meters.
Measure once more in Standalone Game.
Frame:   6.40 ms
Game:    2.25 ms
Draw:    5.14 ms
GPU:     3.60 ms
Draw fell from 14.62ms to 5.14ms. Mesh draw calls in stat scenerendering should have dropped from around 3,000 to around 1,000. Frame went from 15.10ms to 6.40ms, which is well past 60 FPS and closer to 150.
Step 4: See It With Your Own Eyes
Stand in the middle of the forest during play, press Ctrl + Shift + O, and pull the camera straight up. You'll see that the trees beyond 120 meters simply don't exist. That's what's saving you nine milliseconds of Draw right now.
Then walk the player around. If you see trees popping in ahead of you, raise Cull Distance to 15000, then 18000, until you find a distance you don't notice.
If it isn't working, here's how to narrow it down.
Drawdidn't drop → the Cull Distance Volume isn't enclosing the trees. Check its size. Only actors inside the volume get culled- All the trees vanished →
Cull Distanceis too small, or theSizerow doesn't match the trees' bounds. Try a row withSizeset to 0 (applies to everything) to isolate the issue GPUdidn't drop → LODs weren't generated. Check withMesh LOD Colorationthat the colors change- Freeze Rendering does nothing → make sure you're running in PIE or Standalone, not the editor viewport
Two things to take away.
- LOD hits GPU, culling hits Draw: remember this mapping and your
stat unitresults tell you which fix to apply. High GPU means LODs and materials; high Draw means culling and instancing. In the hands-on above, neither fix alone would have saved nine milliseconds - Decide cull distances by walking around: on paper, shorter is always better, but pop-in wrecks immersion. After tuning the numbers, always walk the level to confirm
To push Draw further, the next step is Instanced Static Mesh or Hierarchical Instanced Static Mesh, which draw many copies of the same mesh in one command. And the completely different angle of "don't load it into the level at all" is covered in Level Streaming and World Partition.
Bonus: Good to Know for Later
Many copies of one mesh can be drawn together. When you're placing hundreds or thousands of the same mesh — trees, rocks — you can collapse the draw commands into one (→ Cutting Draw Calls with Instanced Static Meshes). It combines with culling.
Every material slot adds a draw command. A mesh with five material slots means five draw commands. Consolidating slots while modeling background assets pays off in Draw. Cut your 3,000 trees from two slots to one and you've removed 3,000 draw commands.
Shadows are drawn too. An object casting a shadow from a dynamic light gets drawn a second time for the shadow pass. Turning off Cast Shadow on distant objects, or tightening the light's Dynamic Shadow Distance, reduces cost with almost no visual change.
Auto-generated LODs are usually good enough. For background assets, the LODs produced by Apply Changes hold up in production. Hand-authoring LOD meshes is only worth it when a broken silhouette would be obvious, like on straight-edged architecture.
Hierarchical Level of Detail (HLOD) is the next tier up. It replaces multiple distant actors with a single merged mesh. On World Partition levels, it's part of the standard toolkit (see Level Streaming and World Partition).
Run r.VisualizeOccludedPrimitives 1 to display wireframes where occlusion-culled objects are. It's a quicker way than Freeze Rendering to check what's currently hidden.
Summary
| Technique | What it does | Number it moves | What to do |
|---|---|---|---|
| LOD | Swaps distant objects for simpler meshes | GPU | Set Number of LODs, or pick a LOD Group |
| Frustum culling | Skips what's outside the view | Draw | Automatic. Check that bounds aren't abnormally large |
| Occlusion culling | Skips what's behind geometry | Draw | Automatic. Place large occluders in your level |
| Distance culling | Skips what's far away | Draw | Cull Distance Volume or Desired Max Draw Distance |
The mapping is the thing to remember. LOD hits GPU, culling hits Draw. Check which is larger with stat unit, then decide which fix to apply.
Your verification tools are Ctrl + Shift + O (Freeze Rendering) and stat initviews. Culling leaves no visual trace when it works, so you have to confirm it separately.
So far this has all been about not drawing what's already in the level. Next we step up a level and look at not loading it into the level at all (see Level Streaming and World Partition).
Try pressing Ctrl + Shift + O in your own level and pulling the camera straight up. More may already be getting culled than you expected.