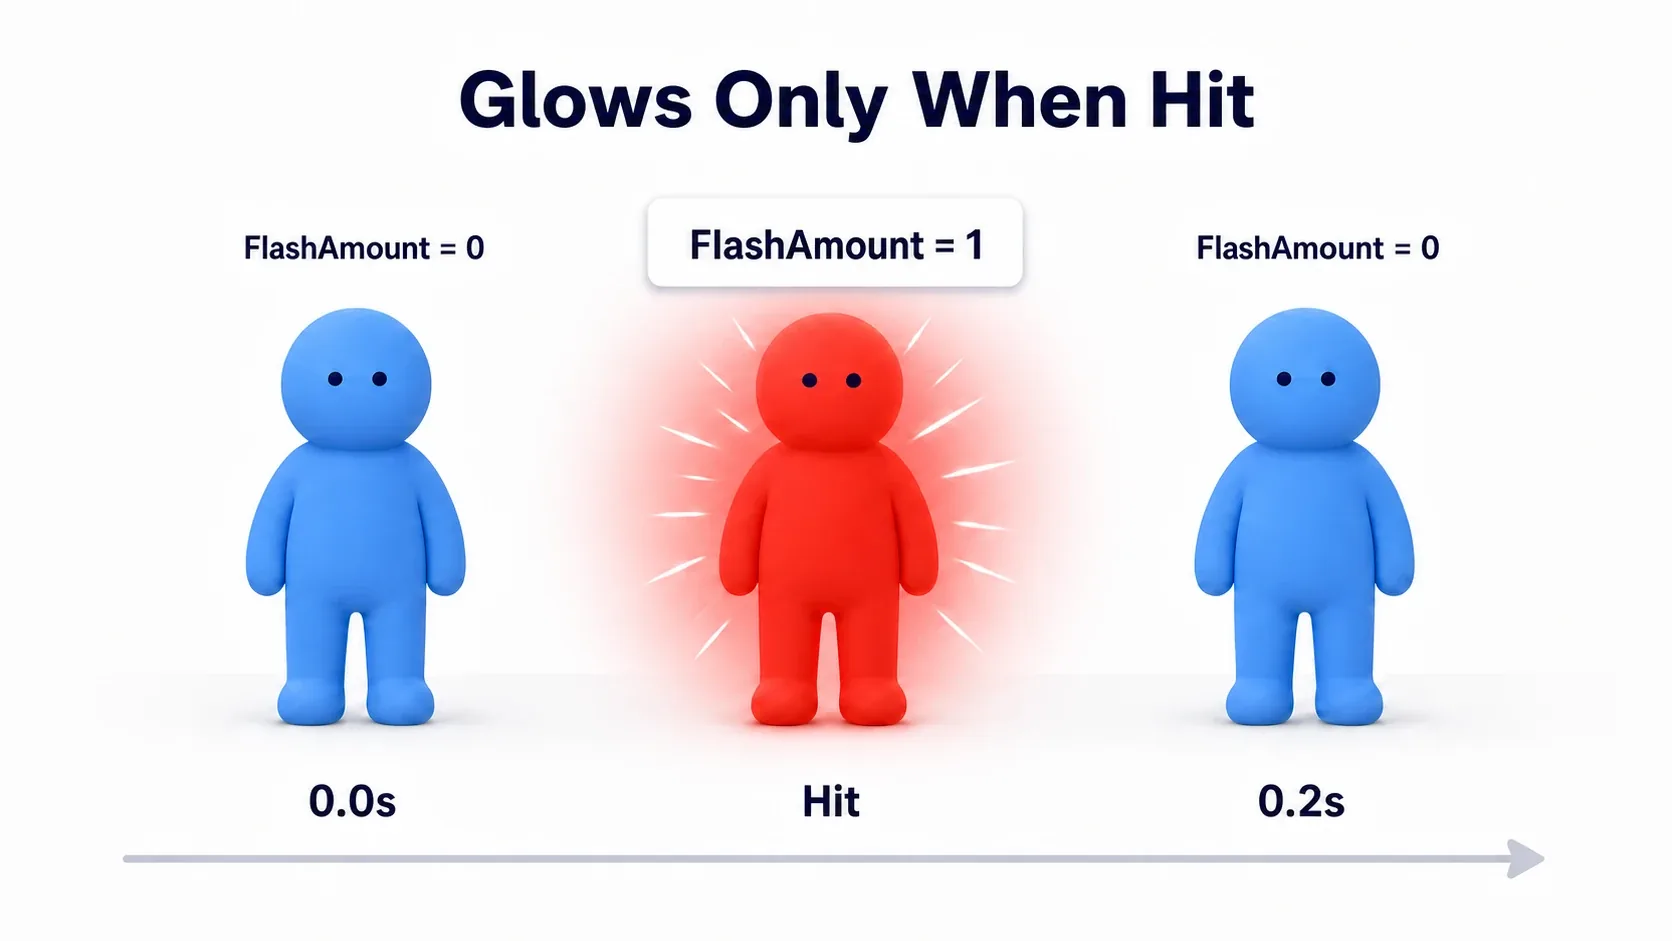
You hit an enemy and its HP drops, but there's no feedback. In commercial games, the thing you hit flashes white or blinks red for an instant, making the hit unmistakable. So you go to change a Material Instance's values from Blueprint, and there's no node to change parameters at all.
Changing a material's appearance at runtime requires a specific derivative: a Dynamic Material Instance. A regular Material Instance has fixed values set at edit time and doesn't move at runtime. This article covers the differences between the three kinds of material, how to use Create Dynamic Material Instance, how to hold onto it instead of rebuilding it every frame, and how to combine it with a Timeline for a smooth fade back.
What You'll Learn
- Only a Dynamic Material Instance can change values at runtime
- The three layers: Material / Material Instance / Dynamic Material Instance
- The arguments to
Create Dynamic Material Instance(target component and Element Index)- To make something flash, the parent material has to be parameterized first
- Don't rebuild it every frame (create it once in BeginPlay and hold it)
- Hands-on: flash red on hit and fade back in 0.2 seconds
Only One of Them Changes at Runtime
Materials come in three layers with confusingly similar names. Mixing them up guarantees you'll run into "my value change doesn't apply" or "I flashed one enemy and all of them flashed."
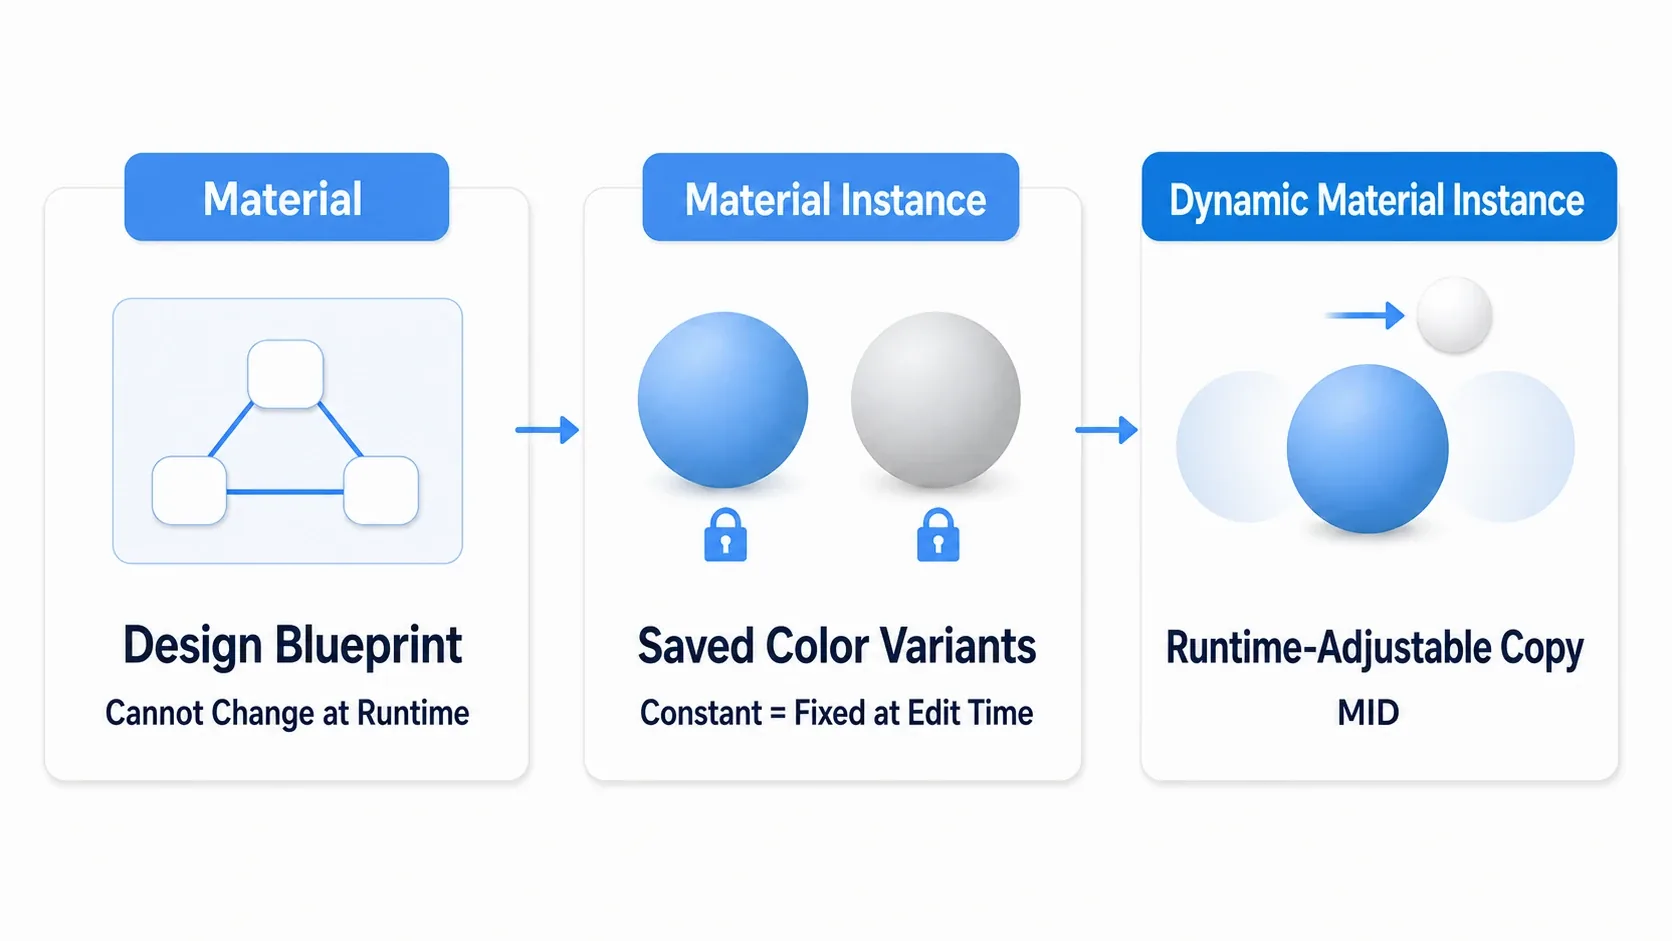
| Layer | Formal name | When values are decided | Changeable at runtime |
|---|---|---|---|
| Material | Material | When you author it | No |
| Material Instance | Material Instance Constant | At edit time (in the Content Browser) | No |
| Dynamic Material Instance | Material Instance Dynamic | At runtime | Yes |
Material is the blueprint. It's the base where you wire nodes together to build a surface, and you don't rewrite it at runtime (→ fundamentals in the material basics article).
Material Instance is a color variant made from that blueprint. It's what Create Material Instance produces in the Content Browser, formally a Material Instance Constant. As the name says, it's Constant: values are decided while editing, and they don't change during gameplay.
Only a Dynamic Material Instance can swap values at runtime. Its formal name is Material Instance Dynamic, often abbreviated MID. You don't store it in the Content Browser. You create it at runtime, in Blueprint.
There's one more important property here. Create Dynamic Material Instance creates a new Material Instance Dynamic (MID) on the component you called it on, and assigns it. Call it per actor and each gets its own separate MID.
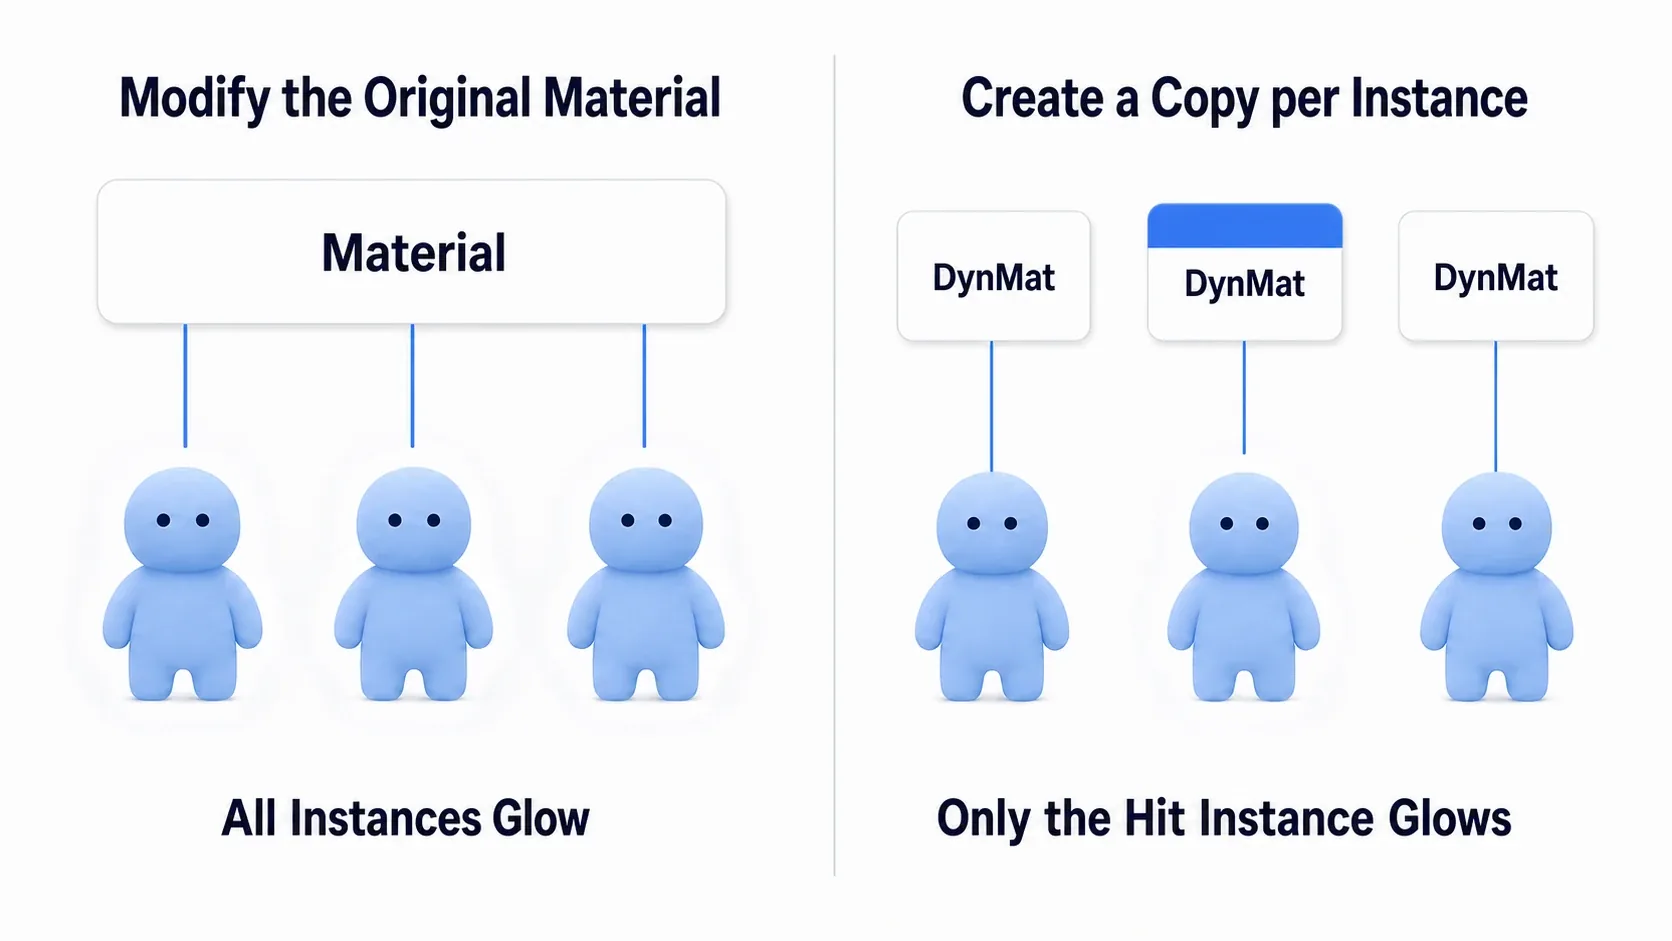
Line up ten copies of the same enemy and they all start out sharing one material. That's why touching the source material directly makes all ten flash at once. Call Create Dynamic Material Instance once per actor and each holds its own MID, so you can flash just the one that got hit.
The reverse also holds: assign the same MID to multiple actors and they all change together. When you want one to flash and all of them do, check whether you're sharing a MID.
Prep Work: Parameterize the Parent Material
A Dynamic Material Instance can only change values that were made into parameters on the parent material. Skip this and there's nothing to change even after you create the instance.
Parameterizing means right-clicking a constant node and choosing Convert to Parameter. It's the same operation covered in the fundamentals, so see the material basics article for details.
For a hit flash, you need one thing: the blend ratio between "the original color" and "white." Build it like this.
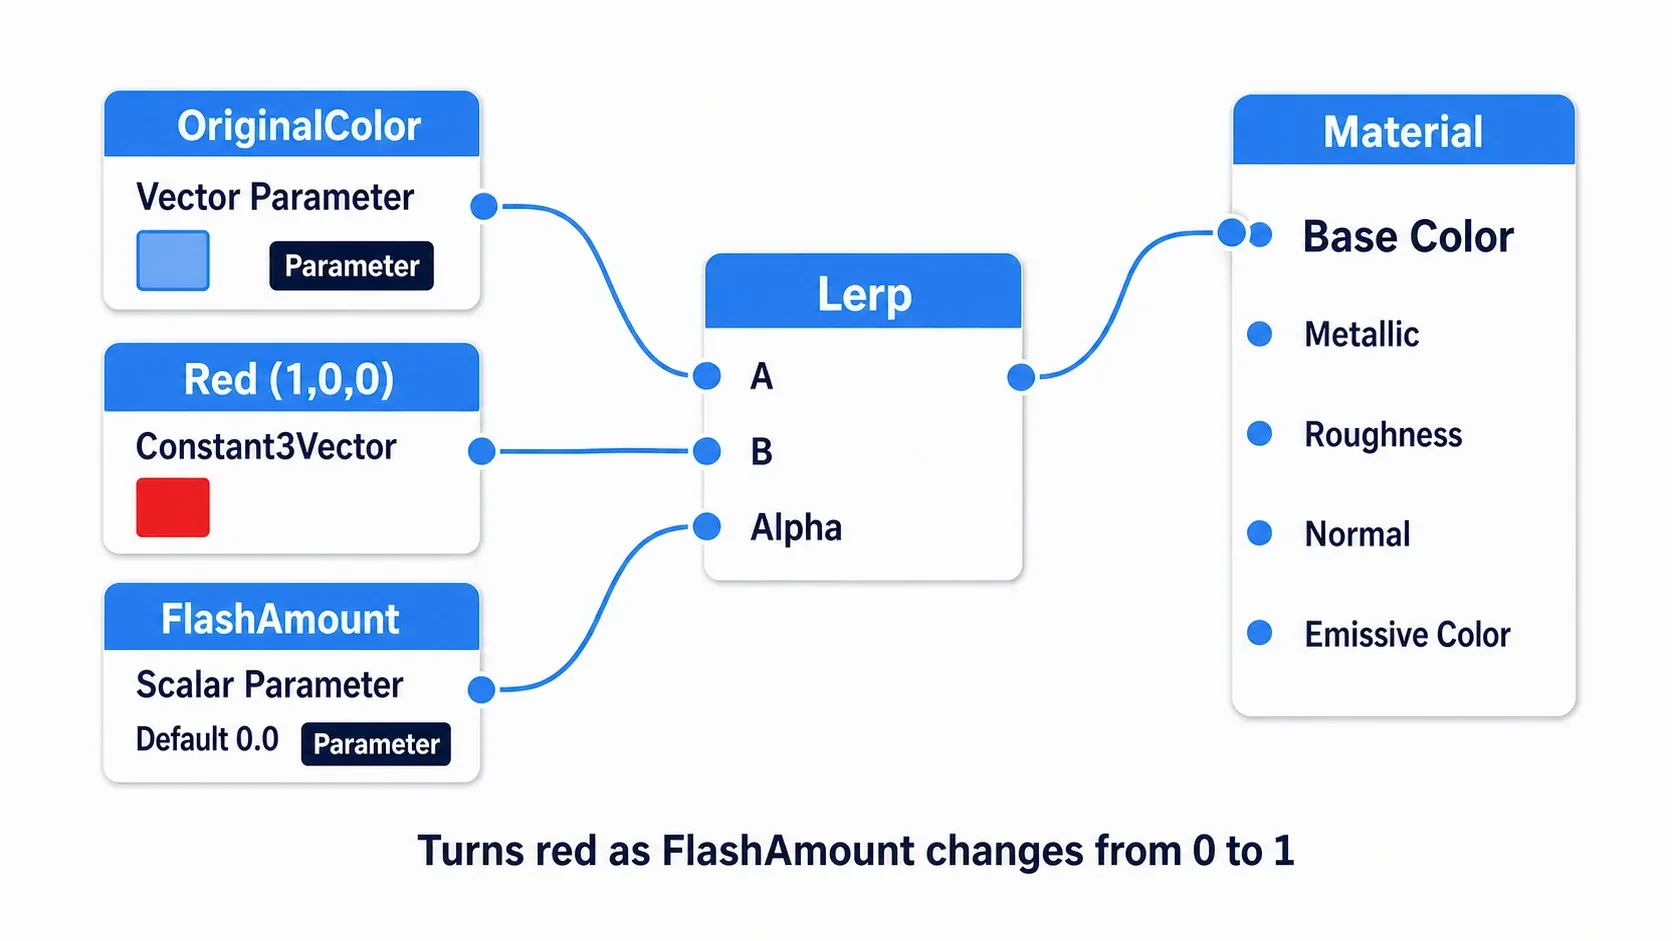
| Node | Role | Parameterize? |
|---|---|---|
Constant3Vector → Convert to Parameter | The original color | OriginalColor (Vector Parameter) |
| Constant3Vector (red 1,0,0) | The flash color | No (a constant is fine) |
Constant → Convert to Parameter | The blend ratio | FlashAmount (Scalar Parameter, default 0.0) |
| Lerp (Linear Interpolate) | Blends the two colors | — |
Plug OriginalColor into Lerp's A, red (R=1.0 / G=0.0 / B=0.0) into B, and FlashAmount into Alpha, then wire the output to Base Color.
FlashAmount = 0→ the original color, untouchedFlashAmount = 1→ fully red
Drive FlashAmount from 0 to 1 at runtime and that's your flash. The name you gave in Convert to Parameter has to match exactly the name you specify from Blueprint later. A typo there is the classic reason nothing works.
Note: If you want it to glow in dark areas, Base Color alone isn't enough (it only tints, it doesn't self-illuminate). In that case, wire
FlashColor × FlashAmount × emissive strengthinto Emissive Color. The key is to always multiply byFlashAmountso that emission is 0 whenFlashAmountis 0. If the emissive surface is large and bright enough, UE5's Lumen environment will bleed the color onto surroundings too (→ the lighting article).
Making a Copy with Create Dynamic Material Instance
With the prep done, you create the dedicated copy at runtime using Create Dynamic Material Instance. This is a node on primitive components (Static Mesh, Skeletal Mesh, and so on), so you drag it off the target mesh component.
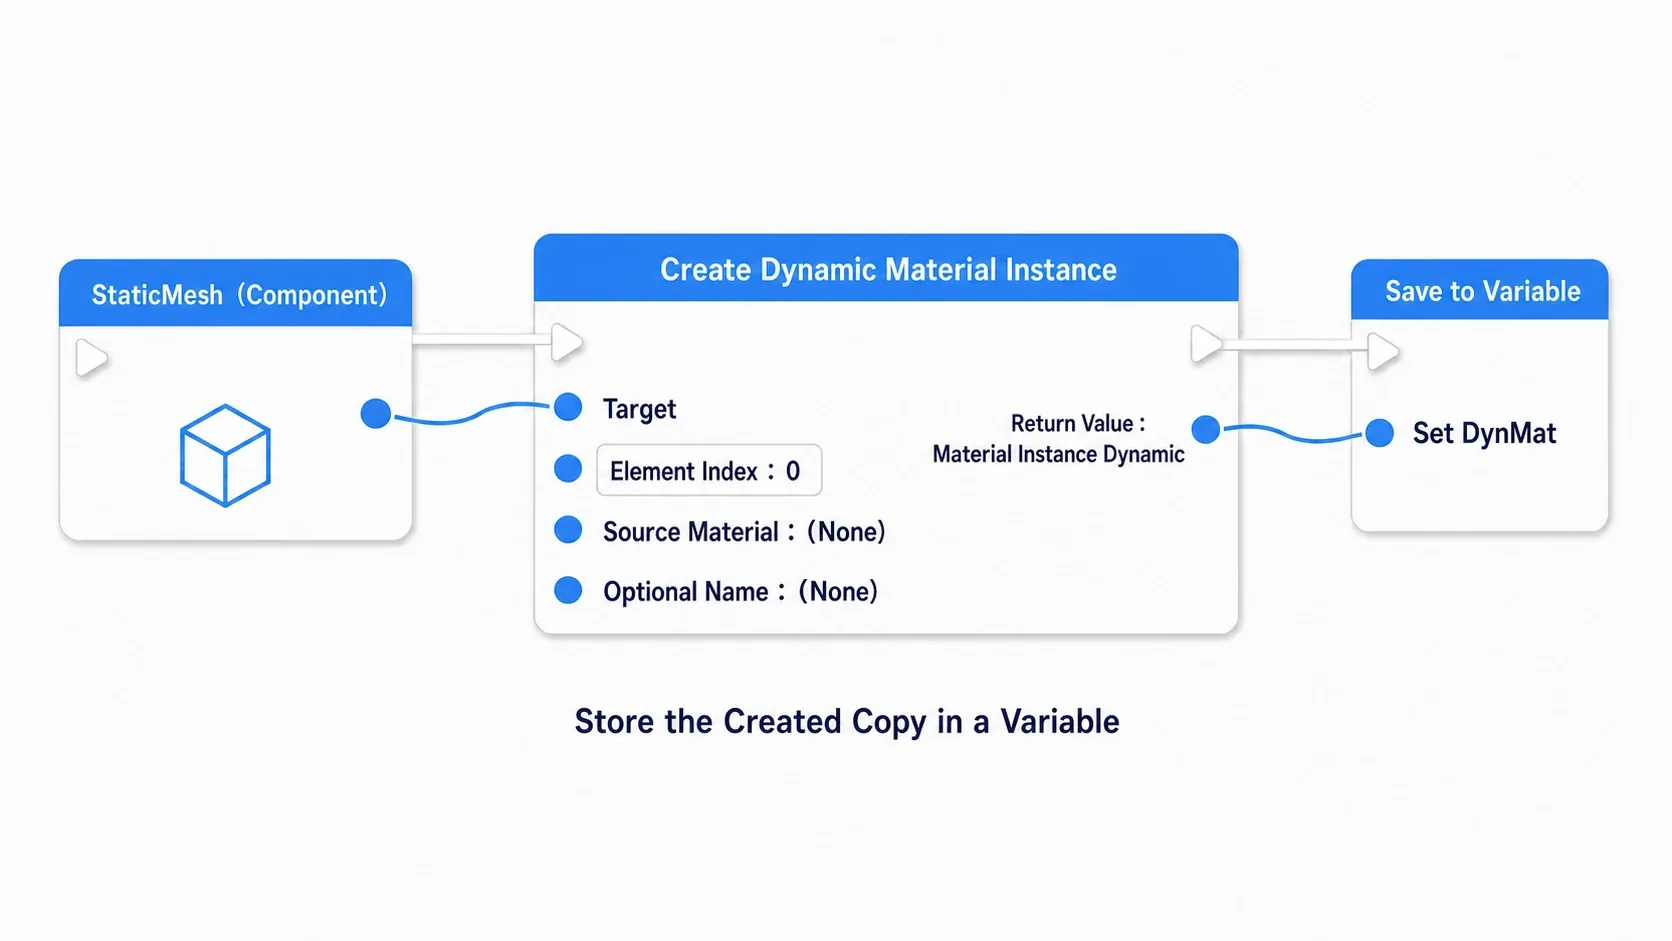
| Pin | Type | Meaning |
|---|---|---|
| Target | Primitive Component | The mesh component to act on |
| Element Index | int | Which material slot (default 0) |
| Source Material | Material Interface | The material to derive from (empty means whatever's currently in that slot) |
| Optional Name | Name | A name to give it (optional) |
| Return value | Material Instance Dynamic | The copy that was made. Hold onto this and use it |
It does three things, all bundled into one node.
- Creates a copy (a Dynamic Material Instance) based on whatever material is currently in that slot
- Reassigns that copy back into the same slot
- Returns the copy as the return value
So the moment you call Create Dynamic Material Instance, that mesh's appearance is already driven by the copy. After that, writing values to the return value changes only that mesh.
Element Index matters on meshes with multiple material slots. If a character is split into "body" and "gear" across two slots, the body is 0 and the gear is 1. Specify the slot number you want to flash. To flash every slot, call Create Dynamic Material Instance once per slot.
There are two nodes for writing values.
| Node | What it changes | Value type |
|---|---|---|
| Set Scalar Parameter Value | A single number (FlashAmount, for instance) | float |
| Set Vector Parameter Value | A color (OriginalColor, for instance) | Linear Color |
Both take the Dynamic Material Instance (the return value from Create) in Target, the parameterized name in Parameter Name, and the new value in Value.
Don't Rebuild It Every Frame
This is the most common mistake in practice. Never call Create Dynamic Material Instance from Event Tick, or every time damage lands.
Create makes a new copy each time it's called. Call it per frame and a brand-new material is born every frame while the old one gets thrown away. It looks like it works, but pointless allocations pile up internally.
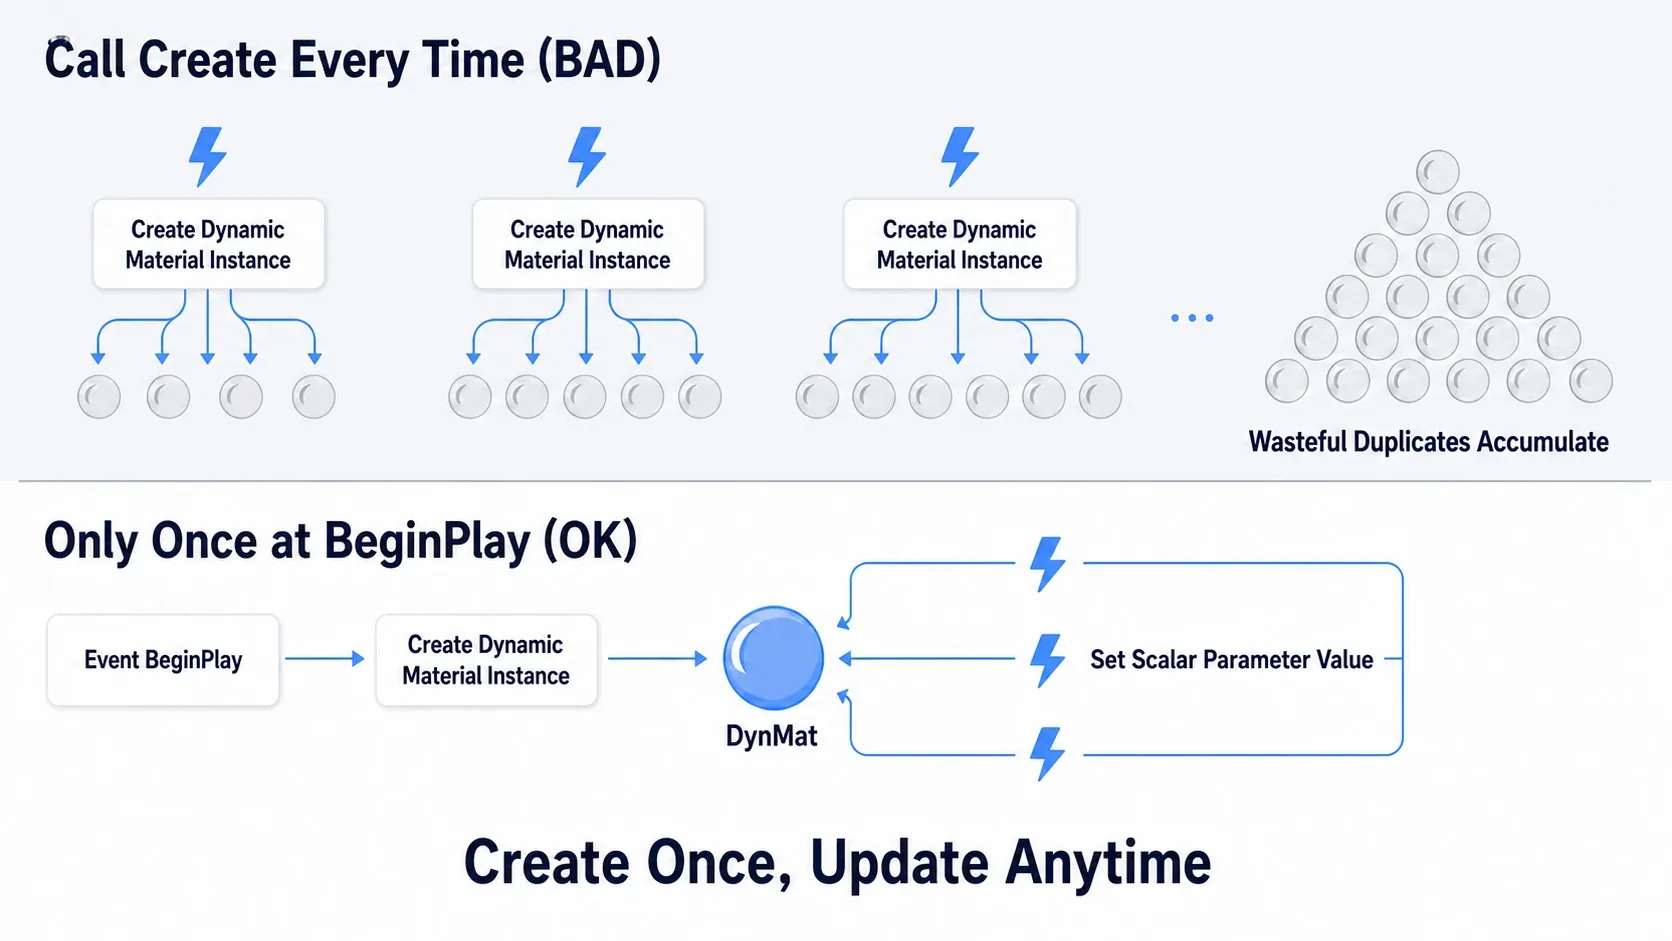
The correct shape is this.
| When | What to do |
|---|---|
Event BeginPlay | Call Create Dynamic Material Instance exactly once and save the return value to a variable |
| Afterward (on hit, etc.) | Just call Set Scalar Parameter Value on the saved variable |
Event BeginPlay
  → (Mesh) Create Dynamic Material Instance (Element Index: 0)
  → Set DynMat (save the return value into the variable DynMat)

(on hit)
  → Set Scalar Parameter Value (Target: DynMat, Parameter Name: FlashAmount, Value: 1.0)
Create once, change as often as you like. Keep that division and you can call Set Scalar Parameter Value as much as you want. Note that if you do recreate it, setting values on the old DynMat variable won't change anything, because that MID is no longer assigned to the mesh. Create it exactly once, during initialization.
Fading Back Smoothly with a Timeline
Setting FlashAmount to 1.0 turns it white, but it stays white. You need to bring it back to 0 over time.
Using Set Timer to wait a moment and then set it back to 0.0 already gives you a "flash on, flash off" look. The blink just reads as stiff. Reducing it smoothly from 1.0 to 0.0 gives a natural flash that eases out. A Timeline is exactly the right tool for that.
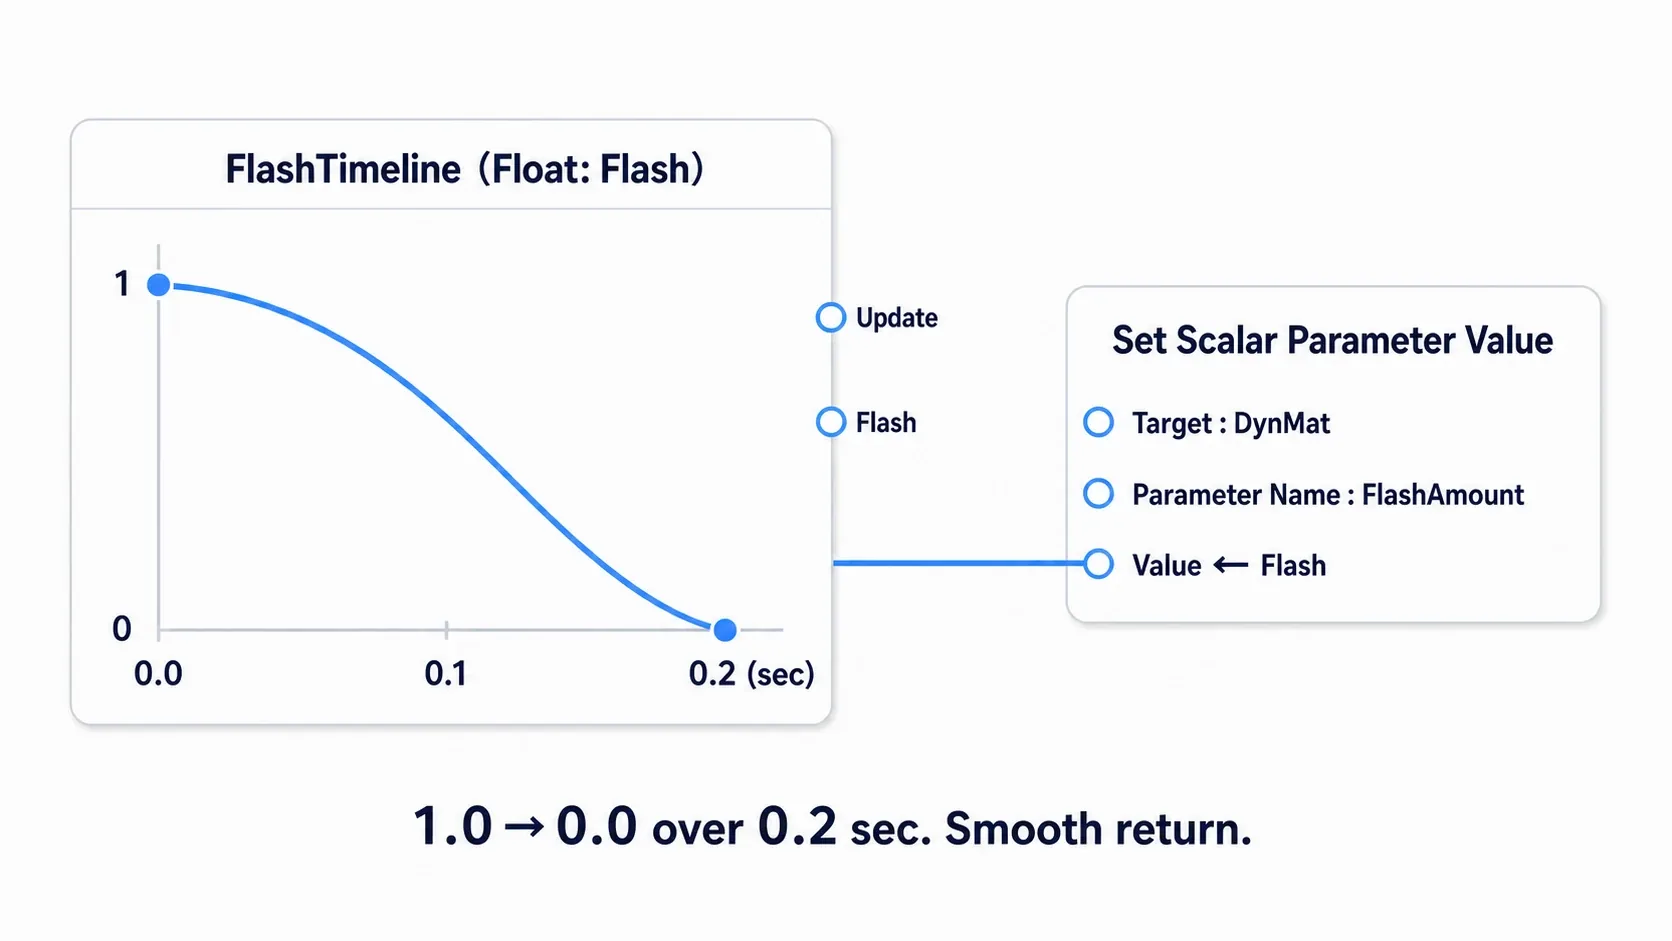
A Timeline is a node that produces a value moving over time. Add one Float track inside it and draw a curve that reads 1.0 at 0 seconds and 0.0 at 0.2 seconds.
| Timeline pin | Where it goes |
|---|---|
| Play from Start | Triggered by the hit event (replays from the beginning each time) |
| Update | Calls Set Scalar Parameter Value from here every frame |
| (Float track output) | Into Set Scalar Parameter Value's Value |
Trigger Play from Start on every hit and it drops from 1.0 to 0.0 over 0.2 seconds each time. Even under rapid successive hits, it returns to the start every time, so the state is always "brightest at the moment of impact."
Building Timelines and editing their curves is covered in the Timeline node article.
Hands-On: Flash Red on Hit
Taking damage in a 2D action game, an enemy hit in an ARPG, armor registering a shot in a shooter. Showing "that connected" through color shapes how a game feels across every genre. Here we'll add a hit flash to the receiving side built in the damage article.
The Finished Result
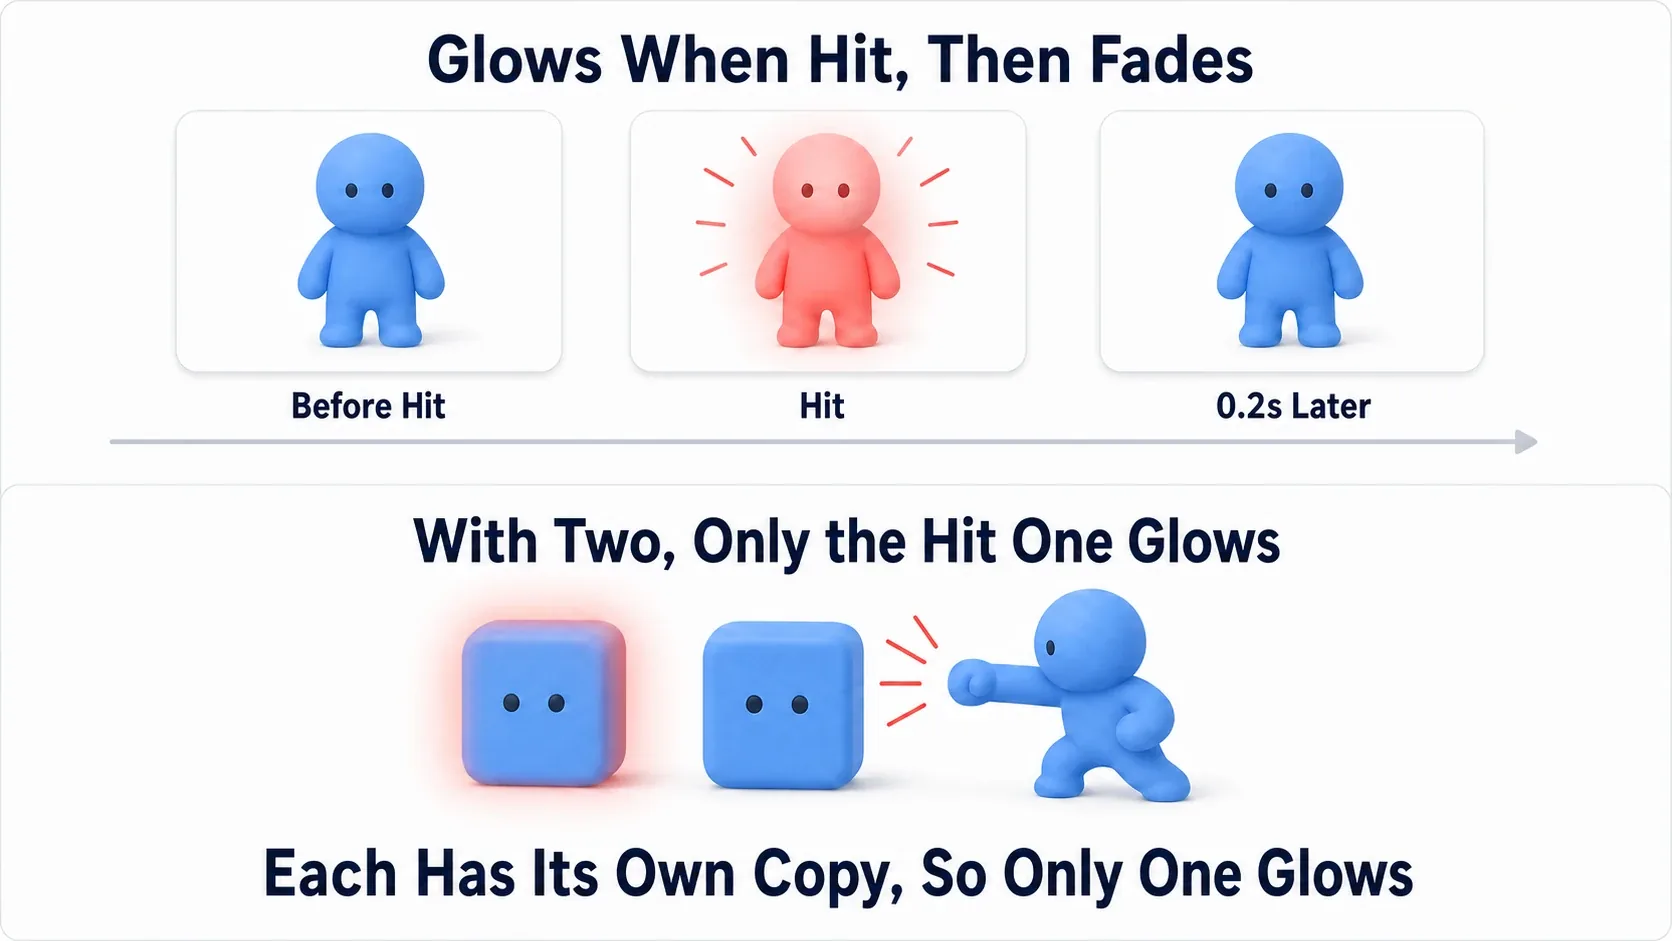
Every time you hit the Cube, it flashes red for an instant and returns to its original color in 0.2 seconds. Line up two of them and only the one you hit flashes; the other doesn't change.
Setup
Start from the Third Person template with BP_Damageable from the damage article working (a Cube whose HP drops when you hit E). If you don't have it, any Actor that reacts to damage will do.
Material prep
| Kind | Name | Contents |
|---|---|---|
| Material | M_Flashable | The material with OriginalColor / FlashAmount from the prep section above |
Assign M_Flashable to Material Slot 0 of BP_Damageable's StaticMesh, and Apply and save on the material side. FlashAmount defaults to 0.0. If multiple slots are visible, each slot needs its own MID.
Variables (add to BP_Damageable)
| Variable | Type | Default | Purpose |
|---|---|---|---|
DynMat | Reference to Material Instance Dynamic | None | Holds the dedicated copy you created |
Timeline (add to BP_Damageable)
| Setting | Value |
|---|---|
| Timeline name | FlashTimeline |
| Track | One Float track (named Flash) |
| Keys | Value 1.0 at time 0.0 / value 0.0 at time 0.2 |
| Length | 0.2 |
Step 1: Create the Copy Once in BeginPlay
Add this to BP_Damageable's Event BeginPlay. This runs exactly once.
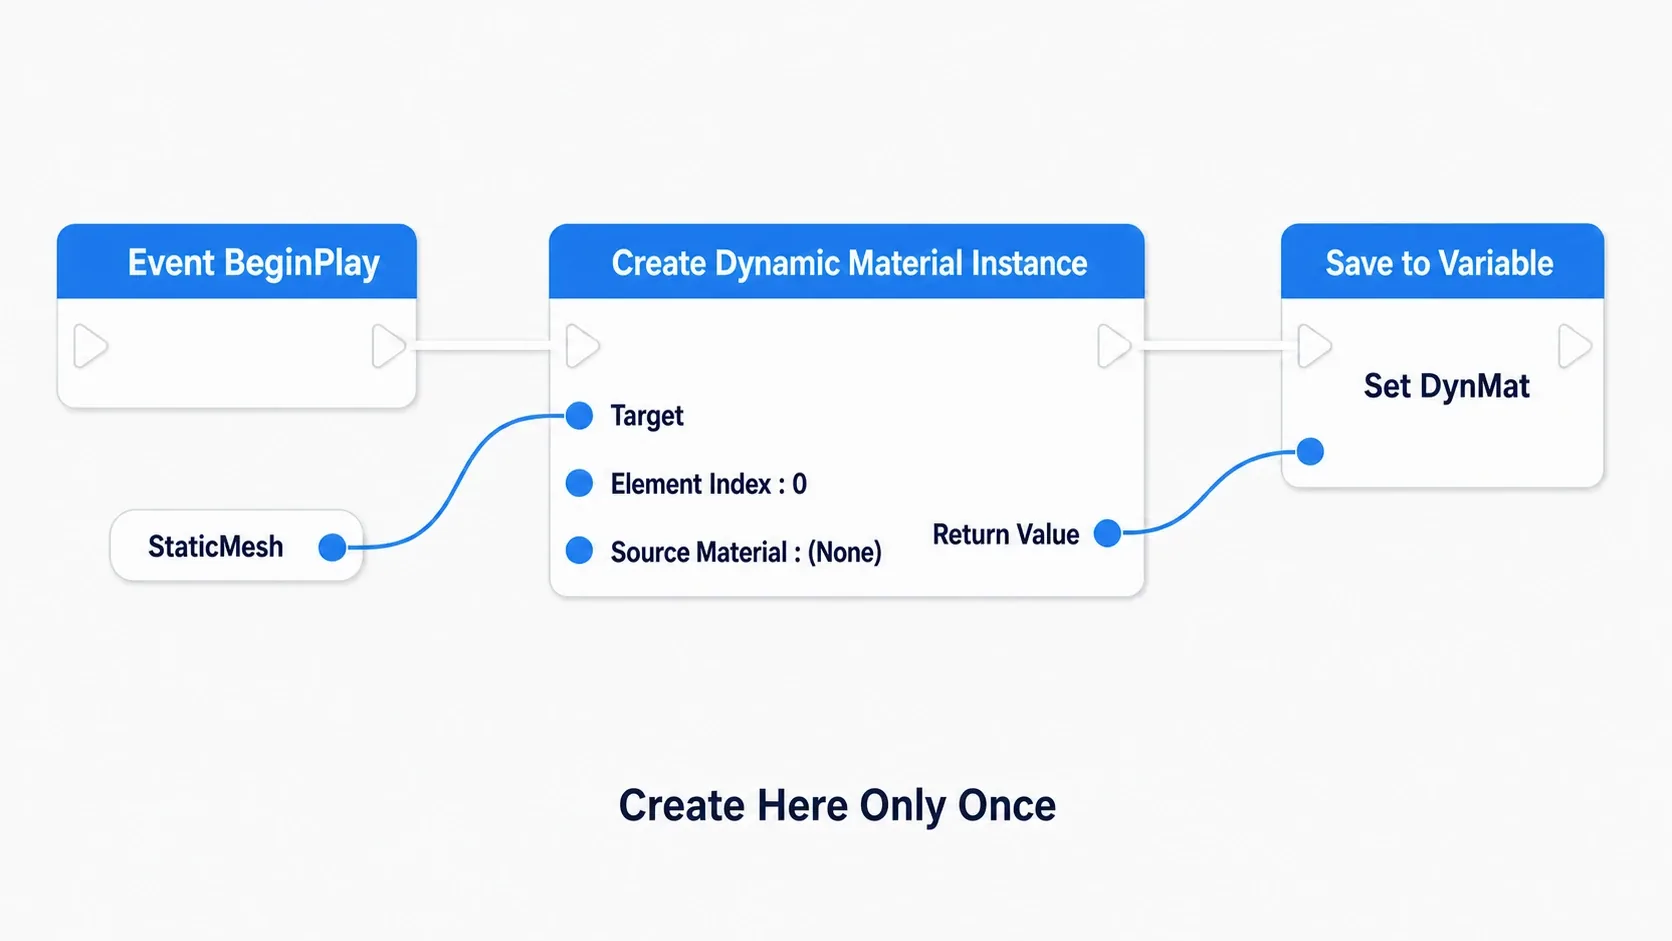
Event BeginPlay
  → StaticMesh (component reference)
  → Create Dynamic Material Instance
        Element Index : 0
        Source Material : (leave empty; the M_Flashable currently in the slot is used)
  → Set DynMat (save the return value)
Now this Cube has its own MID, assigned to its mesh. From here on, you only touch the color through DynMat.
Step 2: Run the Timeline on Hit
In Event AnyDamage from the damage article, trigger FlashTimeline right after subtracting HP.
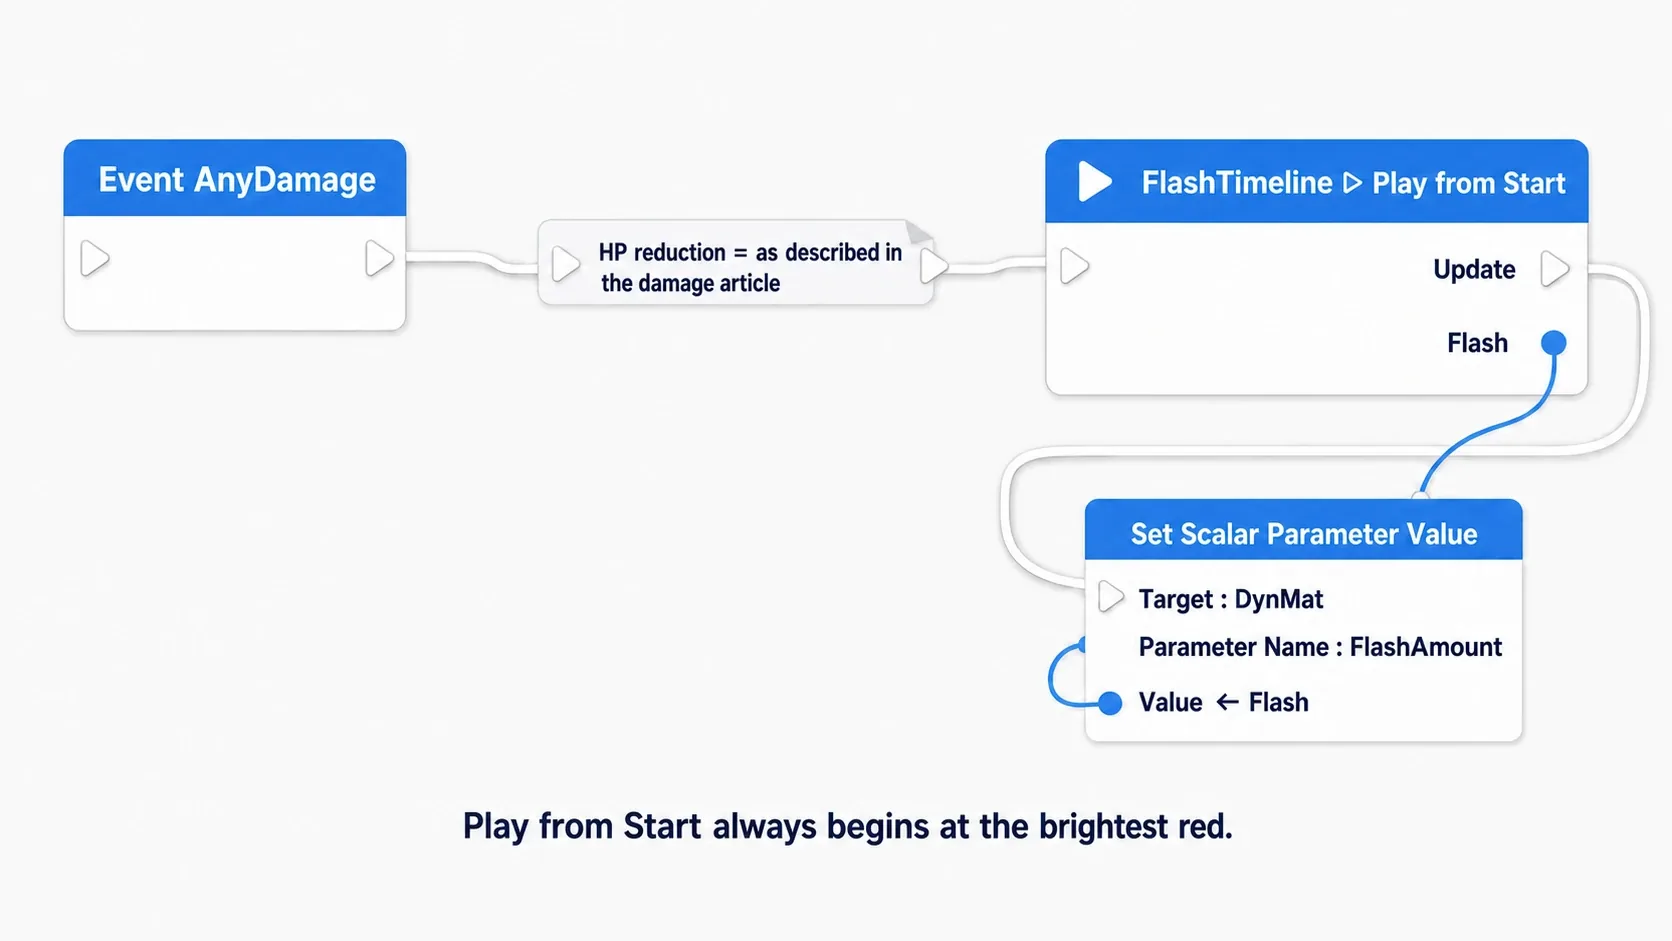
Event AnyDamage
  → (HP subtraction. Same as the damage article)
  → FlashTimeline ▷ Play from Start

FlashTimeline
  Update ─────────────────┐
  Flash (Float track out) ─┤
                            ↓
  → Set Scalar Parameter Value
        Target         : DynMat
        Parameter Name : FlashAmount
        Value          : ← Flash (the track's value)
Update calls Set Scalar Parameter Value every frame, passing the Timeline's Flash value straight into FlashAmount. It drops from 1.0 to 0.0 over 0.2 seconds, so the red drains away gradually.
Choosing Play from Start is the key detail. With a plain Play, a second hit partway through resumes from where it was and doesn't re-flash. Play from Start returns to the beginning every time, so each hit always starts from the reddest state.
Warning: If you set
Lerp'sBto red during prep, no extra setup is needed. If you want to change the color at runtime (red for fire, blue for ice), makeBa Vector Parameter namedFlashColorand pass the color withSet Vector Parameter Valueon hit.
Verify It
Hit Play, stand in front of the Cube, and press E.
- Press once → The Cube flashes red and returns to its original color in about 0.2 seconds
- Mash it quickly → If you set up invincibility frames (
InvincibleTimeof 1.0 seconds) in the damage article, it flashes once per second (the flash only fires when damage actually lands) - Duplicate the Cube, place two, and hit only one → Only the one you hit flashes; the other doesn't change
That third one is what this article most wants you to confirm. Holding a MID per actor is exactly what makes flashing a single one possible.
Here's how to narrow it down when something goes wrong.
- No color change on hit →
Set Scalar Parameter Value'sTargetisn'tDynMat, orParameter Namedoesn't matchFlashAmount. Or you're re-callingCreate Dynamic Material Instanceon every hit and setting the staleDynMat - It flashes white (or the original color) but never red →
Lerp'sBis still white. Change the blend color to red, or pass it withSet Vector Parameter Value - It stays lit and never returns → The Timeline's end point (0.2s) isn't 0.0, or you're calling
SetfromFinishedinstead ofUpdate - Two Cubes both flash → You're not calling
Create Dynamic Material Instanceand are setting the source material or Material Instance Constant directly - Stuttering / gradual slowdown → You're calling
Create Dynamic Material InstancefromEvent Tickor on every hit. Do it once inBeginPlay
Two things to take away.
- Create once, change as often as you like: Call
Create Dynamic Material Instanceonce inBeginPlayand hold it in a variable. Calling it on every flash is the same as building a new material and throwing it away each time - Per-actor differences come from Dynamic Material Instances: The source material is shared by everyone. Anything per-actor, like flashing one enemy or tinting by remaining health, always goes through that actor's own copy
The same mechanism works directly for blinking pickups, tinting a selected building green, or bleeding red as health drops. To design the flash, hit stop, and camera shake together as "feel," head to Hit Feedback and Game Feel; to add the effects themselves, head to the Niagara article.
Bonus: Good to Know for Later
-
This hands-on assumes single player:
Event AnyDamageonly fires on the server, and MID changes aren't replicated automatically. Extending this to multiplayer needs a separate mechanism to play the flash on each client -
Skeletal Meshes use the same node: You can call
Create Dynamic Material Instancefrom a character's Skeletal Mesh Component too. They often have several material slots, though, so checkElement Index. To flash a whole body, create one per slot and hold them in an array -
Set Vector Parameter Value takes Linear Color: The color you pass to
Set Vector Parameter Valueis in linear space, not gamma. Passing a color picked in a UI directly can look brighter (or darker) than expected -
Also useful for health bar color: Structuring things as "pass one ratio and the look changes," like
FlashAmount, lets you build continuous changes with the same mechanism, such as getting redder as health drops. For example, inserting aMap Range Clamped(HP ratio 0.3→0.0 mapped to output 0.0→1.0) makes the red build up once HP drops below 30%. Receiving HP notifications through an Event Dispatcher lets you add it without touching the receiver -
For global changes, use Material Parameter Collection: For something like shifting the whole world's color for day and night, per-actor Dynamic Material Instances are far too many. There's a separate feature for that called Material Parameter Collection. Per-actor differences go through Dynamic, global changes go through Collection
-
Melting, freezing, and getting wet work the same way: Add a parameter to the material and animate it over time the same way you animated
FlashAmount, and you get dissolve masks, ice thickness, or wetness. Only the thing being changed differs; the mechanism is identical -
When color won't change, suspect the name:
Set Scalar / Vector Parameter Valuesilently ignores a name that doesn't exist, without raising an error. Most "it doesn't work" cases come down to a tiny difference between the parameter name in the parent material and what you typed in Blueprint
Summary
- Only a Dynamic Material Instance can change material values at runtime. A regular Material Instance (Constant) has values fixed at edit time
- A Dynamic Material Instance is a copy dedicated to that component, which is why you can flash a single actor
- Values you want to change need
Convert to Parameteron the parent material, and the name must match exactly - Call
Create Dynamic Material Instanceonce inBeginPlayand hold it in a variable. Don't create it per frame or per hit - Fade back smoothly with a Timeline, replaying from the beginning with
Play from Start
In the game you're building now, what's the first moment you want to tell the player "that one landed"? Adding a single color to that instant changes how it feels.