Open the Third Person template and your character already runs with WASD and jumps with Space. But when you want it a bit faster, or the jump feels too floaty, there's nowhere obvious to change it. Look through the event graph and you won't find a single speed value.
Those numbers live inside a component called the Character Movement Component. It ships with the Character class, and it handles ground detection, walking up slopes, and falling, all in one place. This article explains what its main parameters actually control, how Movement Modes switch, and why you should always move through Add Movement Input.
What You'll Learn
- A Character is a bundle of a capsule, a mesh, and a Character Movement Component
- What Max Walk Speed / Jump Z Velocity / Gravity Scale / Air Control each decide
- The moment Movement Modes (Walking / Falling / Flying / Swimming) switch
- Why moving with
Set Actor Locationbreaks things- Hands-on: turning the sluggish default movement into snappy action-game feel
A Character Is a Bundle of Three Parts
UE has two kinds of things you can control: Pawn and Character. A Pawn is a bare container that only says "a player can possess this" — it knows nothing about walking. A Character is that same container with the parts needed to move a humanoid already built in.
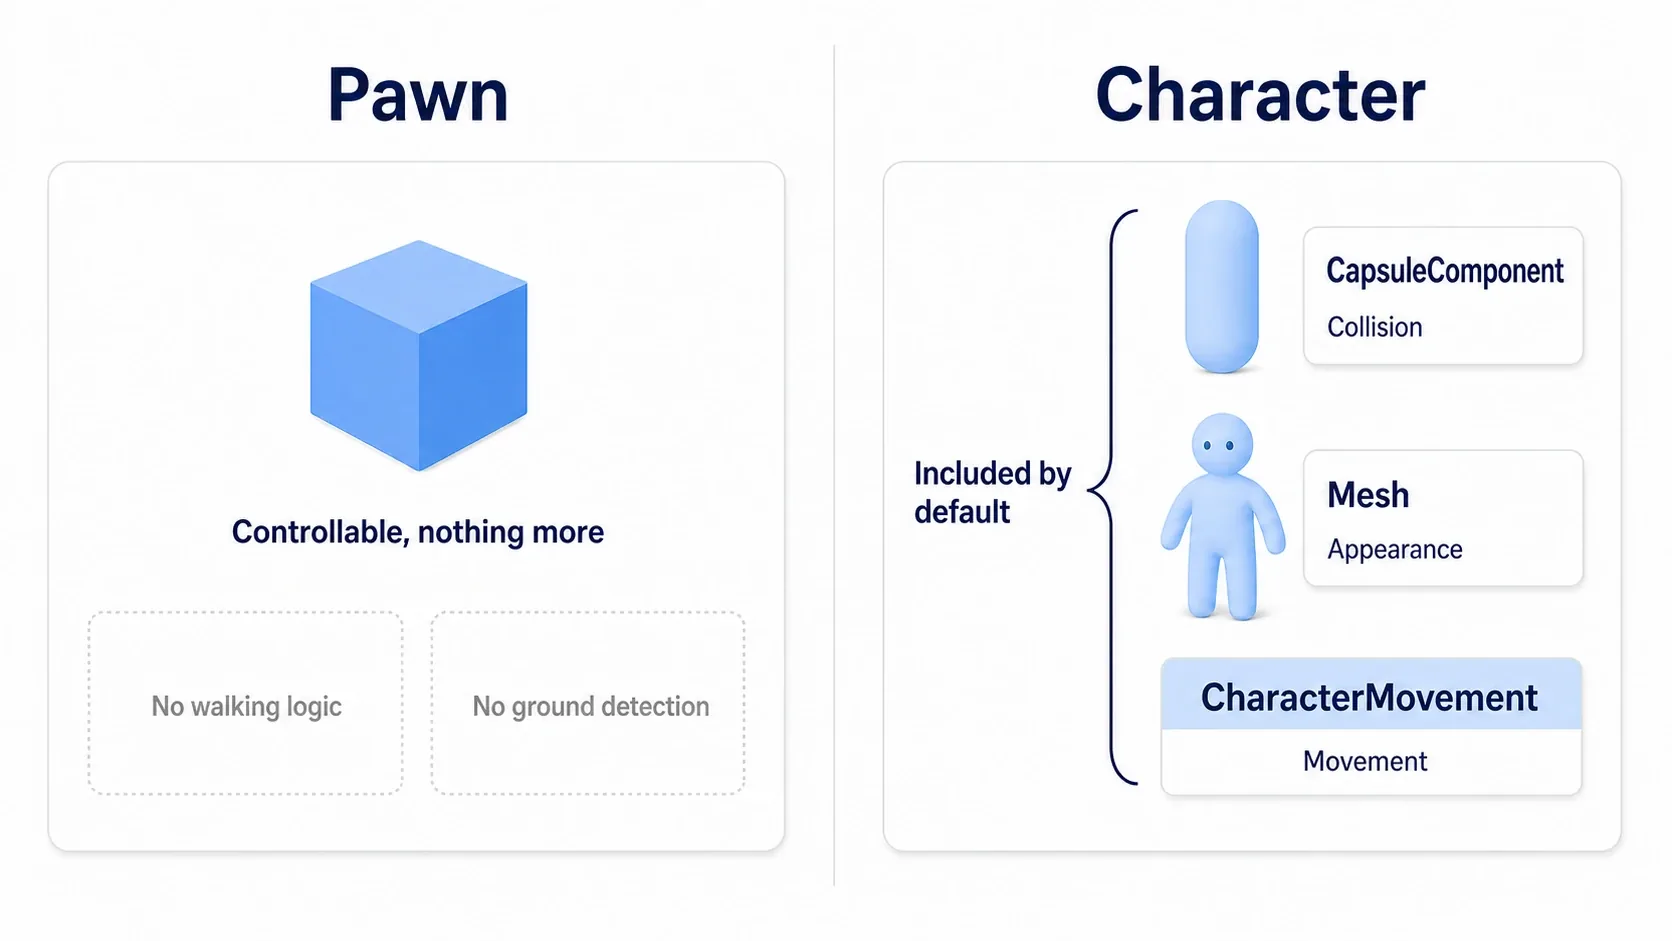
A Character comes with three things.
| Part | Name | Role |
|---|---|---|
| Collision | CapsuleComponent | The body that collides with the world. This capsule's position is the character's position |
| Visuals | Mesh (Skeletal Mesh) | The model you see. It just hangs off the capsule |
| Movement | CharacterMovement | All the walking, jumping, and falling logic |
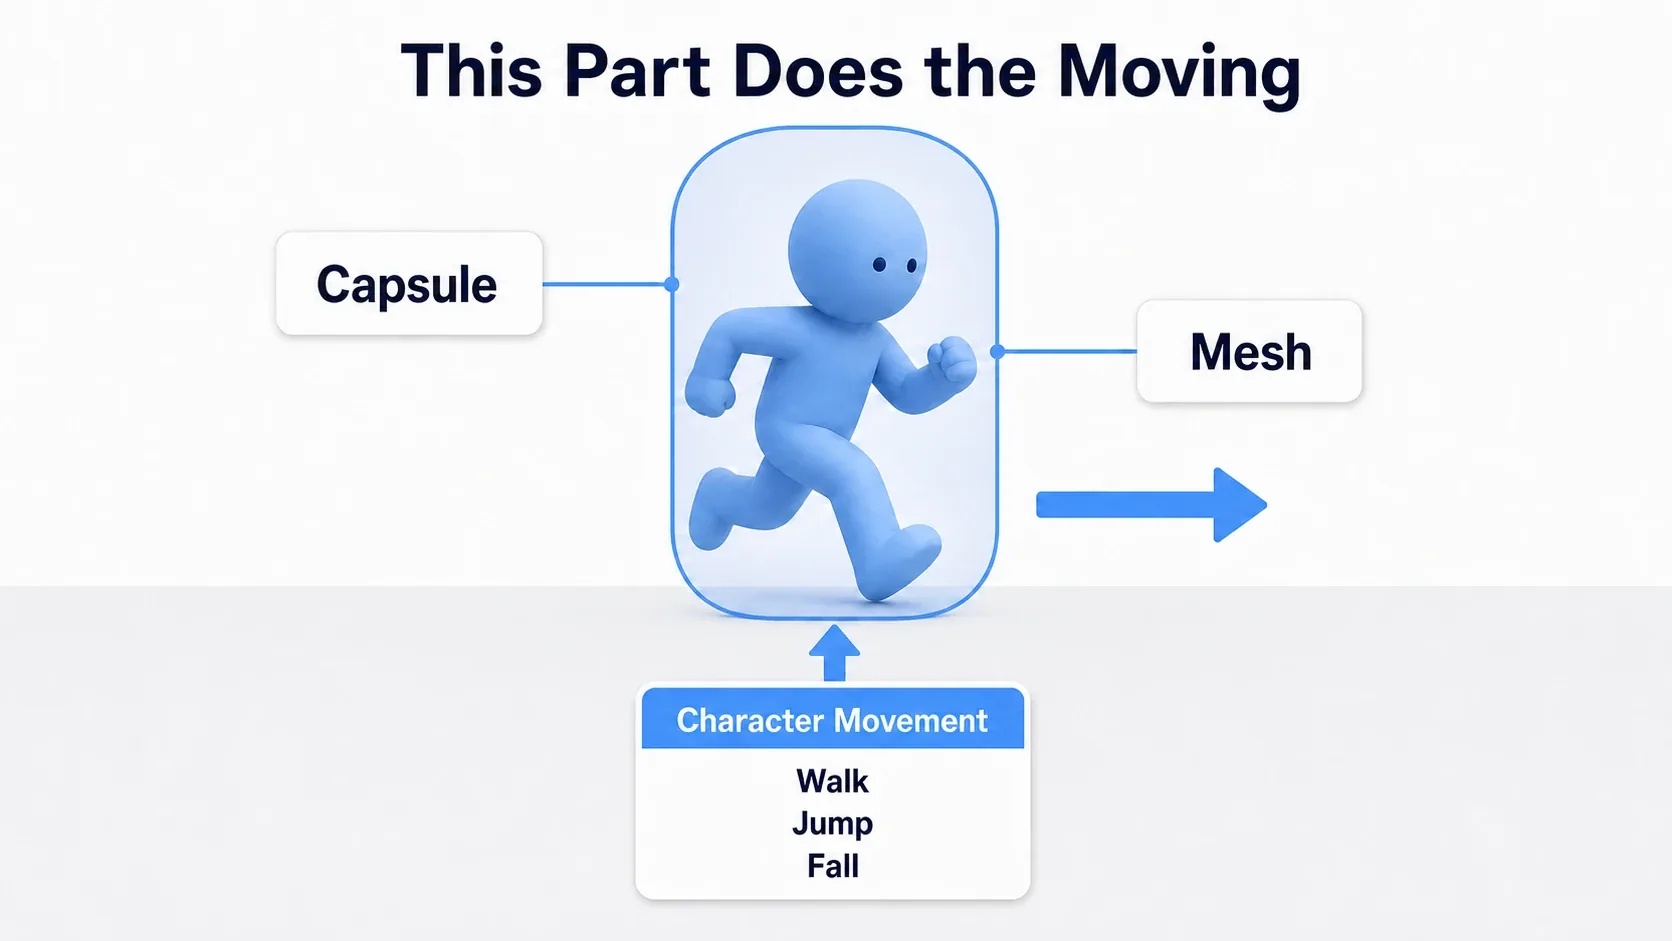
The important part: what collides with the world is the capsule, not the mesh. The visible model is only displayed following the capsule. "It stops even though the model isn't touching the wall" and "the arm clips through the wall" both come from this structure.
Movement itself is handled by the Character Movement Component (CMC from here on). Select the CMC and the Details panel fills with categories.
Character Movement: Walking(ground movement)Character Movement: Jumping / Falling(jumping and falling)Character Movement (General Settings)(gravity and other global values)Character Movement: Swimming/Flying/Nav Movement
For now, the first three are all you need.
Note: The capsule's width and height come from
Capsule Half HeightandCapsule Radius. The defaults are radius 34 / half height 88 (176 cm total), sized to a human. For how collision works in general, see the collision article.
Five Parameters That Decide the Feel
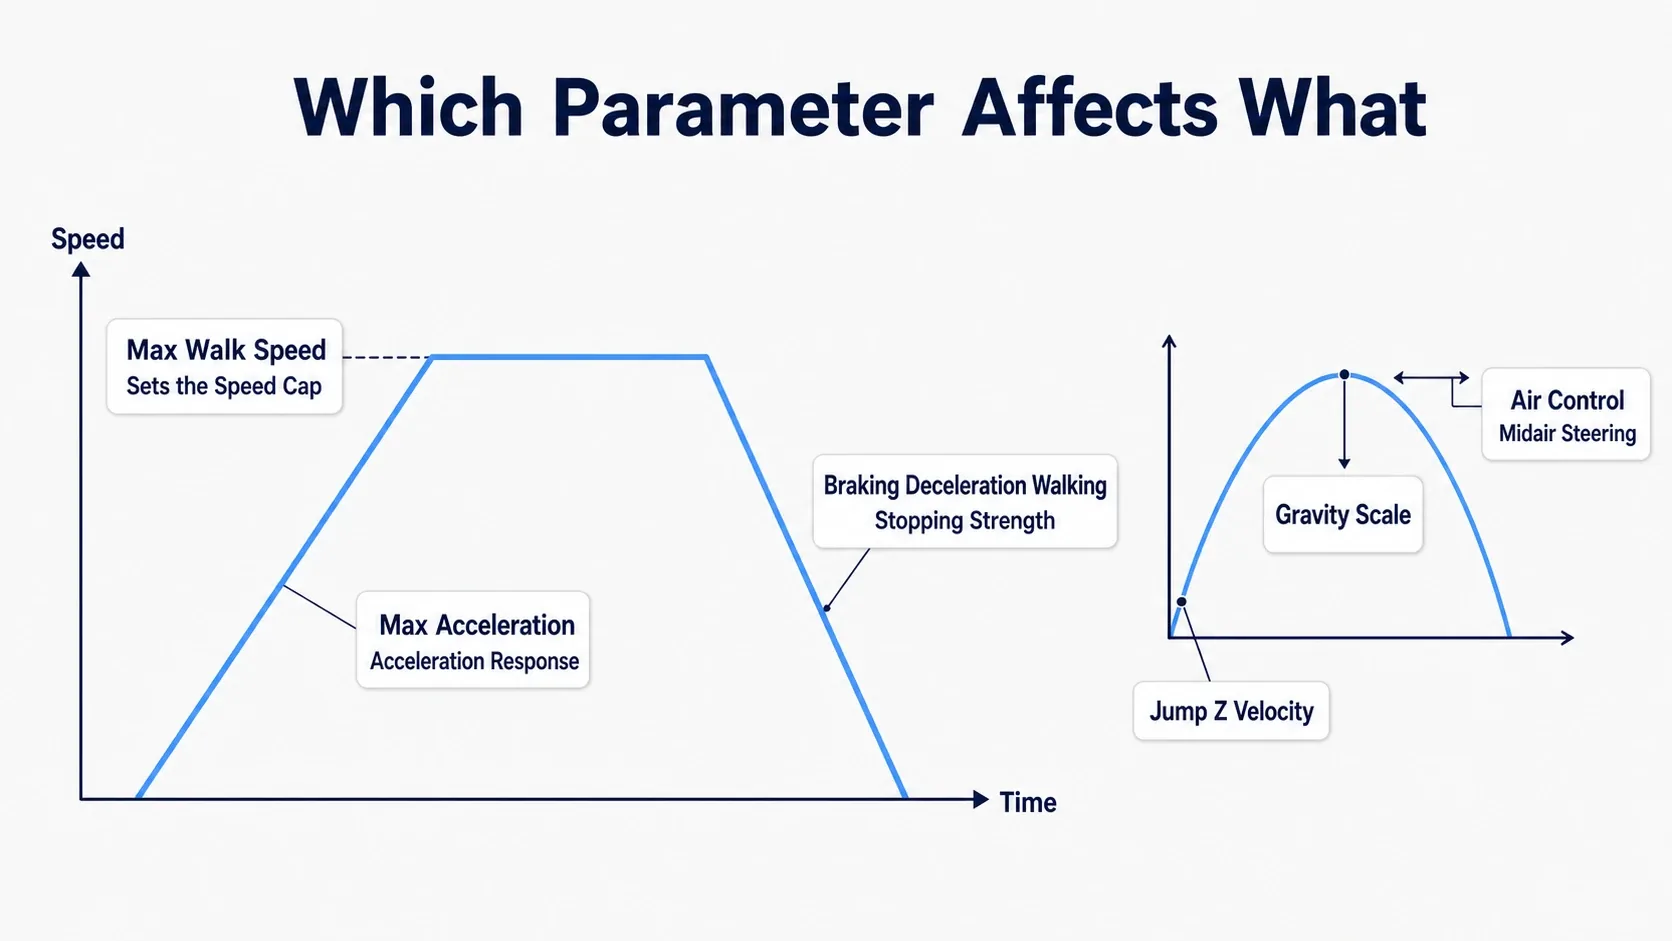
The CMC has well over a hundred parameters, but only five directly shape how movement feels.
| Parameter | Category | Class default | What it decides |
|---|---|---|---|
| Max Walk Speed | Walking | 600.0 | Top speed on the ground (cm/sec) |
| Max Acceleration | General | 2048.0 | How quickly you reach top speed |
| Braking Deceleration Walking | Walking | 2000.0 | How quickly you stop after releasing input |
| Jump Z Velocity | Jumping / Falling | 420.0 | Upward speed at the instant you jump |
| Air Control | Jumping / Falling | 0.05 | How much you can steer mid-air (0 to 1) |
The table above shows the CMC class defaults. The Third Person template's BP_ThirdPersonCharacter overrides some of them, so check the actual values in the Details panel.
Speed Is Three Numbers, Not One
If you think of "speed" as a single number, tuning never quite works. It's actually split three ways.
- Max Walk Speed only sets the ceiling. Raise it and, if acceleration is slow, short distances still won't feel fast
- Max Acceleration is the ramp up to that ceiling. Low values make starting to run feel mushy
- Braking Deceleration Walking is how hard the brakes bite. Low values make you slide after releasing the key
When an action game feels "snappy," it's usually because the last two are high. Conversely, icy floors and drifting racing controls come from lowering those same two.
Think of Jump Height and Hang Time Separately
The most common jump misconception is that lowering Jump Z Velocity gives you a "heavy" jump. In reality it only lowers the height; the floaty feeling stays.
Launch speed and gravity relate like this:
- Peak height =
Jump Z Velocitysquared ÷ (2 × gravity) - Hang time =
Jump Z Velocity÷ gravity × 2
Gravity is World Settings' -980 (cm/sec²) multiplied by the CMC's Gravity Scale. So raising Gravity Scale shrinks both height and hang time together. To keep the height while shortening only the hang time, raise Gravity Scale and raise Jump Z Velocity to compensate.
| What you want | What to change |
|---|---|
| Jump higher | Raise Jump Z Velocity |
| Kill the floatiness (snappy) | Raise Gravity Scale, then raise Jump Z Velocity to restore the height |
| Make it floaty (moon gravity) | Lower Gravity Scale |
| Steer in mid-air | Raise Air Control (0.05 means "basically no control") |
Air Control is the fraction of your input that applies while airborne. Set it to 0 and the arc locks the moment you jump, giving that old-school rigid feel. Set it to 1.0 and you can turn in the air just like on the ground, giving forgiving Mario-style control.
When Movement Modes Switch
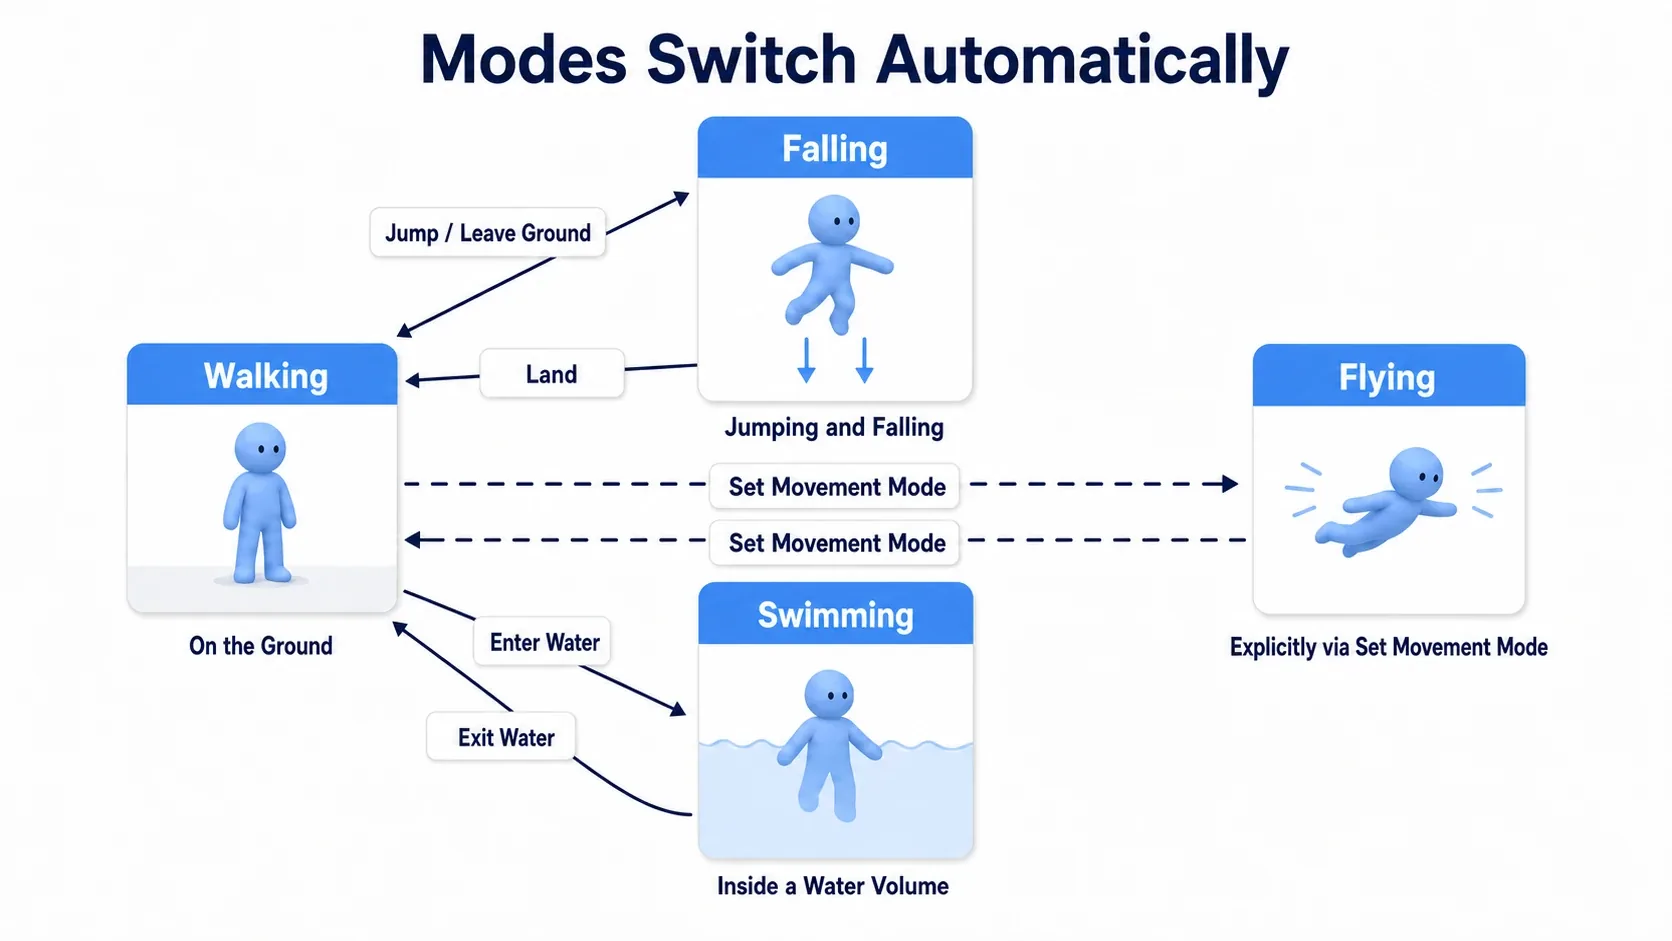
The CMC is always in exactly one Movement Mode. You can set the starting value with Default Land Movement Mode in the Details panel, but at runtime the CMC switches modes on its own.
| Mode | State | How you get there |
|---|---|---|
| Walking | Grounded and walking on a floor | On landing |
| Falling | Airborne (both rising and falling) | On jumping, or on walking off a ledge |
| Flying | Free movement with no gravity | Explicitly, via Set Movement Mode |
| Swimming | Underwater, with buoyancy | On entering a Physics Volume set as a Water Volume |
Rising and falling are both Falling. You can't tell them apart by mode, so to know whether you're going up or down, check the sign of Velocity's Z component.
Mode changes double as animation transition conditions. When an Animation Blueprint decides "grounded or airborne," it usually uses Is Falling (a CMC function). That path continues in the Anim BP state machine article.
Switching to Flying with Set Movement Mode makes gravity stop applying immediately. Flight, ghost mode, and free-cam debug movement are all built this way. Just note that standing on a floor while in Flying will not return you to Walking. You have to set Walking back yourself.
Always Move Through Add Movement Input
When you want to push a character forward, the first thing that comes to mind is Set Actor Location. It moves, and it will definitely break.
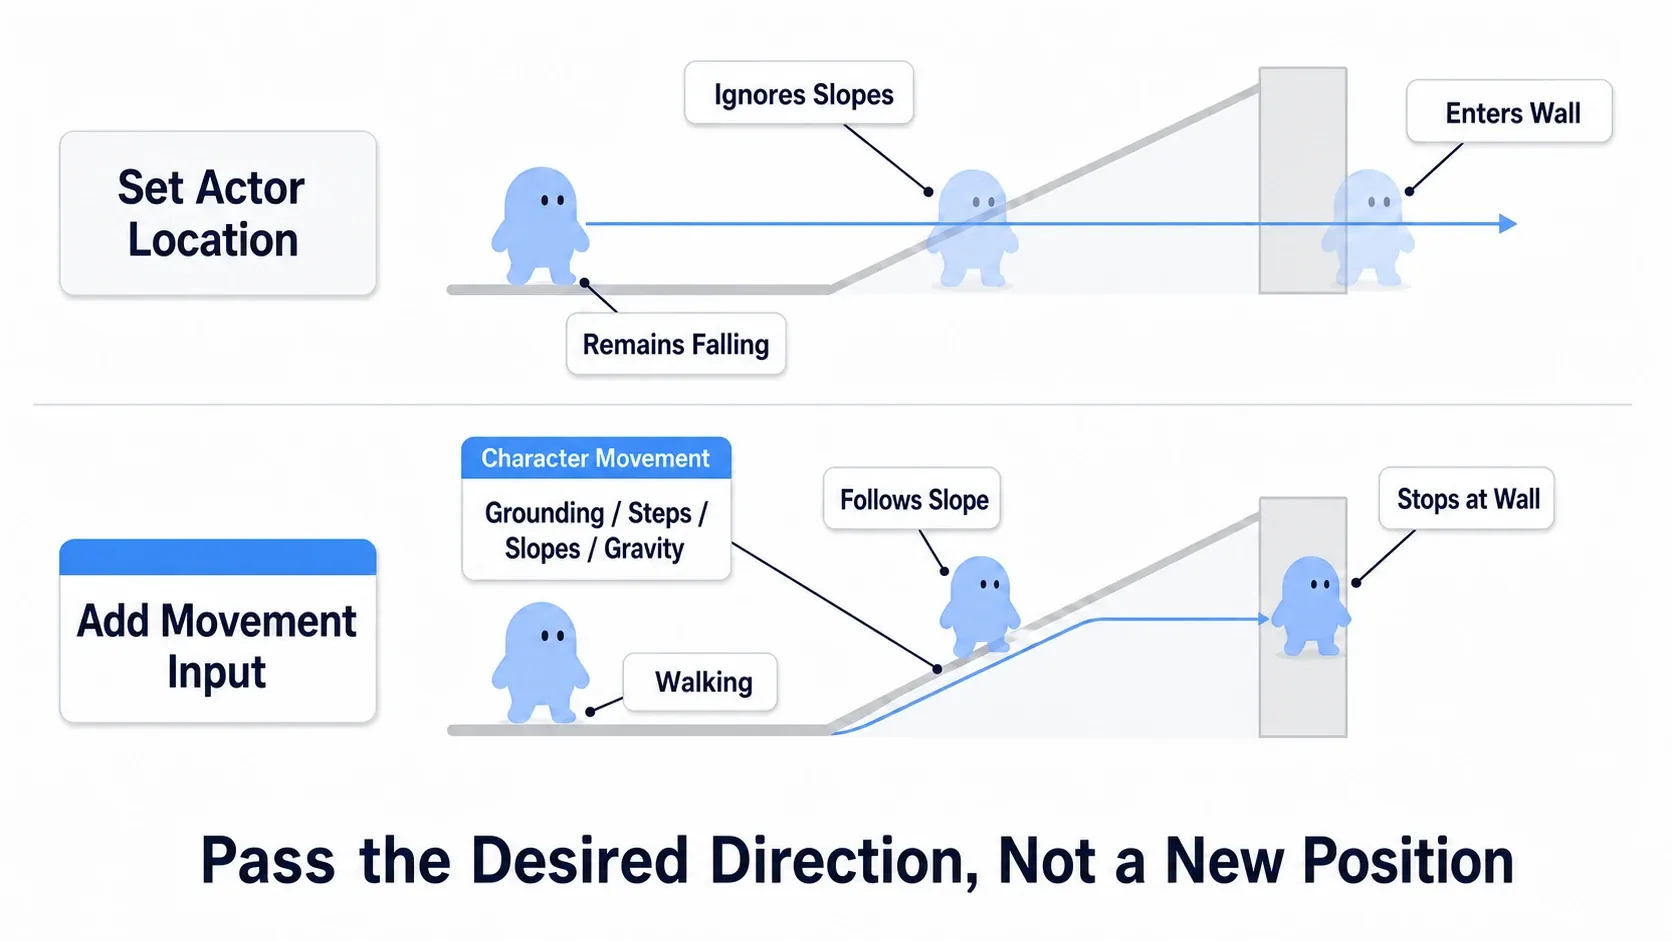
| Method | What happens |
|---|---|
Set Actor Location | Force-overwrites the position. You can end up inside a wall. You move horizontally through slopes. You stay in Falling while standing on the floor |
Add Movement Input | Queues a request saying "I want to move this way." The CMC does the actual moving, handling walls, slopes, steps, and gravity |
Add Movement Input is designed to be called every frame, and it takes three arguments.
| Argument | Meaning |
|---|---|
| World Direction | The direction you want to move (world space vector) |
| Scale Value | Input strength in that direction. 0 to 1 for an analog stick |
| Force | Check it to bypass input-disable settings. Normally leave it off |
At the end of the frame, the CMC picks up the queued requests and converts them into actual movement after applying acceleration, top speed, friction, and ground checks. Stopping at walls, climbing slopes, and stepping up ledges all happen because you went through this path.
In the Third Person template, World Direction is built from "forward relative to the camera." That's why turning the camera right and pressing W sends the character into the screen. This camera-relative setup is covered in the Spring Arm article. For how input arrives in the first place, see the Enhanced Input article.
Note: To knock a character back with an explosion, use
Launch Character. It applies velocity directly and drops you straight into Falling. For teleports and forced repositioning, where you really do want to ignore physics and only change position, combineSet Actor LocationwithTeleport.
Hands-On: From Sluggish to Snappy
The hero of a Metroidvania, a beat-'em-up brawler, a top-down ARPG's melee combat. Different genres, but "the controls feel heavy" always traces back to the same place. The Third Person template's defaults are tuned gently as a general-purpose sample, so they don't work for action as-is.
Here we'll turn the default movement snappy using numbers alone, then add a Shift sprint.
The Goal
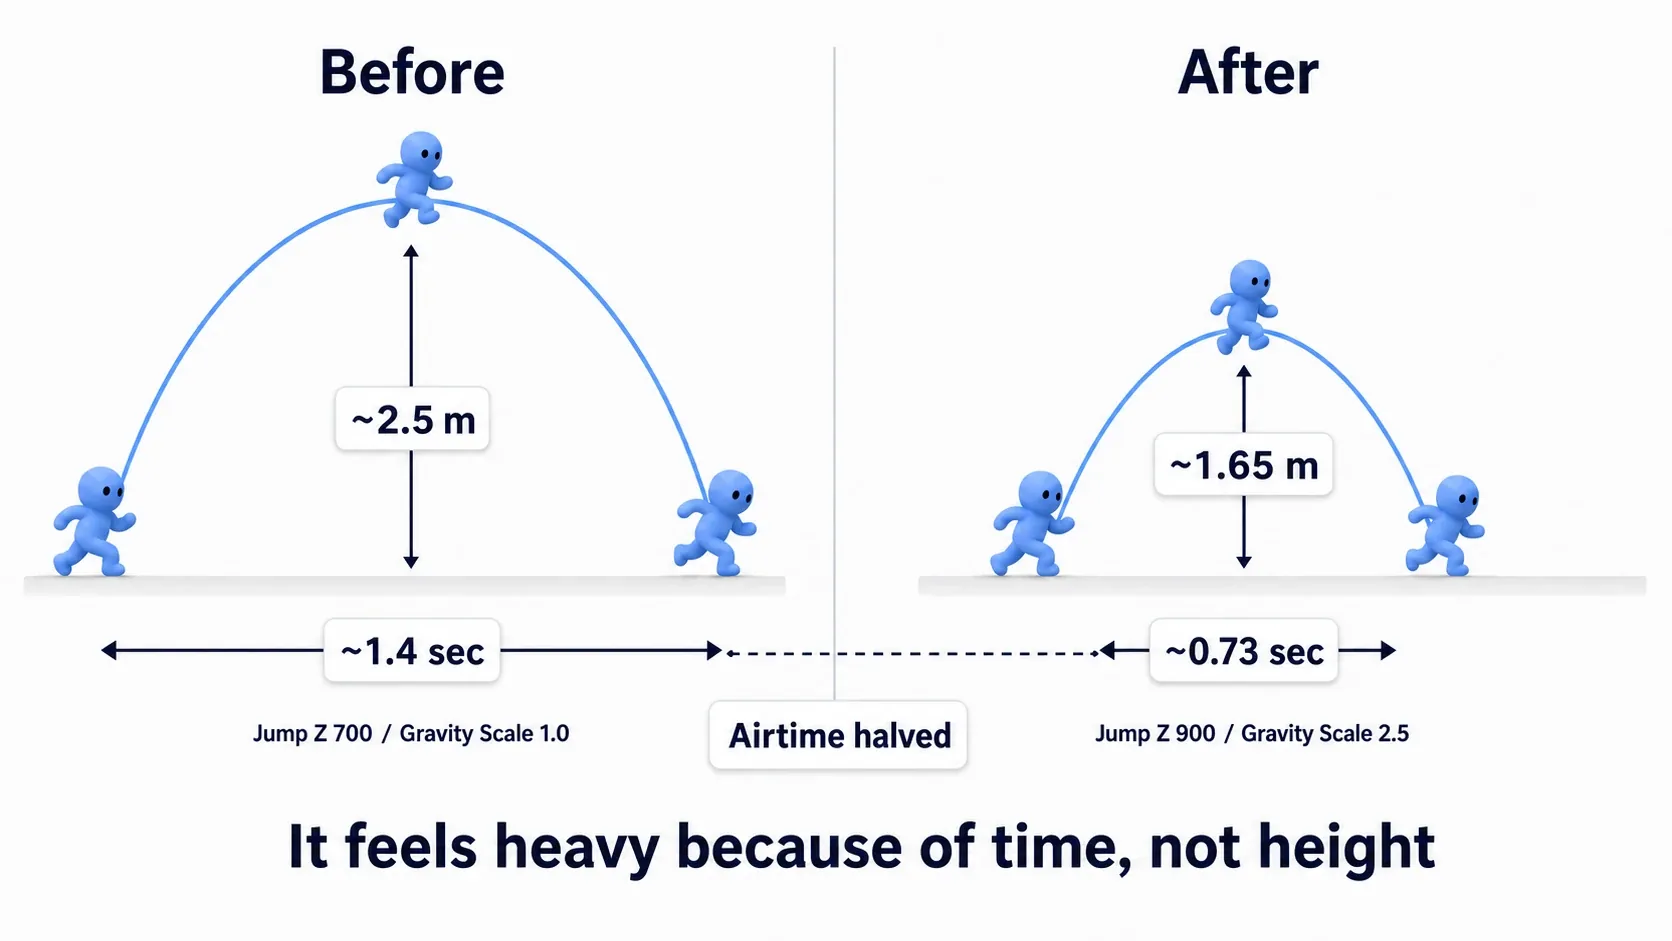
You jump to roughly the same height, but hang time drops by about half. Starting and stopping become sharp, and speed increases only while Shift is held.
Setup
Create a new project from the Third Person template and open Content/ThirdPerson/Blueprints/BP_ThirdPersonCharacter. Select CharacterMovement in the Components tab and check the values in the Details panel.
The template starts here (this is your baseline).
| Parameter | Category | Starting value |
|---|---|---|
| Max Walk Speed | Walking | 500.0 |
| Max Acceleration | General Settings | 2048.0 |
| Braking Deceleration Walking | Walking | 2000.0 |
| Jump Z Velocity | Jumping / Falling | 700.0 |
| Air Control | Jumping / Falling | 0.35 |
| Gravity Scale | General Settings | 1.0 |
Play with these values and the jump peaks at about 2.5 m, taking roughly 1.4 seconds from launch to landing. That 1.4 seconds is what "sluggish" actually means.
For the sprint, add these variables to BP_ThirdPersonCharacter.
| Variable | Type | Default | Purpose |
|---|---|---|---|
WalkSpeed | Float | 500.0 | Normal speed |
SprintSpeed | Float | 900.0 | Speed while sprinting |
On the input side, create IA_Sprint (Value Type: Digital / Bool) and map it to Left Shift in IMC_Default. The steps are the same as in the Enhanced Input article.
Step 1: Change the Numbers
Change these in the Details panel.
| Parameter | Before | After | Why |
|---|---|---|---|
| Gravity Scale | 1.0 | 2.5 | Stronger fall, shorter hang time |
| Jump Z Velocity | 700.0 | 900.0 | Recover the height lost to heavier gravity |
| Air Control | 0.35 | 0.6 | Let players correct their arc mid-air |
| Max Acceleration | 2048.0 | 4096.0 | Sharpen the start of a run |
| Braking Deceleration Walking | 2000.0 | 4000.0 | Remove the slide when stopping |
Those five values alone change the feel. Run the math and the peak is about 1.65 m with roughly 0.73 seconds of hang time. The height drops to about two-thirds, but the time is cut in half. What people perceive as "heavy" is the time, not the height, so shortening it is what works.
Step 2: Build the Shift Sprint
Build these nodes in the event graph.
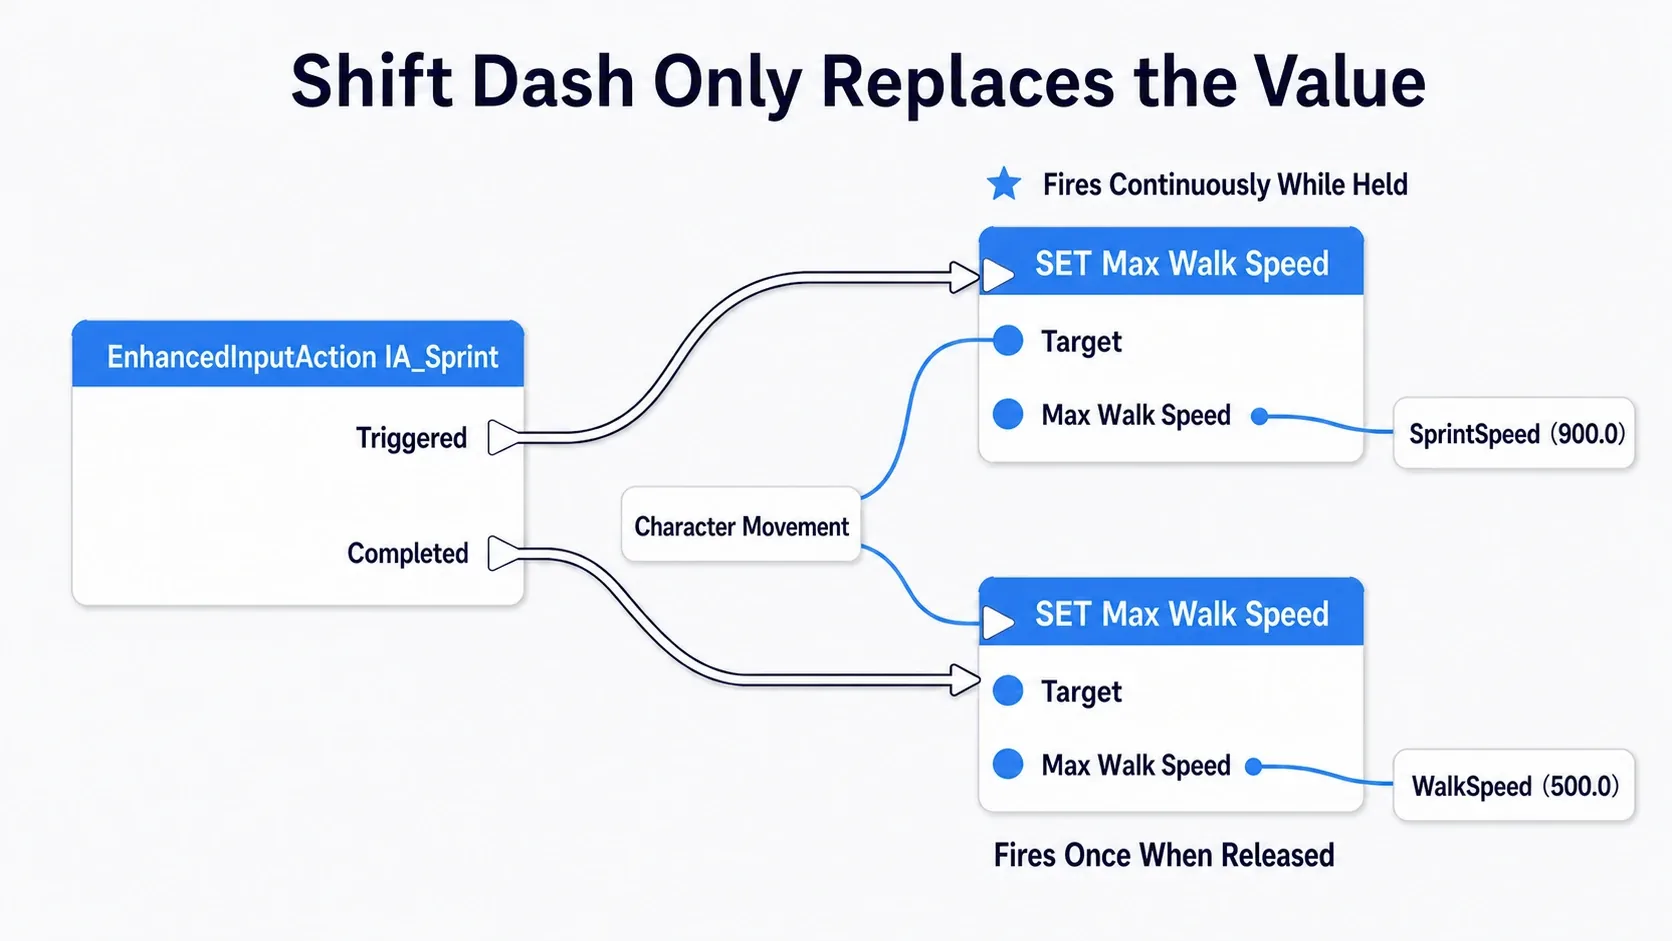
Event: EnhancedInputAction IA_Sprint
  ├ [Triggered] → Set Max Walk Speed
  │                 Target: Character Movement (drag from the component)
  │                 Max Walk Speed: SprintSpeed (900.0)
  │
  └ [Completed] → Set Max Walk Speed
                    Target: Character Movement
                    Max Walk Speed: WalkSpeed (500.0)
To find Set Max Walk Speed, drag CharacterMovement from the Components tab into the event graph, then drag off it and search. It isn't a dedicated node; it's a property setter.
Triggered fires continuously while the key is held, and Completed fires once on release. It doesn't matter how many times Set Max Walk Speed gets called while the key is down; it just writes the same value again.
Verify
Press Play and check three things.
- The jump feels like half the time to landing, and you can act again right after
- You hit top speed almost instantly after pressing W, and stop with barely any slide on release
- Holding Shift is visibly faster, and releasing returns you to normal
To confirm with numbers, wire Get Velocity → Vector Length into Print String in the event graph. If it caps around 500 normally and around 900 while sprinting, it's working (how to use Print String).
If something's off, work from the symptom.
- Jump height didn't change → you changed
Gravity Scalebut forgot to raiseJump Z Velocityback - Shift does nothing →
IA_Sprintisn't mapped inIMC_Default, or Set Max Walk Speed's Target points at a different component - Still fast after releasing Shift → you only wired
Triggered, notCompleted - No mid-air control →
Air Controlis still the class default0.05(check it's back at the template's0.35) - Fast to start but won't stop → you forgot to change
Braking Deceleration Walking
Two things to take away.
- "Heavy" is about time, not speed: raising top speed won't help if acceleration, braking, and hang time are all long. Suspect
Max Acceleration,Braking Deceleration Walking, andGravity Scalefirst - A sprint is just swapping a value: you don't need a separate movement path. Overwrite a CMC property at runtime and acceleration, braking, and ground detection all keep working. Crouching (
Crouch/UnCrouch) follows the same idea; it just switches to theMax Walk Speed Crouchedvalue
Once the run feels right, the next question is where you view it from. Building a third-person camera continues in the Spring Arm article.
Checks When Nothing Moves
Here are the four movement problems people hit most often, grouped by cause.
| Symptom | Where to look |
|---|---|
| Slides back down slopes | Walkable Floor Angle (default 45.0 degrees). Anything steeper isn't treated as floor, so you go into Falling |
| Stops on small steps | Max Step Height (default 45.0). Steps up to this height are handled automatically; anything taller counts as a wall |
| No mid-air steering at all | Air Control. The class default 0.05 is effectively nothing |
| Can't jump | The Can Jump conditions. You can't jump while already Falling. For multi-jumps, set Jump Max Count to 2 or more |
Raising Walkable Floor Angle lets you walk up steeper slopes, but push it too far and you'll be able to climb walls. Around 50 to 55 degrees is a sensible ceiling.
When steps catch, suspect the geometry of the stairs first. Laying down a single ramp often solves it, and it's safer than pushing Max Step Height to extremes.
Bonus: Good to Know for Later
- Character rotation is split between the CMC and the Pawn: turning the body toward the movement direction is the CMC's
Orient Rotation to Movement, while matching the camera direction is the Pawn'sUse Controller Rotation Yaw. Turning both on makes them fight (→ the Spring Arm article) - Turn speed is Rotation Rate: with
Orient Rotation to Movementon, how fast the body turns comes fromRotation Rate's Z (Yaw). The template uses500.0; higher values turn more sharply. When you want facing controlled independently of movement (turrets, security cameras, a head that turns), you rotate it yourself instead → Rotation and Interpolation Basics - Keeping values in data speeds up tuning: move speeds and jump strengths into a Data Table or a Data Asset and you can manage per-character differences in a table
- Don't put movement in Tick: calling
Add Movement Inputfrom input events is enough. Before adding your own per-frame work, read designing with less Tick - The CMC is built for multiplayer: that makes it somewhat heavy, but position replication and correction come free. Roll your own with
Set Actor Locationand you lose all of it - A successor to the CMC is in the works: there's a plugin called
Mover, and Epic states it is intended to eventually replace the CMC. That said, its specifics can still change, and the CMC has vastly more mileage behind it. Building on the CMC today is fine. The ideas you learn here — speed is three numbers (cap, acceleration, braking), Movement Mode decides state, input is queued as a request — carry over unchanged if you do migrate
Summary
- A Character is a capsule + a mesh + the CMC. What collides with the world is the capsule
- Speed is split into Max Walk Speed / Max Acceleration / Braking Deceleration Walking
- Treat jump height and hang time as separate. To shorten only hang time, raise
Gravity Scaleand raiseJump Z Velocitytoo - Movement Modes switch automatically. Rising and falling are both Falling
- Always move through
Add Movement Input.Set Actor Locationskips ground detection entirely
How long does your current character take from jumping to landing? Start by measuring that.