The first wall you hit when you start building AI is usually "the enemy won't take a single step." You built the Behavior Tree, you assigned the AI Controller, and it still just stands there. Most of the time the cause isn't the AI at all. It's the floor under its feet.
UE's AI doesn't walk freely over the ground. It only moves across the NavMesh, the data describing "where walking is allowed." This article covers how to see the NavMesh, how to match its settings to your AI's size, what to pick for games where terrain changes, and the steps to actually fix AI that won't move.

What You'll Learn
- AI walks on the NavMesh, not the ground
- Start by pressing the P key to see the green floor (everything begins here)
- A narrower green area is normal (it's carved back by the Agent Radius)
- Runtime Generation offers three choices: Static / Dynamic Modifiers Only / Dynamic
- Hands-on: fixing motionless AI by narrowing it down from the top
AI Walks on the NavMesh
The player walks on the ground's collision, but AI doesn't. AI references the NavMesh, data that holds "you can walk and move here" in the shape of a floor.
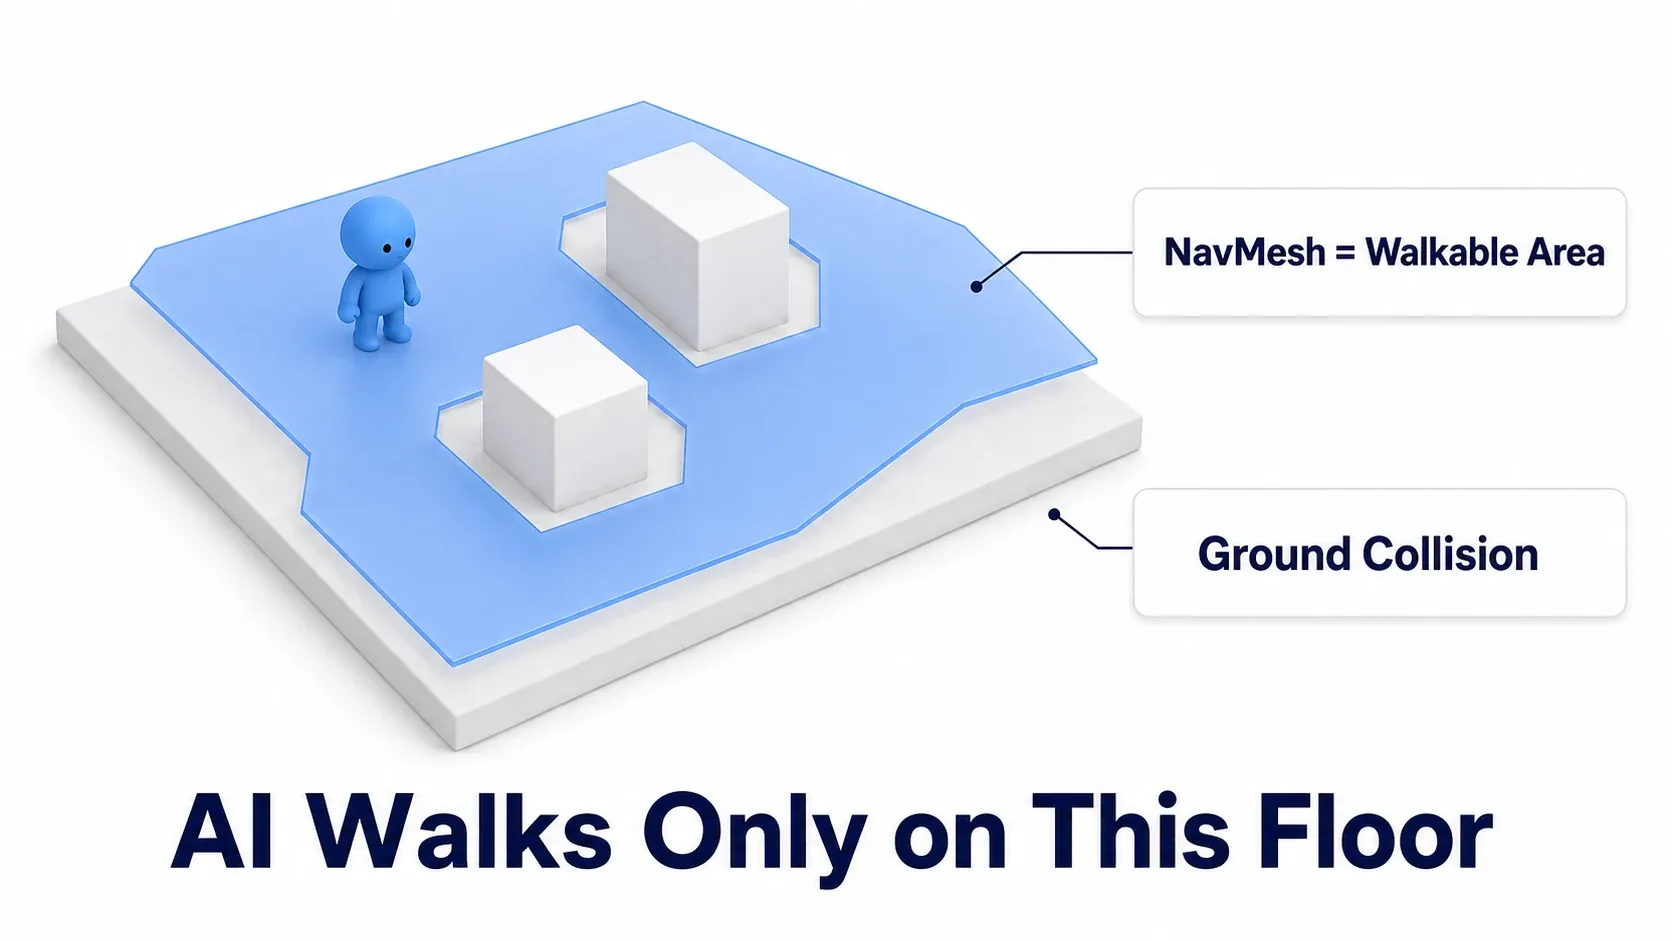
Why does it need separate data? To compute paths. When asked "get from A to B," inspecting ground polygons every time would never keep up. Reducing the walkable surface to simple shapes ahead of time is what makes pathfinding fast to solve.
Two important consequences follow.
- AI can't move anywhere without a NavMesh. It doesn't matter that there's ground there
- The NavMesh is generated in advance. Place a floor afterward and it won't be reflected until you regenerate
Nearly every "my AI won't move" is one of those two.
Press P First
Before you guess at causes, look. Hover the mouse over the editor viewport and press the P key, and the NavMesh appears as a green floor.
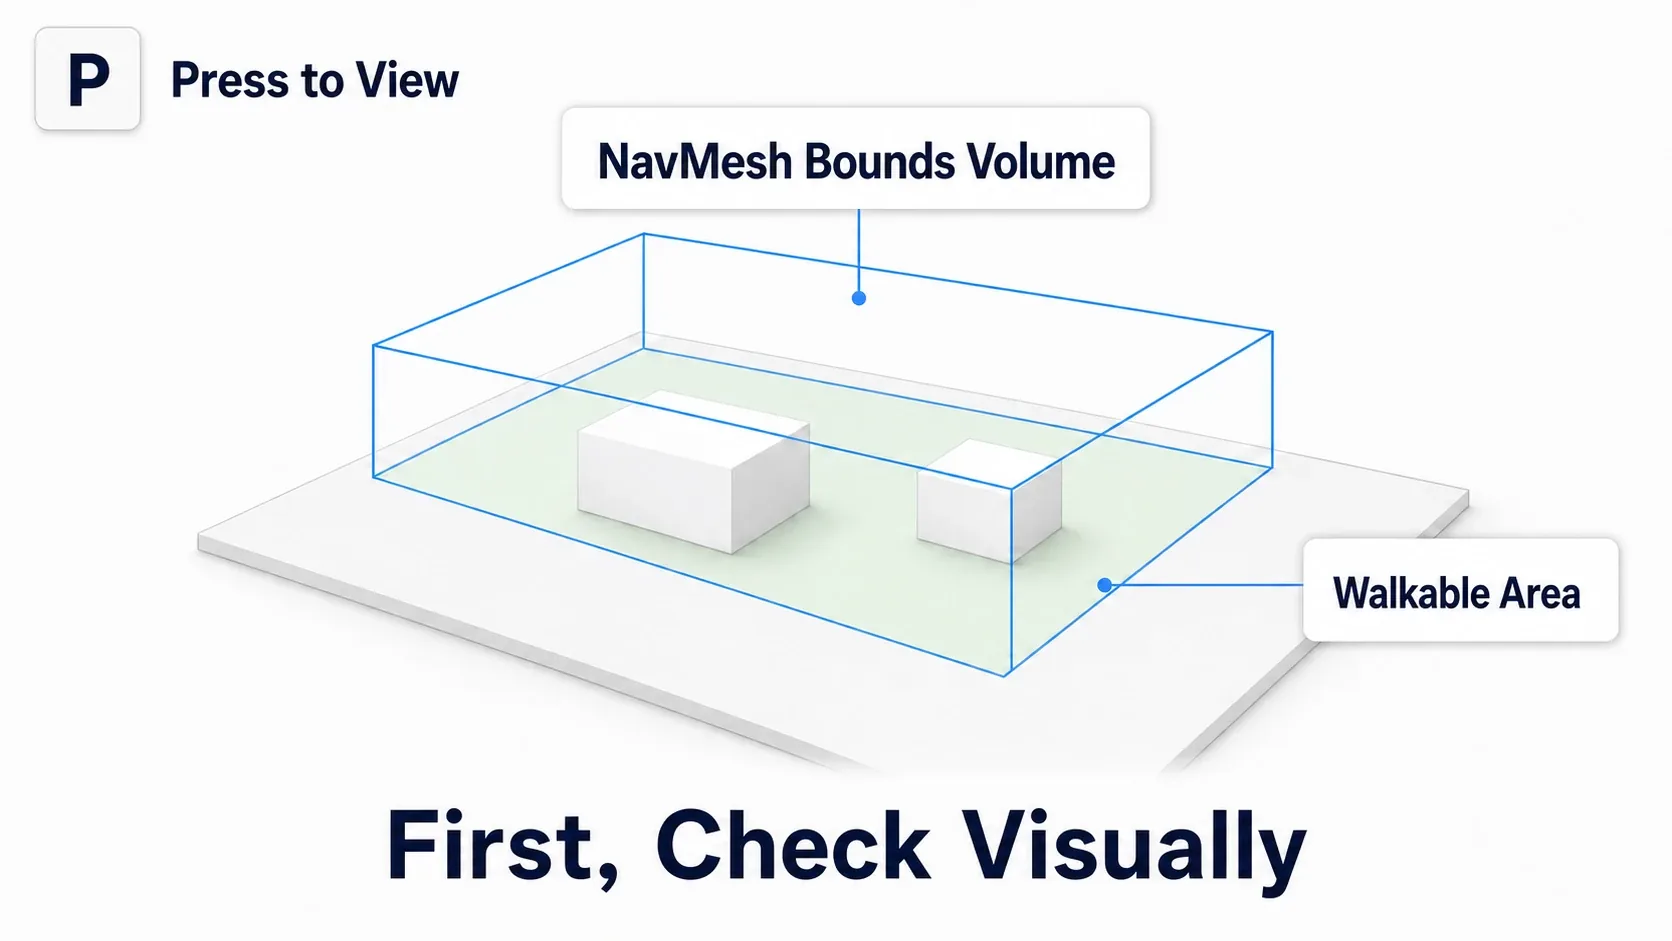
If nothing appears, the first suspect is the NavMesh Bounds Volume. Search for "Nav" in the Place Actors panel (Window → Place Actors) and drag a NavMesh Bounds Volume into the level.
If it still doesn't appear, check these too.
- Does the floor have collision?: the NavMesh is built from world collision. A visible floor with no collision generates nothing
- Is
Can Ever Affect Navigationenabled on the floor?: it's in the Actor's details panel. With it off, the Actor isn't considered for NavMesh generation - Is auto-update enabled?:
Update Navigation AutomaticallyunderEdit → Editor Preferences → Level Editor → Miscellaneous. Where it's off, nothing generates until you runBuild → Build Paths
Once placed, scale it so it entirely encloses the area you want AI walking in. Two things trip up beginners here.
- The volume doesn't contain the ground: floating in the air, or sitting entirely above the ground, generates nothing. Make sure the ground is inside it
- The volume is too small: if you want AI walking to the far edge, it has to cover that far edge
Once P shows a green floor, also confirm that the AI's feet, its route, and its destination are all connected as one continuous patch of green. Green showing up somewhere isn't enough.
Pis a shortcut for the level editor viewport. It may not toggle during PIE while the game is capturing input.
Green appeared but it's narrow? A slight carve-back along walls is normal. The Agent Radius, covered next, is the reason.
Matching Your AI's Size
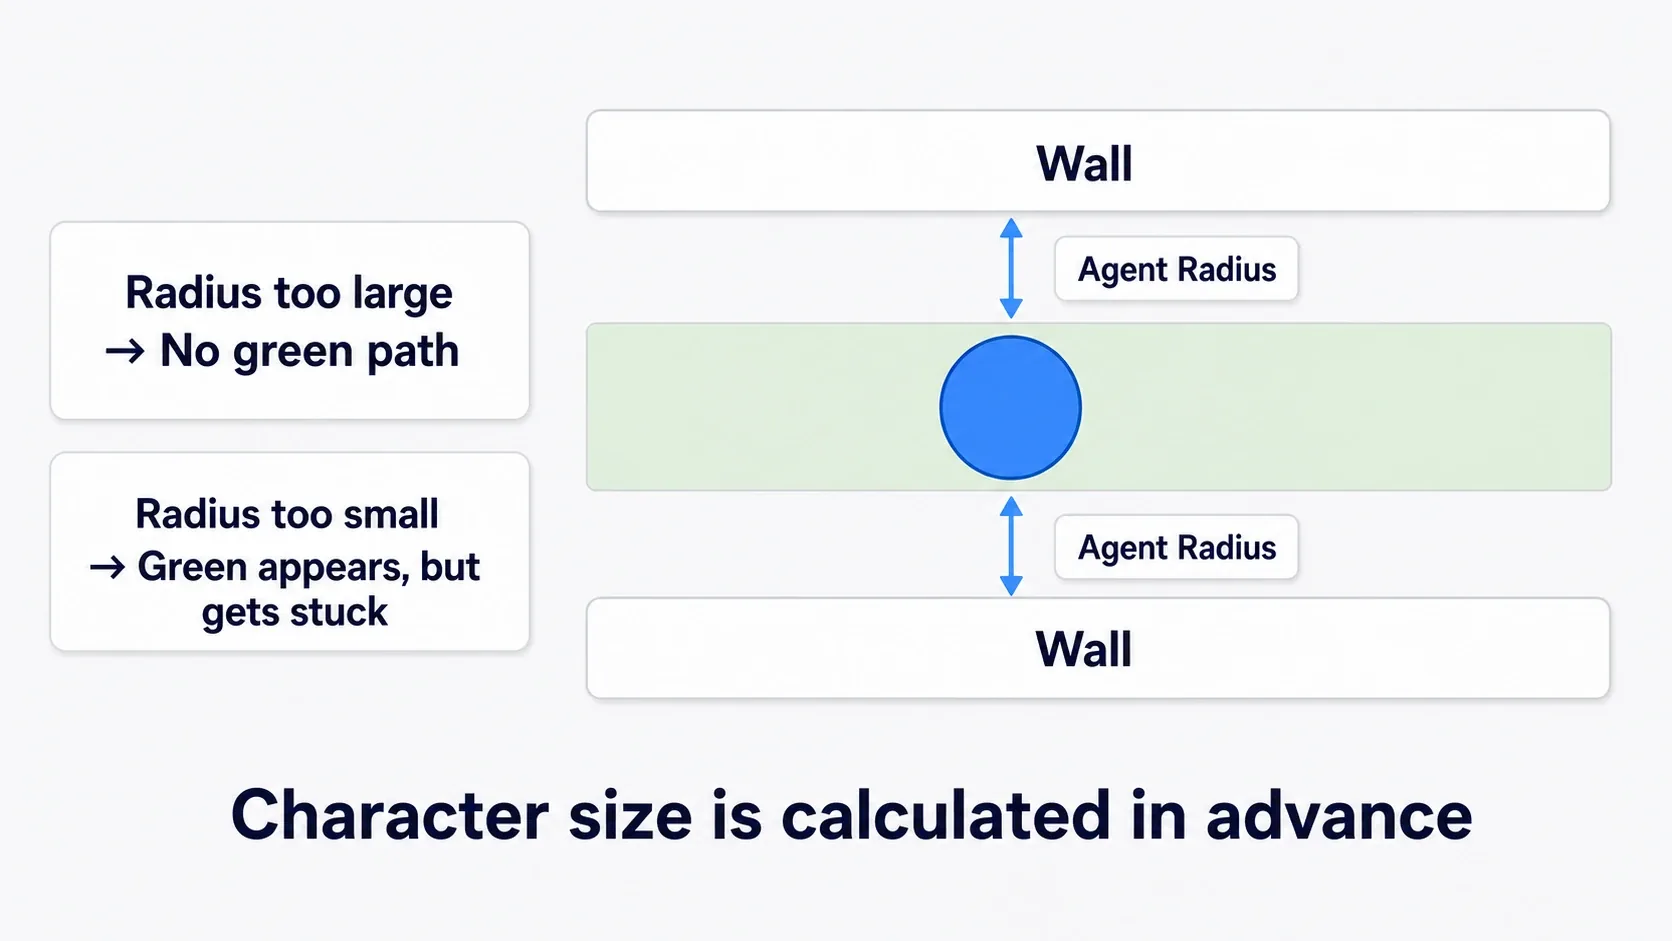
The green floor is built with your AI's size taken into account. Since it precomputes "can this character fit through here," a mismatch between your character and the settings makes behavior go strange.
The settings live in Edit → Project Settings → Engine → Navigation Mesh (the Agents section; step height lives under Nav Mesh Resolution Params).
| Setting | Meaning | Match it to |
|---|---|---|
| Agent Radius | The AI's width | The character's Capsule Radius |
| Agent Height | The AI's height | The character's Capsule Half Height × 2 |
| Agent Max Slope | The slope angle it can climb | Default 44 degrees. Raise it for steep slopes |
| Agent Max Step Height | The step it can climb | Character Movement's Max Step Height |
The larger the Agent Radius, the further the green floor is carved back from walls. That's the engine precomputing the obvious fact that a wide character can't squeeze along a wall.
So the symptoms look like this.
- Setting larger than reality → no green appears in a corridor that should be passable, and AI never enters it
- Setting smaller than reality → green appears, but the AI can't actually fit and snags on the wall and stops
Changing the values changes the shape of the green, so adjusting with P held on is the clearest way to work (if you've turned off auto-update, you'll need Build → Build Paths).
Note that the carve-back is roughly equal to the Agent Radius, but since it's computed by voxelizing internally, the numbers and the visuals don't match exactly.
Steps and slopes need attention on both the NavMesh side and the character side. For steps, check
Agent Max Step Heightand Character Movement'sMax Step Height. For slopes, checkAgent Max Slopeand Character Movement'sWalkable Floor Angle. Raising only one side won't get you up there. When "green is showing but it won't climb," this is almost always the cause.
Settings for Games Where Terrain Changes
"Opening a door makes the path passable." "Breaking a wall opens a route." Games like these need to update the NavMesh at runtime.
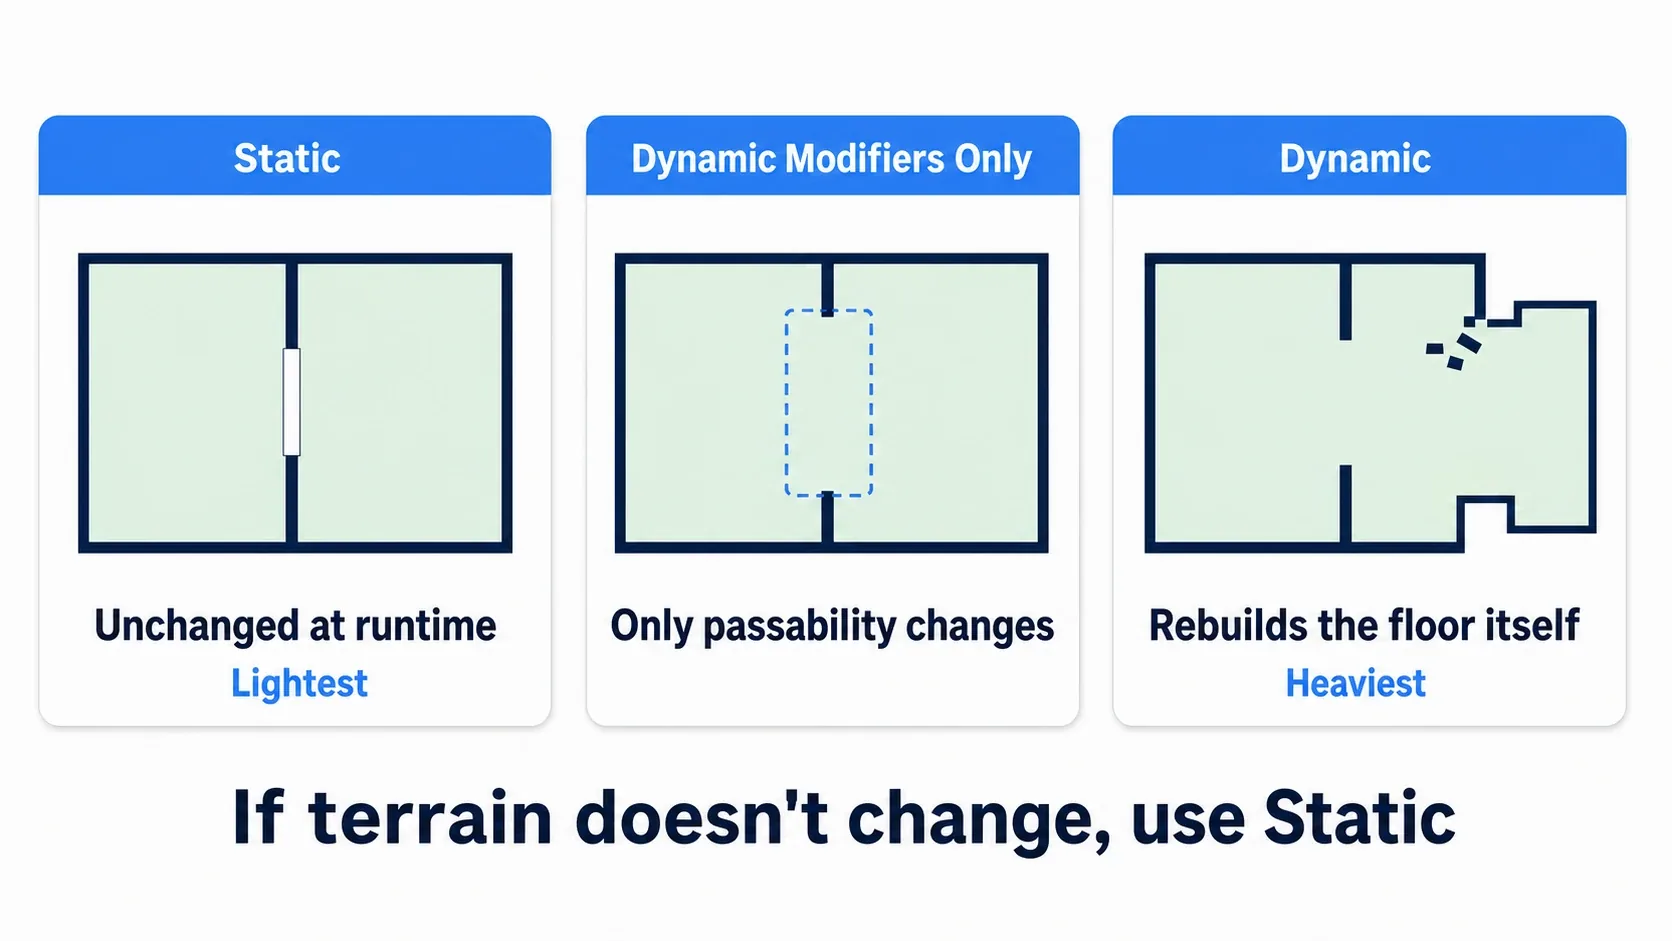
Pick one of three options under Runtime Generation in Project Settings → Navigation Mesh → Runtime.
| Setting | Runtime updates | Suits |
|---|---|---|
| Static | None (uses what was baked in the editor) | Games where terrain doesn't change. The lightest option |
| Dynamic Modifiers Only | Changes to Area Class, cost, and blocking via Nav Modifiers | Doors and similar, where only the treatment of existing floor changes |
| Dynamic | Regenerates only the tiles that changed | Destruction that alters the terrain itself, or dynamically generated floors |
Static is the default choice. There's no reason to run Dynamic in a game where terrain doesn't change.
And there's one distinction worth knowing.
A Nav Modifier changes how existing floor is treated; it doesn't create new floor. If you want AI to walk through a hole opened by a broken wall, the NavMesh has to be regenerated there, so you need
Dynamic.Doors need care too.
Dynamic Modifiers Onlycovers doors only if you build them with aNav Modifierthat toggles between "passable when open" and "impassable when closed." Simply moving the door mesh isn't reflected, and that needsDynamic.
Marking Places You Don't Want Crossed
"Don't walk over the lava." "Avoid this bridge if you can." Adjustments like these are made with a Nav Modifier Volume.
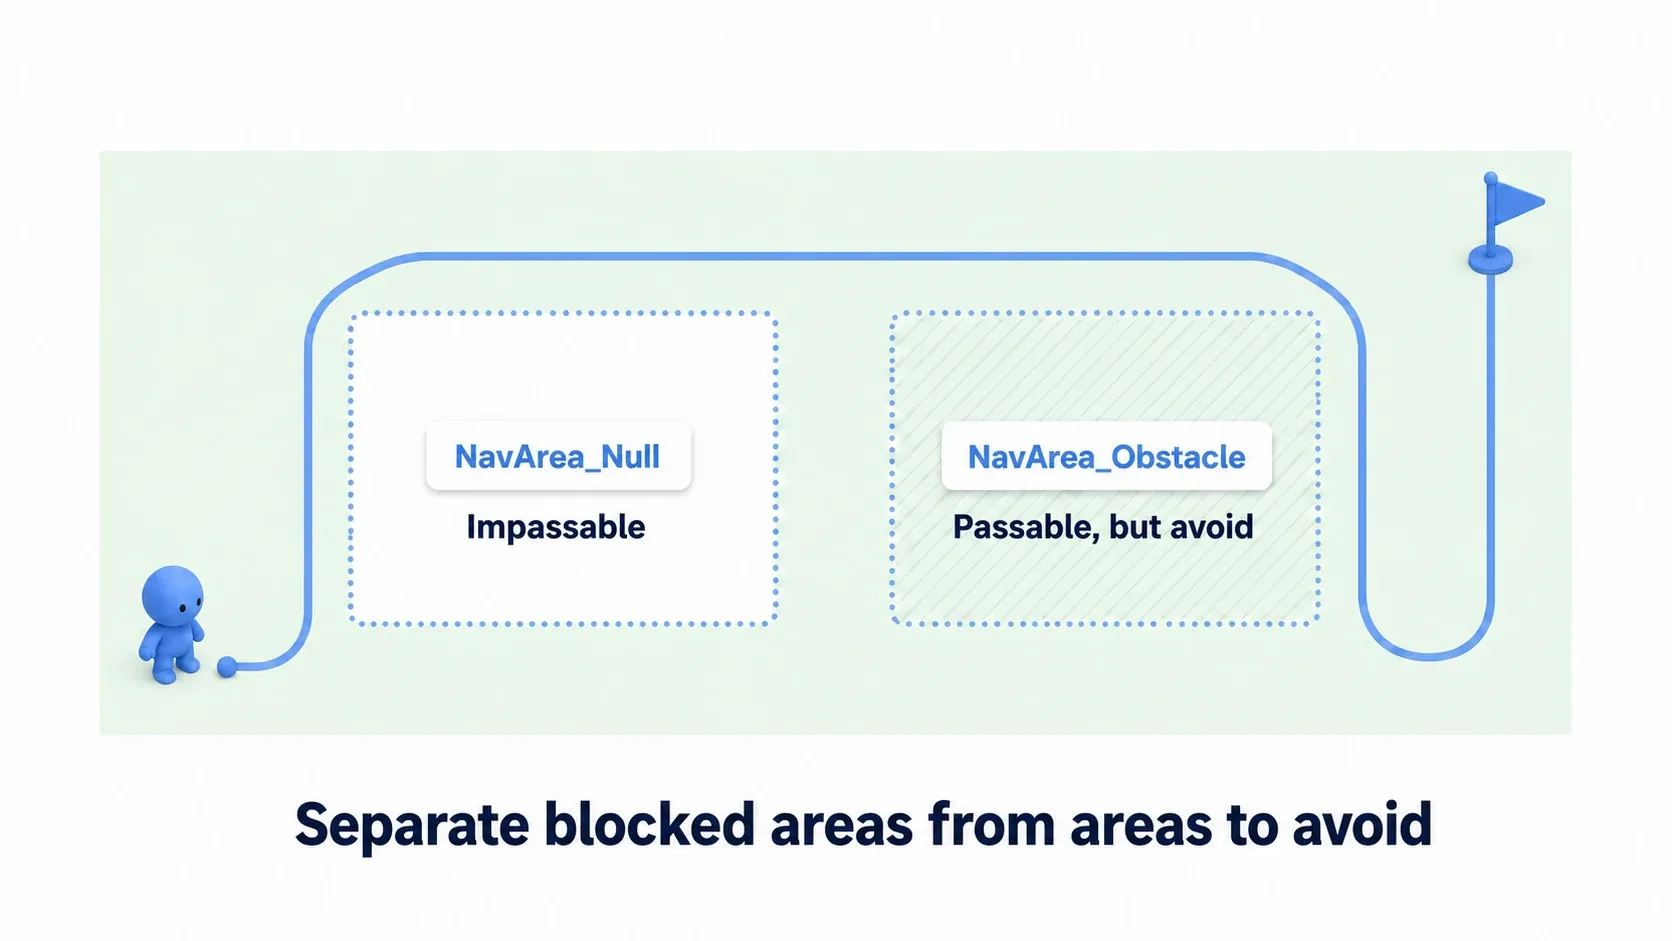
Place a Nav Modifier Volume from Place Actors and set its Area Class.
| Area Class | Effect |
|---|---|
| NavArea_Null | Impassable. The green disappears there |
| NavArea_Obstacle | Passable but high cost. Avoided if another route exists |
| NavArea_Default | A normal passable area |
NavArea_Obstacle is the broadly useful one. Because it expresses "prefer to avoid" rather than "forbidden," you get the natural behavior of "usually detour, but go through if there's no other way." It suits risky terrain like lava, poison swamps, and open ground exposed to enemy sightlines.
Hands-On: Diagnosing and Fixing Motionless AI
A patrolling guard in a stealth game, a pursuer in a horror game, an advancing unit in a tower defense. "The AI won't move" is the first trouble you hit in any genre. Here we'll go through narrowing it down from the top, checking each step while it's actually running.
Setup to follow along: we'll test with a minimal configuration.
| Type | Name | Settings |
|---|---|---|
| Character | BP_Enemy | AI Controller Class set to BP_EnemyAIController, Auto Possess AI set to Placed in World or Spawned |
| AIController | BP_EnemyAIController | Build the graph below |
| Level | A floor with collision | The NavMesh is generated from collision. Enable Can Ever Affect Navigation too |
| Level | Nav Mesh Bounds Volume | Don't place it yet (we're producing the symptom on purpose) |
First, write the minimal logic in the AI Controller: just head toward the player.
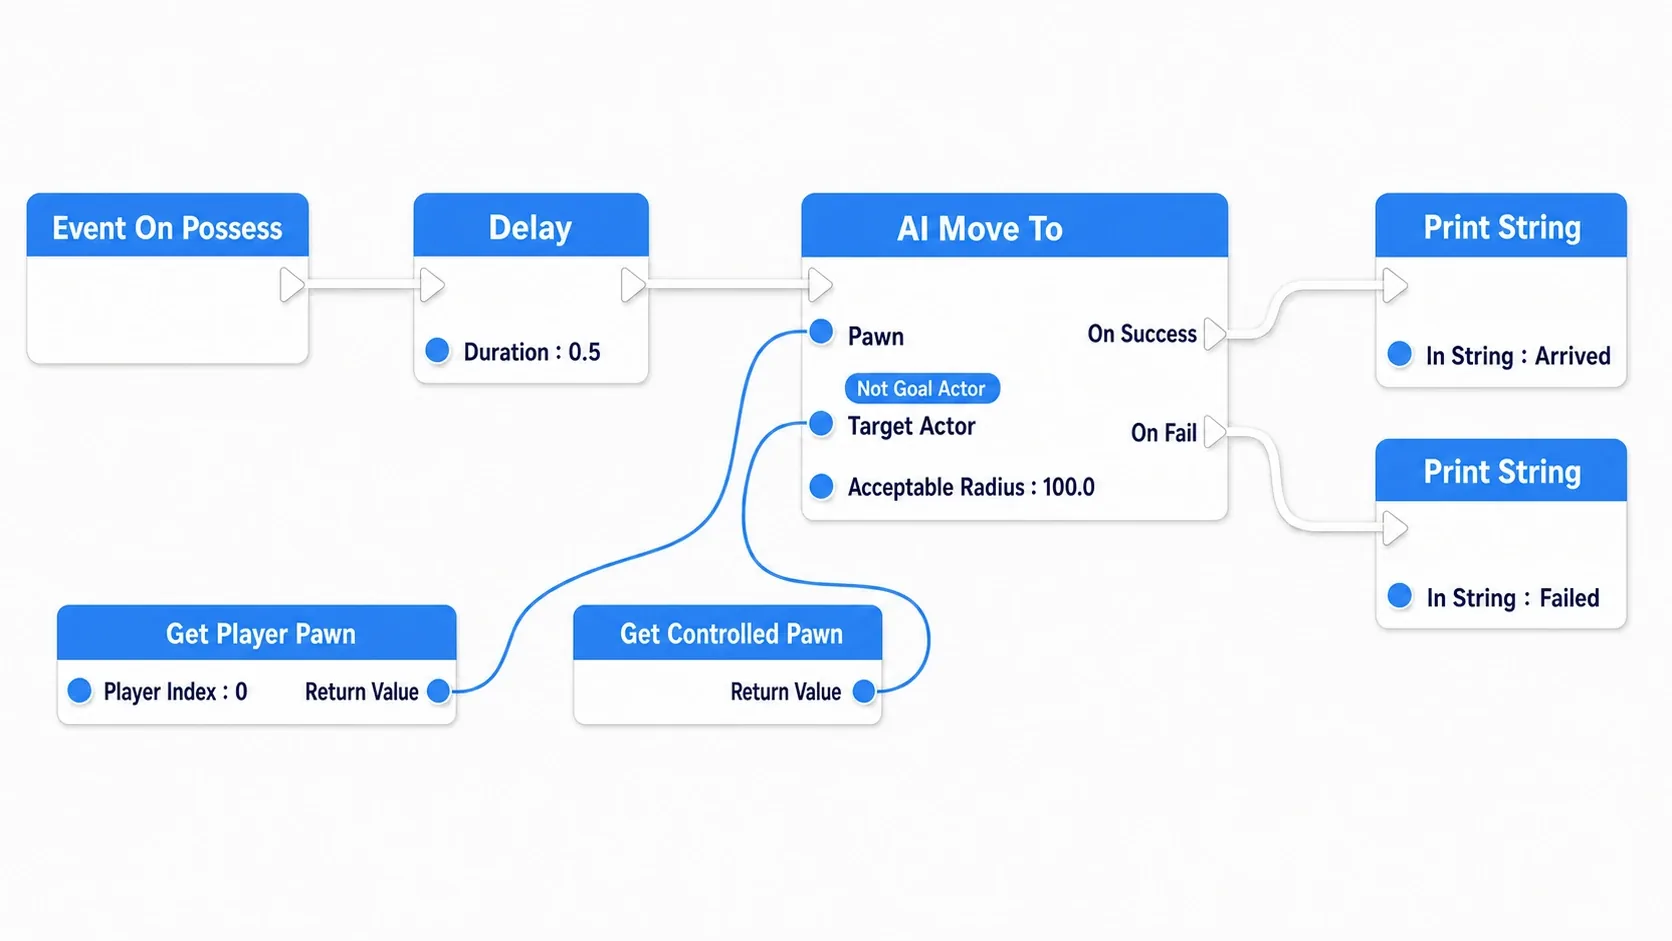
Event On Possess (BP_EnemyAIController)
  → Delay (Duration: 0.5)
  → Get Player Pawn (Player Index: 0)
  → Is Valid ?
      Valid → AI Move To (Pawn: Get Controlled Pawn,
                          Target Actor: the Pawn we got,
                          Acceptable Radius: 100.0)
          On Success → Print String ("Arrived")
          On Fail    → Print String ("Failed")
Watch the pin names. The destination goes in Target Actor (Goal Actor is the name on a different node, so searching for it here gets you nowhere). Wire Get Controlled Pawn into the Pawn pin.
The Delay is a crude way to wait for the player to spawn. It isn't reliable, so catch it with Is Valid to make failures visible.
Confirming the symptom: hit Play and the enemy doesn't move, printing Failed. The fact that On Fail fires at all is a clue. Let's work through it in order.
Step 1: Is there a NavMesh? Press P. No green floor should appear. Place a NavMesh Bounds Volume from Place Actors and scale it to cover the whole level.
Press P again, and once green appears, hit Play. This time the enemy comes toward you. That resolves most cases.
Step 2: If it still doesn't move, check what's around it. Go through these in order.
BP_Enemy'sAI Controller ClassandAuto Possess AI- Is there green under the enemy's feet too? (the starting point needs to be on the NavMesh, not just the destination)
- Are both
PawnandTarget ActoronAI Move Toconnected? - Is
Get Player PawnreturningNone? (check the GameMode's Default Pawn setting)
Step 3: Green is there, but it stops partway. If it snags mid-corridor, your Agent settings don't match your character's size.
| Symptom | Where to look |
|---|---|
| Won't enter a narrow corridor | Agent Radius is larger than the actual Capsule Radius |
| Scrapes against walls and stops | Agent Radius is too small |
| Stops at a step | Agent Max Step Height and Character Movement's Max Step Height |
| Won't climb slopes | Agent Max Slope |
Step 4: Are the start and destination connected by one continuous patch of green? This is easy to miss, but both ends need to sit on the same green region. Check with P on that the player isn't standing outside the volume.
(Depending on your settings, partial paths that only get partway may be allowed. Whether it "doesn't move at all" or "stops partway" is a useful clue.)
Hit Play and check. The enemy should approach by going around walls rather than in a straight line. Seeing that means pathfinding is working. On arrival, the Arrived log prints.
There are two key points.
- Press
Pbefore you guess: the NavMesh is visible. Instead of agonizing over "maybe the setting is...," checking whether green appears and how far it extends is the fastest route - The NavMesh and the character are configured separately: changing Agent settings doesn't change the character, and vice versa. Steps and slopes need matching values on both sides
When you're ready to build the AI's behavior itself, head to Building Enemy AI with Behavior Trees. Once movement works end to end, the next step is spotting and chasing the player—detection is covered in Getting Enemies to Notice You with AI Perception. If it moves but looks unnatural, the problem may be on the Animation Blueprint side.
Bonus: Good to Know for Later
Getting AI to walk on a moving platform isn't straightforward. The NavMesh doesn't stick to the floor and move with it (with Dynamic it may regenerate from the collision's current position, but that's expensive). For elevators and moving platforms, a different design like "stop the AI's movement while riding and attach it to the platform" is more practical.
Get Random Reachable Point in Radius is the standard for patrol AI. It returns a random point on the NavMesh, so "wander around the area" takes just a few nodes. There's a similarly named Get Random Location in Navigable Radius, which doesn't guarantee reachability. For patrols, you want the Reachable one.
NavMesh generation takes time on large levels. If editing feels sluggish, you can turn off Update Navigation Automatically under Edit → Editor Preferences → Level Editor → Miscellaneous and switch to generating with Build → Build Paths when needed.
If your level is split up, only the loaded range is considered for generation. With World Partition, unloaded regions may not build as intended, so verify on the target platform (see Level Streaming).
The thinking is the same when you drive movement from C++.
// Inside the AI Controller
void AMyAIController::ChaseTarget(AActor* Target)
{
    if (Target)
    {
        // Internally computes a path using the NavMesh
        MoveToActor(Target, /*AcceptanceRadius=*/100.0f);
    }
}
MoveToActor / MoveToLocation fill a similar role (Blueprint's AI Move To is an async node with On Success / On Fail, so they aren't exactly identical). No NavMesh means nothing moves in C++ either, so it's still the P key first.
Summary
"My AI won't move" resolves fastest if you work through it in this order.
| Order | What to check | Common cause |
|---|---|---|
| ① | Does P show a green floor | NavMesh Bounds Volume missing, too small, or floating |
| ② | Is an AI Controller assigned | AI Controller Class unset, Auto Possess AI |
| ③ | Are Pawn and Target Actor on AI Move To connected | Empty pins |
| ④ | Do Agent settings match the character | Radius / Step Height / Slope |
| ⑤ | Is there green at the goal | The destination sits outside the volume |
And one operational guideline: leave it on Static unless terrain changes. Dynamic is something you switch to when you need it, not something you pick from the start.
Press P in your level. Is the green reaching all the way to the edges?