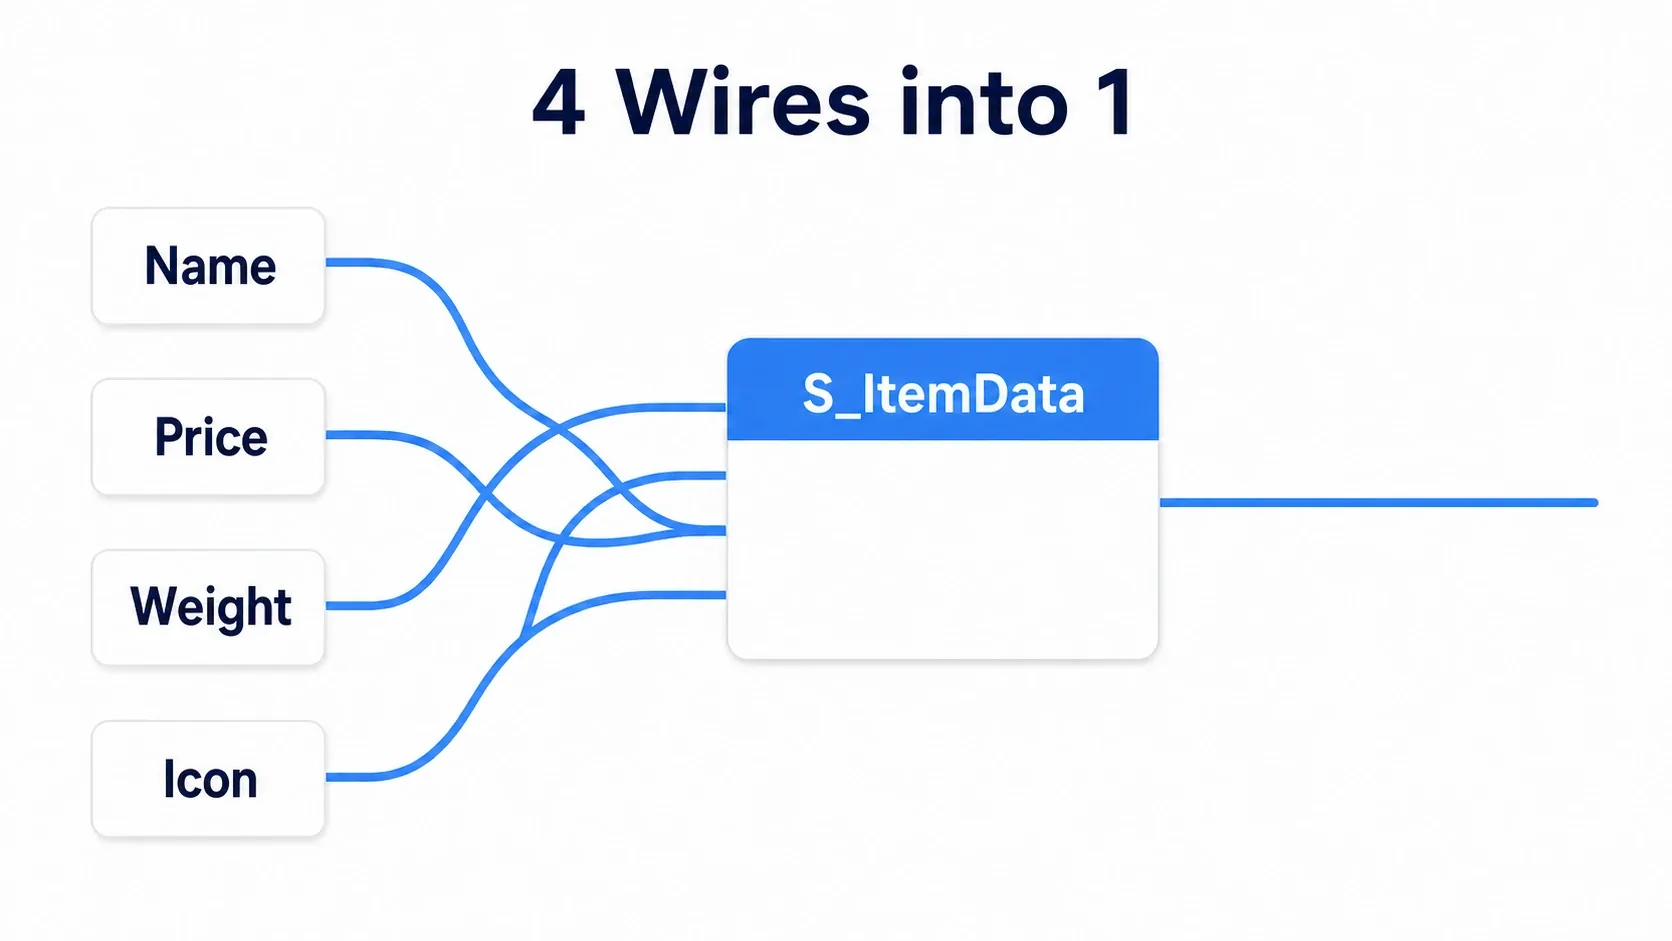
As you build out a Blueprint, your variable list grows: PlayerName, PlayerHealth, PlayerAttack, PlayerIcon. Every time you pass them to a function you drag four wires , and the moment you want to add one more parameter, you have to fix every call site.
A Struct groups those "values that always travel together" into a single type . One wire instead of four, and adding a field leaves callers untouched.
But structs come with a trap that almost everyone in Blueprint hits at least once : you change a value and nothing happens. This article covers how to create and use structs, plus why that trap occurs and how to fix it.
What You'll Learn
- A struct is a type that groups values you always handle together
- Break takes values out, Make builds one up
- Structs are value types , so Get returns a copy . This is the biggest trap
- To edit an array element, use Set Array Elem or get a reference
- Hands-on: design item data and make it actually editable
When to Reach for a Struct
The call is simple: do you have three or more values that always move together?
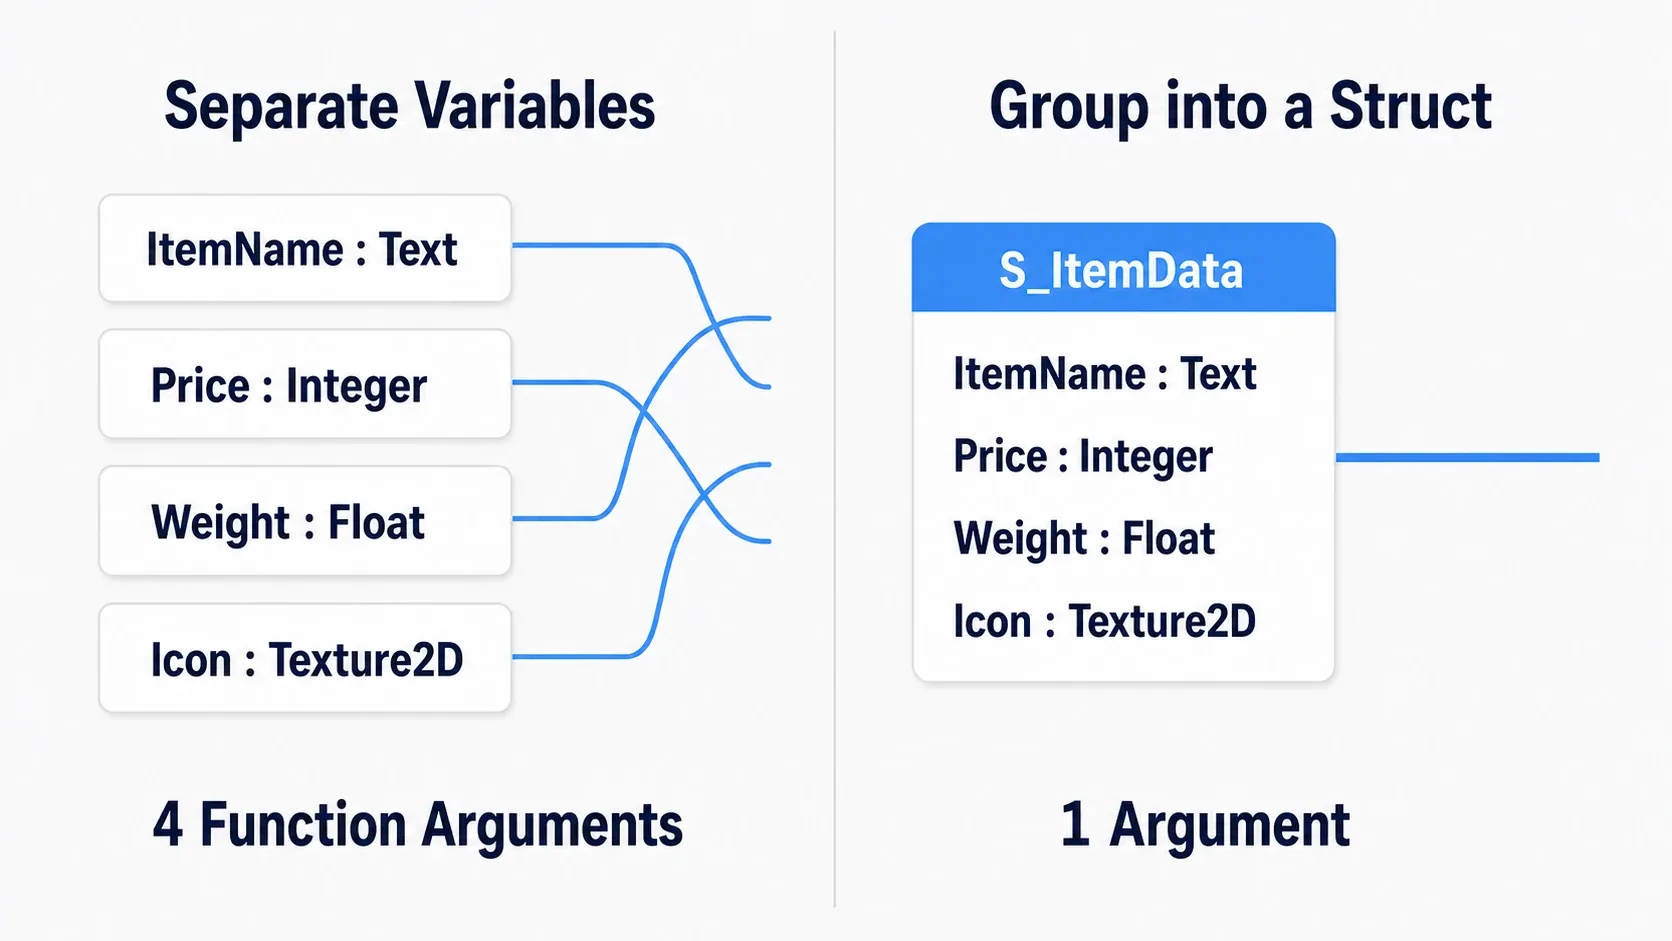
Take an item. Name, attack power, price, icon. These are always handled as a set. You never pass the name and forget the attack power, because they describe one single thing .
Leaving values like that as separate variables causes real problems.
- Function inputs pile up: four values means four wires
- Adding a field breaks things: the moment you add "rarity", you have to fix every call site
- You can't make an array of them: representing "the player holds 10 items" forces you to keep four parallel arrays in sync
With a struct, that becomes one wire and one array .
| Separate variables | Struct | |
|---|---|---|
| Passing to a function | 4 wires | 1 |
| Adding a field | Fix every call site | Just edit the struct |
| Holding several | 4 parallel arrays | 1 array |
How it differs from an array: an array lines up the same type ; a struct groups different types . "10 items" is an array; "the information one item carries" is a struct. Combining both into an array of structs is the standard shape for an inventory (the full build is covered in Building an Inventory System).
Creating One, Plus Make/Break
Right-click in the Content Browser → Blueprints → Structure . Prefixing the name with S_ makes it easy to spot in variable lists.
Open it and add fields with Add Variable . Each one gets a type and a default value.
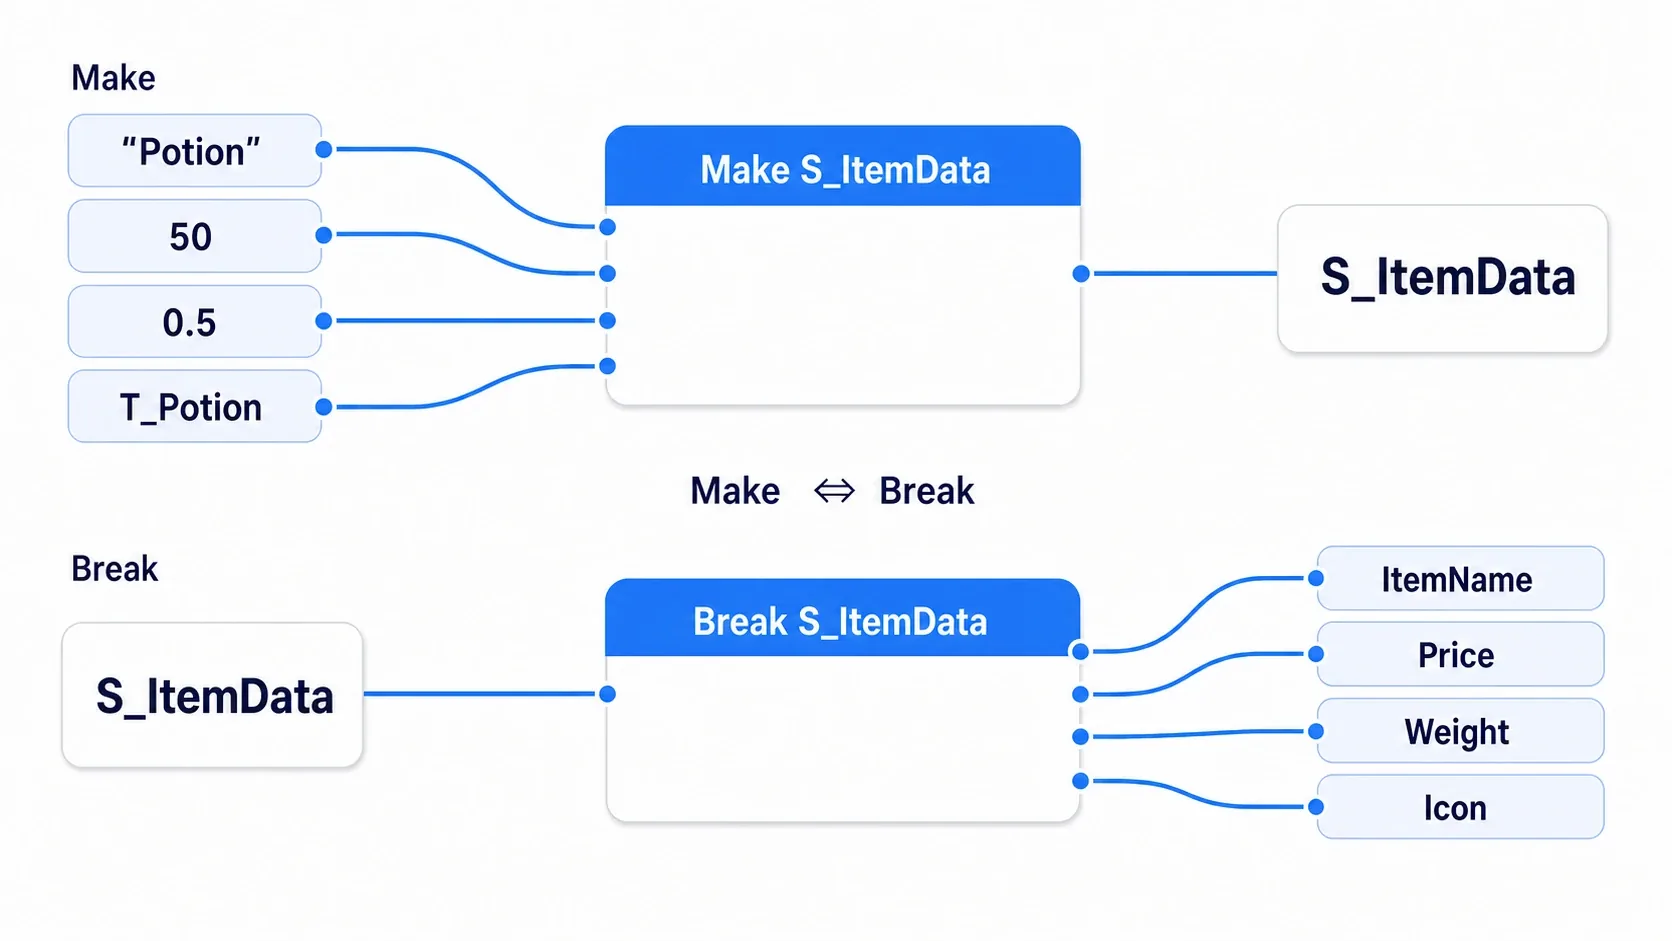
Then there are two nodes you use everywhere.
| Node | Direction | When you use it |
|---|---|---|
| Make | values → struct | Creating a new one (spawning an item) |
| Break | struct → values | Reading the contents (showing a name in the UI) |
Remember it as "Make packs the box, Break opens it."
You can expose only the pins you need. Right-click a struct pin →
Split Struct Pinto expand its contents inline. The details panel on Make/Break nodes also lets you hide pins you aren't using. Even a 10-field struct keeps the graph tidy when only the two relevant pins are visible.
The Big Trap: Value-Type Copies
Here's the main event. Structs are value types , and understanding what that means will save you a lot of debugging time.
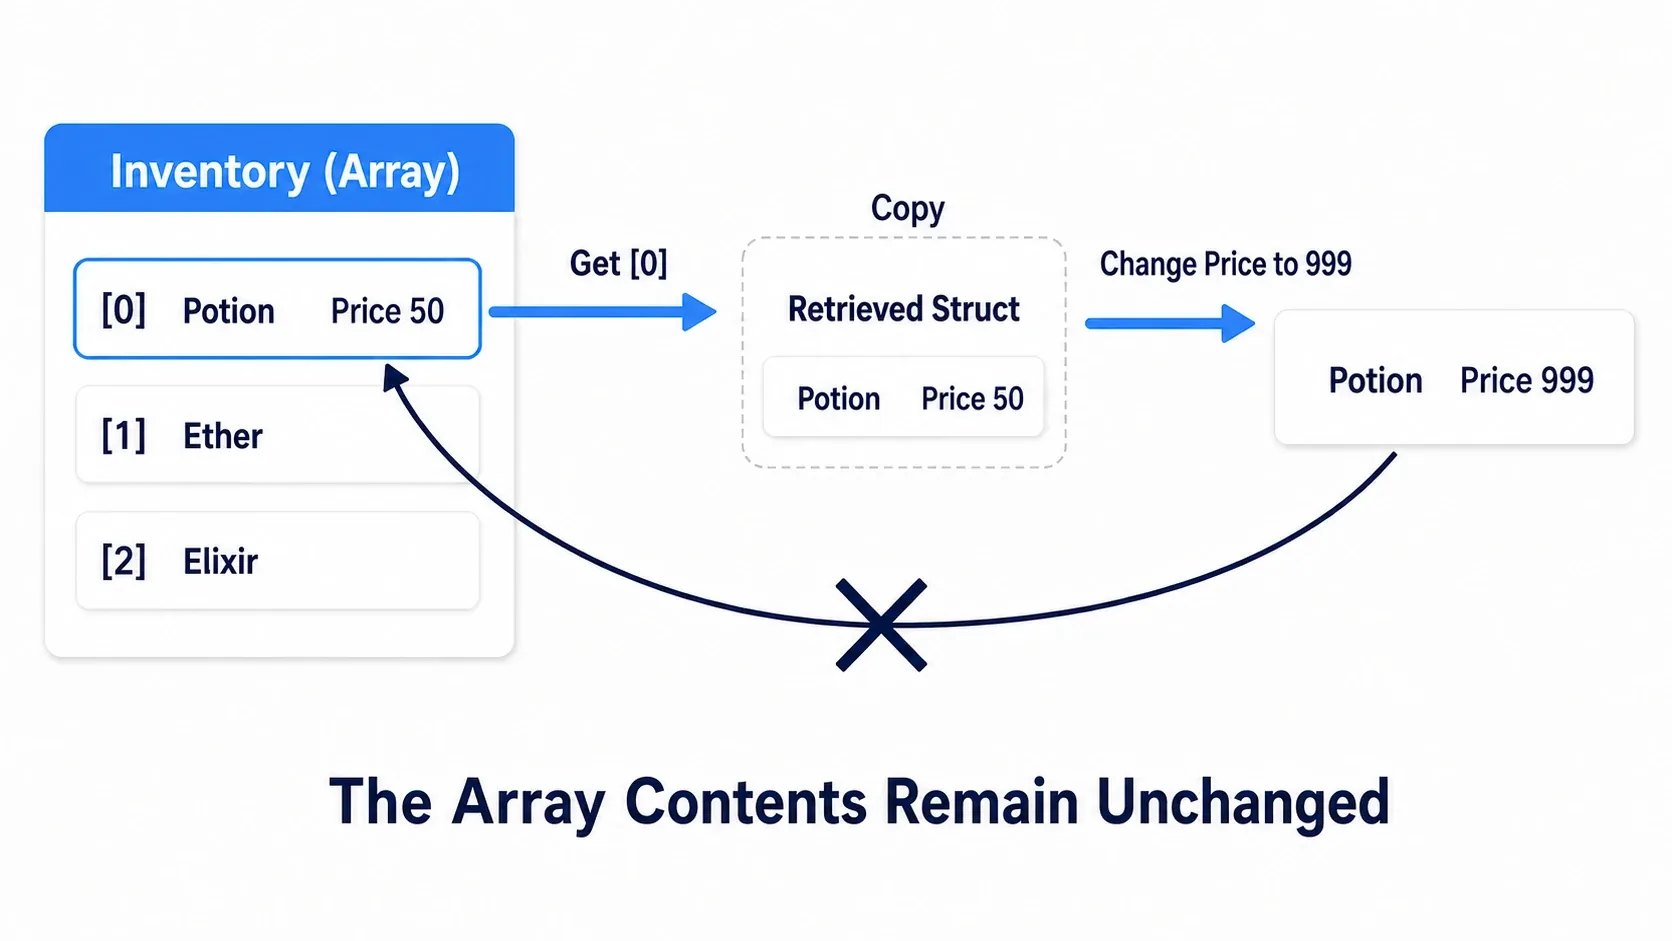
Say you want to reduce the durability of the first item in your inventory (an array of structs). The obvious approach looks like this.
Get (Inventory, Index 0)         <- fetch the item
  → Break S_Item                 <- open it up
  → subtract 1 from durability
  → Make S_Item                  <- rebuild it
And the original array doesn't change one bit.
The reason is that Get returns a copy . The moment you fetch it, it's a separate thing, so no amount of editing affects what's in the array.
There are two fixes.
Option 1: write it back (Set Array Elem)
Get (Inventory, Index 0) → Break → reduce durability → Make
  → Set Array Elem (Target: Inventory, Index: 0, Item: the rebuilt struct)  <- write it back
Straightforward and easy to follow. Always treat fetch → change → write back as one three-step move.
Option 2: fetch a reference
Right-click the array's Get node and switch it to Get a reference , and you receive a reference to the original instead of a copy. In that case you can edit it directly with Set Members in Struct .
Why is it designed this way? Because passing copies is safe . If a function modifies a struct you passed in, the caller is unaffected. The price of that safety is that you must explicitly write values back when you do want them to stick.
How to spot the symptom: "the node that changes the value definitely runs, but the next time I look it's back to the old value." When you see that, suspect a copy first.
Watch Out When Changing a Struct
There's one more issue that bites in real projects. Changing a Blueprint struct after the fact is risky.
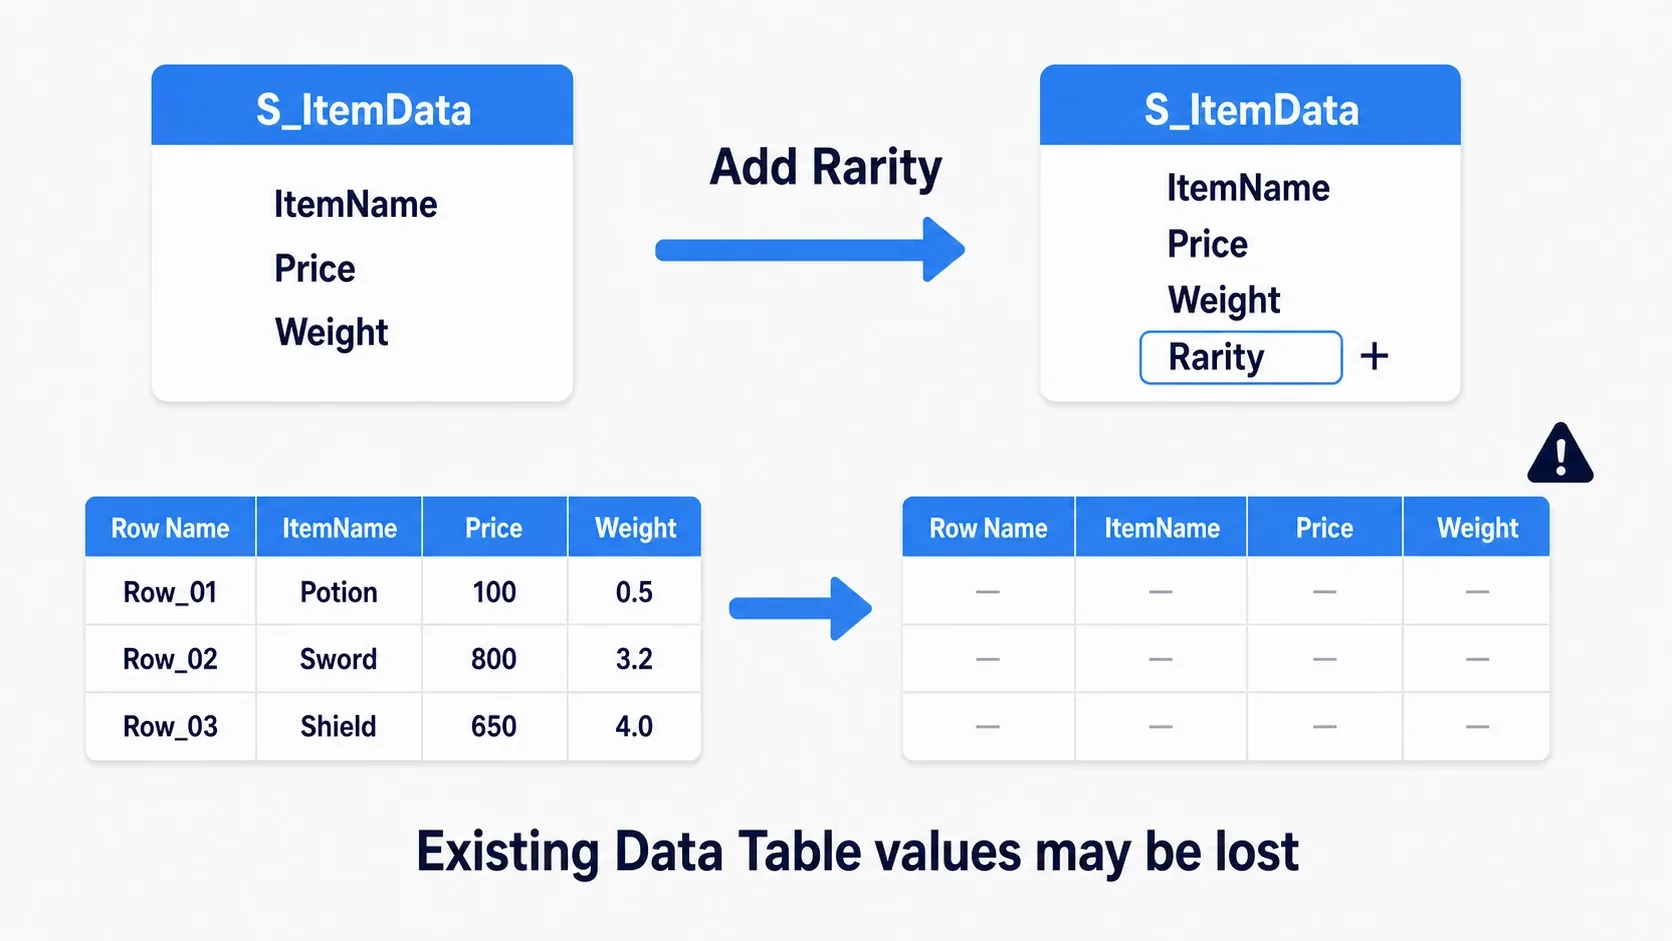
Adding, removing, or reordering struct members can reset the values wherever it is used . The dangerous case is changing the struct after you've entered 100 rows into a Data Table.
Two practical countermeasures.
- Lock the design in first: decide the struct's fields before you pour a lot of data into a Data Table. Fields you might add later are safer to include from the start
- Back up before changing: Data Tables can be exported to CSV. Export before touching the struct and you can restore if things break
Defining it in C++ is another option. Owning the struct on the C++ side makes this problem far less painful.
USTRUCT(BlueprintType)
struct FItemData : public FTableRowBase
{
    GENERATED_BODY()

    UPROPERTY(EditAnywhere, BlueprintReadWrite)
    FText DisplayName;

    UPROPERTY(EditAnywhere, BlueprintReadWrite)
    int32 Attack = 0;

    UPROPERTY(EditAnywhere, BlueprintReadWrite)
    TObjectPtr<UTexture2D> Icon = nullptr;
};
USTRUCT(BlueprintType) makes it usable from Blueprint, and inheriting FTableRowBase lets it serve as a Data Table row. Keep in mind that serious data ownership belongs on the C++ side ; it pays off later (→ Creating Your First C++ Class).
Hands-On: Designing Item Data
RPG equipment, roguelite loot, survival crafting materials. Every genre needs some way to "hold items". Here we'll go all the way through creating a struct, holding it in an array, and editing its contents .
Setup to follow along: prepare the following.
| Kind | Name | Contents |
|---|---|---|
| Structure | S_Item | Information for one item |
Variable on BP_Player | Inventory | An array of S_Item |
Step 1: create the struct. Right-click → Blueprints → Structure . Name it S_Item , open it, and add these fields.
| Variable name | Type | Default value |
|---|---|---|
DisplayName | Text | (empty) |
Attack | Integer | 0 |
Durability | Integer | 100 |
Default values save you from typing them into every Make node. Setting Durability to 100 is the important part here.
Step 2: hold them in an array. Create a variable Inventory on BP_Player and set its type to S_Item . Then use the icon to the right of the type to switch it to Array .
Step 3: add some items. Insert two on BeginPlay .
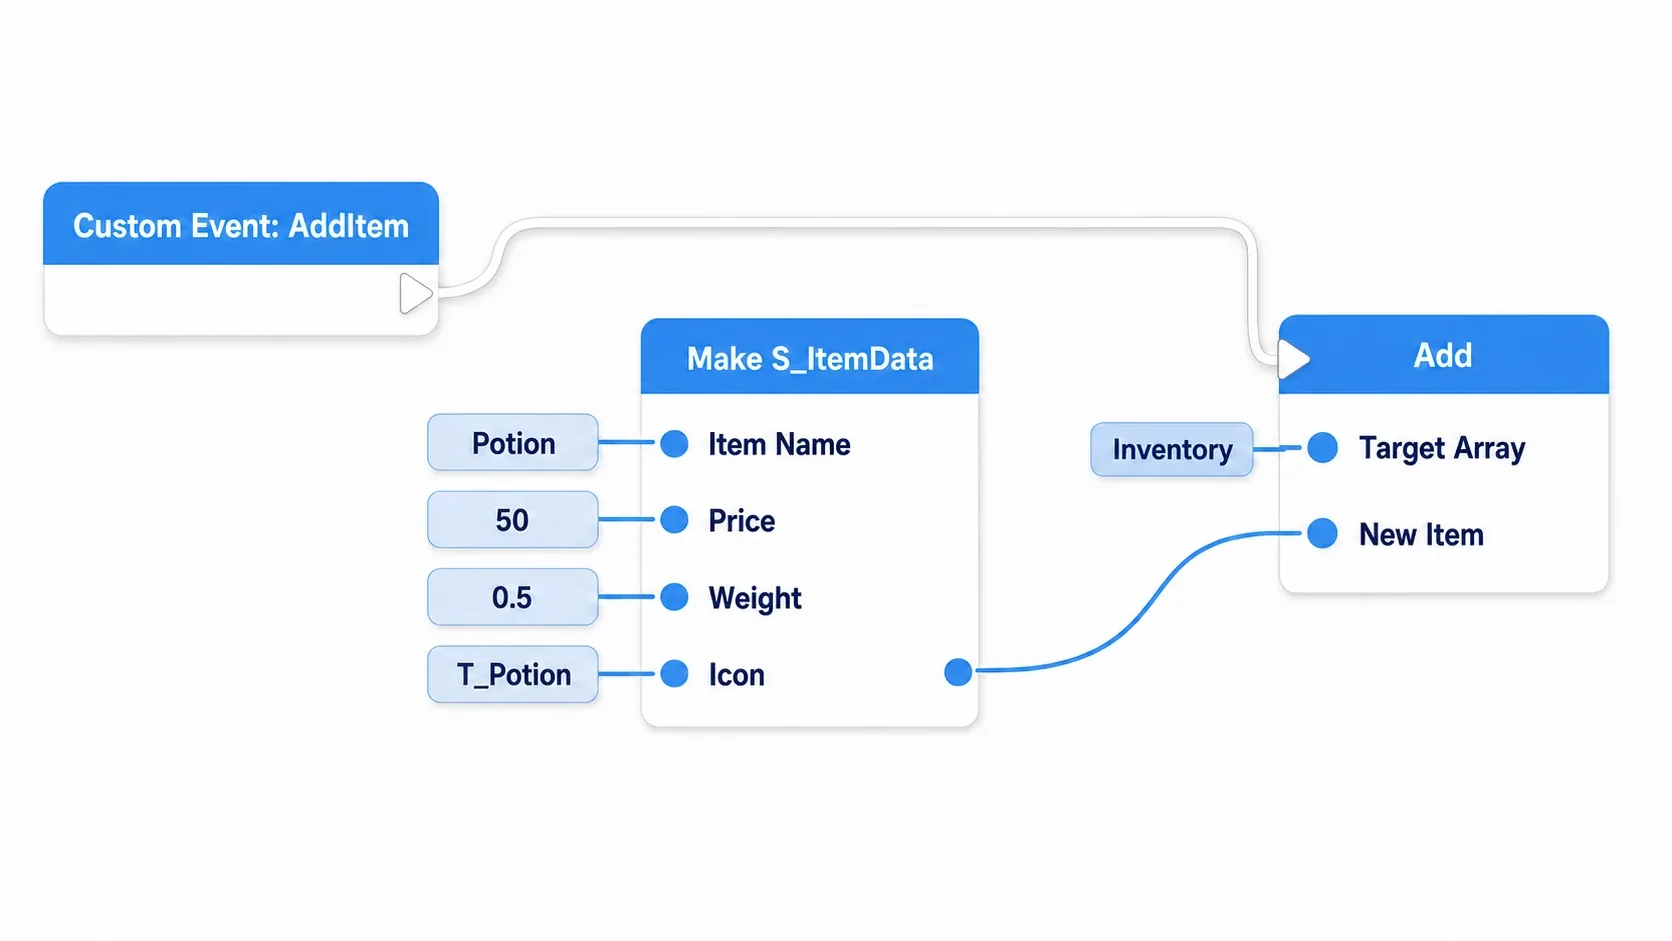
Event BeginPlay
  → Make S_Item (DisplayName: "Iron Sword", Attack: 10, Durability: 100)
  → Add (Target: Inventory)
  → Make S_Item (DisplayName: "Wooden Shield", Attack: 2, Durability: 50)
  → Add (Target: Inventory)
Step 4: experience the trap. Now deliberately try the wrong approach .
Get (Inventory, Index 0) → Break S_Item
  → Subtract (A: Durability, B: 10)
  → Make S_Item (that result into Durability, other pins straight from Break)
  → Print String (Durability of the rebuilt struct)    <- prints 90
Print String shows 90 . It looks like it worked.
But right after that, read the array again.
Get (Inventory, Index 0) → Break S_Item
  → Print String (Durability)                          <- still 100!
Still 100. What you edited was a copy; the array was untouched.
Step 5: write it back properly. Add Set Array Elem and wrap the whole thing in a function.
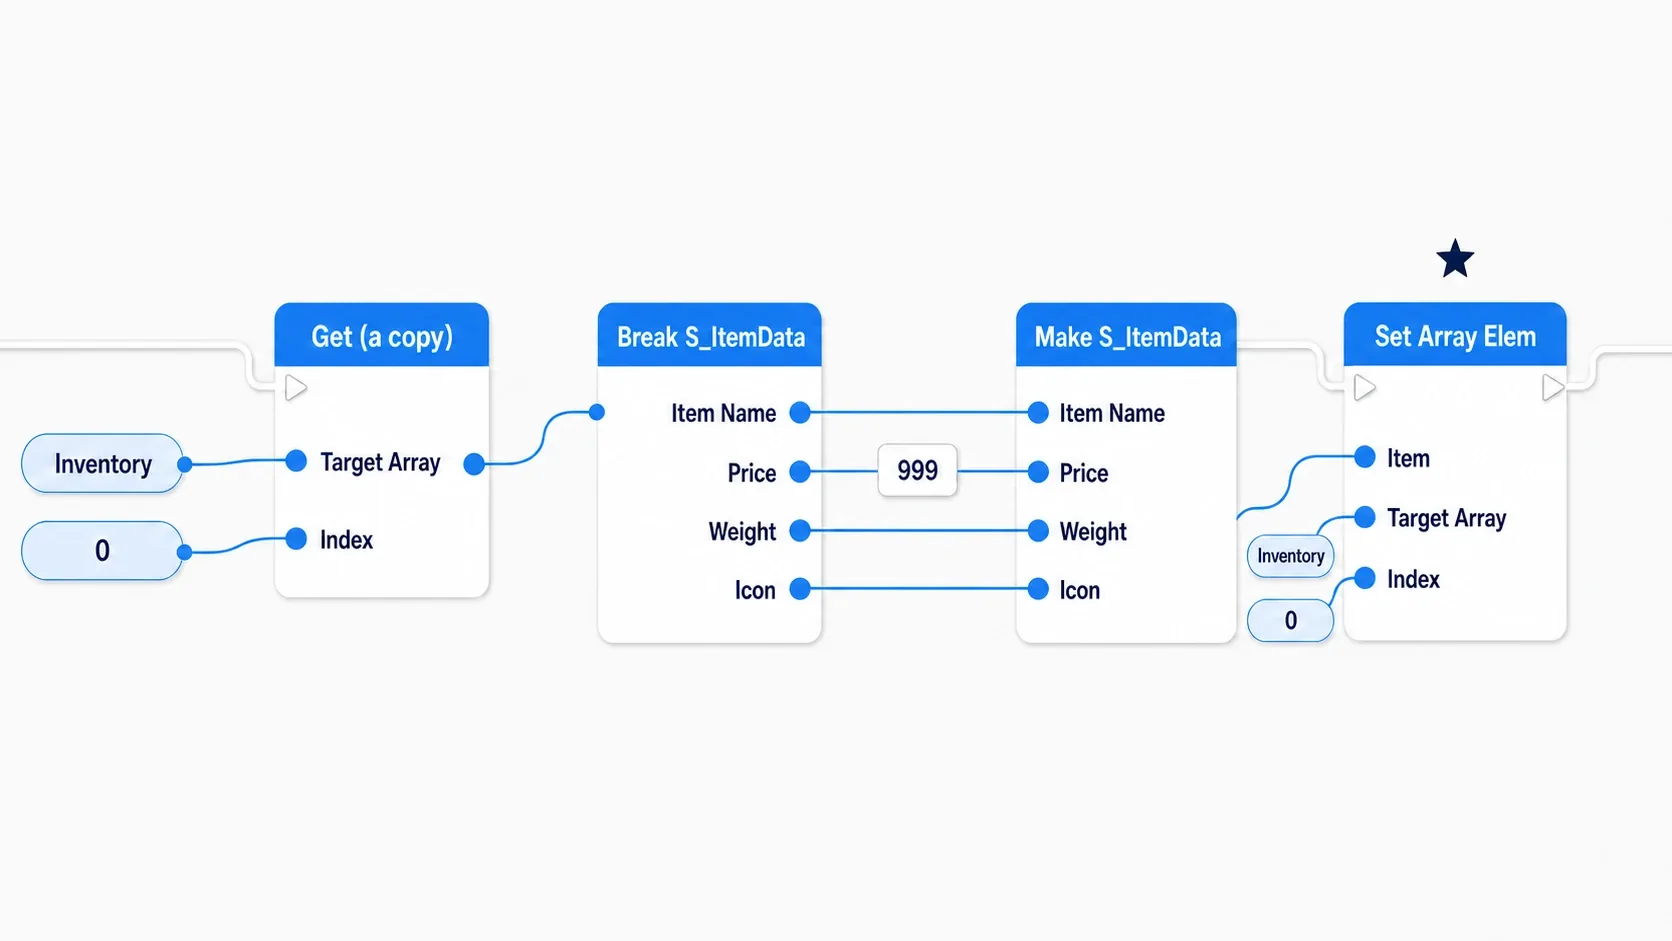
Function: DamageItem (inputs: ItemIndex / Integer, Amount / Integer)
  → Get (Inventory, ItemIndex)
  → Break S_Item
  → Subtract (A: Durability, B: Amount)
  → Make S_Item (that result into Durability, other pins straight from Break)
  → Set Array Elem (Target: Inventory, Index: ItemIndex, Item: the rebuilt struct)
Call DamageItem(0, 10) and read the array again, and this time it's 90 .
Hit Play and check. Before you add Set Array Elem it stays at 100; after you add it, it changes to 90. If you can see that difference, you've got it.
Troubleshooting if it doesn't work.
- The value still reverts → check that the
IndexonSet Array Elemmatches the one you read from - Other fields got wiped → you forgot to wire a Break output into Make. Unconnected fields fall back to their defaults
- Values disappeared after changing the struct → that's the member-change effect. Re-enter them, or restore from your CSV backup
Two things to take away.
- Learn "fetch, change, write back" as one three-step move: whenever you pull a struct out of an array or map and edit it, you need the write-back. Remembering "anything you Get is a copy" lets you diagnose this yourself
- Decide your fields as early as possible: adding members later can wipe the data you entered. Including fields you'll "probably use" from the start ends up being safer
Once your item list grows, it's time to manage it in a table rather than hard-coding it in Blueprint. This S_Item can be used as-is as a Data Table row. If you'd rather hold each entry as its own independent asset, going data-driven with Data Assets is another option.
Bonus: Good to Know for Later
You can nest structs inside structs. Putting an S_Stats (attack, defense, speed) inside S_Item works fine. But nesting too deep makes Break nodes stack up and gets hard to read, so two levels is a good ceiling.
If there are many rows and the content is fixed, consider a Data Table first. Data like "the item list" is easier to manage in a Data Table than assembled in Blueprint. In that case the struct's job becomes defining the shape of a row .
Pair it with an Enum to classify things. Giving S_Item an ItemType (Enum: Weapon / Armor / Consumable) makes per-category logic easy to write. But if you want multiple properties at once , like "fire-elemental and rare", Gameplay Tags fit better than an Enum.
They're also handy for bundling function return values. You can create functions with multiple output pins, but if the values belong together semantically, returning one struct keeps the call site cleaner.
For state, look elsewhere. Structs are value types, so they're a poor fit for anything you want to "always share the latest state of". State like HP that is read and updated from several places is more naturally made into a Component.
Summary
Four things to keep in mind when using structs.
| Aspect | Takeaway |
|---|---|
| When to use | Three or more values that always travel together |
| Build / unpack | Create with Make , open with Break |
| Biggest gotcha | Value type . Get returns a copy, so it won't stick unless you write it back |
| Change caution | Adding members can wipe existing data |
And one practical rule: anything you Get is a copy . Remember just that and you'll never lose an afternoon to "I changed it, but it reverted".
Are there wires in your Blueprint that you always drag four at a time?