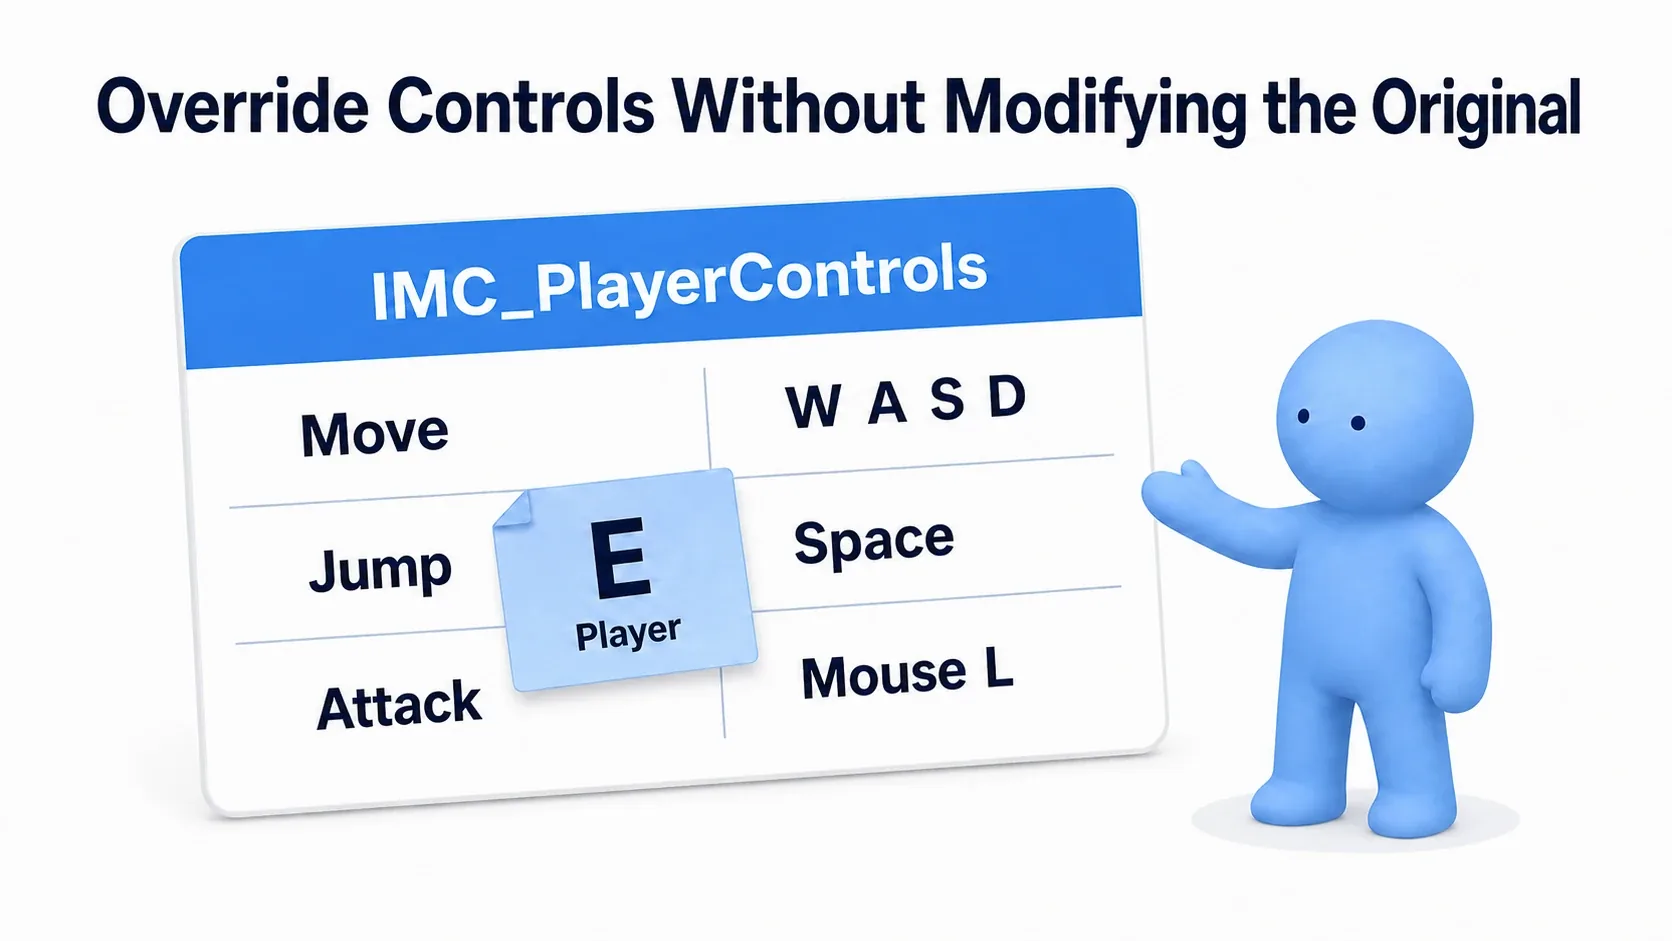
You want a "Controls" tab in your settings screen. You want players to change jump from Space to E. But as soon as you start looking into it, you find that an Input Mapping Context is an asset, which makes rewriting it at runtime a bad idea.
Enhanced Input has a separate mechanism built for exactly this. It's a two-layer setup: Player Mappable Key Settings marks which assignments are allowed to change, and Enhanced Input User Settings holds the per-player overrides. This article explains how that works and how to build a settings screen that changes the jump key and keeps it after a restart.
What You'll Learn
- Why Enhanced Input lets you change key assignments after the fact
- Naming the "changeable" assignments with Player Mappable Key Settings
- How Enhanced Input User Settings (UE5.3+) handles overrides and saving
- The fastest way to capture a pressed key: the Input Key Selector widget
- Hands-on: changing the jump key from a UI and keeping it across restarts
Why Rebinding Is Possible
Whether a key config screen is practical at all comes down to the structure of the input system.
In the old input system, Blueprint events were bound to the keys themselves. You received an event that literally meant "the Space key was pressed," so changing an assignment meant swapping the event node itself.
With Enhanced Input, as covered in the Input Action and Input Mapping Context article, "what you want to do" and "which key does it" live in separate assets. Your Blueprint receives IA_Jump, not the Space key.
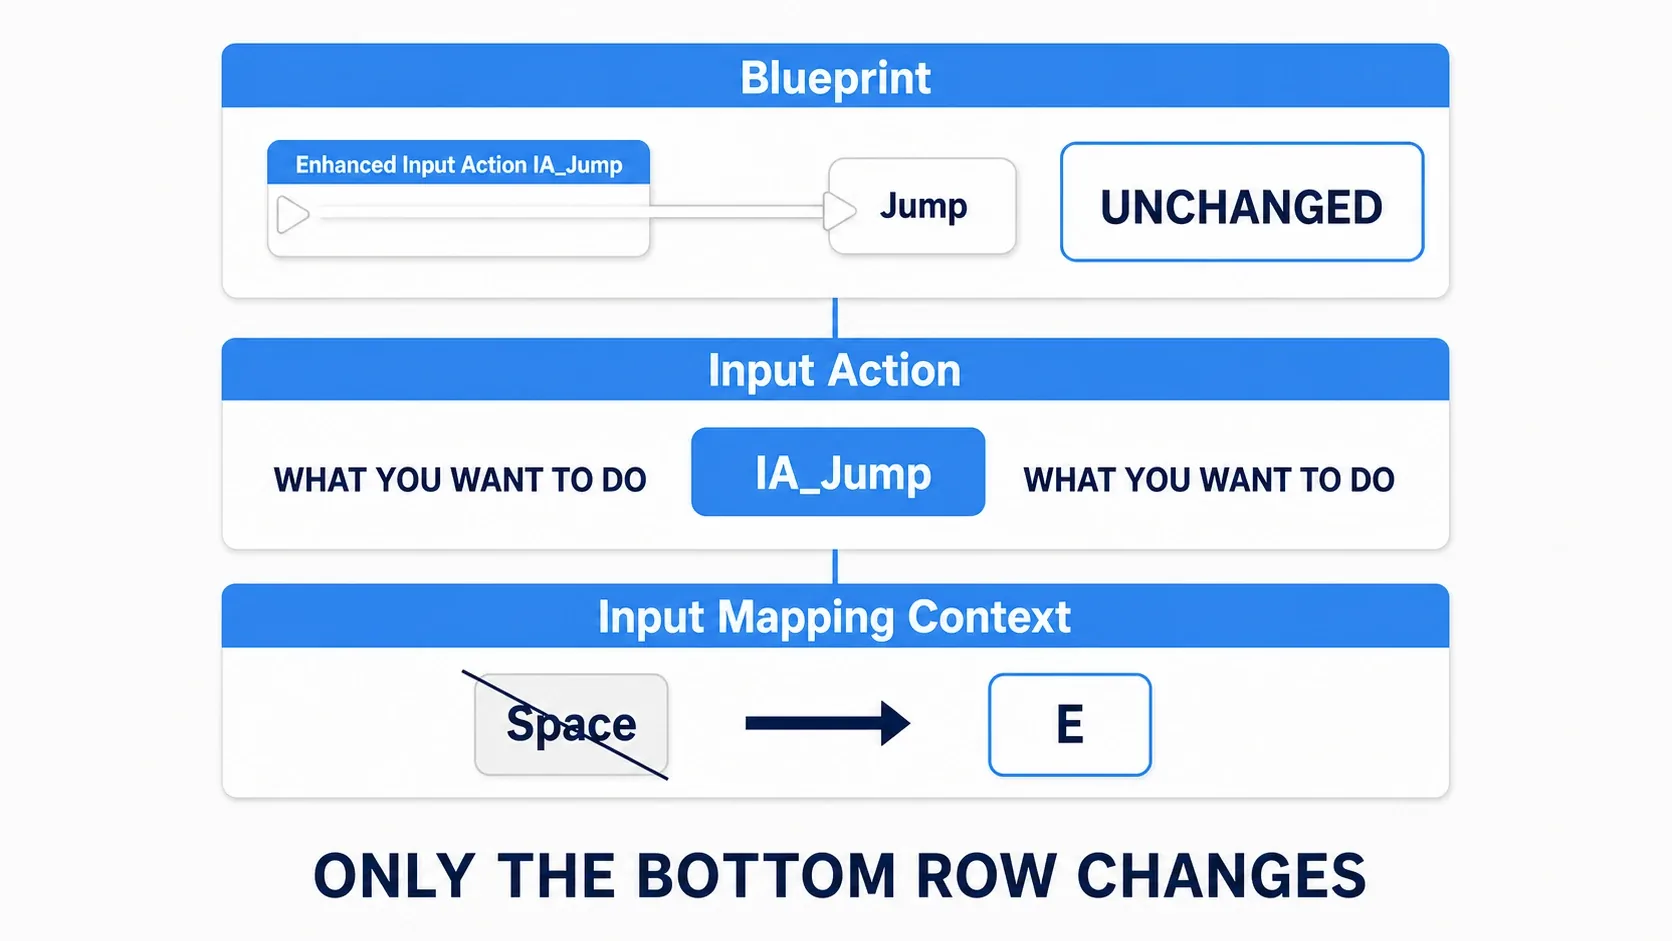
That means changing the key layout doesn't change a single node in your Blueprint. The only thing that swaps is the line connecting the IA to a key.
That said, avoid rewriting the IMC itself at runtime. An IMC is an asset shipped with your project, and after packaging it's treated as read-only. Instead, there's a mechanism that layers "per-player overrides" on top of the IMC. That's the subject of this article.
| Layer | Contents | Who decides |
|---|---|---|
| Input Action | What you want to do (IA_Jump) | Developer |
| Input Mapping Context | Default key assignments (Space) | Developer |
| User Settings (overrides) | The key the player changed it to (E) | Player |
Naming the Assignments You Allow Players to Change
Not every assignment needs to be changeable. Movement and jumping are fine to rebind, but letting players rebind UI confirm and cancel is a great way to lock them out. So UE takes the approach of marking rows one at a time as "this one may be changed."
That mark is a Mapping Name. The override mechanism doesn't look at which IA a row belongs to; it looks at this name to decide which assignment to replace.
Here's the procedure.
- Open
IMC_PlayerControls - Expand the triangle on the key row you want to allow changes for (
IA_Jump+Space Bar) - In the
Player Mappable Key Settingsfield, choose the classPlayer Mappable Key Settings - In the expanded
Namefield, enter a unique name (e.g.Jump) - In
Display Name, enter the label to show in the settings screen (e.g.Jump)
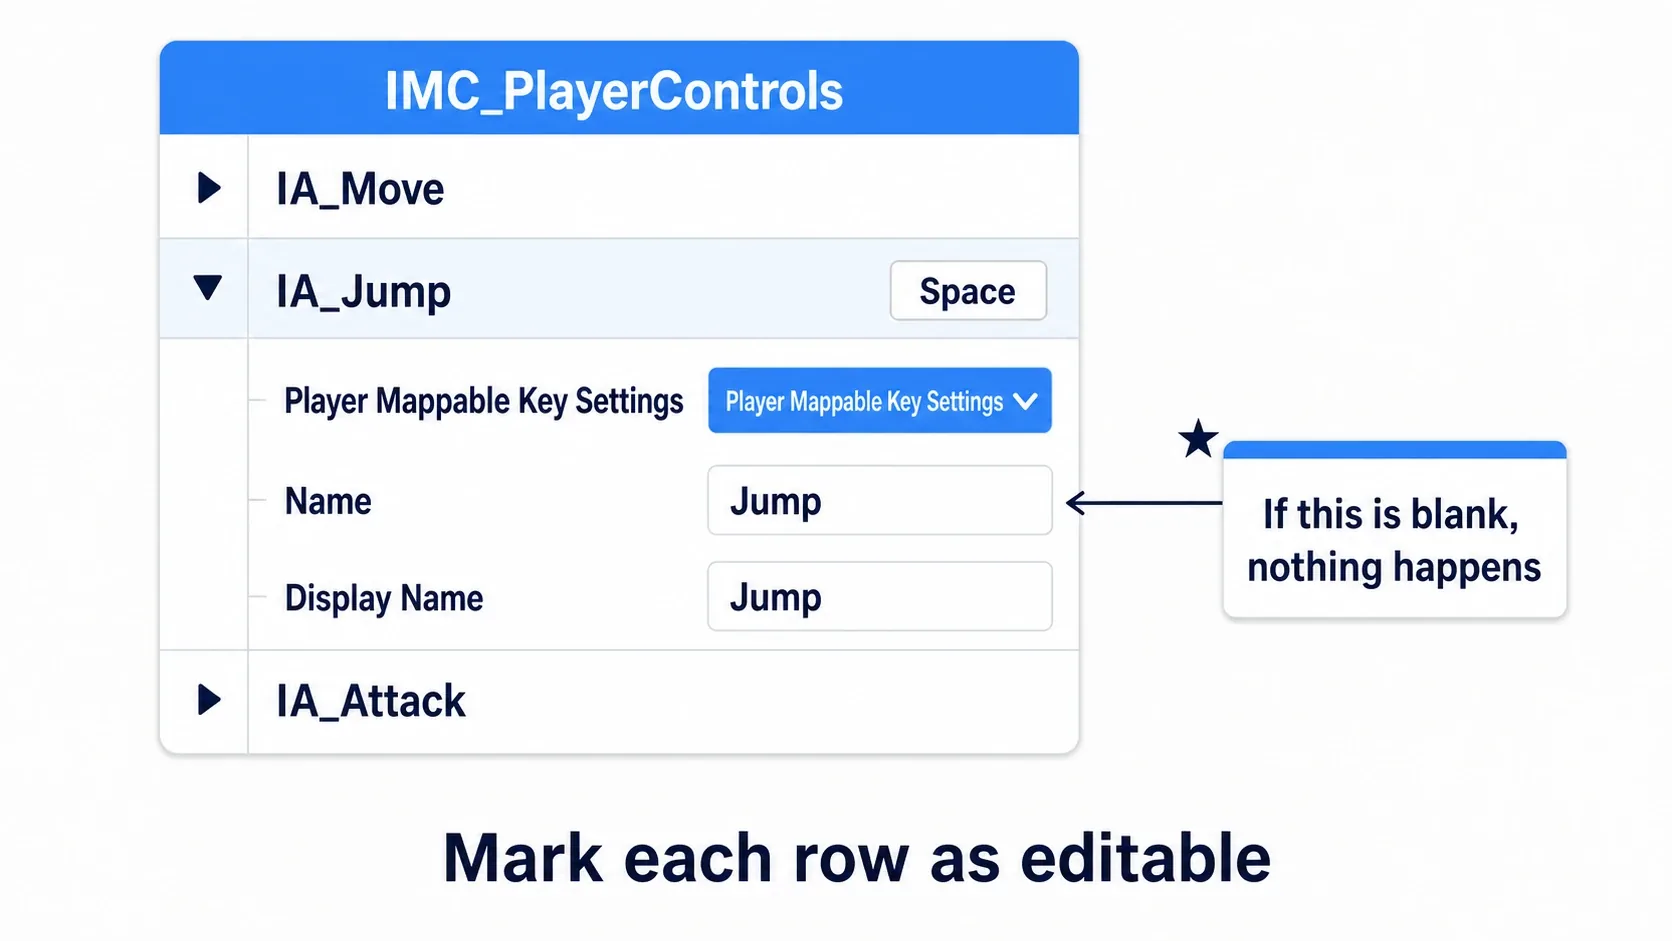
If you leave Name empty, this row is never eligible for overrides. Your rebinding code will silently do nothing, and this is where most people first get stuck. The name is the identifier you'll pass straight to Map Player Key later, so keep it readable: Jump, MoveForward, and so on.
Note: Keep
Nameunique across the entire project. If another IMC uses the sameJump, there's no way to tell which one you meant. When you have multiple IMCs, a prefix likeWalk.Jumpavoids collisions.
Enabling Enhanced Input User Settings
Enhanced Input User Settings is an object added in UE5.3 that holds per-player input settings. It takes care of both retaining overridden keys and writing them to a file.
It's disabled by default, so enable it first.
- Open Edit > Project Settings
- Choose Engine > Enhanced Input from the list on the left
- Check
Enable User Settingsunder User Settings - Restart the editor
Without the restart, calling Get Enhanced Input User Settings in a Blueprint may return nothing. If it doesn't work right after you enabled it, try restarting first.
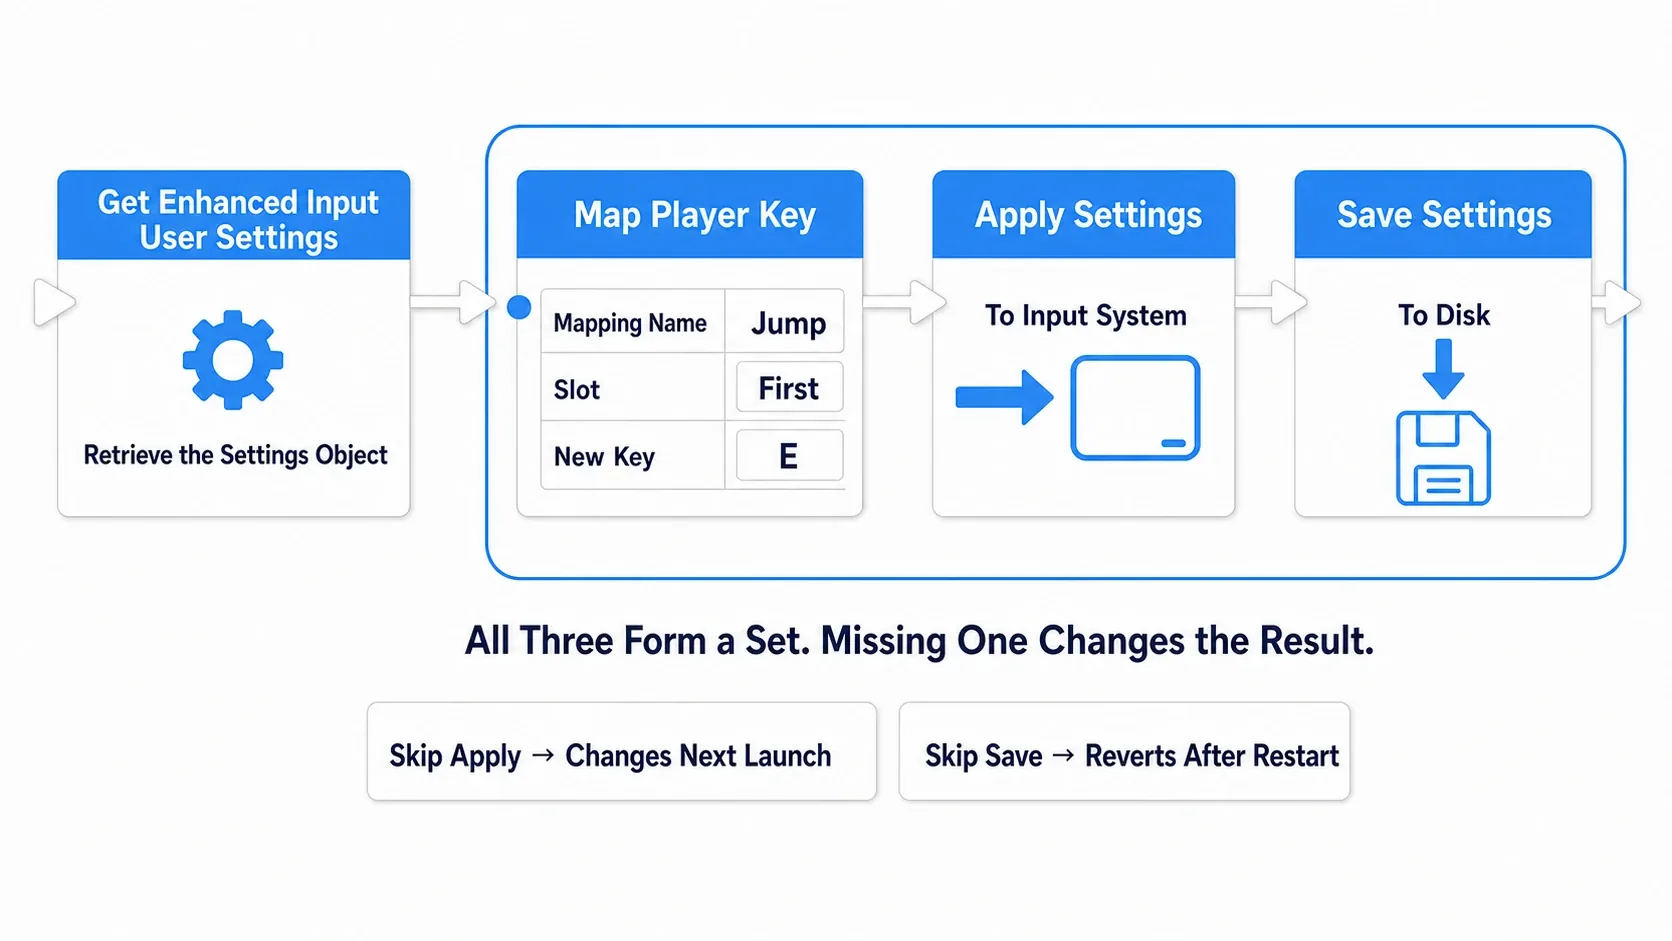
Once enabled, you can work with it from Blueprints in the following flow.
| Node | Role |
|---|---|
| Get Enhanced Input User Settings | Retrieves the settings object (drag off the Enhanced Input Local Player Subsystem) |
| Map Player Key | Registers "change the assignment with this name to this key" |
| Apply Settings | Pushes the registered changes into the actual input system |
| Save Settings | Writes the contents to disk (restored on the next launch) |
These three go together. Leave any one out and you get a different symptom.
- Forget
Apply Settings→ nothing changes now, but it has changed the next time you launch - Forget
Save Settings→ it changes now, but reverts after a restart
Map Player Key receives its arguments bundled in a struct called Map Player Key Args. Right-click the pin and split it (Split Struct Pin) to wire the members directly.
| Member | What goes in |
|---|---|
| Mapping Name | The Name you set in the IMC (e.g. Jump) |
| Slot | One of First / Second / Third / Fourth |
| New Key | The key to assign |
Capturing the Pressed Key
The other tricky part of building a settings screen is "grab the next key that gets pressed." Normal input events come through an IMC, so unassigned keys never reach you.
UMG has a widget built for this: the Input Key Selector.
Place it, hit Play, and it behaves like a button: click it and it waits for input, then holds the next key pressed and returns to idle. Gamepad buttons are captured the same way.
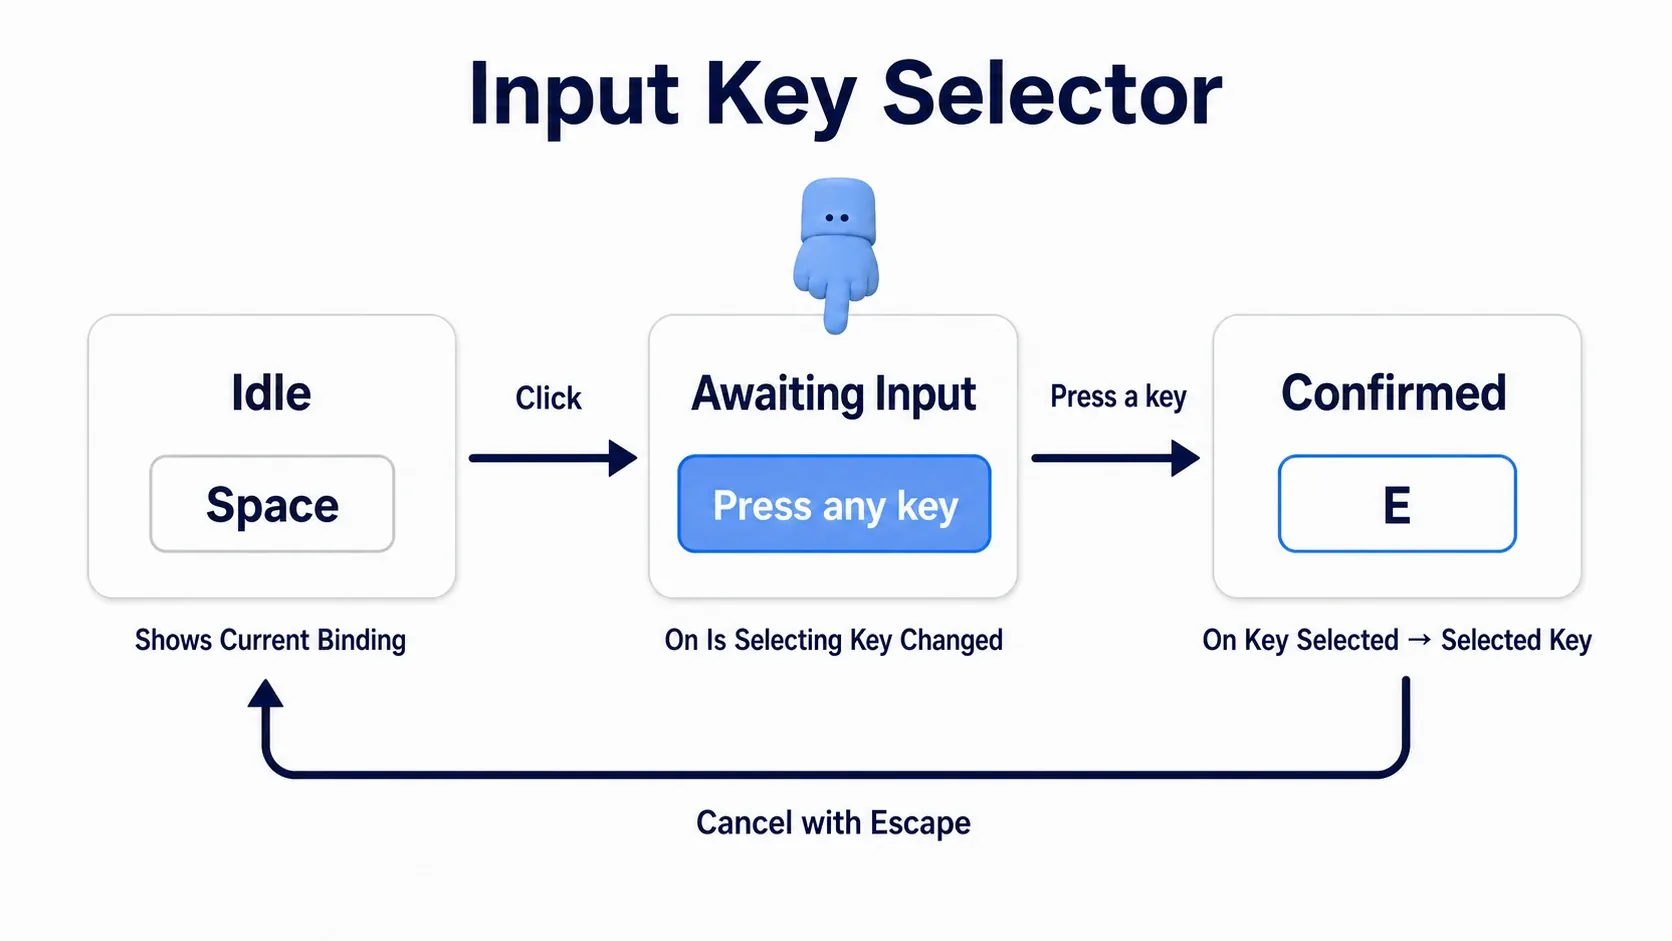
Two events see most of the use.
| Event | When it fires | What it's for |
|---|---|---|
| On Key Selected | When a key is confirmed (returns Selected Key) | Call Map Player Key here |
| On Is Selecting Key Changed | When it enters or leaves the waiting state | Toggling a "Press a key" prompt |
In the Details panel, Key Selection Text changes the text shown while waiting for input, and No Key Specified Text changes the text when nothing is set. Putting Escape in Escape Keys gives players a way to cancel.
If you want to build your own, you can turn on Is Focusable on a UMG widget and override On Key Down to grab the pressed key. But then you're writing modifier key and gamepad handling yourself, so starting with Input Key Selector is faster.
Handling Duplicate Assignments
Map Player Key registers the key as-is, even if it's already used elsewhere. You can set both jump and attack to E, and both will fire at the same time.
If you want to prevent that, you add the check yourself. The idea is simple: keep the keys of the entries listed in your settings screen as an array, and check whether the selected key is already in it.
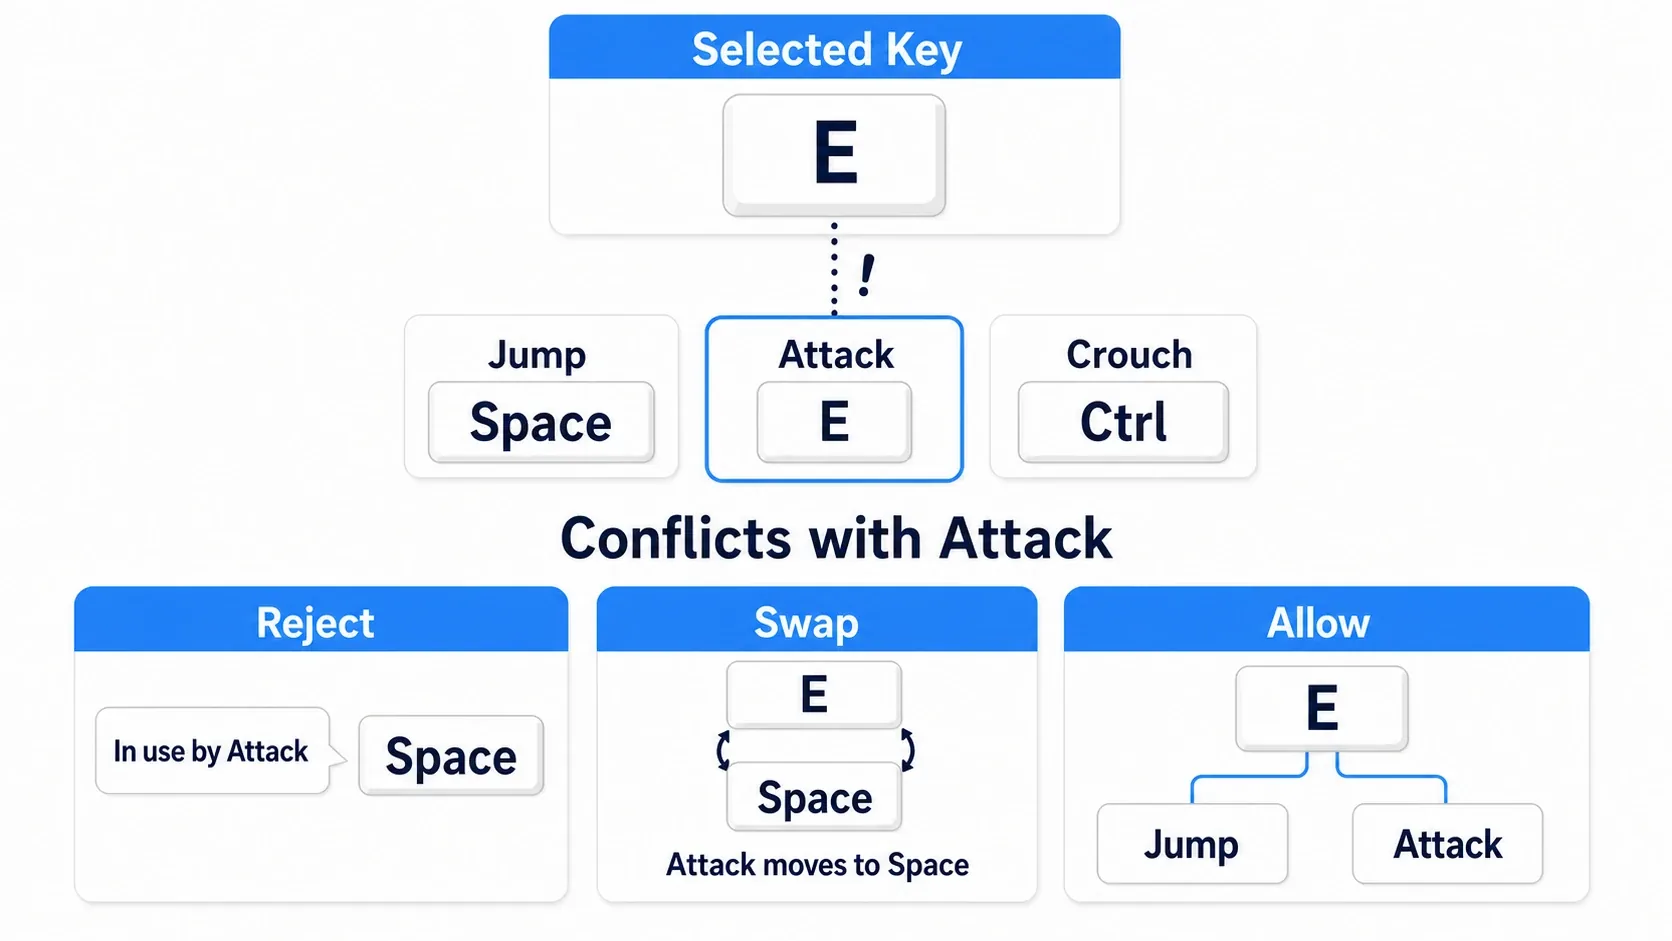
There are three ways to respond. Pick based on the kind of game you're making.
| Approach | Behavior | Suits |
|---|---|---|
| Reject | Show "That key is already in use" and don't change anything | Few controls, where a collision is clearly an accident |
| Swap | Give the original owner the old key of the entry you just changed | Action games with many controls. Fewest steps for the player |
| Allow | Assign it to both | Games that use simultaneous firing on purpose |
For solo development, reject is the easiest and also prevents mistakes. Instead of "Could not change," it's friendlier to name the action it conflicts with. This is where filling in Display Name pays off.
Separating Keyboard and Gamepad
A single Mapping Name can hold four Slots, First through Fourth. In other words, you can register multiple keys for the same "jump."
| Slot | Common use |
|---|---|
| First | Keyboard / mouse |
| Second | Gamepad |
| Third / Fourth | Spares (other devices, secondary bindings) |
Since you only switch the Slot on Map Player Key, the implementation is easy. Split your settings screen into "Keyboard" and "Gamepad" tabs, and have each button register the same Mapping Name with a different Slot.
This assumes the IMC has a row for each Slot too. If IA_Jump only has a Space Bar row, there's no gamepad entry to write into at all. Add a Gamepad Face Button Bottom row, set Player Mappable Key Settings on it as well, and give it the same Name.
Getting the pad working at all (stick Dead Zone, triggers, UI focus) is covered in Gamepad support. Do that first and this section slots right in.
Note: There's also an argument called
bCreateMatchingSlotIfNeededthat creates the target Slot automatically when it doesn't exist. It makes behavior harder to trace, though, so I'd recommend preparing the rows in the IMC first.
Hands-On: Rebinding and Saving the Jump Key
Action games, horror games, puzzle games. Whatever the genre, a "Controls" tab in the settings screen shows up in almost every shipped game. Here we'll build the minimum version of one.
The Goal
Click the "Jump" field in the settings screen and press E. Close it, hit Play, and Space no longer jumps but E does. Close and reopen the editor, and it's still E.
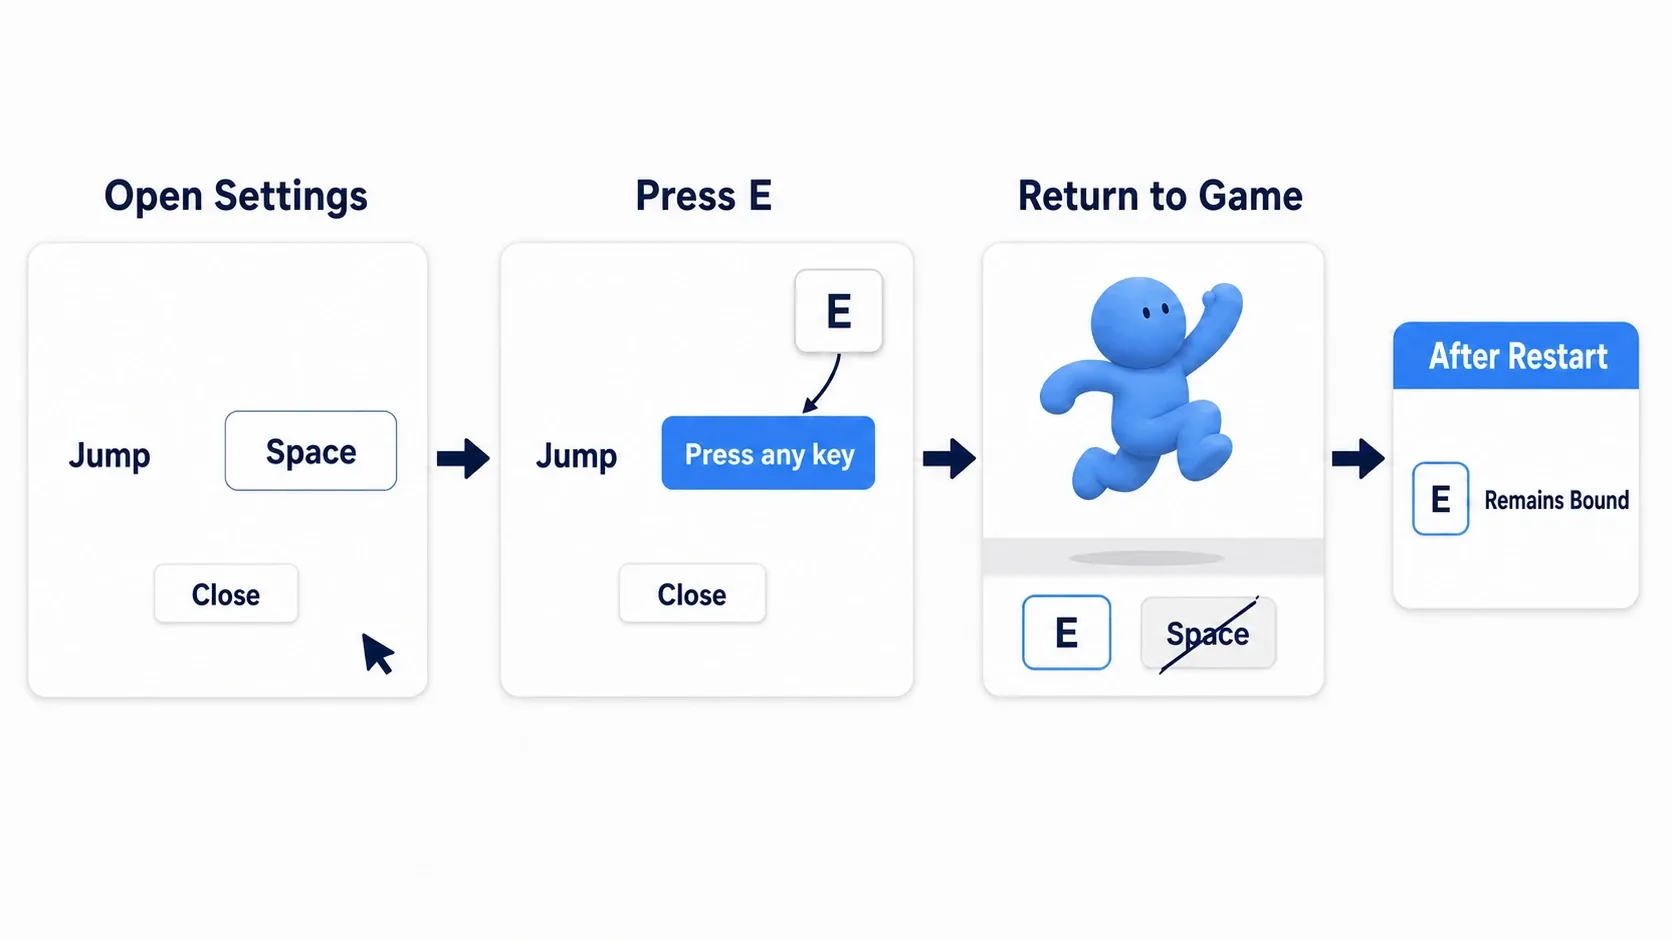
Reproduction Setup
Create a new project from the Third Person template and set it up as follows.
| Type | Name | Settings |
|---|---|---|
| Project Settings | Engine > Enhanced Input | Turn on Enable User Settings → restart the editor |
| Input Mapping Context | IMC_Default | The template's default one (Content/ThirdPerson/Input) |
| IMC key row | IA_Jump + Space Bar | Set Player Mappable Key Settings. Name = Jump, Display Name = Jump |
| Widget Blueprint | WBP_KeyConfig | Parent class User Widget |
Inside WBP_KeyConfig | Text (text block) | Text is Jump |
Inside WBP_KeyConfig | KeySelector_Jump (Input Key Selector) | Turn on Is Variable. Escape in Escape Keys |
Inside WBP_KeyConfig | Button_Close (button) | Text is Close |
For layout, putting the text and the Input Key Selector side by side in a Horizontal Box with a close button underneath is enough. For UMG assembly itself, see the UMG article.
Step 1: Show the Settings Screen
In BP_ThirdPersonCharacter's Event Graph, make the P key open the settings screen (opening a settings screen works the same way as in the pause menu article).
Keyboard Event P
  Pressed
    → Create Widget (Class: WBP_KeyConfig)
    → Add to Viewport
    → Get Player Controller → Set Show Mouse Cursor (true)
    → Set Input Mode UI Only (In Widget to Focus: the widget you created)
Including Set Input Mode UI Only keeps the character from moving while you're in the settings.
Step 2: Register the Key on Confirmation
In WBP_KeyConfig's Event Graph, select KeySelector_Jump and add On Key Selected from the events section of the Details panel.
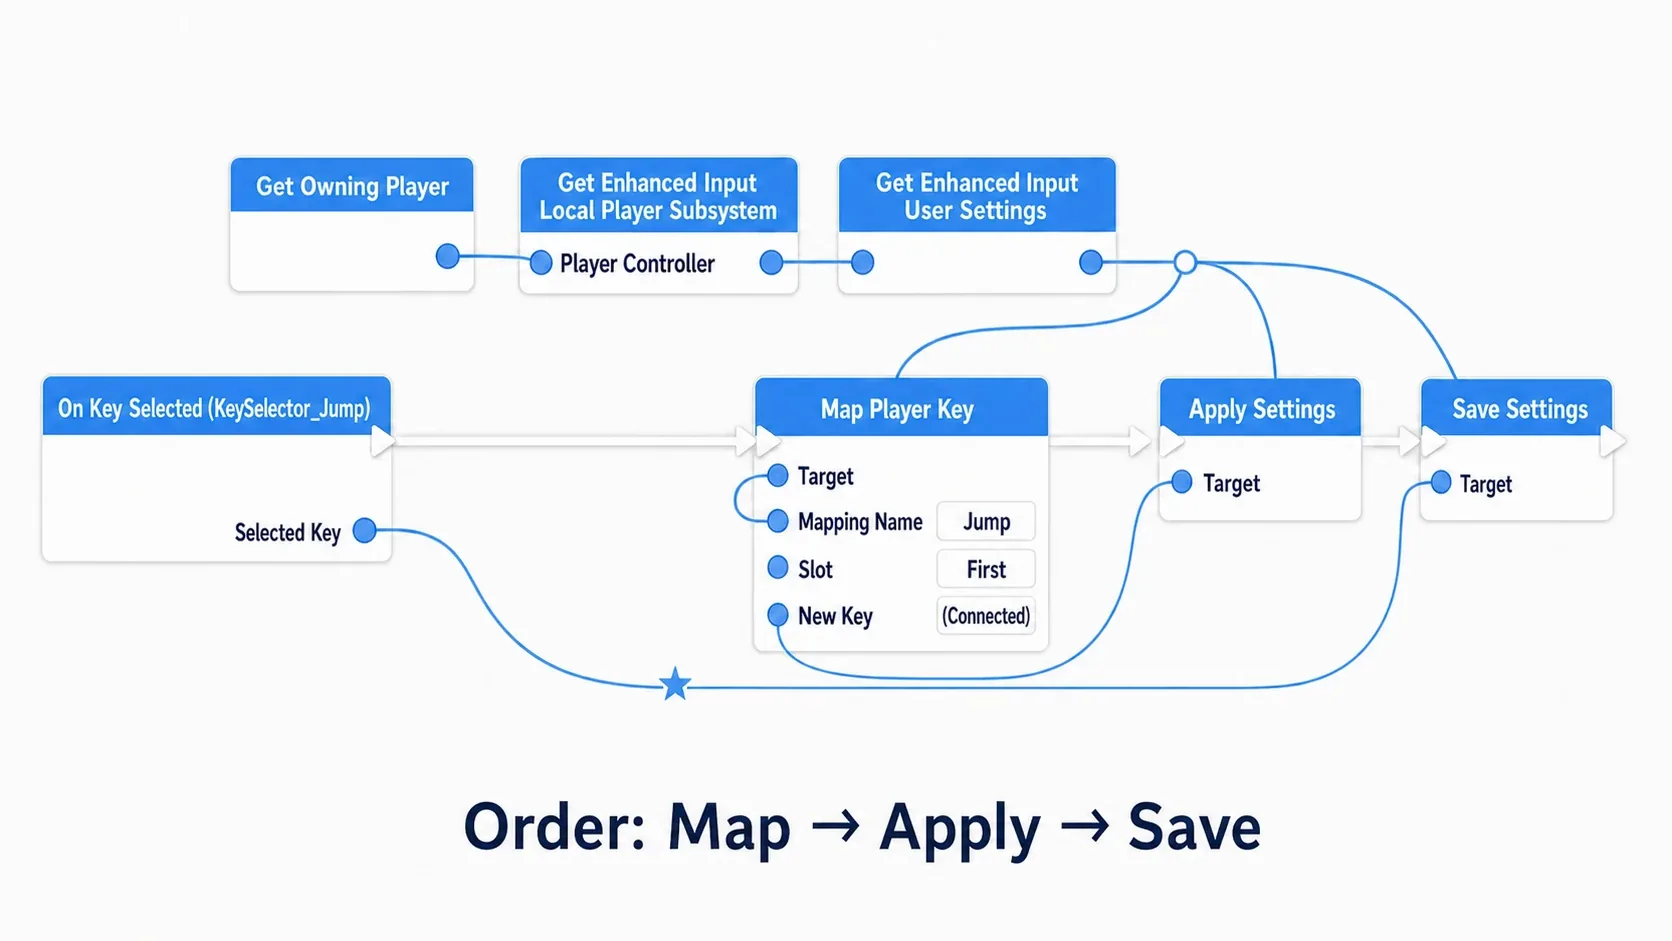
On Key Selected (KeySelector_Jump)
  Selected Key ──────────────────┐
    → Get Owning Player           │
    → Get Enhanced Input Local Player Subsystem
    → Get Enhanced Input User Settings   ← reuse this pin from here on
    → Map Player Key
         Args (Split Struct Pin)
           Mapping Name : Jump          ← must match the Name set in the IMC exactly
           Slot         : First
           New Key      : ←─────────────┘ (connect Selected Key)
    → Apply Settings
    → Save Settings
Connect the return value of Get Enhanced Input User Settings to the Target of all three: Map Player Key, Apply Settings, and Save Settings. Don't reorder them. Saving before applying writes out the old contents.
Step 3: Verify
Hit Play, press P, click the jump field, and press E. The field should now read E, and after closing it, Space no longer jumps while E does. Close and reopen the editor, hit Play again, and if E still jumps, saving is working too.
If something's off, here's how to narrow it down.
- The field updates but the game still uses Space → the IMC's
Nameis empty, or it's spelled differently from the Blueprint'sMapping Name - It changes now but reverts after a restart →
Save Settingsisn't connected - It doesn't change now but has changed after a restart →
Apply Settingsisn't connected Get Enhanced Input User Settingsreturns nothing →Enable User Settingsis off, or you didn't restart the editor after turning it on- Both Space and E jump → the IMC has a row other than
Space Barthat has noNameset - The character moves the instant the settings screen appears →
Set Input Mode UI Onlyis missing
Now try changing it back to Space after switching to E. If you can round-trip through the same path, you've got the mechanism down.
Two things to take away.
- Overrides live in User Settings, not in the IMC: The IMC asset stays untouched the whole time. When you build a "restore defaults" feature, clearing the overrides in User Settings brings the default keys back
- Mapping Name is the password for the whole system: If the IMC's
Nameand the Blueprint'sMapping Namedon't match, nothing happens, with no error and no warning. When it doesn't work, suspect this spelling first
Once you reach the point of sharing these settings with the title screen or saving them alongside other options, combine this with the Save Game article. Putting volume and graphics quality there while leaving key assignments to User Settings is an easy split to work with.
Bonus: Good to Know for Later
- Reading the current assignment back into your UI varies a lot by version: To show "Space is currently assigned" at startup, you fetch the current profile with
Get Current Key Profileand query it. But the names and arguments of the query nodes changed between UE5.3 and 5.5, so drag offGet Current Key Profilein your version and check the available options. This article only puts the reliably-working path into the hands-on section - You can get a key's display name with
Get Display Name: Drag off aKeytype and you get display text likeSpace BarorE. That's how you build labels for the settings screen - Don't take away Escape: Leaving
Escape Keysempty onInput Key Selectormakes Escape itself an assignable key. That removes the player's way to cancel, so always fill it in - Leave UI controls out of the rebindable set: If confirm, cancel, and open-menu are all rebindable, one failed change can leave the player unable to do anything. It's safer to not attach
Player Mappable Key Settingsto those key rows - Projects older than UE5.3 work differently: 5.1 and 5.2 had
Player Mappable OptionsandAdd Player Mapped Keyon the subsystem. Those were deprecated in 5.3. When you follow older articles, always check which version they target - When you're unsure whether it applied, add one log line: Insert a
Print StringafterMap Player Keyand outputSelected Keyas a string. That at least tells you whether the value is arriving (→ Checking values with Print String)
Summary
Key config gets straightforward once you work through the three layers in order.
| What you're doing | Where you do it |
|---|---|
| Decide which assignments are changeable | Name in the IMC's Player Mappable Key Settings |
| Hold the player's overrides | Enhanced Input User Settings |
| Capture the pressed key | UMG's Input Key Selector |
| Apply it | Apply Settings |
| Save it | Save Settings |
And through all of it, your Blueprint game logic never changes by a single node. Receiving input under the name IA_Jump is exactly what makes the settings screen possible.
How many controls in your game do you want players to be able to change? Start with one, and give it a name.