You hit an enemy, damage lands, and HP drops. And yet somehow it doesn't feel like it connected. The numbers move but the impact feels weightless, and that's where progress stalls.
The cause isn't one missing feature. That sense of impact comes from layering small effects at the same instant: freezing briefly, shaking the screen, launching the target, flashing them, playing a sound. This article covers building the three at the core of that (hitstop, camera shake, and knockback), delegates the rest to dedicated articles, and focuses on how to layer and balance them.
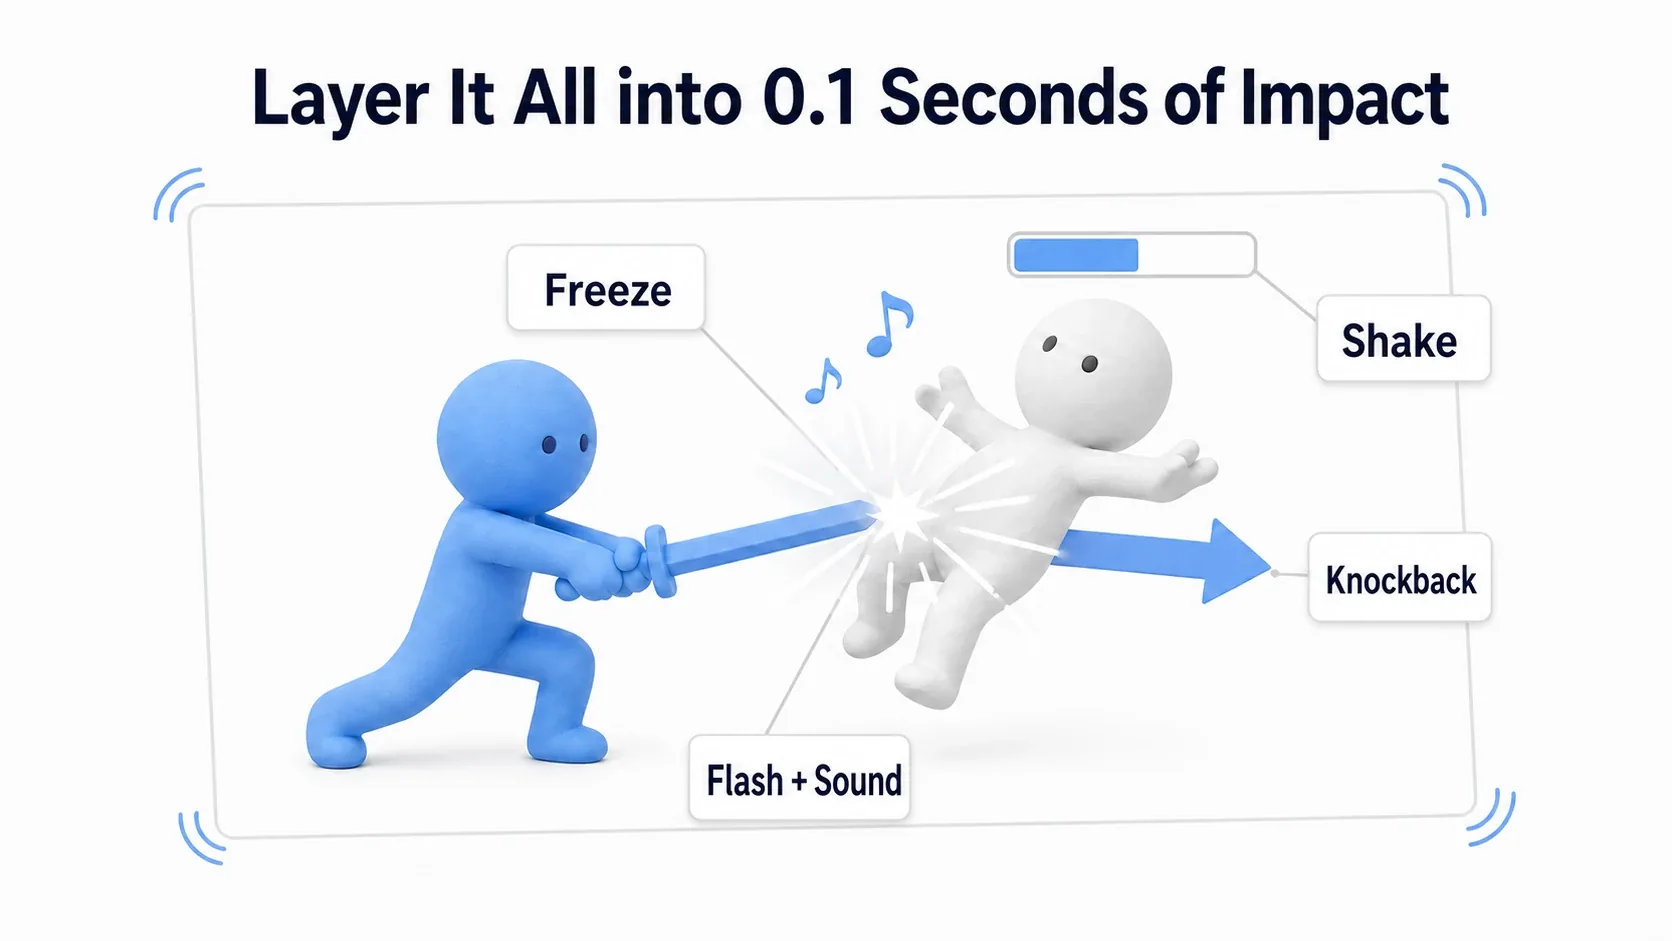
What You'll Learn
- Impact comes from layering several effects, not one feature
- The key to hitstop: the difference between Global and Custom Time Dilation
- Camera shake (Camera Shake) and knockback (Launch Character)
- Light, sound, effects, and numbers get delegated to dedicated articles so you can focus on the mix
- Hands-on: layer "freeze + shake + launch" at the moment of impact
"Feeling the Hit" Is a Composite
Start with the premise. A satisfying attack isn't built from a single feature. At the moment of impact, several small effects happen simultaneously.
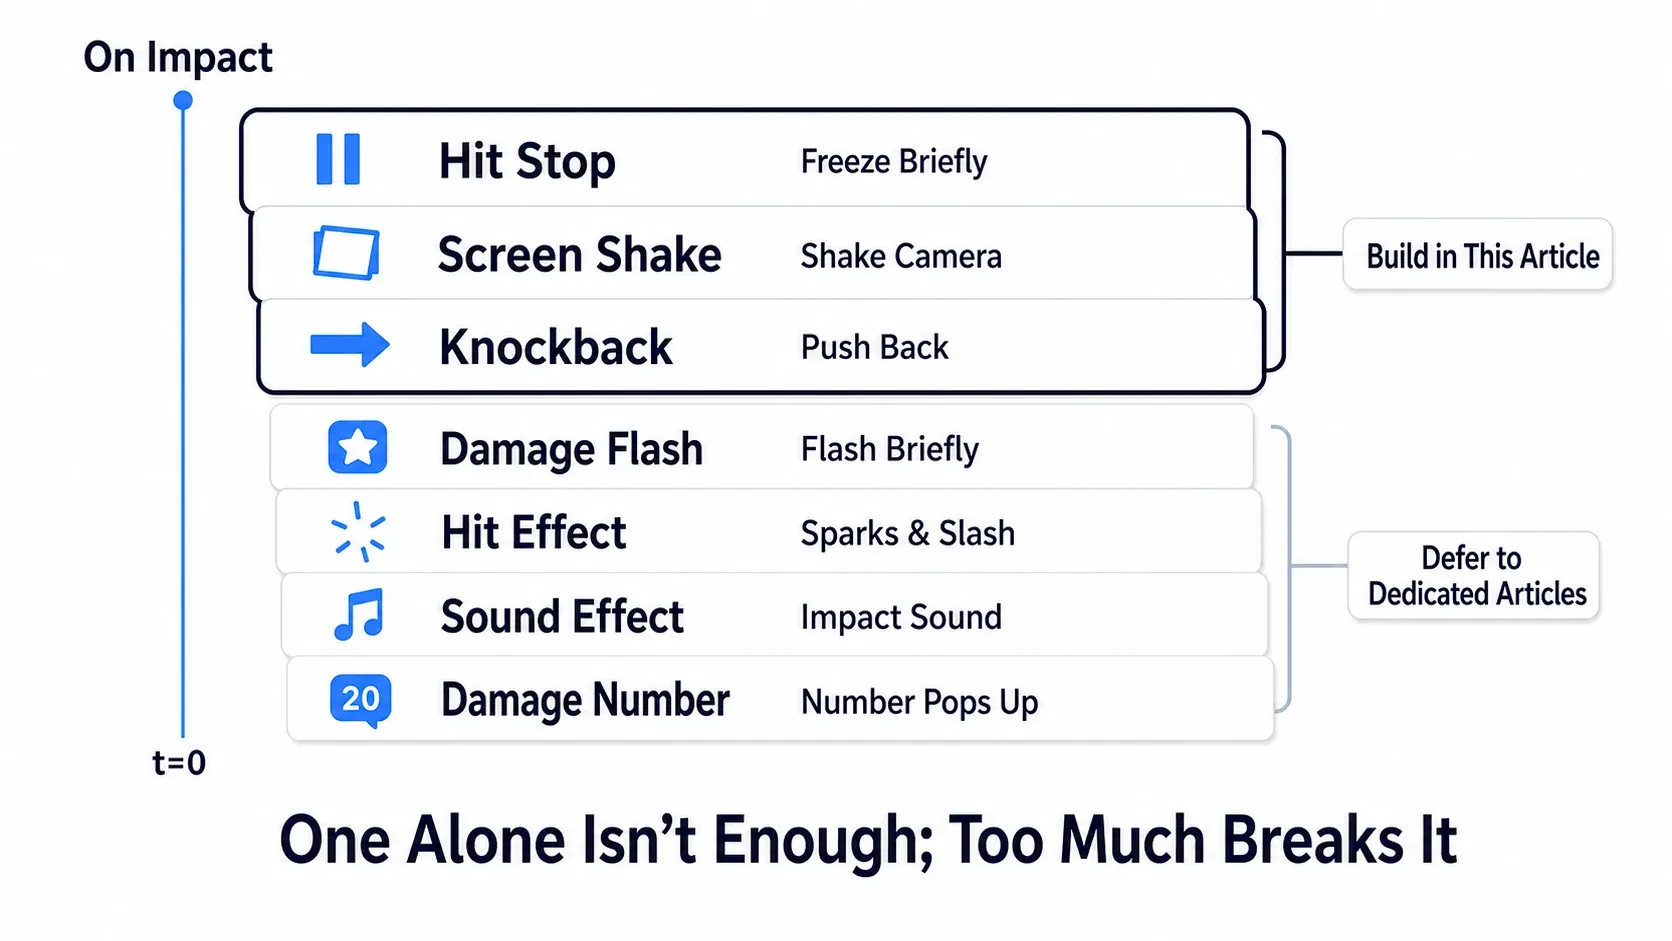
Here are the common ones.
| Effect | Role | Covered here? |
|---|---|---|
| Hitstop | Freeze briefly to sell the bite | Built in this article |
| Camera shake | Shake the camera on impact | Built in this article |
| Knockback | Launch the target backward | Built in this article |
| Hit flash | Flash the target for an instant | Delegated to a dedicated article |
| Hit effect | Sparks, slash arcs | Delegated to a dedicated article |
| Sound effect | Play an impact sound | Delegated to a dedicated article |
| Damage numbers | Pop numbers out | Delegated to a dedicated article |
What matters is layering these at the same instant, in the right amounts. One alone isn't enough, and maxing everything out breaks the screen. So this article builds the three core ones (freeze, shake, launch) yourself, and combines tools from existing articles for the rest.
Note that this article assumes you can already detect that an attack connected. The mechanism for applying damage and reducing HP is covered in the health and damage article.
Hitstop: Two Kinds of Time Dilation
Hitstop is freezing time for just a few frames when an attack connects. That bite you feel the instant a punch or slash "lands" is almost entirely this.
UE has two ways to change the speed of time, and they differ in scope. Mixing them up is the first stumbling block.
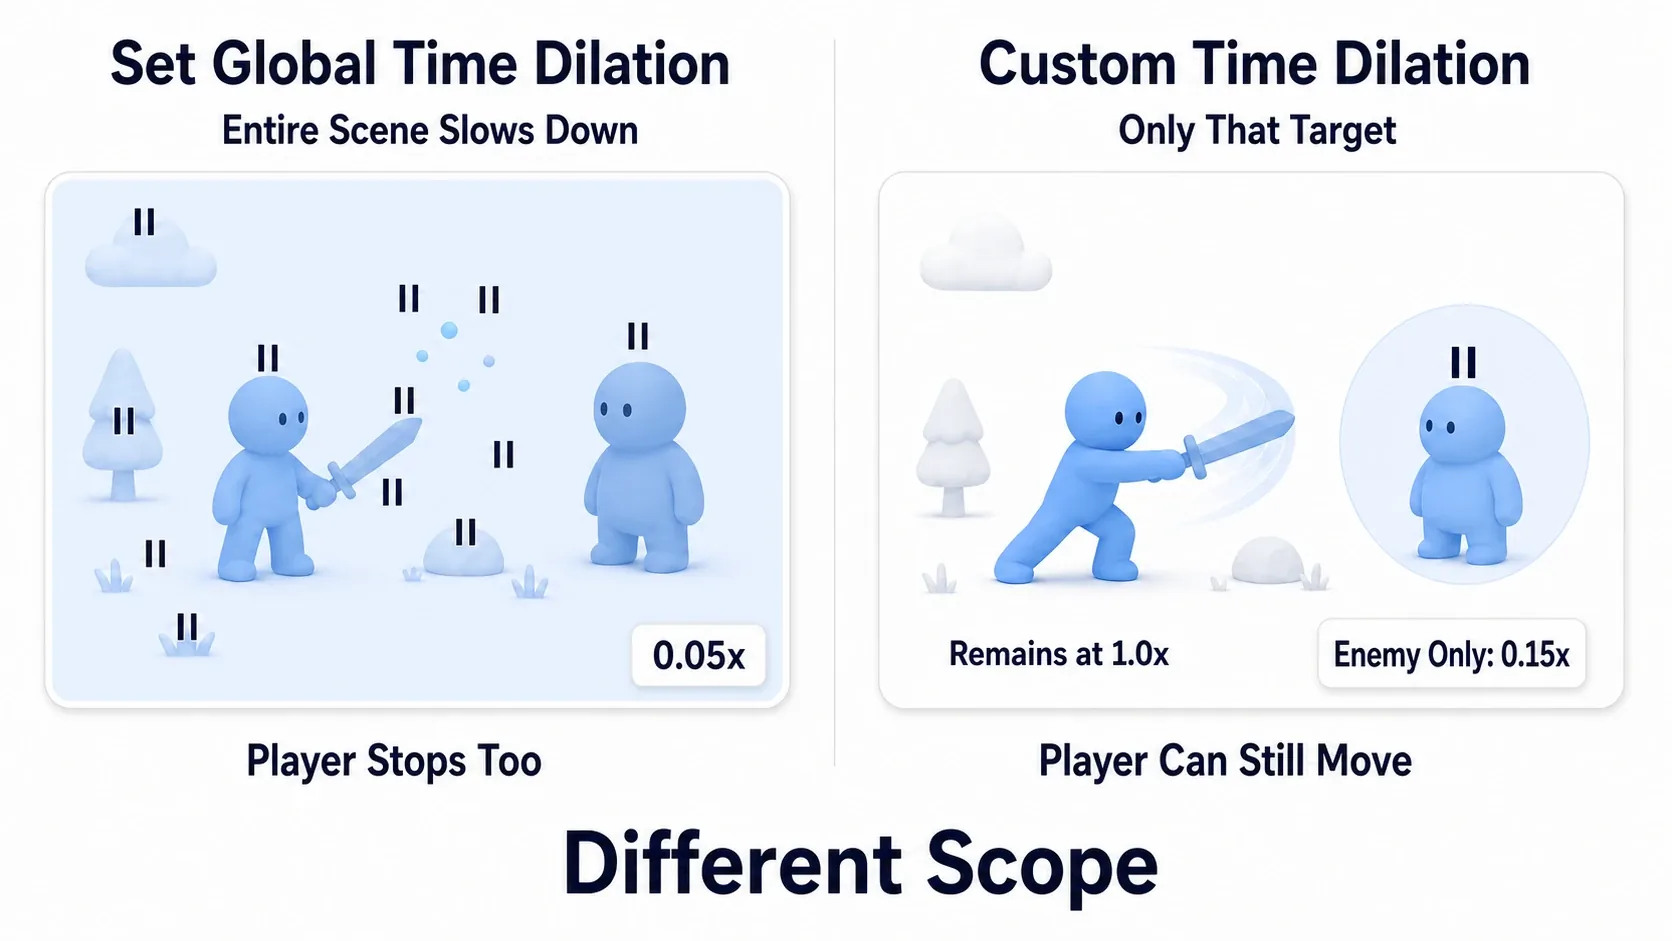
| Method | What slows down | When to use it |
|---|---|---|
| Set Global Time Dilation | The whole world | Bullet time, global slow-mo |
| An Actor's Custom Time Dilation | Only that Actor | Freezing just the target that got hit |
Set Global Time Dilation is a GameplayStatics node where 1.0 is normal and 0.05 is 5% speed (slow motion). But it slows down literally everything, including the player and effects.
Actors, meanwhile, have a Custom Time Dilation property you can change individually with Set Custom Time Dilation. An Actor's actual time speed is Global × Custom, so leaving Global at 1.0 and setting the struck target's Custom to 0.15 freezes that target alone for an instant while you keep moving normally.
The Timer Trap
Here's where a lot of people get caught. Timers and Delays are affected by Global Time Dilation.
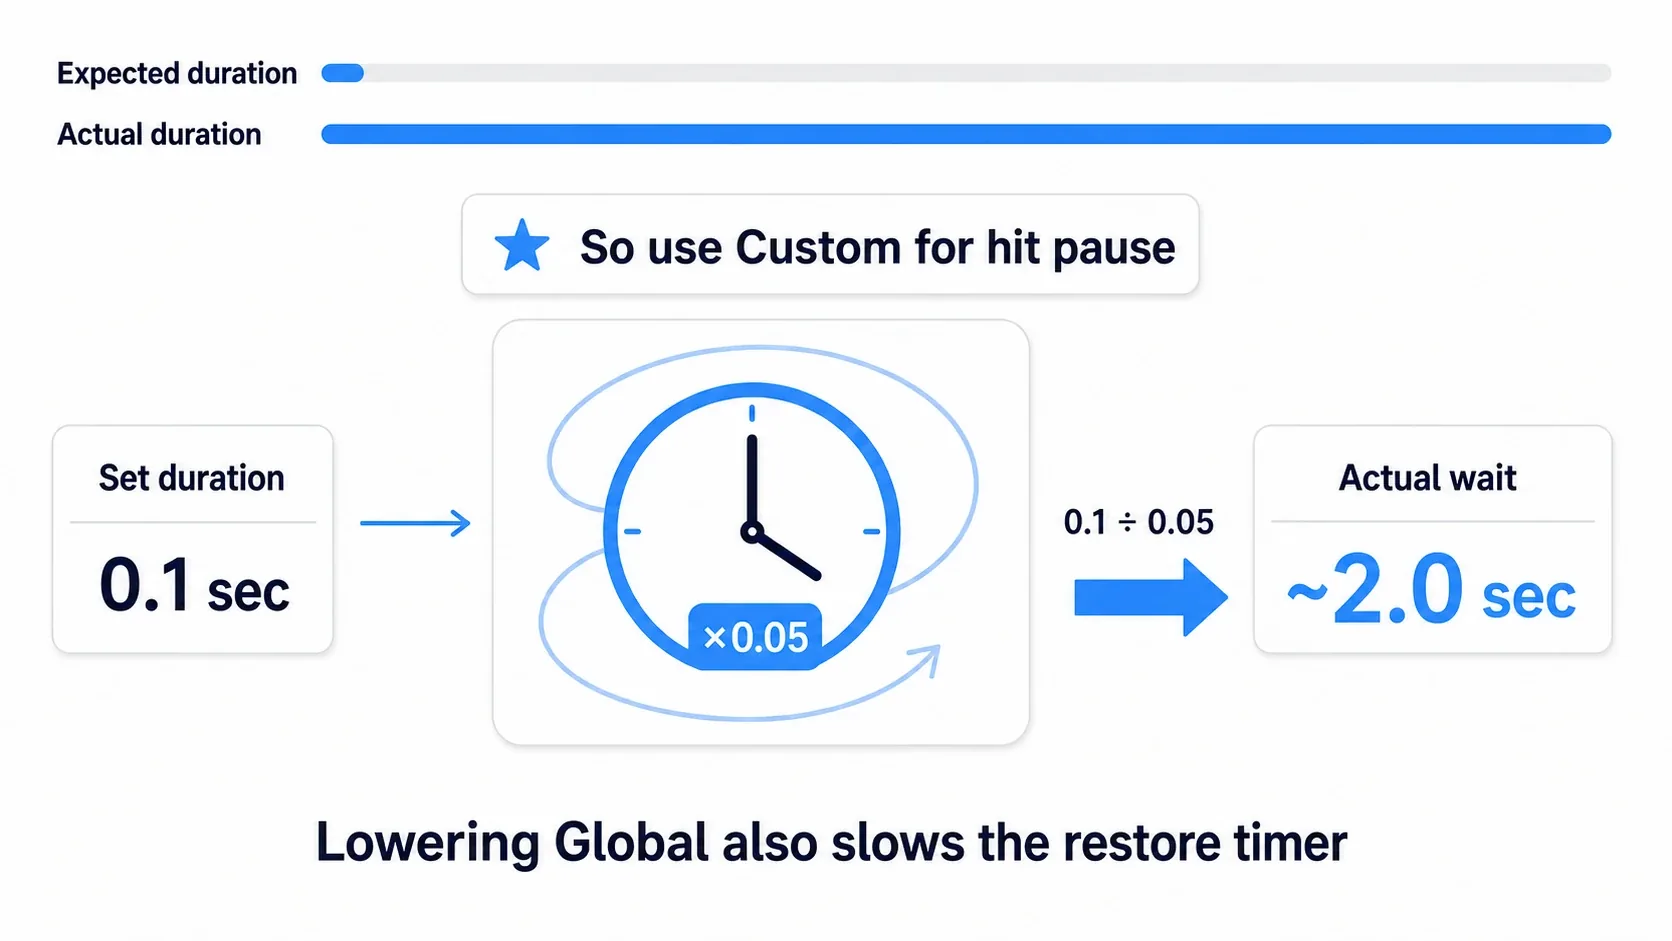
Say you set Global to 0.05 and set a timer to restore it after 0.1 seconds. That 0.1 seconds is 0.1 seconds inside the slowed world, so in real time it stays frozen for roughly 2 seconds (0.1 ÷ 0.05). That's what's behind "I meant to freeze for an instant and it never came back."
The reliable way to avoid it is to use Custom Time Dilation for hit reactions. Timers obey Global Time Dilation, but they do not obey an Actor's Custom Time Dilation. Leave Global at 1.0 and lower only the target's Custom, and your restore timer runs on real time and comes back cleanly.
| Goal | What to use | How to restore |
|---|---|---|
| Freeze only the struck target briefly | Custom Time Dilation | A timer, on real time |
| Slow the whole screen (a set piece) | Global Time Dilation | Restore on input or an event (avoid short fixed timers) |
Camera Shake
Camera shake is a brief tremor on impact. Building it takes two steps.
- Author the shake: Create a
Blueprint Classwith Legacy Camera Shake as the parent and name itCS_Hit(this is the one whose details panel exposes shake values directly; usingCamera Shake Baseas the parent requiresRoot Shake Patternsetup, described below) - Play it: Call
Start Camera Shakeat the moment the attack connects
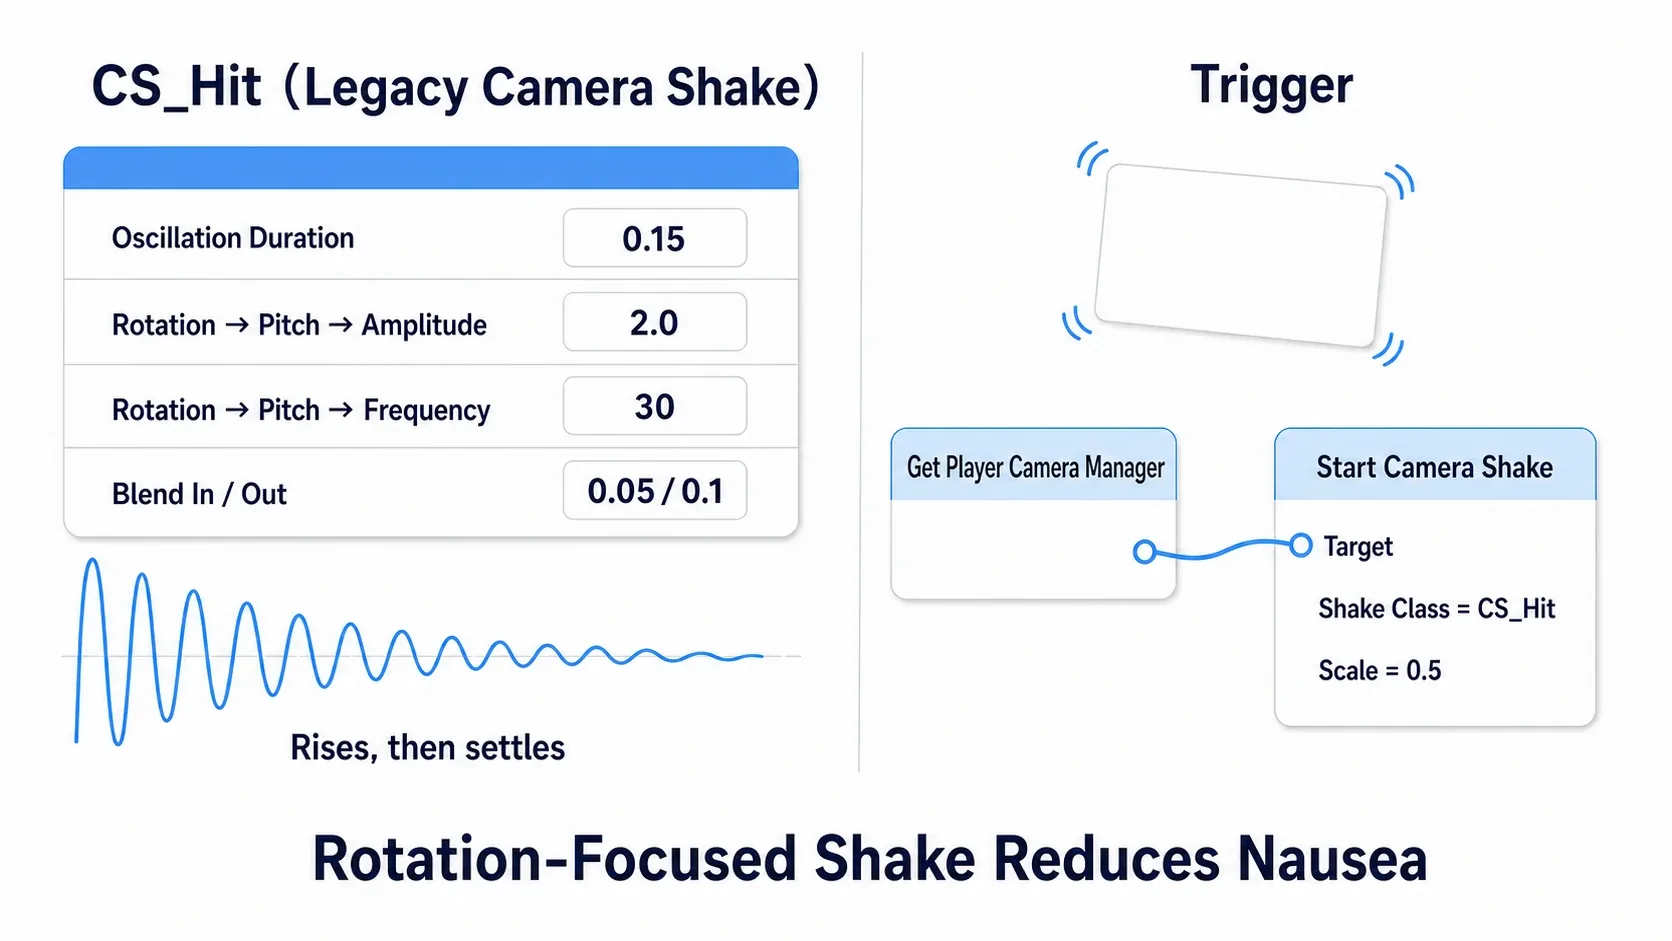
Choosing Legacy Camera Shake puts the shake settings (Oscillation Duration, Rot Oscillation) directly in the class's details panel. Adding a light rotational shake (Rotation Oscillation) first is the easiest thing to work with.
Note: If you parent to the newer
Camera Shake Base, values don't appear directly in the details panel. You assign aWave Oscillator(orPerlin Noise) toRoot Shake Patternand set Amplitude and Frequency on that Pattern. The workflow differs, so starting with the more straightforward Legacy Camera Shake is the recommendation.
| Setting | Ballpark value | Meaning |
|---|---|---|
| Oscillation Duration | 0.15 | How long it shakes (seconds) |
| Rotation Oscillation → Pitch → Amplitude | 1.0–3.0 | Size of the vertical shake |
| Rotation Oscillation → Pitch → Frequency | 20–40 | Speed of the shake |
| Blend In Time / Blend Out Time | 0.05 / 0.1 | Ramp up and settle |
To play it, call Start Camera Shake on the Player Camera Manager. Get it with Get Player Camera Manager, pass CS_Hit to Shake Class and a strength to Scale (1.0 is the baseline). You can also use Client Start Camera Shake from the Player Controller (use that in multiplayer when you only want that client's camera affected).
Leading with rotational shake (Rotation Oscillation) rather than positional shake (Location Oscillation) is easier on the stomach and loses less on-screen information. Save strong positional shake for limited moments like large explosions.
Knockback
Knockback launches the target backward. If the target is a Character (something with Character Movement), Launch Character is the easiest option.
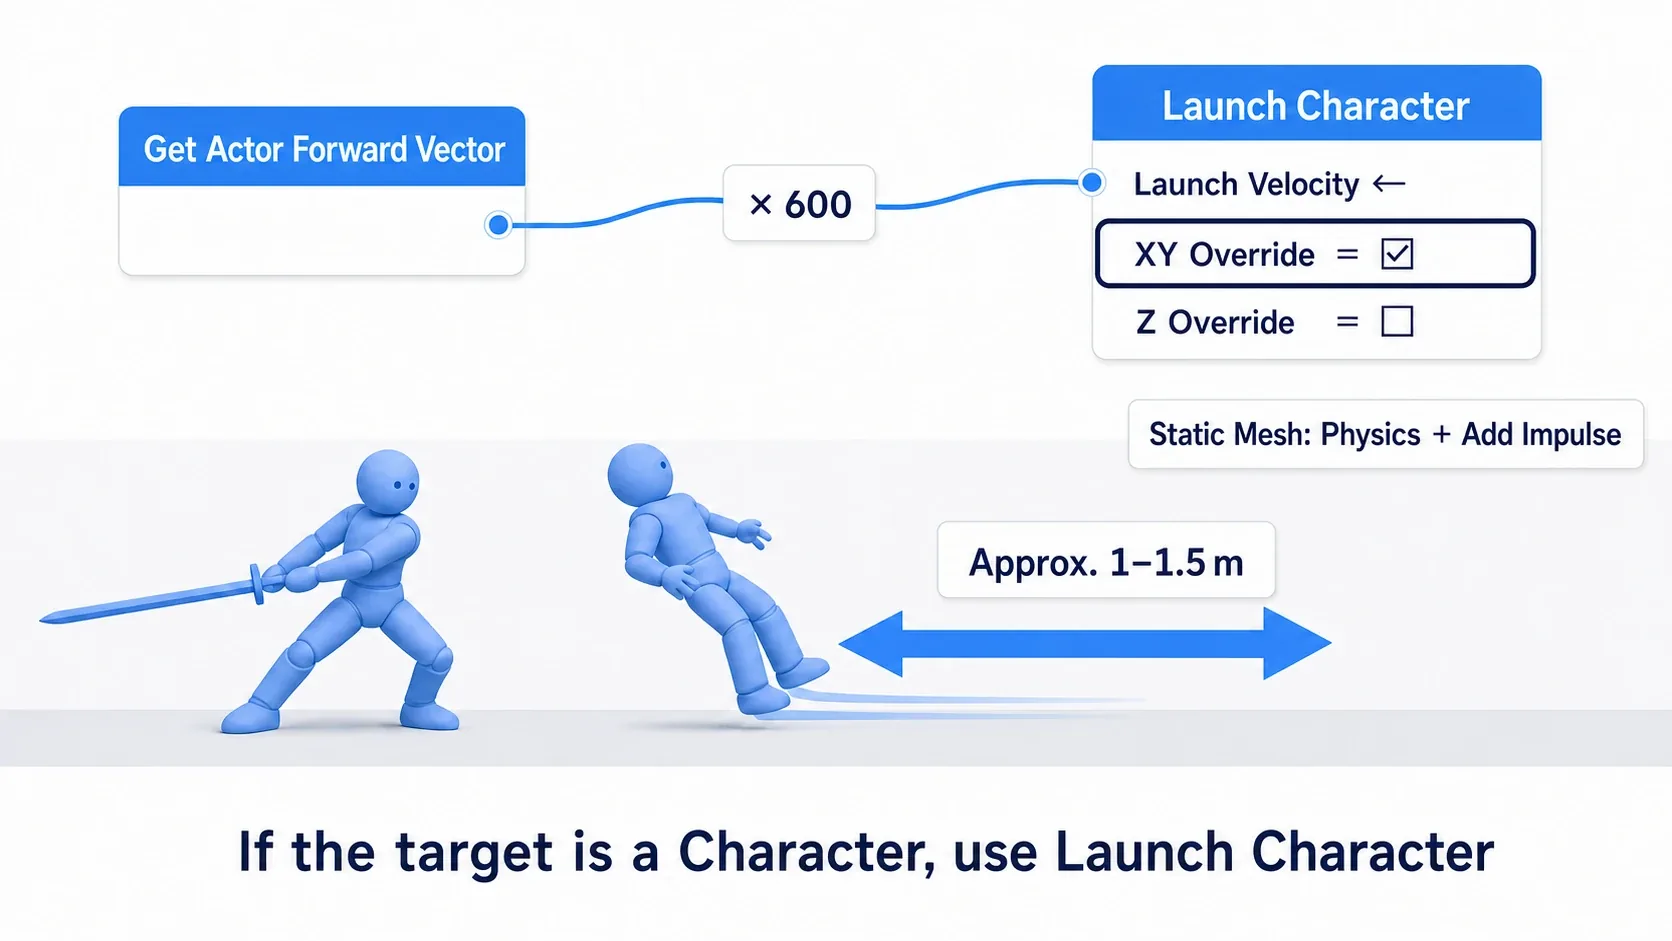
| Pin | Type | Meaning |
|---|---|---|
| Launch Velocity | Vector | Launch speed (cm/s). Direction × magnitude |
| XY Override | bool | true overrides horizontal speed, false adds to it |
| Z Override | bool | true overrides vertical speed, false adds to it |
Launch Velocity is a direction × magnitude vector. Multiply the attacker's forward vector (Get Actor Forward Vector) by 600 and the target flies the way you swung. That only works correctly while the attacker is facing the enemy, though. To launch "outward from the source" regardless of facing, use the normalized direction of target position − attacker position.
Setting XY Override to true ignores the target's current walking speed so it launches cleanly. For Z Override, if you don't want any vertical component, set Launch Velocity's Z to 0 and leave it false (false means "add," so any Z value gets summed in).
If the target isn't a Character (a plain Static Mesh or a trap), Launch Character isn't available. In that case you enable physics simulation and use Add Impulse. How Character velocity works is covered in the Character Movement article.
Light, Sound, Effects, and Numbers Live Elsewhere
With freeze, shake, and launch as your foundation, the rest of the presentation is just layering tools from articles that already exist. Rather than building everything here, we delegate and focus on the combination.
| Effect | Tool | Reference article |
|---|---|---|
| Hit flash (a brief white flash) | Dynamic Material Instance | The Dynamic Material Instance article |
| Hit effects (sparks, slash arcs) | Niagara | The Niagara article |
| Sound effects (impact sounds) | Sound Cue / MetaSounds | The Sound Cue article |
| Damage numbers | Widget Component / screen projection | The overhead bars and damage numbers article |
| Pinpointing the moment of impact | Anim Notify | The Animation Montage article |
The standard hit flash is to make the target's material a Dynamic Material Instance and briefly raise an emissive scalar before bringing it back. Timeline interpolation is well-suited to bringing the value back smoothly. Sparks at the moment of impact go to Niagara, impact sounds to the Sound Cue article, and popping damage numbers to overhead bars and damage numbers.
Once you have the foundation of game feel in place, finishing the screen is just a matter of adding one part at a time from each of those articles.
Hands-On: Build the Instant a Slash Connects
A punch in a beat-em-up, a slash in an ARPG, a stomp in a 2D action game. How you present the 0.1 seconds after an attack connects shapes the feel in any genre. Here we'll layer "freeze + shake + launch" all at the moment of impact.
What It Looks Like Running
With no effects, the enemy just stands there when hit. Layer all three and the screen jolts once on impact, the enemy freezes for an instant, and then slides backward.
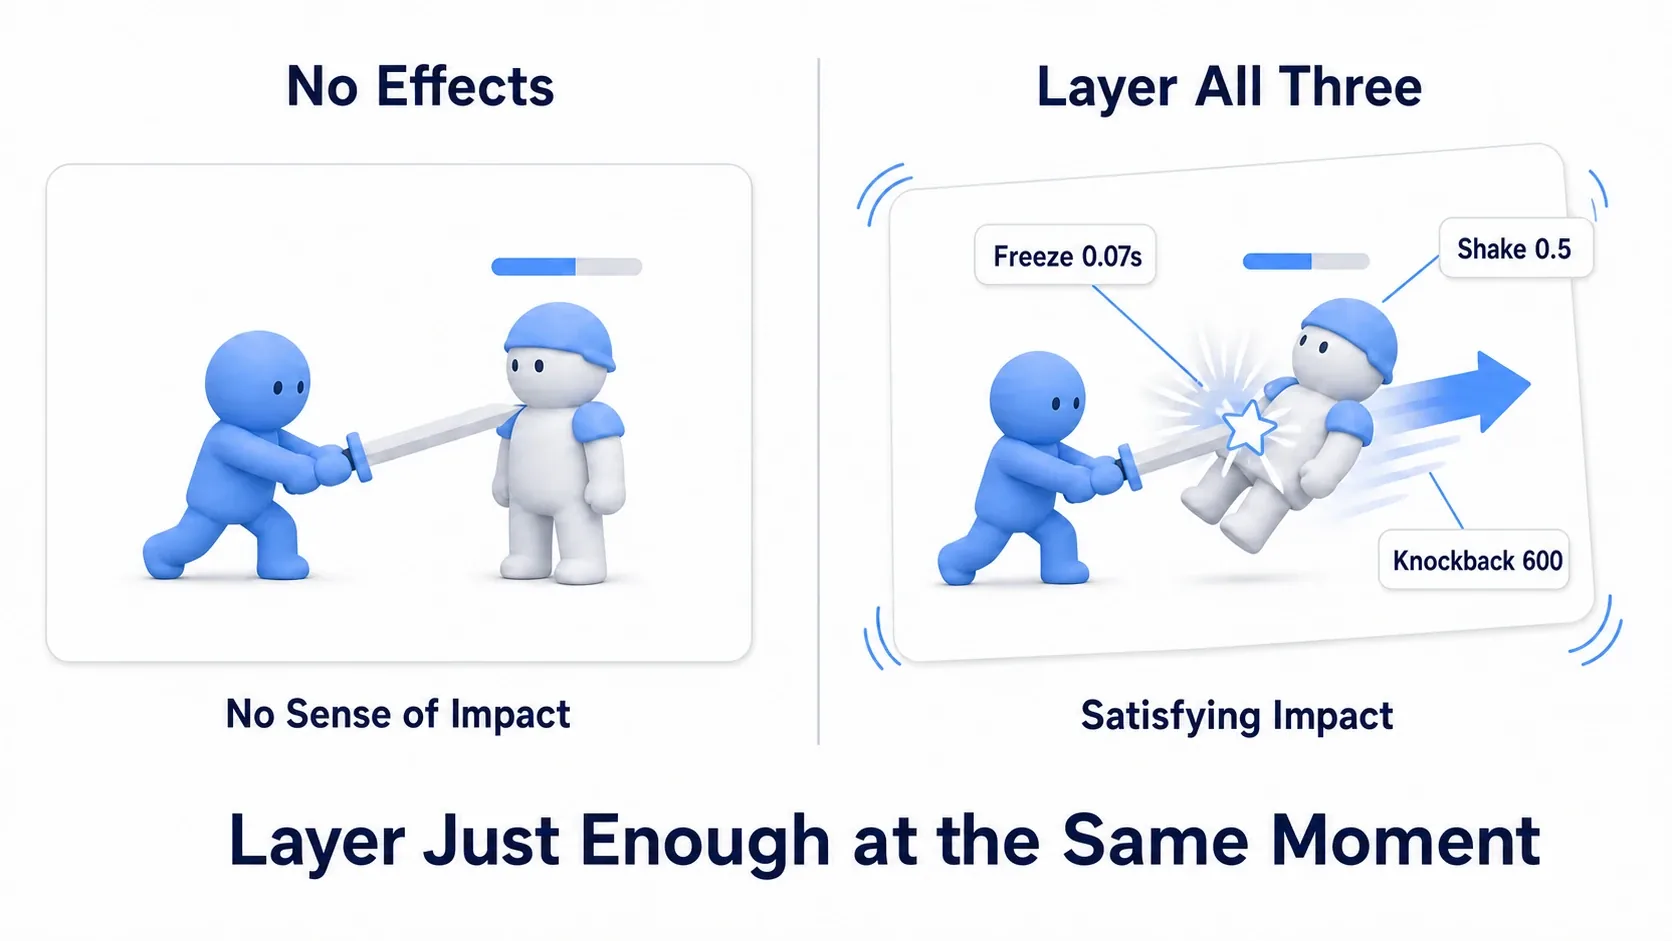
Setup
Create a new project from the Third Person template and prepare the following. For attack hit detection and Apply Damage, you can use the hands-on from the health and damage article as-is.
| What you need | Details |
|---|---|
| BP_Enemy | An enemy with Character as its parent class (Character is required for knockback) |
| CS_Hit | A shake with Legacy Camera Shake as its parent (configured with the values in the table above) |
| Attack input | An attack on BP_ThirdPersonCharacter that fires a Line Trace forward |
Give the attacking BP_ThirdPersonCharacter these variables.
| Variable | Type | Default | Purpose |
|---|---|---|---|
HitStopScale | Float | 0.15 | Custom Time Dilation while frozen |
HitStopTime | Float | 0.07 | Freeze duration (seconds, real time) |
KnockbackStrength | Float | 600.0 | Knockback strength |
ShakeScale | Float | 0.5 | Camera shake strength |
LastHitActor | Actor (reference) | None | Remembers who to restore on recovery |
The Graph at the Moment of Impact
Right after the Line Trace hits the enemy and you've sent Apply Damage, build the following while still holding Hit Actor. The camera belongs to the attacker, so all the presentation lives on the attacker's side.
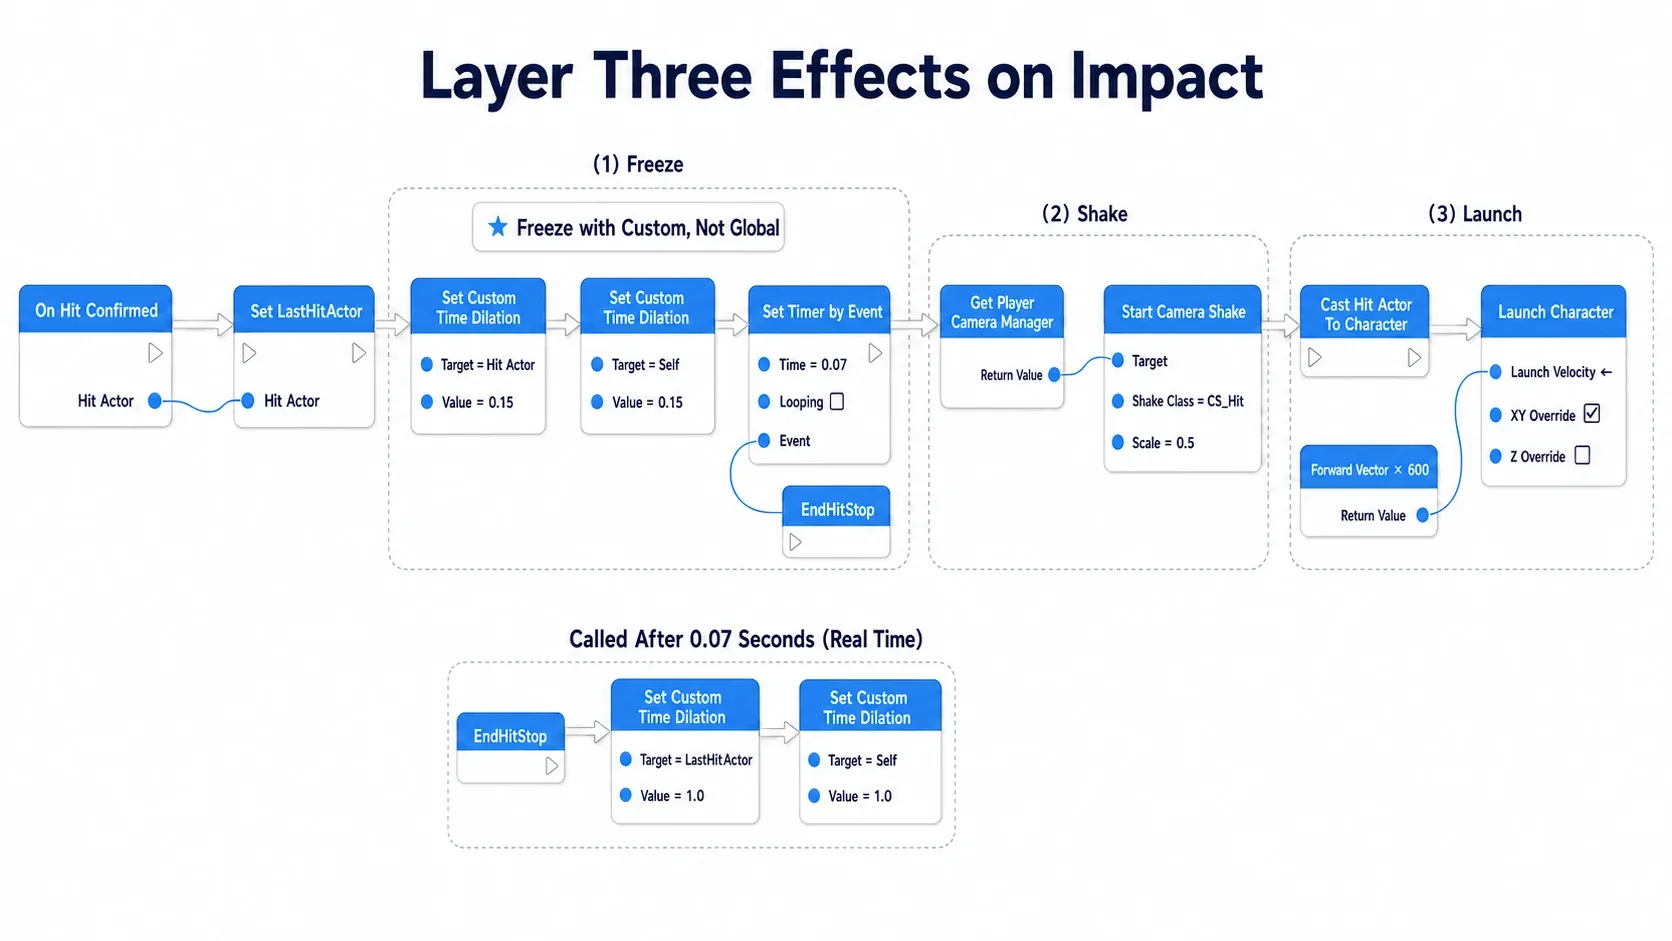
On Hit Confirmed (holding Hit Actor)
  → Set LastHitActor = Hit Actor
  // (1) Hitstop: freeze only the target and self. Don't touch Global
  → Set Custom Time Dilation (Target = Hit Actor, Value = HitStopScale 0.15)
  → Set Custom Time Dilation (Target = Self,      Value = HitStopScale 0.15)
  → Set Timer by Event (Time = HitStopTime 0.07, Looping = false) → EndHitStop
  // (2) Camera shake
  → Get Player Camera Manager → Start Camera Shake (Shake Class = CS_Hit, Scale = ShakeScale 0.5)
  // (3) Knockback
  → Cast Hit Actor To Character
        → Launch Character
              Launch Velocity = Get Actor Forward Vector(Self) × KnockbackStrength(600)
              XY Override = true / Z Override = false

Custom Event EndHitStop
  → Set Custom Time Dilation (Target = LastHitActor, Value = 1.0)
  → Set Custom Time Dilation (Target = Self,         Value = 1.0)
Using Custom Time Dilation for the freeze is the key point. Because Global is untouched, the recovery Set Timer by Event fires EndHitStop after a real-time 0.07 seconds and restores cleanly. Swap it for Set Global Time Dilation and, as described above, the recovery timer slows down too and never comes back.
Verify It
Hit Play and slash the enemy.
- On impact → The screen jolts once (about
0.15 seconds) - At the same time → The enemy and player freeze for
0.07 seconds, and immediately after, the enemy is launched backward (how far it travels depends on floor friction and deceleration as well as initial speed, so tune the feel withLaunch Velocity's magnitude) - Compared to no effects → The sense that it "landed" is obvious
Here's how to narrow it down when something goes wrong.
- No shake →
Start Camera Shake's target isn't thePlayer Camera Manager, orShake Classis empty - No freeze → You used
Set Global Time Dilationwhere you meantSet Custom Time Dilation(Global freezes the whole screen) - Frozen forever → You wrote the recovery with
Delayand also loweredGlobal Time Dilation. The Delay slows down too and never returns. Switch to Custom + Timer - No knockback → The target isn't a Character.
Launch Characteris Character-only (Static Meshes need physics +Add Impulse) - Enemy flies too far / doesn't slide → It's either
KnockbackStrength's magnitude or how you're handlingXY Override(true overrides, false adds)
Two things to take away.
- Custom for freezing, Global for slow-mo: Freezing only the target with Custom Time Dilation keeps the recovery timer out of the crossfire. Use Global only when you want a full-screen bullet time
- The first few frames do the most work: Layer hitstop
0.07 seconds, shake0.5, and knockback at the same instant, then add light and sound on top (Niagara, Sound Cue). Max everything out and the player can't read what happened (next section)
How to Tell When It's Too Much
More effects don't automatically mean better. Max everything out and the screen fills with information, and the impact actually disappears.
- Hitstop that's too long: Past
0.3 secondsit stops reading as "heavy" and starts reading as "sluggish." Around0.05–0.1 secondsfor normal attacks, slightly longer for specials - Shake that's too strong: A big shake every time makes people motion sick. Keep
Scalelow as a baseline and raise it only for heavy attacks - Grade the intensity: Putting a real gap in the amount of presentation between light attacks, heavy attacks, and specials communicates their relative power through feel. If everything is maxed, that information is gone
Game feel is about distribution, not addition. Grade it, like hitstop alone for light attacks and shake plus knockback for heavy ones, and the screen becomes both readable and satisfying.
Bonus: Good to Know for Later
- Pinpoint impact with Anim Notify: Firing the presentation on the frame the attack button is pressed makes it trigger even on a whiff, which kills the effect. The moment the sword actually touches is best captured with an Anim Notify in the attack animation
- Don't shake the camera in Tick: Shake built by offsetting the camera position yourself every frame in
Event Tickbehaves differently at different frame rates.Camera Shakeis time-based and stays stable (→ designing without Tick) - Timers keep running during hitstop: The reason to use a Timer rather than a Delay for recovery is to avoid the Global Time Dilation crossfire described above. With Custom Time Dilation, the recovery timer runs on real time
- Knockback direction should be "outward from the source": You can build it from the attacker's forward vector or from the direction of
target position − attacker position. The latter is more natural when the source is a point, like an explosion (→ Damage Causer in the damage article) - When it feels weak, remove rather than add: The reflex when impact feels weak is to add more presentation, but sometimes the existing effects cancel each other out. Turn everything off once and rebuild starting from hitstop alone, and you'll see which pieces are actually working
Summary
- "Feeling the hit" isn't one feature, it comes from layering freeze, shake, launch, flash, and sound
- Hitstop is safest when you freeze only the target with Custom Time Dilation. Global drags in the whole screen and your timers with it
- Camera shake is Legacy Camera Shake + Start Camera Shake (target: Player Camera Manager)
- Knockback is Launch Character, usable when the target is a Character
- Light, sound, effects, and numbers are delegated to dedicated articles, so this article focuses on layering and balance
- It's distribution, not addition. Max everything out and the impact disappears instead
In the attack you're building now, does anything on screen move when it connects? Start by adding a single hitstop.