Once your game is running well in Blueprint, C++ starts to look like an option. But open any introductory article and you are met with UCLASS() and GENERATED_BODY(), with no obvious place to start.
C++ in UE is not about throwing away Blueprint and rewriting everything. The usual setup is to build the foundation in C++ and keep assembling everything above it in Blueprint. This article walks through creating your first C++ class and exposing C++ variables and functions to Blueprint using three macros: UCLASS, UPROPERTY, and UFUNCTION.
What You'll Learn
- The reason to use C++ is less about speed and more about things Blueprint cannot express cleanly
- How to create your first class from Tools > New C++ Class...
- The role of the three macros:
UCLASS(registration) /UPROPERTY(exposing variables) /UFUNCTION(exposing functions)- How to read specifiers, starting with the fact that EditAnywhere and BlueprintReadWrite do different jobs
- Which changes Live Coding can apply, and which it cannot
- Hands-on: write a parent class in C++ and create Blueprint children that tune the values
Why Use C++
You often see "because C++ is fast," but for a solo developer the first real need for C++ usually has nothing to do with speed. It shows up when something is awkward to express in Blueprint.
| The problem | What it looks like in Blueprint |
|---|---|
| Nested data structures | You cannot directly declare "an array of arrays" or "a Map whose values are arrays" as a variable type |
| Reviewing diffs and merging | Blueprints are binary assets. Git cannot show you what changed inside, and conflicts cannot be resolved by hand |
| Making sweeping edits | You cannot search the whole project for one function name. Text search and find-and-replace do not work |
| Sharing a common foundation | Adding the same variable to 20 Blueprints means doing the same job 20 times |
Speed only matters for work that runs many times every frame. Moving event-driven logic like "press a button, a door opens" into C++ makes no perceptible difference. For how to find bottlenecks, see the stat command article.
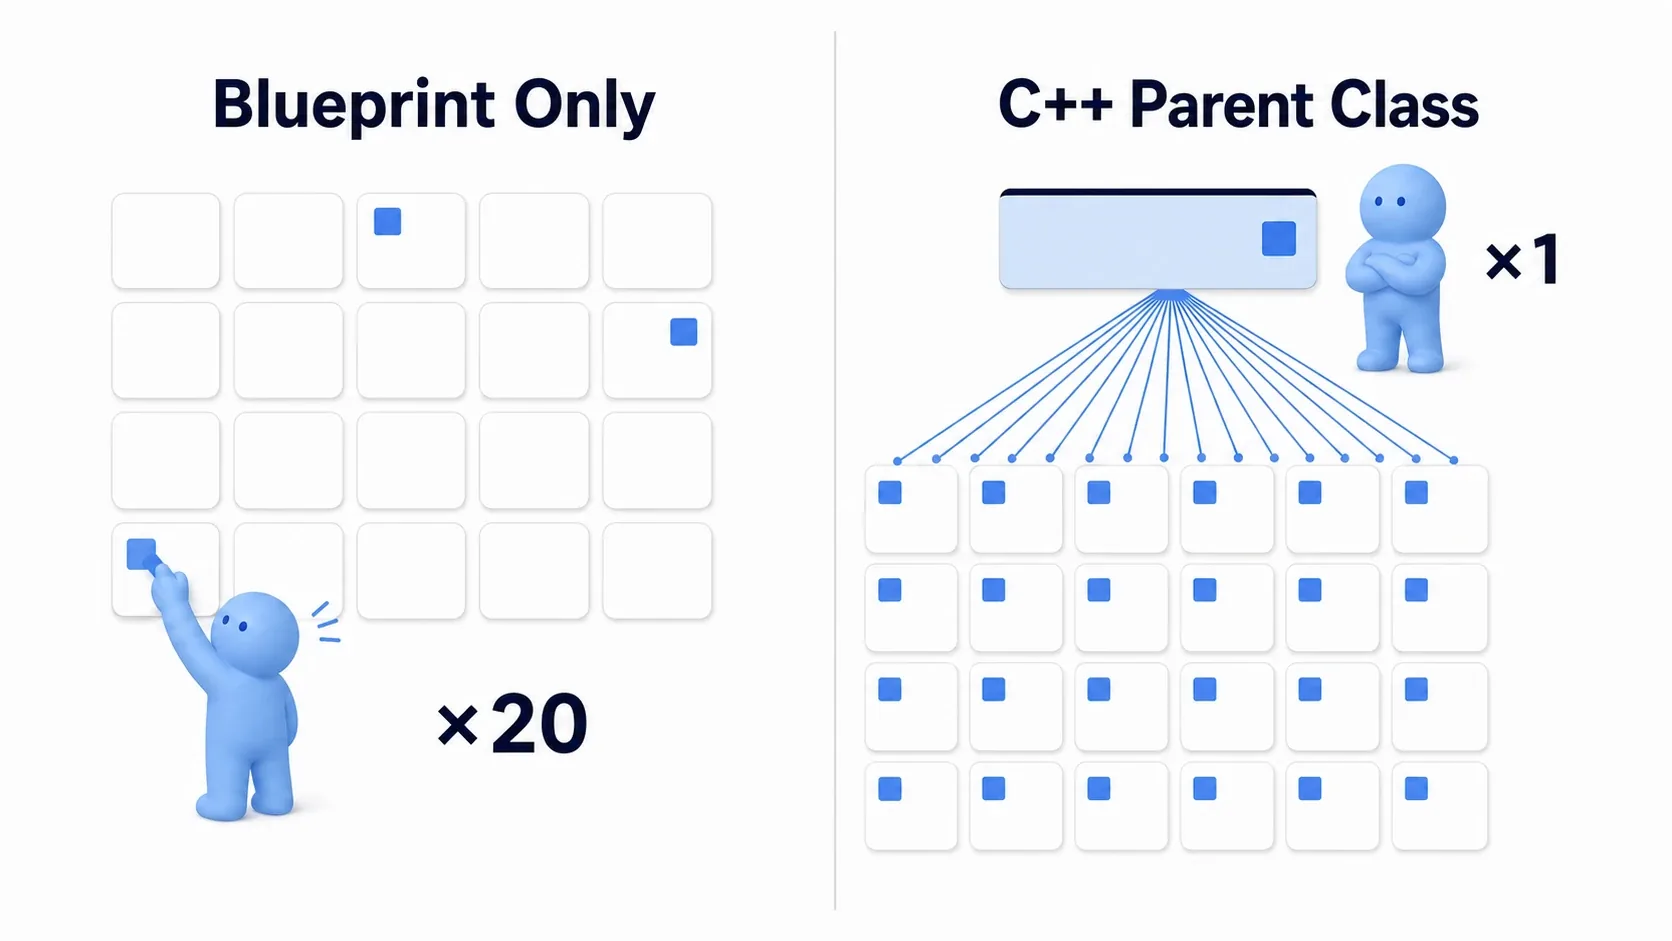
The flip side is that as long as none of the rows above apply to you, staying in Blueprint is fine. The moment you want to hand the same foundation to many actors is the moment to write your first C++ class.
Creating Your First C++ Class
Pick Tools > New C++ Class... from the editor menu. A wizard opens, and you work through it step by step.
Step 1: Choose a Parent Class
The most common parent classes are listed as buttons. Pick based on what you are making.
| Parent class | What it becomes |
|---|---|
| Actor | Something you can place in a level or spawn (items, doors, gimmicks) |
| Character | A character that walks and jumps |
| Actor Component | A part you attach to an Actor to add a feature (see the Component article) |
| None | A plain object that fits none of the above |
Step 2: Decide the Name and Location
Type a name. UE has prefix rules for class names.
- A: Derived from Actor (
AItemPickup) - U: Derived from UObject but not Actor (
UMyComponent) - F: Plain C++ types such as structs (
FEnemyStats)
If you type ItemPickup in the wizard, it is created as AItemPickup. For the Public / Private choice, Public is fine when you are unsure.
Note: Adding your first C++ class to a Blueprint-only project turns that project into a C++ project. You need a build environment (on Windows, Visual Studio with the "Game development with C++" workload). You may be asked to restart the editor after creation.
Step 3: Look at the Generated Files
You get two files, ItemPickup.h and ItemPickup.cpp. The header (.h) declares what the class has; the source (.cpp) contains the actual work.
// ItemPickup.h
#pragma once

#include "CoreMinimal.h"
#include "GameFramework/Actor.h"
#include "ItemPickup.generated.h"   // must always be the last include

UCLASS()
class MYPROJECT_API AItemPickup : public AActor
{
    GENERATED_BODY()

public:
    AItemPickup();

protected:
    virtual void BeginPlay() override;

public:
    virtual void Tick(float DeltaTime) override;
};
Here are the parts that stand out on a first read.
#include "ItemPickup.generated.h"must be the last include. Change the order and the build failsMYPROJECT_APIis a string built from your project name that marks the class as usable from other modules. You never need to touch itGENERATED_BODY()is the insertion point for code UE generates behind the scenes. Leave it alone as well
Bridging to Blueprint with Three Macros
Writing something in C++ does not make it visible to Blueprint. You have to mark what you want to expose with a macro. The system that reads those marks is called the reflection system.
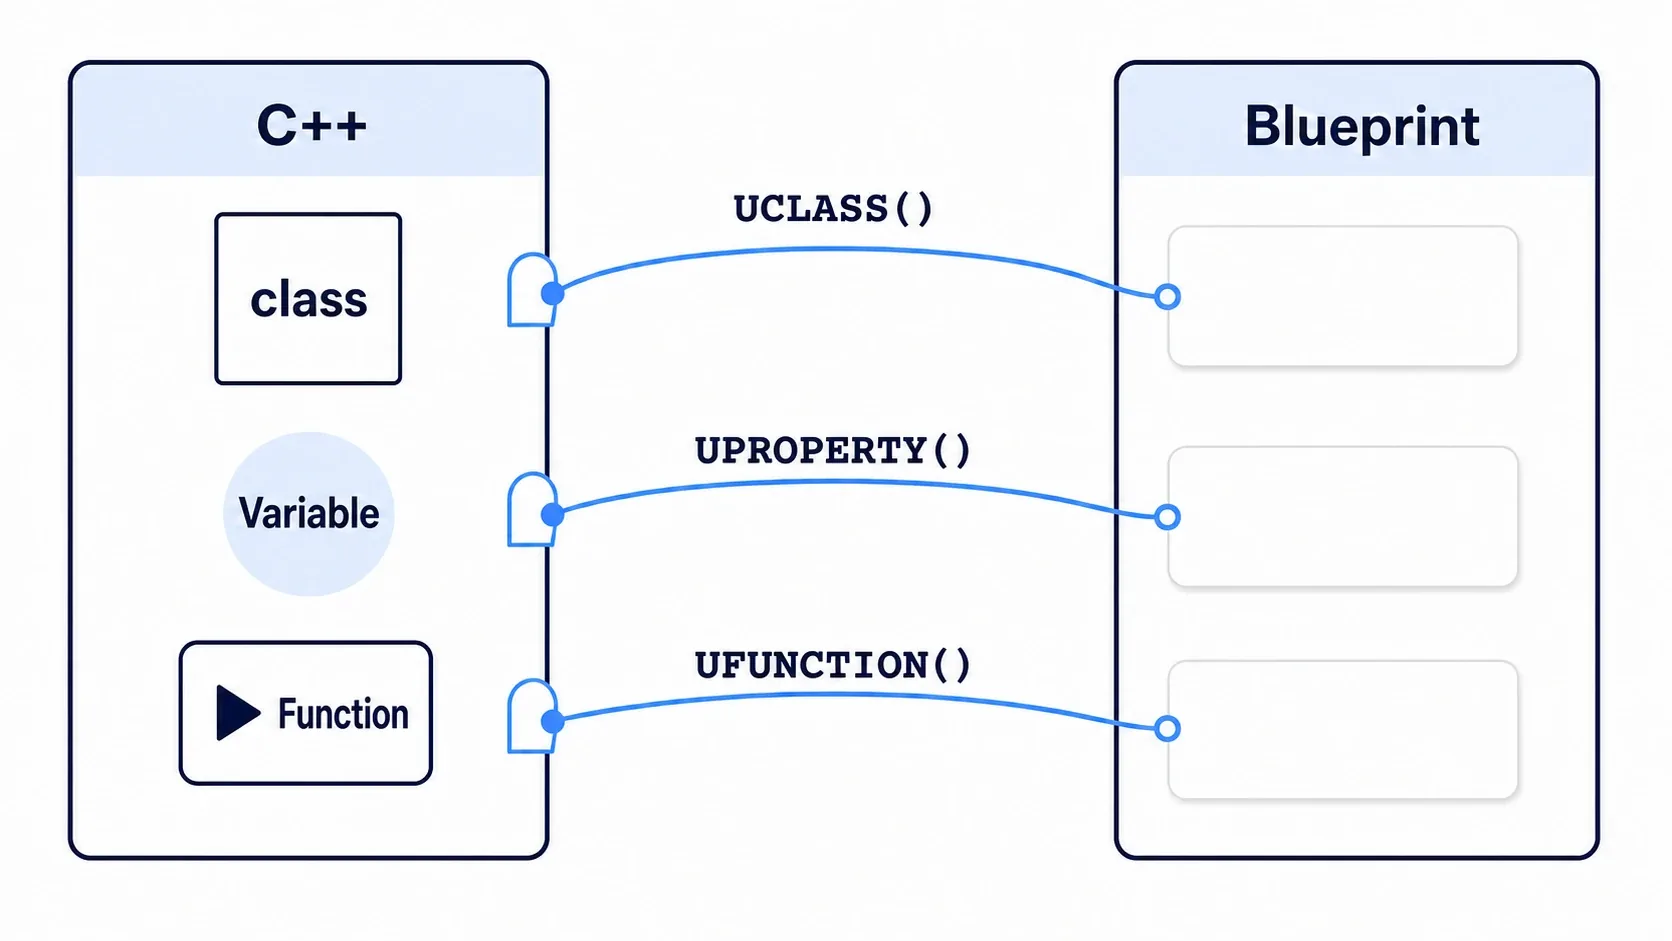
| Macro | What you attach it to | What it enables |
|---|---|---|
UCLASS() | A class | The class can be a Blueprint parent, and the editor recognizes it |
UPROPERTY() | A member variable | Editing in the Details panel, reading/writing in Blueprint, inclusion in saves |
UFUNCTION() | A member function | Calling it as a Blueprint node, registering it with timers and delegates |
Unmarked variables have one more pitfall. A UObject pointer without UPROPERTY is not protected from garbage collection. The object you think you are holding gets collected, and you crash. Adding UPROPERTY() to UObject-based member variables is standard practice even when you have no plan to expose them to Blueprint.
UPROPERTY()
TObjectPtr<UStaticMeshComponent> MeshComponent;   // protected from GC
Reading Specifiers: EditAnywhere and BlueprintReadWrite Are Different
What you write inside the UPROPERTY parentheses is called a specifier. This is the first place people trip up. EditAnywhere and BlueprintReadWrite open different doors.
- Edit specifiers: whether you can edit the value in the Details panel
- BlueprintRead specifiers: whether you can use Get / Set nodes in a Blueprint graph
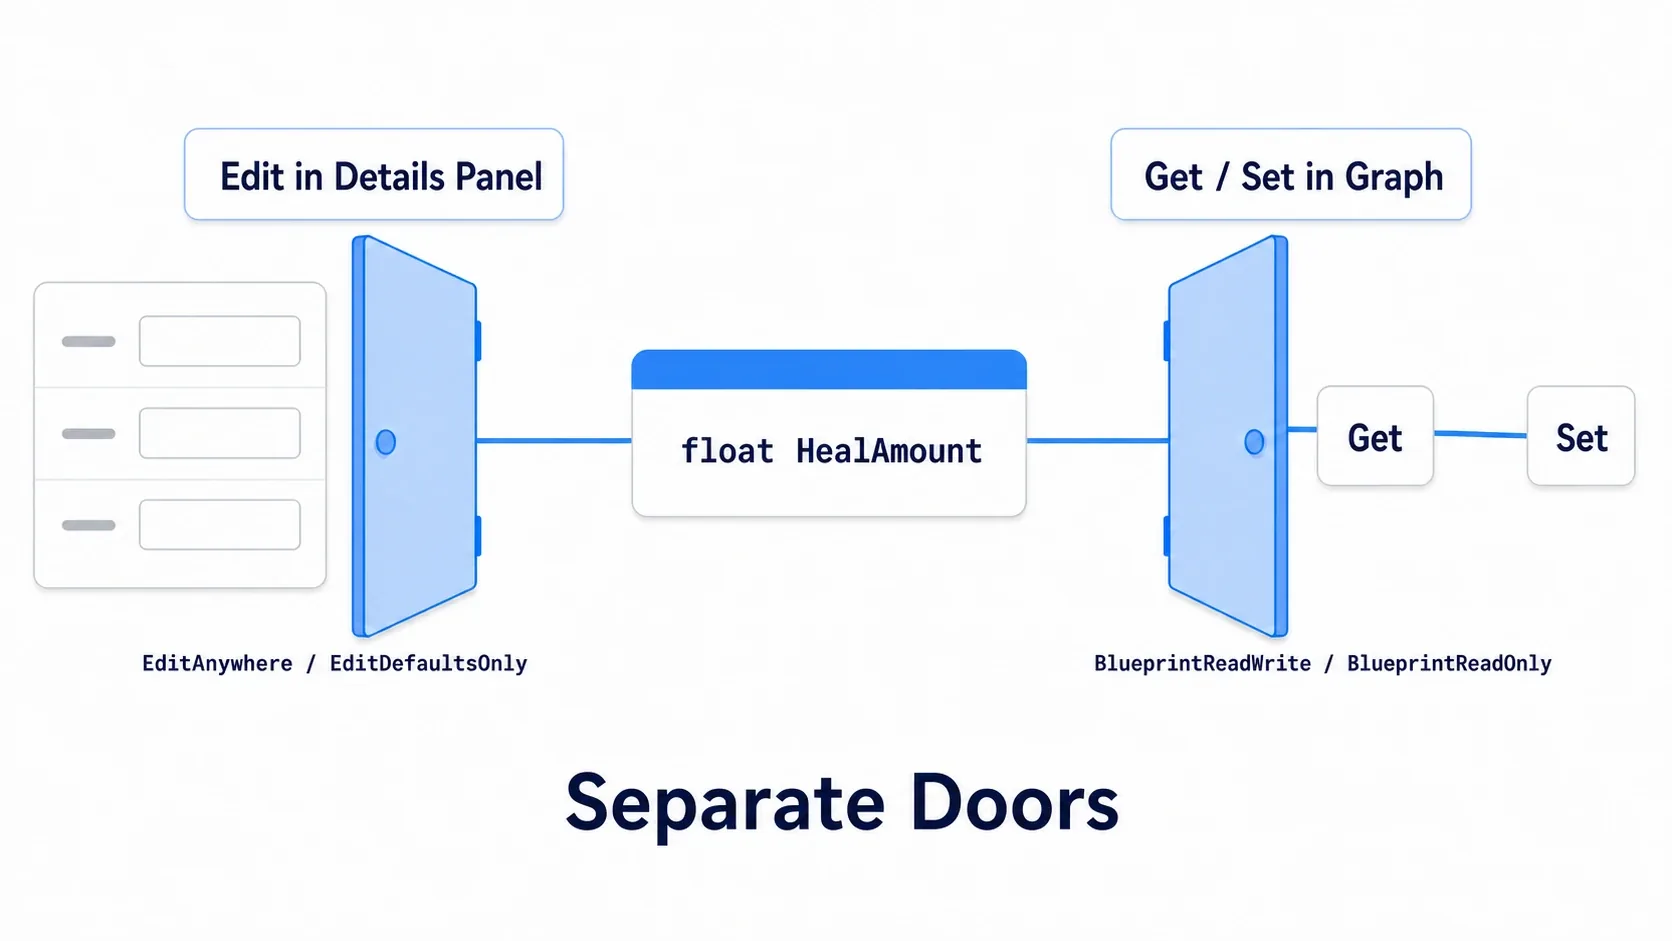
Edit Specifiers (Details Panel Side)
| Specifier | Where you can edit |
|---|---|
EditAnywhere | Both the Blueprint class defaults and individual instances placed in a level |
EditDefaultsOnly | Blueprint class defaults only. Cannot be changed per instance |
EditInstanceOnly | Placed instances only. Cannot be changed on the class |
VisibleAnywhere | Shown but not editable (good for debug display) |
BlueprintRead Specifiers (Graph Side)
| Specifier | What you can do in a graph |
|---|---|
BlueprintReadWrite | Both Get and Set nodes are available |
BlueprintReadOnly | Get node only. Blueprint cannot write to it |
| (omitted) | Does not appear in graphs at all |
Here is a practical combination.
// A value a designer tunes. EditAnywhere so it can vary per instance,
// BlueprintReadOnly because BP never needs to write it at runtime
UPROPERTY(EditAnywhere, BlueprintReadOnly, Category = "Pickup")
float HealAmount = 25.0f;

// Runtime state. View-only in the editor, read/write from BP
UPROPERTY(VisibleAnywhere, BlueprintReadWrite, Category = "Runtime")
bool bIsConsumed = false;
Category is a group name. It becomes a collapsible heading in the Details panel, so always add one once your variable count starts growing.
UFUNCTION Specifiers
For functions, two specifiers will carry you a long way.
| Specifier | How the node looks |
|---|---|
BlueprintCallable | A node with white execution pins. Called as an action |
BlueprintPure | A green node with no execution pins. Just returns a value (make it const) |
UFUNCTION(BlueprintCallable, Category = "Pickup")
void Consume(AActor* Taker);

UFUNCTION(BlueprintPure, Category = "Pickup")
float GetRemainingHeal() const;
There is also a specifier for the other direction, where C++ calls into Blueprint. A function marked BlueprintImplementableEvent is declared in C++ with no body, and its implementation is written as a Blueprint event. Use it when you want to say "the pickup effect is entirely up to the BP side."
// ItemPickup.h — C++ only decides when to call it
UFUNCTION(BlueprintImplementableEvent, Category = "Pickup")
void OnPickedUpEffect();
The Reality of Building and Live Coding
After writing C++ you need a build, which is separate from Blueprint's compile button. UE5 enables Live Coding by default, so you can rebuild and apply your code with Ctrl + Alt + F11 while the editor is still open.
That said, Live Coding can apply some changes and not others. Not knowing where the line is will burn your time on "I changed it but nothing happened."
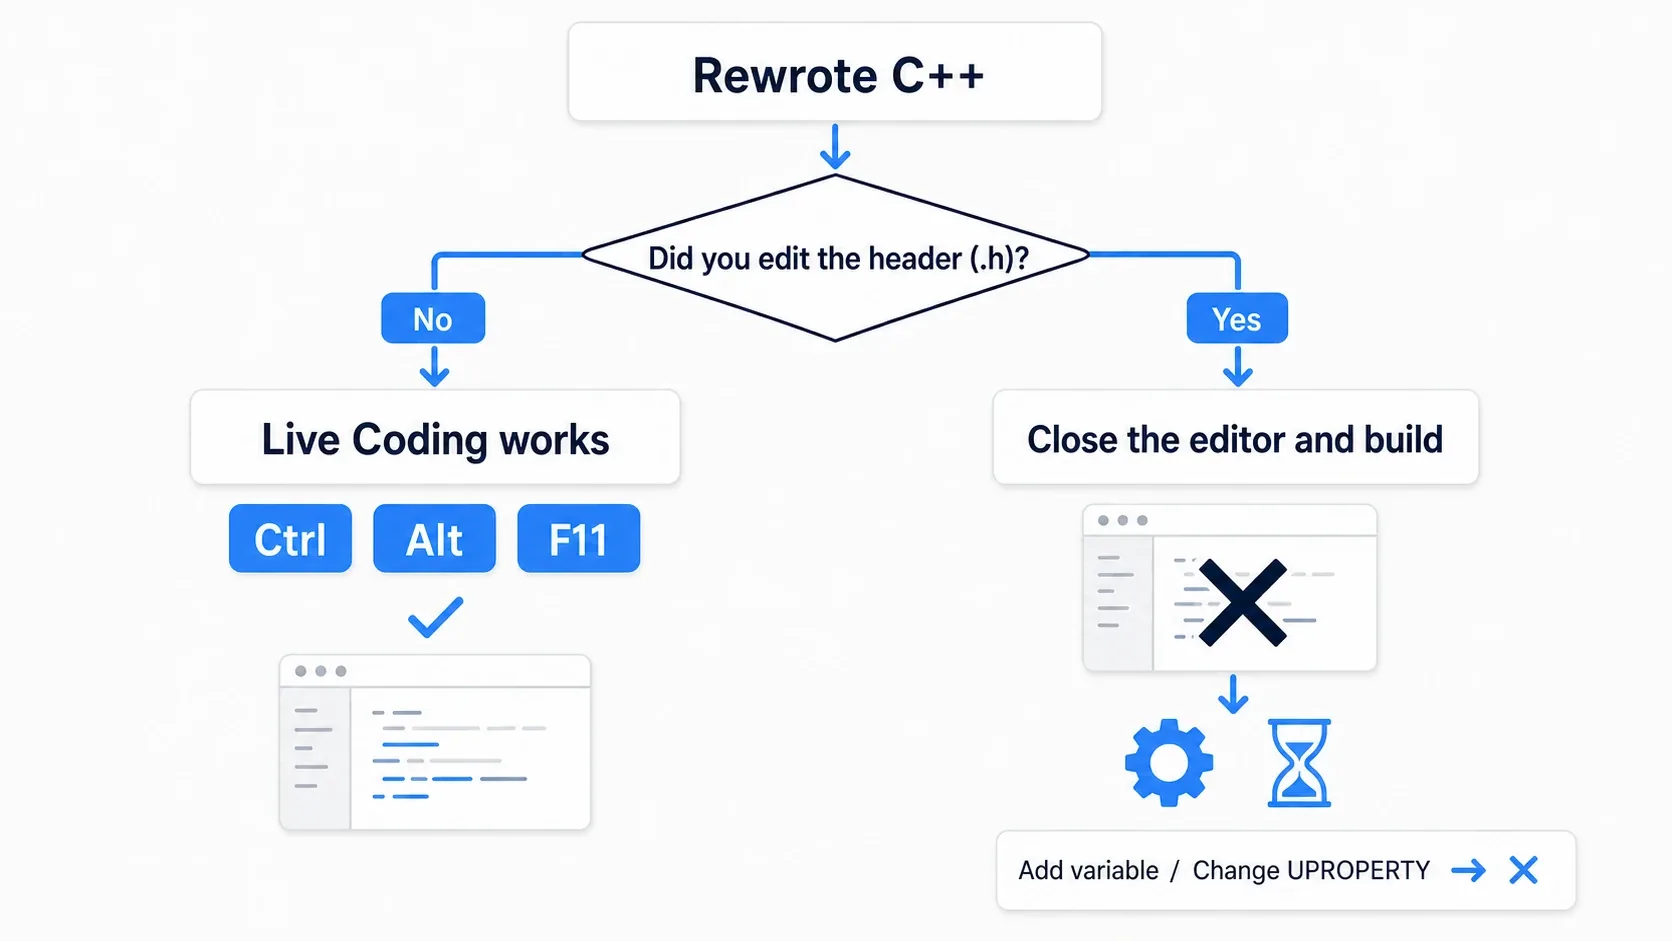
| Change | Can Live Coding apply it? |
|---|---|
Rewriting a function body in .cpp | Yes |
| Adding logs, fixing a formula | Yes |
Adding a variable / changing a UPROPERTY | No. Close the editor and rebuild |
| Adding a class / changing a parent class | No. Same as above |
The rule is simple: if you touched the header (.h), close the editor. Build from your IDE with the editor closed, then reopen it when the build finishes.
Note: If the build succeeded but your variable does not appear in the Details panel, you are almost certainly trying to push a header change through Live Coding. Close the editor and do a full build.
Hands-On: A C++ Parent and Many Blueprint Children
Let's turn the three macros into something real. We are building an item that does something when you pick it up. A health pack in an FPS, a floor drop in a roguelike, a boost panel in a racing game: "you walk into it, it disappears, and something happens" is the same shape across genres.
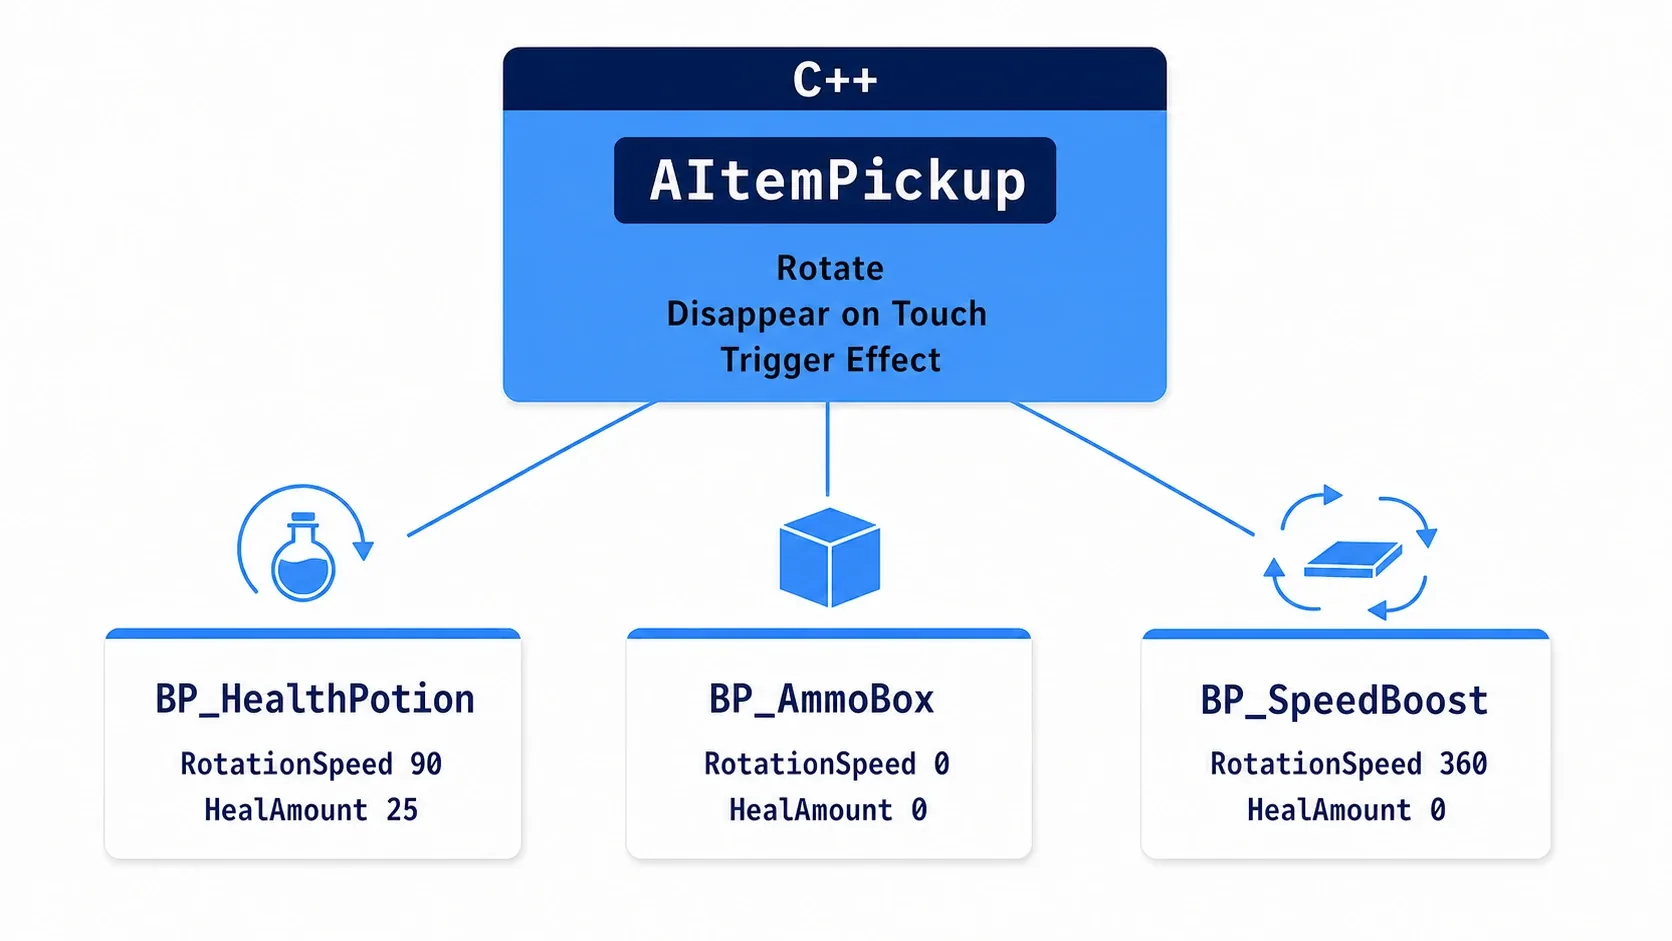
C++ holds only the shared skeleton (spin, vanish on overlap), while the heal amount, spin speed, and pickup effect are decided by Blueprint child classes.
The Finished Result
Setup
Give AItemPickup (parent class: Actor) the following members.
| Member | Type | Initial value | Specifiers |
|---|---|---|---|
MeshComponent | UStaticMeshComponent* | none | VisibleAnywhere |
CollisionSphere | USphereComponent* | radius 100.0 | VisibleAnywhere |
RotationSpeed | float | 90.0f | EditAnywhere, BlueprintReadOnly |
HealAmount | float | 25.0f | EditAnywhere, BlueprintReadOnly |
OnPickedUpEffect() | function (no params, no return) | — | BlueprintImplementableEvent |
C++ Side: Writing the Skeleton
// ItemPickup.h
#pragma once

#include "CoreMinimal.h"
#include "GameFramework/Actor.h"
#include "ItemPickup.generated.h"

class USphereComponent;

UCLASS()
class MYPROJECT_API AItemPickup : public AActor
{
    GENERATED_BODY()

public:
    AItemPickup();

    virtual void Tick(float DeltaTime) override;

protected:
    virtual void BeginPlay() override;

    // Appearance. The mesh is swapped in on the BP side
    UPROPERTY(VisibleAnywhere, Category = "Components")
    TObjectPtr<UStaticMeshComponent> MeshComponent;

    // Pickup detection range
    UPROPERTY(VisibleAnywhere, Category = "Components")
    TObjectPtr<USphereComponent> CollisionSphere;

    // Degrees of rotation per second. Tuned in the child BP
    UPROPERTY(EditAnywhere, BlueprintReadOnly, Category = "Pickup")
    float RotationSpeed = 90.0f;

    // Heal amount on pickup. Tuned in the child BP
    UPROPERTY(EditAnywhere, BlueprintReadOnly, Category = "Pickup")
    float HealAmount = 25.0f;

    // Pickup effect. Implementation is left to Blueprint
    UFUNCTION(BlueprintImplementableEvent, Category = "Pickup")
    void OnPickedUpEffect();

    UFUNCTION()
    void OnSphereOverlap(UPrimitiveComponent* OverlappedComp, AActor* OtherActor,
                         UPrimitiveComponent* OtherComp, int32 OtherBodyIndex,
                         bool bFromSweep, const FHitResult& SweepResult);
};
// ItemPickup.cpp
#include "ItemPickup.h"
#include "Components/SphereComponent.h"
#include "Components/StaticMeshComponent.h"
#include "GameFramework/Character.h"

AItemPickup::AItemPickup()
{
    PrimaryActorTick.bCanEverTick = true;

    CollisionSphere = CreateDefaultSubobject<USphereComponent>(TEXT("CollisionSphere"));
    CollisionSphere->InitSphereRadius(100.0f);
    RootComponent = CollisionSphere;

    MeshComponent = CreateDefaultSubobject<UStaticMeshComponent>(TEXT("MeshComponent"));
    MeshComponent->SetupAttachment(RootComponent);
    // The sphere handles detection, so the mesh should not collide
    MeshComponent->SetCollisionEnabled(ECollisionEnabled::NoCollision);
}

void AItemPickup::BeginPlay()
{
    Super::BeginPlay();

    CollisionSphere->OnComponentBeginOverlap.AddDynamic(this, &AItemPickup::OnSphereOverlap);
}

void AItemPickup::Tick(float DeltaTime)
{
    Super::Tick(DeltaTime);

    // Spin RotationSpeed degrees per second
    AddActorLocalRotation(FRotator(0.0f, RotationSpeed * DeltaTime, 0.0f));
}

void AItemPickup::OnSphereOverlap(UPrimitiveComponent* OverlappedComp, AActor* OtherActor,
                                  UPrimitiveComponent* OtherComp, int32 OtherBodyIndex,
                                  bool bFromSweep, const FHitResult& SweepResult)
{
    // Ignore anything that is not the player (a Character)
    if (!OtherActor->IsA(ACharacter::StaticClass()))
    {
        return;
    }

    UE_LOG(LogTemp, Log, TEXT("%s picked up. Heal: %.1f"), *GetName(), HealAmount);

    // Call the Blueprint implementation for the effect
    OnPickedUpEffect();

    Destroy();
}
Blueprint Side: Create Children and Fill In Values
In the Content Browser, open the C++ Classes folder, right-click ItemPickup, and choose Create Blueprint class based on ItemPickup. Name it BP_HealthPotion.
Open it and you will find a Pickup category in the Details panel. Fill in the values there.
| Child BP | RotationSpeed | HealAmount | Mesh |
|---|---|---|---|
BP_HealthPotion | 90.0 | 25.0 | Potion mesh |
BP_AmmoBox | 0.0 | 0.0 | Crate mesh |
BP_SpeedBoost | 360.0 | 0.0 | Panel mesh |
In the Event Graph, right-click > Event On Picked Up Effect and place the node. The function you marked BlueprintImplementableEvent in C++ appears as a red event node. Wire Spawn System at Location (Niagara) and Play Sound at Location into it, and the whole presentation layer lives in Blueprint.
BP_HealthPotion (child class)
Event On Picked Up Effect
  → Spawn System at Location (System: NS_Heal, Location: Get Actor Location)
  → Play Sound at Location (Sound: SFX_Heal, Location: Get Actor Location)
Verify
Place all three child BPs in a level and press Play.
BP_HealthPotioncompletes exactly one rotation in 4 seconds (90 deg/s x 4 s = 360 deg)BP_SpeedBoostcompletes one rotation per second (360 deg/s)BP_AmmoBoxstays still because itsRotationSpeedis 0- Touching one with the player destroys the actor and prints
BP_HealthPotion_C_0 picked up. Heal: 25.0in the Output Log
If nothing rotates, check that PrimaryActorTick.bCanEverTick = true; is in the constructor. If touching does nothing, check that CollisionSphere uses the OverlapAllDynamic collision preset and that the player capsule is set to return Overlap (see the collision preset article).
Two things to take away.
- C++ holds only the steps that never change: spin, vanish on touch, call the effect. That skeleton is identical for every item. Adding a fourth type becomes "make one child BP and type in the numbers"
BlueprintImplementableEventhands the presentation over: C++ decides when to call, Blueprint decides what happens. You never wait for a build just to swap an effect, and you get the same loose coupling between C++ and BP that Event Dispatchers give you inside Blueprint
Bonus: Good to Know for Later
.generated.his the last include: change the order and you get a build error. If the error message points at.generated.h, suspect the include order first- Use forward declarations in headers: declare just the name, like
class USphereComponent;, and include the real header in the.cpp. The more includes a header pulls in, the slower your builds get - Blueprint changes cannot be moved back to C++: variables you add in a child BP are invisible to C++. Promoting one to the parent later means rewriting it in C++ and deleting the BP variable. Anything likely to become shared is easier to put in C++ from the start
- You can reparent an existing Blueprint to C++: open the Blueprint and use File > Reparent Blueprint to pick your new C++ class. Variable name collisions can wipe values, so back up before you do it
- Starting with a
UDataAssettype definition is a valid approach: defining just a data type in C++ has a much smaller blast radius than jumping straight to an Actor, and it is easier to roll back (see the Data Asset article)
Summary
- The reason to use C++ is less about speed and more about things Blueprint cannot express cleanly: diffs, sweeping edits, and shared foundations are the main ones
- Create classes from Tools > New C++ Class.... Pick a parent and follow the
A/Unaming rules - The bridge to Blueprint is three macros:
UCLASS(class) /UPROPERTY(variables) /UFUNCTION(functions) - Specifiers split into Edit = Details panel, BlueprintRead = graph. They are separate doors, so write both if you want both
- Touch the header, close the editor and build. Live Coding only covers function bodies
- The basic shape is C++ parent, Blueprint child: skeleton in C++, tuning and presentation in BP
Exactly where to draw the line between C++ and Blueprint is covered in detail in Dividing Work Between Blueprint and C++.
Is there a Blueprint in your project where you keep copying the same variable over and over? That shared part is the content of your first C++ class.