You want to fire at an enemy. You want to drop an item where an enemy died. You want to place a trap at your feet on a button press. Different goals, same underlying operation: add one actor to the level at runtime.
In UE5 that's the job of Spawn Actor from Class. On top of that, the Projectile Movement Component ships with the engine to make the spawned actor behave like a projectile. This article covers what each pin on Spawn Actor means, the "my bullet doesn't appear" problem everyone hits first, Projectile Movement's main parameters, and when to use Line Trace instead.
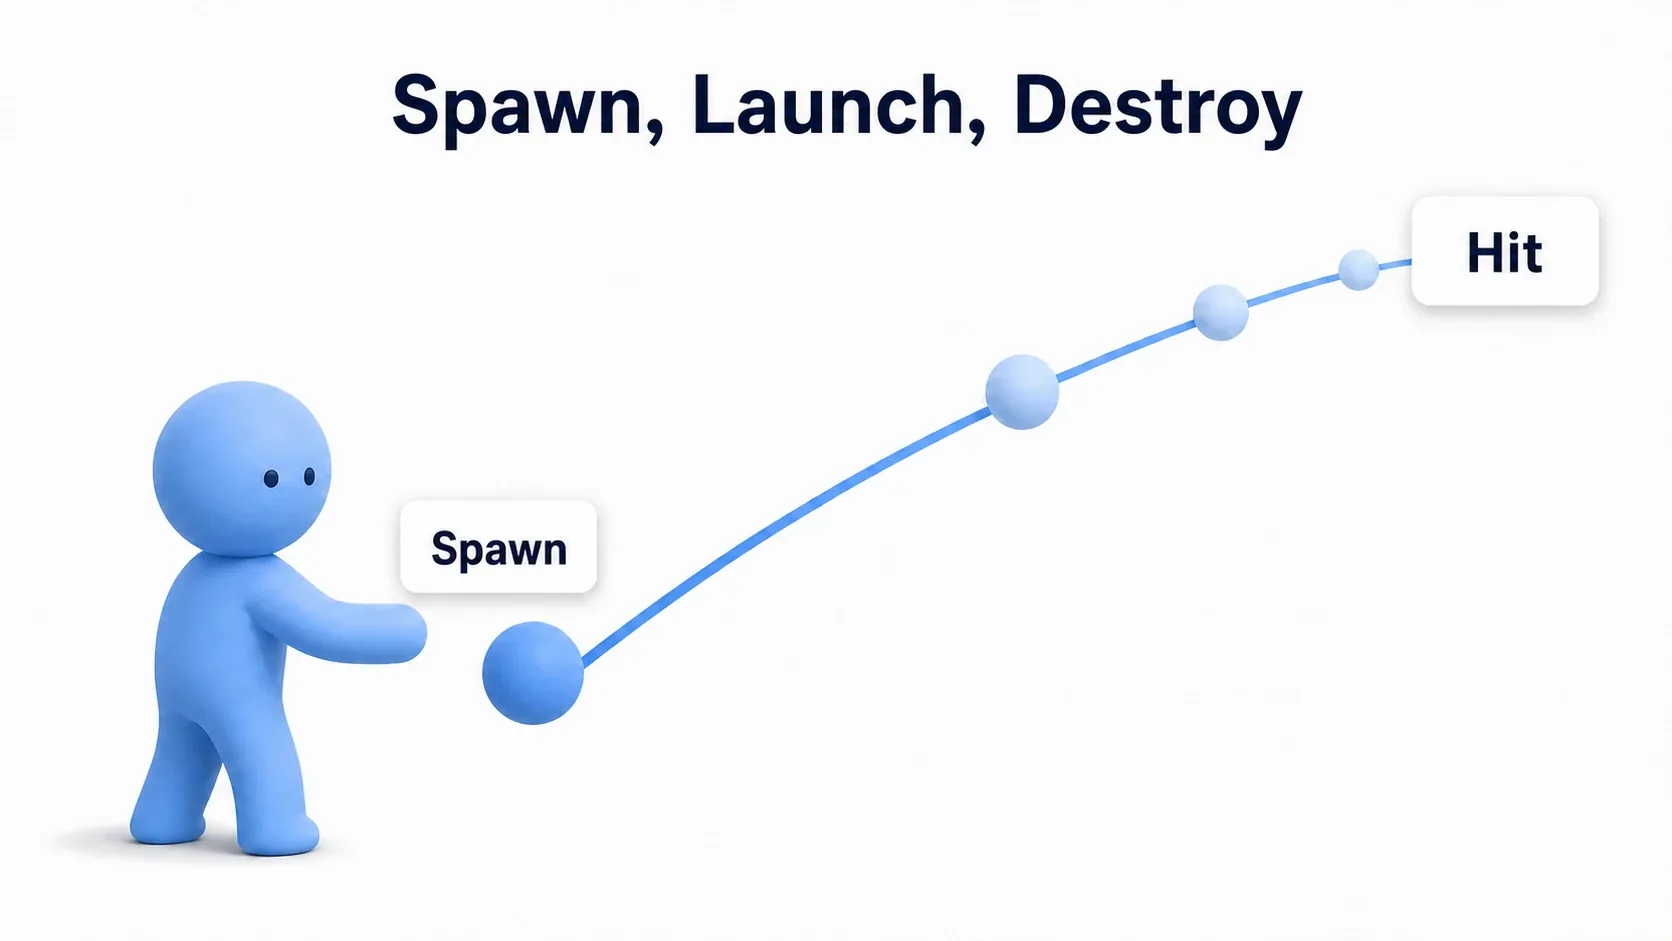
What You'll Learn
- What the five pins on Spawn Actor from Class decide
- The Collision Handling Override behind "my bullet doesn't appear"
- Why it's worth filling in Owner and Instigator
- Setting speed, gravity, and bounce with the Projectile Movement Component
- Cleaning up stray shots with Initial Life Span
- Choosing between Line Trace and a real projectile
- Hands-on: fire, damage what you hit, and destroy the projectile
- The Five Pins on Spawn Actor from Class
- The Culprit Behind Missing Projectiles: Collision Handling Override
- Why Owner and Instigator Matter
- Flying with the Projectile Movement Component
- Projectile Actor Structure and the Hit Event
- Cleaning Up Stray Shots with Life Span
- Line Trace or Real Projectile?
- Hands-On: Shoot and Destroy an Enemy
- Bonus: Good to Know for Later
- Summary
The Five Pins on Spawn Actor from Class
Right-click in a Blueprint graph and add Spawn Actor from Class. Some pins don't appear until you pick something for Class, so choose the class first.
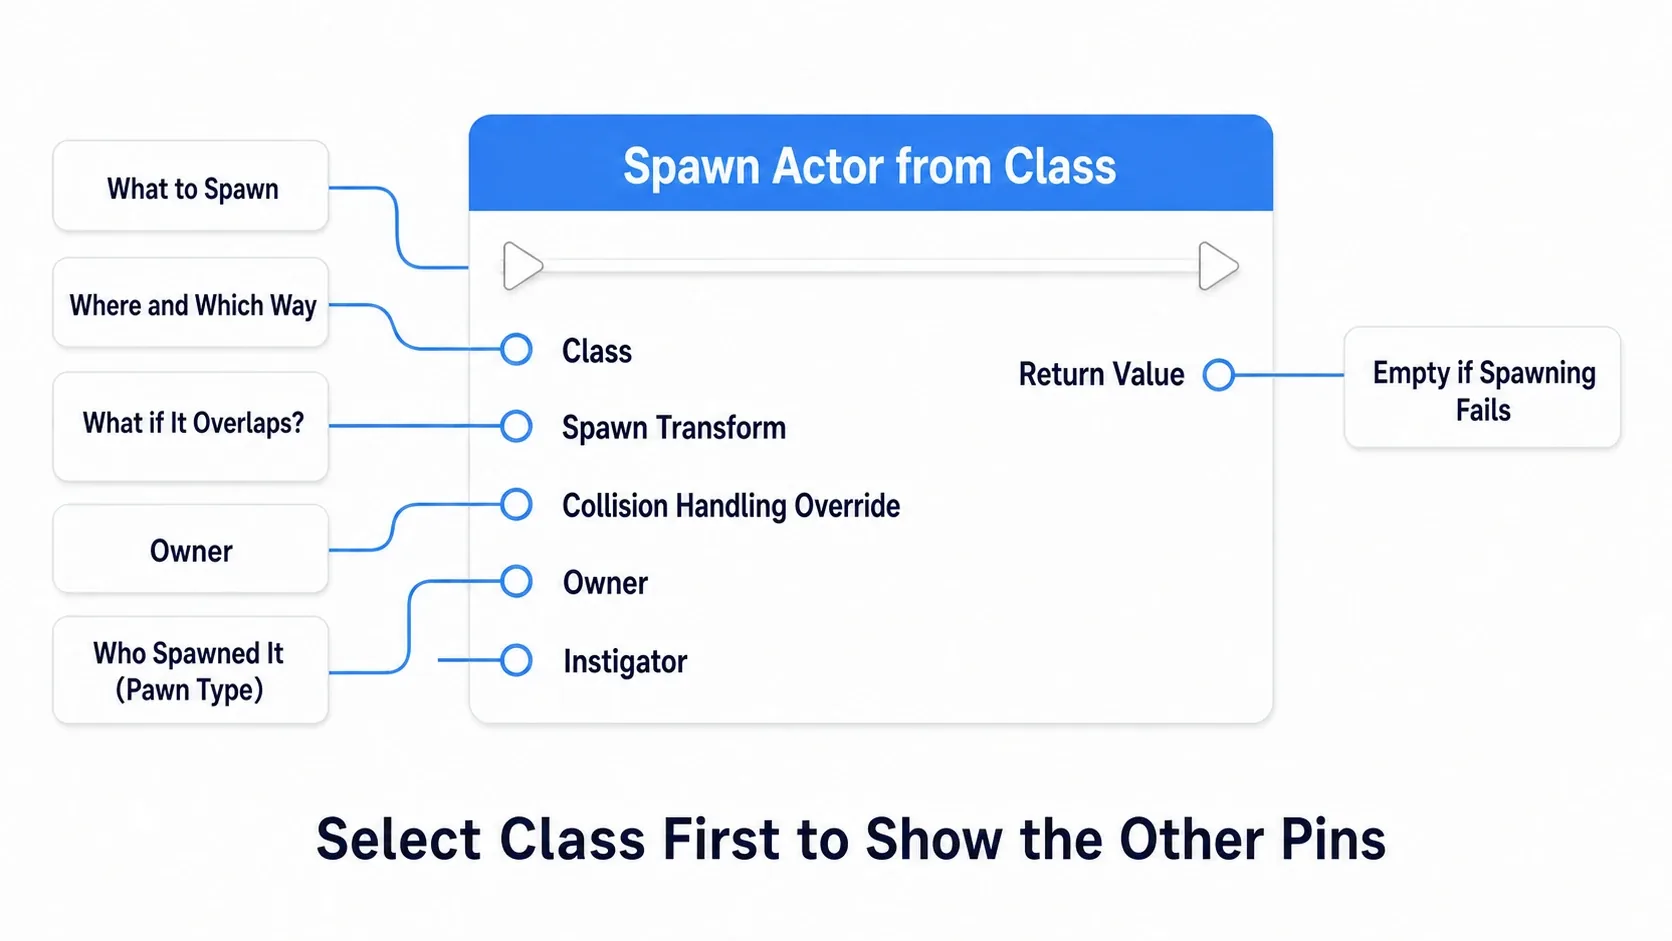
| Pin | Type | What it decides |
|---|---|---|
| Class | class | What to spawn |
| Spawn Transform | Transform | Where, facing which way, and at what scale |
| Collision Handling Override | enum | What to do if something is already at that spot |
| Owner | Actor | Who owns this actor |
| Instigator | Pawn | Who is responsible for the action |
Return Value gives you a reference to the spawned actor. Worth knowing: if the spawn fails, Return Value is empty. If you're going to store it in a variable or call functions on it right away, check it with Is Valid first.
Building the Spawn Transform
Spawn Transform is a Transform struct, so you can't just hand it a location. There are two ways around that.
| Approach | Steps |
|---|---|
| Use Make Transform | Add a Make Transform node, wire Location / Rotation / Scale separately, and plug it into Spawn Transform |
| Split the pin | Right-click the Spawn Transform pin and choose Split Struct Pin. It splits into three pins |
Once you're used to it, Split Struct Pin is faster and adds no nodes. You can undo it with Recombine Struct Pin from the right-click menu.
The location is built the same way as in a Line Trace.
Spawn location = my location + (forward vector × distance) + (0, 0, height)
Spawn it at the character's center and it collides with the character the instant it appears. The basic form is 100 to 150 cm forward plus about 50 cm of height, putting it outside the body. Building that math is covered in detail in the Line Trace article.
Rotation is easy to forget, but it's critical for projectiles. The next sections explain why.
The Culprit Behind Missing Projectiles: Collision Handling Override
You wired up Spawn Actor and nothing appears. Most of the time, this pin is why.
When you try to spawn an actor where something already overlaps, UE lets you choose how it behaves. There are five options.
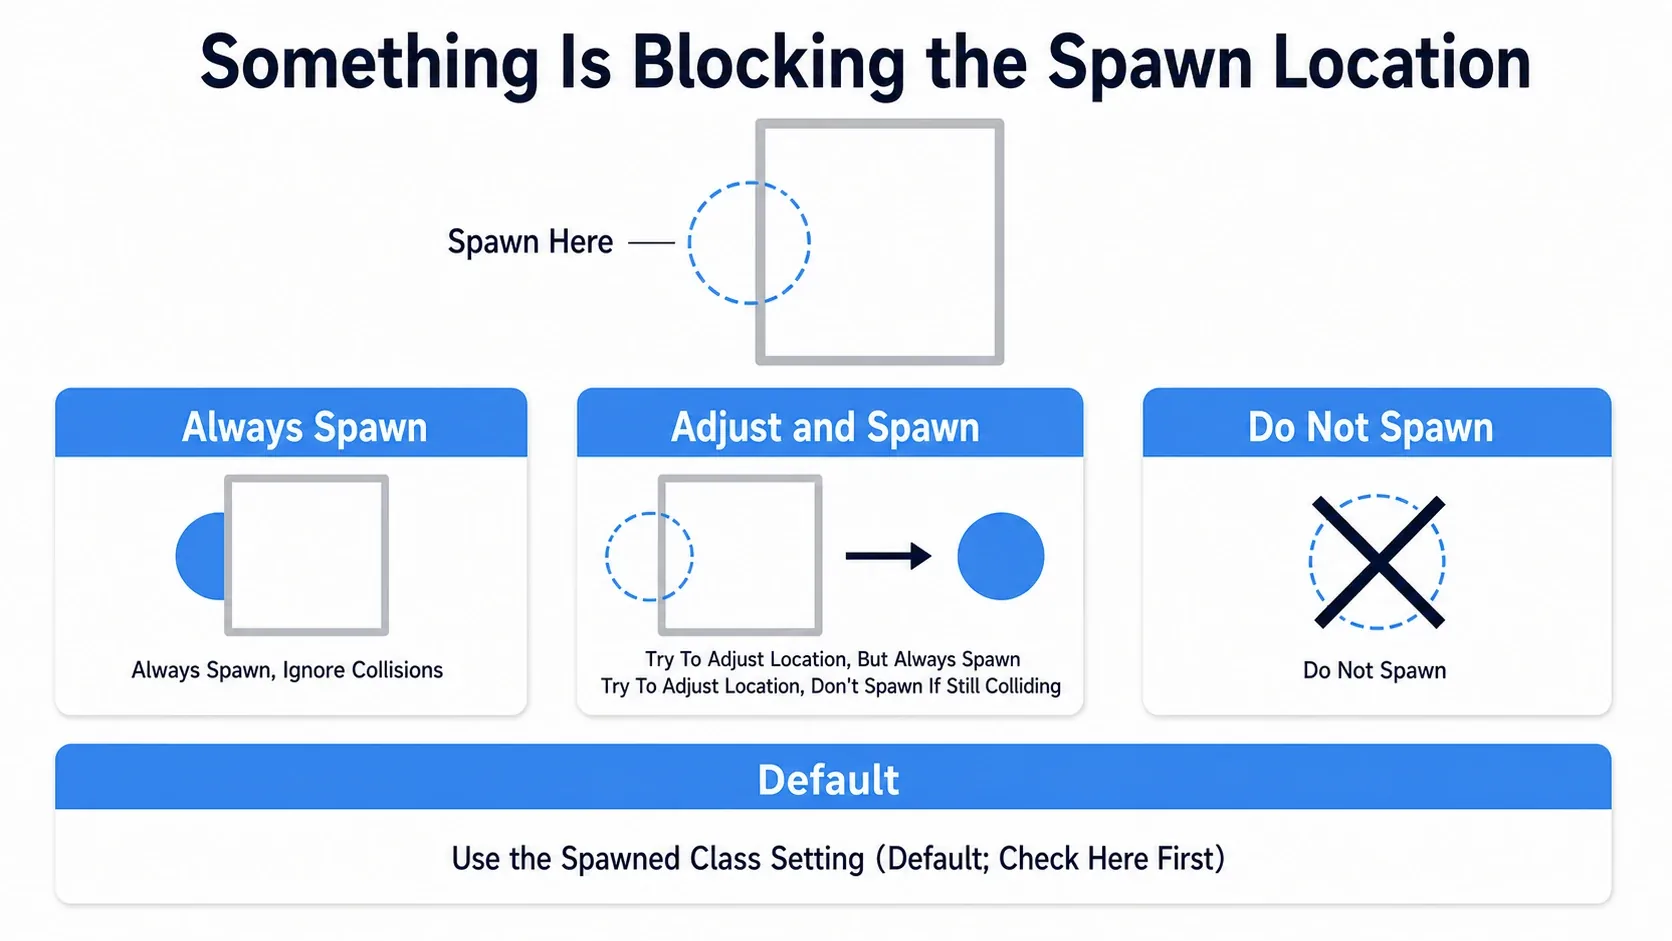
| Option | Behavior |
|---|---|
| Default | Follow the setting on the class being spawned |
| Always Spawn, Ignore Collisions | Spawn no matter what overlaps |
| Try To Adjust Location, But Always Spawn | Look for a clear spot and shift there. Spawn even if none is found |
| Try To Adjust Location, Don't Spawn If Still Colliding | Look for a clear spot, and give up if there isn't one |
| Do Not Spawn | Don't spawn if anything overlaps |
The default is Default, meaning it follows the spawned class's own Spawn Collision Handling Method (in the Actor category of Class Defaults). When nothing appears, check here first.
For something like a projectile that absolutely must appear, explicitly setting Always Spawn, Ignore Collisions on the Spawn Actor node is the reliable choice. On the other hand, Try To Adjust Location, But Always Spawn is handy for enemy respawns and item placement: even if you specify a spot buried in a wall, the engine nudges it clear.
Note: Choosing "always spawn" doesn't change the fact that the spawned actor is inside a wall. With physics simulation enabled, it may get pushed out violently on the next frame. Whether it spawned and whether it behaves afterward are two separate problems.
Why Owner and Instigator Matter
Both of these spawn fine when left empty, so they tend to get ignored. They come back to bite you later.
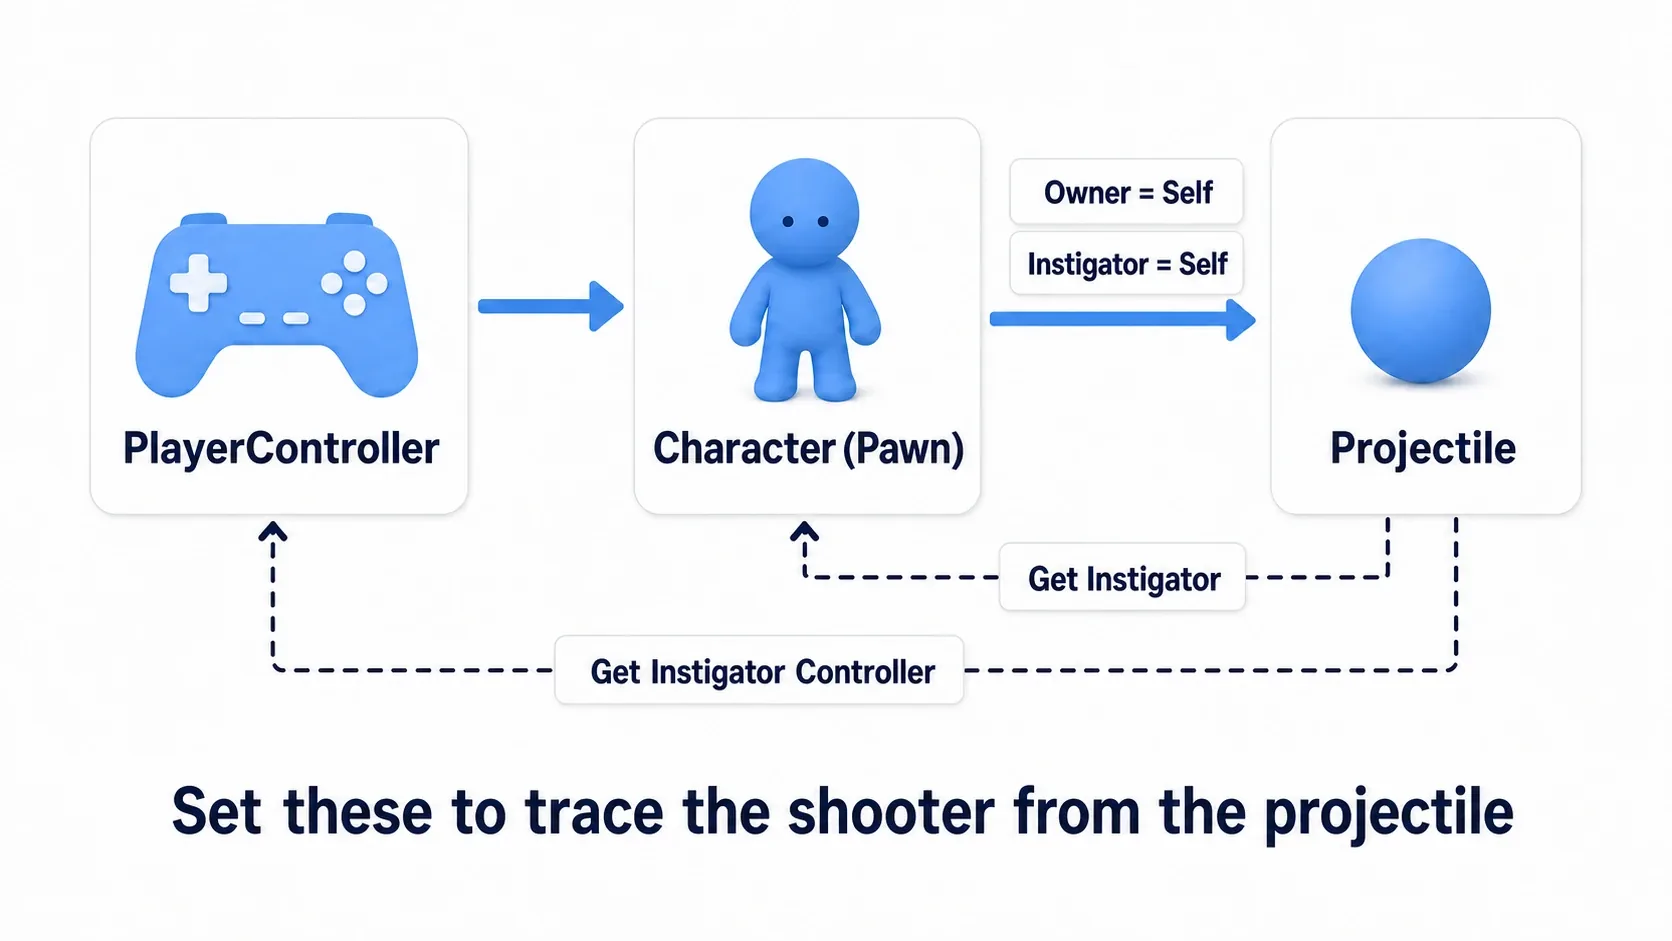
| Pin | Type | What it points to | What to pass for a projectile |
|---|---|---|---|
| Owner | Actor | The owning parent | The character that fired (Self) |
| Instigator | Pawn | The party responsible | The character that fired (Self) |
When a character fires, you can pass Self to both. Only the type differs; they point at the same thing.
The practical benefit is that the projectile can trace back to whoever fired it. Call Get Instigator in the projectile's Blueprint and you get the Pawn that fired. Get Instigator Controller gives you the Controller possessing that Pawn.
That matters in cases like these.
- Score and kill logs: recording who got the kill
- Preventing self-damage: checking whether the actor you hit is the Instigator
- Passing damage responsibility:
Apply Damage'sEvent Instigatoris a Controller, so you can wireGet Instigator Controllerstraight into it
That last one matters most in practice. Leave Instigator empty and killing an enemy with an explosion awards the score to nobody. For how damage works in detail, see the health and damage article.
Flying with the Projectile Movement Component
Spawning an actor just puts it there, standing still. Making it fly is the Projectile Movement Component's job.
Add Projectile Movement from the "Add" button at the top left of the Blueprint editor. This component moves its actor's root component every frame. You don't need to write any Set Actor Location yourself.
There are five main parameters.
| Setting | Default | Meaning |
|---|---|---|
| Initial Speed | 0.0 | Launch speed (cm/sec) |
| Max Speed | 0.0 | Speed limit. 0.0 means "no limit" |
| Projectile Gravity Scale | 1.0 | How much gravity applies. 0.0 for straight flight, 1.0 for normal falling |
| Should Bounce | Off | Whether it bounces on impact |
| Bounciness | 0.6 | How bouncy (when Should Bounce is on) |
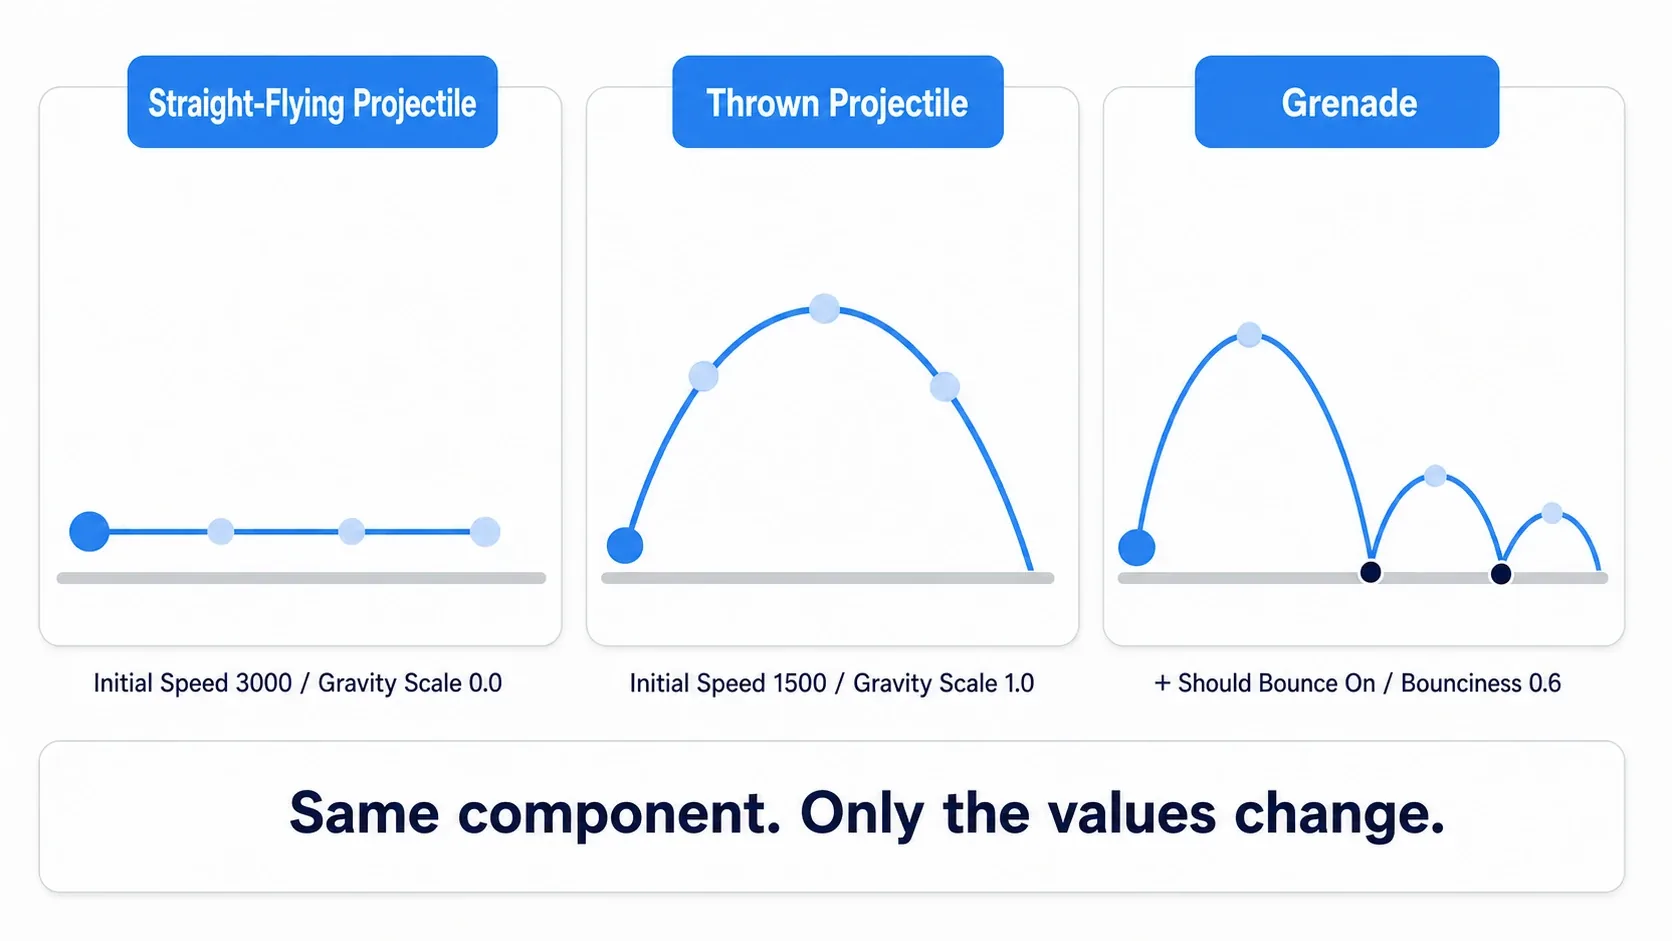
Note that Initial Speed defaults to 0.0. That's almost always the cause of "the projectile spawns but doesn't move." For a straight-flying bullet, around 3000.0 is easy to work with.
Direction Comes from the Actor's Rotation
Projectile Movement has no "direction" setting. So what does it follow? The actor's local +X (forward) axis.
Which means if you don't pass the character's rotation into Spawn Transform's Rotation, the projectile always flies toward world +X. When every shot goes the same direction, you forgot to wire the Rotation pin.
To fire along the character's facing, pass Get Actor Rotation. To fire where the camera is aiming, pass Get Control Rotation.
Settings by Use Case
| What you're making | Initial Speed | Gravity Scale | Should Bounce |
|---|---|---|---|
| Straight-flying bullet | 3000.0 | 0.0 | Off |
| Arrow or throwable | 1500.0 | 1.0 | Off |
| Grenade | 1200.0 | 1.0 | On |
| Slow-drifting magic bolt | 800.0 | 0.1 | Off |
One component, and changing numbers alone gives you all of that. Building a base BP_ProjectileBase and deriving child Blueprints that only change values keeps things manageable.
Note: You can make homing projectiles too. Turn on
Is Homing Projectile, wire the target's component intoHoming Target Component, and set the tracking strength inHoming Acceleration Magnitude. Too much strength makes the projectile orbit its target forever, so start small.
Projectile Actor Structure and the Hit Event
Build the projectile Blueprint with Actor as the parent class. Inside, it's a set of three.
| Component | Role | Setup point |
|---|---|---|
| Sphere Collision (root) | Collision | Turn on Simulation Generates Hit Events |
| Static Mesh | Visuals | Set Collision Presets to NoCollision |
| Projectile Movement | Movement | Set Initial Speed and Gravity Scale |
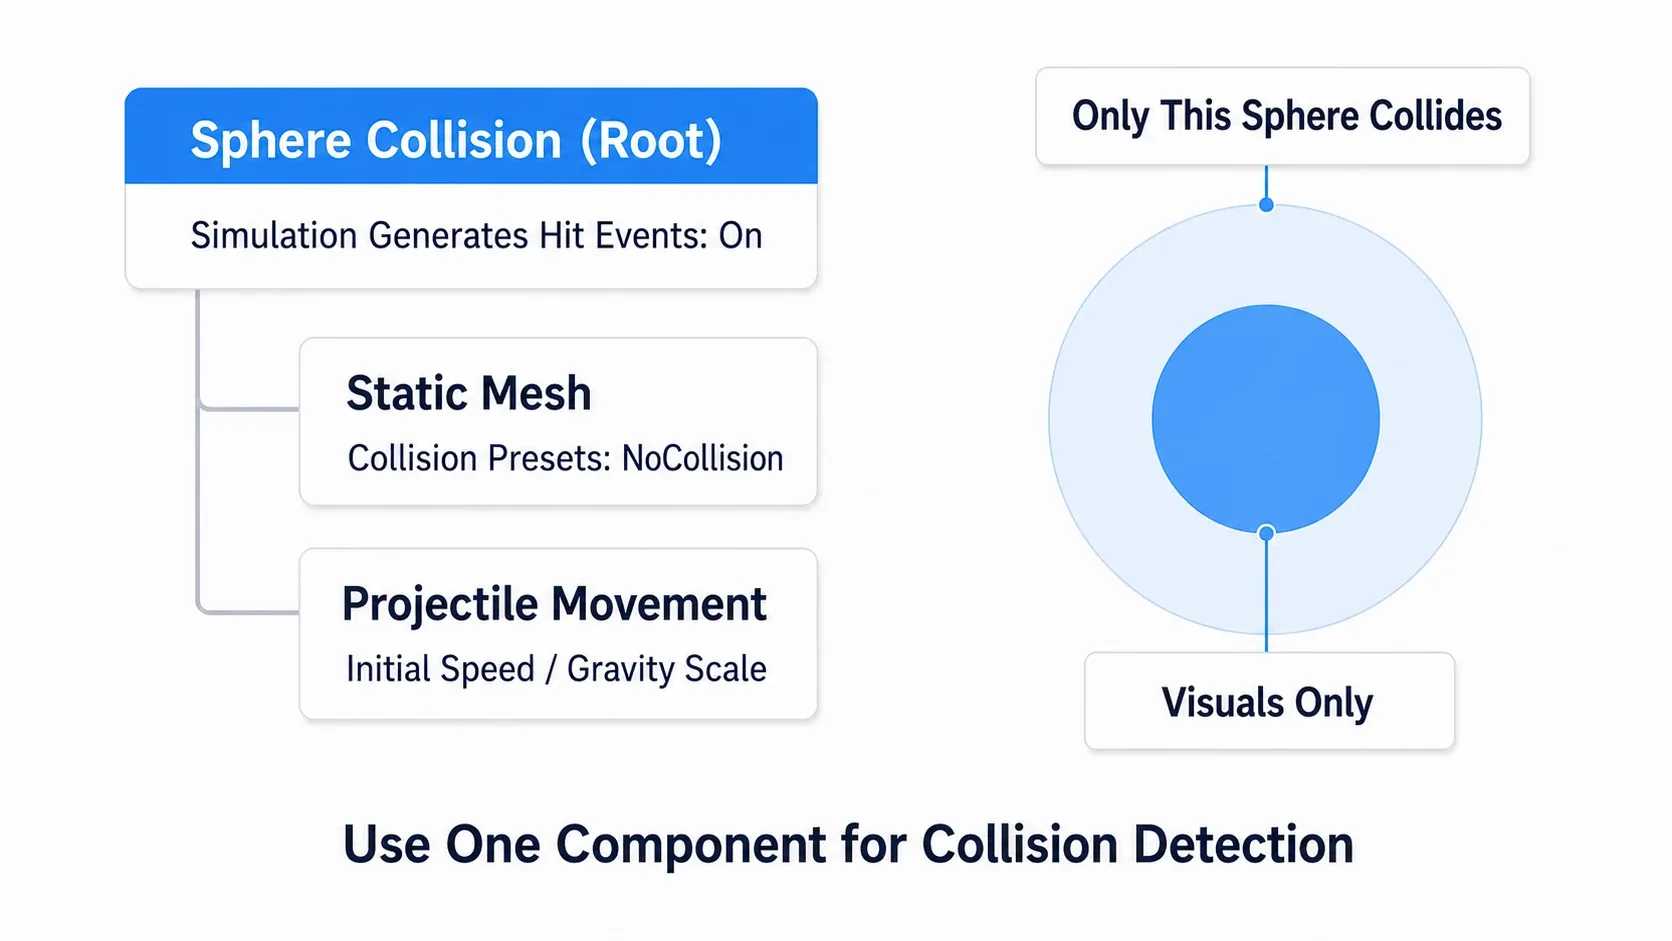
The critical part is removing collision from the visual Static Mesh. Leave it on and the sphere's collision and the mesh's collision both register, firing the Hit event twice. Collision should be the responsibility of exactly one component.
Always use Simple (primitive) collision for projectiles. Complex Collision on a small, fast-moving object drives the cost through the roof. That distinction is covered in the Simple/Complex collision article.
Receiving the Hit
With Sphere Collision selected, add On Component Hit from the event list at the bottom of the Details panel. It fires on impact and gives you the following.
| Pin | Contents |
|---|---|
| Other Actor | The actor that was hit |
| Hit | A Hit Result with the impact location and surface direction |
| Normal Impulse | The force of the impact |
Send damage to Other Actor, spawn an effect, and finally destroy yourself with Destroy Actor. That's the basic flow of a projectile.
Warning: The Hit event only fires when the other side's collision is set to
Block. If the other side is set toOverlap, useOn Component Begin Overlapinstead. When it looks like a hit but no event fires, check both collision presets (→ the collision profile article).
Cleaning Up Stray Shots with Life Span
A shot fired at the sky hits nothing. Destroy Actor is never called, so it flies on forever. In a game with rapid fire, that's thousands of actors within minutes.
The fix is one line. Open Class Defaults on the projectile Blueprint and set Initial Life Span in the Actor category.
| Value | Behavior |
|---|---|
| 0.0 (default) | Never destroyed automatically |
| 3.0 | Destroyed automatically 3 seconds after spawning |
At 3000 cm/sec, three seconds covers 90 m. For an indoor game, one or two seconds is plenty. Instead of "remembering to write the cleanup," make it "destroyed by time from the start" and you eliminate one performance problem that's hard to find later.
To change it at runtime, the Set Life Span node does the same thing. That's useful for cases like letting debris roll for half a second before it disappears, rather than destroying it on impact.
Line Trace or Real Projectile?
Even for the same act of "shooting," UE gives you two approaches.
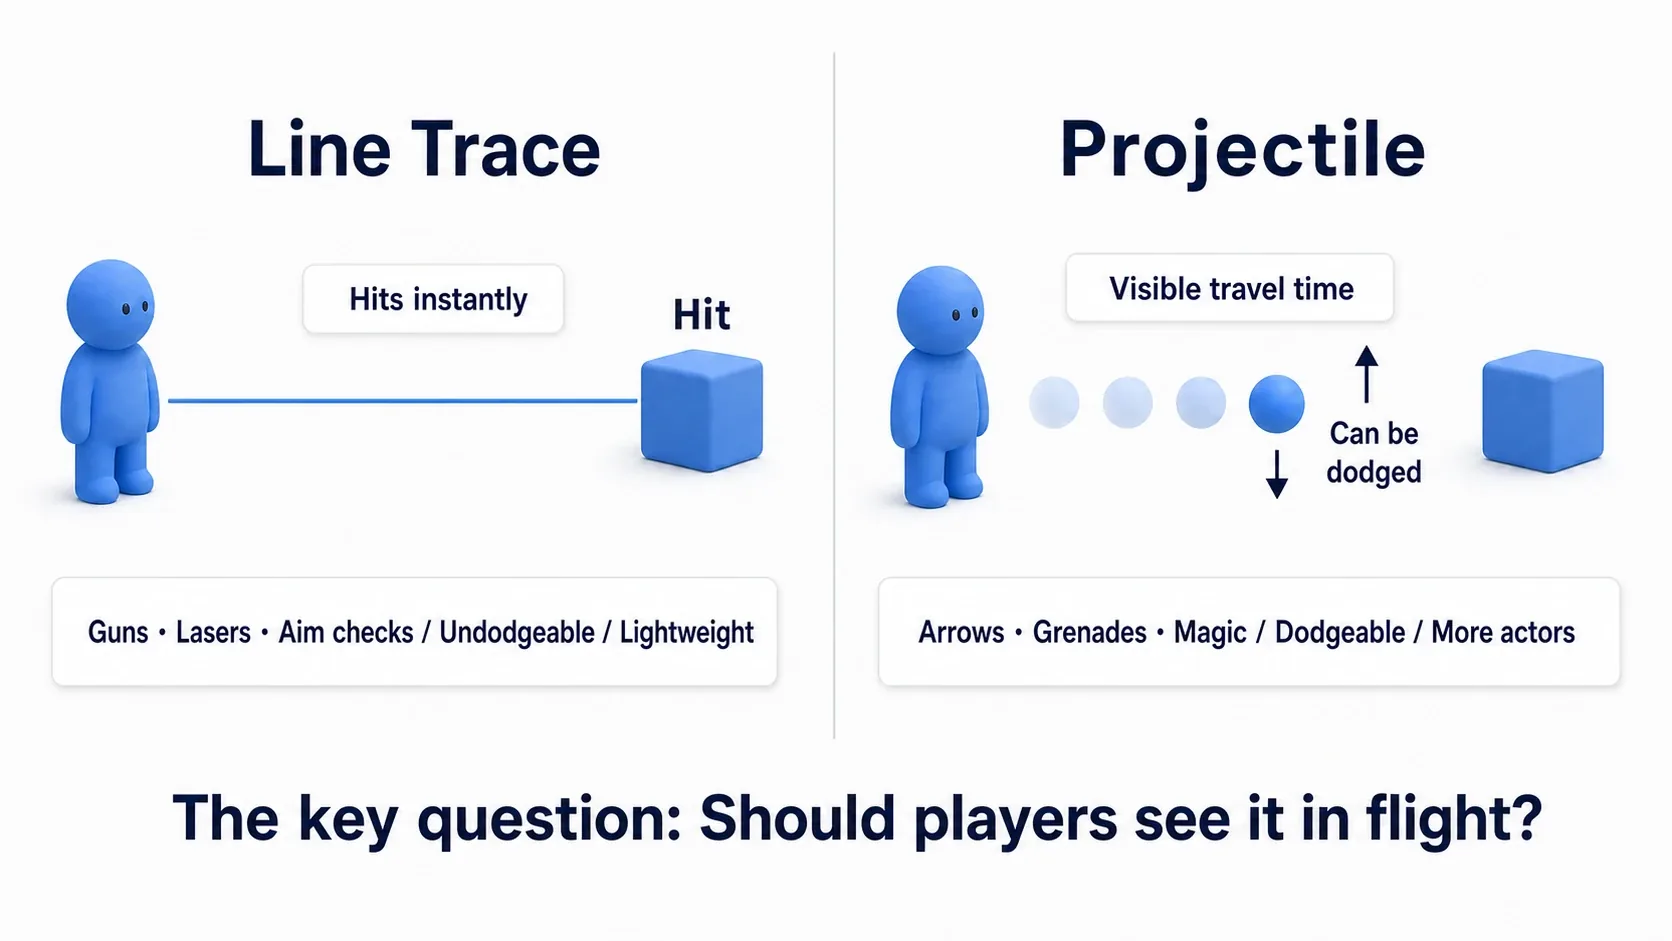
| Line Trace (hitscan) | Real projectile | |
|---|---|---|
| When it lands | Instantly | When it arrives |
| Visible during flight | No (you draw it yourself) | Yes |
| Dodgeable | No | Yes |
| Arcs and bounces | Hard to build | Natural fit |
| Cost | Light | Heavier, since actors accumulate |
There's one deciding question: do you want the flight to be visible?
- Line Trace suits: modern firearms, lasers, long-range sniping, line-of-sight checks
- Real projectiles suit: arrows, grenades, magic bolts, rocket launchers, bullet-hell patterns
Most games use both. The player's gun as a Line Trace and the boss's attacks as dodgeable real projectiles is a classic combination. A slow projectile hands the player the option to dodge. That's not just a visual choice; it changes how the game feels to play.
The Line Trace side is covered in the Line Trace article.
Hands-On: Shoot and Destroy an Enemy
The player's shots in a 2D shmup, a TPS handgun, a top-down ARPG's magic bolt. Fire → fly → hit → the target loses HP → the projectile disappears uses the same skeleton in every genre. Here we'll build all of it, end to end.
The Goal
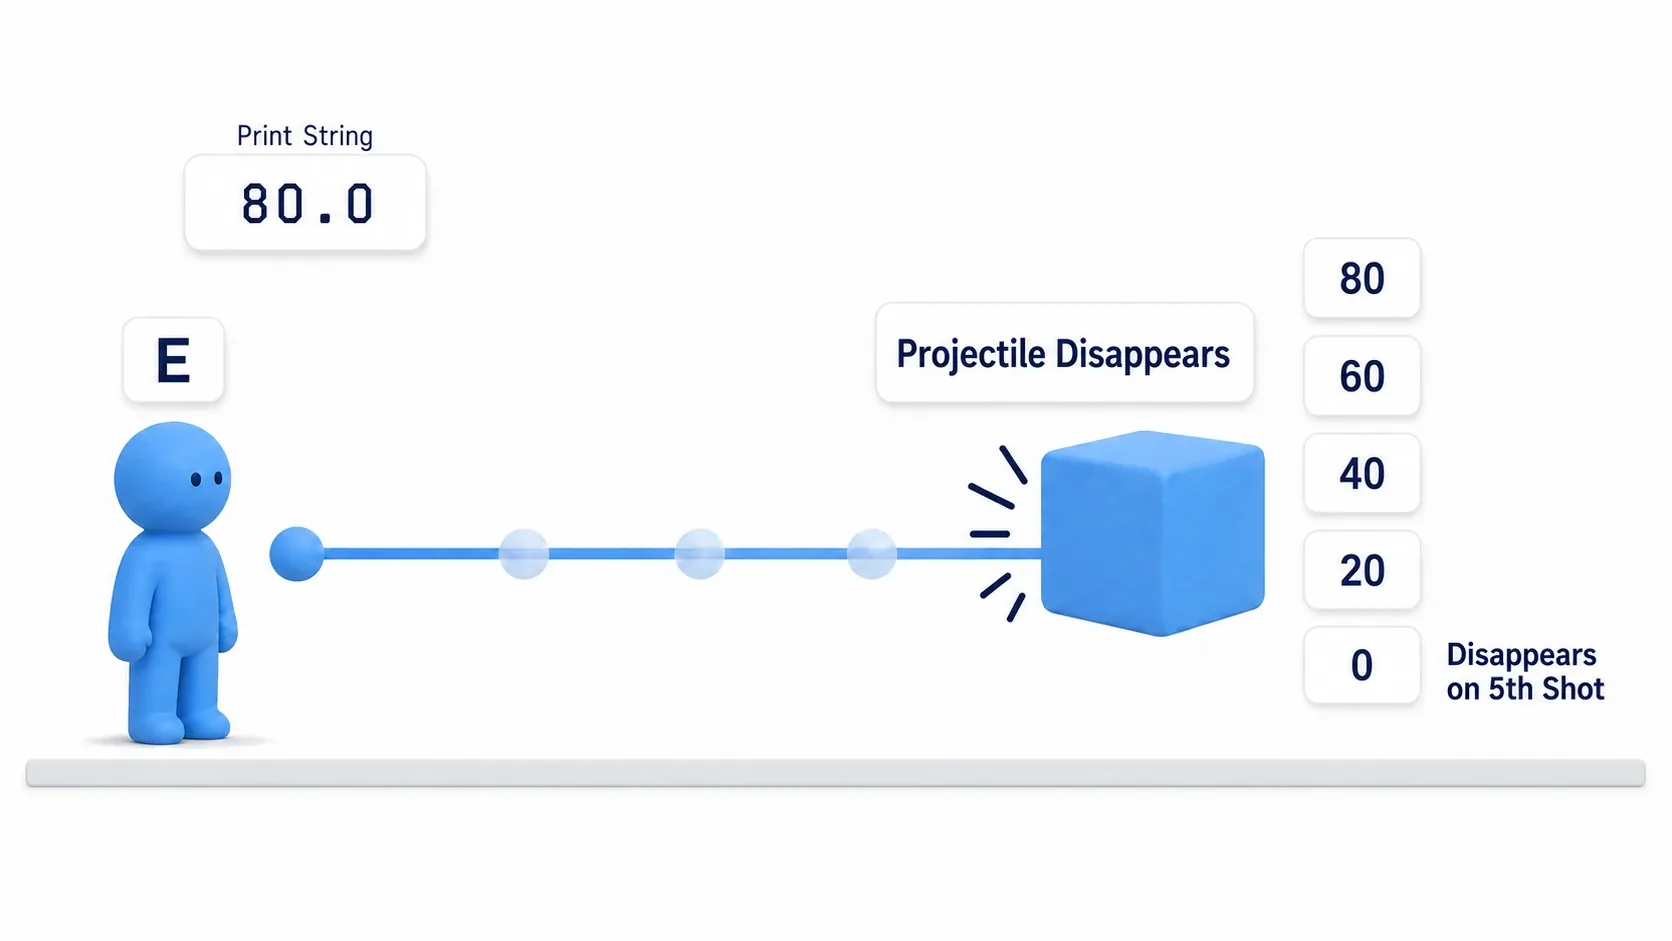
Press E and a white sphere shoots out from in front of the character, travels straight, and hits a Cube. On impact the sphere disappears and the Cube's HP drops from 100 by 20. Five hits and the Cube is gone.
Setup
Create a new project from the Third Person template (Blueprint) and prepare these three things.
1. The target (BP_Damageable)
Create a Blueprint with Actor as the parent and assign Cube to a StaticMesh component. It's the same one used in the health and damage article.
| Variable | Type | Default |
|---|---|---|
CurrentHealth | Float | 100.0 |
Event AnyDamage subtracts Damage from CurrentHealth, prints the value with Print String, and calls Destroy Actor at zero or below. That's all it does. Set the StaticMesh's Collision Presets to BlockAll. Projectiles only generate Hits against things that Block them.
Place it within 600 cm in front of the character, at about waist height. Sitting directly on the floor, the projectile flies over it.
2. The projectile (BP_Projectile)
Create another Blueprint with Actor as the parent, structured like this.
| Component | Settings |
|---|---|
| Sphere Collision (root) | Sphere Radius 16.0 / Collision Presets BlockAllDynamic / Simulation Generates Hit Events on |
| Static Mesh (child of the sphere) | Static Mesh set to Shape_Sphere / Scale 0.3 / Collision Presets NoCollision |
| Projectile Movement | Initial Speed 3000.0 / Max Speed 3000.0 / Projectile Gravity Scale 0.0 |
Set Initial Life Span to 3.0 in Class Defaults.
To make Sphere Collision the root, add the component and then drag it onto DefaultSceneRoot. Drag the Static Mesh onto that sphere to make it a child.
3. The shooter
Open BP_ThirdPersonCharacter. For quick verification we'll use a direct E key input (right-click in the graph → "Keyboard Events > E"). To build it with Enhanced Input instead, see the Enhanced Input article.
The Projectile Graph
Build the impact logic in BP_Projectile's event graph.
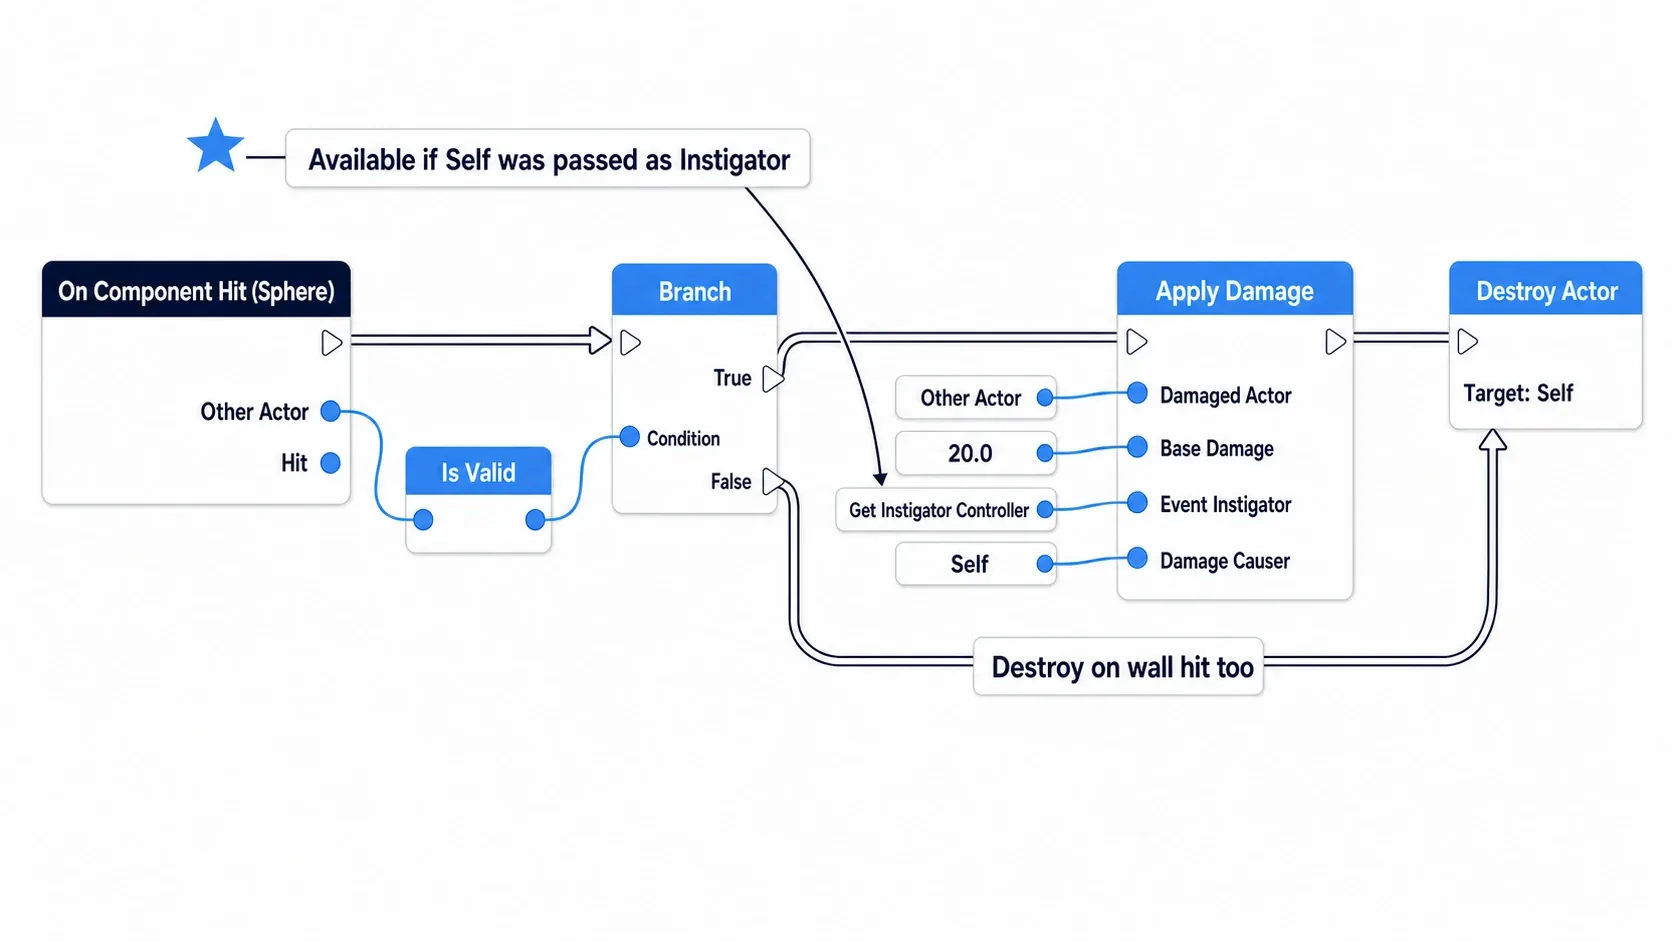
On Component Hit (Sphere)
  ├ Other Actor ─→ Is Valid ─→ Branch
  │
  → Branch (True)
      → Apply Damage
            Damaged Actor    : Other Actor
            Base Damage      : 20.0
            Event Instigator : Get Instigator Controller
            Damage Causer    : Self
      → Destroy Actor (Target: Self)
  → Branch (False)
      → Destroy Actor (Target: Self)
Get Instigator Controller returns the firing player's Controller as long as you passed Self to Spawn Actor's Instigator pin. Leave that empty and there's no way to know who got the kill.
We also destroy on the False branch so the projectile disappears when it hits a floor or wall.
The Shooter's Graph
Build this in BP_ThirdPersonCharacter's event graph.
E (Pressed)
  → Spawn Actor from Class
        Class                       : BP_Projectile
        Spawn Transform (split with Split Struct Pin)
          Location : Get Actor Location
                     + (Get Actor Forward Vector × 150.0)
                     + (0, 0, 50)
          Rotation : Get Actor Rotation
          Scale    : (1, 1, 1)
        Collision Handling Override : Always Spawn, Ignore Collisions
        Owner                       : Self
        Instigator                  : Self
Build it in this order.
- Right-click empty graph space, type
E, and add Keyboard Events > E - Add
Spawn Actor from Classand chooseBP_Projectilefor Class. The other pins won't appear until you do - Right-click the Spawn Transform pin and choose Split Struct Pin
- Lay out
Get Actor Location,Get Actor Forward Vector,Multiply(Vector × Float, with150.0in B), andAdd(Vector + Vector), and wire the result into Location - To add the height, insert another
AddwithMake Vector(X 0 / Y 0 / Z 50) in B - Wire
Get Actor Rotationinto Rotation - Set
Collision Handling Overrideto Always Spawn, Ignore Collisions - Wire
Selfinto both Owner and Instigator
Verify
Press Play, stand in front of the Cube, and press E.
A small white sphere appears just ahead of the character, flies straight and level, and disappears the instant it hits the Cube. At the same time, 80.0 appears in the top-left of the screen. Five hits give you 80 → 60 → 40 → 20 → 0, and the Cube disappears on the fifth. Fire at empty space and the sphere flies for three seconds before quietly vanishing.
- Nothing appears →
Collision Handling Overrideis stillDefaultand the spawn location overlaps the character. Check the 150 cm forward offset too - The sphere appears but sits still →
Initial Speedis still the default0.0 - Every shot goes the same direction →
Get Actor Rotationisn't wired into Spawn Transform'sRotation - It disappears the moment you fire → the spawn location is inside your own body. Raise the offset to
200.0 - The sphere falls to the floor →
Projectile Gravity Scaleis still1.0 - Hits do nothing → Sphere Collision's
Simulation Generates Hit Eventsis off, or the target's Collision Presets aren't set toBlock - One shot takes 40 HP → the visual Static Mesh still has collision, so Hit fires twice
Now try setting Projectile Gravity Scale to 1.0 and Initial Speed to 1200.0. With the same Blueprint, the projectile becomes an arcing throwable. Turn on Should Bounce and it's a grenade. A projectile's personality is decided entirely by component values.
Two things to take away.
- Spawn Transform's Rotation decides the direction: Projectile Movement only travels along the actor's local +X. Aiming is the spawner's responsibility. For a camera-aimed game, swapping in
Get Control Rotationis the whole change - Make the projectile responsible for its own cleanup: set
Initial Life Spanup front and the shooter never has to think about shots that missed. Separating the shooter's job from the projectile's means adding weapons doesn't add cleanup code
Sparks and explosions on impact continue in the Niagara article. It connects with a single node added just before Destroy Actor in On Component Hit.
Bonus: Good to Know for Later
- Expose on Spawn passes in initial values: create a variable in the projectile Blueprint and check Expose on Spawn in the Details panel, and an input pin for it grows on the Spawn Actor node. When you want per-projectile damage or color, use this rather than
Set-ing after spawning. The value arrives beforeEvent BeginPlay, so you can use it inside BeginPlay - Fast projectiles can tunnel: if the distance covered in one frame exceeds a wall's thickness, they pass through. Projectile Movement uses swept movement so it's mostly prevented, but for extremely fast projectiles consider the
Sweepsettings or combining with a Line Trace - Firing a lot makes spawning and destroying the cost: in a bullet-hell shooter spawning dozens per frame, the spawn/destroy work itself gets expensive. Before switching to a design that reuses objects, measure first (→ the profiling article)
- Spawn Actor isn't just for projectiles: item drops, enemy respawns, placed traps, debris on destruction. Anything that appears at runtime comes from the same node. What you learned on projectiles carries straight over
- Keeping spawned actors in an array makes management easier: "destroy all of them at once" and "cap the number" always come up eventually. Adding Return Value to an array covers it (→ the arrays and maps article)
- Rotation Follows Velocity cleans up the look: turn on Projectile Movement's
Rotation Follows Velocityand the actor automatically faces its direction of travel. For long, thin projectiles like arrows and missiles, leaving it off means they fly sideways
Summary
- Adding actors at runtime is Spawn Actor from Class. Spawn Transform is easiest to work with via Split Struct Pin
- The culprit behind "nothing appears" is Collision Handling Override. Use
Always Spawn, Ignore Collisionsto guarantee it - Pass
Selfto Owner and Instigator so the projectile can trace back to whoever fired it - Projectile Movement's Initial Speed defaults to 0.0. That's almost always why it doesn't move
- Flight direction is the actor's local +X. Spawn Transform's Rotation is effectively your aim
- Set Initial Life Span to clean up shots that never hit anything
- Use Line Trace to land instantly, a real projectile to show the flight
In the game you're building, should the player's attacks be dodgeable? That answer decides whether you reach for a Line Trace or a real projectile.