You want a door to open slowly. You want the screen to fade to black over one second. You want the camera to glide toward a target. It's tempting to write these "change a value over time" jobs as small additions inside Event Tick.
That works, but you have to detect the end position yourself, and Tick keeps running once it's over. UE has a node made for exactly this job: the Timeline. This article explains what a Timeline outputs, when to use each of the four track types and each pin, how to edit curves, the standard pattern of pairing it with Lerp, and how to build an automatic door that opens as you approach.
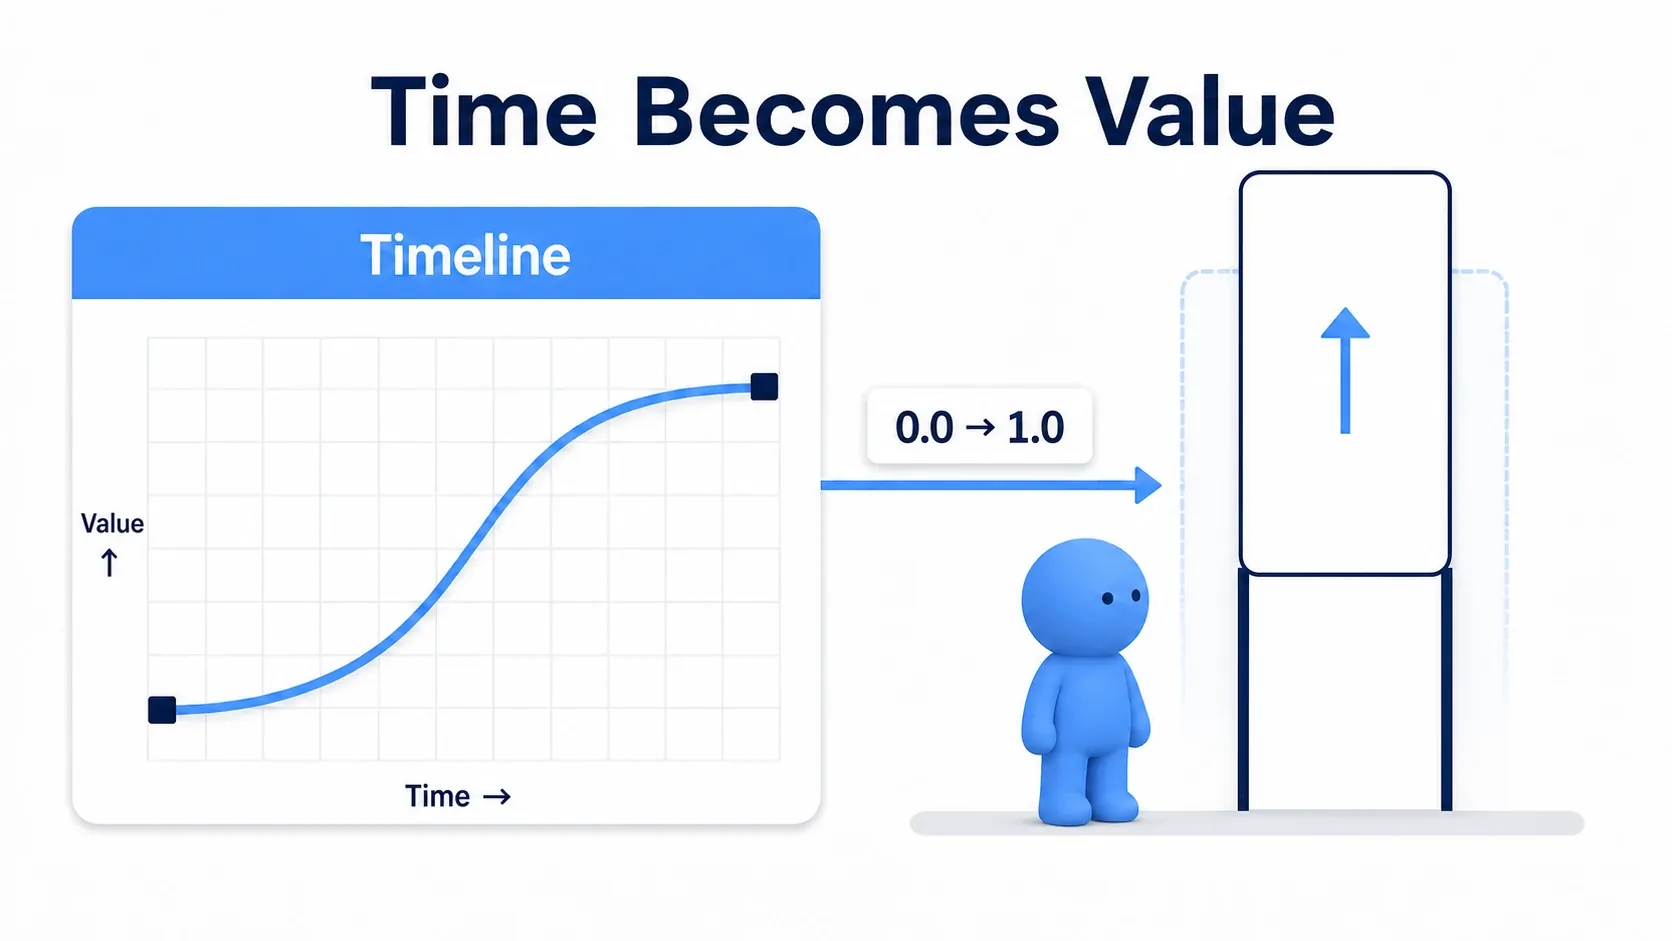
What You'll Learn
- That a Timeline is a node that emits curve values over time
- When to use each of the Float / Vector / Color / Event tracks
- The differences between
Play/Play from Start/Reverse/Stop- How a curve's interpolation mode decides how motion feels
- Where Timelines cannot be placed
- Hands-on: an automatic door that opens as you approach and closes as you leave
- A Timeline Emits Values Over Time
- Why Not Just Use Tick
- The Four Track Types
- Input and Output Pins
- Editing Curves and Interpolation Modes
- Pairing It with Lerp Is the Standard Pattern
- Where Timelines Cannot Be Placed
- Hands-On: Building an Automatic Door
- Checks When It Doesn't Work
- Bonus: Good to Know for Later
- Summary
A Timeline Emits Values Over Time
A Timeline is a small animation curve you can hold inside a Blueprint. Once playback starts, it outputs the value along the curve every frame as time advances.
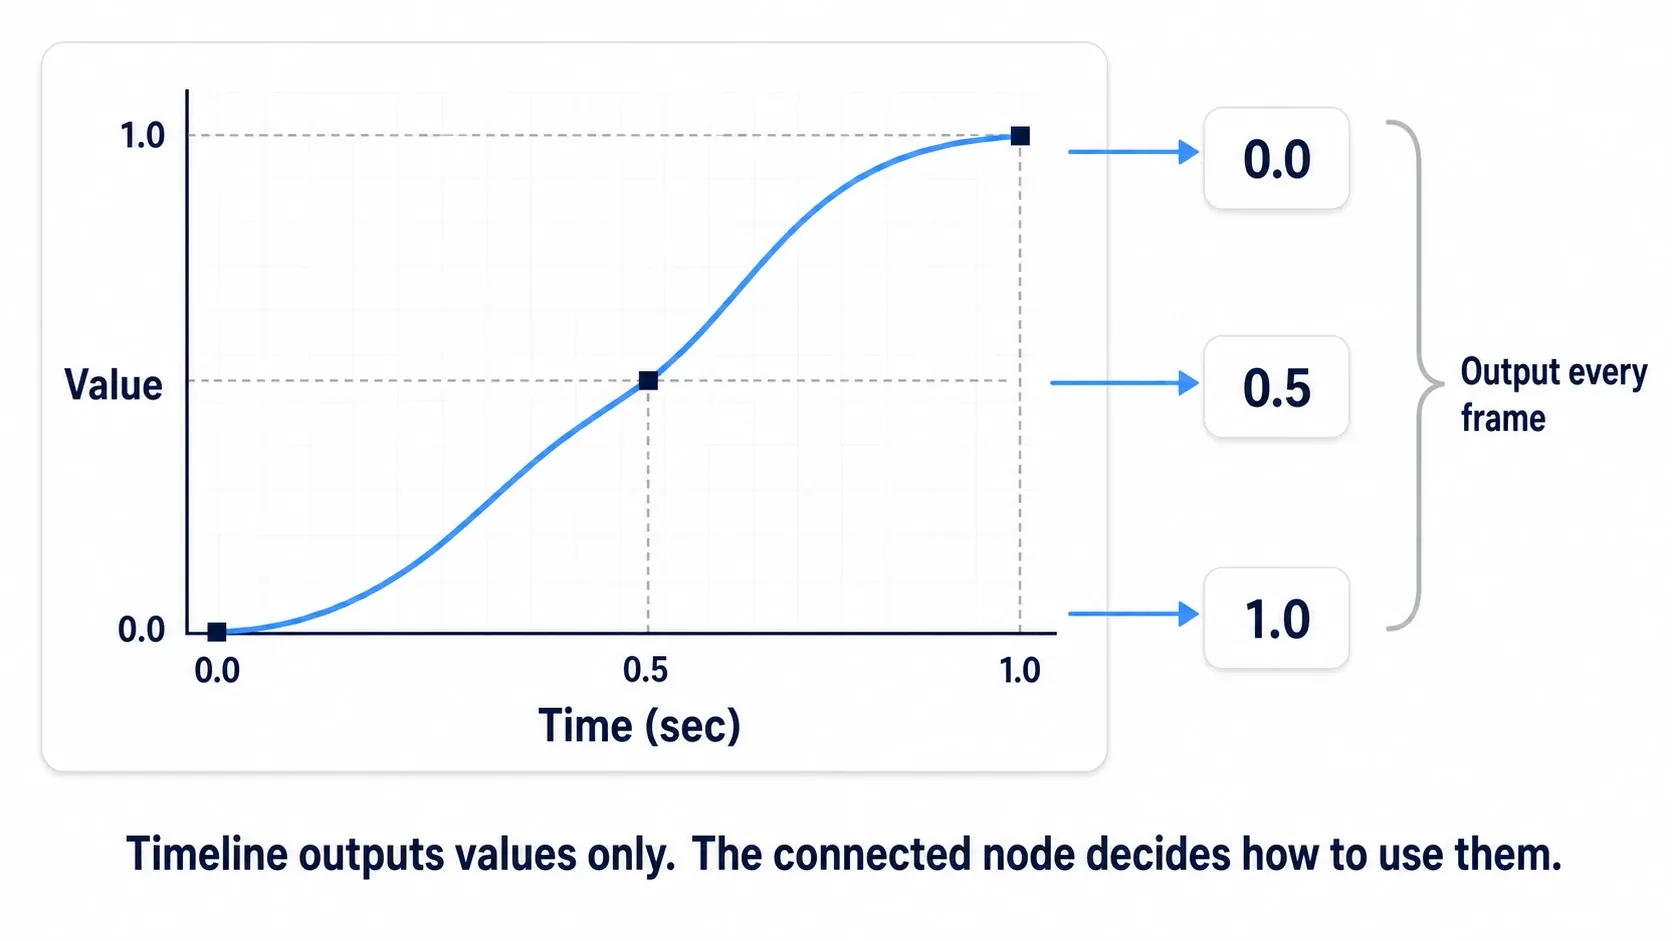
To add one, right-click in the event graph of an Actor Blueprint and choose "Add Timeline...". Give it a name and a Timeline node is placed in the graph, while a variable with the same name appears under Variables in the My Blueprint panel. That variable is a reference to the Timeline Component, used later for things like changing playback speed.
Double-click the Timeline node to open its dedicated curve editor. That's where you add tracks and place keys to shape the motion.
A Timeline's only job is to emit values. What those values do is decided by whatever you wire them into. Feed a position and it moves; feed a color and it fades; feed a material parameter and it pulses. Learn one Timeline and it applies everywhere.
Why Not Just Use Tick
You can write the same motion in Event Tick. But doing so adds a list of things you have to manage yourself.
| Writing it in Event Tick | Writing it with a Timeline | |
|---|---|---|
| Tracking progress | Hold elapsed time in a variable and add to it | The Timeline holds it |
| Detecting the end | Compare "did it reach the target" every frame | The Finished pin fires |
| Stopping | Write your own code to stop Tick | Playback stops on its own when it ends |
| Reversing midway | Add code to compute the reverse | Just call Reverse |
| Easing | Build the math yourself | Decided by the shape of the curve |
Avoiding Tick isn't only about performance. It's about reducing designs where processing keeps running even when nothing is moving. A Timeline runs only during playback and stops itself when done. That idea is collected in the article on designing Blueprints without Tick, and the Timeline is the most direct way to put it into practice.
The Four Track Types
The buttons in the top-left of the curve editor add four kinds of tracks.
| Track | Output type | Typical use |
|---|---|---|
| Float Track | Float | Progress (0→1), opacity, volume, parameters in general |
| Vector Track | Vector | Driving position, scale, or direction directly |
| Color Track | Linear Color | Fades, light color changes, UI colors |
| Event Track | Execution pin | Cues at specific times, such as "play a sound at 0.5 seconds" |
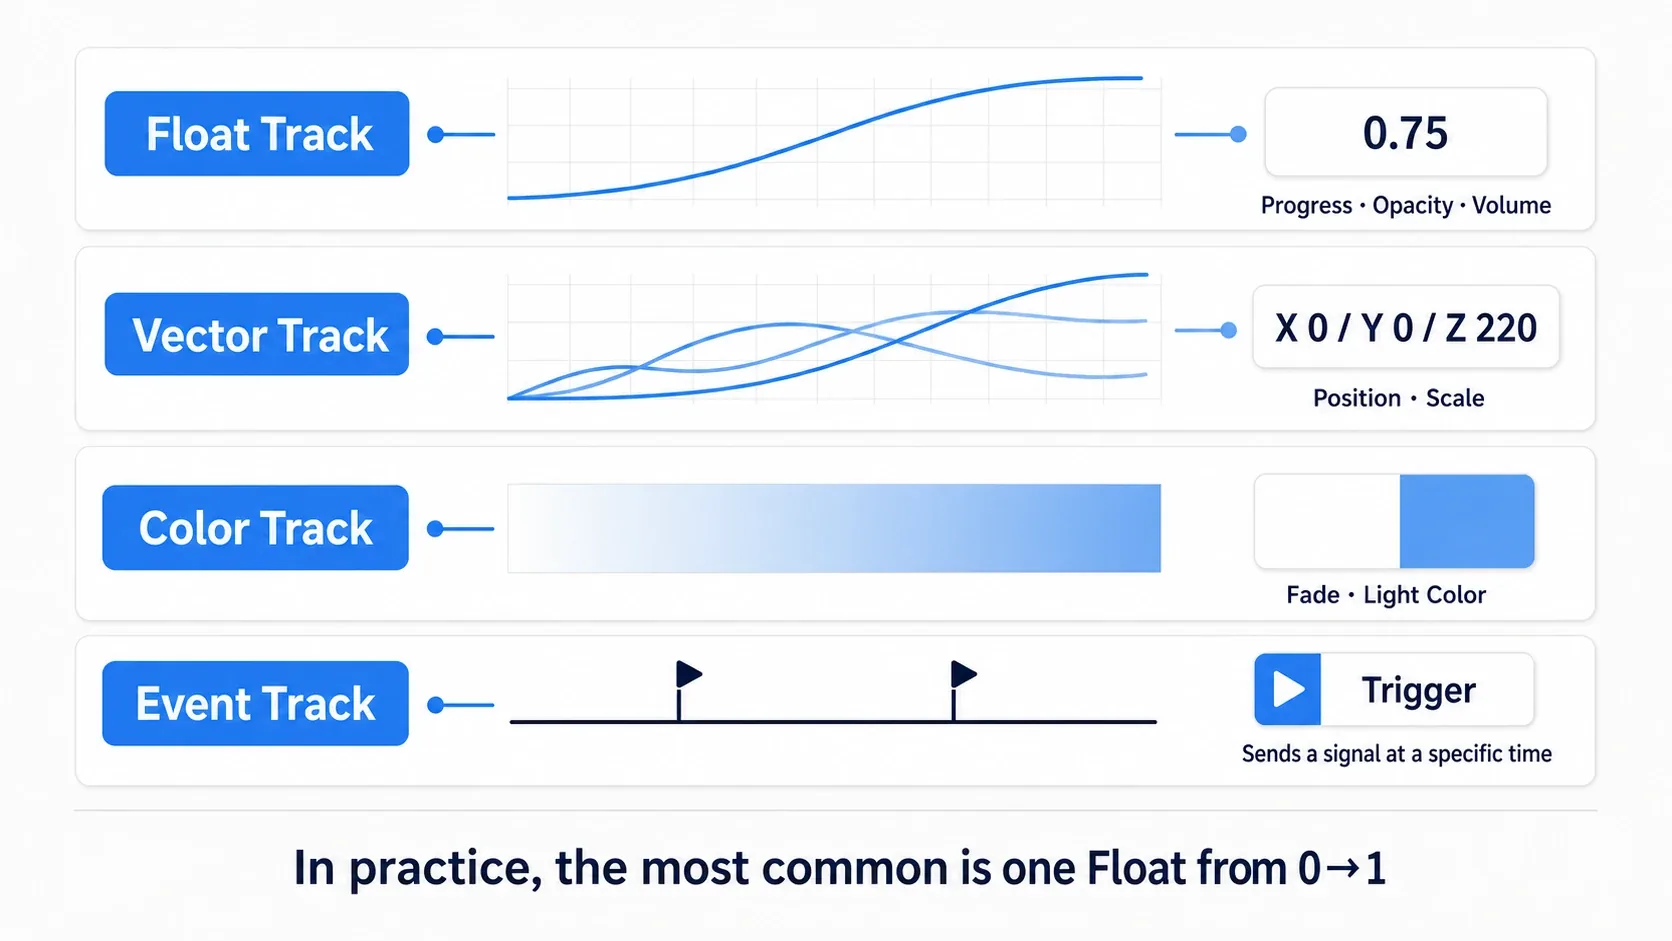
A single Timeline can hold multiple tracks, and each one adds an output pin on the right side of the Timeline node. The track name becomes the pin name, so use descriptive names like Alpha or DoorOffset.
The one you'll use most in practice is the Float Track. Build a single curve going from 0 to 1 and feed it into Lerp (covered below), and position, color, and rotation are all handled the same way. Reusing one 0→1 Float is easier to adjust later than building a dedicated Vector Track.
The Event Track behaves a bit differently. An execution pin fires at the time where you placed a key, which is useful for timing things like "play a sound 0.2 seconds before the door finishes opening."
There's also a fifth item in the list: External Curve. Instead of storing the curve inside the Timeline, it references an external Curve Float asset. Use it when several Blueprints should share the same motion.
Input and Output Pins
A Timeline node's pins are fixed.
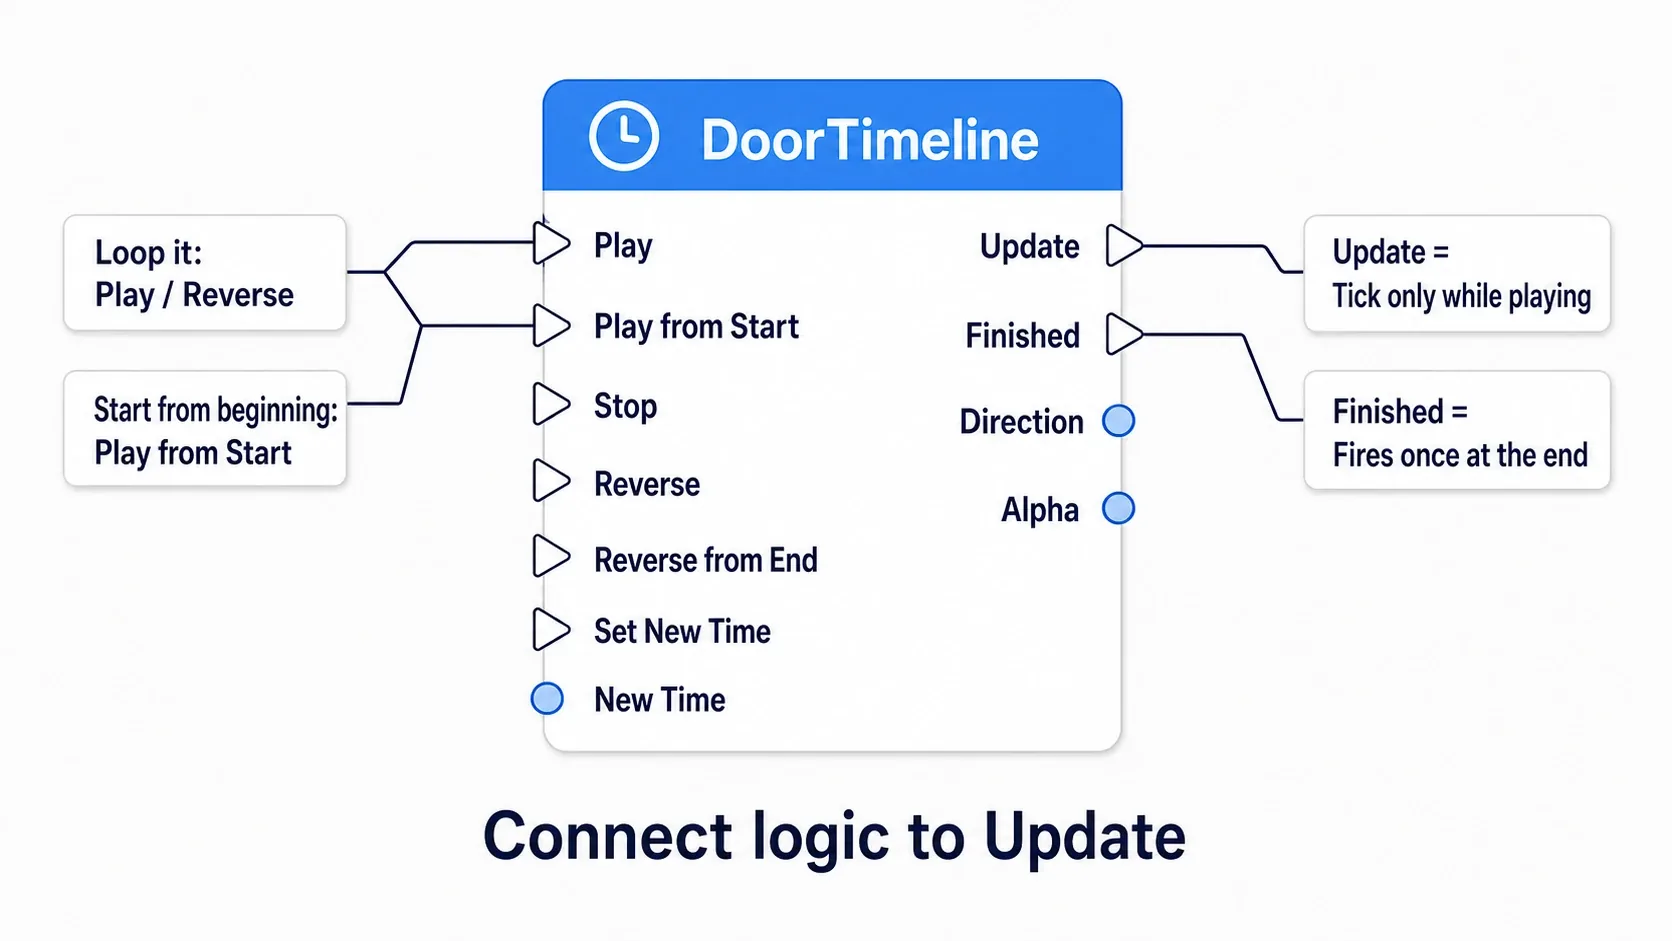
Left side (inputs)
| Pin | Behavior |
|---|---|
| Play | Play forward from the current position |
| Play from Start | Rewind to time 0, then play forward |
| Stop | Stop where it is (position is kept) |
| Reverse | Play backward from the current position |
| Reverse from End | Jump to the end, then play backward |
| Set New Time | Move the playback position to the value of New Time |
| New Time (Float) | The destination time used by Set New Time |
Right side (outputs)
| Pin | Behavior |
|---|---|
| Update | Fires every frame during playback |
| Finished | Fires once when playback reaches the end (or the start when reversing) |
| Direction | An Enum returning the current playback direction (Forward / Backward) |
| Each track name | The curve value for that frame |
The key distinction is Play vs. Play from Start.
- Things that go back and forth, like doors and switches, use
Playpaired withReverse. Even if the direction changes midway, they return naturally from that position - Things you want from the top every time, like hit effects, use
Play from Start. Even mashed, it always plays from the beginning
Stop keeps the playback position where it is. Call Play again to continue, or Play from Start to restart from the beginning.
The actual work goes on the Update pin. Think of Update as a Tick that only fires during playback. It stops firing once playback ends, so there's no risk of it running forever like Tick.
Editing Curves and Interpolation Modes
Double-click the Timeline and Shift + left-click on a track to add a key. Select a key and you can type exact Time and Value numbers in the fields at the top-left of the editor. The standard starting point is two keys: Time 0.0 / Value 0.0 and Time 1.0 / Value 1.0.
Right-click a key to pick its interpolation mode. This is what decides how the motion feels.
| Mode | Curve shape | Feel |
|---|---|---|
| Linear | Straight line | Constant speed. Mechanical. Elevators, conveyor belts |
| Auto | Automatically smoothed curve | Gentle start and finish. Usually what you want |
| User | Manually adjusted curve | Drag the handles to get exactly the easing you want |
| Break | Separate curves before and after | Different momentum in each half |
| Constant | Stepped | Values jump. Choppy effects, blinking |
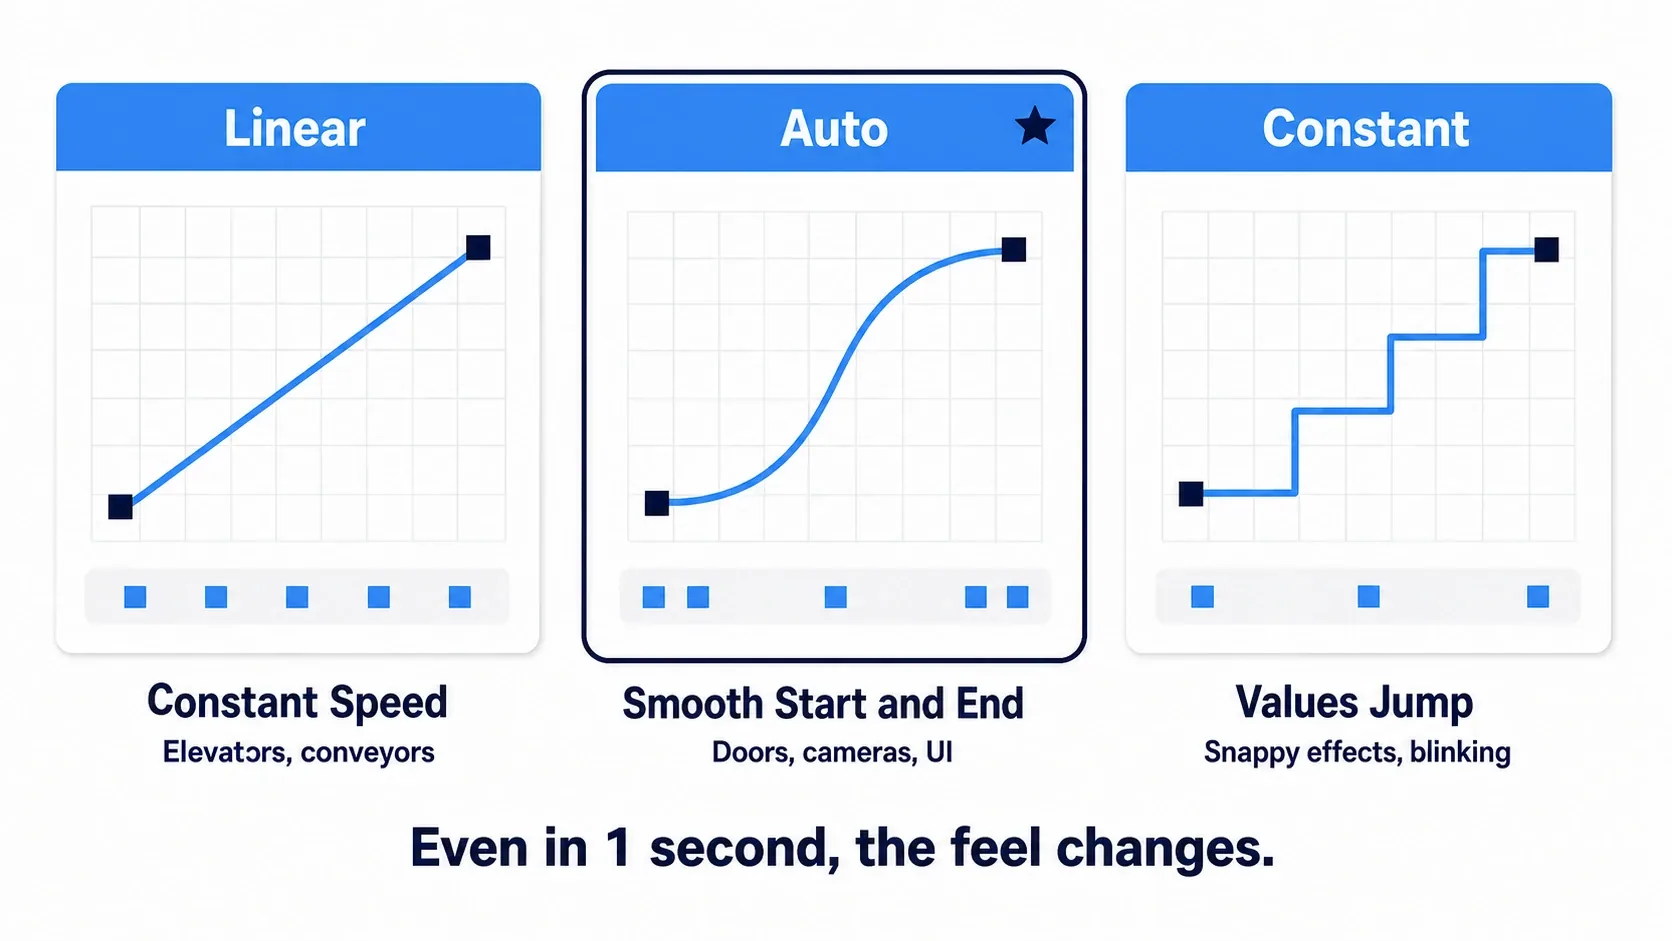
Even for the same 0→1, Linear feels like a machine moving and Auto feels like an object moving. Switching doors, cameras, and UI popups to Auto changes the impression immediately. Conversely, using Auto on something that should move at a constant speed makes it feel sluggish right before it stops.
The top-right of the editor has Length (the Timeline's duration, default 5.0 seconds) and Use Last Keyframe?. Check Use Last Keyframe? and the last key's position automatically becomes the end, so you don't have to fix Length every time you move keys.
Next to it, Loop makes playback repeat, and Finished stops firing. AutoPlay starts playback the moment the Actor is spawned.
Playback speed can be changed at runtime too. Drag the Timeline variable into the graph, call Set Play Rate, and pass a multiplier to New Rate. 2.0 is double speed, 0.5 is half. Handy when door speed should follow an in-game setting.
Pairing It with Lerp Is the Standard Pattern
This is the most common way to use a Timeline.
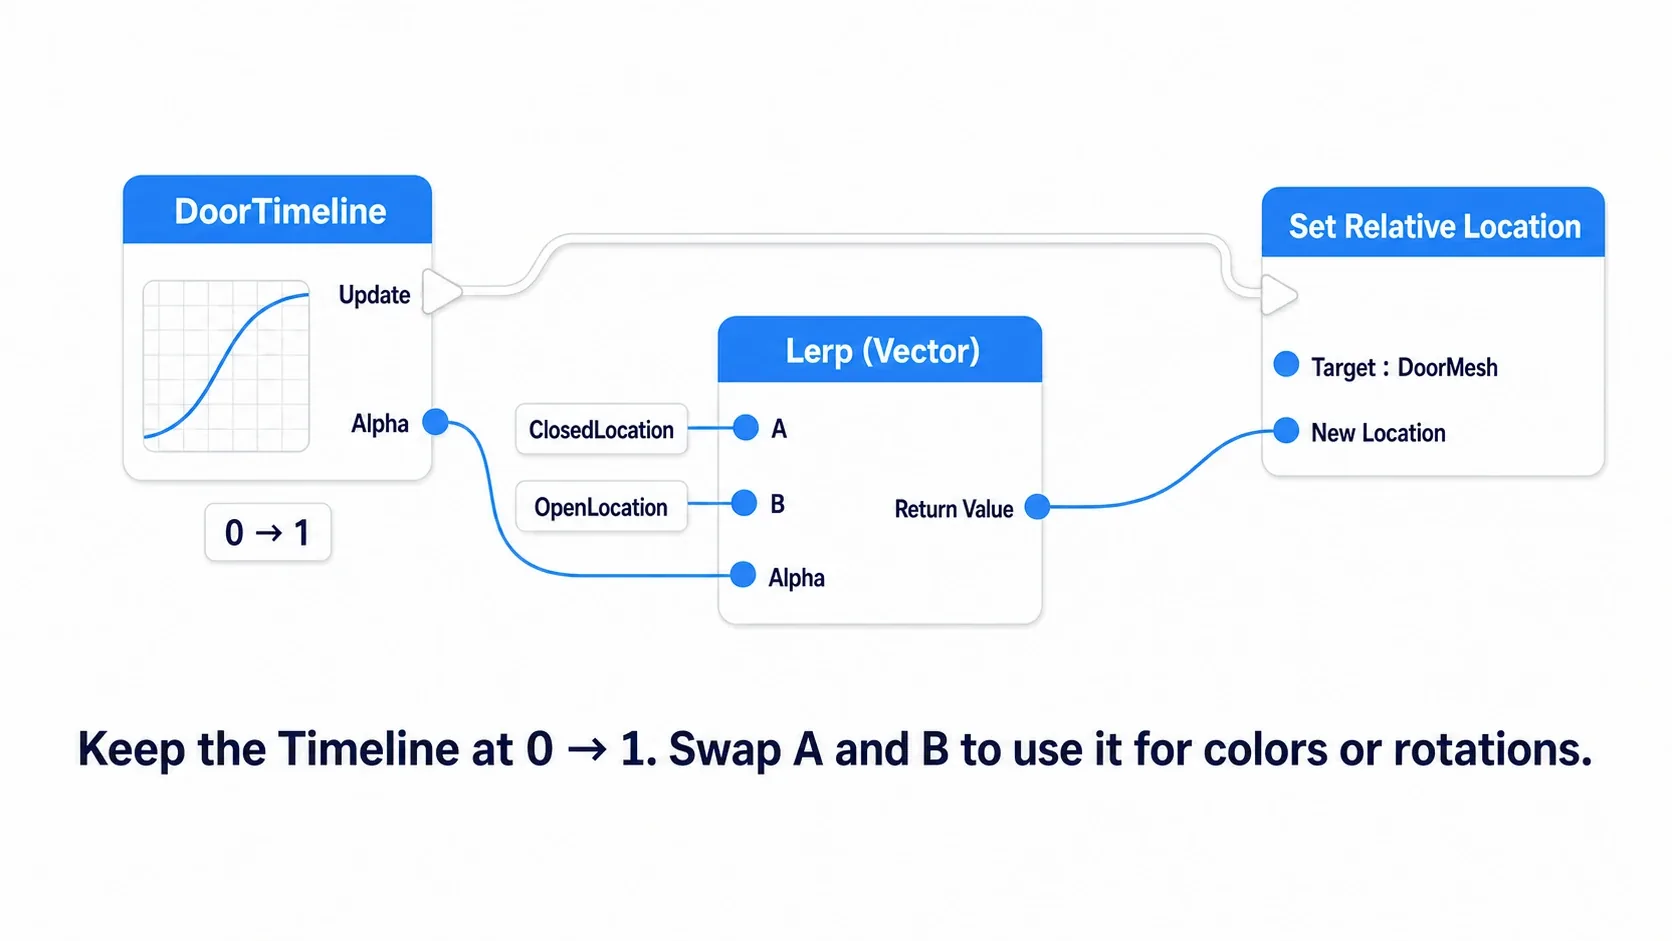
Timeline (Update)
  → Lerp (Vector)
      A     = ClosedLocation
      B     = OpenLocation
      Alpha = the Timeline's Float output (0→1)
  → Set Relative Location (Target = DoorMesh)
Lerp blends between A and B by the ratio in Alpha. Alpha 0.0 gives A, 1.0 gives B, and 0.5 gives the exact midpoint. The split is that the Timeline emits 0→1 and Lerp translates it into an actual value.
Put another way, Lerp does nothing unless something drives its Alpha — here, the Timeline. Motion whose target keeps moving (an enemy facing the player, a turret swiveling) can't be written with a Timeline, so it uses the Interp To family instead. That split is covered in Rotation and Interpolation Basics.
The nice part of this shape is that the Timeline stays at 0→1 untouched, and swapping A and B changes what it does.
| Lerp variant | What goes in A and B | What it drives |
|---|---|---|
| Lerp (Vector) | Coordinates | Position (Set Relative Location) |
| Lerp (Rotator) | Rotations | Orientation (Set Relative Rotation) |
| Lerp (Float) | Numbers | Material parameters, volume |
| Lerp (Linear Color) | Colors | Light color, UI color |
Lerp (Rotator) is found by searching for "RLerp".
Note: When moving position, the important detail is using
Set Relative Locationrather thanSet World Location. With Relative, the same Blueprint works no matter where in the level you place the Actor or how you rotate it.
Where Timelines Cannot Be Placed
Timelines have placement restrictions. Not knowing them leaves you stuck hunting for "Add Timeline" where it doesn't exist.
| Location | Allowed? | Use instead |
|---|---|---|
| Actor-derived Blueprint (event graph) | Yes | |
| Function graph | No | Place it in the event graph and call it from the function |
| Macro graph | No | Same as above |
| Widget Blueprint | No | UMG's Widget Animation |
| Blueprint Function Library | No | A Curve Float asset plus your own logic |
Functions and macros can't hold one because a Timeline carries state across time. A function has to complete where it is called, so it can't hold a Timeline mid-playback. To drive one from a function, place the Timeline in the event graph and call a custom event that leads to it.
To do the same in a Widget Blueprint, use UMG's Widget Animation. It's built from keys and curves just like a Timeline, and it even plays while the game is paused (see the pause article).
Hands-On: Building an Automatic Door
Automatic doors in horror games, airlocks in sci-fi, rising platforms in puzzle games. "Opens as you approach, closes as you leave" is the first gimmick you build in any genre. We'll build a door with one Timeline that behaves naturally even if you turn back halfway.
The Finished Result
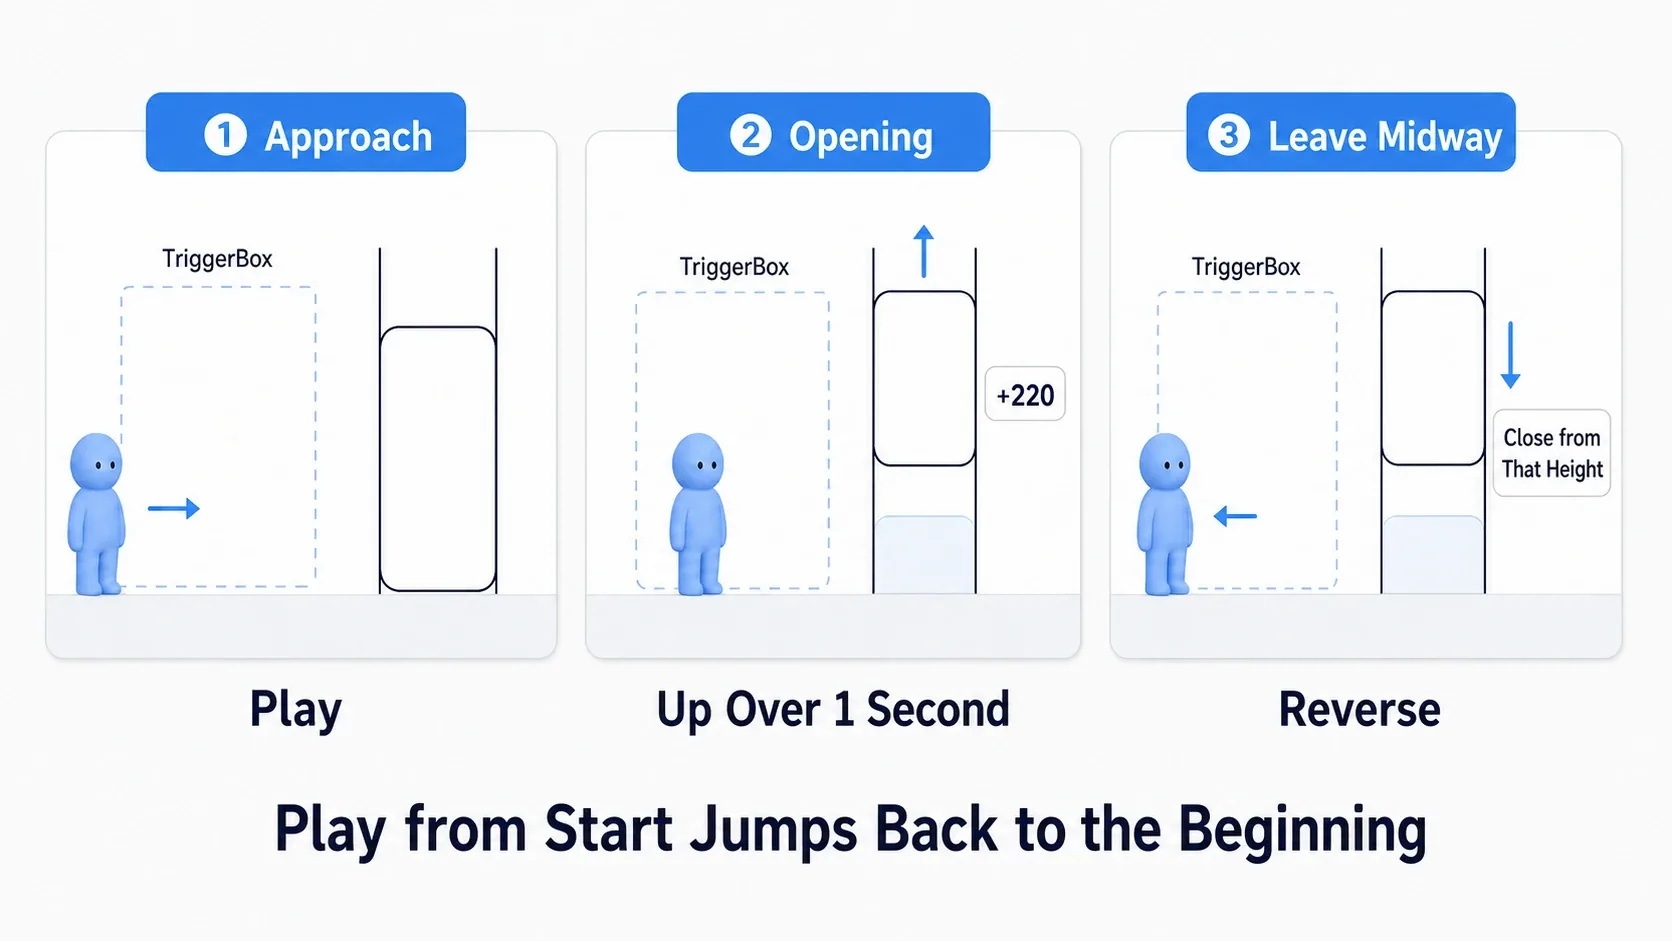
Stand in front of the door and it slides upward over one second. Step away and it descends from wherever it is. Leave before it finishes opening and it starts closing from that partial height.
Setup
Create a new project from the Third Person template and make an Actor-derived Blueprint named BP_AutoDoor.
Components
| Component | Type | Settings |
|---|---|---|
DefaultSceneRoot | Scene | Root |
DoorMesh | Static Mesh | Set Mesh to Cube. Scale (0.2, 2.0, 3.0), Location (0, 0, 150) |
TriggerBox | Box Collision | Box Extent (200, 200, 200). Leave Collision Preset at the default OverlapAllDynamic |
Variables
| Variable | Type | Default | Purpose |
|---|---|---|---|
ClosedLocation | Vector | (0, 0, 150) | DoorMesh's relative location when closed |
OpenLocation | Vector | (0, 0, 370) | Relative location when fully open (220 higher) |
Enter the defaults in "Default Value" in the Details panel after creating the variables (the fields don't appear until you compile).
Timeline
Right-click in the event graph, choose "Add Timeline...", and name it DoorTimeline. Double-click to open it and set it up like this.
| Item | Value |
|---|---|
| Track | Add one Float Track and name it Alpha |
| Key 1 | Time 0.0 / Value 0.0 |
| Key 2 | Time 1.0 / Value 1.0 |
| Interpolation mode for both keys | Auto |
| Use Last Keyframe? | On |
Building the Graph
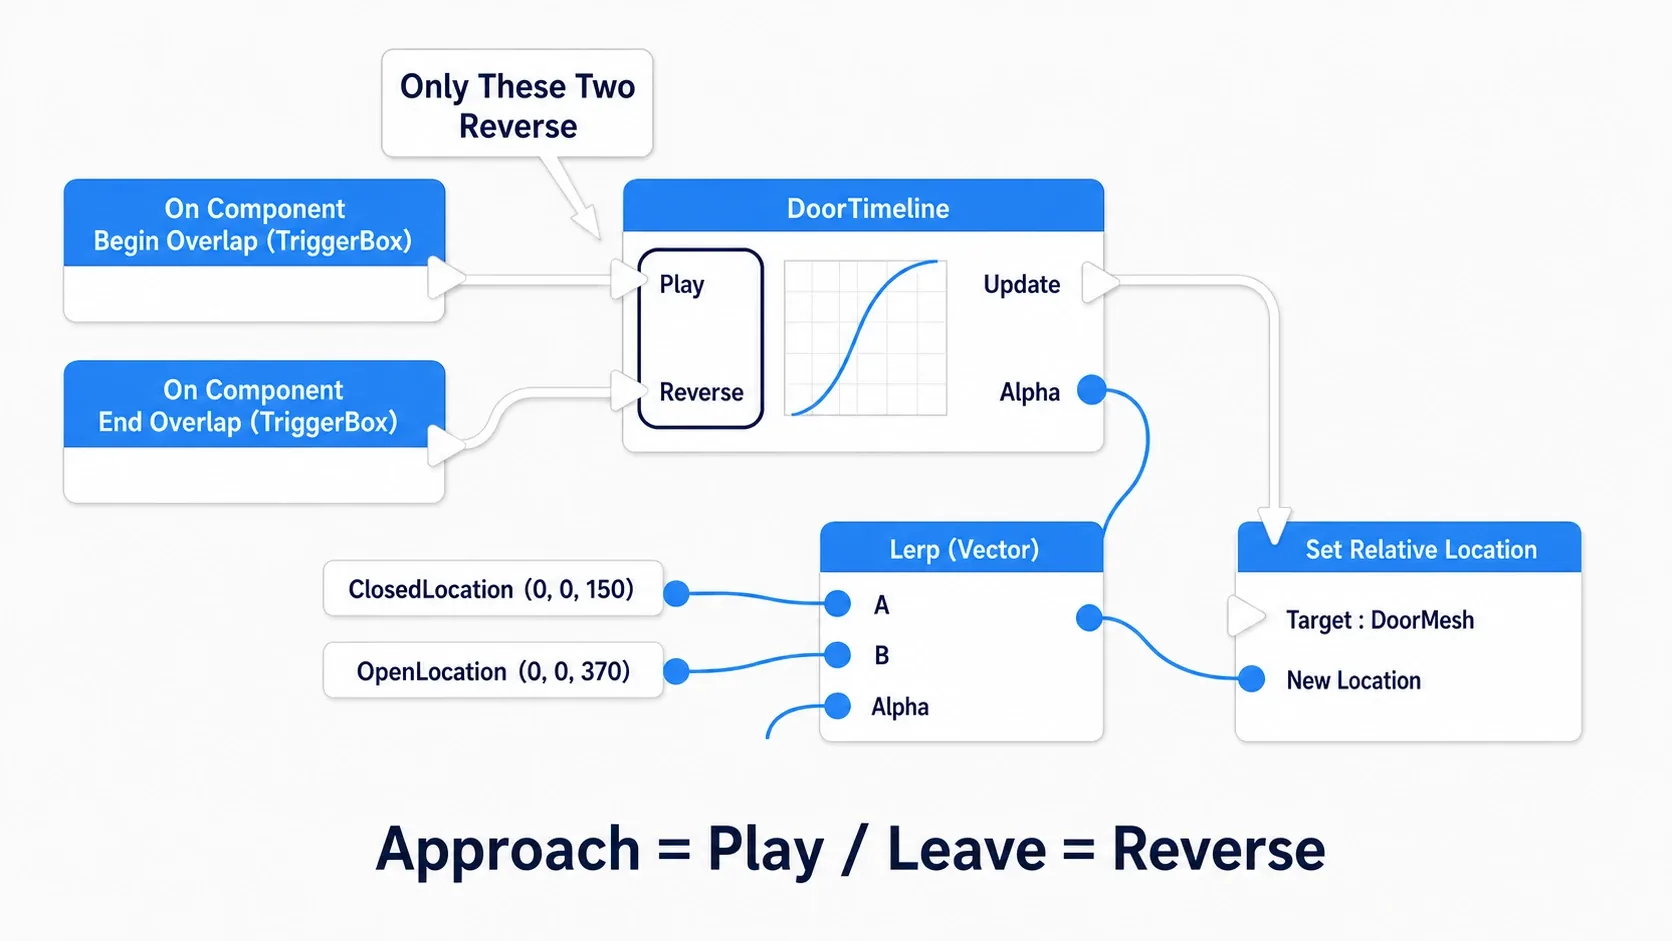
Select TriggerBox in the component list and add On Component Begin Overlap and On Component End Overlap from the Events section at the bottom of the Details panel.
On Component Begin Overlap (TriggerBox)
  → DoorTimeline : Play

On Component End Overlap (TriggerBox)
  → DoorTimeline : Reverse

DoorTimeline (Update)
  → Lerp (Vector)
      A     = ClosedLocation   (0, 0, 150)
      B     = OpenLocation     (0, 0, 370)
      Alpha = Alpha (DoorTimeline's Float output)
  → Set Relative Location
      Target        = DoorMesh
      New Location  = the return value of Lerp
The key detail is using Play and Reverse as a pair. With Play from Start, leaving while the door is still opening makes it jump back to the beginning before closing, so the door teleports.
Drag the finished Blueprint into the level.
Verifying It
Press Play and approach the door. You have it right when the door glides 220 units upward over one second, clearing enough height to walk through. Step away and it returns to its original height over the same second.
Next, step backward about 0.3 seconds after it starts opening. The door never reaches the top and begins descending from that partial height. That is Reverse at work.
Then try changing both keys' interpolation mode to Linear and compare. Over the same one second, the moment it stops reads very differently.
- The door doesn't move at all →
On Component Begin Overlapis attached toDoorMeshinstead ofTriggerBox. The target component name is printed under the event name, so check there - The door teleports →
Set Relative Locationis wired toFinishedinstead ofUpdate - The door jumps somewhere odd → you're using
Set World Location, orClosedLocation's default doesn't matchDoorMesh's actual position - It opens but never closes →
On Component End Overlapisn't connected, or you're usingPlay from Start - The player clips through the door →
DoorMesh's Collision Preset isNoCollision
Two things to take away.
- Keep the Timeline at 0→1 and let Lerp do the translation: With that split, changing how high the door opens means touching only
OpenLocation. Let the Timeline's curve handle nothing but the easing - Build anything that goes back and forth with
PlayandReverse:Play from Startis only for effects you want from the top each time. Doors, switches, and drawers move between states, so thePlay/Reversepair that reverses from the current position is the right choice
Keeping the same shape, swap in Lerp (Linear Color) for a fade, or wire it into Set Scalar Parameter Value for a glowing material. To take the door further, Blueprint Component reuse shows how to package the open/close logic so other Actors can carry it too.
Checks When It Doesn't Work
| Symptom | Where to look |
|---|---|
| Can't add a Timeline | Is it an Actor-derived Blueprint? Widget Blueprints and Function Libraries can't hold one |
| "Add Timeline..." doesn't appear | You have a function or macro graph open. Switch to the event graph |
| The value stays 0 | The track only has one key. You need at least two |
| It stops partway | Length is shorter than the last key. Turn on Use Last Keyframe? |
Finished never fires | Loop is on. It doesn't fire while looping |
| You want it to run while paused | Timelines stop when paused. For UI, use Widget Animation |
| Speed changes during a slow-motion effect | Turn on Ignore Time Dilation and it stops being affected by Set Global Time Dilation |
When you can't tell what values are coming out, wire the track output into a Print String from Update. If 0→1 is flowing, the problem is downstream of the Timeline. Using debug output is covered in the Print String article.
Bonus: Good to Know for Later
- One Blueprint can hold multiple Timelines: Door movement and lamp blinking can live in separate Timelines. Name them by role, like
DoorTimelineandLampTimeline, and they'll still make sense later - Share shapes with a Curve Float asset: To use the same easing across several Blueprints, create Miscellaneous > Curve > Curve Float in the Content Browser and reference it as an External Curve on a Timeline track. Fix it in one place and everything updates
- Long sequences belong in Sequencer: Timelines are good at short motions contained in a single Actor. Cutscenes that move cameras, characters, and audio together are more manageable in Sequencer than in a stack of Timelines
Set New Timelets you start partway: To begin a level with the door already half open, pass0.5toSet New Timeand then callPlay- Keep variables inside the Blueprint: Whether values like
ClosedLocationandOpenLocationshould be local variables or regular ones comes down to lifetime (see choosing local variables) - To notify other Actors on completion: Call an Event Dispatcher from
Finishedand you can announce the moment the door finishes opening (see the Event Dispatcher article)
Summary
- A Timeline is a node that emits curve values over time. Add it to the event graph of an Actor-derived Blueprint
- There are four track types: Float / Vector / Color / Event. In practice, reusing one 0→1 Float is the easiest to work with
- Use
PlayandReversefor things that go back and forth, andPlay from Startfor things that always play from the top - Wire your logic to
Update. It only fires during playback, so it never runs on like Tick - The curve's interpolation mode decides how it feels. Switch between Linear and Auto and compare
- Feeding it into
Lerpis the standard pattern. The Timeline stays at 0→1 while swapping A and B changes the use
Is there anything in your project adding small amounts to a value inside Event Tick? That's exactly the spot a Timeline replaces.