You land a hit and the enemy's HP drops, but nothing else happens. You kill an enemy and it just quietly vanishes. The logic works correctly, and yet playing it feels weightless.
What's missing are effects. In UE5 that's Niagara's job. The trouble is that opening Niagara presents a column of unfamiliar settings, and it's easy to close the window without knowing where to start. This article organizes Niagara's three-layer structure, then walks through modifying a template and firing it from Blueprint. Building from scratch is out of scope.
What You'll Learn
- What each of the three layers, System / Emitter / Module, is responsible for
- The stack's execution order (Spawn runs once, Update runs every frame)
- Why building from a template is the realistic approach
- The modules you'll actually touch (Spawn Rate / Initialize Particle / Add Velocity / Gravity Force)
- Materials are what decide how a particle looks
- When to use Spawn System at Location versus Spawn System Attached
- Hands-on: fire an explosion the moment an enemy dies
- Niagara's Three Layers: System / Emitter / Module
- Know the Stack's Execution Order
- Build From a Template
- The Modules You'll Actually Touch
- Materials Decide the Look
- Firing It From Blueprint
- Changing Values From Outside With User Parameters
- Hands-On: Fire an Explosion the Moment an Enemy Dies
- Bonus: Good to Know for Later
- Summary
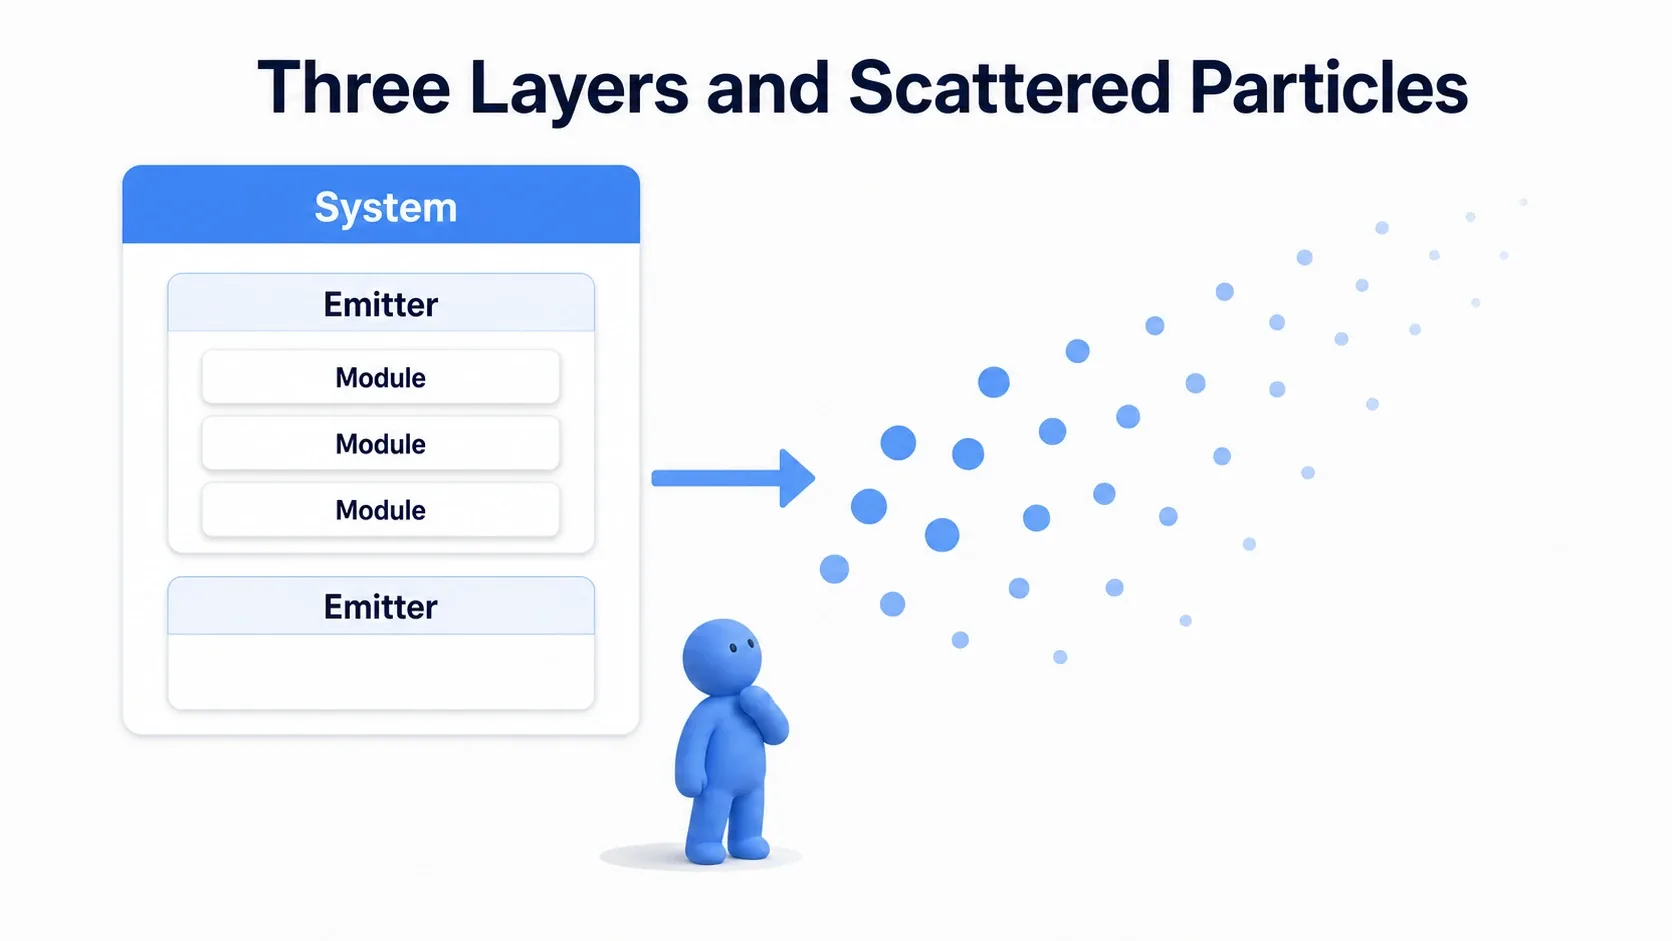
Niagara's Three Layers: System / Emitter / Module
The first thing that trips people up in Niagara isn't the number of features, it's the nesting. Sort this out first and the rest of the UI becomes readable.
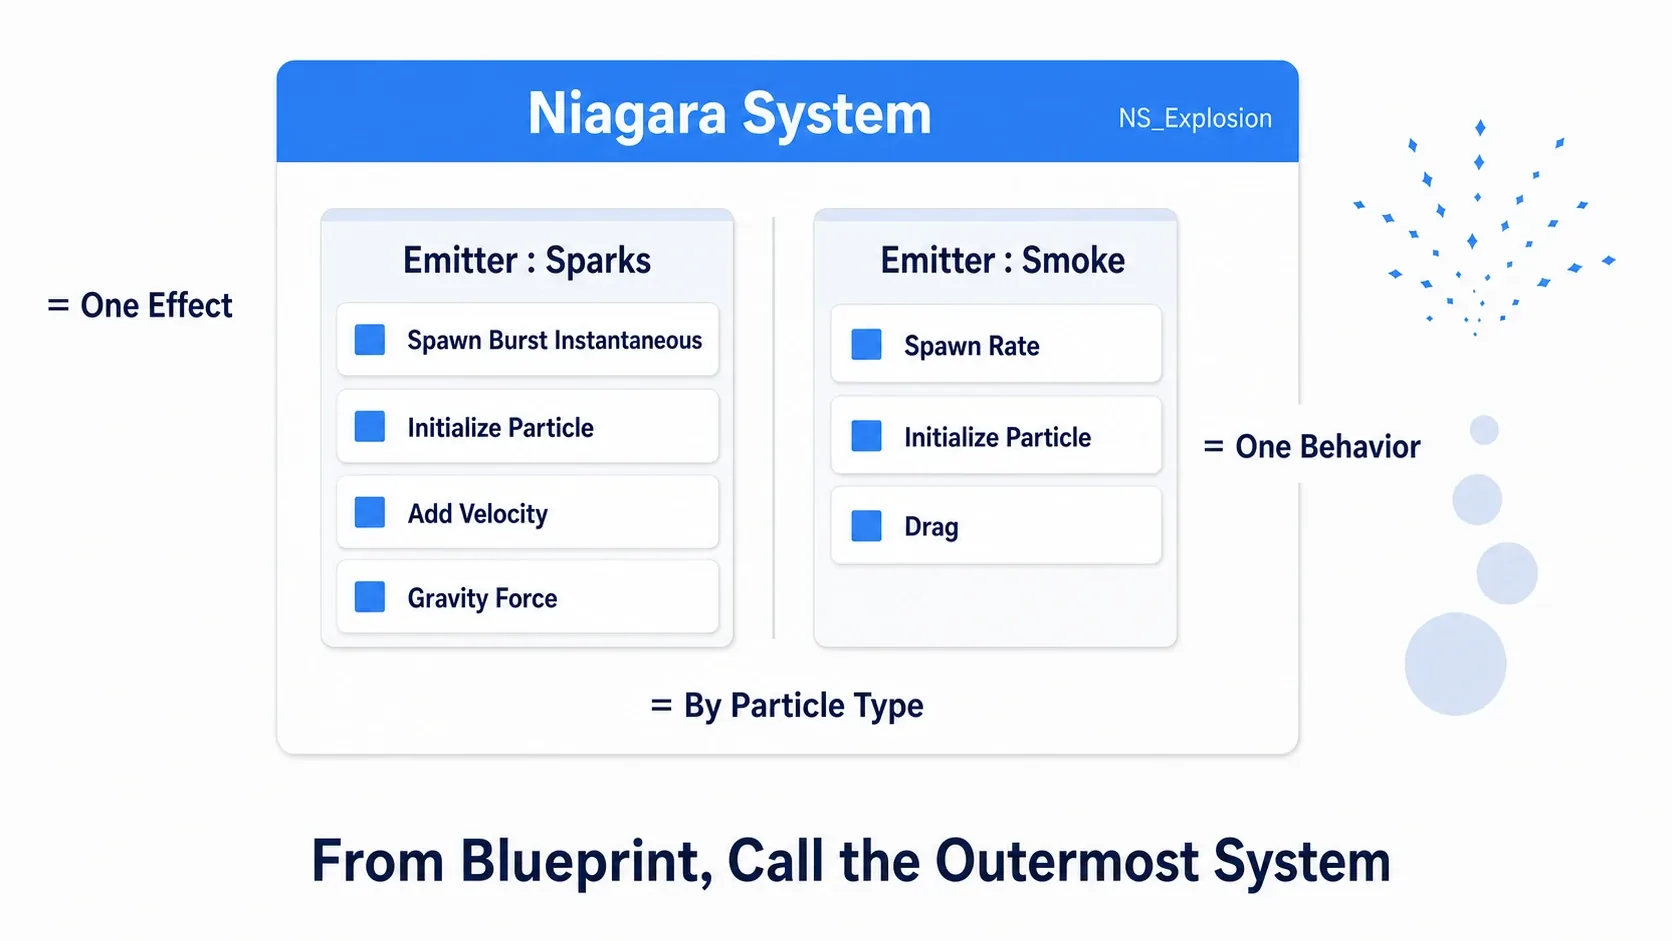
| Layer | Unit | Example (an explosion) |
|---|---|---|
| System | One complete effect | NS_Explosion |
| Emitter | One source per type of particle | Sparks emitter, smoke emitter, flash emitter |
| Module | One behavior | "spawn 30," "shoot them upward," "pull them down with gravity" |
The System is the unit you call from Blueprint. For an explosion, bundle sparks, smoke, and flash into a single System, and call that one thing from Blueprint.
Emitters are split by type of visual. Sparks fly fast and die quickly; smoke spreads slowly and lingers. Different motion, different lifetime, different material, so they can't live in the same Emitter. Lining up multiple Emitters in one System is the normal way to build.
Modules are parts, each with one job. They come in units like "spawn particles at a steady rate," "set the initial color and size," and "apply gravity." Stack them vertically and you've defined the Emitter's behavior.
Which means editing in Niagara mostly boils down to "which value, in which module, in which emitter, do I change?" Keep these three layers in your head and you'll always know what part of the screen you're looking at.
Know the Stack's Execution Order
Open an Emitter and you'll see Modules arranged vertically in several groups. That ordering isn't decorative, it's the exact order of execution, top to bottom.
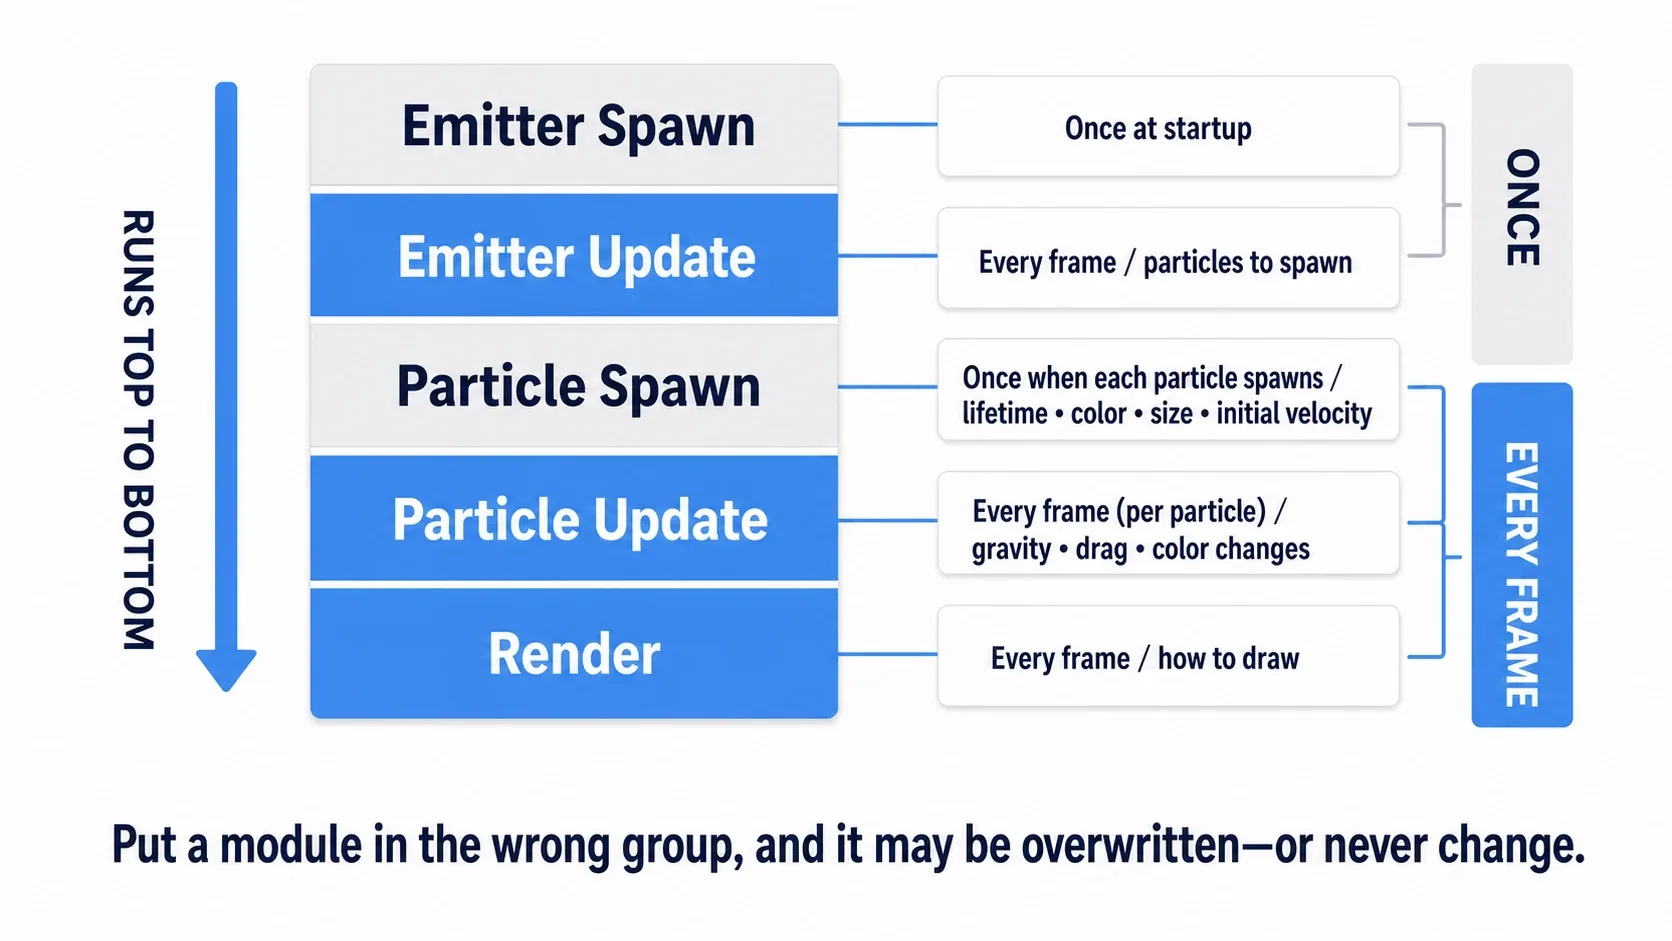
| Group | When it runs | Main role |
|---|---|---|
| Emitter Spawn | Once when the Emitter starts | Initial setup |
| Emitter Update | Every frame | How many particles to spawn |
| Particle Spawn | Once when a particle is born | That particle's initial values (lifetime, color, size, initial velocity) |
| Particle Update | Every frame (per particle) | Changes while it's alive (gravity, drag, color shifts) |
| Render | Every frame | How it's drawn (sprite, mesh, ribbon) |
The most important thing here is the difference between Particle Spawn and Particle Update.
- Particle Spawn runs exactly once at the moment a particle is born. It's where you write "make it red when it's born"
- Particle Update runs every frame while a particle is alive. It's where you write "fade from red to transparent over time"
"I only wanted to set it once but it keeps getting overwritten" and "I wanted it to change but it's stuck at the initial value" are almost always a matter of putting something one group off.
The same logic applies to Emitter Update. Spawn Rate lives there and gets evaluated every frame, so particles keep coming. For "spawn a batch all at once," you use a different module (next section).
Build From a Template
Create a new Niagara System by right-clicking in the Content Browser and choosing FX > Niagara System. A dialog appears asking how you want to build it.
| Option | What it does |
|---|---|
| Create from a template | Creates one with Emitters already in a working state |
| Create from an existing Emitter | Reuses an Emitter you built |
| Copy an existing System | Duplicates a System you made |
| Create an empty System | Start with nothing in it |
Always pick a template at first. Building from empty means adding both the spawning modules and the rendering modules yourself, and you'll stall out before you get a single dot on screen.
The template list shifts between versions, but Fountain (particles that rise and fall like a fountain) is in every version. Opening that and playing with its numbers is the shortest learning path there is.
Double-click the System you created and the editor opens: preview in the center, the Emitter stack on the left, and the selected module's details on the right. The preview plays live, so you immediately see the result of any number you change. Getting hands-on here is the fastest way to learn.
The Modules You'll Actually Touch
Open the Fountain template and there are already plenty of modules lined up. You don't need to understand all of them. Start with just five.
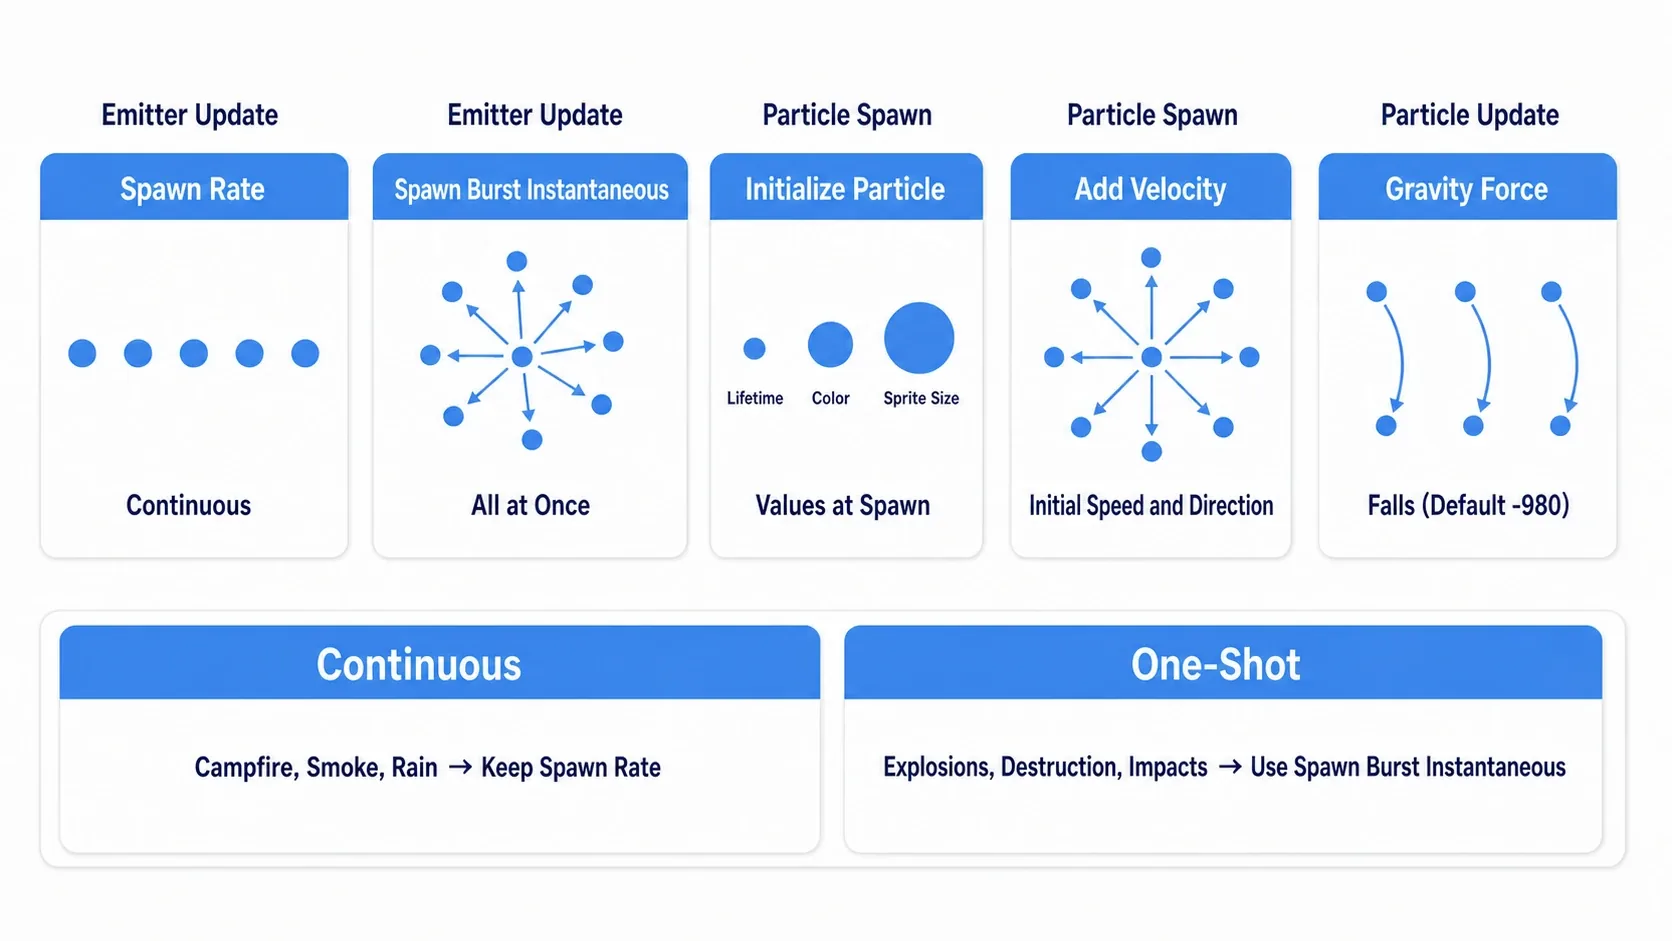
| Module | Group it lives in | What it changes |
|---|---|---|
| Spawn Rate | Emitter Update | Particles spawned per second |
| Spawn Burst Instantaneous | Emitter Update | Spawns a set count all at once, at a set time |
| Initialize Particle | Particle Spawn | Lifetime, Color, Sprite Size |
| Add Velocity | Particle Spawn | Speed and direction at birth |
| Gravity Force | Particle Update | Gravity. Defaults to -980 downward |
The difference between Spawn Rate and Spawn Burst Instantaneous decides the character of your effect.
- Spawn Rate: keeps emitting. Campfires, chimney smoke, water spray, rain
- Spawn Burst Instantaneous: emits a batch at once. Explosions, kills, impacts, jump dust
If you want a one-shot effect but leave Spawn Rate in place, particles pour out forever. Remove Spawn Rate, add Spawn Burst Instantaneous. That's the first move when converting a template into a one-shot. Add modules via the + button to the right of the group name and search.
Initialize Particle is the central module for setting a particle's initial values in one place. Most fields offer randomized ranges in addition to fixed values. Give lifetime a range like 0.4 to 0.8 and particles stop vanishing in unison, which alone makes them look natural. Everything dying at the same instant is the most visible tell in a beginner's effect.
Add Velocity offers a few ways to set direction, including aligning everything one way or scattering radially from a point. For an explosion, you want the latter.
Weakening Gravity Force makes particles drift slowly. Smoke and magical lights look more convincing if you drop gravity to around -100 or remove it entirely.
Note: Module names and categories can change between UE versions. When you can't find one, the reliable move is to hit + on the group and type a keyword into the search box.
Velocitynarrows down speed-related modules,Sizenarrows down size-related ones.
Materials Decide the Look
This is an easy one to miss. What Niagara's modules decide is how many particles exist, where, and at what size. How those particles actually look is decided by the material.
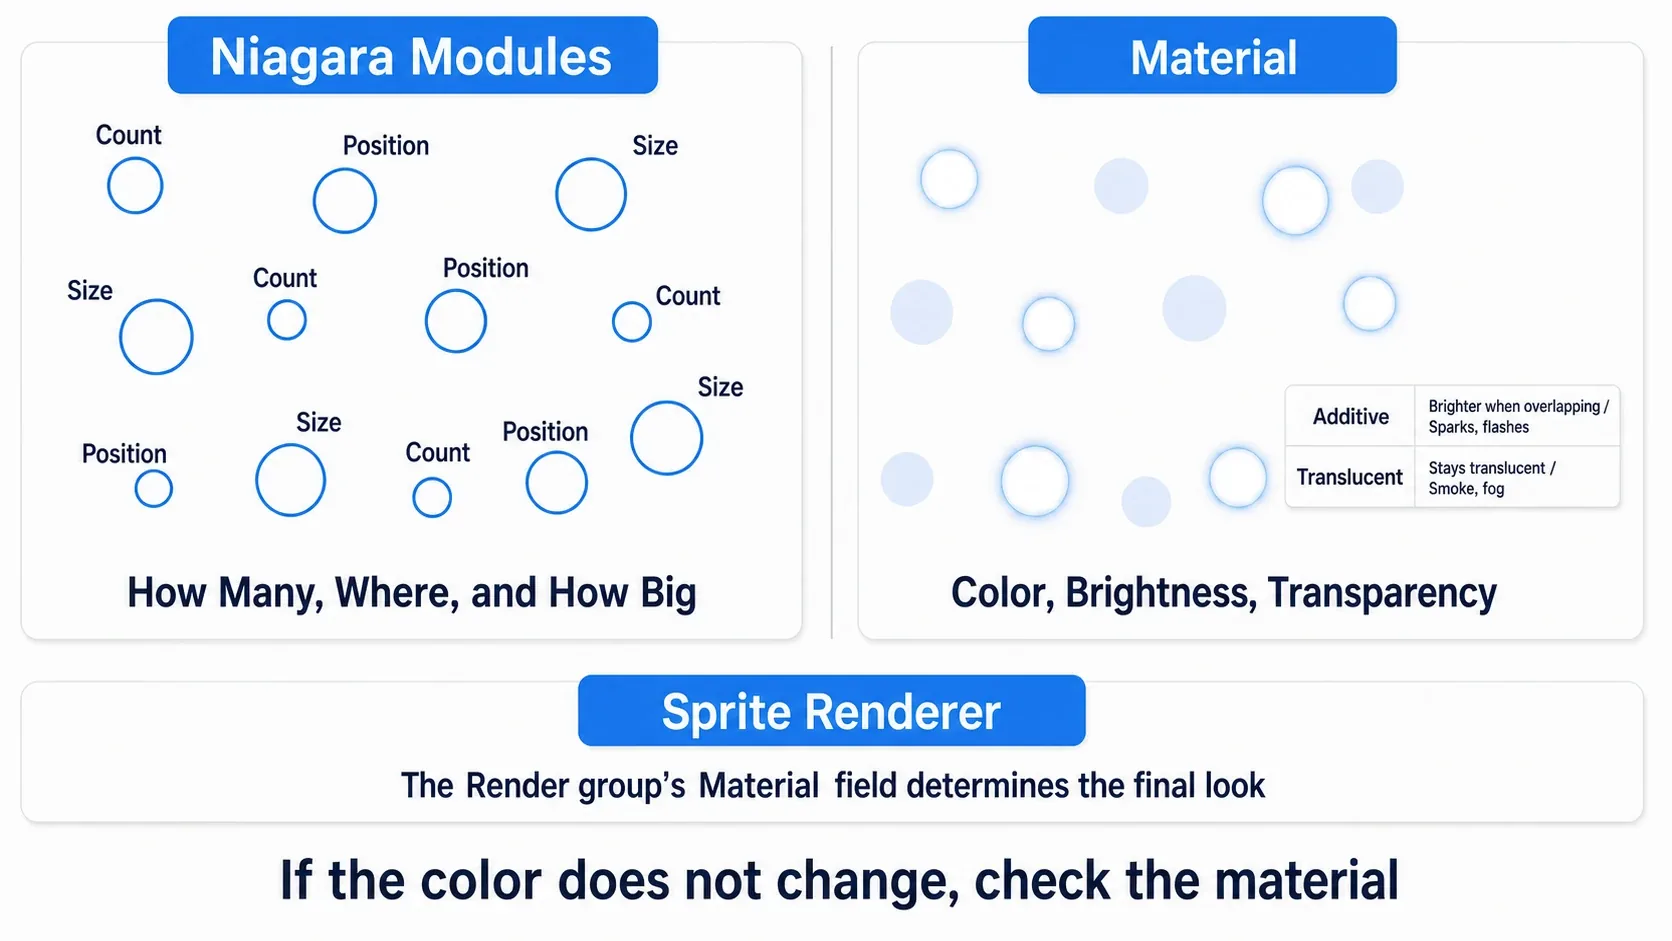
The settings that draw particles live in the Render group's Sprite Renderer. Whatever is set in its Material field is what you're actually seeing.
The thing to know about effect materials is how to pick a Blend Mode.
| Blend Mode | How it looks | Good for |
|---|---|---|
| Additive | Brighter where it overlaps. Black lets the background through | Sparks, flashes, magic, lasers |
| Translucent | Semi-transparent. Overlaps don't brighten | Smoke, fog, spray, clouds |
"It's an explosion but it doesn't glow" means the Blend Mode is Translucent. Conversely, "my smoke is blowing out to white" means it's Additive.
There's one more thing to verify: whether the material is reading the color you set in the Niagara module. Initialize Particle's color only shows up if the material has a Particle Color node in it. If changing the color in Initialize Particle does nothing, the cause is on the material side. Material fundamentals are covered in the material article.
Also, effect materials need the Usage checkbox in the details panel for particle usage (Niagara Sprites and similar). If you repurpose an existing material and get solid black or a checkerboard, suspect this.
Firing It From Blueprint
Once the System exists, you call it during gameplay. There are two nodes.
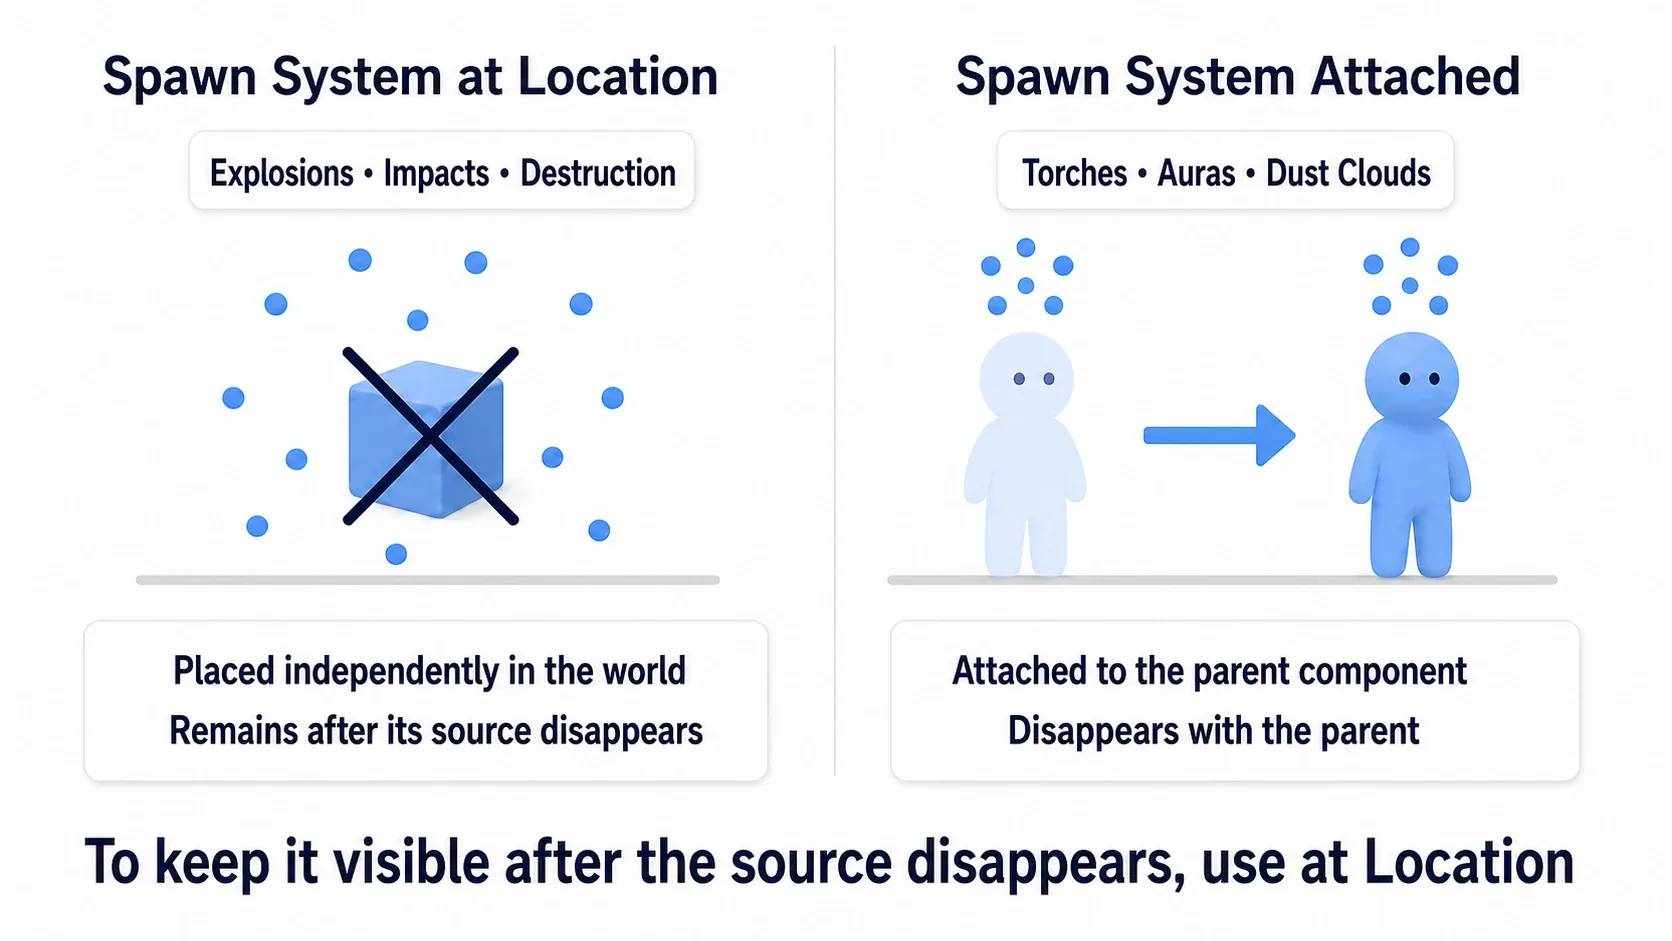
| Node | How it spawns | Good for |
|---|---|---|
| Spawn System at Location | Placed independently in the world at a given coordinate | Explosions, impacts, death effects |
| Spawn System Attached | Attached to a given component | Torch flames, buff auras, running dust |
The main pins on Spawn System at Location are as follows.
| Pin | Meaning |
|---|---|
| System Template | The Niagara System to play |
| Location | Where to spawn it |
| Rotation / Scale | Orientation and size |
| Auto Destroy | Clean up automatically when playback ends (on by default) |
| Auto Activate | Start playing on spawn (on by default) |
The return value is a reference to the Niagara Component. Use it if you want to change colors or stop it later. Leave it unconnected if you don't.
The decisive difference between the two is what happens when the source disappears.
- Spawn System at Location: placed independently in the world, so destroying the original actor leaves the effect running to completion
- Spawn System Attached: hangs off the parent component, so when the parent disappears, the effect goes with it
Build a death effect with Spawn System Attached and you'll see nothing, because the effect dies the instant the enemy does. "Leave it behind in place" always means at Location.
Conversely, spawning a flame or aura the character carries around with at Location leaves it stranded where it started. Only use Attached for things that should move along with something.
Note: For things that burn continuously, like a torch, another option is to add a Niagara component to that actor up front. Add the Niagara component from the Blueprint's "Add" menu and set a System Asset. You can then toggle it with
ActivateandDeactivate, which suits things like turning a torch on and off.
Changing Values From Outside With User Parameters
You want the same explosion in red for fire and blue for ice. You want the same dust cloud scaled to enemy size. Duplicating the System for every color variation quickly becomes unmanageable.
Niagara Systems have a feature called User Parameters that lets you create an entry point for passing values in from outside.
- In the Niagara System editor, add a variable in the User Parameters section with + (types include Float, Vector, Linear Color, and so on)
- In a module's value field, switch from a fixed value to a reference to that User Parameter
- In Blueprint, call a set-value node on the return value (the Niagara Component) from
Spawn System at Location
The Blueprint nodes are split by type. Drag from the Niagara Component reference and type Set Niagara Variable, and you'll see candidates for Float, Vector, Linear Color, and others. The name you pass is exactly the name you gave it in the User Parameters panel.
Warning: Setting the value happens after Auto Activate has already started playback. If you want it reflected in "the color at the moment a particle is born," the first frame's worth may come out in the default color. To guarantee it takes effect, turn
Auto Activateoff at spawn, set the value, then callActivate.
Hands-On: Fire an Explosion the Moment an Enemy Dies
Killing an enemy in a 2D shooter, a slime bursting in an ARPG, a block clearing in a puzzle game. One-shot effects at the moment something disappears are the most reusable effects there are, in any genre. Here we'll modify a template into an explosion and call it from Blueprint.
The Finished Result
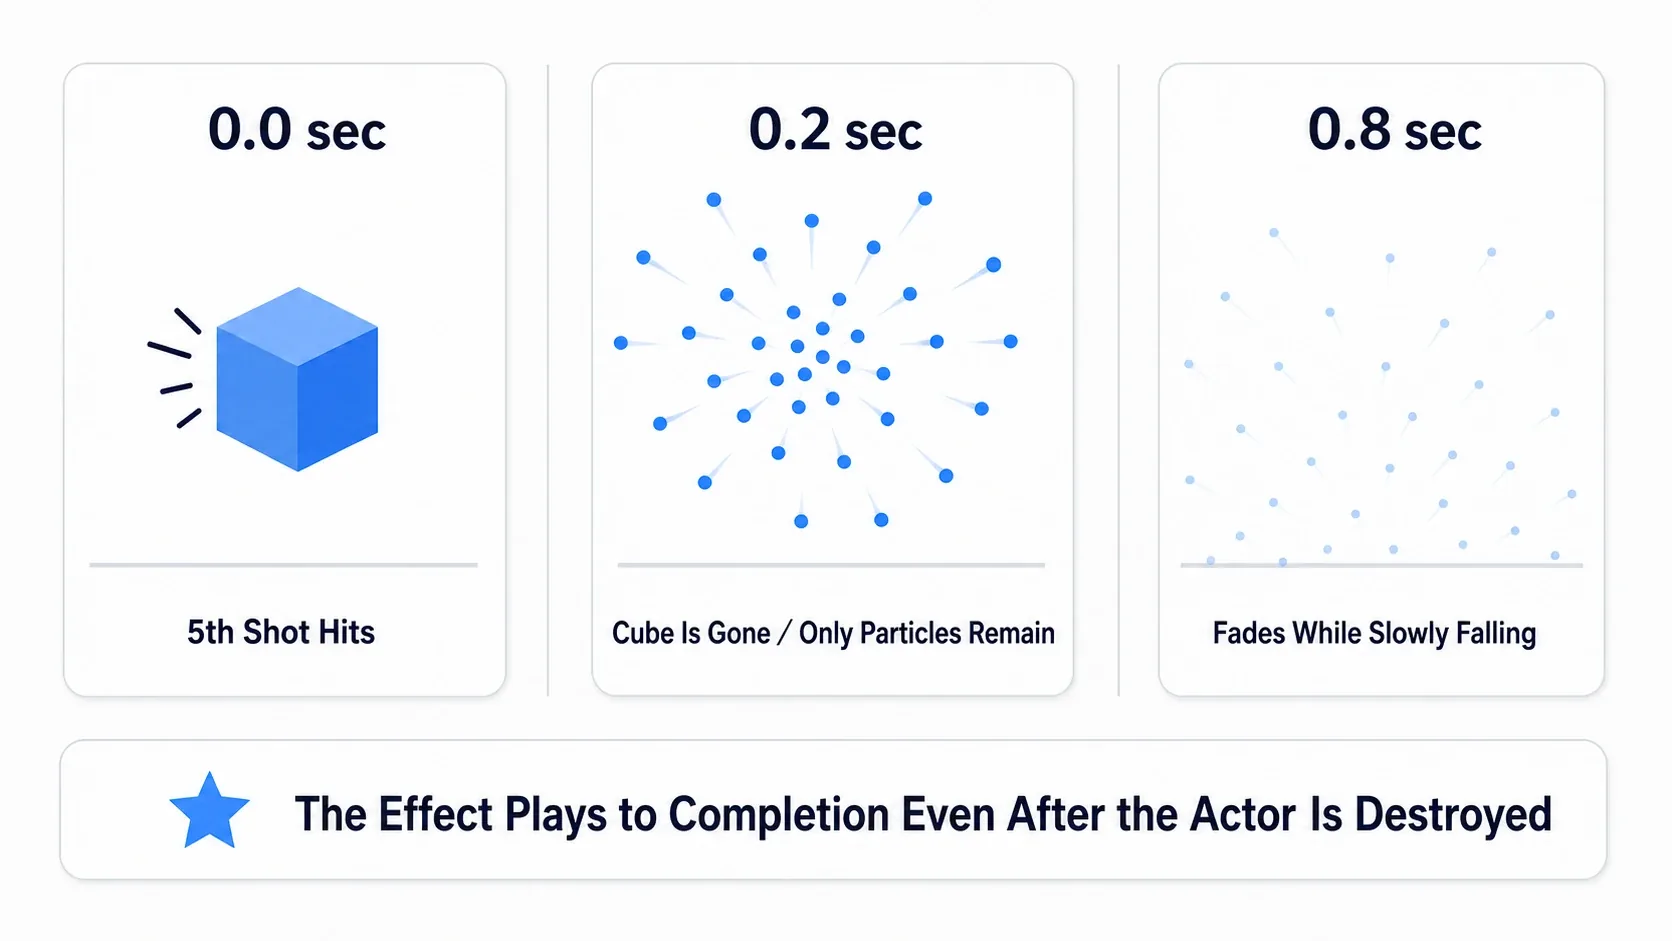
Shoot a Cube five times and its HP hits 0, and the Cube disappears. At the spot where it vanished, about 30 orange particles scatter outward, fall slightly, and fade out in 0.8 seconds. The point is that the Cube is already gone while the particles remain.
Setup
Create a new project from the Third Person template (Blueprint).
1. The target (BP_Damageable)
Create a Blueprint with Actor as the parent class, assign Cube to its StaticMesh, and set Collision Presets to BlockAll.
| Variable | Type | Initial value |
|---|---|---|
CurrentHealth | Float | 100.0 |
In Event AnyDamage, subtract Damage from CurrentHealth and destroy the actor when it hits 0 or below. See the health and damage article for details. For the shooting side, use BP_Projectile (20 damage per shot) from the projectile article as-is.
2. The explosion (NS_Explosion)
Right-click in the Content Browser → FX > Niagara System → pick the Fountain template and name it NS_Explosion. Open it and change the following.
| Group | Action | Value |
|---|---|---|
| Emitter Update | Emitter State → Loop Behavior | Once / Loop Duration 1.0 |
| Emitter Update | Delete Spawn Rate | (right-click → Delete) |
| Emitter Update | Add Spawn Burst Instantaneous | Spawn Count 30 / Spawn Time 0.0 |
| Particle Spawn | Initialize Particle → Lifetime | Random range 0.4 to 0.8 |
| Particle Spawn | Same → Color | Orange (R 1.0 / G 0.5 / B 0.1 / A 1.0) |
| Particle Spawn | Same → Sprite Size (Uniform) | 15.0 |
| Particle Spawn | Add Velocity → direction | Radial from a point / speed 300 to 600 |
| Particle Update | Gravity Force | (0, 0, -400) |
Don't forget to set Loop Behavior to Once. Leave it at Infinite and the explosion repeats forever.
The Blueprint Graph
In BP_Damageable's Event Graph, build the logic for HP reaching 0.
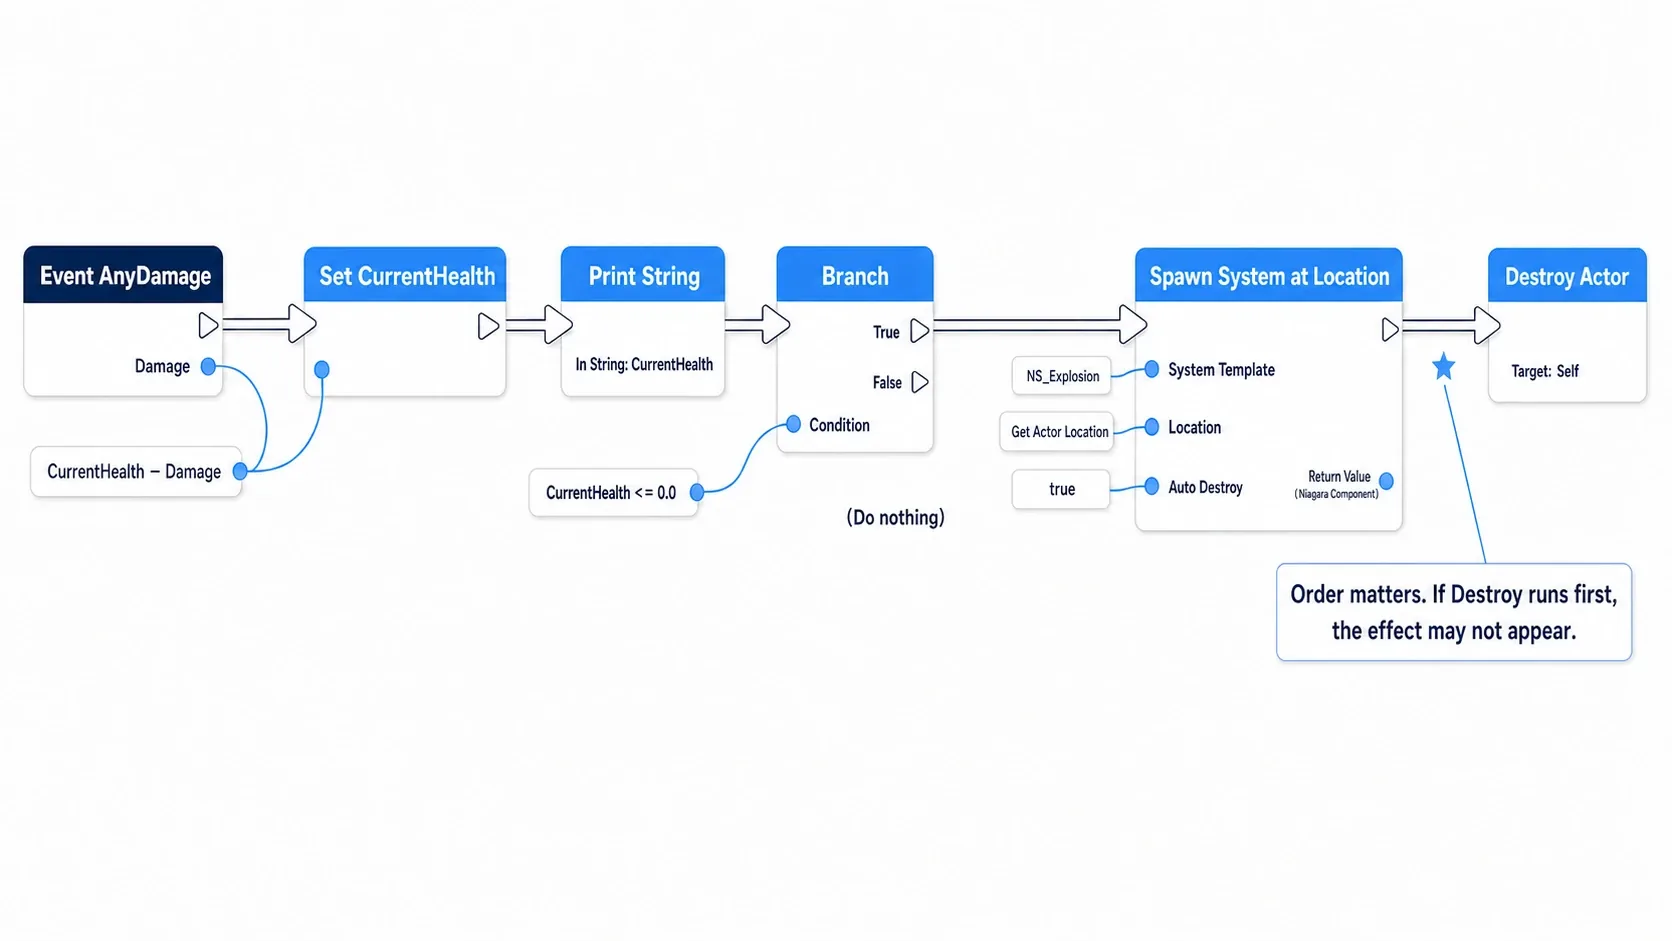
Event AnyDamage (Damage / ...)
  → Set CurrentHealth = CurrentHealth - Damage
  → Print String (CurrentHealth)
  → Branch (Condition: CurrentHealth <= 0.0)
      True ↓
  → Spawn System at Location
        System Template : NS_Explosion
        Location        : Get Actor Location
        Auto Destroy    : true (default)
  → Destroy Actor (Target: Self)
Put Spawn System at Location before Destroy Actor. In the other order, the effect sometimes doesn't appear at all.
Verify It
Hit Play and land five shots on the Cube.
On the fifth shot the Cube disappears, and orange particles spread outward from that position. They drift downward as they fade, vanishing completely in about 0.8 seconds. If the Cube is gone first while particles hang in the air, that's exactly right. It's proof that Spawn System at Location created a component that lives independently in the world.
- No particles at all →
System Templateis stillNone, orSpawn Burst Instantaneous's Spawn Time is later than Loop Duration - Particles keep coming and never stop →
Emitter State's Loop Behavior is stillInfinite - Effect vanishes instantly →
Destroy Actorcomes beforeSpawn System at Location - Color isn't orange → The Sprite Renderer's material isn't reading
Particle Color. Swap the material, or add Particle Color following the material article - Particles only fly upward →
Add Velocityis still set to a single direction. Switch it to radial - Particles drop to the ground immediately →
Gravity Forceis still at the default-980
Now try changing Spawn Count from 30 to 200. Same 0.8 seconds, completely different scale of explosion. Then try fixing the Lifetime range from 0.4 to 0.8 down to 0.8 to 0.8 and the particles all vanish at once, which reads as mechanical. Those two comparisons show that variation is what creates naturalness.
Two things to take away.
- One-shots are Spawn Burst Instantaneous plus Loop Behavior: Once: Templates ship configured to "keep emitting," so those two settings always have to change for kills and impacts. Conversely, leave Spawn Rate alone when building campfires and smoke
- at Location to leave it behind, Attached to carry it along: For effects where the source actor gets destroyed, this choice decides the outcome. When unsure, ask whether you want the effect visible after the source is gone
To add a hit flash or a full-screen flash, combining this with the Post Process Volume article raises the impact further.
Bonus: Good to Know for Later
- Local Space matters for moving sources: Turning on
Local Spacein the Emitter's properties puts particles in the source's coordinate space. Particles that should move with the source, like an aura on a running character, want it on; particles that should stay behind, like car exhaust, want it off - Particle count matters less than it looks: The reflex for "make it flashier" is to multiply the count by ten, but in most cases variation in size and how fast the color fades change the impression more. Before adding particles, try widening the Lifetime and size ranges
- If effects disappear at a distance, suspect Bounds: Effects can stop being drawn based on an off-camera test. For effects that spread widely, explicitly setting the Emitter's Fixed Bounds makes it stable
- Switching to GPU lets you push the count: Setting the Emitter property
Sim Targetto GPU lets you handle large particle counts. However, some modules aren't available on GPU, and Fixed Bounds becomes necessary. Build on CPU first and consider this once you feel the count isn't enough - Measure before judging cost: Effect cost isn't proportional to how flashy it looks. Translucency layered across the whole screen is especially expensive. Judge by measurement, not by feel (→ the profiling article)
- Sound completes it: Explosion particles on their own often feel underwhelming, and the cause is frequently the missing sound. Play a sound effect at the same place you call
Spawn System at Location(→ the audio article) - Use Notify to sync with animation: For things that must fire on a specific animation frame, like a slash arc as the sword swings or dust on landing, calling from an Anim Notify is more precise than a Blueprint event (→ the Montage and Notify article)
Summary
- Niagara has three layers: System (the effect) > Emitter (type of particle) > Module (behavior)
- The stack's order is the execution order. Particle Spawn runs once at birth, Particle Update runs every frame
- Don't build from scratch, build from a template. Opening
Fountainand adjusting numbers is the shortest route - The first five to touch are Spawn Rate / Spawn Burst Instantaneous / Initialize Particle / Add Velocity / Gravity Force
- The material decides how a particle looks. For a glow, Blend Mode should be Additive
- From Blueprint, choose between Spawn System at Location (stays behind) and Spawn System Attached (follows along)
- One-shots are Spawn Burst Instantaneous + Loop Behavior: Once
In the game you're building now, what tells the player "that hit" or "that killed it"? If the answer is only a number going down, it's worth putting one effect there.