"I just want to move with WASD, so why do I need three separate files?" That's the first reaction most people have when they start working with input in UE5. In UE4 you wrote everything in one place in Project Settings. Now you create an Input Action, an Input Mapping Context, and then register it from a Blueprint.
That split looks like busywork, but it pays off later. This article breaks Enhanced Input down into three parts, framed as the separation between "what you want to do" and "which key does it," and walks through building WASD movement and jumping. In the hands-on section, you'll build a setup where the entire control scheme swaps the instant the player gets into a car using just two nodes.
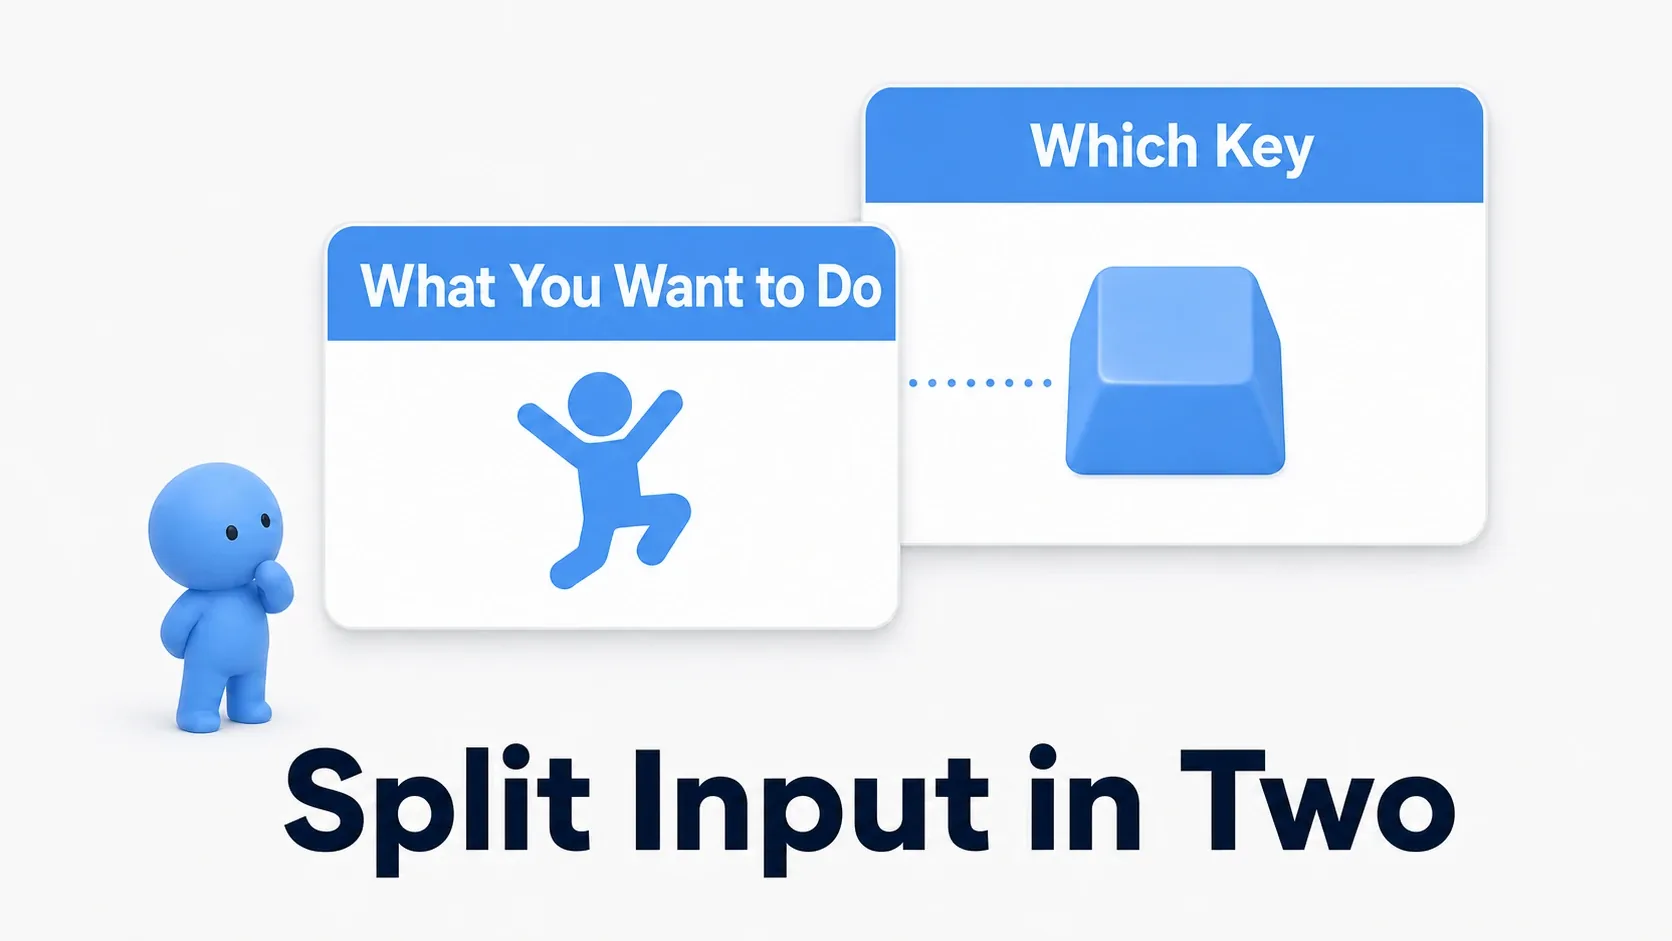
What You'll Learn
- The core idea behind Enhanced Input is separating "what you want to do" (IA) from "key assignments" (IMC)
- The entry point for enabling an IMC is the Enhanced Input Local Player Subsystem
- The number one cause of broken WASD movement: the role of Swizzle Input Axis Values
- Triggers (hold, tap) and Modifiers (negate, dead zone) can be configured on the asset side
- Hands-on: swapping an entire control scheme the moment the player enters a vehicle
The Three Parts and How They Relate
What makes Enhanced Input feel hard isn't the number of parts, it's that which part is responsible for what isn't obvious at first. Let's start with the division of labor.
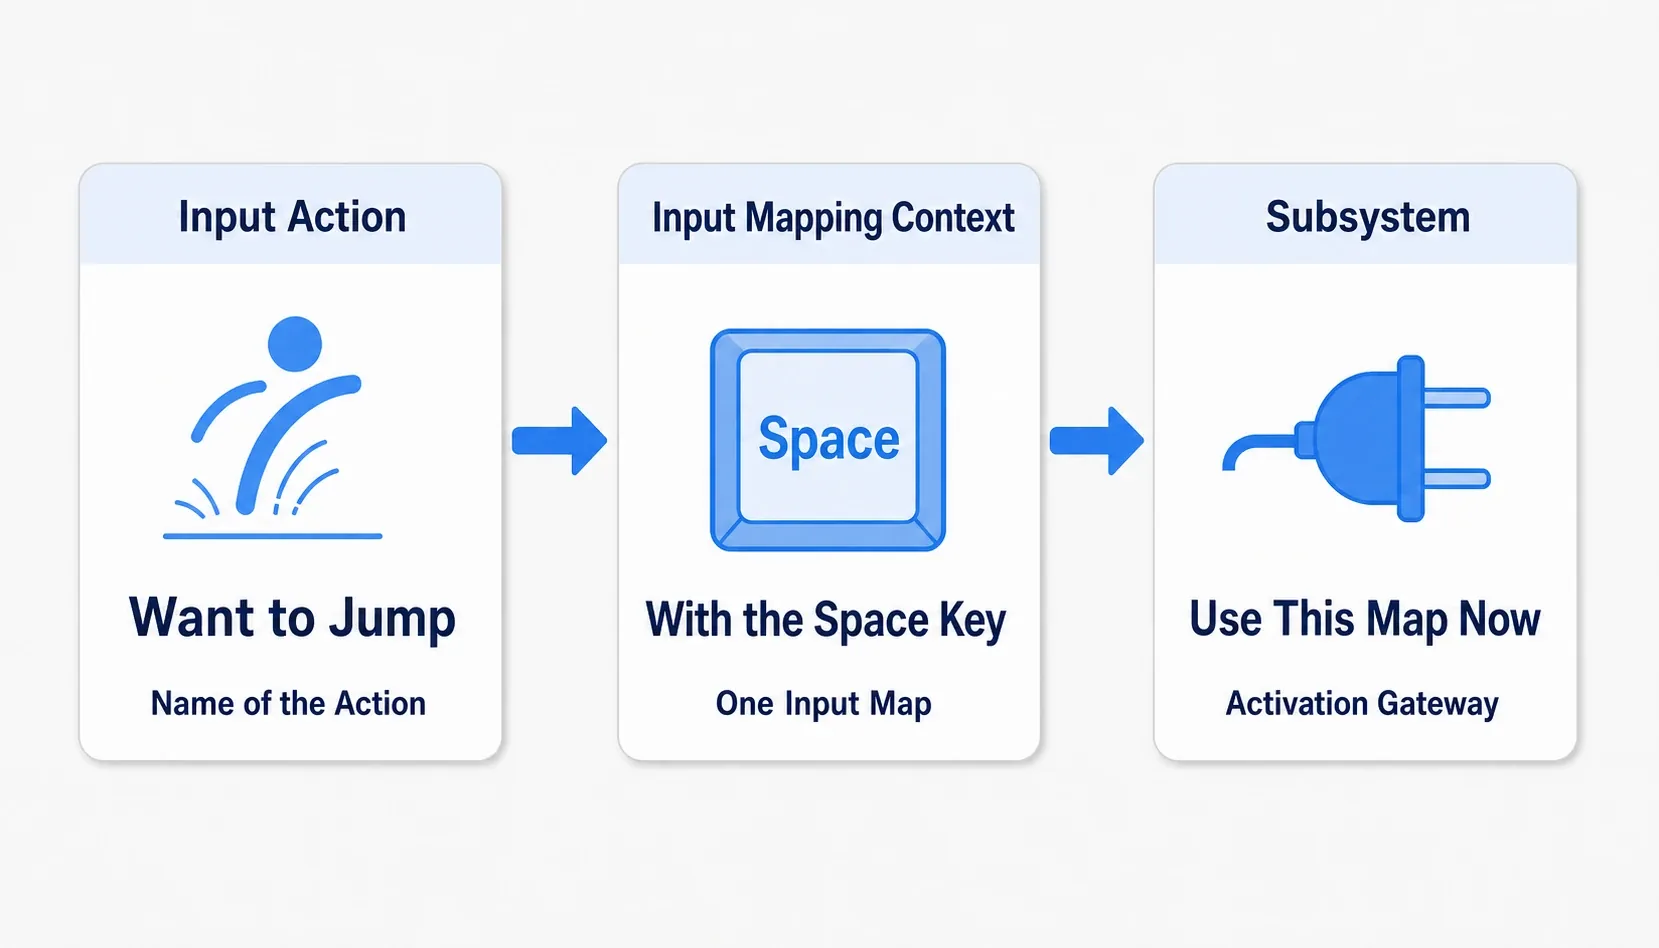
| Part | Responsibility | In a nutshell |
|---|---|---|
| Input Action (IA) | Defines what you want to do: "jump," "move." Holds no key information | A name tag for an intent |
| Input Mapping Context (IMC) | The assignment sheet: "Jump = Space key," "Move = WASD" | One control sheet |
| Triggers / Modifiers | Activation conditions and value processing: "fire on hold," "invert the value" | Annotations on the control sheet |
There's one more piece you touch from Blueprints. The Enhanced Input Local Player Subsystem manages "which control sheet is active right now." Creating an IMC does nothing on its own; it only becomes active once you hand it to this subsystem with Add Mapping Context.
Why bother splitting things up? Because you can swap an entire control sheet at once. Prepare one sheet for walking and another for driving, and getting into a car is just a matter of swapping sheets. You never need code that branches "handle the W key differently in driving mode."
Difference from UE4's input system: In UE4 you wrote all inputs into Project Settings and received events like
InputAction Jumpdirectly in Blueprints. Having everything in one place is convenient, but switching controls based on the situation meant branching all over your code. UE5 swaps the sheet itself.
Building WASD Movement and Jumping
Create a new Third Person template project and all of this is already set up. But building it once yourself shows you exactly where people get stuck, so we'll do it by hand.
Step 1: Create Two Input Actions
In the Content Browser, right-click → Input → Input Action, and create two of them.
| Name | Value Type | Why |
|---|---|---|
IA_Move | Axis2D (Vector2) | To receive forward/back and left/right together |
IA_Jump | Digital (Bool) | Pressed or not pressed is all we need |
Changing the Value Type later breaks existing connections, so decide it up front.
Step 2: Assign Keys in an Input Mapping Context
Right-click → Input → Input Mapping Context, create IMC_PlayerControls, open it, and add mappings with +.
| Input Action | Key | Modifiers |
|---|---|---|
IA_Move | W | Swizzle Input Axis Values (YXZ) |
IA_Move | S | Swizzle Input Axis Values (YXZ) + Negate |
IA_Move | A | Negate |
IA_Move | D | (none) |
IA_Jump | Space Bar | (none) |
This is the first hurdle. Why do W and S need those odd settings? The reason is simple: a keyboard key always outputs 1.0 on the X axis when pressed.
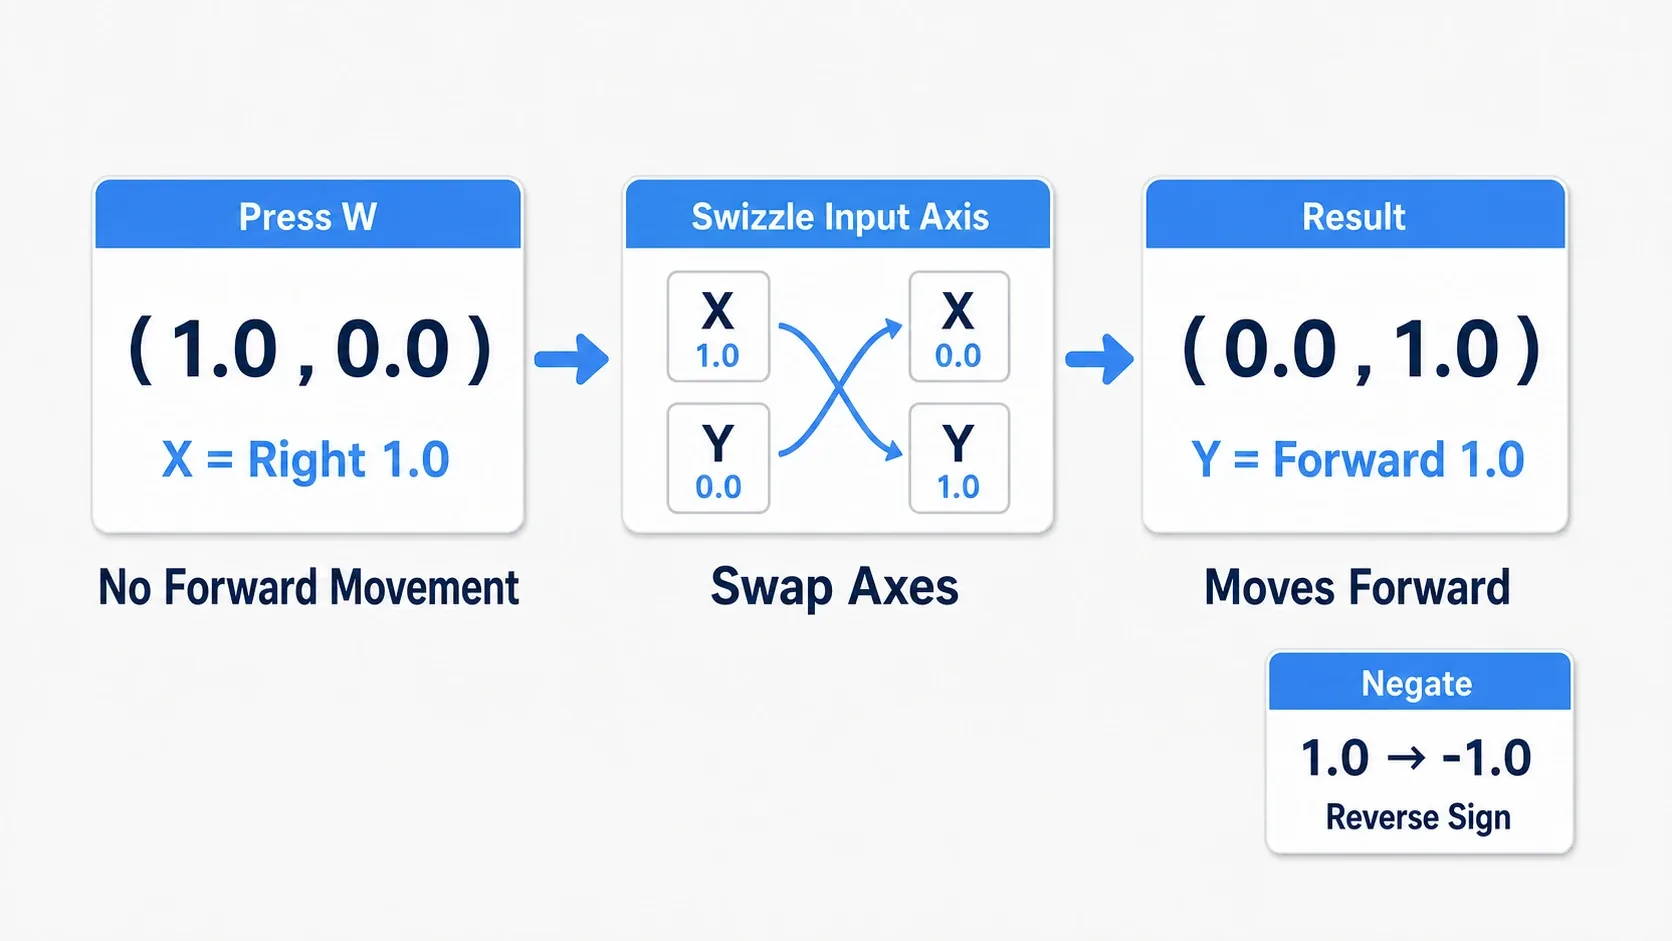
IA_Move expects a Vector2 (X = left/right, Y = forward/back). But pressing W delivers (1.0, 0.0), which means "1.0 to the right." That won't move you forward. Swizzle Input Axis Values (YXZ) swaps the axes to give you (0.0, 1.0), which is "1.0 forward." The S key takes that and flips the sign with Negate to get "1.0 backward." The A key is already on the X axis, so it only needs Negate.
When you get stuck: 90% of "WASD doesn't work" cases come down to these Modifier settings, or forgetting
Add Mapping Contextin the next step.
Step 3: Activate the Control Sheet
In your character Blueprint (BP_ThirdPersonCharacter, for example), hand your control sheet to the subsystem on Event BeginPlay.
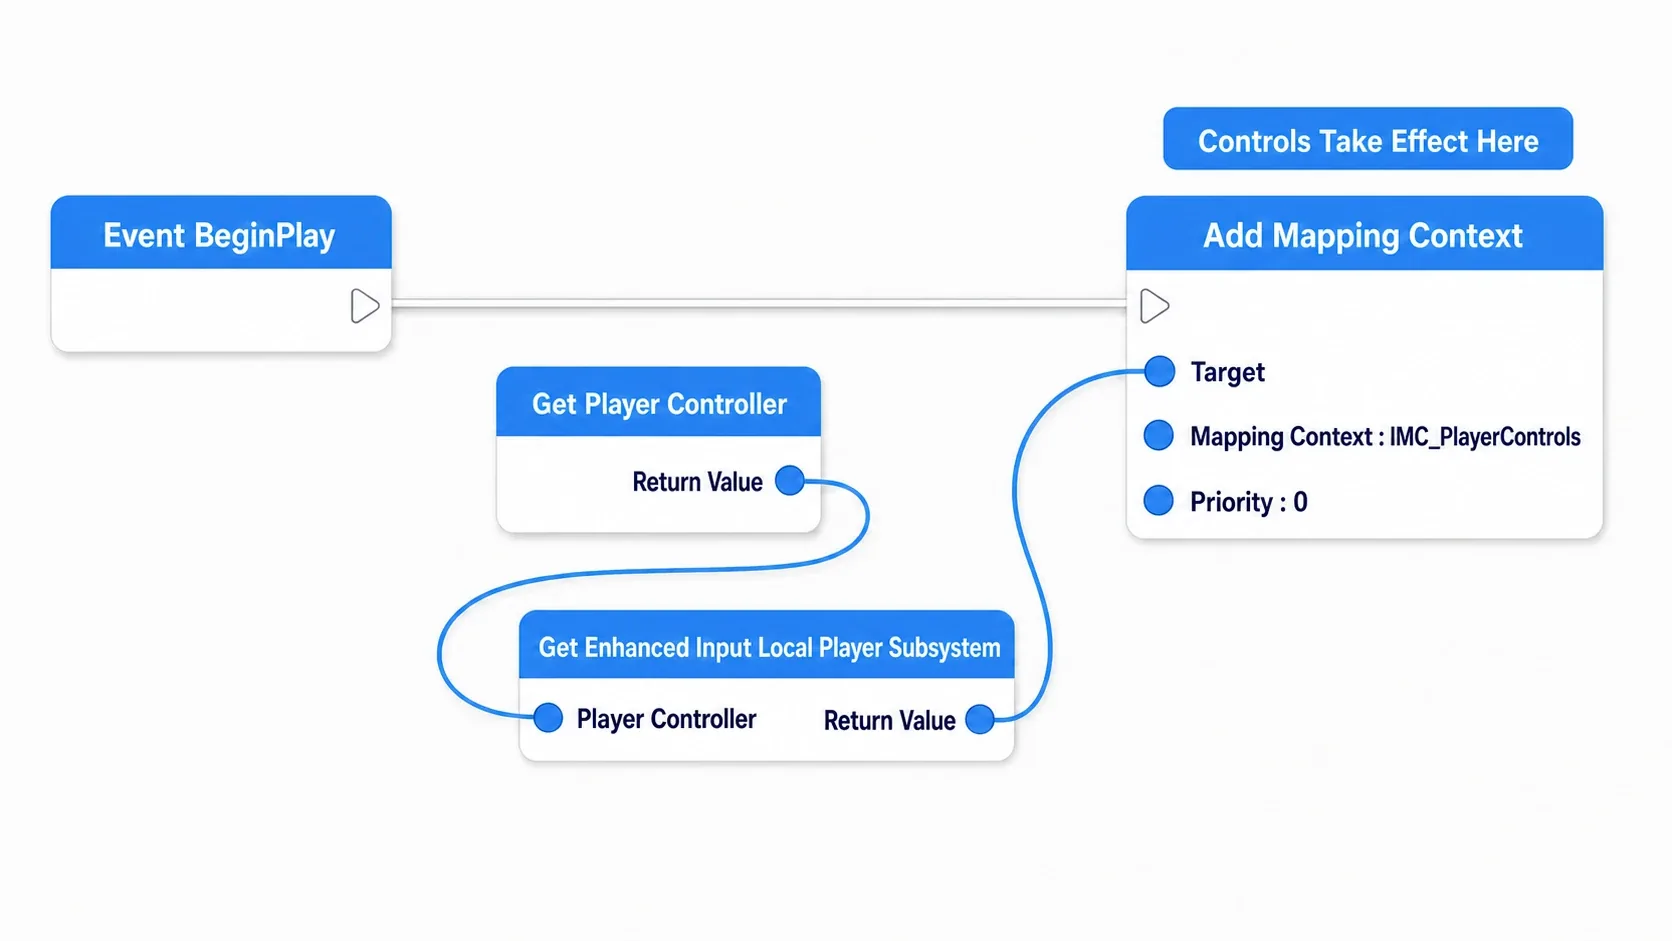
Event BeginPlay
  → Get Player Controller
  → Get Enhanced Input Local Player Subsystem   ← connect the Player Controller
  → Add Mapping Context (Mapping Context: IMC_PlayerControls, Priority: 0)
If you can't find the node: There is no node called "Cast to Enhanced Input Player Controller." Drag off the Player Controller and search for
Get Enhanced Input Local Player Subsystem(usingGet Subsystemwith the class set toEnhancedInputLocalPlayerSubsystemworks the same way).
Step 4: Receive the Events and Move
Right-click in the Event Graph and search for IA_Move, and you'll find Enhanced Input Action IA_Move. That's your input receiver.
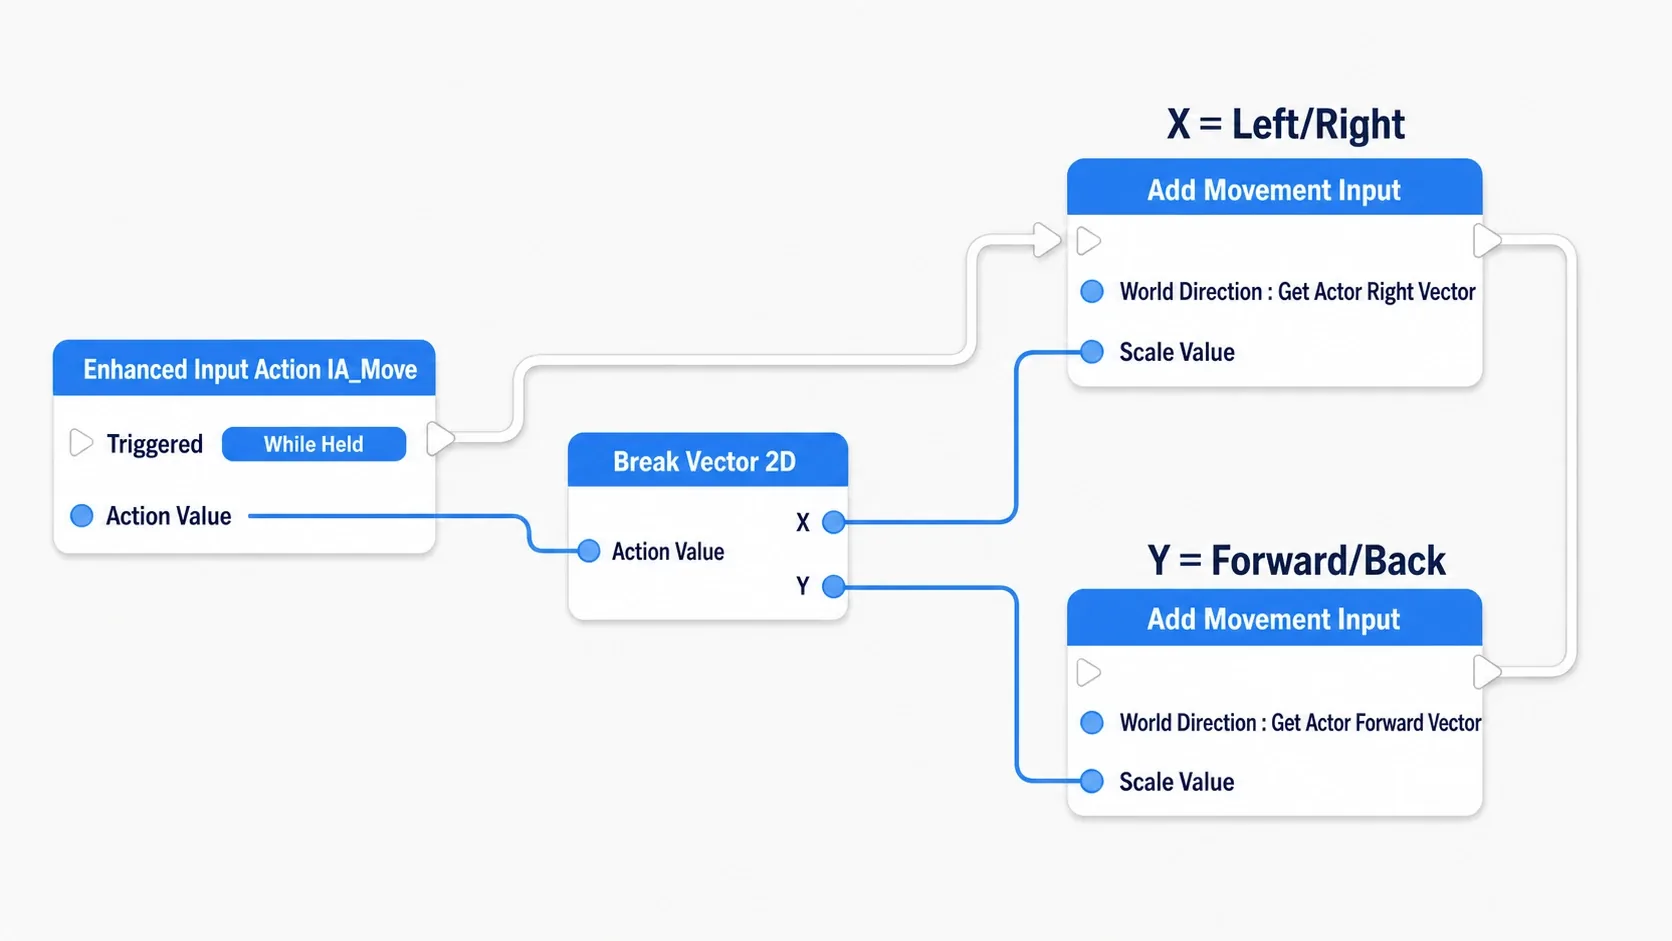
Enhanced Input Action IA_Move
  Triggered
    → Break Vector 2D (Action Value)
    → Add Movement Input (World Direction: Get Actor Forward Vector, Scale Value: Y)
    → Add Movement Input (World Direction: Get Actor Right Vector, Scale Value: X)

Enhanced Input Action IA_Jump
  Started   → Jump
  Completed → Stop Jumping
Hit Play and you can move with WASD and jump with Space. You've probably noticed that the event has four output pins. Three of them see regular use.
| Pin | When it fires | What it's for |
|---|---|---|
| Started | Once, the moment it's pressed | Jumping, single attacks |
| Triggered | Every frame while the condition holds | Movement, camera look |
| Completed | When the input ends | Stopping a jump, releasing a charge |
Wire movement to Started and you'll only move for an instant; wire jumping to Triggered and it'll try to jump the entire time you hold the key. Remember it as continuous actions use Triggered, one-shot actions use Started.
Triggers and Modifiers: Changing Behavior Without Adding Nodes
This is the best part of Enhanced Input. Adjustments like "fire on a long press" or "ignore stick drift" are handled entirely in IMC settings, without adding a single node to your Blueprint.
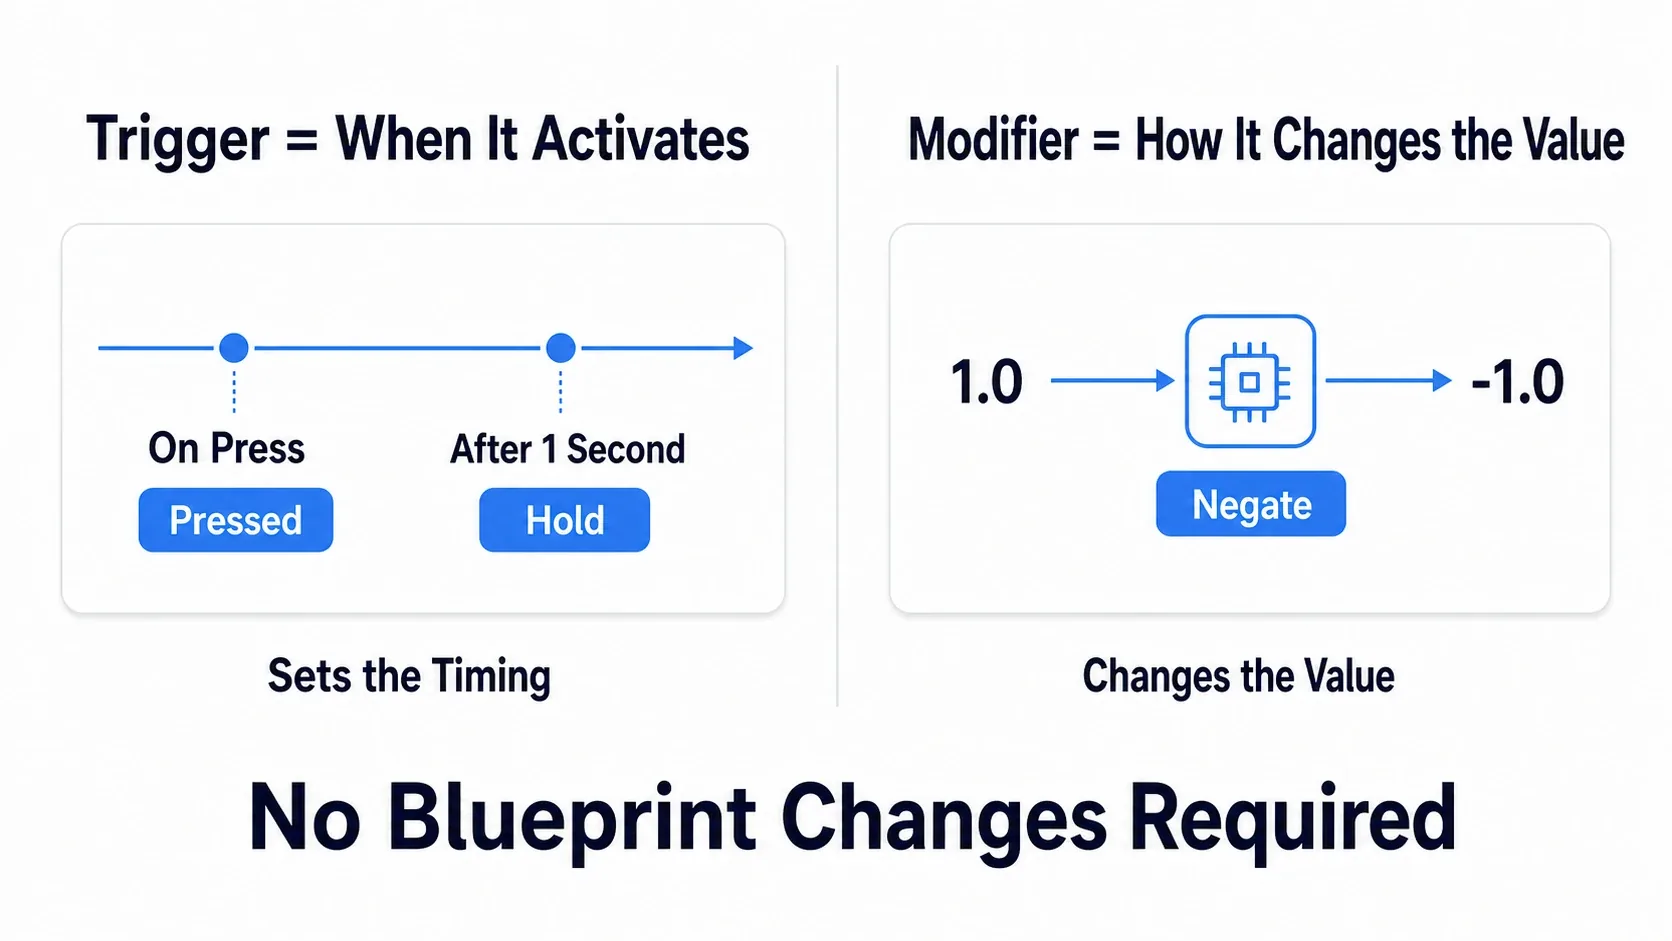
Triggers (when it fires)
| Trigger | Behavior | What it's for |
|---|---|---|
| Pressed | The moment it's pressed | Normal attacks, jumping |
| Hold | After being held for a set duration | Charge attacks, hold-to-open menus |
| Tap | Pressed and released quickly | Dodge steps, quick swaps |
| Chord Action | While another IA is held at the same time | L1+R1 commands |
Modifiers (how the value is processed)
| Modifier | Behavior | What it's for |
|---|---|---|
| Dead Zone | Discards inputs below a threshold | Gamepad sticks |
| Negate | Flips the sign | Moving backward, inverted Y look |
| Swizzle Input Axis Values | Swaps axes | Keyboard WASD |
| Scalar | Multiplies the value by a constant | Look sensitivity |
Gamepad-specific tuning such as stick drift (Dead Zone) and analog trigger depth is covered in Gamepad support.
Take "hold E to open a door." With the old system you had to record the press time and measure elapsed time every frame. With Enhanced Input you add a Hold Trigger to the IA_Interact mapping and set Duration to 1.0 seconds. Your Blueprint just listens for Triggered.
Hands-On: Swapping the Whole Control Scheme on Entering a Vehicle
Enhanced Input really earns its keep in games with multiple control schemes. Walking and driving in an open world, hip-fire and sniper scope in a shooter, exploration and first-person camera in a horror game. All of these want the same key to mean different things.
Here we'll build getting in and out of a car. Press F to get in, WASD becomes driving while you're in the vehicle, and F gets you back out on foot. No branching required.
Setup: In addition to the on-foot assets, prepare the driving ones.
| Type | Name | Settings |
|---|---|---|
| Input Mapping Context | IMC_Driving | Control sheet for driving |
| Input Action | IA_Accelerate | Axis1D (Float). W = as-is, S = Negate |
| Input Action | IA_Steer | Axis1D (Float). D = as-is, A = Negate |
| Input Action | IA_ToggleVehicle | Digital (Bool). F key. Register it in both IMCs |
| Variable (character) | bIsDriving (Boolean) | Default false. Tracks the state |
The key detail is that only IA_ToggleVehicle goes into both control sheets. Whether you're in the car or not, F needs to keep working.
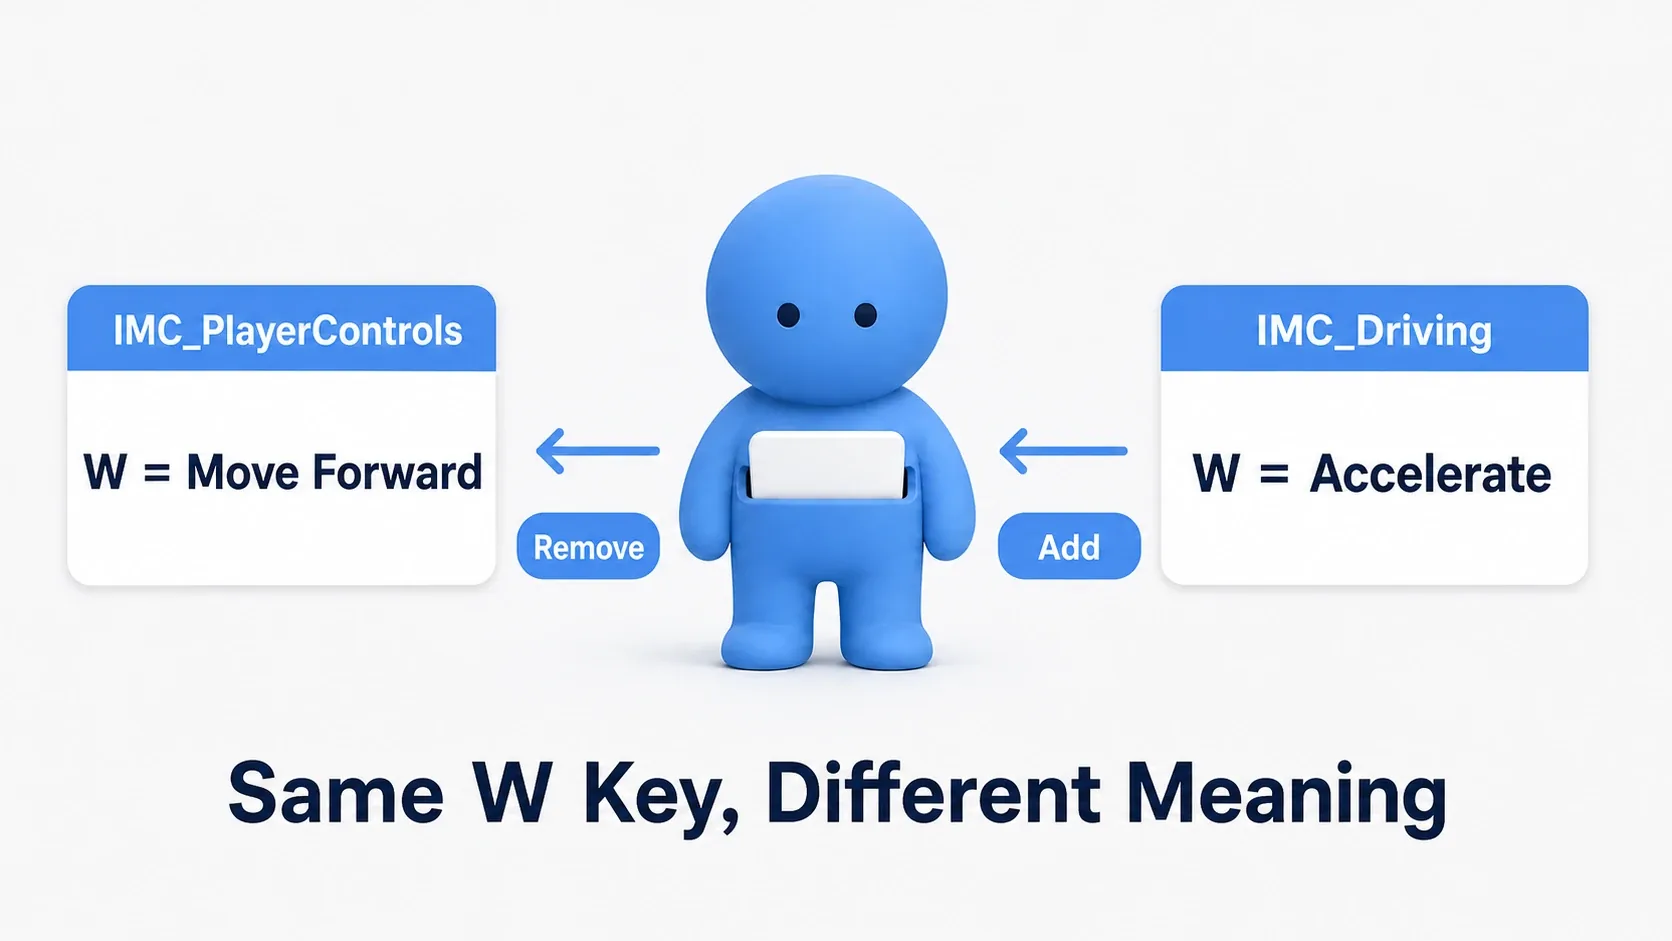
Here's the graph.
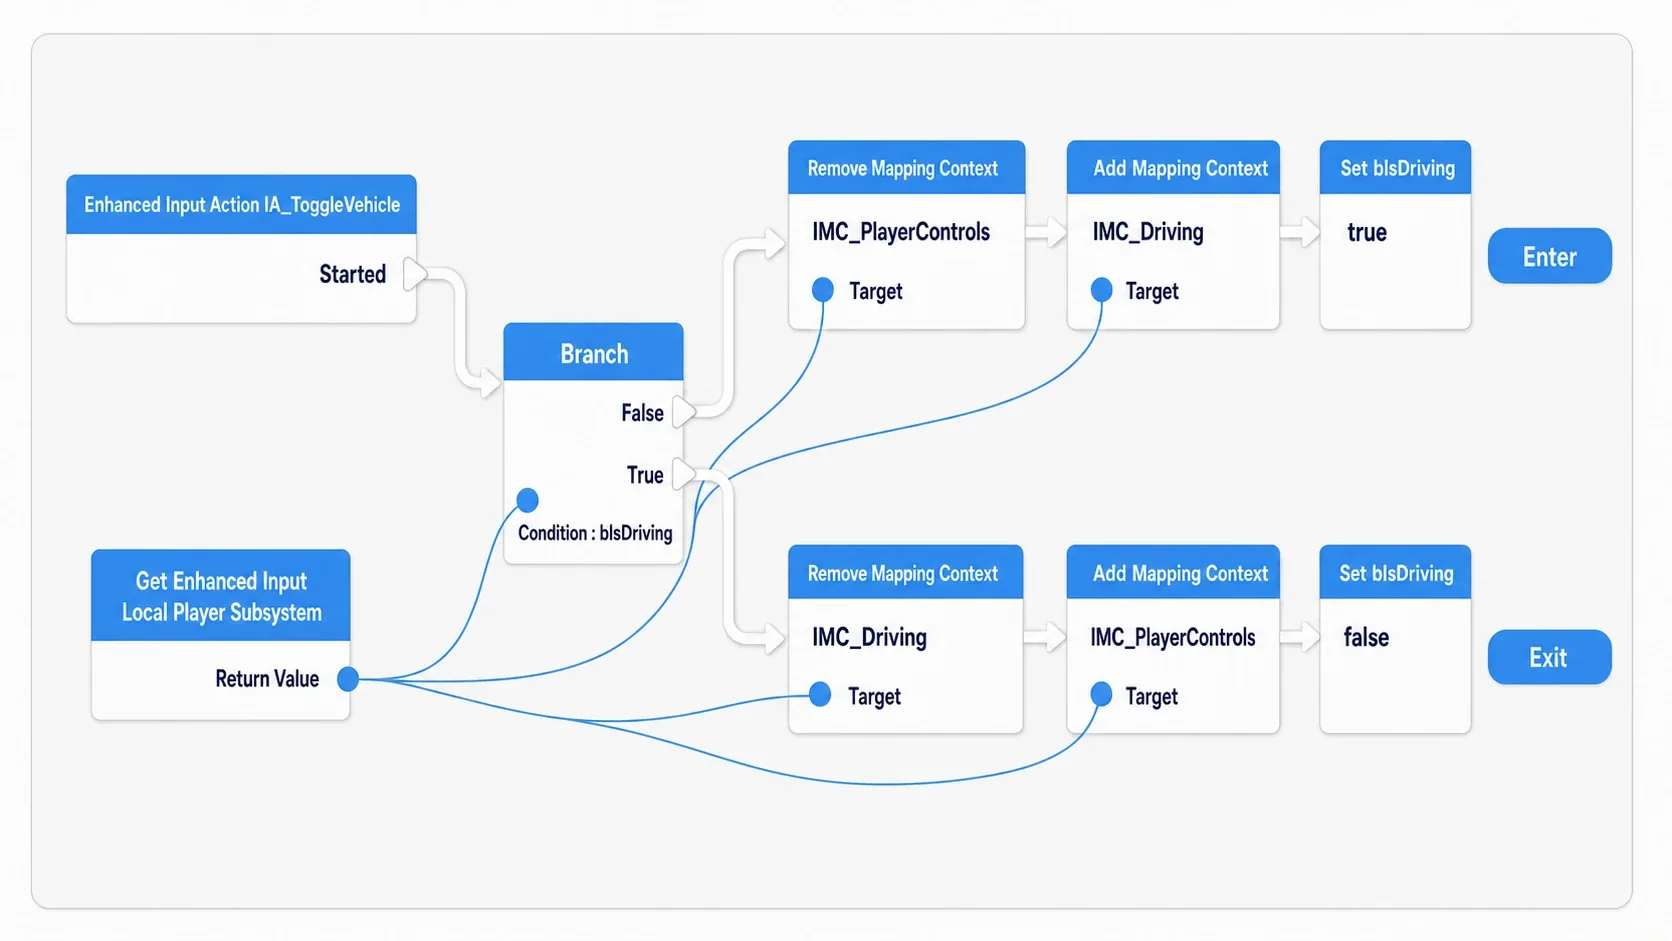
Enhanced Input Action IA_ToggleVehicle
  Started
    → Get Player Controller → Get Enhanced Input Local Player Subsystem
    → Branch (Condition: bIsDriving)
        False (= on foot now, get in)
          → Remove Mapping Context (IMC_PlayerControls)
          → Add Mapping Context (IMC_Driving, Priority: 0)
          → Set bIsDriving (true)
        True (= driving now, get out)
          → Remove Mapping Context (IMC_Driving)
          → Add Mapping Context (IMC_PlayerControls, Priority: 0)
          → Set bIsDriving (false)
The swap isn't visible on its own. To confirm the driving action is actually receiving input, hook one debug log onto IA_Accelerate.
Enhanced Input Action IA_Accelerate
  Triggered
    → Print String (In String: Append("Accel: ", Action Value))
Now, after you enter driving mode and press W, Accel: and a number stream across the screen. In walking mode this action has no key bound, so pressing W prints nothing.
Hit Play and try the keys. Before you press F, WASD walks; after you press it, your character stops (IA_Move no longer fires) and W instead streams the Accel: value; press F again and you can walk once more. That's success.
- Nothing changes when you press F →
IA_ToggleVehicleis only registered in one of the IMCs - After pressing F, W prints no
Accel:→IA_Accelerateisn't registered inIMC_Driving, orAdd Mapping Contextdidn't run - Walking and driving both respond →
Remove Mapping Contextis missing
Two things to take away.
- Your character never needs an "am I driving?" branch: The moment the IMC is removed,
IA_Moveevents stop firing. Your movement code stays untouched - The same mechanism gives you key rebinding: When you want to let players change key assignments, you only rewrite the contents of the IMC. Your Blueprint logic is untouched (→ building key rebinding)
When you want multiple control sheets active at once, such as opening a menu while driving, use Priority. The IMC with the higher number wins when the same key is contested.
Bonus: Good to Know for Later
The Enhanced Input plugin is enabled by default, but check anyway. Search for "Enhanced Input" under Edit → Plugins and confirm it's checked. That saves you from wasting time on "the nodes don't show up."
When you're not sure whether input is arriving, add one log line. Hook a Print String to IA_Move's Triggered and connect Action Value. If numbers stream by, your IMC is applied and the problem is in your movement code. If nothing appears, the issue is Add Mapping Context or your Modifiers (→ Checking values with Print String).
Name your IAs after verbs and you'll never get confused. Name them for what you want to do: IA_Jump, IA_Interact, IA_Reload. If you put a key name in there like IA_SpaceKey, the name becomes a lie the moment you change the binding, and the whole point of the separation is lost.
What this looks like in C++. Blueprints are enough for most solo development, but you may need to integrate this into an existing C++ project. In that case, cast to UEnhancedInputComponent inside SetupPlayerInputComponent and bind an IA to a function with something like BindAction(MoveAction, ETriggerEvent::Triggered, this, &AMyCharacter::Move). The concept is identical to Blueprints; you're registering a function instead of wiring an event's output pin.
Summary
Enhanced Input added more parts, but in exchange it lets you treat control schemes as sheets.
| What you want to do | Where you do it |
|---|---|
| Change key assignments | IMC (Blueprint unchanged) |
| Make it a hold or a tap | Trigger in the IMC (Blueprint unchanged) |
| Negate, dead zone | Modifier in the IMC (Blueprint unchanged) |
| Swap the entire control scheme | Two nodes: Remove / Add Mapping Context |
| Change what happens on press | Blueprint event |
As the table shows, most input changes never require touching a Blueprint. The initial setup takes more steps, but every change after that is far lighter.
How many "control sheets" does your game need?