You talk to an NPC and a long line of dialogue dumps onto the screen all at once. You want that effect where text flows in one character at a time, but you don't know how to build it. You want choices, but it seems like you'd have to line up a pile of buttons and wire each one by hand.
A dialogue system is very manageable once you combine Data Tables with UMG. This article covers where to store your lines, how to build typewriter text, the two-stage advance input, and how to branch a conversation with choices.
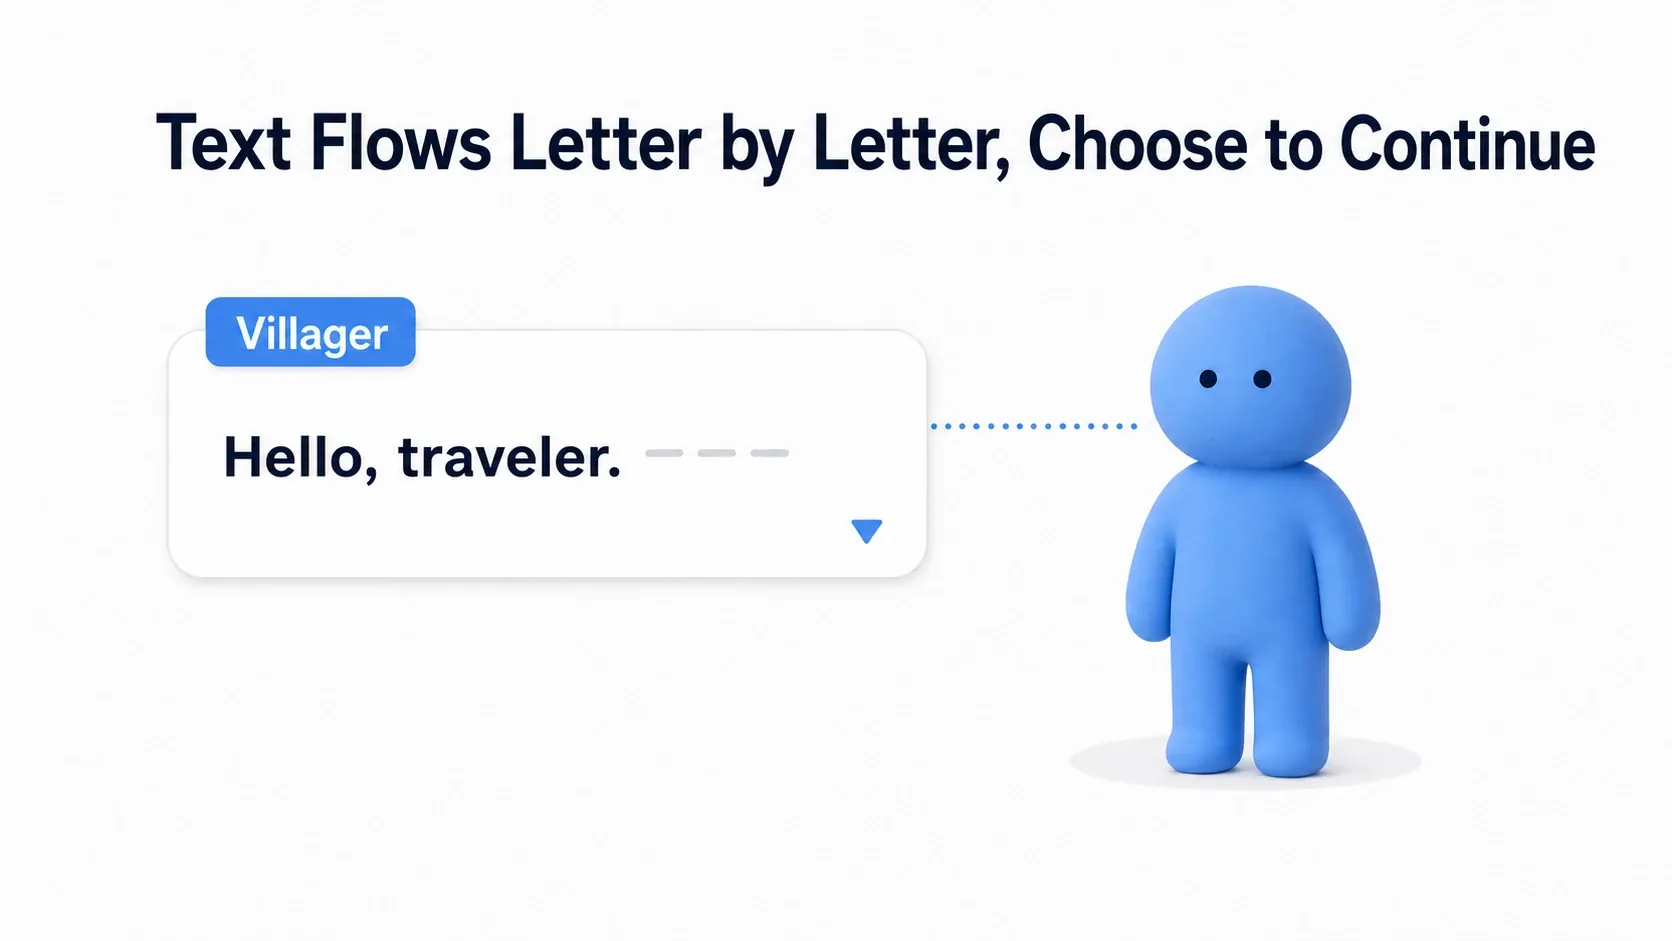
What You'll Learn
- Store lines in a Data Table with one row per line
- Typewriter text means holding the full string and increasing the visible count with a Timer
- Advancing is two-stage (mid-reveal shows the full line, already-revealed moves on)
- Choices are buttons generated on the fly , and the chosen one changes the next row
- Set Input Mode UI Only stops movement during conversation
- Hands-on: talk to an NPC, start a conversation, and branch with choices
Where to Store Your Lines
The first decision is where you write your lines . Write them straight into the widget and you'll be opening and compiling that widget every time you add a single line. Dialogue grows to dozens or hundreds of lines, so this belongs outside.
A Data Table is the right fit. Make one row equal one line , with columns for the speaker, the body text, and the next row.
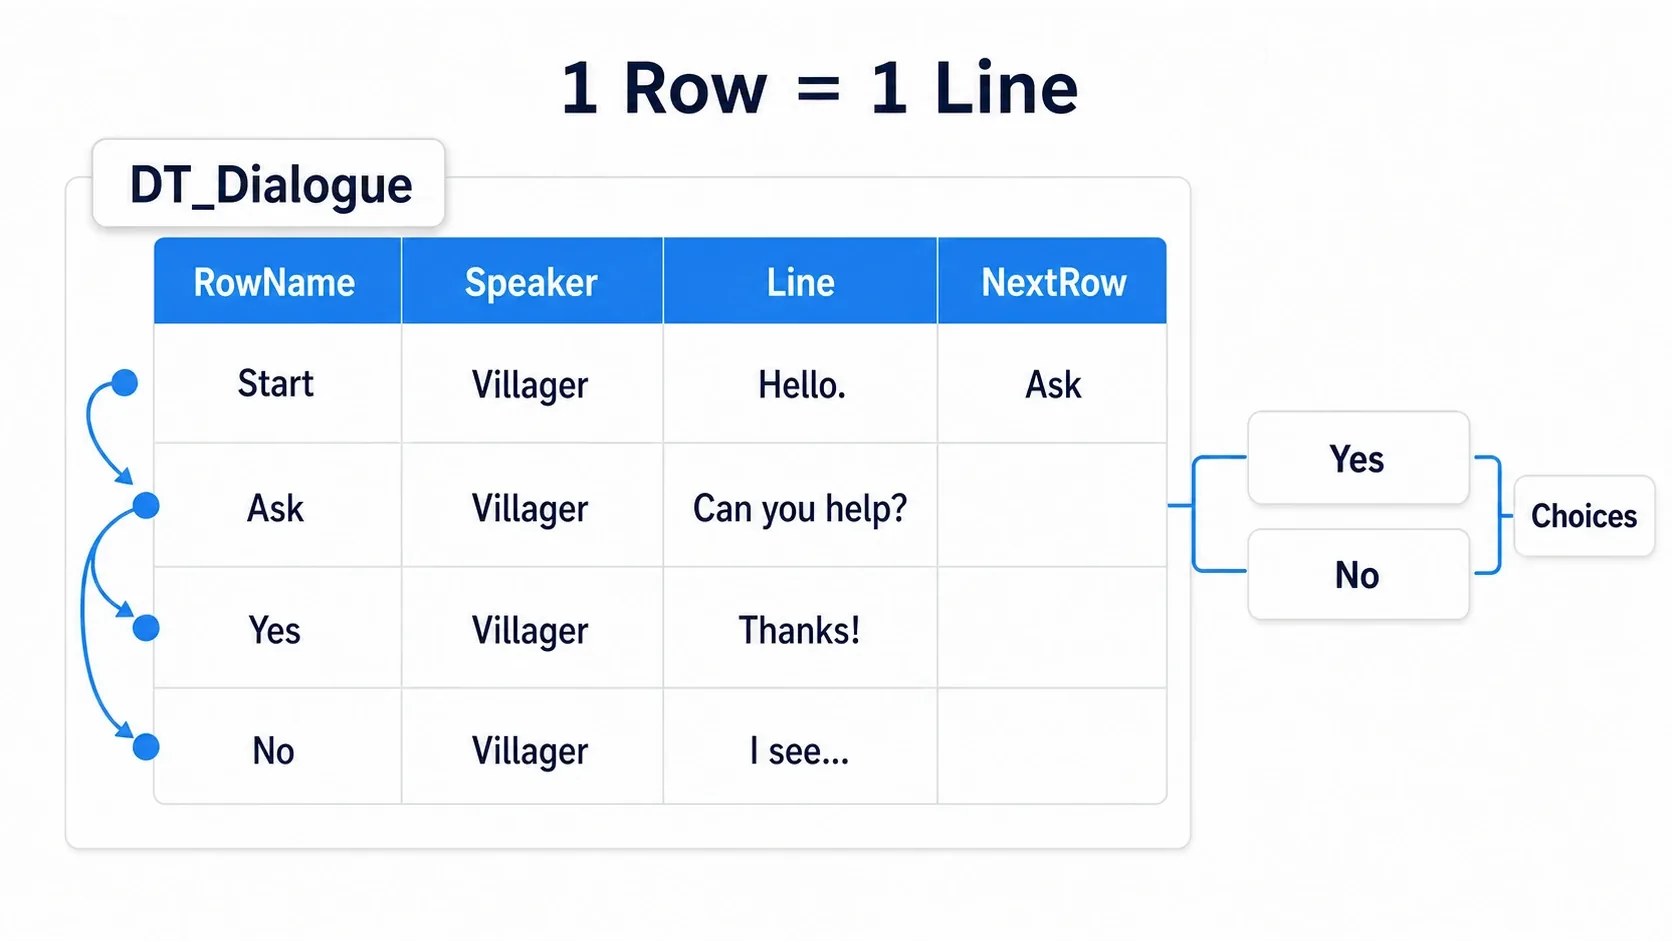
First, create a struct called S_DialogueLine that defines a row's shape (creating structs is covered in the struct article).
| Variable | Type | Contents |
|---|---|---|
Speaker | Text | The name of who's talking |
Line | Text | The line itself |
NextRow | Name | The row to advance to. Leave it empty at the end of a conversation |
Choices | S_DialogueChoice ( array ) | Choices. Empty if there aren't any |
A single choice gets its own small struct, S_DialogueChoice.
| Variable | Type | Contents |
|---|---|---|
ChoiceText | Text | The text on the button ("Yes" and so on) |
TargetRow | Name | The row to jump to when this is chosen |
Now a conversation is expressible as movement from row to row . Ordinary lines point at the next row via NextRow, and only the rows that fork fill in Choices.
It matters that the body text and speaker name are held as Text rather than String . Text is what localization operates on, so translations can be dropped in later. String isn't part of that system (see Localizing your game).
Note: Nested arrays like
Choicescan't round-trip through CSV. You can bulk-edit speakers and body text in CSV, but choices have to be edited directly in the Data Table asset. Treating it as "bulk-import normal lines from CSV, add branches in the editor" is the practical compromise.
If your lines amount to a sign or a hint with only a few sentences, skip the Data Table and just pass Text straight to the widget. Let the volume of dialogue decide how heavy the machinery should be.
Anatomy of the Dialogue Widget
Now the visual container. Create one Widget Blueprint called WBP_Dialogue and lay out the parts you need.
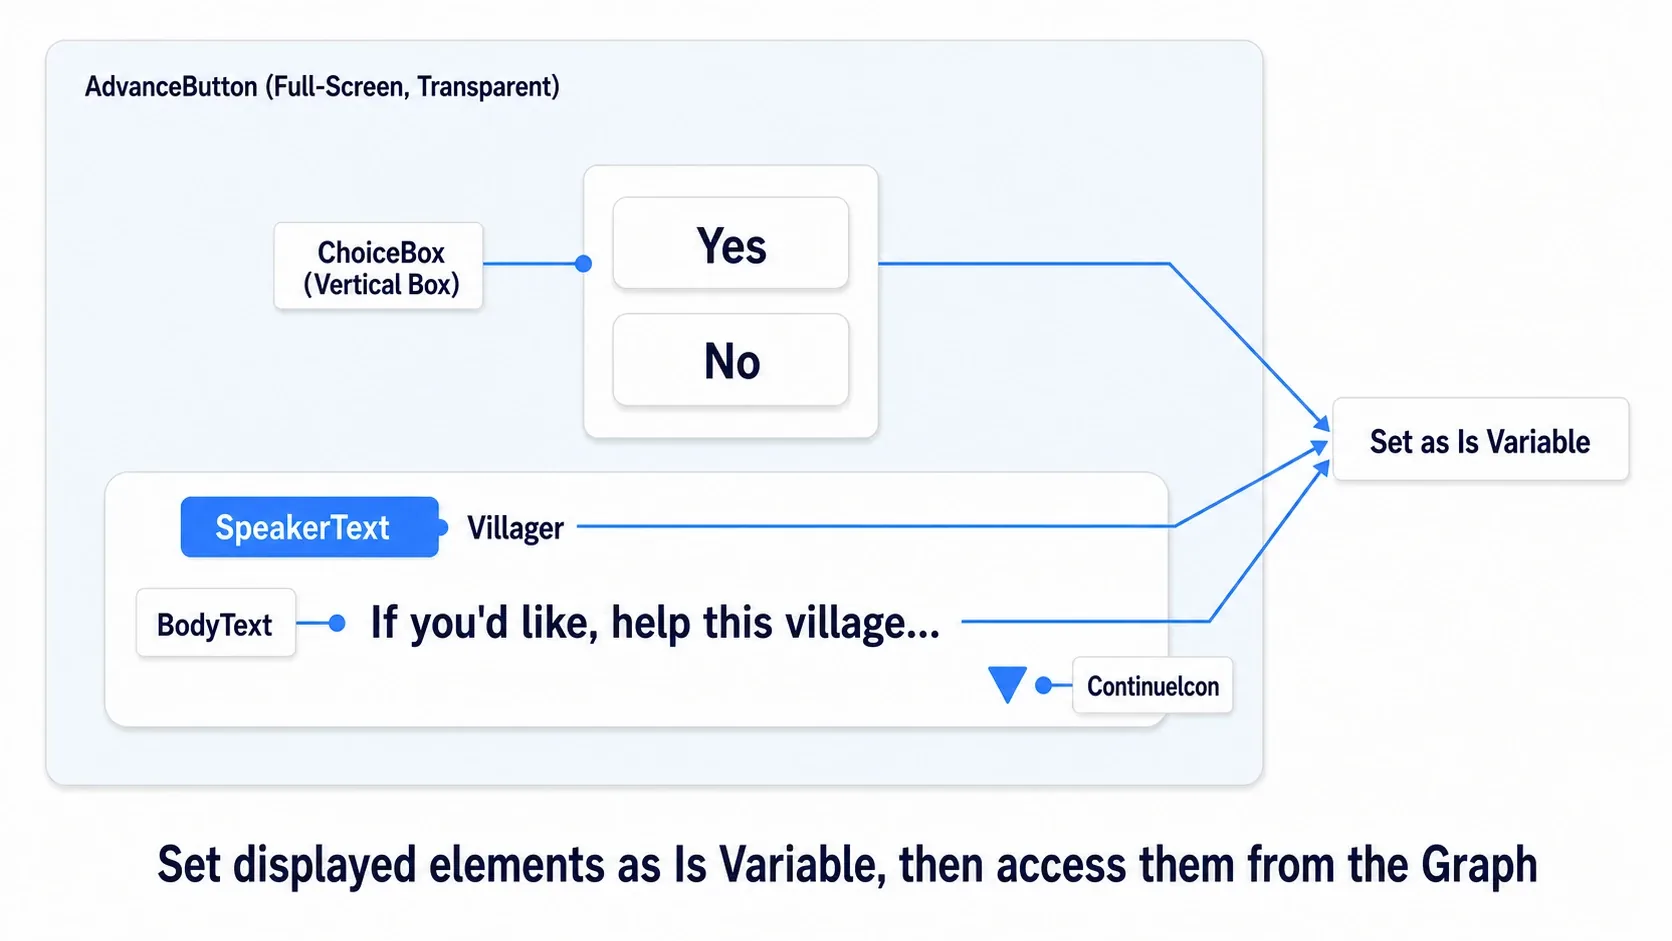
Five parts go in. Check Is Variable in the Details panel for anything you'll display through , so you can reach it from the Graph.
| Part | Type | Role |
|---|---|---|
SpeakerText | Text Block | The speaker's name, shown small above |
BodyText | Text Block | The line itself. Turn on Auto Wrap Text |
ContinueIcon | Text Block ("▼") | The advance cue, shown once the reveal finishes |
ChoiceBox | Vertical Box | Where choice buttons get stacked |
AdvanceButton | Button | A transparent button covering the whole screen, so clicking anywhere advances |
Always turn on Auto Wrap Text on BodyText. UMG's Text Block doesn't wrap by default, so long lines run off the screen.
AdvanceButton is the trick behind "clicking anywhere on screen advances." Place it on the Canvas Panel, stretch its anchors to fill the screen, and set Background Color's alpha to 0 so it's invisible. The key is the stacking order in the Hierarchy: put ChoiceBox below AdvanceButton. UMG draws later items in front, so the choice buttons end up in front of the advance button and receive clicks first.
Choice buttons get created one at a time on the spot. Preparing a dedicated WBP_ChoiceButton gives them all the same look. Its contents:
| Element | Contents |
|---|---|
Button + Text Block | The visuals |
Variable TargetRow (Name) | The row to jump to when this button is pressed |
Event Dispatcher OnChosen (Name output) | The broadcast that tells the parent it was pressed |
WBP_ChoiceButton does nothing but fire OnChosen (carrying TargetRow) from its inner Button's On Clicked. The button itself doesn't know who's listening. This broadcast mechanism is covered in the Event Dispatcher article.
Typewriter Text: Increase the Visible Count
Now for the main event. Revealing text one character at a time is easiest to build not by appending characters one at a time , but by holding the full string and increasing how many characters you show .
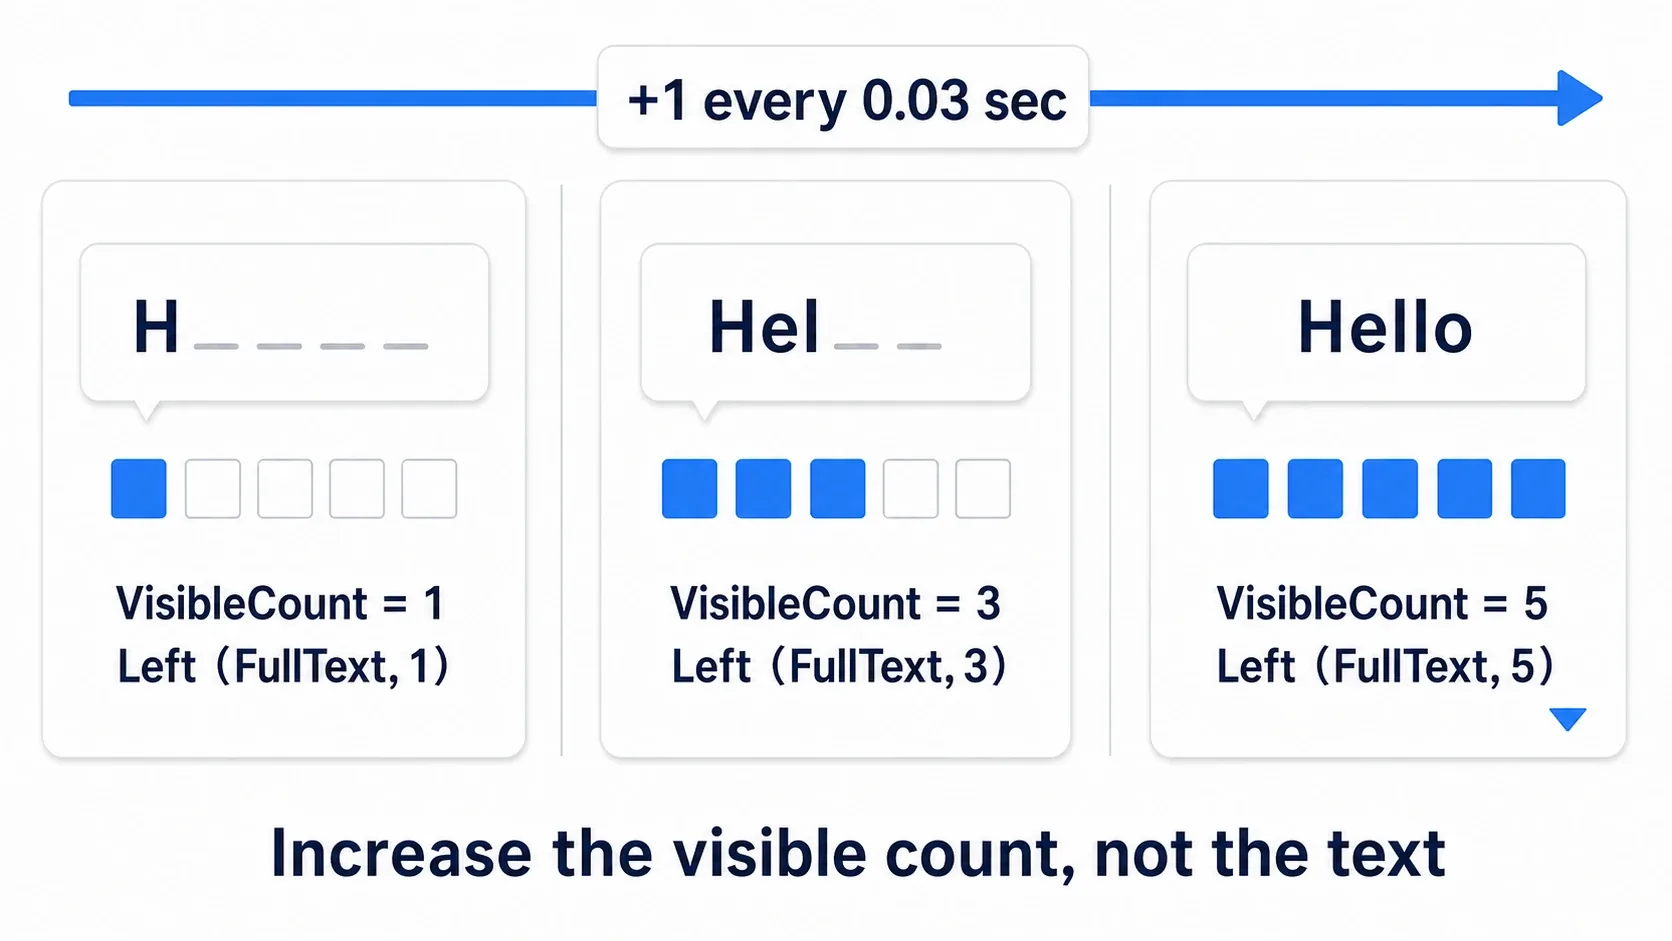
Add the variables you need for display to WBP_Dialogue.
| Variable | Type | Default | Role |
|---|---|---|---|
CurrentLine | S_DialogueLine | — | The current row's contents (its NextRow and choices are referenced later) |
FullString | String | (empty) | The full text of the current line |
VisibleCount | Integer | 0 | How many characters are shown so far |
CharInterval | Float | 0.03 | Seconds per character |
TypeTimer | Timer Handle | — | The handle for the looping timer |
IsTyping | Boolean | false | Whether characters are currently being revealed |
Holding a single CurrentLine is the key. Advancing and building choices both ask "what's the current row's NextRow?" and "are there choices?" repeatedly, so remember its contents each time you display a row.
You can't slice a Text value directly, so convert to String once when displaying a line (To String (Text)). Do the slicing in String, and convert back to Text when displaying.
The ShowLine function that displays a row goes like this.
Function: ShowLine (Input: RowName / Name)

  → Get Data Table Row (Data Table: DT_Dialogue, Row Name: RowName)
  → Branch (Condition: Found Row)
      False → Print String ("Row not found: " + RowName) → Return  ← ★always include this
      True ↓
  → Set CurrentLine (= Out Row)    ← "the current row" below reads from this
  → Break S_DialogueLine (Out Row)
  → Set Text (Target: SpeakerText, In Text: Speaker)
  → Set FullString (= To String (Line))
  → Set VisibleCount = 0
  → Set Visibility (Target: ContinueIcon, New Visibility: Hidden)
  → Clear Children (Target: ChoiceBox)
  → Set IsTyping = true
  → Set Timer by Event (Time: CharInterval, Looping: ✔, Event: RevealNextChar)
        → Set TypeTimer (store the returned Timer Handle)
Get Data Table Row doesn't error when the row isn't found . It just returns an empty struct in Out Row. Always branch on Found Row (this pitfall is covered in detail in the Data Table article).
Use Set Timer by Event for the timer. Drag off the red Event pin to create a custom event called RevealNextChar, and check Looping. We pick Set Timer by Event over Set Timer by Function Name because it doesn't require naming a function as a string, so renaming won't break it.
RevealNextChar extends the reveal by one character each time it's called.
Custom Event: RevealNextChar

  → Set VisibleCount = VisibleCount + 1
  → Set Text (Target: BodyText,
              In Text: To Text (Left (FullString, VisibleCount)))
  → Branch (Condition: VisibleCount >= Len (FullString))
      True → FinishTyping
Left (string, count) is the node that returns that many characters from the start . A VisibleCount of 1 gives you the first character, 2 gives you the first two. Increase it by one every 0.03 seconds and characters appear from left to right. If the count exceeds the full length, Left just returns the whole string, so there's no overflow to worry about.
Len (string) returns the character count. Once VisibleCount reaches it, call FinishTyping to stop the timer.
Function: FinishTyping

  → Clear and Invalidate Timer by Handle (Handle: TypeTimer)
  → Set IsTyping = false
  → Set Text (Target: BodyText, In Text: CurrentLine's Line, still as Text)  ← guarantee the full line is shown
  → (If there are choices, build them; otherwise set ContinueIcon to Visible)
Setting the body text once more as Text at the end is there to guarantee the full line ends up displayed . That gets you lines flowing in one character at a time with a "▼" lighting up when they finish.
Make Advancing Two-Stage
Give the advance input (a click or a confirm key) two meanings . The same input does different things depending on whether characters are still being revealed or the line is already fully shown.
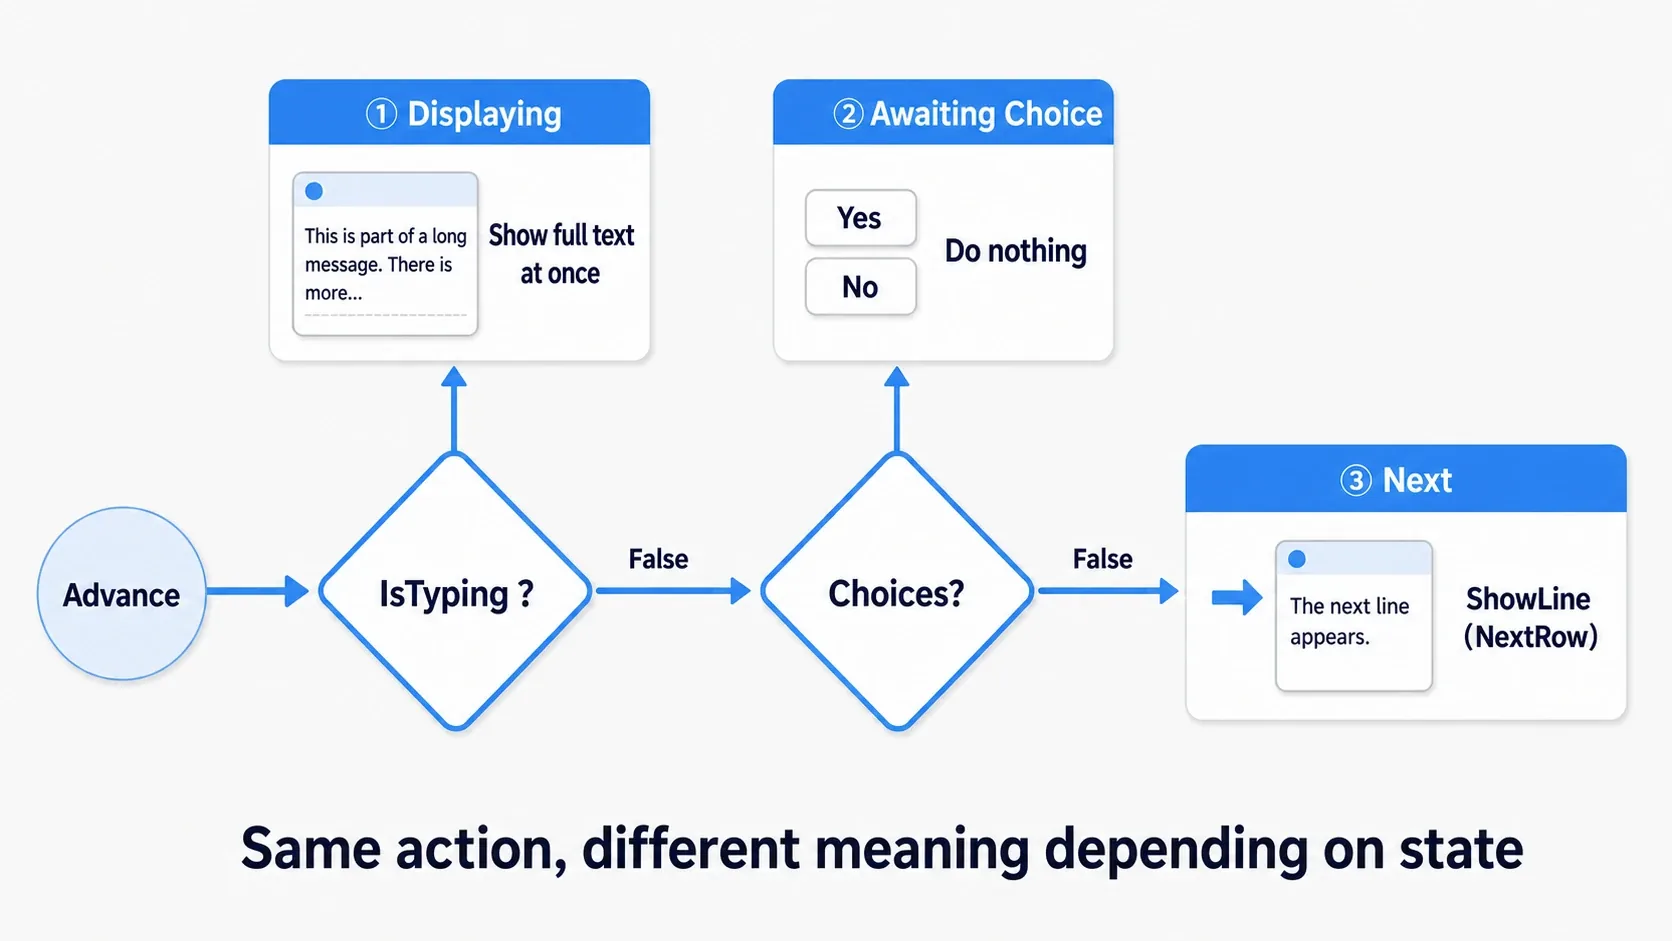
| Current State | Pressing Advance |
|---|---|
| Characters are still revealing | Stop early and show the full line at once |
| Fully revealed (no choices) | Move to the next row |
| Fully revealed (choices present) | Do nothing (wait for a choice) |
Handle this in AdvanceButton's On Clicked.
AdvanceButton On Clicked

  → Branch (Condition: IsTyping)
      True → FinishTyping                       ← mid-reveal, jump to full display

      False → Branch (Condition: is CurrentLine.Choices non-empty?)
                True  → (do nothing; wait for a choice)
                False → Branch (Condition: is NextRow empty?)
                          True  → EndDialogue    ← end of the conversation
                          False → ShowLine (NextRow)
This two-stage behavior is what determines how text advancing feels. Impatient players get the full line on the first click and move on with the second. Players who want to read slowly wait for the reveal to finish and press once. Neither way of pressing breaks anything , and that's the goal of this shape.
EndDialogue, called when NextRow is empty, tears down the UI and restores control. Its contents come up in "Stop Movement During Conversation" below.
Branching with Choices
For choices, create one button on the spot for each entry in that row's Choices . Fixed buttons placed in advance mean reusing the same slots whether a scene has two choices or three, which can't adapt to the count.
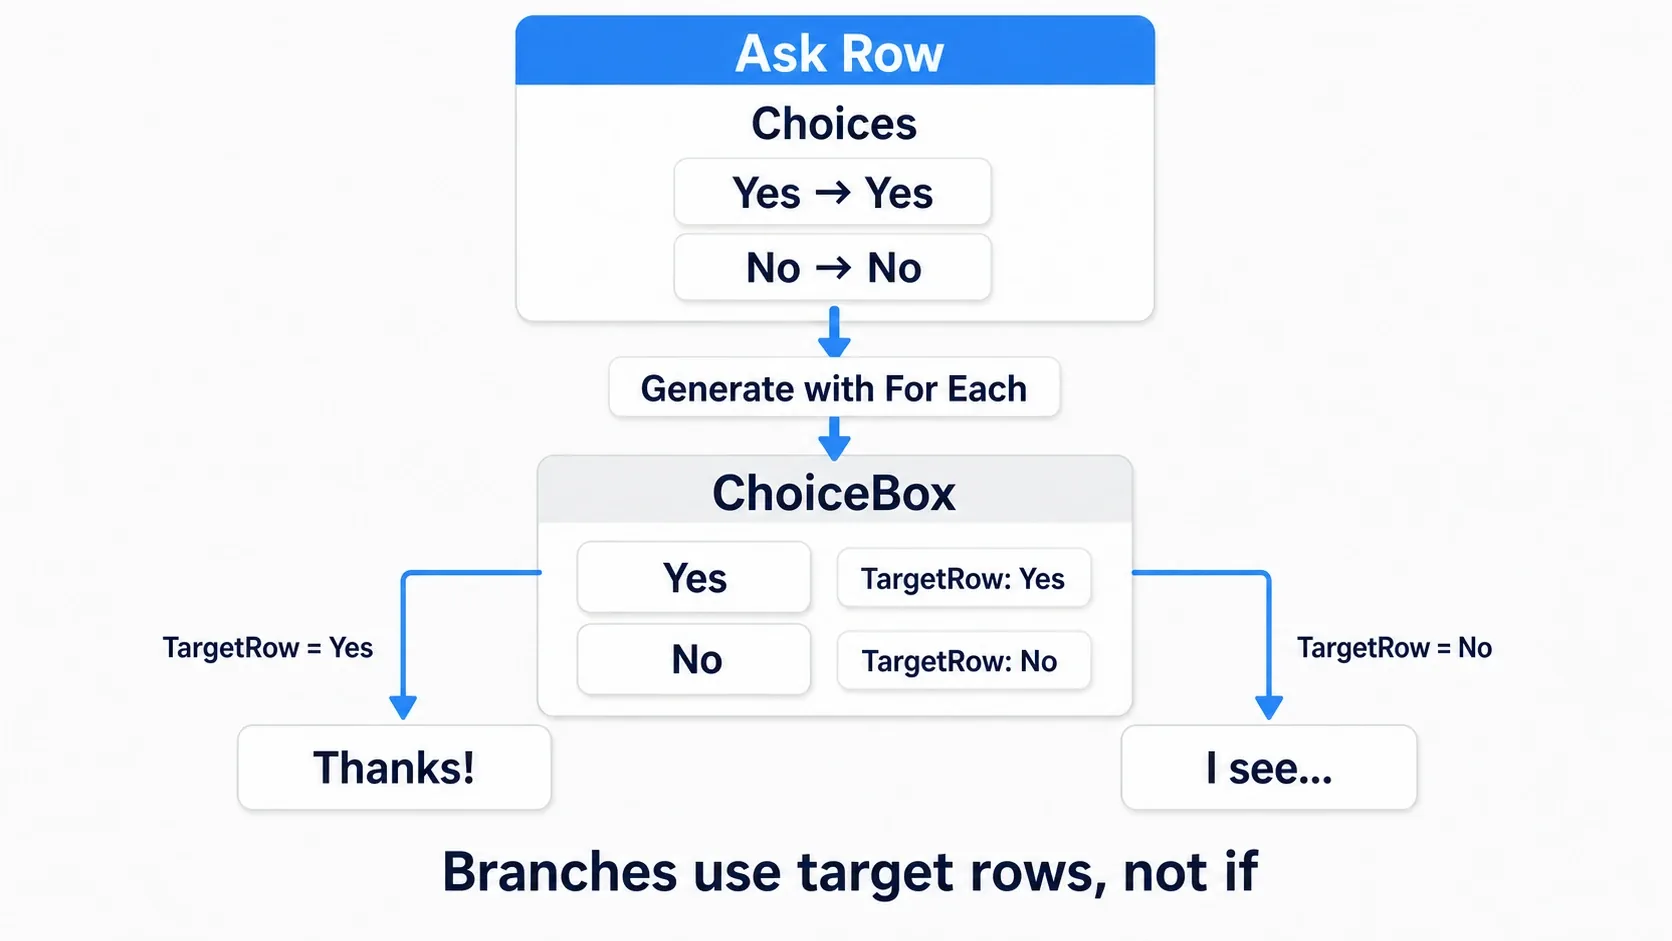
At the end of FinishTyping, call BuildChoices if CurrentLine has choices.
Function: BuildChoices (Input: Choices / array of S_DialogueChoice)

  → Clear Children (Target: ChoiceBox)        ← remove the previous choices
  → For Each Loop (Array: Choices)
      Loop Body →
        Create Widget (Class: WBP_ChoiceButton)
          → Set Choice Text (Array Element's ChoiceText)
          → Set Target Row (Array Element's TargetRow)
          → Bind Event to OnChosen (Target: the button you created)
                Event pin ← Custom Event: HandleChoice (receives TargetRow)
          → Add Child to Vertical Box (Target: ChoiceBox, Content: the button you created)
Step by step: Create Widget builds the actual button, and Add Child to Vertical Box puts it inside ChoiceBox . That pair is the basic combination for dynamically adding parts in UMG. Without Clear Children to delete the old buttons first, the previous choices stay and pile up.
Each button you create registers a listener with Bind Event to OnChosen, so pressing it calls HandleChoice.
Custom Event: HandleChoice (Input: TargetRow / Name)

  → Clear Children (Target: ChoiceBox)   ← clean up the choices
  → ShowLine (TargetRow)                  ← advance to the chosen row
The pressed button carries its own TargetRow in the broadcast, so HandleChoice completes the branch simply by displaying that row. "Yes" goes to the acceptance line, "No" goes to the decline line. A branch isn't a chain of ifs; only the row you jump to differs.
Stop Movement During Conversation
A conversation starting while the player can still walk around ruins the moment. During dialogue, point input at the dialogue UI.
The way to do that is to switch the Player Controller's input mode. Pair the states so you restore them when the conversation ends.
| When | What to Call |
|---|---|
| Starting a conversation | Set Input Mode UI Only + Set Show Mouse Cursor (true) |
| Ending a conversation | Set Input Mode Game Only + Set Show Mouse Cursor (false) |
With Set Input Mode UI Only, game input is routed to the UI, so movement and jump input never arrive and the character stops . Advancing the dialogue is handled by the AdvanceButton's On Clicked we built earlier. A Button click is a UI event, so it arrives just fine even under UI Only.
There's a common pitfall here: don't try to reuse the key that started the conversation for advancing . If you started the conversation with E, the game input for E is blocked during UI Only, so pressing E again does nothing. Receiving advance input from an on-screen Button instead of a key is the reliable approach.
Wire the start and end of a conversation like this.
StartDialogue (e.g. pressing confirm near an NPC)
  → Create Widget (Class: WBP_Dialogue, Owning Player: Player Controller)
  → Set DialogueRef (hold the instance you created)
  → Set Data Table / Set Start Row (the first row of the conversation)
  → Add to Viewport
  → Get Player Controller
      → Set Input Mode UI Only (In Widget to Focus: DialogueRef)
      → Set Show Mouse Cursor = true
  → DialogueRef → ShowLine (first row)

EndDialogue (inside WBP_Dialogue, when NextRow is empty)
  → Get Owning Player
      → Set Input Mode Game Only
      → Set Show Mouse Cursor = false
  → Remove from Parent
Set Input Mode Game Only alone leaves the mouse cursor on screen, so always pair it with Set Show Mouse Cursor (false) . Restore only one and the cursor lingers after the conversation ends.
Note: This isn't the same as pausing.
Set Game Pausedalso freezes the animations and timers running behind the conversation. If you want the background alive during dialogue, switching input mode like this is the right fit. Cases that genuinely need pausing are covered in the pause menu article.
Hands-On: Talk to an NPC and Branch with Choices
Chatting with villagers in an RPG, event scenes in a visual novel, notes in a horror game, muttered asides in an escape room. Text that flows in when you talk to someone, with choices that change the response, shows up in every genre. Here we build a conversation with a villager that splits based on whether you accept a request.
What It Looks Like Running
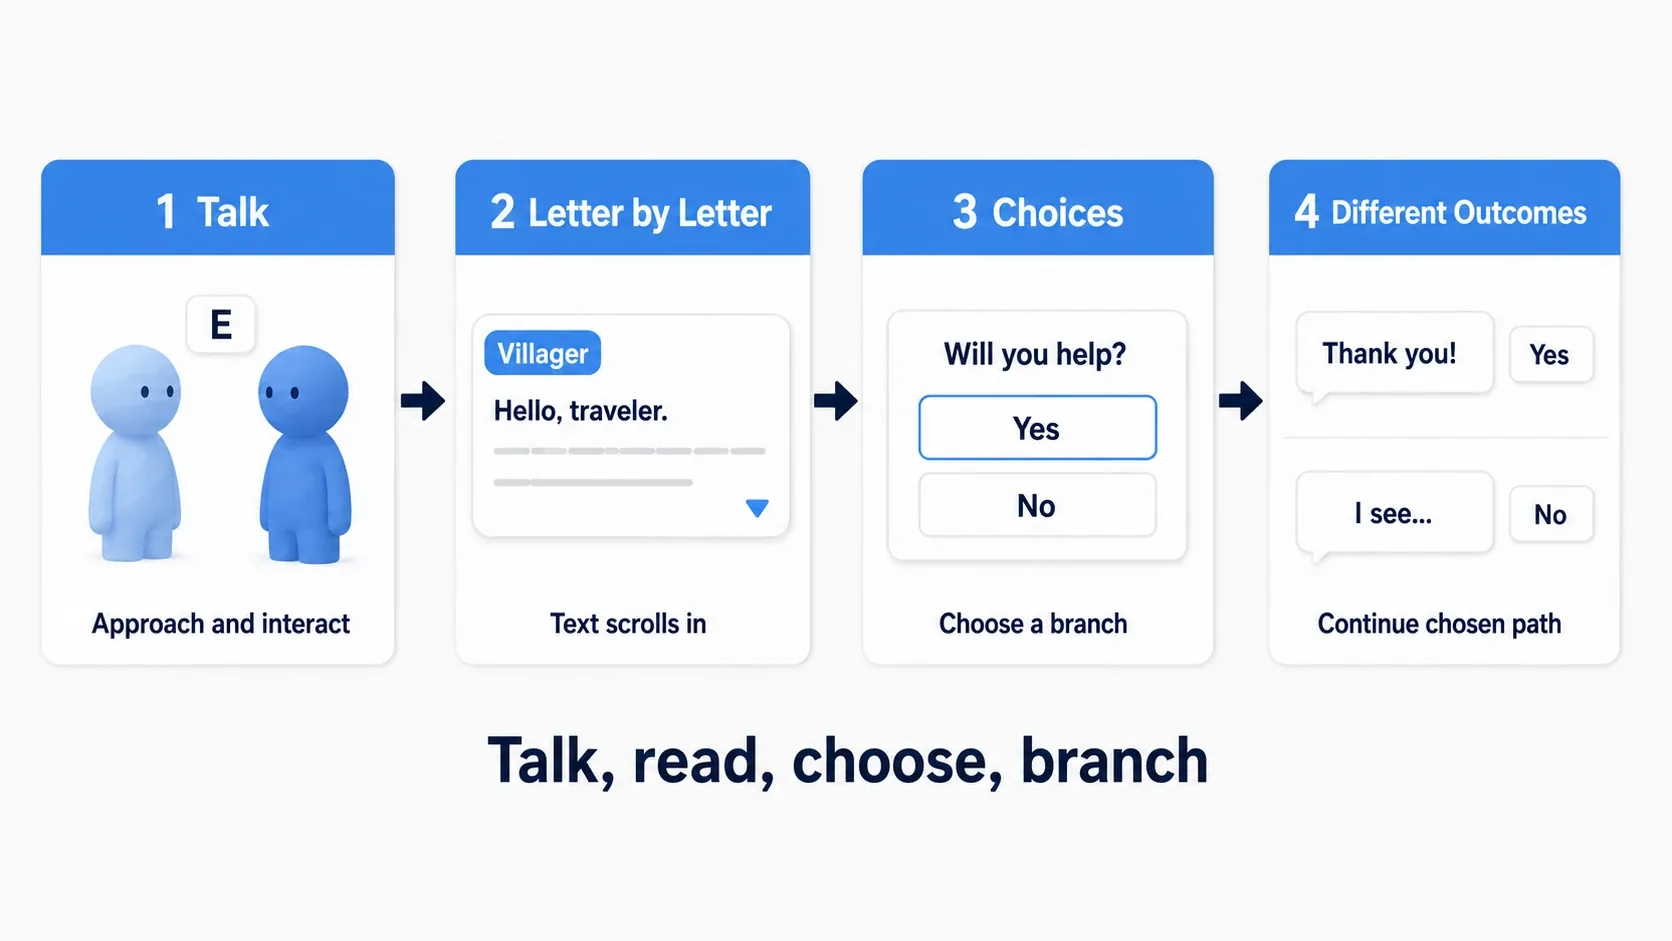
Walk up to the villager and press the confirm key, and a conversation starts with text flowing in one character at a time. At the "will you help?" line, two choices appear, and "Yes" leads to a line of thanks while "No" leads to a disappointed line before the conversation ends.
Setup to Reproduce It
Create a new project from the Third Person template and prepare the following.
Two structs (created following the struct article)
| Struct | Variable | Type |
|---|---|---|
S_DialogueChoice | ChoiceText | Text |
TargetRow | Name | |
S_DialogueLine | Speaker | Text |
Line | Text | |
NextRow | Name | |
Choices | S_DialogueChoice (Array) |
A Data Table called DT_Dialogue (with S_DialogueLine as the Row Structure). Add these four rows. Choices go only on the Ask row, entered directly in the Data Table editor.
| Row Name | Speaker | Line | NextRow | Choices |
|---|---|---|---|---|
Start | Villager | Hello there. You must be a traveler. | Ask | (empty) |
Ask | Villager | If you have a moment, would you help our village? | (empty) | Yes→Yes / No→No |
Yes | Villager | Thank you! I won't forget this. | (empty) | (empty) |
No | Villager | I see... come back if you change your mind. | (empty) | (empty) |
Two widgets
| Widget | Contents |
|---|---|
WBP_ChoiceButton | Button + Text, variable TargetRow (Name), function SetChoiceText, Event Dispatcher OnChosen (Name output). The Button's On Clicked calls OnChosen |
WBP_Dialogue | The five parts from "Anatomy of the Dialogue Widget." Variables and functions as described above |
BP_NPC (parent class: Actor), which holds the trigger for the conversation.
| Element | Settings |
|---|---|
| Box Collision | The range you can talk from. Box Extent 150 / 150 / 100 |
Variable bPlayerInRange (Boolean) | Default false |
Variable StartRow (Name / Instance Editable) | Default Start |
Wiring Up the Trigger
In BP_NPC, remember whether the player is in range and start the conversation when the confirm key is pressed inside it.
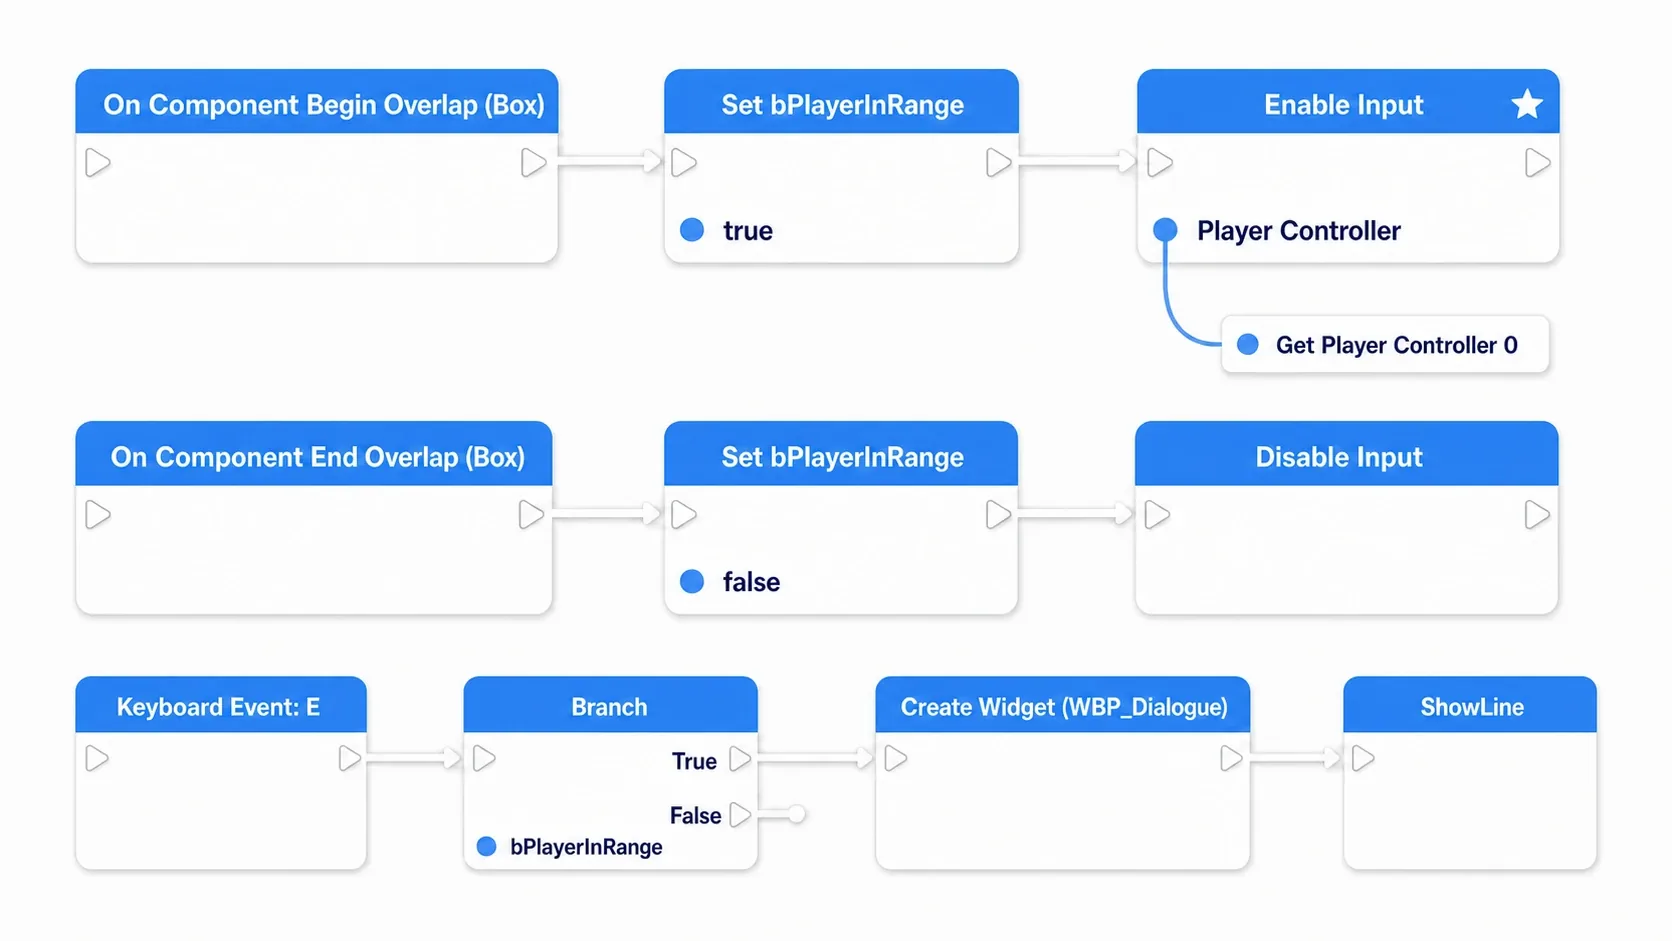
BP_NPC

On Component Begin Overlap (Box)
  → Cast To BP_ThirdPersonCharacter
  → Set bPlayerInRange = true
  → Enable Input (Player Controller: Get Player Controller 0)   ← without this, E never arrives

On Component End Overlap (Box)
  → Cast To BP_ThirdPersonCharacter
  → Set bPlayerInRange = false
  → Disable Input (Player Controller: Get Player Controller 0)

Keyboard Event: E (Pressed)
  → Branch (Condition: bPlayerInRange)
      True →
        Create Widget (Class: WBP_Dialogue, Owning Player: Get Player Controller)
        → Set DialogueRef
        → DialogueRef: Set Data Table = DT_Dialogue
        → Add to Viewport
        → Get Player Controller
            → Set Input Mode UI Only (In Widget to Focus: DialogueRef)
            → Set Show Mouse Cursor = true
        → DialogueRef → ShowLine (StartRow)
The part that's easy to miss is Enable Input. An Actor (anything that isn't a Pawn) doesn't receive key input by default. Input only reaches the Pawn the Player Controller is possessing, so placing a Keyboard Event: E on a plain Actor like BP_NPC won't fire on its own. Call Enable Input when the player enters the range to register "route input to this Actor too," and Disable Input when they leave. Now E only works while the player is nearby.
On the WBP_Dialogue side, use the ShowLine / RevealNextChar / FinishTyping / AdvanceButton On Clicked / BuildChoices / HandleChoice / EndDialogue we built above as-is. Only the tail of FinishTyping splits on whether there are choices.
Tail of FinishTyping
  → Branch (Condition: Length of CurrentLine.Choices > 0)
      True  → BuildChoices (CurrentLine.Choices)
      False → Set Visibility (Target: ContinueIcon, New Visibility: Visible)
Verifying
Place BP_NPC in the level, hit Play, walk up, and press E.
- The conversation starts and "Hello there. You must be a traveler." appears one character at a time , then "▼" lights up when it stops
- Clicking the screen mid-reveal shows the rest of the line at once
- Clicking again advances to "If you have a moment, would you help our village?" with "Yes" and "No" buttons appearing below
- Pressing "Yes" gives "Thank you! I won't forget this." and "No" gives "I see... come back if you change your mind."
- When the conversation ends, the cursor disappears and you can walk again
Here's how to narrow things down when it doesn't work.
- The whole line appears at once →
Loopingisn't checked onSet Timer by Event. It ran once and jumped to the full string - Nothing appears, or you see
Row not found→StartRowdoesn't match the row's name. Row Names are case-sensitive (see checking with Print String) - Text runs off the screen →
Auto Wrap Textis off onBodyText - Pressing a choice doesn't advance →
WBP_ChoiceButtonisn't firingOnChosen, or the parent isn't callingBind Event - Clicking doesn't advance, or choices can't be pressed →
AdvanceButtonis in front ofChoiceBoxin the Hierarchy. MoveAdvanceButtondown (behind) - The cursor stays after the conversation, or you can't move →
EndDialogueis missing eitherSet Input Mode Game OnlyorSet Show Mouse Cursor (false) - Walking up and pressing
Edoes nothing →Enable Inputisn't being called. An Actor's Keyboard Event doesn't fire by default (see "Wiring Up the Trigger" above) - Talking does nothing → The Box Collision is too small to enter, or the
bPlayerInRangetoggles aren't wired up
Now try rewriting the Line on the Data Table's Start row with a much longer sentence and hitting Play. The timer interval hasn't changed, yet longer lines take longer to finish . The reveal time is character count × CharInterval. When you want to change the pacing, adjust CharInterval.
Two points to take away.
- Typewriter text isn't "adding characters," it's "showing more of them": holding the full text in
FullStringand cutting withLeft (full string, visible count)makes skipping ahead (showing the full line) nothing more than maxing out the visible count. A version that appends characters one at a time needs separate logic just to skip - Branching only means "changing which row you read next": don't process the choice contents with
if. Just pass the chosen button'sTargetRowintoShowLine. However much your conversation branches, the code doesn't grow. Only the Data Table's rows do
Hooking "Yes" up to accepting a quest leads into the quest and objective system article. Styling the lines and adding text-advance sound effects falls under the UMG article.
Bonus: Good to Know for Later
- If you want repeat conversations to differ, keep the flag outside: to change the starting row based on "first meeting or not," store the fact that you've talked in Game Instance and pick
StartRowfrom that flag. Keep state inside the dialogue data and it resets to a first meeting every time you change levels Leftoperates on code units: it cuts by character (code unit). Ordinary letters are one unit each, so they reveal cleanly one at a time. Emoji and certain special characters are made of multiple units, so those can briefly render as fragments. It rarely causes real problems in dialogue, but knowing about it saves you from a mysterious glitch later- Play the advance sound "the moment a character appears": firing a short SFX inside
RevealNextCharproduces that classic clicking sound. Every character is grating, so thinning it to once every two or three characters sounds better (for audio, see the sound article) - To vary color or position per speaker, switch visuals on Speaker: read
SpeakerText's contents and swap the panel color or icon so it's obvious at a glance who's talking. If the conditions multiply, moving speaker info into a Data Asset definition keeps things tidy - To let players skip, jump to the last row rather than skipping rows: a "skip all" button is safest when it stops walking
NextRowand callsShowLineon that conversation's terminal row directly. If you can't afford to skip acceptance logic along the way, fast-forward internally to the end instead
Summary
- Store lines in a Data Table with one row per line . Columns for speaker, body, and next row, with the body held as Text
- Typewriter text means holding the full text as String and increasing the visible count with a Timer , cutting with
Left. MakeSet Timer by Eventloop - Advancing is two-stage . Mid-reveal jumps to the full line, fully revealed moves on. Split on
IsTyping - Choices are built on the spot with
Create Widget→Add Child to Vertical Box, and branching is just passing the chosen button'sTargetRowintoShowLine - Stop movement during conversation with
Set Input Mode UI Only, and take advance input from a Button's On Clicked . Restore Game Only and cursor-off as a pair at the end
In the game you're building right now, who's the first person a player talks to? Start with just that one conversation, built from a four-row Data Table.