Through the articles so far, you've touched the individual pieces: moving a character, detecting collisions, showing UI, saving data. And yet it's easy to end up with nothing you'd call "my game." Knowing how to build parts and knowing how to tie parts into one game are separate skills.
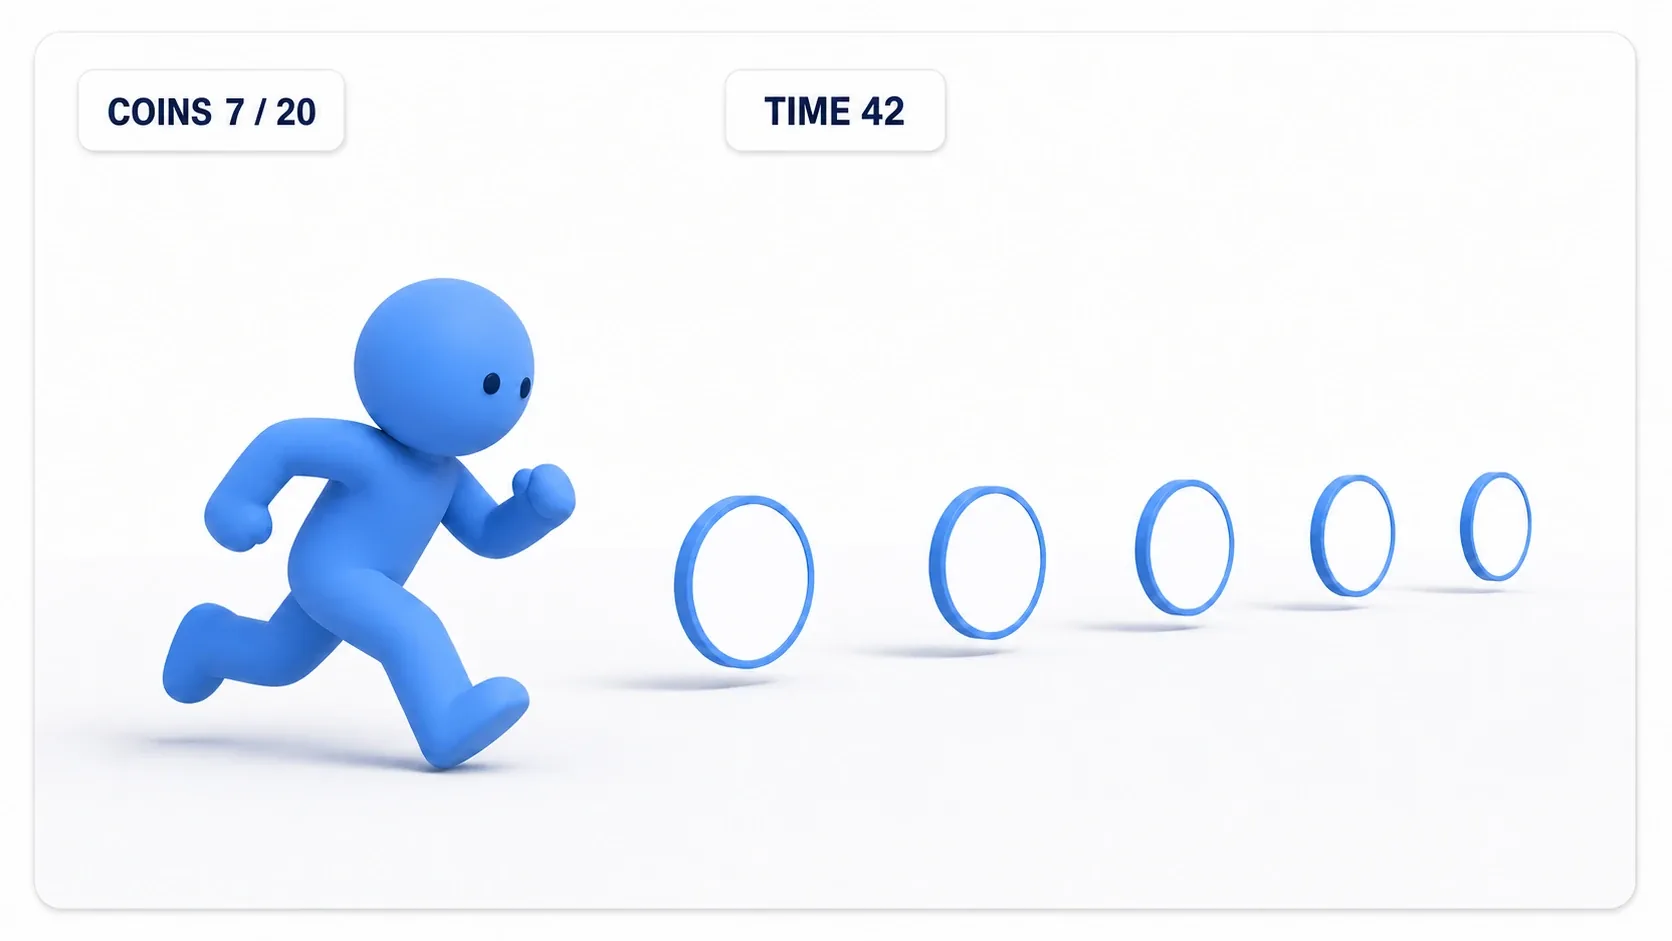
In this article, we'll build a one-stage game where you collect 20 coins in 60 seconds from start to finish. We'll set up the stage, place the coins, manage score and remaining time, show them on a HUD, split clear from game over, save a high score, and export it as an exe you can hand to someone.
What You'll Learn
- Pinning down the spec in a single sentence before you build
- The coin Actor (spinning, Overlap pickup, pickup effects)
- Why score and remaining time belong in GameState, and how to implement it
- Wiring the HUD with an Event Dispatcher
- Clear, game over, retry, and saving the high score
- Hands-on: three additions that improve game feel in 30 minutes
Decide What You're Building in One Sentence
The first thing to do is not to open the editor. It's to write the completion condition in one sentence.
Collect all 20 coins placed in a single stage within a 60-second time limit to clear. Run out of time and it's game over.
That's all. No enemies, one stage. It looks thin, but this one sentence lets you answer "should I be building this right now?" every single time.
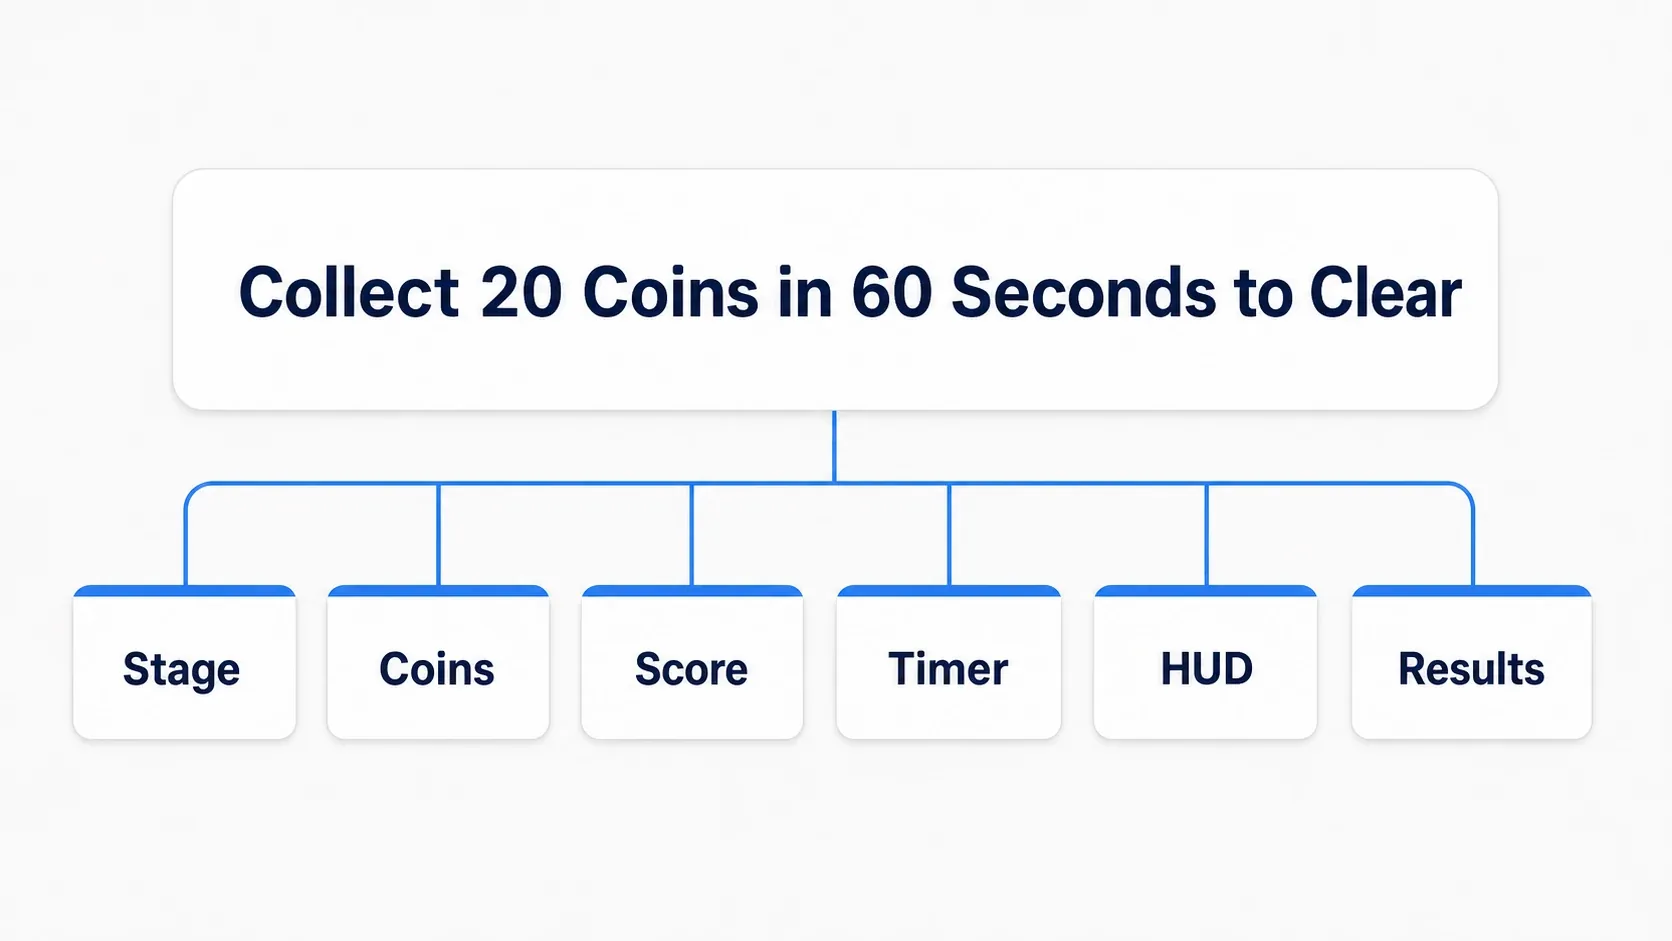
Laying out the parts that sentence requires gives us this.
| What we need | Handled by |
|---|---|
| A character and camera you can run around with | Third Person template |
| Collectible coins | BP_Coin (Actor) |
| Score and remaining time | BP_CoinGameState (GameState) |
| On-screen display | WBP_HUD (Widget) |
| Clear / game over | A result panel inside the HUD |
| High score | BP_CoinSave (SaveGame) |
That's only four Blueprints. Deciding up front not to add any more is what gets you to the finish line.
Set Up the Stage and Player
Create a new project with Games > Third Person. Match these three settings.
| Setting | Value |
|---|---|
| Project Defaults | Blueprint |
| Variant | None |
| Starter Content | Enabled |
Starter Content is optional, and if you forget to check it you won't have Shape_Cylinder (the coin's look) or the sound effects we use later. Do not skip this one.
This template ships with a controllable character (BP_ThirdPersonCharacter), a camera, and input settings, which saves you all the movement setup.
When you want to tune the character's movement yourself, head to Moving Characters with Character Movement Component and Third-Person Cameras with Spring Arm. Here we'll leave the template alone.
The stage doesn't need to be elaborate. Use the template's level as-is and add two or three raised platforms on the floor (Greyboxing with Modeling Mode is the fastest way to shape them). Just confirm there's a Player Start where the player should begin.
Once the project exists, it's safest to get saving and version control sorted out first, so you can recover if you break something (see Managing UE Projects with Git LFS).
Build the Coin Actor
Right-click in the Content Browser, choose Blueprint Class → Actor, and name it BP_Coin.
It has three components.
- Add a Sphere Collision, drag it above DefaultSceneRoot to make it the root, set
Sphere Radiusto 60, setCollision Presetsto OverlapAllDynamic, and confirmGenerate Overlap Eventsis checked - Add a Static Mesh as a child of the Sphere and assign
Shape_Cylinder(Content/StarterContent/Shapes). SetScaleto (1.0, 1.0, 0.1) to make it a thin disc and setRotationX to 90 to stand it upright. SetCollision Presetsto NoCollision - Add a Rotating Movement component (search
Rotating Movementwhen adding) and setRotation RateZ to 90
Adding Rotating Movement alone makes the coin spin. It's a quietly useful component that gives you rotation without writing any Tick logic (see Designing Without Event Tick, Using Timers and Events).
The key point is that the Sphere carries the collision while the visible mesh is set to NoCollision. If the hit detection matched the thin disc shape exactly, you'd miss coins when running straight into them from the side. Making the pickup volume a sphere slightly larger than the visuals is the standard move (see Simple vs. Complex Collision).
Wire Up What Happens on Pickup
Build the following graph in the event graph.
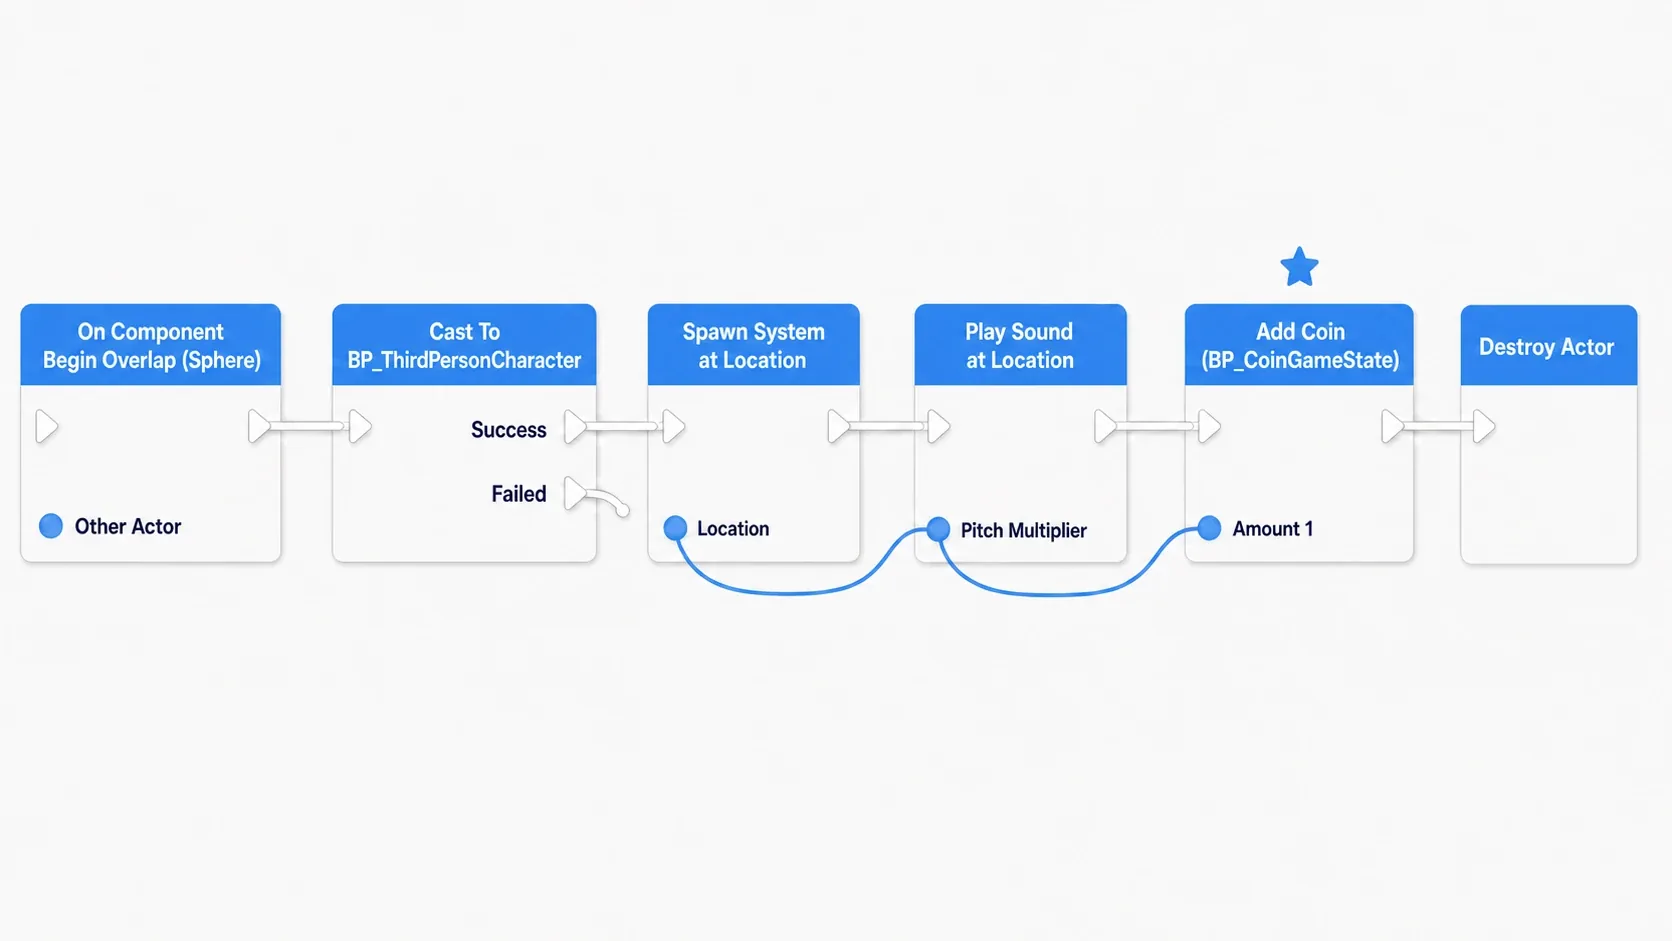
Here's the same thing as pseudocode.
BP_Coin (Event Graph)

On Component Begin Overlap (Sphere)
  → Cast To BP_ThirdPersonCharacter (Object = Other Actor)
  → (on success) Spawn System at Location (System = NS_CoinPickup, Location = GetActorLocation)
  → Play Sound at Location (Sound = a short SFX, Location = GetActorLocation)
  → Get Game State → Cast To BP_CoinGameState
  → Add Coin (Amount = 1)        // A function on GameState. We build it in the next section
  → Destroy Actor (Target = Self)
The Cast To BP_ThirdPersonCharacter in the middle is there so that anything other than the player can't pick the coin up. Without it, a stray pebble flying past would make the coin disappear.
Placing the effects (particles and sound) before Add Coin is deliberate. Inside Add Coin, hitting the 20th coin runs the entire game-ending sequence in one go. Put the effects afterward and the 20th coin alone freezes the screen with no sound and no particles. Show what you want seen before you call the ending logic. It's purely a matter of ordering, but the difference is obvious when you actually play.
For audio, use Play Sound at Location. If you attach the sound to the coin with Spawn Sound Attached, the default settings mean the immediately following Destroy Actor kills the sound too, so it seems like nothing played. Remember it as: when a disappearing Actor plays a sound, choose playback that isn't bound to the Actor (see Sound Cue vs. Sound Wave).
You don't need the effect and sound assets ready yet. Leave those two nodes for later and get the whole loop working first.
Place 20 copies of your BP_Coin around the stage. Place one and hold Alt while dragging to copy it. Putting some on top of platforms and in corners makes searching for them fun.
Put Score and Time in GameState
This is the most design-flavored decision in the whole article.
Where should score and remaining time live? You could put them on the player character. But these two aren't "the state of that character," they're "the state of the game as a whole." You don't want the score wiped when the player dies and respawns, and you want the HUD and result screen to have exactly one place to look. That's the role of GameState.
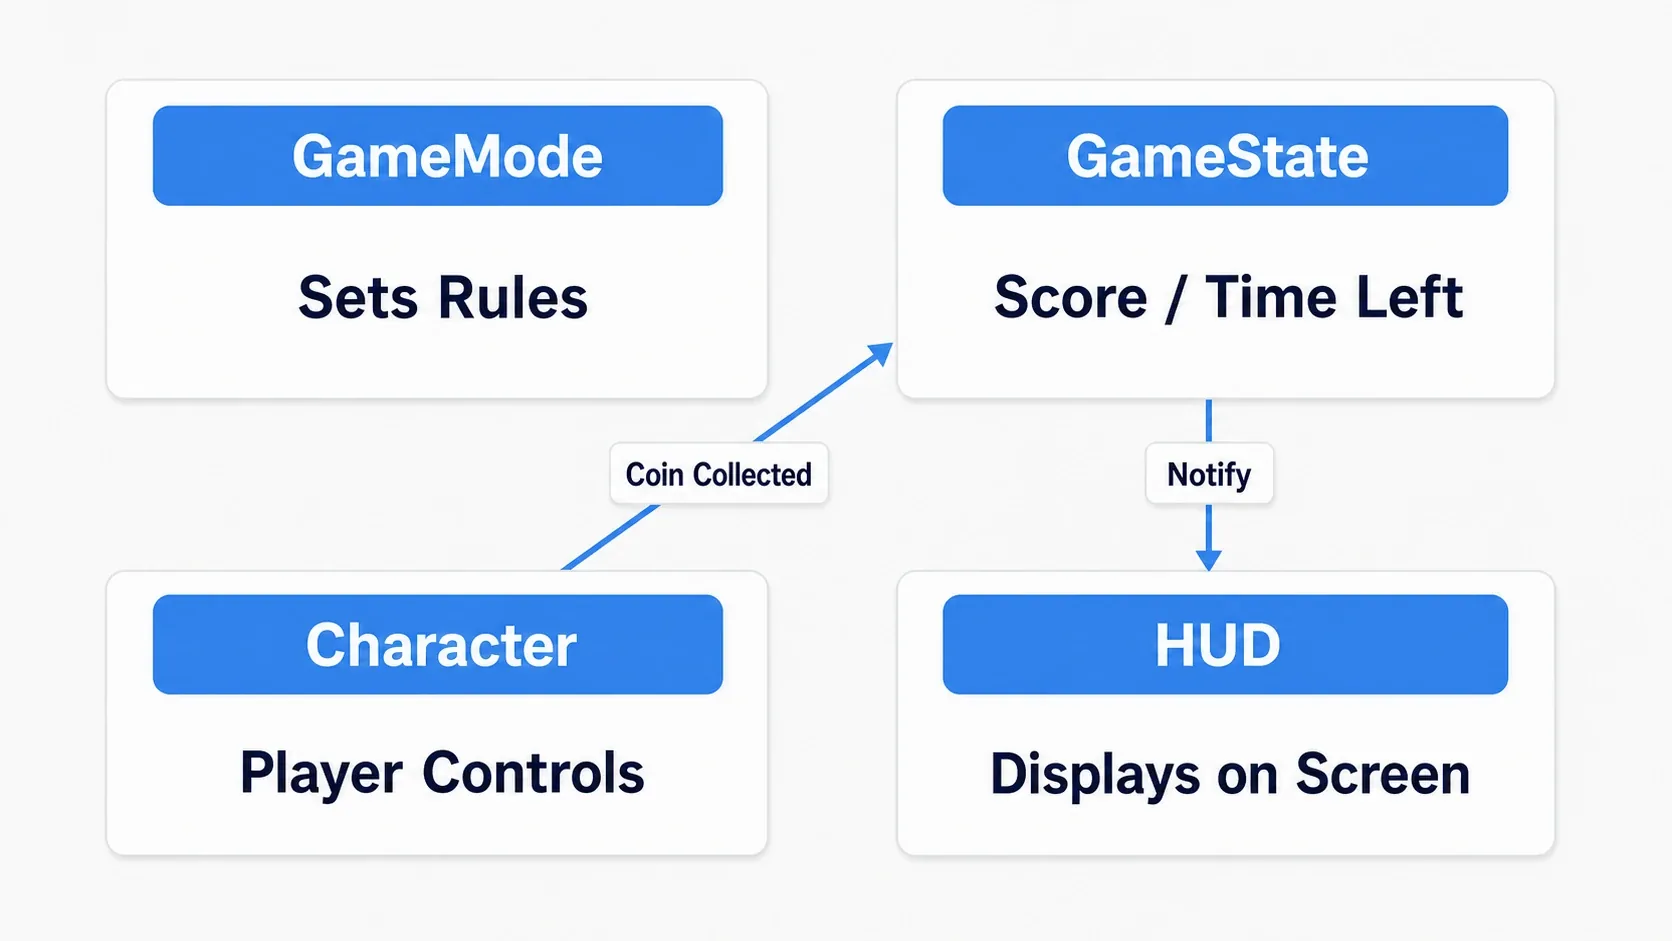
The division of roles is covered in detail in Understanding the Game Framework. Here, "whole-game state goes in GameState" is enough to move forward.
Create and Register the GameState
- Blueprint Class → pick
Game State Baseas the parent class and create it asBP_CoinGameState - In the Content Browser, open
Content/ThirdPerson/Blueprints/BP_ThirdPersonGameModeand changeGame State ClassinClass DefaultstoBP_CoinGameState - Open your level and confirm that
GameMode OverrideinWindow → World Settingsis set toBP_ThirdPersonGameMode
Skip step 3 and the level falls back to Project Settings → Maps & Modes → Default GameMode. With the untouched template that happens to work, but if you create your own new level it gets a different GameMode, Cast To BP_CoinGameState silently fails, and you go straight to "collecting coins doesn't increase the score." Setting it explicitly in World Settings is safer, so the rules apply no matter which level you open.
Variables and Dispatchers
Give BP_CoinGameState the following.
| Name | Kind | Type | Default |
|---|---|---|---|
Score | Variable | Integer | 0 |
TimeRemaining | Variable | Float | 60.0 |
TargetCoins | Variable | Integer | 20 |
bFinished | Variable | Boolean | false |
BestScore | Variable | Integer | 0 |
CountdownHandle | Variable | Timer Handle | - |
OnScoreChanged | Event Dispatcher | Input: NewScore(Integer) | - |
OnTimeChanged | Event Dispatcher | Input: NewTime(Float) | - |
OnGameFinished | Event Dispatcher | Input: bCleared(Boolean) | - |
Making TargetCoins a variable means you can tune the difficulty with a single number if 20 turns out to be too many. Not hardcoding magic numbers is a habit that pays you back later.
The three dispatchers exist so GameState never has to know about the UI. GameState just shouts "the score changed" without caring who's listening. The HUD comes and listens on its own (see Event-Driven Design with Event Dispatchers).
Run the Countdown
Start a one-second looping timer from Event BeginPlay.
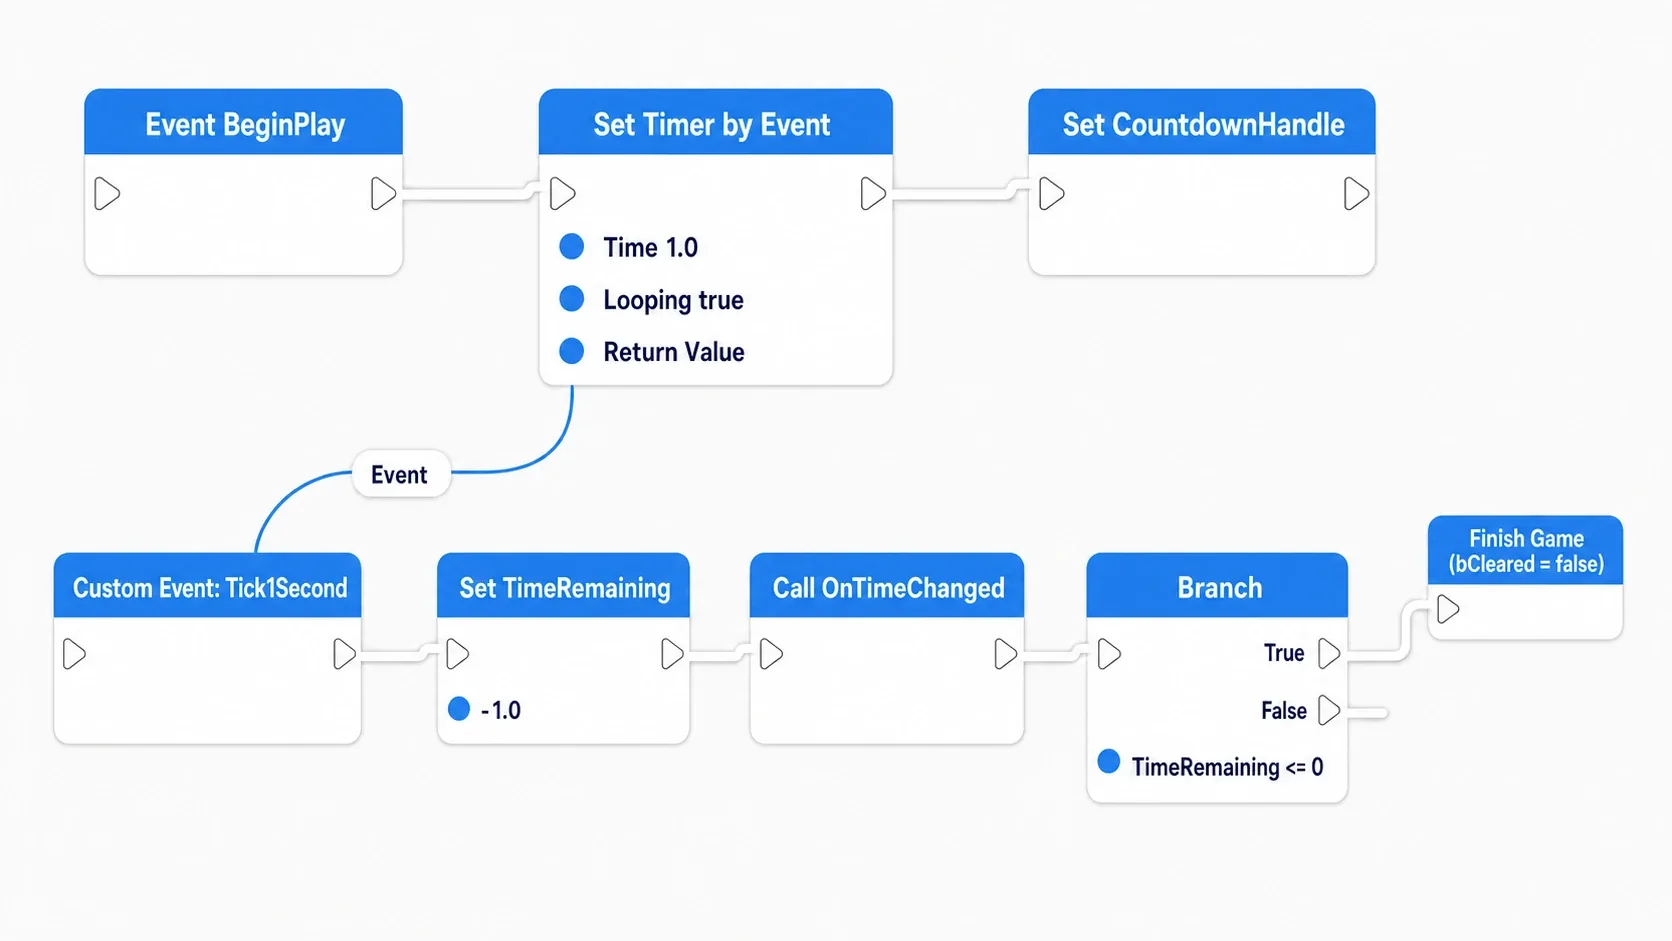
BP_CoinGameState (Event Graph)

Event BeginPlay
  → Set Timer by Event (Time = 1.0, Looping = true)
       Event pin → connect to Custom Event "Tick1Second"
       Return Value → Set CountdownHandle          // Save it so we can stop the timer later

Custom Event: Tick1Second
  → Set TimeRemaining (TimeRemaining - 1.0)
  → Call OnTimeChanged (NewTime = TimeRemaining)
  → Branch (TimeRemaining <= 0.0)
       True → Finish Game (bCleared = false)
Always save the return value (the Timer Handle) of Set Timer by Event into a variable. Without it, the countdown keeps running after the game ends and Finish Game gets called over and over behind the result screen.
Count the Coins
Create two functions. First, Add Coin (input: Amount(Integer)).
Function: Add Coin (Amount: Integer)
  → Branch (bFinished == true) → True: Return    // Stop counting after the game ends
  → Set Score (Score + Amount)
  → Call OnScoreChanged (NewScore = Score)
  → Branch (Score >= TargetCoins)
       True → Finish Game (bCleared = true)
Then Finish Game (input: bCleared(Boolean)).
Function: Finish Game (bCleared: Boolean)
  → Branch (bFinished == true) → True: Return    // Prevent finishing twice
  → Set bFinished = true
  → Clear and Invalidate Timer by Handle (Handle = CountdownHandle)
  → Save High Score (covered below)
  → Call OnGameFinished (bCleared = bCleared)
Both functions check bFinished at the top and bail out. Ending logic must run exactly once. Ignore that and the moment the 20th coin and the time running out land on the same frame, you get two result screens.
Wire Up the HUD
Create a Widget Blueprint named WBP_HUD (right-click → User Interface → Widget Blueprint → User Widget).
In the Designer tab, place the following.
| Widget | Name | Placement |
|---|---|---|
| Text | Text_Score | Top left (anchor top left too) |
| Text | Text_Time | Top center (anchor top center too) |
| Vertical Box | Panel_Result | Screen center. The three below go inside it |
| Text | Text_Result | Inside Panel_Result (shows CLEAR! / TIME UP) |
| Text | Text_BestScore | Inside Panel_Result (shows the high score) |
| Button | Btn_Retry | Inside Panel_Result (with a "RETRY" Text inside it) |
Set Panel_Result's Visibility to Collapsed in the details panel. It stays hidden during play and appears when the game ends. Layout and anchoring are covered in Getting Started with UMG.
Receive Notifications from GameState
In the Graph tab, connect to the GameState's dispatchers from Event Construct.
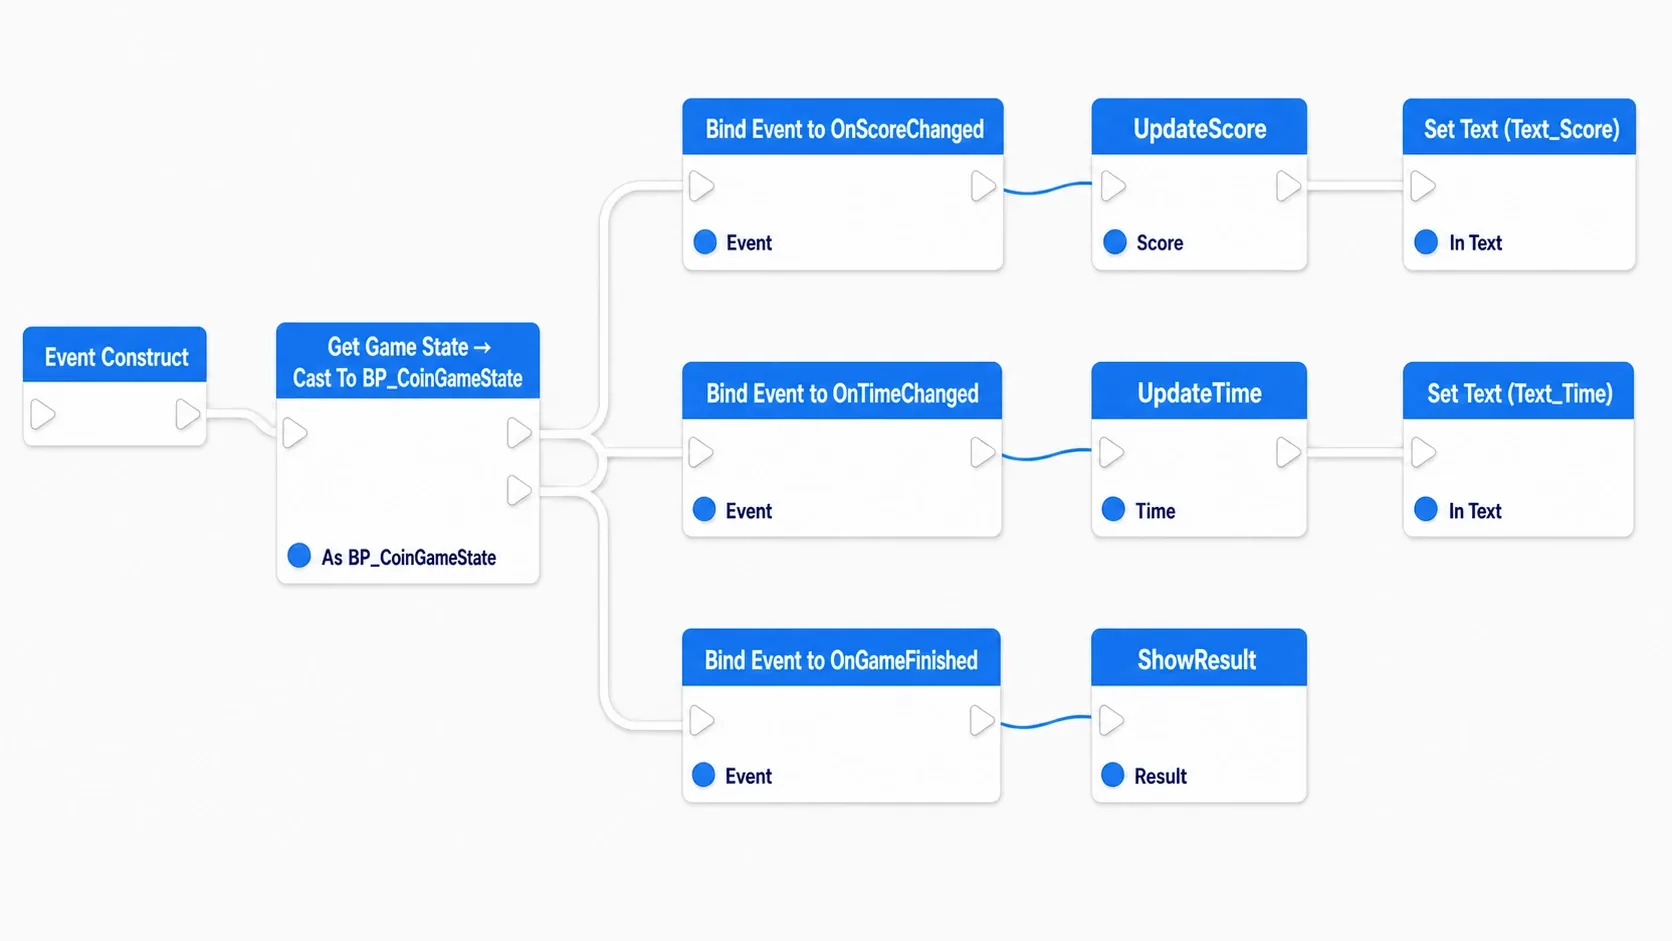
WBP_HUD (Graph)

Event Construct
  → Get Game State → Cast To BP_CoinGameState
  → Bind Event to OnScoreChanged   → Custom Event "UpdateScore" (NewScore)
  → Bind Event to OnTimeChanged    → Custom Event "UpdateTime" (NewTime)
  → Bind Event to OnGameFinished   → Custom Event "ShowResult" (bCleared)
  → UpdateScore (NewScore = GameState's Score)   // Call once ourselves for the initial display
  → UpdateTime (NewTime = GameState's TimeRemaining)

Custom Event: UpdateScore (NewScore)
  → Text_Score → Set Text (Format Text "COINS {0} / {1}" with NewScore and TargetCoins)

Custom Event: UpdateTime (NewTime)
  → Text_Time → Set Text (Format Text "TIME {0}" with Truncate(NewTime))
Drag a wire from the red Event pin on the left side of a Bind Event to ... node and pick Add Custom Event ..., and UE creates a Custom Event with matching parameter types and count automatically. Build it by hand and you'll get the parameters wrong and fail to connect, so learn this shortcut.
Truncate is the node that drops the decimals and returns an integer (search for Truncate). It gives you TIME 42 instead of TIME 42.0.
The important bit is those last two lines, where we call the initial display once ourselves. Dispatchers only fire "when something changes," so without this you'd see placeholder text like COINS 0 / 0 for the first second.
Not using Binding to update the Text is deliberate. Bindings are evaluated every frame, which is overkill for a display that changes once per second (see UMG Focus Management and Invalidation Box Optimization).
Put It on Screen
Create the HUD and add it to the screen from BP_ThirdPersonGameMode's Event BeginPlay.
BP_ThirdPersonGameMode (Event Graph)

Event BeginPlay
  → Create Widget (Class = WBP_HUD, Owning Player = Get Player Controller (0))
  → Add to Viewport
At this point, pressing Play should show the coin count in the top left and the remaining seconds in the top center, with the number rising each time you grab a coin. Play once and confirm this much works. Seeing it run before you move on makes it far easier to find what broke later.
Clear and Game Over
Now build the contents of the ShowResult event.
Custom Event: ShowResult (bCleared)
  → Text_Result → Set Text (bCleared ? "CLEAR!" : "TIME UP")   // Branch with a Select node
  → Text_BestScore → Set Text (Format Text "BEST {0}" with GameState's BestScore)
  → Panel_Result → Set Visibility (Visible)
  → Get Owning Player → Set Show Mouse Cursor (true)
  → Set Input Mode UI Only (Player Controller = Owning Player, In Widget to Focus = Panel_Result)
  → Set Game Paused (true)
We'll write the high score into GameState's BestScore in the next section. ShowResult just reads it. By the time OnGameFinished fires, the save work on the GameState side is already done, so you don't need to worry about ordering.
We use Set Input Mode UI Only because on the result screen all you do is click a button with the mouse and gameplay input isn't needed. Conversely, in a situation like a pause menu where you want to close it with the same key, this mode would leave you unable to close it. Use Game And UI there instead (see Implementing a Pause Menu Correctly).
For the retry button, select Btn_Retry in the Designer and press the + next to On Clicked in the details panel to add it to the graph.
On Clicked (Btn_Retry)
  → Set Game Paused (false)      // Unpause before transitioning
  → Open Level (by Name) (Level Name = Get Current Level Name)
Put unpausing before Open Level. In most cases the level gets rebuilt anyway so it would work without it, but switching screens while leaving a pause state active is a breeding ground for bugs. Undo what you stopped, right where you stopped it.
Get Current Level Name has Remove Prefix String enabled by default, so it strips the UEDPIE_ prefix added during Play In Editor (PIE) and returns a clean name you can pass straight to Open Level. For level transitions themselves, see Getting Started with Level Transitions.
Save the High Score
Reloading the level with Open Level rebuilds the GameState along with everything else, so the high score would be lost. We need to write it to disk.
Blueprint Class → pick Save Game as the parent class and create BP_CoinSave. Give it exactly one variable.
| Variable | Type | Default |
|---|---|---|
BestScore | Integer | 0 |
Add one variable named SaveObject of type BP_CoinSave to BP_CoinGameState, then create the Save High Score function and call it from Finish Game.
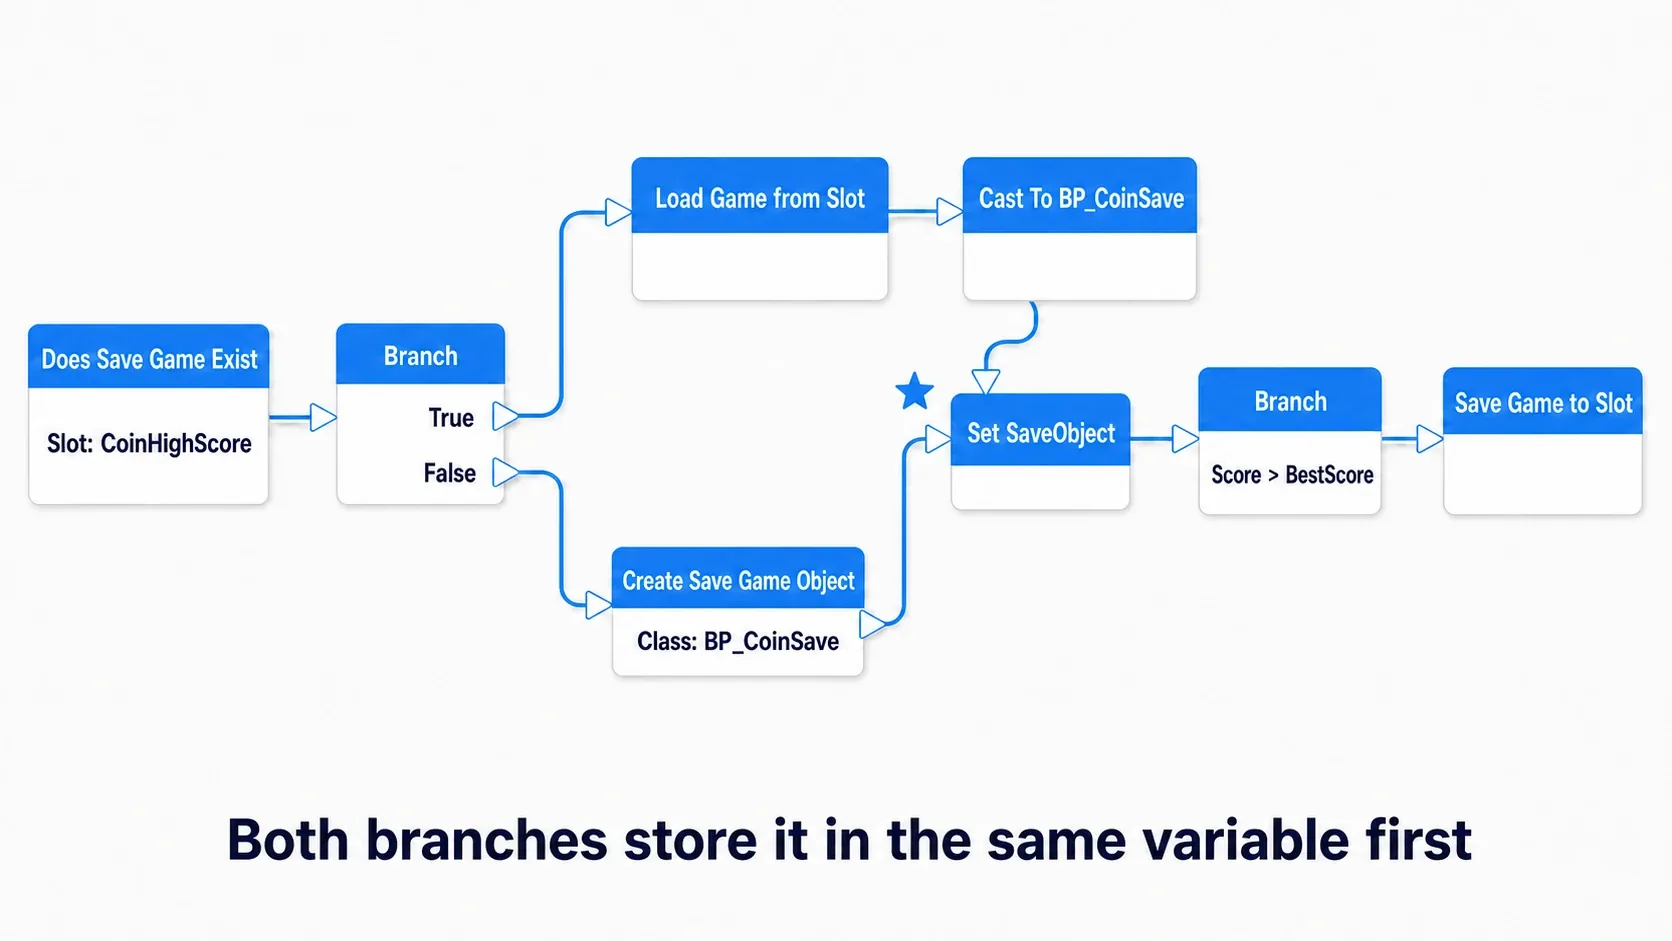
Function: Save High Score

  → Branch (Does Save Game Exist (Slot Name = "CoinHighScore", User Index = 0))
       True  → Load Game from Slot ("CoinHighScore", 0)
             → Cast To BP_CoinSave → Set SaveObject
       False → Create Save Game Object (Class = BP_CoinSave)
             → Set SaveObject
  → (merged) Branch (Score > SaveObject.BestScore)
       True → SaveObject.BestScore = Score
            → Save Game to Slot (Save Game Object = SaveObject, "CoinHighScore", 0)
  → Set BestScore (SaveObject.BestScore)     // Copy into GameState for display
Routing through a SaveObject variable is the key here. In Blueprint, objects coming out of two branches of a Branch aren't treated as one value just because you merged the execution pins. Store them in the same variable on both branches, then use that variable downstream. Skip this and you'll be stuck on "the pin won't connect after the merge."
The load path needs Cast To BP_CoinSave, because Load Game from Slot returns the base Save Game type and you can't read BestScore off it directly (Create Save Game Object already specifies the class, so no cast is needed there). Saving is covered in depth in Implementing a Save/Load System.
That last line copies the value into GameState's BestScore, so the result screen only has to display it. Just seeing "I got better than last time" is reason enough to play again.
Hands-On: Three Additions That Improve Game Feel in 30 Minutes
At this point the one-sentence spec is satisfied. The game is playable. Whether it feels good to play is a separate question.
From here, we'll make three additions that change nothing about the spec and improve only the feel. Action game, puzzle game, racing game: this is the layer that ends up mattering in all of them.
Here's what you'll see. Particles of light burst the instant you touch a coin, and the pitch of the sound climbs a little with each pickup. When under 10 seconds remain, the timer at the top center starts flashing red. The numbers climb exactly the same way, but the sense of being pressed for time is unmistakable.
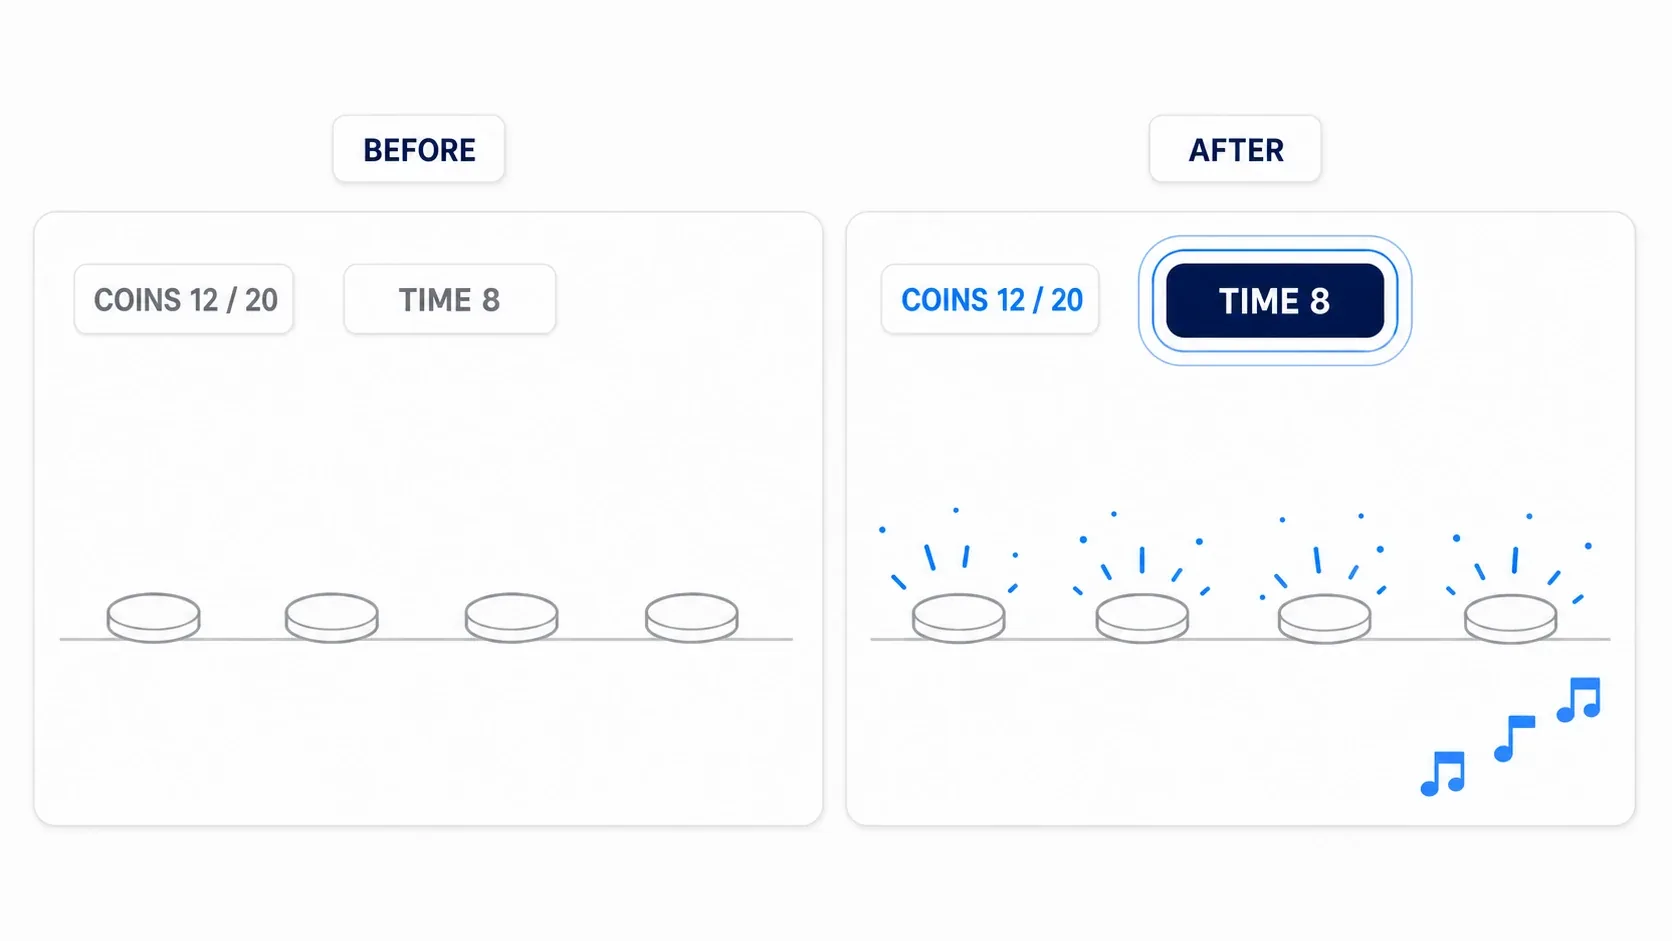
Setup
| Item | Value |
|---|---|
TargetCoins on BP_CoinGameState | 20 |
Default TimeRemaining on BP_CoinGameState | 60.0 |
Variable to add (BP_CoinGameState) | ComboPitch (Float / default 1.0) |
| Effect to use | One Niagara System you make yourself (named NS_CoinPickup) |
| SFX to use | Any short sound from Content/StarterContent/Audio/ in Starter Content |
The one thing you have to prepare is the effect. The particles included in Starter Content are the older Cascade generation (P_Sparks and friends) and can't be passed to Spawn System at Location (those use Spawn Emitter at Location instead). Follow the steps in Getting Started with Niagara to make a single NS_CoinPickup that just bursts some particles. It takes five minutes.
Addition 1: Raise the Pickup Pitch Gradually
When the sound gets higher with each coin, you get a sense of building a streak. Add two lines to Add Coin in BP_CoinGameState.
In Function: Add Coin (Amount: Integer), right after Set Score
  → Set ComboPitch (Clamp(1.0 + Score * 0.03, 1.0, 1.6))
On the BP_Coin side, connect GameState's ComboPitch to the Pitch Multiplier pin on Play Sound at Location. That pin is hidden by default, so click the small downward arrow (Advanced Pin) at the bottom of the node to expand it. "That pin doesn't exist" is usually this.
The Clamp caps it at 1.6 so the 20th coin doesn't become shrill and unpleasant.
The sound plays before Add Coin, so the pitch rise starts from the next coin. The first one plays at the base pitch and climbs from there, which actually sounds more natural.
If you want to go deeper on the sound design itself, see Sound Cue vs. Sound Wave. You can also randomize pitch with a Sound Cue's Modulator node.
Addition 2: Burst Particles on Pickup
Assign your Niagara system to the Spawn System at Location node you left in BP_Coin's graph. Adding about Z + 50 to GetActorLocation makes the burst read as coming from the middle of the coin, which looks better.
When you want to build your own effects, head to Getting Started with Niagara. Here, dropping in one ready-made system is plenty.
Addition 3: Flash Red Under 10 Seconds
Add a branch to UpdateTime in WBP_HUD.
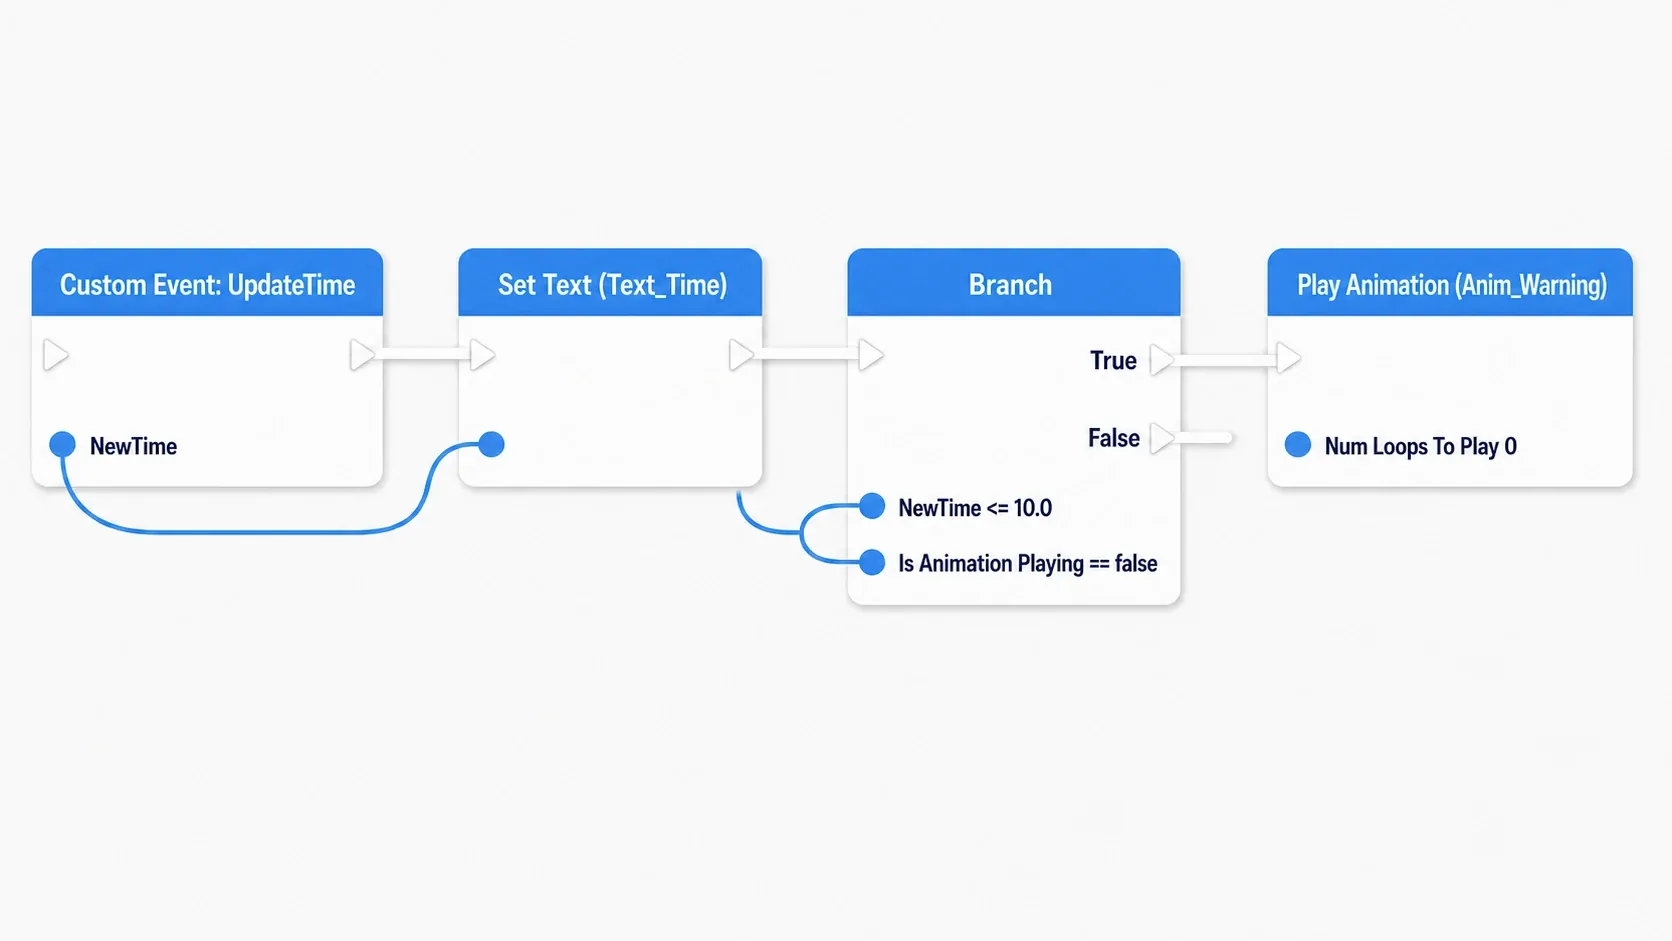
First, in the Designer, create Anim_Warning from the Animations panel. Add Text_Time's Color and Opacity to the track and key white at 0 seconds, red at 0.25 seconds, and white at 0.5 seconds. Leave Loop unchecked in the details panel; we'll loop it from the caller.
Custom Event: UpdateTime (NewTime)
  → Text_Time → Set Text (Format Text "TIME {0}" with Truncate(NewTime))
  → Branch (NewTime <= 10.0 AND Is Animation Playing(Anim_Warning) == false)
       True → Play Animation (Anim_Warning, Num Loops To Play = 0)   // 0 means loop forever
Is Animation Playing is in the condition to prevent the animation from restarting from the beginning every second. When you start playback from an event that fires every second, always check whether it's already playing. That pattern applies well beyond flashing text.
Verify
Hit Play and run until you've collected all 20. The sound climbs a little with each pickup, particles burst, and under 10 seconds the timer at the top pulses red. The instant you grab the 20th coin, CLEAR! appears and time stops.
Here's how to narrow things down when it doesn't work.
- The pitch doesn't rise → GameState's
ComboPitchisn't reachingPitch Multiplier. Expand the Advanced Pin and confirm you're going throughGet Game State → Cast - The timer flashes constantly or keeps restarting → The
Is Animation Playingcondition is missing - Only the 20th coin has no sound or particles → In
BP_Coin's graph,Add Coincomes beforeSpawn SystemandPlay Sound. The 20th coin stops the game insideAdd Coin, so reorder it to run the effects first
Two things to take away.
- Feel lives outside the spec: none of the three changed the rules by a millimeter. It's still 20 coins in 60 seconds. And yet the experience is different. The order matters: finish the spec first, then spend time on this layer
- Ride on the notifications you already have: all three were a few lines added to the existing
Add CoinandUpdateTime. No new machinery. Once you start restructuring your design for the sake of effects, finishing gets further away (see Building Game Feel: Hit Stop and Screen Shake)
Bonus: Good to Know for Later
It isn't finished until it's shareable. Export an exe with Platforms → Windows → Package Project in the toolbar and zip the whole output folder to hand over. Before exporting, set Project Settings → Maps & Modes → Game Default Map to the level you want people to play. Leave it at the default and launching gives you an empty screen. Only after this can you say you made something. The steps and the pitfalls are collected in Getting Started with Packaging. Always play the exported build yourself once. "Works in the editor, doesn't work packaged" is common.
If you add something next, add another stage before you add enemies. Enemy AI sounds fun, but building it blows up the spec immediately. Making one more level and sending the player to it after clearing keeps that sense of completion going (see Getting Started with Level Transitions). When you want to carry the score across stages, that's Persisting Data with GameInstance.
Watch out for miscounting your 20 coins. Place only 19 and the game can never be cleared no matter how long you search, because TargetCoins is hand-typed as 20. If that worries you, you can set TargetCoins from the element count of Get All Actors of Class (BP_Coin) on Event BeginPlay. That node scans every Actor in the level and is expensive, so the rule is to call it exactly once, in BeginPlay.
Picking one person to play it speeds up finishing. Having a deadline in the form of "I'm handing this to someone" lets you cut off the urge to keep polishing. This is the practical version of "finish something small" from Learning Roadmaps and Goal Setting.
Summary
Lining up what we built, it was only four Blueprints.
| Blueprint | Role |
|---|---|
BP_Coin | Gets counted and destroyed on touch |
BP_CoinGameState | Holds score, remaining time, and end conditions, and announces changes |
WBP_HUD | Listens for announcements, displays them, and shows the result |
BP_CoinSave | Keeps the high score on disk |
The relationship between those four is the skeleton of most games. It splits into something that holds the state (GameState), something that changes the state (Actor), and something that reflects the state (UI), connected by events in between. Add enemies or add stages and this shape doesn't change.
The most important part, though, was that first sentence. Deciding "collect 20 coins in 60 seconds to clear" up front is what got you here without getting lost along the way.
What single sentence describes the next game you'll build? If you can write it, you're already halfway done.
Further Reading
- 10 Common Blueprint Mistakes and How to Fix Them — where to look when you're stuck
- Versioning Save Data — for when you want to add fields to
BP_CoinSave - Debugging with Print String and the Output Log — how to investigate when things don't work
- Unreal Engine Official Documentation: Blueprint Visual Scripting