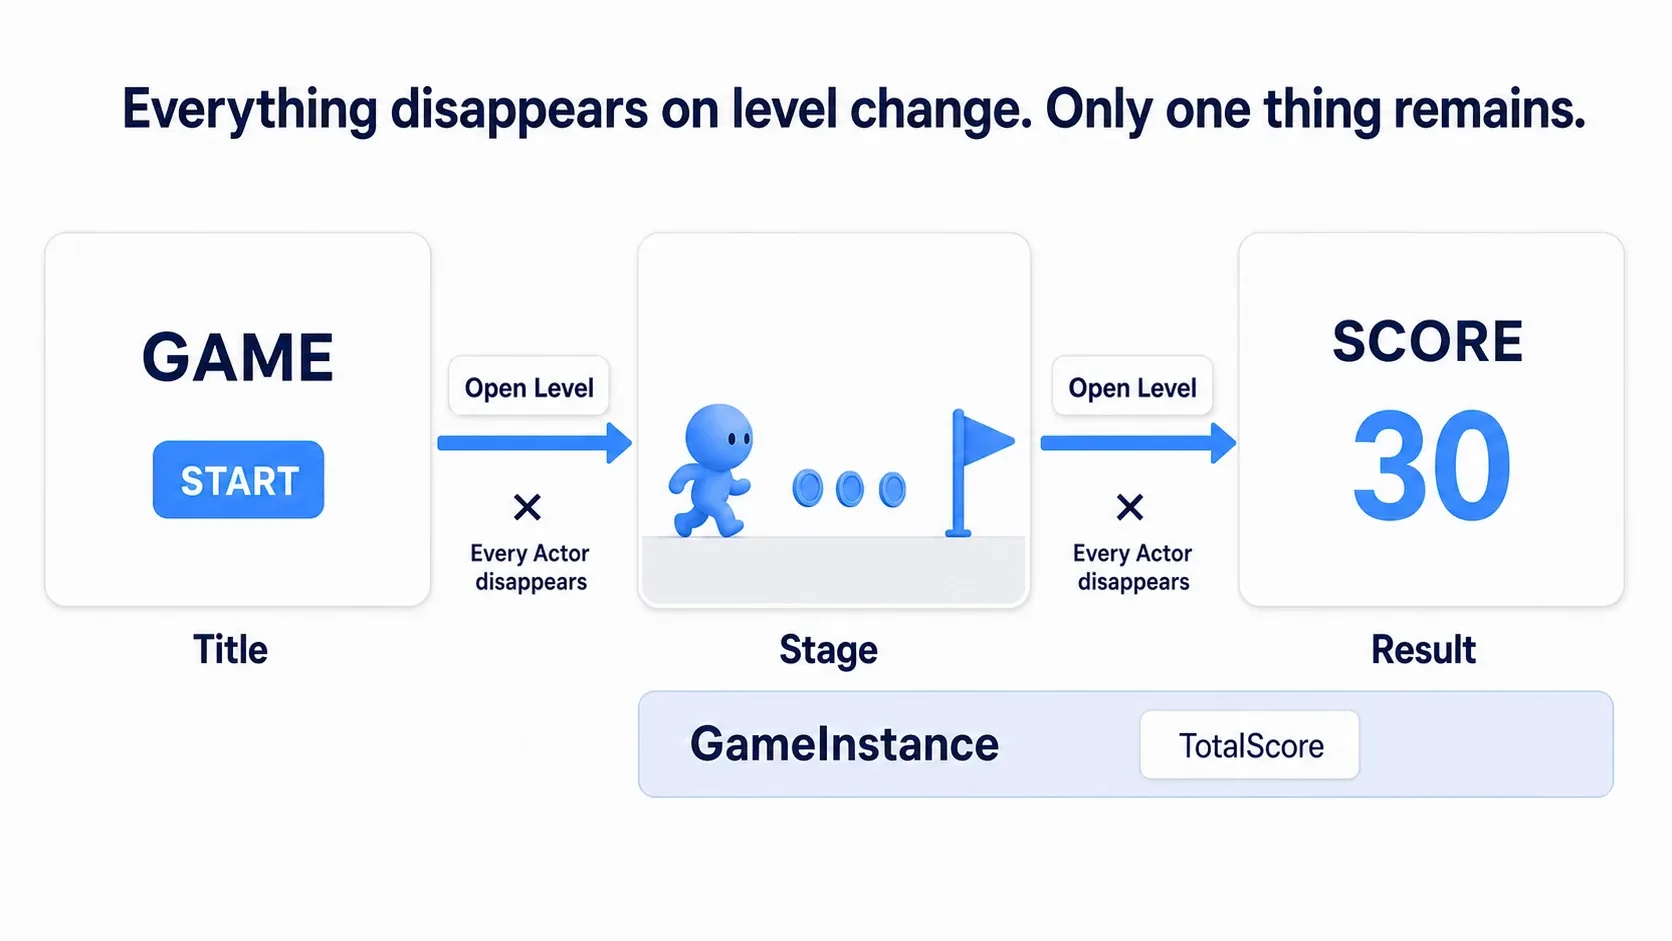
Press a button on the title screen and the stage begins; touch the goal and the results appear. Every finished game needs this skeleton. The node that does the switching is a single one, and it works as soon as you place and connect it.
The trouble starts afterward. The coins you collected in the stage read 0 on the results screen, the picture freezes while loading, and the transition fails the moment you package the build. This article covers the two flavors of Open Level, what is destroyed and what survives when you change levels, and how to handle loading screens.
What You'll Learn
- The difference between Open Level (by Name) and (by Object Reference), and which to pick
- The premise that a level change destroys almost everything
- Handing your score to GameInstance, the one thing that survives
- Why loading screen Widgets never appear, and a practical workaround
- How this differs from Level Streaming
- Hands-on: connecting title → stage → results with a score carried through
- There's Only One Node for Switching
- by Name vs. by Object Reference
- A Level Change Destroys Almost Everything
- Handing Data to GameInstance
- Why Your Loading Screen Never Appears
- A Practical Compromise: Fade to Black First
- Hands-On: Connecting Title to Results
- How This Differs From Level Streaming
- Bonus: Good to Know for Later
- Summary
There's Only One Node for Switching
Switching levels takes exactly one node: Open Level. Whether it's a button click or touching the goal, this is the only thing you call.
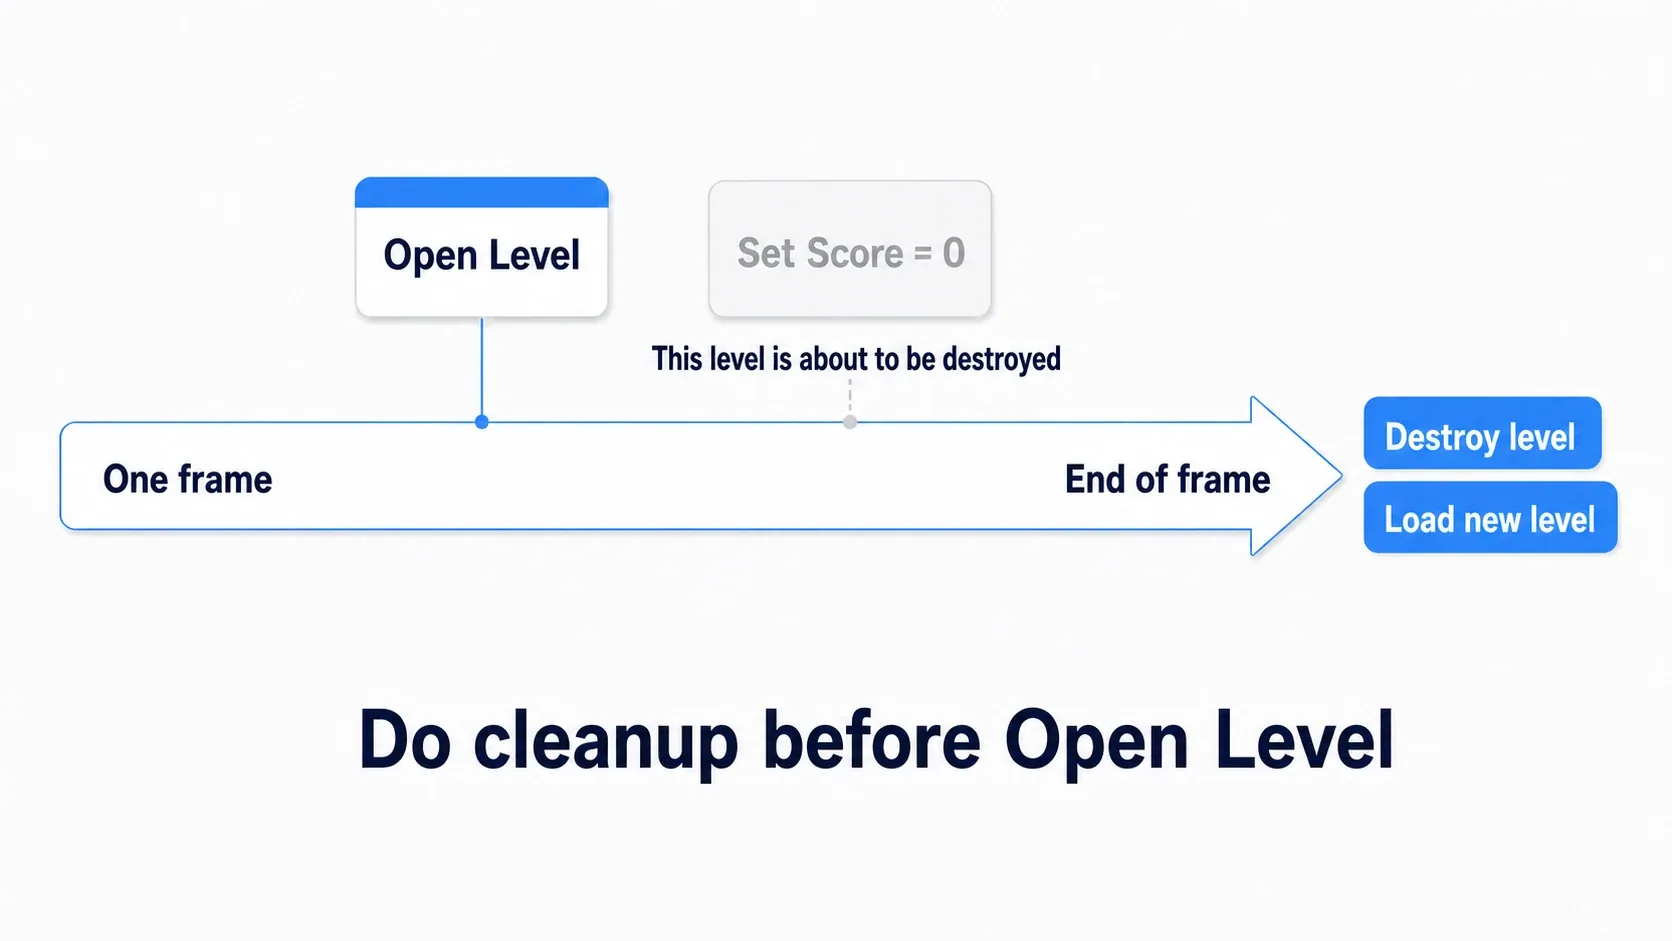
There is one behavior to keep in mind, though. Calling Open Level does not switch levels on the spot. It queues the transition, and the actual work runs at the end of that frame.
That means any node you connect after Open Level runs just before the current level disappears.
Open Level (by Object Reference)
  → Set Score = 0     ← Runs in the current level, which vanishes right after. Pointless
Always finish saving scores and cleaning up before you call Open Level. Getting this order backwards is the classic cause of "the data I saved isn't there."
by Name vs. by Object Reference
In UE5, Open Level comes in two versions.
| Node | How you specify the level | Characteristics |
|---|---|---|
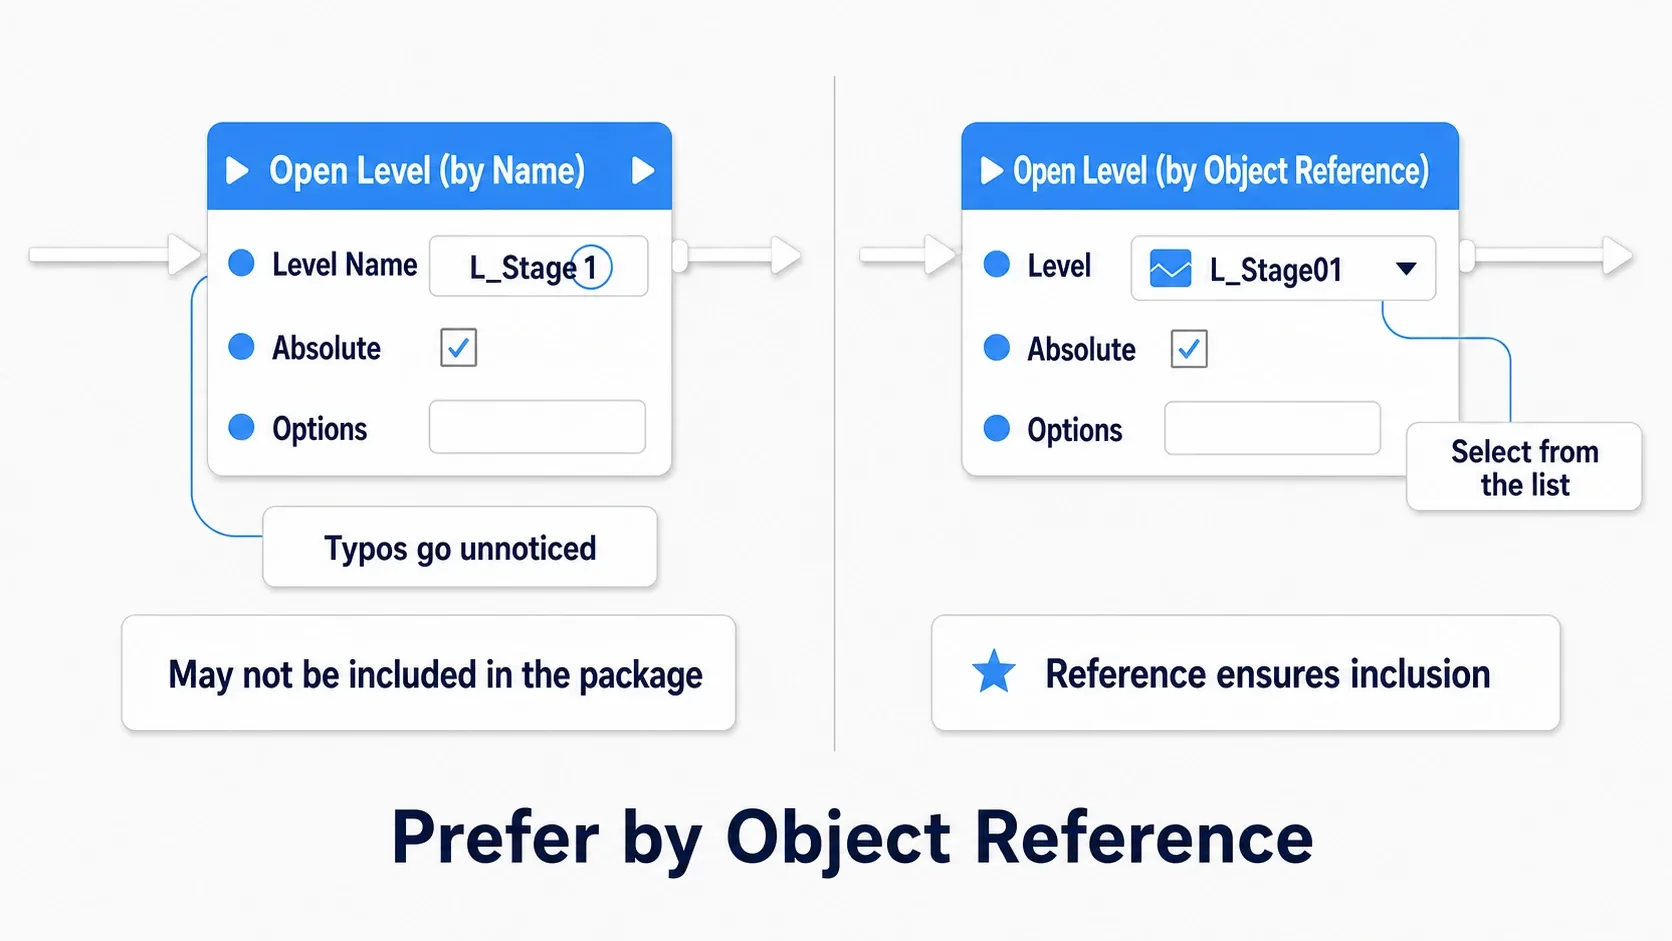
| Open Level (by Name) | Write a name (Name type) in Level Name | You can build the name at runtime. Typos go unnoticed |
| Open Level (by Object Reference) | Point Level directly at a level asset | You pick from a list, so you can't get it wrong, and it follows renames |
Use Open Level (by Object Reference) by default. There are two reasons.
- You can't misspell it: you just pick from a dropdown, so you'll never write
L_Stage1when you meantL_Stage01 - It's guaranteed to be included in the package: because a reference to the asset remains, the map gets pulled into the build along with it
The second one matters most. by Name is nothing but a string, so the build has no way of knowing that map is needed. The result is a hard-to-diagnose bug where things work in the editor but transitions fail only in the packaged executable.
The one case where you have to use by Name is when you build the name dynamically, such as L_Stage01 / L_Stage02. In that case, manually add the maps in question to List of maps to include in a packaged build under Project Settings > Project > Packaging. The packaging article covers this in detail.
| Pin | What it does |
|---|---|
| Absolute | Leaving it at the default (on) is fine |
| Options | Extra information such as ?Difficulty=Hard. You receive it on the GameMode side, which is a bit fiddly, so GameInstance (covered below) is easier for carrying values around |
Also note that if you get the level name wrong, the screen may go black or nothing may happen at all. When that occurs, open the Output Log first and check for a load-failure warning (→ the logging article).
A Level Change Destroys Almost Everything
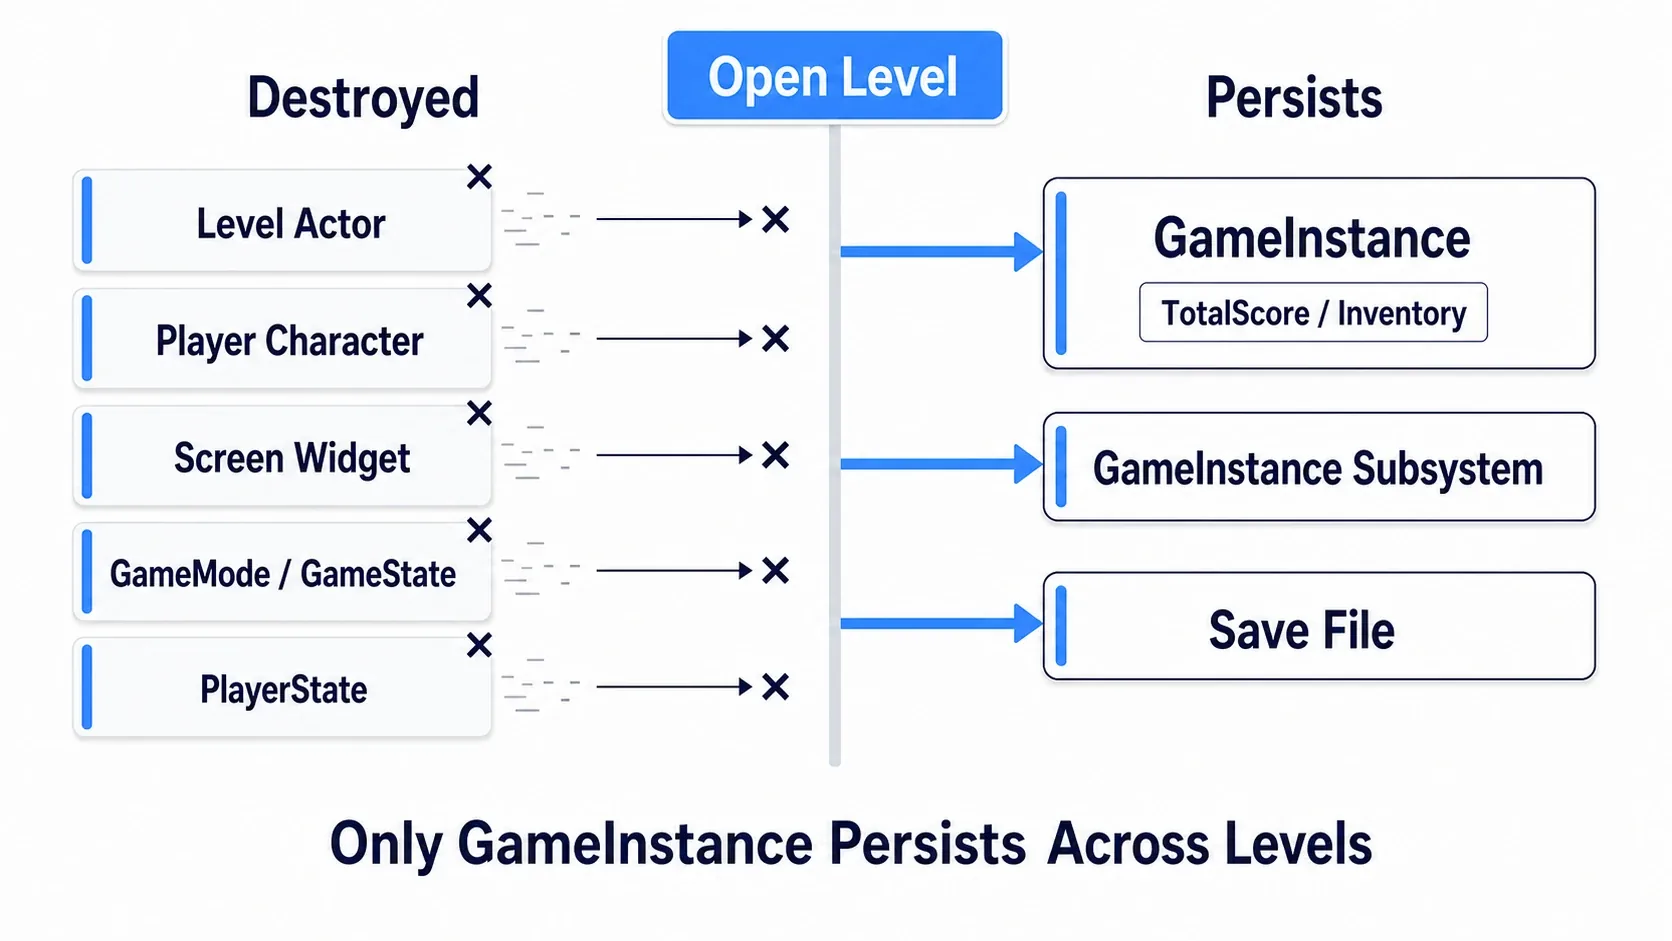
This is the biggest pitfall. When Open Level runs, essentially everything in the current level is destroyed.
| Destroyed | Survives |
|---|---|
| Every Actor placed in the level | GameInstance |
| The player Character | GameInstance Subsystems |
| Widgets added to the viewport | Save files (on disk) |
| GameMode / GameState / PlayerState | |
| Level Blueprint variables |
Note that even GameMode and PlayerState are rebuilt. That's because they are provided per level. It's also why World Settings' GameMode Override lets you assign a different GameMode to each level (→ the game framework article).
"I stored the score in PlayerState and it was 0 on the results screen" is a common way to get stuck, but that behavior is exactly as designed. PlayerState is a container that lives and dies within a single level.
Handing Data to GameInstance
The one container that survives for as long as the session lasts is GameInstance. Exactly one exists, from the moment the game launches until it quits.
Creating one takes three steps.
- In the Content Browser, create a Blueprint Class and choose GameInstance as the parent class (search for it under
ALL CLASSES) - Name it
BP_GameInstanceand add the variables you want to carry over - Set that class under Project Settings > Project > Maps & Modes > Game Instance Class
Skip the third step and nothing happens. When "I made a GameInstance but values aren't retained," check here first.
You can read and write it from anywhere.
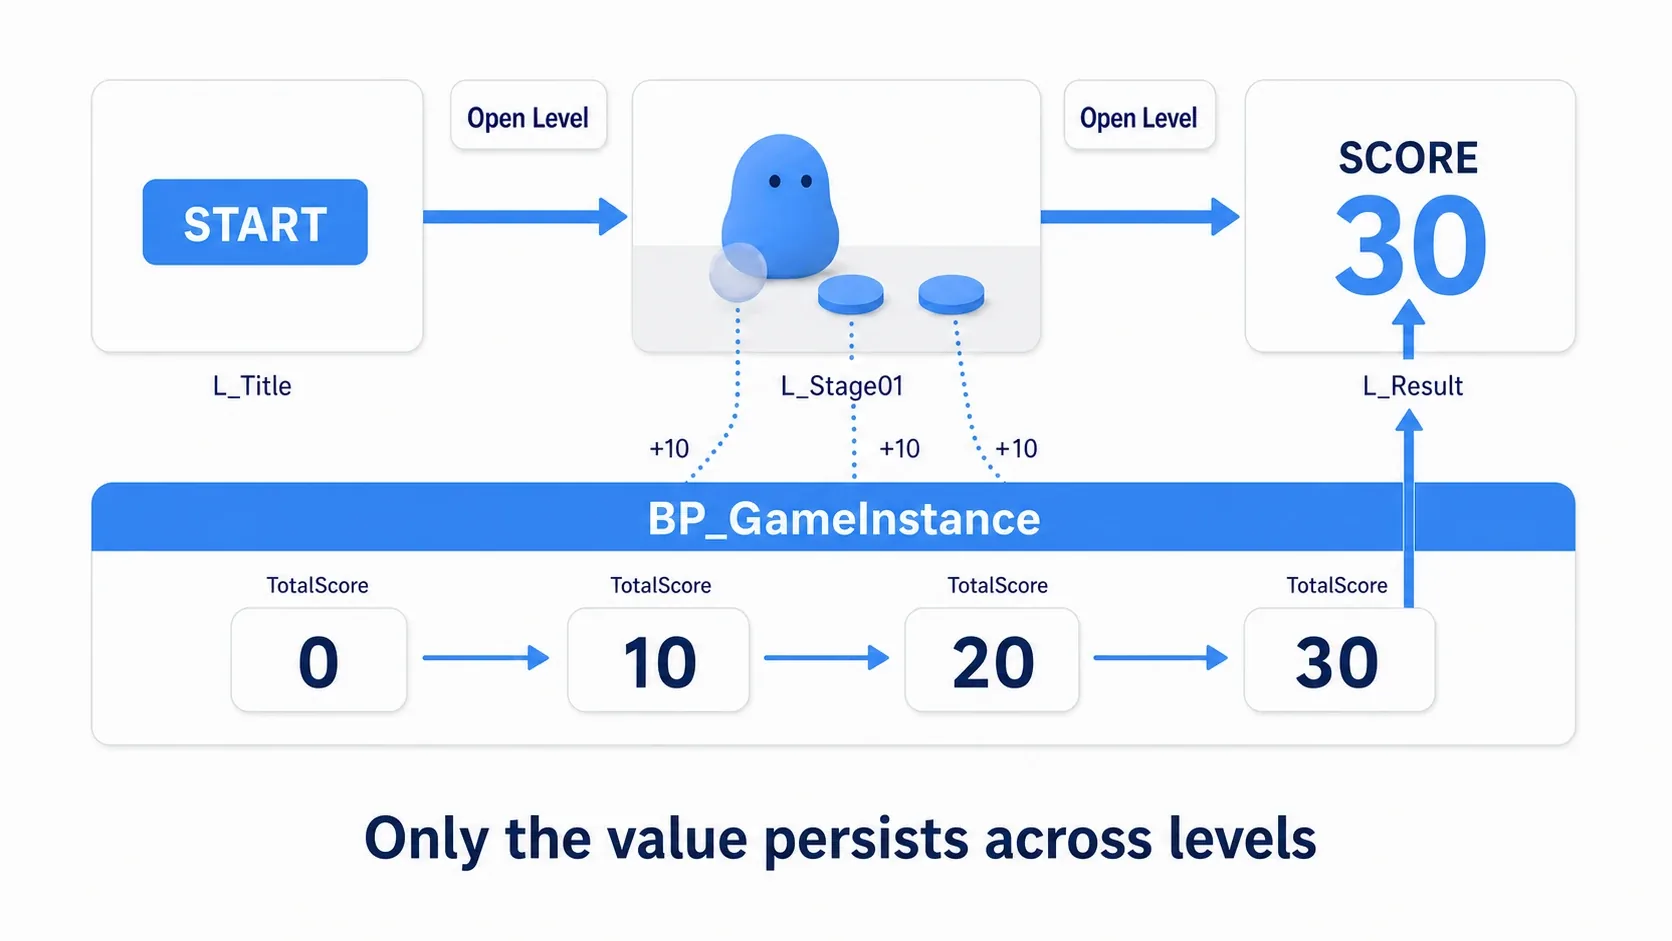
Get Game Instance
  → Cast To BP_GameInstance
  → Set TotalScore = TotalScore + 10
Get Game Instance can be called from any Blueprint. There's one Cast involved, but GameInstance always exists, so it won't fail.
Note: If you'd rather not write the Cast every time, or you want to split features into separate files, use a GameInstance Subsystem. It has the same lifetime as GameInstance without bloating that one class (→ the Subsystem article).
Keep in mind that GameInstance only survives while the application is running. Quit the game and it's gone. For data that must still be there next launch, write it to disk using the save/load system.
Why Your Loading Screen Never Appears
You'll want to show a "Now Loading" message while loading. The obvious approach looks like this.
Create Widget (WBP_Loading) → Add to Viewport → Open Level
This doesn't work. The Widget is created, but it never once appears on screen.
The reason is that level loading is synchronous.
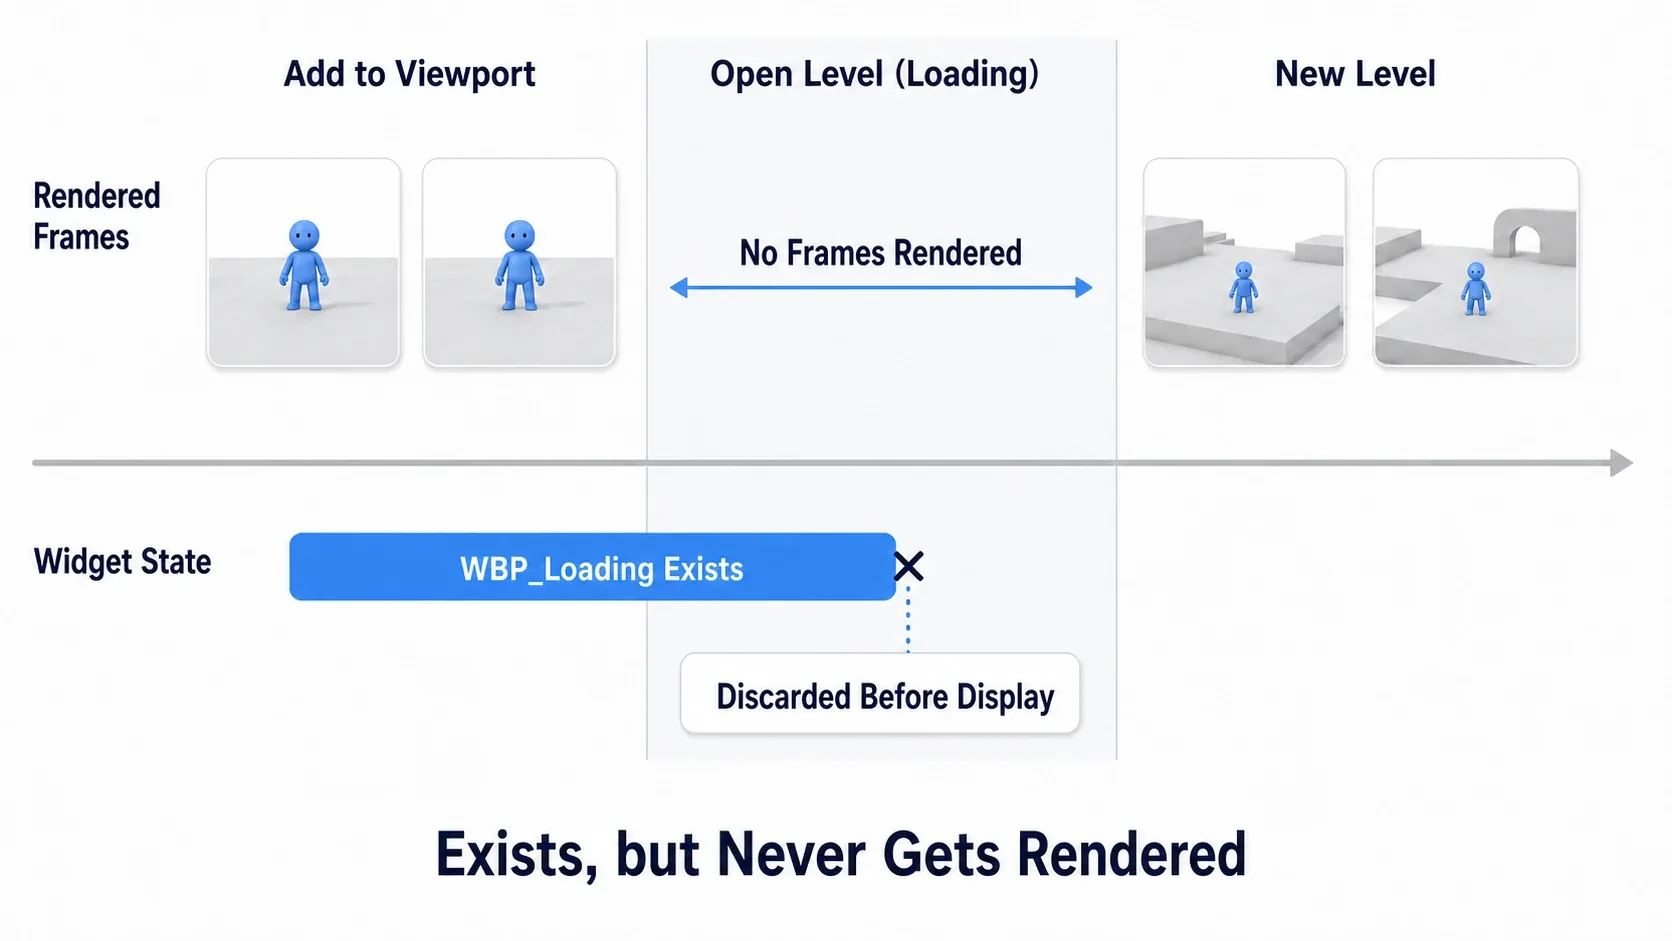
For anything to appear on screen, that frame has to be rendered. But during the load that Open Level kicks off, the game thread is fully occupied with loading and not a single frame is drawn. The Widget you added is destroyed at the switch to the new level, without ever getting a chance to be rendered.
The result is that the player sees a frozen screen for a few seconds. That's what "it freezes while loading" actually is.
Full-scale titles solve this with asynchronous loading and a dedicated loading screen system. Building that as a solo developer is a heavy lift, and often not worth the cost.
A Practical Compromise: Fade to Black First
You can't eliminate the freeze. The practical solution is to make the freeze less noticeable.
What you do is simple: fade the screen fully to black, then call Open Level. Since it freezes while already black, all the player sees is a slightly long fade.
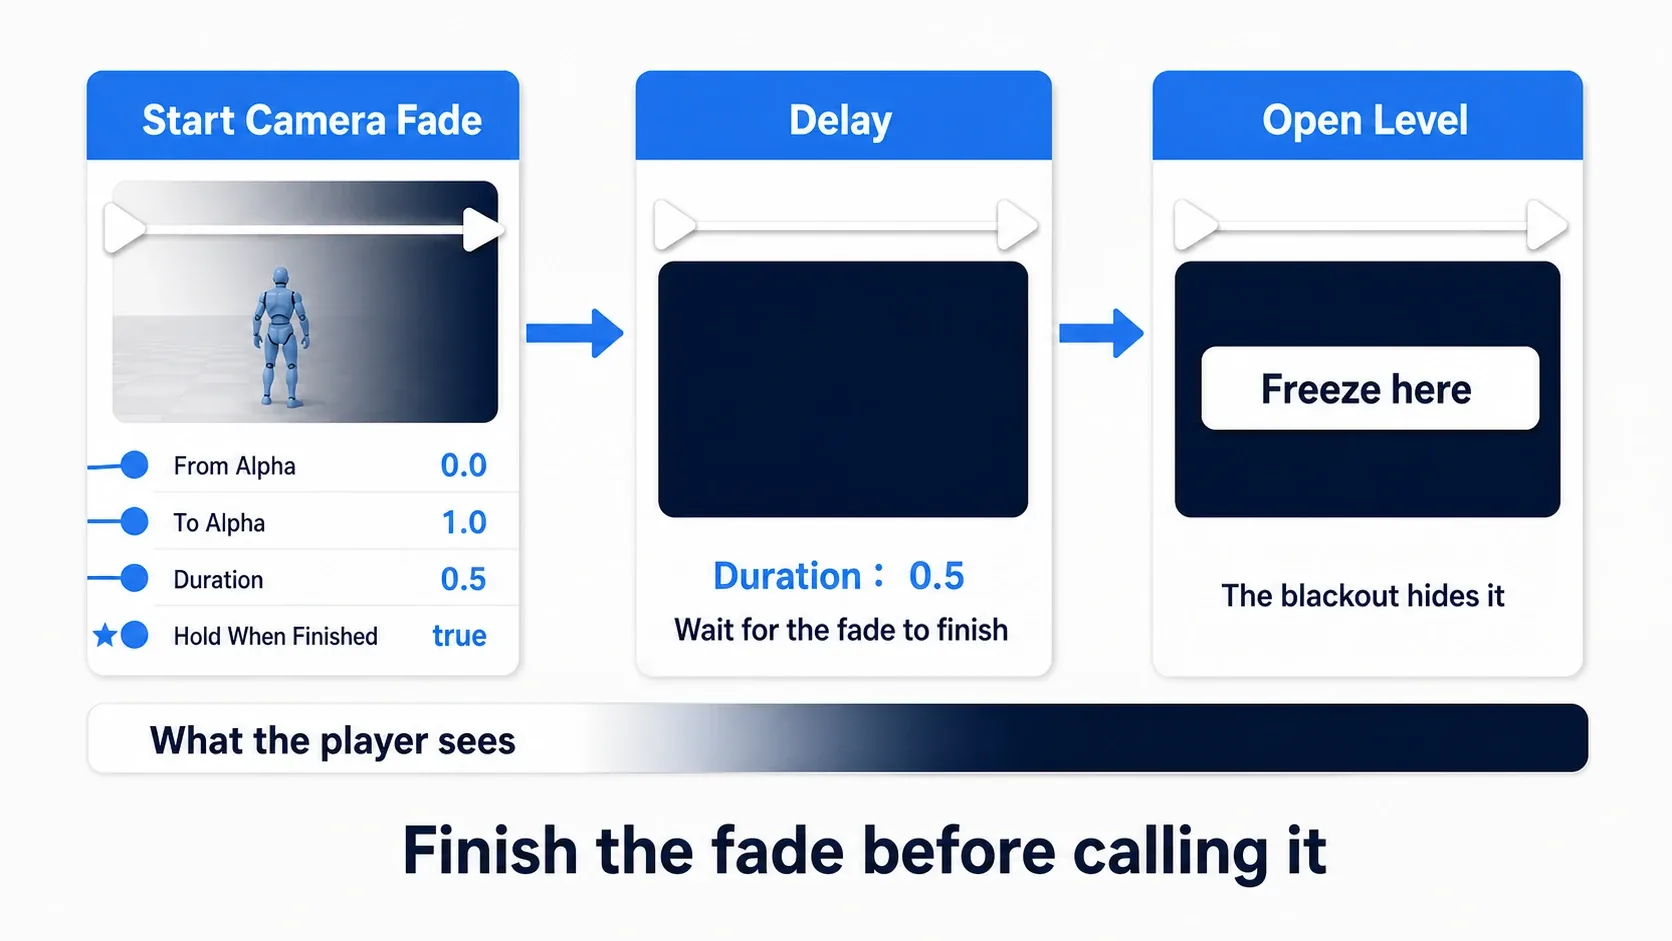
When you want to transition
  → Get Player Camera Manager (Player Index = 0)
  → Start Camera Fade
        From Alpha        = 0.0
        To Alpha          = 1.0
        Duration          = 0.5
        Color             = Black
        Should Fade Audio = true
        Hold When Finished = true
  → Delay (0.5)          ← Wait until the fade finishes
  → Open Level (by Object Reference)
The key is turning on Hold When Finished. With it off, the screen snaps back the instant the fade completes, and the player sees the frozen frame.
Turning on Should Fade Audio fades the sound along with it. A screen that goes dark while footsteps keep playing feels off, so leave this on by default.
In the destination level, fade back in with the reverse.
Event BeginPlay
  → Get Player Camera Manager
  → Start Camera Fade (From Alpha = 1.0, To Alpha = 0.0, Duration = 0.5, Color = Black)
Warning: Start Camera Fade does not cover UMG Widgets. It affects the camera image, so UI stays on top of the black. If you want to hide the HUD too, create a Widget with a fullscreen black Image and raise its opacity with an animation instead (→ the UMG article).
Hands-On: Connecting Title to Results
Stage select in a puzzle game, one run in a roguelite, one race in a racing game. The three-screen skeleton of title → main game → results has the same shape regardless of genre. Here we'll build that loop while carrying a score through it.
The Finished Result
The button on the title screen starts the stage; pick up three coins, touch the goal, and the results screen shows SCORE: 30.
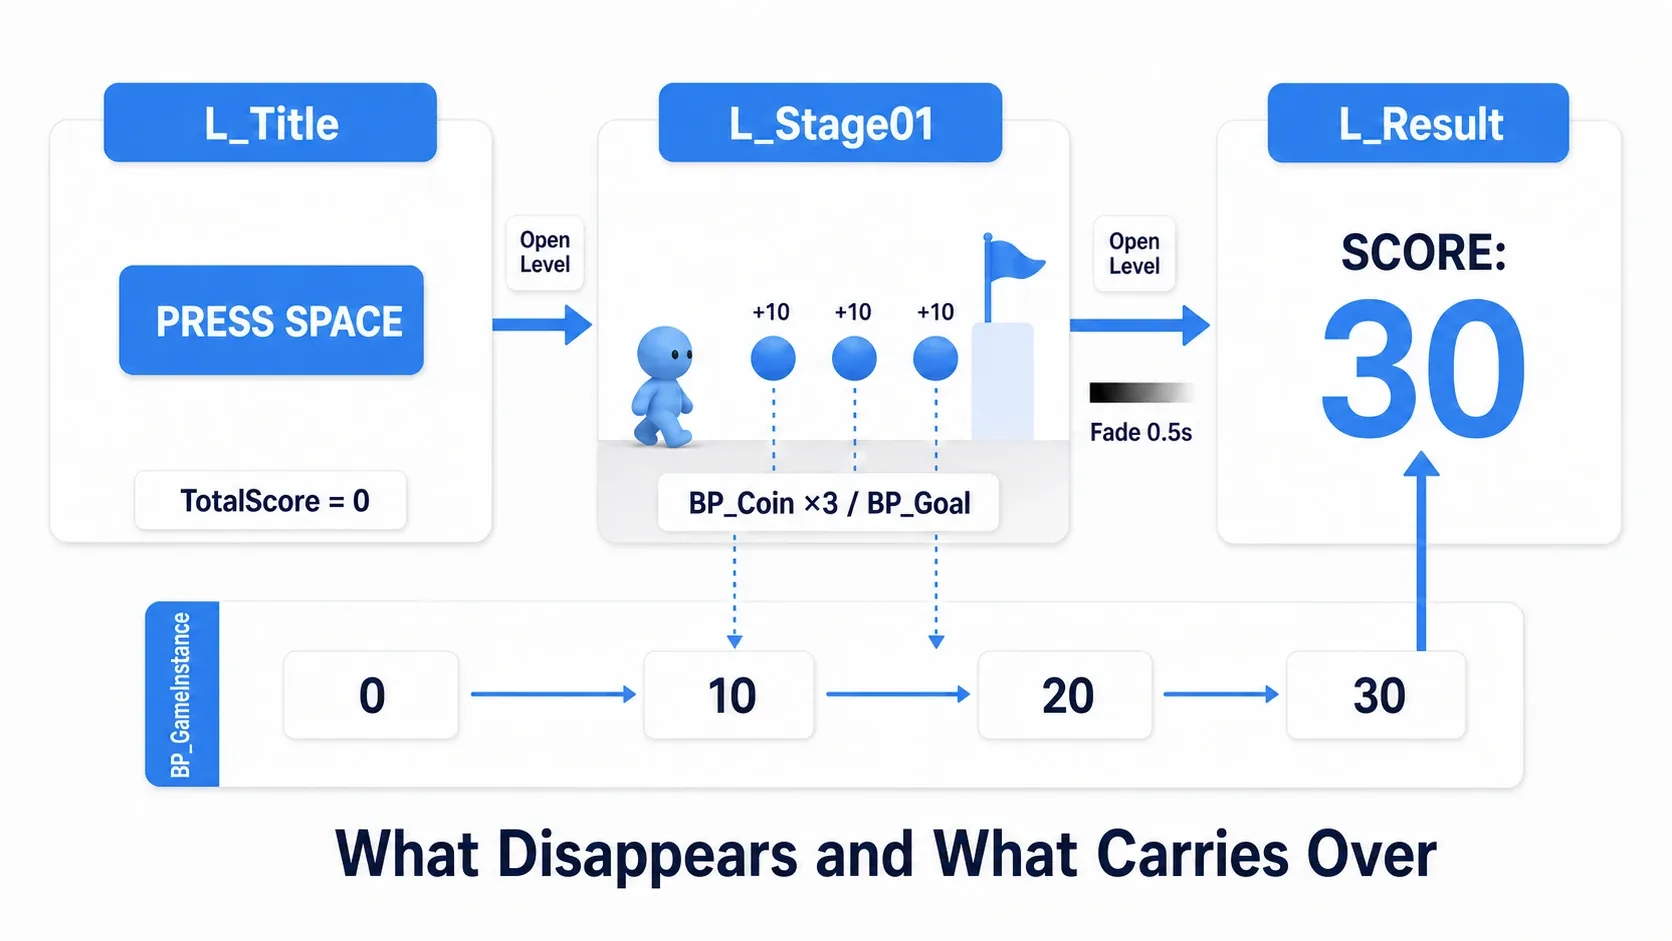
Setup to Reproduce
Create a new project from the Third Person template and prepare the following.
Three levels (create them with File > New Level > Basic and save them in Content/Maps)
| Level | Contents |
|---|---|
L_Title | Player Start only |
L_Stage01 | Player Start, three BP_Coin, one BP_Goal. Set World Settings' GameMode Override to BP_ThirdPersonGameMode |
L_Result | Player Start only |
GameInstance
| Class | Variable | Type | Default |
|---|---|---|---|
BP_GameInstance (parent: GameInstance) | TotalScore | Integer | 0 |
After creating it, set Project Settings > Project > Maps & Modes > Game Instance Class to BP_GameInstance.
Two Actors (both with Actor as the parent class)
| Class | Components | Settings |
|---|---|---|
BP_Coin | Sphere Collision (Radius 50.0) + Static Mesh (Sphere, Scale 0.5) | Collision Preset is OverlapAllDynamic |
BP_Goal | Box Collision (Box Extent 100 / 100 / 100) | Same as above |
Also add a bool variable named IsTransitioning (default false) to BP_Goal. It prevents the transition from running twice if the goal is touched repeatedly.
From Title to Stage
Build this in L_Title's Level Blueprint (we'll skip the UI and start with a key press).
Event BeginPlay
  → Get Game Instance → Cast To BP_GameInstance
  → Set TotalScore = 0        ← Reset here so a second playthrough starts fresh

Space Bar (Pressed)
  → Open Level (by Object Reference)  Level = L_Stage01
The key point is resetting the score on the title screen. If you reset it on the results side, you'd wipe the very score that screen is supposed to display the moment it opens.
Coins and the Goal
Here's BP_Coin's event graph.
Event ActorBeginOverlap (Other Actor)
  → Cast To BP_ThirdPersonCharacter (Other Actor)   ← Don't react to anything but the player
  → Get Game Instance → Cast To BP_GameInstance
  → Set TotalScore = TotalScore + 10
  → Print String  (TotalScore)                      ← For checking
  → Destroy Actor
BP_Goal fades to black before switching levels.
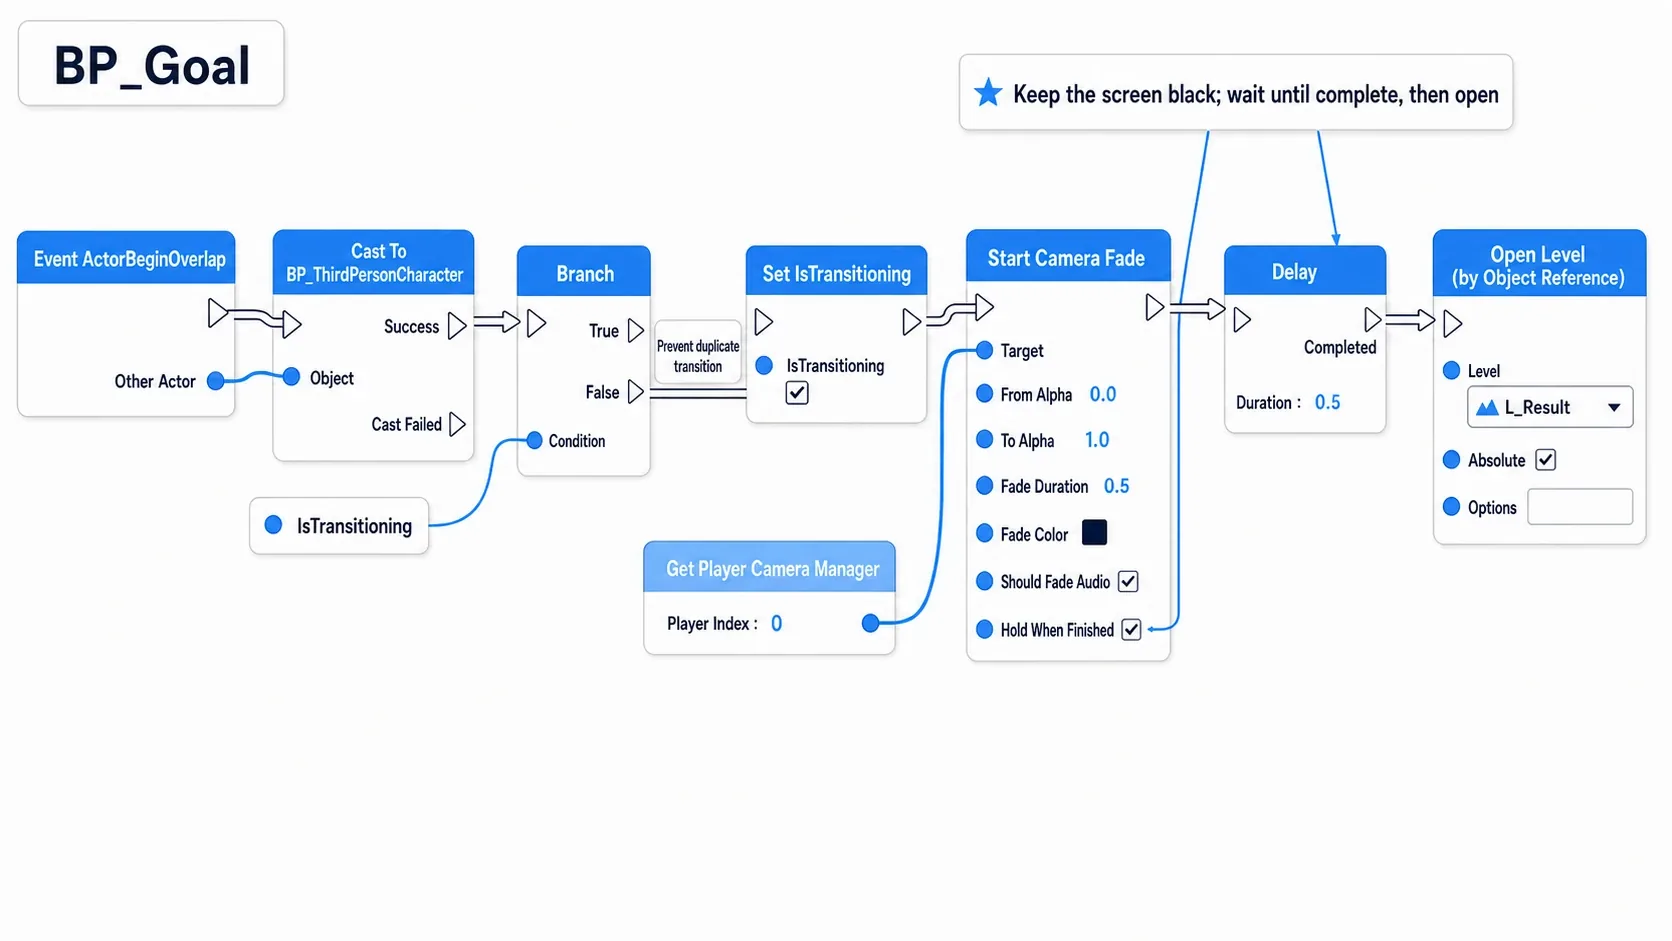
Event ActorBeginOverlap (Other Actor)
  → Cast To BP_ThirdPersonCharacter (Other Actor)
  → Branch (Condition = IsTransitioning)
      True  → (do nothing)
      False ↓
  → Set IsTransitioning = true
  → Get Player Camera Manager (0)
  → Start Camera Fade (From 0.0 → To 1.0 / Duration 0.5 / Black / Fade Audio / Hold When Finished)
  → Delay (0.5)
  → Open Level (by Object Reference)  Level = L_Result
Displaying It on the Results Screen
Read the carried-over value in L_Result's Level Blueprint.
Event BeginPlay
  → Get Player Camera Manager (0)
  → Start Camera Fade (From 1.0 → To 0.0 / Duration 0.5 / Black)
  → Get Game Instance → Cast To BP_GameInstance
  → Print String ("SCORE: " + TotalScore)   Duration = 10.0
Print String is just for checking. To put it on the actual screen, pass this value to a Text in a Widget.
Verifying It
Open L_Title, hit Play, and press Space.
- Collect all three coins and reach the goal → the screen darkens over 0.5 seconds and the results show
SCORE: 30 - Reach the goal without collecting any →
SCORE: 0 - Collect only two →
SCORE: 20 - Return to the title and play again → it starts from 0 again, with no carryover
If something goes wrong, here's how to narrow it down.
- Results always show 0 → Game Instance Class isn't set in Project Settings, so the default GameInstance is being used
- Coins don't increase the score →
Set TotalScoreis targeting a variable on the coin itself or the Level Blueprint instead of the GameInstance - It switches without fading →
Delayis shorter thanDuration, orHold When Finishedis off - The goal transitions twice → the
IsTransitioningBranch is missing, or your logic is connected to the True side - Works in the editor but black in the package → you specified the level by name and the map isn't included in the package
- You can't move in the stage →
GameMode Overrideisn't set inL_Stage01's World Settings
Now try retargeting Set TotalScore from the GameInstance to a Level Blueprint variable. The Print String in the stage still counts up correctly, but nothing survives to the results screen. Seeing "almost everything is destroyed" for yourself makes it much easier to decide where values belong.
Two things to take away.
- Decide where a value lives before you write it: if it crosses levels, GameInstance; if it only matters inside one level, PlayerState or GameState is enough. Moving it later is a chore, so ask "does this cross levels?" before you create the variable
- Always guard transitions against double firing: overlaps and buttons can both fire multiple times in one frame. A single flag like
IsTransitioningprevents doubled fades and conflicting transitions
For polishing the look of the results screen, continue to the UMG article; for keeping a high score across launches, the save/load article.
How This Differs From Level Streaming
There's one more level-related feature: Level Streaming. Their roles are clearly different, so when in doubt, choose by the following.
| Open Level | Level Streaming | |
|---|---|---|
| What it does | Switches | Connects |
| Previous level | Destroyed | Stays as it is |
| Good for | Title, stage select, results | Large maps, seamless movement indoors |
| Player | Rebuilt | Stays the same |
Even for something like "enter the dungeon entrance and move inside," Open Level is enough if it's fine for the screen to change during loading. Conversely, if you want the space beyond the door to look continuous, that's Level Streaming. The Level Streaming article covers it in detail.
Bonus: Good to Know for Later
- Restarting the same level also uses Open Level: build a retry by passing the result of
Get Current Level NametoOpen Level (by Name). Actor state is fully reset, which is more reliable than writing your own reset logic. That said, if you don't want players redoing the whole stage on every death, keep the level loaded and move them back to a recovery point instead (see Checkpoints and respawning) - Change which level opens at startup: as you approach completion, set Project Settings > Maps & Modes > Game Default Map to
L_Title. Leave it on a test level and your packaged build will open straight into a work-in-progress screen - You can change the GameMode per level: World Settings'
GameMode Overrideis a per-level setting. Assigning a UI-only GameMode to the title and your normal one to the stage makes switching input modes much easier - Don't put too much in the Level Blueprint: what's in a Level Blueprint is specific to that level and can't be reused. Once your transition logic grows, move it to a GameMode or a GameInstance Subsystem (→ Level Blueprints vs. Blueprint Classes)
- Keep maps in one place: settling on a folder like
Content/Mapssaves you hunting both when specifying maps in packaging settings and when reopening them (→ the asset management article)
Summary
- Switching takes one node, Open Level. But it runs at the end of the frame, so do your cleanup before calling it
- Use by Object Reference by default. No typos, and it's guaranteed to be in the package
- A level change rebuilds Actors, Widgets, GameMode, and PlayerState from scratch
- The only survivor is GameInstance. Put values you want carried over there
- Loading screen Widgets never get a chance to be drawn, so complete a fade to black first, then call Open Level
- Open Level to switch, Level Streaming to connect
In the game you're building now, which numbers need to survive across stages? Take a moment to check where those values are currently stored.