The steps to build a pause menu are short. Create a widget, call Set Game Paused, and enemies and physics freeze. But the moment you run it, the menu appears yet the buttons don't respond, the mouse cursor is nowhere to be seen, and once you unpause the character refuses to move.
The reason is that pausing only stops the game world , while where input is pointed is managed completely separately. This article sorts out what Set Game Paused stops and what it doesn't, how to switch Input Mode and the mouse cursor, why Enhanced Input goes silent while paused, and how to build a pause menu that opens and closes with Esc.
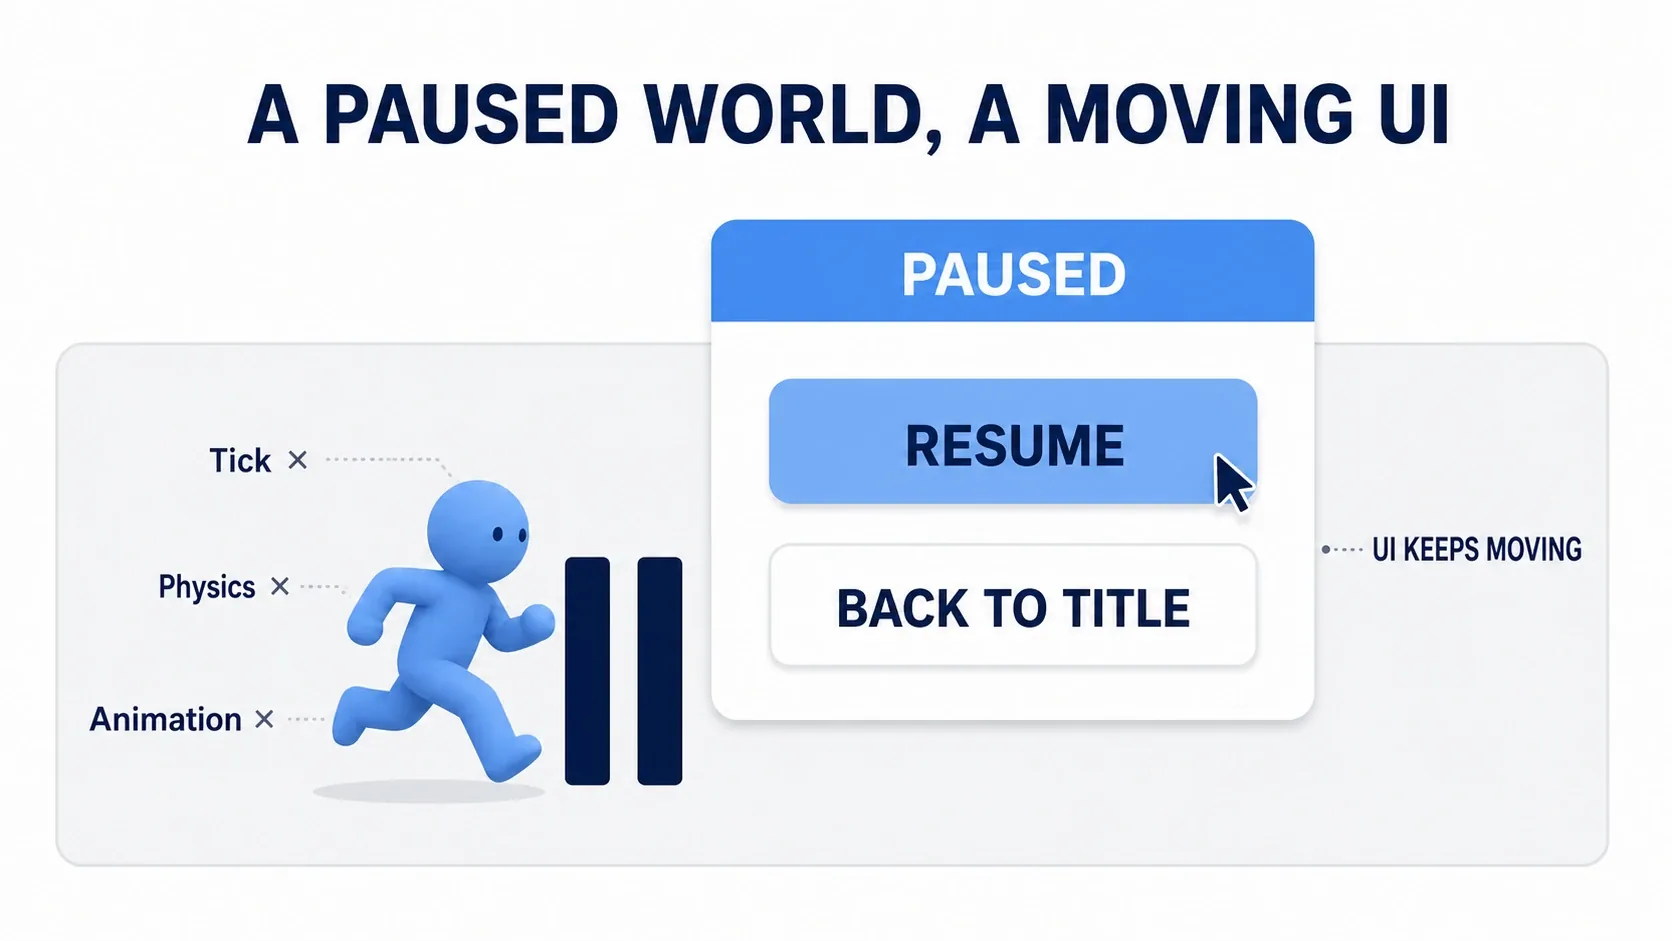
Tested on: UE 5.4 and later
What You'll Learn
- What
Set Game Pausedstops (Tick, Timers, physics, animation) and what it doesn't (UI)- The three Input Mode options, and how to show the mouse cursor
Tick Even when Pausedfor Actors you want running during a pauseTrigger When Pausedto give the unpause key special treatment in Enhanced Input- Hands-on: a pause menu that opens with Esc and has working Resume and Quit to Title buttons
What Set Game Paused Stops
Pausing comes down to a single node: Set Game Paused . Right-click in a Blueprint and search for it. It has one pin, Paused (Boolean). Pass true to pause and false to resume. The returned Boolean tells you whether the pause state was actually changed.
What this node stops is the progression of world time. Specifically:
| Target | While Paused |
|---|---|
An Actor's Event Tick | Stops |
Set Timer by Event / by Function Name | Stops |
| Physics simulation (falling, collisions) | Stops |
| Skeletal Mesh animation | Stops |
| Timeline nodes | Stops |
| Effects such as Niagara | Stops |
| UMG Widgets | Keeps running |
| Widget Animation | Keeps running |
| Player Controller mouse input | Keeps running |
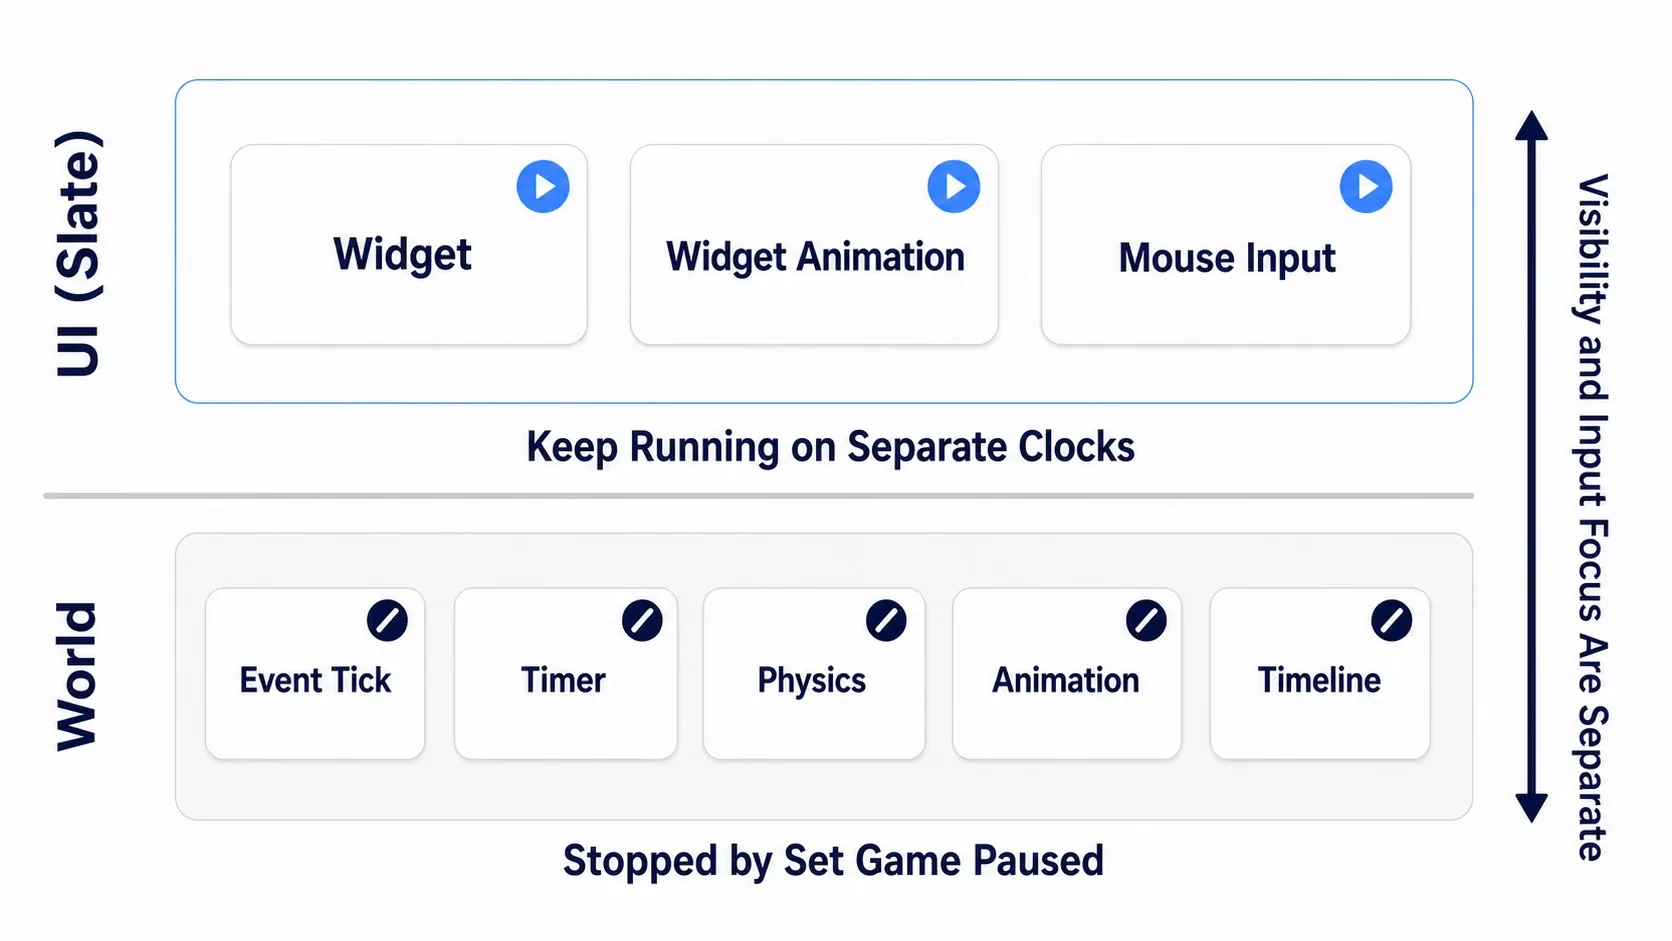
The last three rows are the important ones. UI (Slate) runs on a different clock from the world. That's exactly why button hover effects still respond while paused, and why a menu's fade-in animation still plays. Pause menus work at all because of this separation.
The flip side of that separation is the state where "the menu is alive but pressing it does nothing." Being displayed and having input pointed at you are two different things.
Keeping Only the UI Alive in a Frozen World
Where keyboard and mouse input goes is decided by the Input Mode held on the Player Controller . There are three, each with a dedicated node.
| Node | Where Input Goes | Main Use |
|---|---|---|
| Set Input Mode Game Only | Game side only | Normal gameplay |
| Set Input Mode UI Only | UI side only | Pause menus, title screens |
| Set Input Mode Game and UI | Both | Designs where you can walk while an inventory is open |
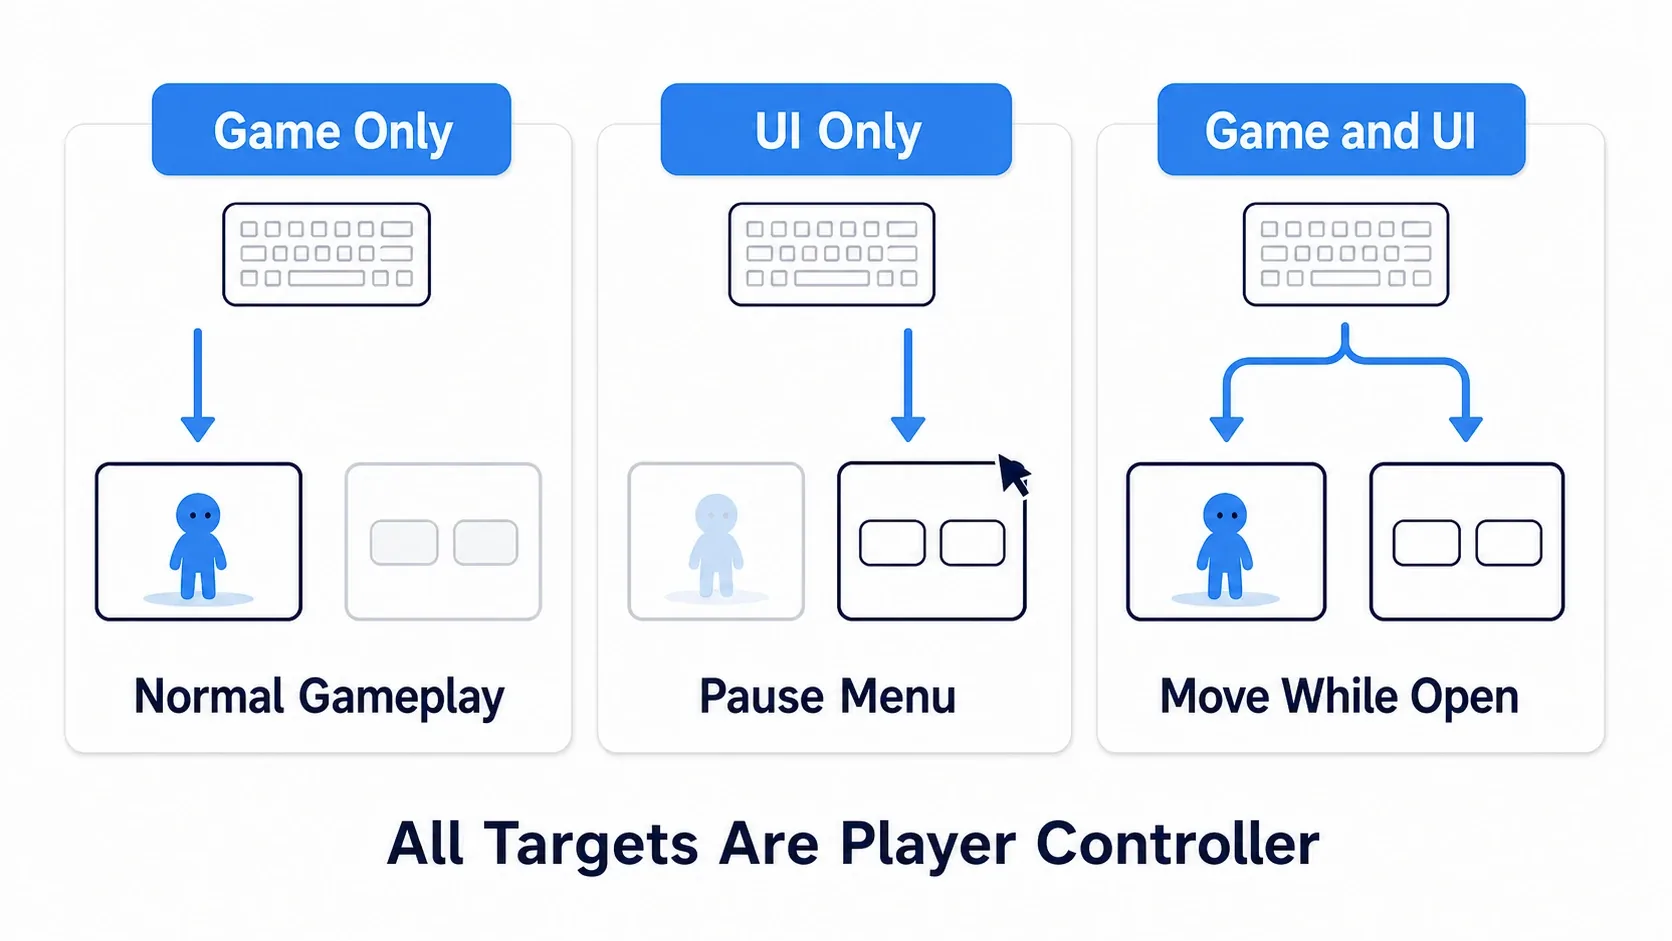
These three aren't Player Controller member functions. They're Widget Blueprint Library functions . Pass the target into the node's Player Controller pin (connect Self if you're calling from inside the Player Controller).
One more thing: Game And UI does not deliver input to both at once. It hands input to the UI first, and only input the UI didn't consume flows through to the game.
Set Input Mode UI Only has an In Widget to Focus pin. Pass in the pause menu widget you just opened. That way the widget starts out holding focus, so a gamepad or keyboard can operate it immediately.
There's also a setting needed on the widget side.
Note:
Is Focusablelives in the Widget Blueprint's Class Defaults (Interaction category), and it's off by default . Turning it on lets the widget itself receive focus.However, turning it on alone doesn't automatically select the first button . If you want gamepad control right away, run
Set Keyboard Focuson the target Button from something like the widget'sEvent Construct.
The mouse cursor is managed separately. The Player Controller's Show Mouse Cursor is just a Boolean variable, so you toggle it with Set Show Mouse Cursor. Changing Input Mode does not bring up the cursor by itself. Always handle these two together.
When You Need Something to Keep Moving
Sometimes you want "the camera to keep slowly rotating while paused" or "just the background effect to keep moving." You can make exceptions per Actor.
In an Actor Blueprint's Details panel, open the Actor Tick category and turn on Tick Even when Paused . Now that Actor's Event Tick alone keeps getting called during a pause.
| Where | Setting | Effect |
|---|---|---|
| Actor Blueprint > Class Defaults > Actor Tick | Tick Even when Paused | That Actor's Tick runs during a pause |
| Actor Blueprint > Class Defaults > Actor Tick | Start with Tick Enabled | Must also be on, or it won't Tick at all |
Even with this on, that Actor's physics, animation, and components don't automatically start running again . Think of it as: only what you explicitly call from Event Tick will execute.
Delta Seconds receives the frame interval, but that isn't wall-clock real time itself. If you need to measure elapsed time accurately during a pause, use Get Real Time Seconds.
The more exceptions you add, the harder it gets to track what's frozen and what isn't. It's safer to build with no exceptions first and open them up one at a time as needed .
Note: If you only want things slower rather than fully stopped, use
Set Global Time Dilationinstead of pausing. Passing something like 0.1 gives you slow motion, with animation and physics continuing at that speed. Hit stop and bullet time belong here.
Enhanced Input Stops During a Pause
This is where implementations trip up most often. Input Actions built with Enhanced Input do not fire during a pause by default. Press the same key you used to open the pause menu, and no close event arrives.
The fix is one setting on the Input Action asset.
- Double-click your pause Input Action (for example,
IA_Pause) to open it - Check
Trigger When Pausedin the Details panel - Save
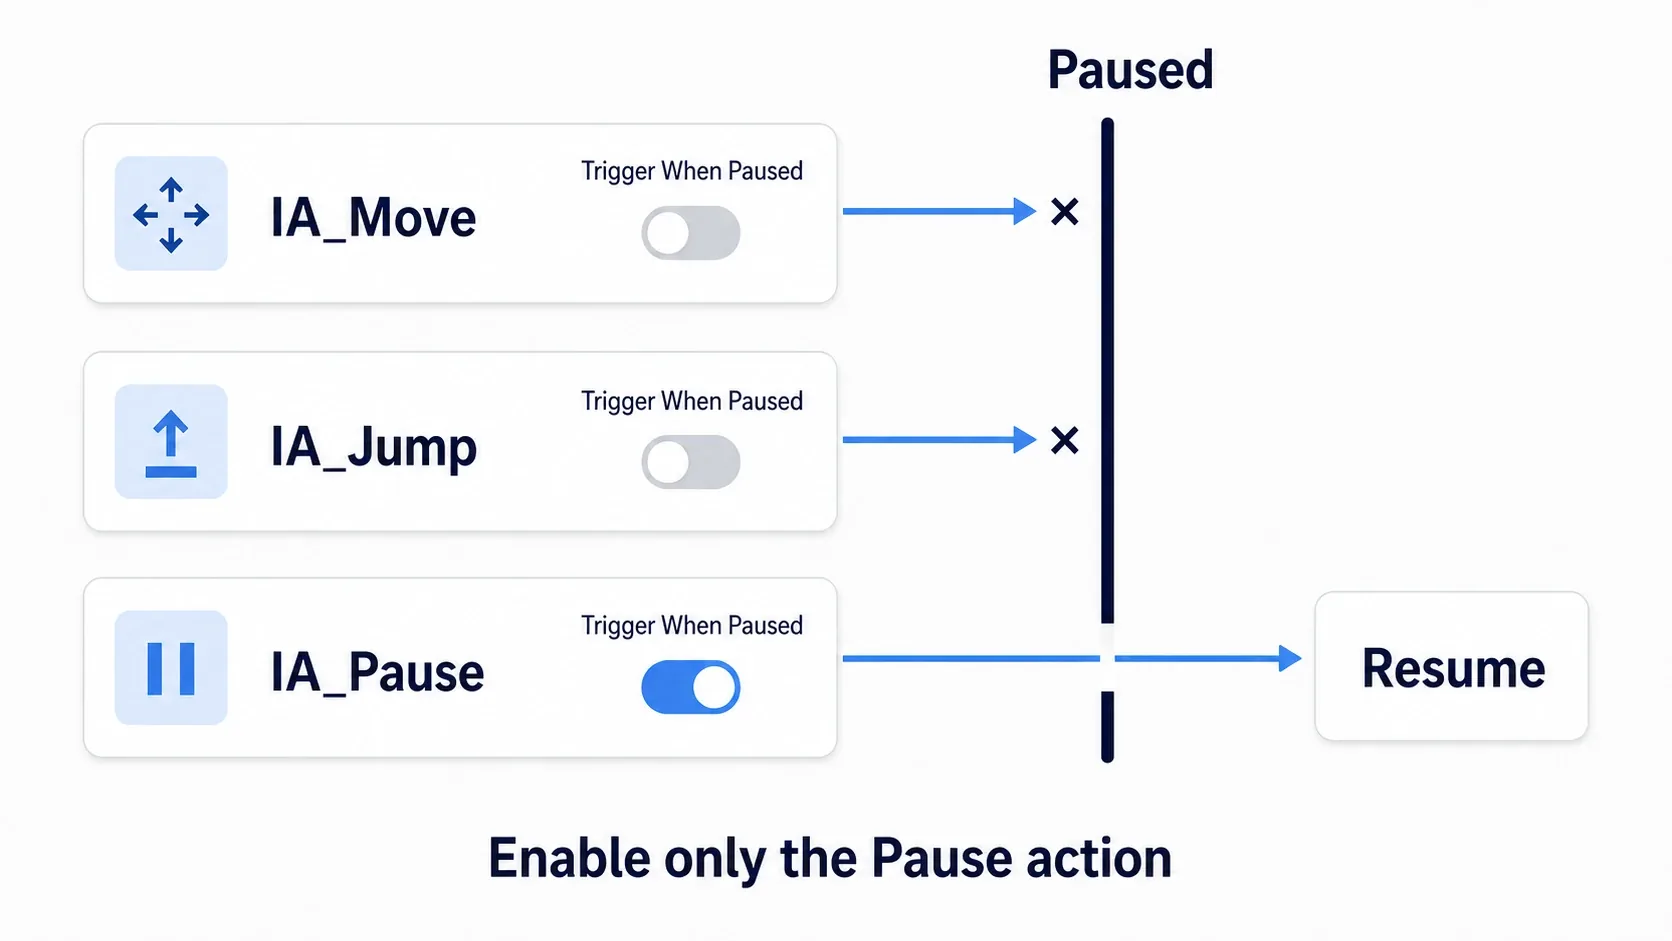
This setting is per Input Action . That means you can keep movement and attack actions frozen while letting only the unpause key through . That's exactly the behavior you want.
Which also means you shouldn't turn it on for every action. Attack input would come through during the pause and fire all at once the moment you resume. Turn it on for the one pause action only.
Setting up Enhanced Input itself is covered in the Enhanced Input System article.
Hands-On: Building a Pause Menu That Opens with Esc
Interrupting an action game, restarting a puzzle game, changing settings in a horror game. Every genre needs a pause menu. Here we build one all the way to working "Resume" and "Quit to Title" buttons.
The Finished Result
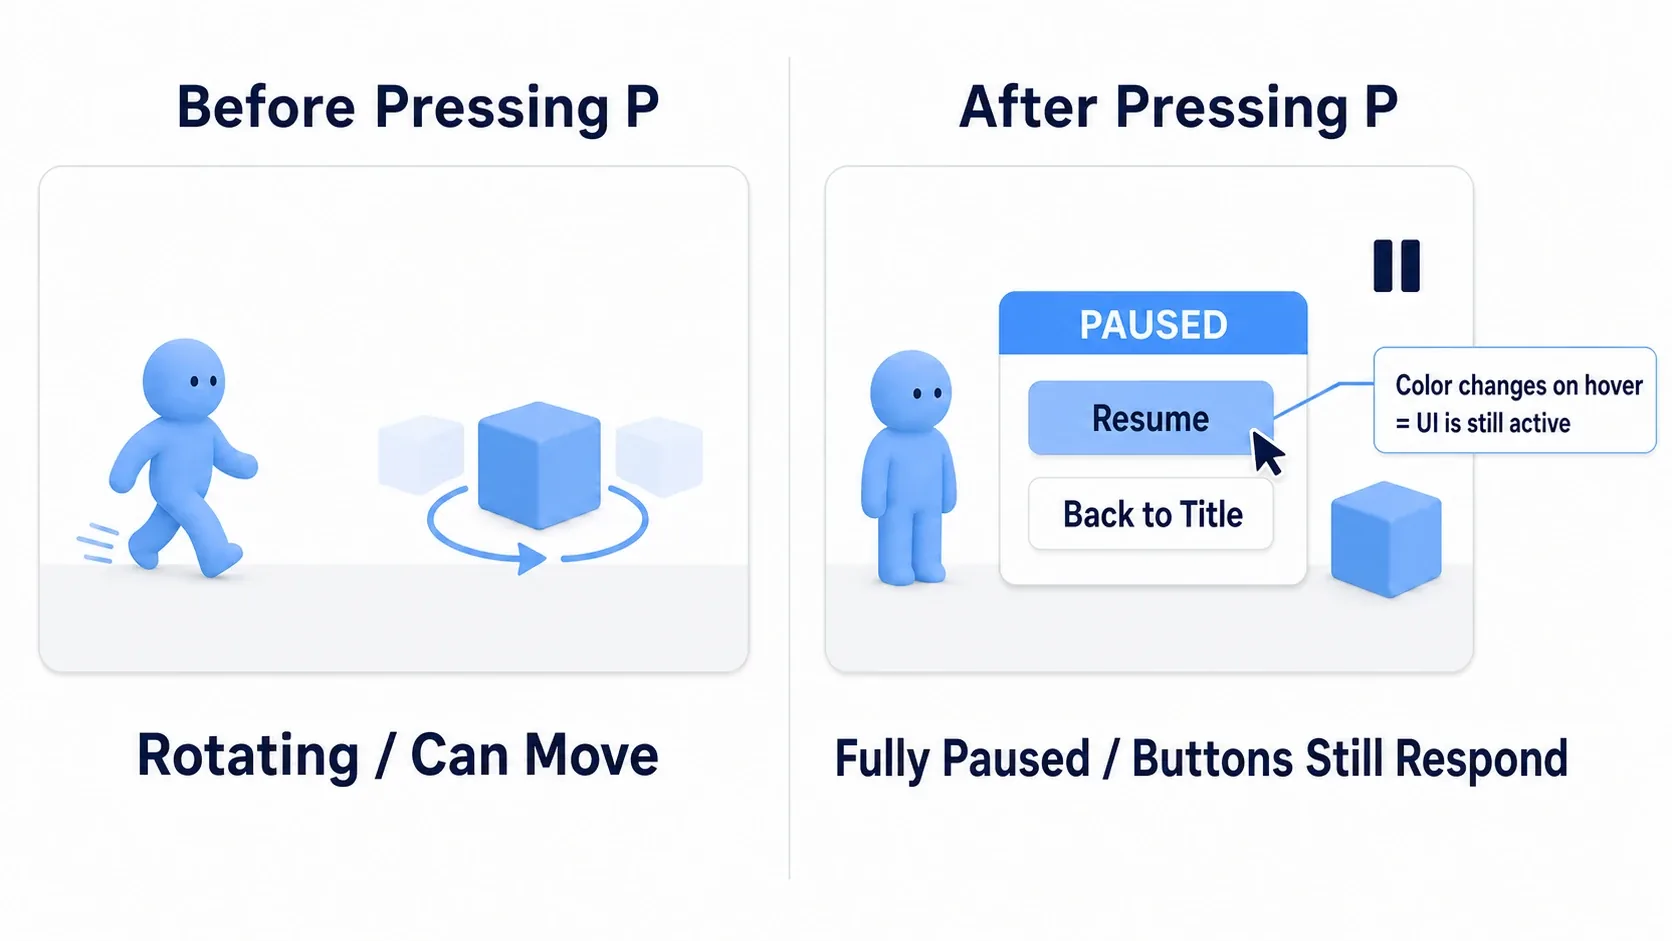
Press Esc and the world freezes, a menu appears in the center of the screen, and the mouse cursor shows up. The rotating Cube in the background stops dead, but hovering over a button still changes its color. Press "Resume" and the menu disappears and the Cube starts spinning again.
Setup to Reproduce It
Create a new project from the Third Person template and prepare the following.
| # | What to Create | Details |
|---|---|---|
| 1 | BP_RotatingCube | Derived from Actor. Add a Static Mesh (Cube) and wire Event Tick → Add Actor Local Rotation (Delta Rotation's Yaw = Delta Seconds × 90). Place one in the level as a visual marker that motion has stopped |
| 2 | WBP_PauseMenu | Derived from User Widget. Put a Vertical Box in the center of a Canvas Panel, add two Buttons, and put a Text inside each ("Resume" and "Quit to Title") |
| 3 | BP_PauseController | Derived from Player Controller |
| 4 | IA_Pause | Input Action. Value Type is Digital (bool). Turn on Trigger When Paused in the Details panel |
| 5 | IMC_Default | Add IA_Pause to the Input Mapping Context that already ships with the Third Person template, and bind both P and Escape to it |
| 6 | GameMode setting | Open BP_ThirdPersonGameMode and change Player Controller Class to BP_PauseController |
Turn on Is Focusable in WBP_PauseMenu's Class Defaults.
Variables (create these on BP_PauseController)
| Variable | Type | Default | Purpose |
|---|---|---|---|
PauseMenuClass | Class Reference to User Widget | WBP_PauseMenu | Which widget class to create |
PauseMenuWidget | Object Reference to User Widget | None | Remembers the widget we created |
Note: In PIE (Play In Editor), pressing
Escapeends play entirely. Test with thePkey, or launch viaPlay > Standalone Game. After packaging,Escapeworks correctly as a pause key.
Opening the Menu
Build this graph in BP_PauseController's Event Graph.
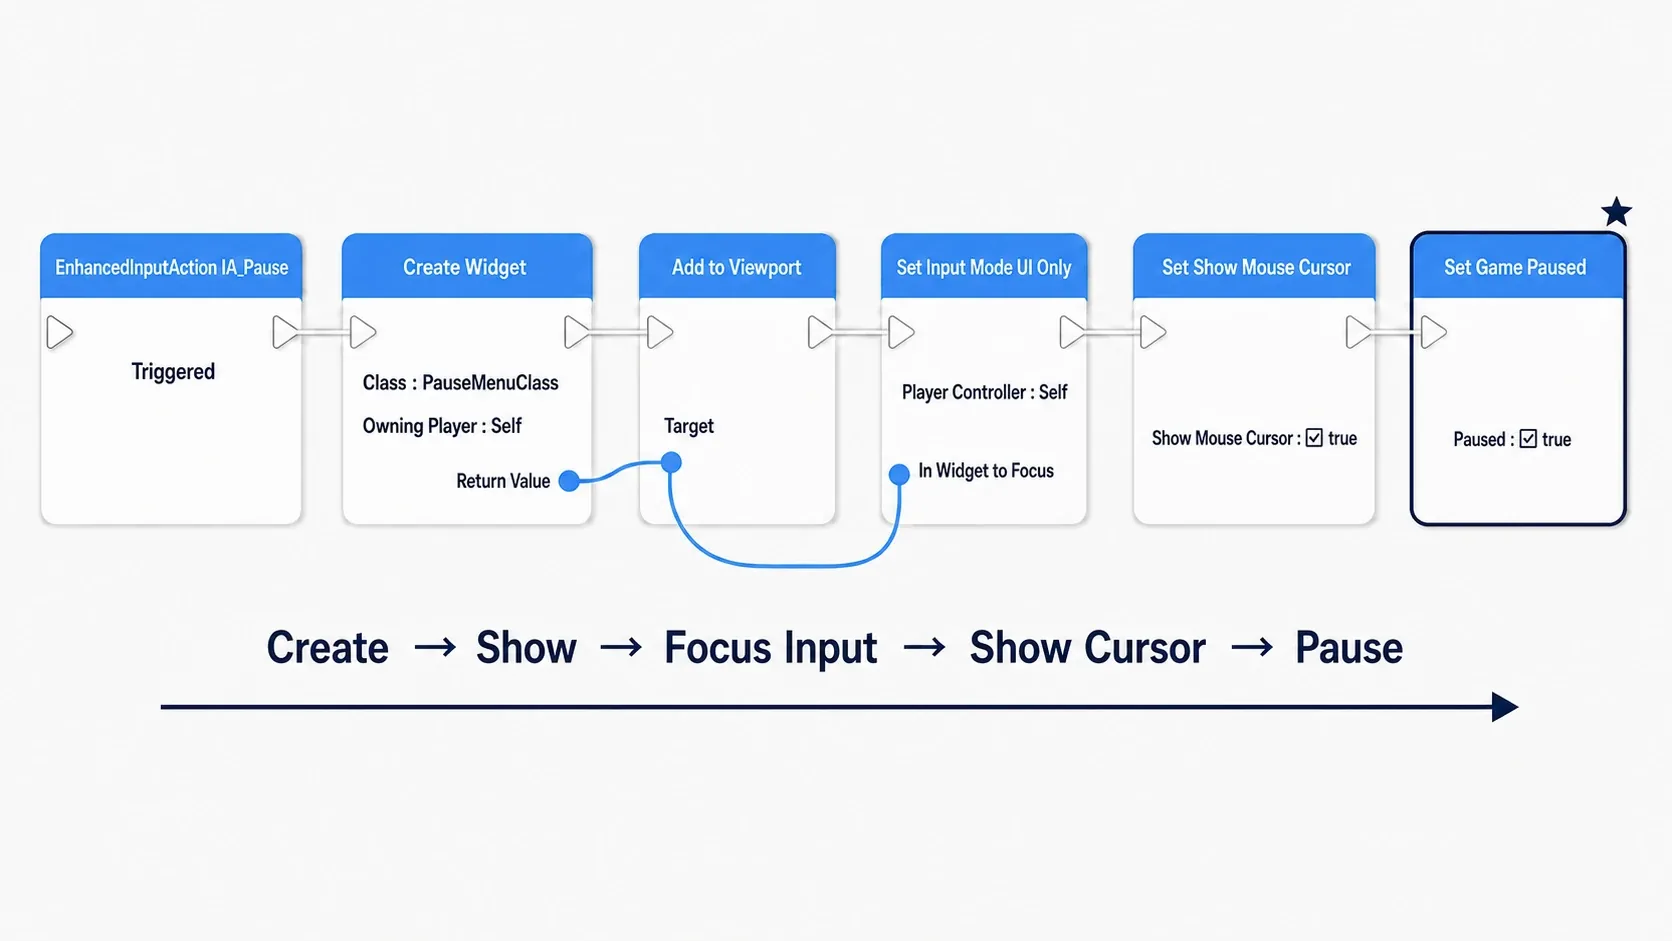
Event BeginPlay
  → Get Enhanced Input Local Player Subsystem
  → Add Mapping Context (Mapping Context = IMC_Default, Priority = 0)

EnhancedInputAction IA_Pause (Started)
  → Branch (Condition = NOT of Is Valid(PauseMenuWidget))
    True (not open yet):
      → Create Widget (Class = PauseMenuClass, Owning Player = Self)
      → Set PauseMenuWidget (store the return value)
      → Add to Viewport (Target = PauseMenuWidget)
      → Set Input Mode Game And UI (Player Controller = Self, In Widget to Focus = PauseMenuWidget,
                                    Hide Cursor During Capture = false)
      → Set Show Mouse Cursor (Target = Self, Show Mouse Cursor = true)
      → Set Game Paused (Paused = true)
    False (already open):
      → Call ResumeGame (the function below)
The order has a reason. You can't pass anything into In Widget to Focus until the widget has been created and added to the Viewport. So the sequence is fixed: create, show, point input at it, show the cursor, freeze.
Two of these choices deserve an explanation.
- Using
Started:Triggeredcan fire continuously while the key is held, which would open and close the menu rapidly. We only want the single moment of the press, so we useStarted Game And UIinstead ofUI Only:UI Onlyblocks game input entirely . You want the sameIA_Pauseto close the menu, but that key would never reach the Player Controller. WithGame And UI, input the UI didn't consume flows to the game, so the same key closes it
Resuming
Create a custom event called ResumeGame on BP_PauseController that undoes the opening steps in reverse.
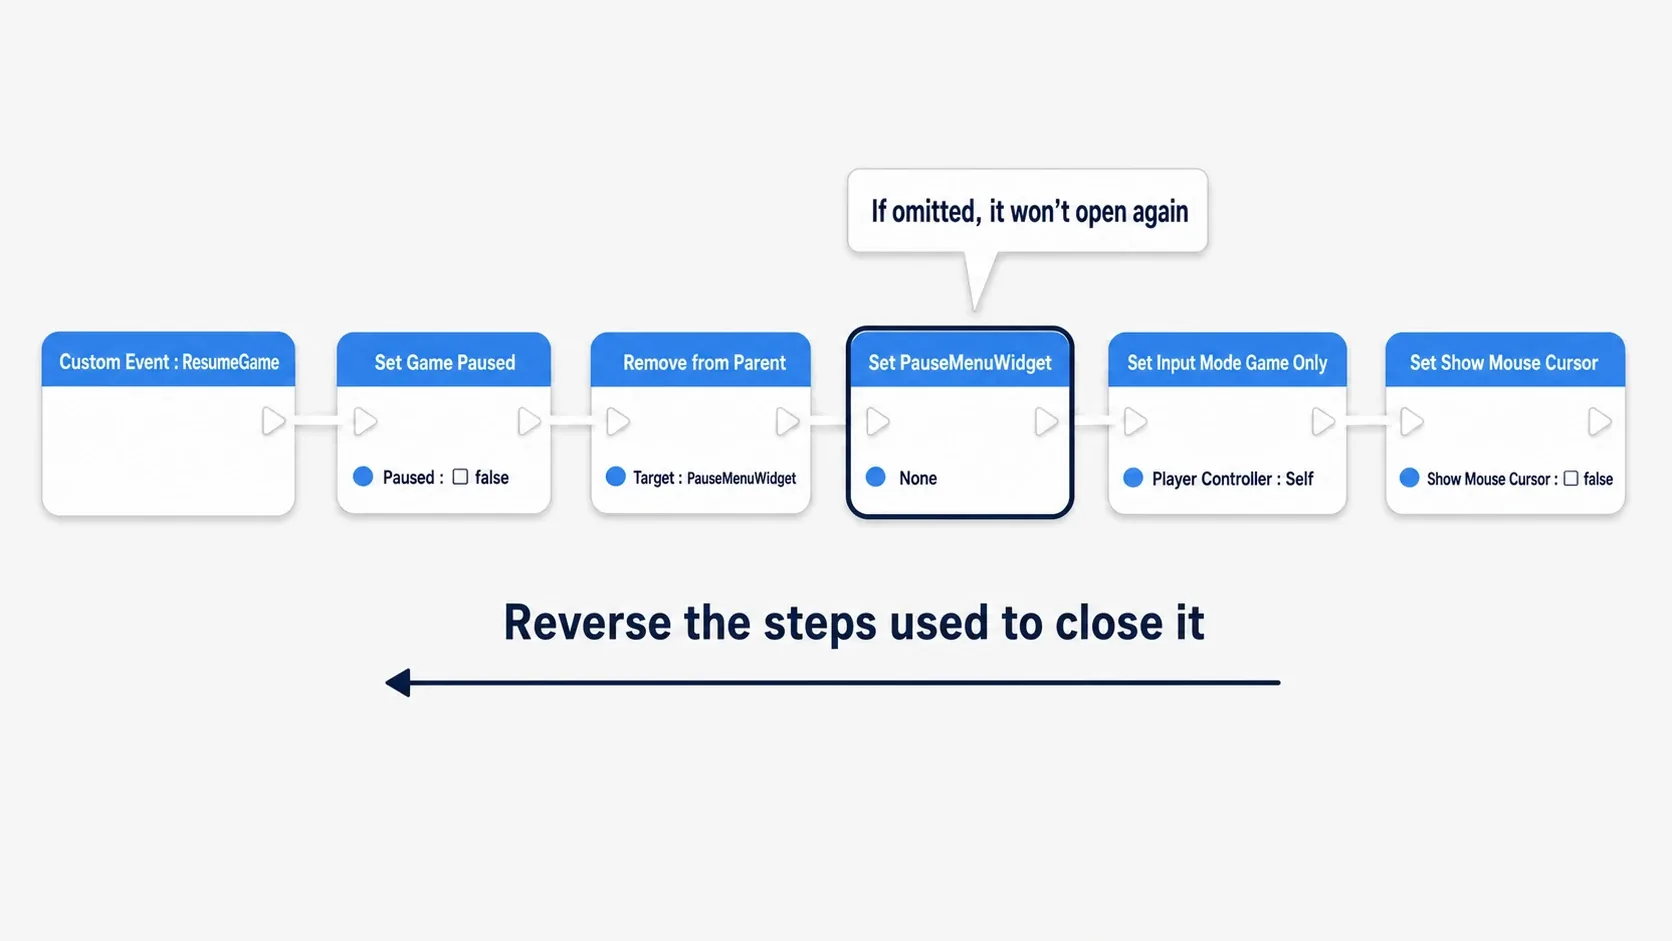
Custom Event ResumeGame
  → Set Game Paused (Paused = false)
  → Remove from Parent (Target = PauseMenuWidget)
  → Set PauseMenuWidget = None      ← forget this and you can't open it a second time
  → Set Input Mode Game Only (Player Controller = Self, Flush Input = true)
  → Set Show Mouse Cursor (Target = Self, Show Mouse Cursor = false)
Resetting PauseMenuWidget to None is the key line. Skip it and Is Valid stays true, so the second Esc keeps being judged as "already open."
Wiring the Buttons
In WBP_PauseMenu's graph, wire up On Clicked for both buttons.
Button_Resume (On Clicked)
  → Get Owning Player
  → Cast To BP_PauseController
  → ResumeGame (call the custom event)

Button_Title (On Clicked)
  → Set Game Paused (Paused = false)   ← unpause first
  → Remove from Parent (Target = Self)
  → Open Level (by Name) (Level Name = your title level's name)
Calling Set Game Paused(false) first in "Quit to Title" is about cleaning up reliably. With a normal Open Level the entire world is replaced, so it isn't strictly required, but explicitly restoring the pause state, Input Mode, and cursor before transitioning means nothing breaks if you change how you transition later.
Note: For this button to work, you need to actually create and save the title level you're transitioning to. Put that level's asset name (without an extension) in
Level Name. Specifying a name that doesn't exist will stop things right there. Level transitions themselves are covered in the Open Level article.
Verifying
Press the P key. The rotating Cube should freeze at whatever angle it was at, the character should become unresponsive, the menu should appear in the center of the screen, and the mouse cursor should show up. Hover over a button and its color changes even though the Cube is still frozen. That's your proof that UI and world run on different clocks.
Press "Resume" and the Cube resumes rotating from the angle where it stopped .
- Menu appears but buttons can't be clicked →
Set Input Mode Game And UIisn't being called, orShow Mouse Cursoris stillfalse - Can't select with a gamepad →
Is Focusableis the setting that lets the widget itself receive focus. To select the first button, runSet Keyboard Focuson the target Button from the widget side - Second
Ppress doesn't open it →ResumeGameisn't resettingPauseMenuWidgettoNone - Holding the key opens and closes rapidly → You're using
Triggered. Switch toStarted - Pressing the key while paused doesn't close it →
Trigger When Pausedis off onIA_Pause. Or you're usingSet Input Mode UI Only, which blocks game input - Character won't move after resuming → You forgot
Set Input Mode Game Only - Cursor stays on screen after resuming → You forgot
Set Show Mouse Cursor(false) - Esc ends play entirely → That's how PIE works. Test with
Por Standalone Game
Two points to take away.
- Always pair the opening steps with the closing steps: widget creation, Input Mode, mouse cursor, and pause are four things you touch on the way in, and every one has to be restored on the way out. Miss one and it surfaces as "I can't control anything" or "the cursor is stuck"
- Keep the open/closed check in one widget reference: hold a separate Boolean like
bIsPausedand you'll eventually desync it from the actual widget with no way to recover. Checking whetherPauseMenuWidgetisNonekeeps the state in a single place
Once you get to polishing the menu's look and layout, the UMG Widget Blueprint article and the focus management article are the natural next reads.
Checks When It Doesn't Work
When the implementation looks right but doesn't run, narrow it down in this order.
| Symptom | Where to Look |
|---|---|
| The pause event never arrives at all | Is Add Mapping Context running in Event BeginPlay? If you swapped the Player Controller, input logic written on the Character won't run |
| The Player Controller wasn't actually swapped | Did you change the GameMode's Player Controller Class? If you're using World Settings' GameMode Override, check that GameMode instead |
| Widget buttons are grayed out while paused | Is the button's Is Enabled turned off? |
| Audio keeps playing while paused | Audio isn't affected by pause by default. To stop it, separate things with Sound Class / Sound Mix |
| Camera still moves while paused | Mouse input hasn't switched to the UI side. Is Set Input Mode UI Only's Target set to the Player Controller? |
Printing Is Game Paused with Print String immediately separates "the pause didn't happen" from "input isn't arriving." How to use debug output is covered in the Print String article.
Bonus: Good to Know for Later
- Put pause logic on the Player Controller: write it on the Character and you can no longer open the pause menu the instant the character dies and is destroyed. The Player Controller lives for the whole level, which makes it the right home for input you always want to accept
- Audio isn't affected by pause:
Set Game Pauseddoesn't stop Sound. To silence effects while keeping BGM, the standard approach is to split them into Sound Classes and lower the volume with a Sound Mix (see the Sound Cue article) - Not suitable for multiplayer:
Set Game Pausedfreezes the entire world on the server. It isn't technically impossible, but it drags every other player in with it, so you can't use it for per-player menus . For online play, design around "the game keeps going even with a menu open" - Make the settings screen a child of the pause menu: when a "Settings" button switches to another widget, don't
Remove from Parentthe pause menu. Set itsSet VisibilitytoCollapsedand leave it around, and the back button becomes trivial to implement - Timelines stop too: if doors open and close via a Timeline, they'll freeze partway through during a pause. They resume where they left off, which feels natural (see the Timeline node article)
Summary
Set Game Pausedstops world time . Tick, Timers, physics, animation, and Timelines all freeze- The UI doesn't stop. Slate runs on a different clock, so buttons and Widget Animation still respond while paused
- Input Mode decides where input goes. Handle
Set Input Mode UI OnlyandSet Show Mouse Cursoras a pair - Enhanced Input stops during a pause by default. Turn on
Trigger When Pausedfor the pause action only - Pair your opening and closing steps. Forgetting to restore something is what "I can't control anything" really is
In the game you're building right now, when would a player want to stop and step away? Decide what you want frozen and what you want alive at that moment, and the settings you need fall out naturally.