"My character sinks halfway into that rock." "The frame rate started stuttering the moment I placed a bunch of these." Both symptoms show up within a few weeks of picking up UE, and they usually trace back to the same thing: the shape you see and the shape you collide with are different.
In UE, a single mesh carries two kinds of collision: the cheap, rough Simple Collision and the accurate but expensive Complex Collision. This article sorts out the difference between the two along with the Collision Complexity setting, and shows how to fix "the rock my character sinks into" without making it expensive.

What You'll Learn
- A mesh holds its visual shape and its collision shape separately
- Simple = fast but rough / Complex = accurate but expensive
- The four
Collision Complexitysettings, and what the defaultProject Defaultactually does- Why sinking into a mesh is not a reason to reach for
Use Complex Collision As Simple- Hands-on: fixing a rock you sink into while keeping it cheap
The Visual Shape and the Collision Shape Are Different Things
Start with the single most important premise in UE: the shape drawn on screen and the shape used for collision are separate pieces of data.
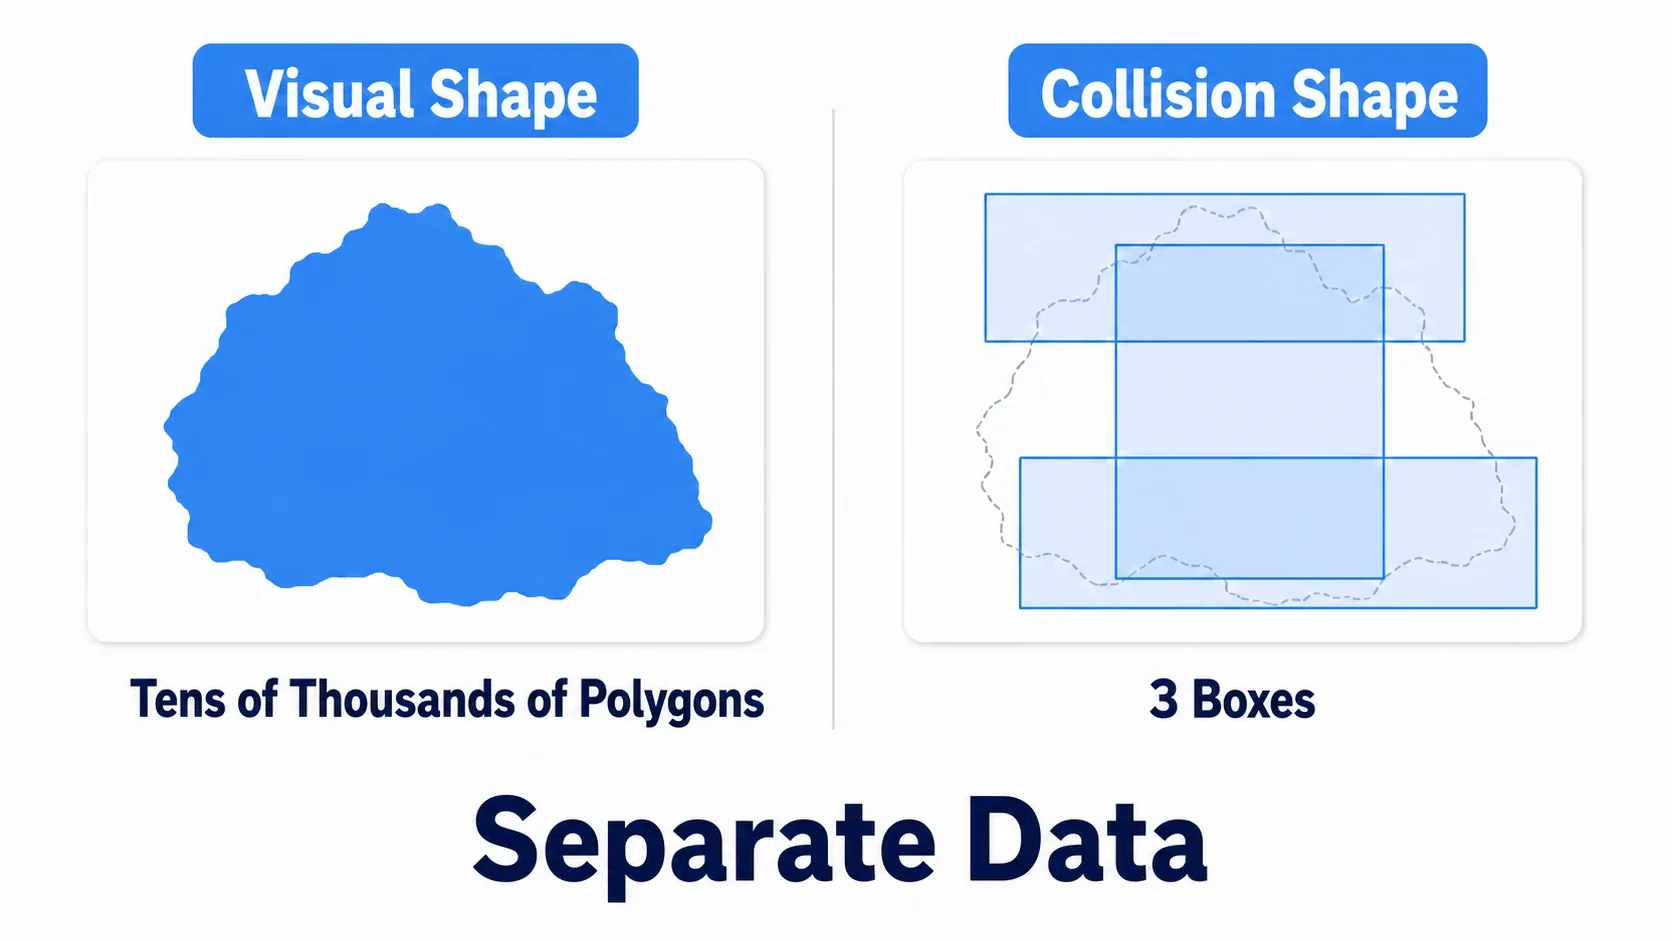
Place one complex rock and the screen shows a rock made of tens of thousands of polygons. The collision, meanwhile, is often just a few boxes roughly covering it. That's why you get mismatches like "there's clearly a gap but I can't walk through it" or "I should be able to stand in that dip but I can't."
Why keep them separate? Cost. Collision is evaluated every time movement, traces, or physics ask for it, so a character simply walking around generates a huge number of queries. Feeding tens of thousands of polygons into that grinds to a halt. So UE keeps a cheap shape on the side and uses that most of the time.
Learn how to inspect it, too. Open the Static Mesh editor and turn on Simple Collision or Complex Collision display from the Collision menu in the toolbar, and the collision shape appears overlaid as a wireframe. The display color changes depending on the situation, so identify them by the menu item name, not the color. This is the fastest route to noticing "that's not the shape I expected."
Simple Collision: Fast, but Rough
Simple Collision is collision built from combinations of primitive shapes: boxes, spheres, capsules, and convex hulls.
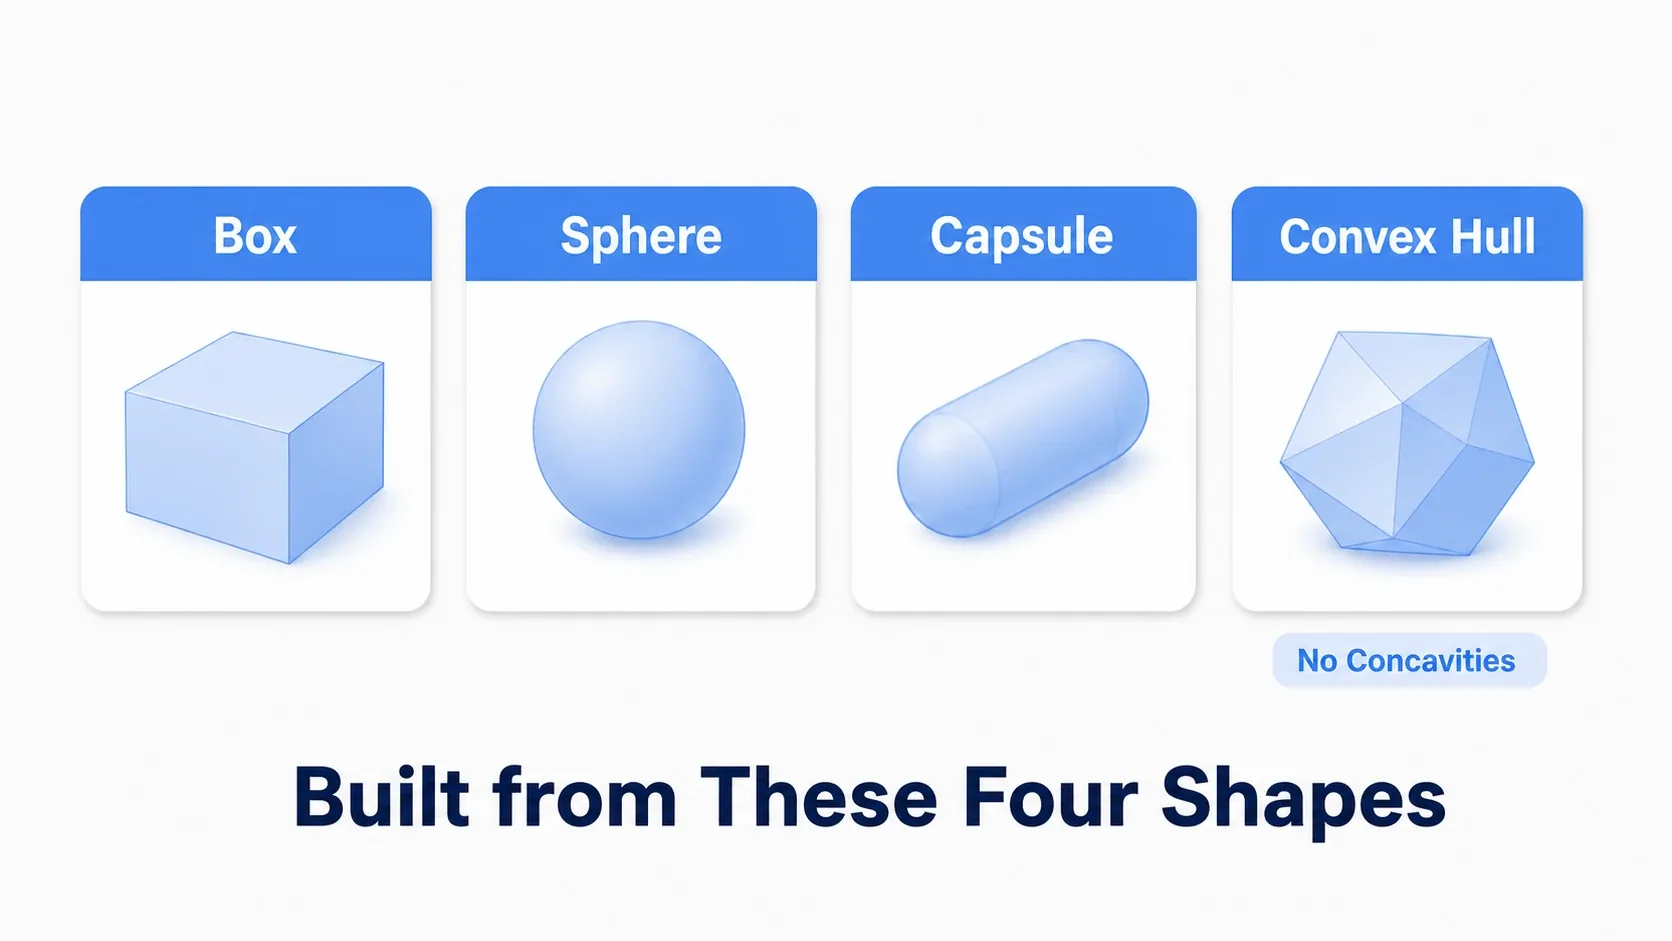
- Fast: It resolves with a formula, so the computational cost is extremely low
- Rough: It doesn't reproduce the original mesh shape. Dips get filled in and thin parts get fattened
- Where it's used: Character movement, physics simulation, pushing against things. In other words, everything evaluated every frame
The term worth internalizing here is convex hull. It means "a shape with no concavities." Picture wrapping a rubber band around the whole mesh and taking that outline. This shape cannot represent concavities. A donut hole or the inside of a cup gets filled in; that's the nature of a convex hull.
That's why a single Simple Collision often doesn't match the shape, and in practice you combine multiple convex hulls to approximate it.
Complex Collision: Accurate, but Expensive
Complex Collision uses the rendered triangles themselves for collision.
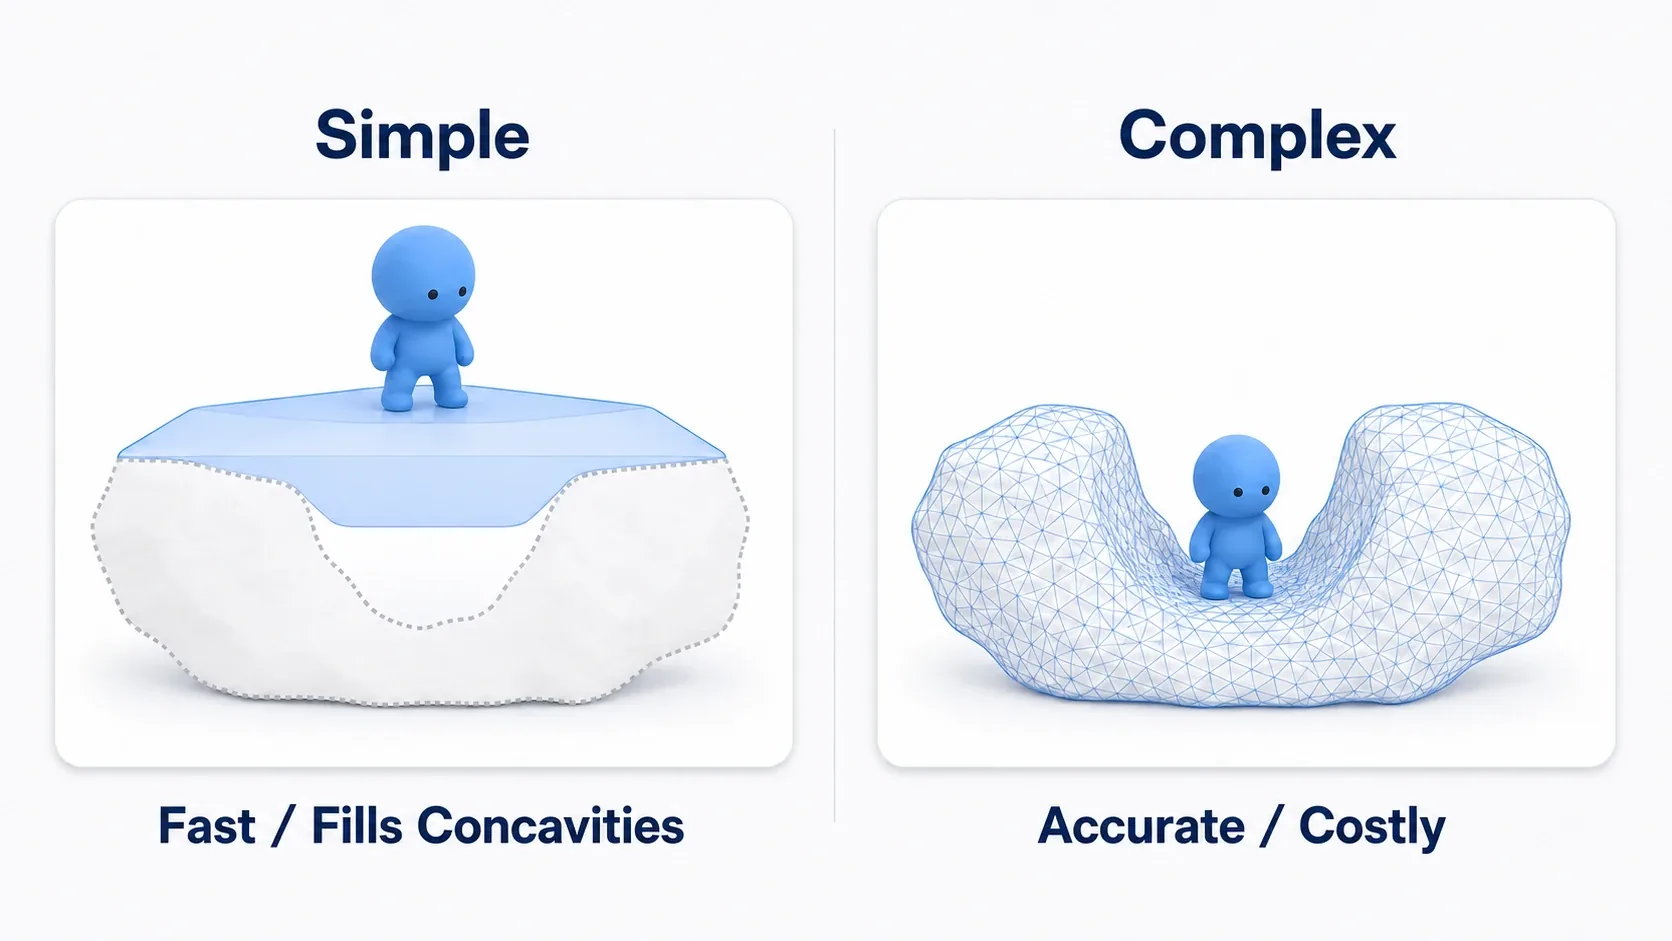
- Accurate: It nearly matches the visuals. Dips and holes collide exactly as they look
- Expensive: Cost rises with the number of triangles to check (in practice there's spatial culling so it isn't brute force, but it's an order of magnitude above Simple)
- Where it's used: Bullet trajectory checks, line-of-sight checks, and other traces that only run occasionally
"Only run occasionally" is the point. A single raycast per shot can afford to be accurate. Character movement, on the other hand, is constantly evaluating collision, so using Complex there sends the cost through the roof.
Note that whether a trace looks at Simple or Complex is also controlled by the Trace Complex checkbox on the Line Trace node. It isn't "automatically decided by use case." It's decided by both the mesh's setting and the trace's specification.
The Four Collision Complexity Settings
What decides "which one do I use" is Collision Complexity in the Static Mesh asset's Details panel. This is a common source of confusion, so let's lay it out visually.
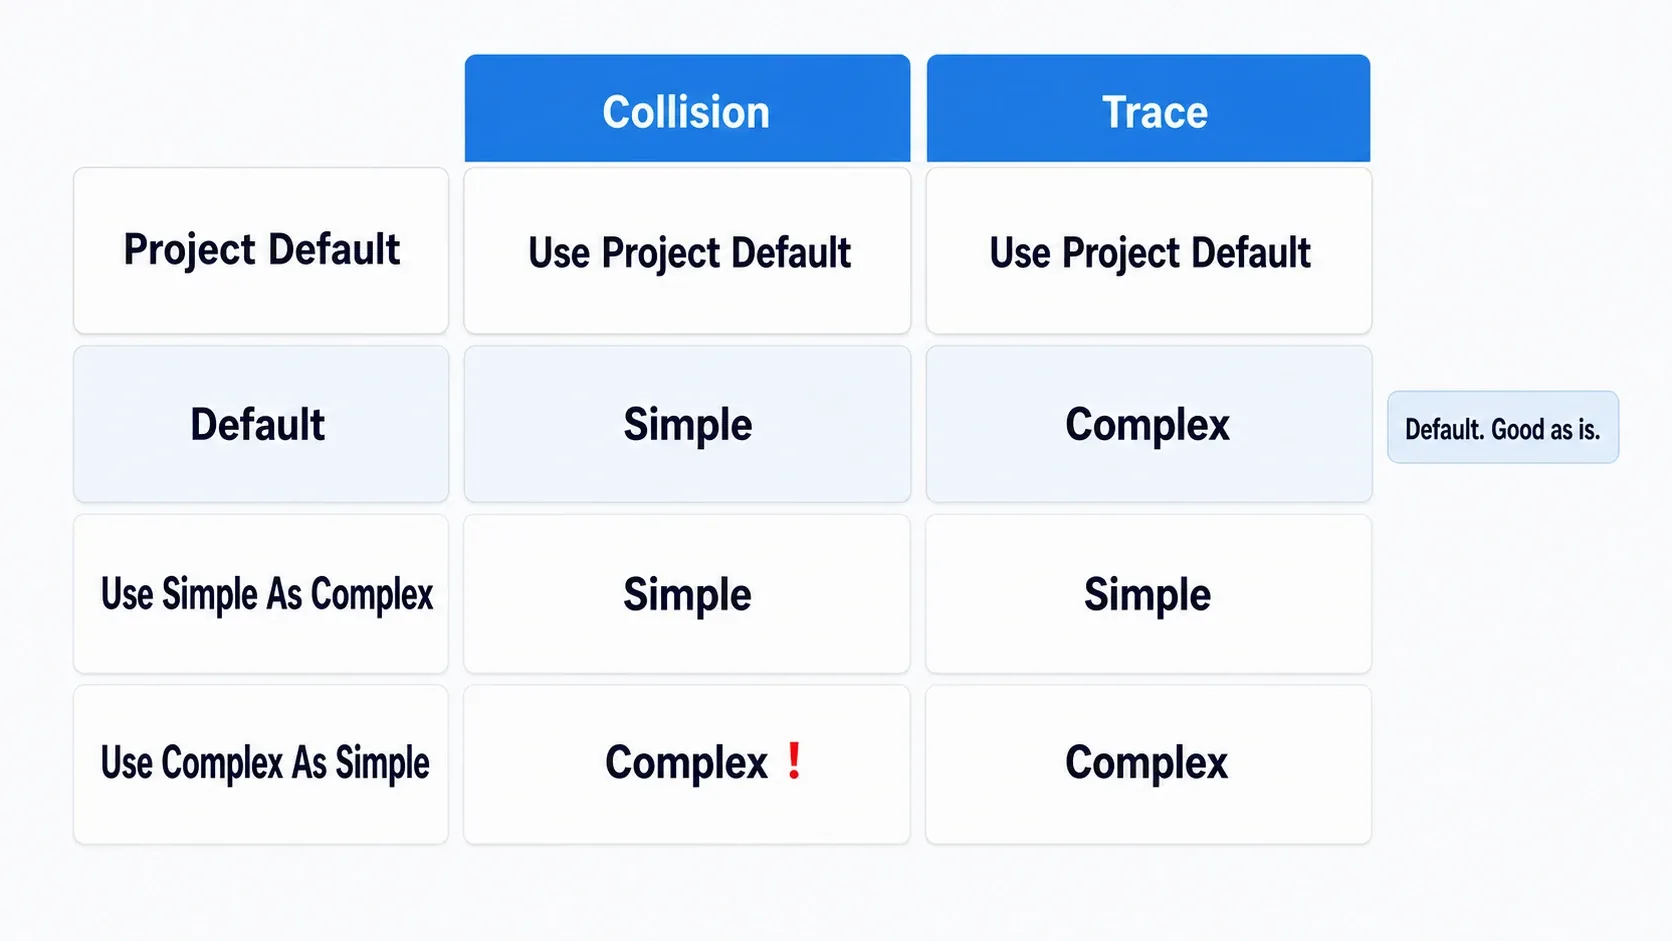
The important part is that UE splits the use cases into two: colliding, standing on, being pushed (Collision), and shooting a line to query something (Trace). The settings decide what gets assigned to each.
| Setting | Collision side | Trace side | When to use it |
|---|---|---|---|
| Project Default | Follows project settings | Same | The default. Leaving it alone is correct for most meshes |
| Simple And Complex | Simple | Complex | When you want it stated explicitly (this is normally what Project Default resolves to) |
| Use Simple Collision As Complex | Simple | Simple | When you want traces cheap too. Line-of-sight accuracy drops |
| Use Complex Collision As Simple | Complex | Complex | Only when surface accuracy for standing on it is mandatory, such as terrain |
The thing to notice is what the default resolves to: Simple And Complex. "Cheap Simple for movement, accurate Complex for line-of-sight" is exactly the split you want, and it's there from the start. Which means you generally don't need to touch it.
One more thing worth knowing: a mesh set to Use Complex Collision As Simple can no longer run physics simulation with Simulate Physics. It's off the table for rolling barrels and flying debris.
The trap in
Use Complex Collision As Simple: Only the LOD 0 mesh is used as Complex. Even when LODs switch at a distance, collision stays at full precision. "It's far away, so it must be cheap" doesn't hold.
Don't Flip to Complex Just Because You Sink
This is the most common accident. "I sank into the rock, so I set Use Complex Collision As Simple and it fixed it." It does fix it, but that rock is now an object that faces tens of thousands of polygons on every query. With one rock you won't notice. It bites once you've placed a lot of them and have several characters walking around on top.
The right fix for sinking isn't switching to Complex, it's rebuilding the Simple shape. That's what we'll do next.
Hands-On: Fixing a Rock You Sink Into, Cheaply
Obstacles in an action game, terrain decoration in an open world, rubble in a horror game. "My character sinks to the waist when standing on that rock" happens in every genre. Here we'll fix that rock without falling back on Complex.
Setup: Prepare one Static Mesh of a rock or piece of rubble with an uneven top surface, place it in the level, and try standing on it with your character. A Starter Content rock or a mesh you imported yourself both work.
The symptom comes in two forms depending on the shape. If the Simple Collision sits inside the actual surface, you sink; if it covers a larger volume, you float or hit an invisible wall. Both have the same cause: the collision shape differs from the visuals.
| Target | Setting | Notes |
|---|---|---|
| Any rock or rubble Static Mesh | Collision Complexity = Project Default | Don't change it. This is our starting point |
| Character | The standard Third Person template | Capsule radius and height stay at defaults |
Step 1: Look at the shape first. Open that mesh in the Static Mesh editor and turn on Simple Collision display from the toolbar's Collision menu (Complex Collision is a separate item, so confirm by name to avoid mixing them up). You'll most likely see a single box wrapping the entire rock, or one rough convex hull. Every bump on the top surface being ignored is the source of the mismatch.

Step 2: Throw away the current Simple Collision. Run Remove Collision from the Collision menu. This only removes the Simple Collision; the mesh itself and the Complex data remain.
Step 3: Auto-generate convex hulls. Choose Collision → Auto Convex Collision and a panel appears at the bottom. There are only two things to touch here.
| Parameter | Meaning | Starting value |
|---|---|---|
| Hull Count | The upper limit on hulls to generate (you won't necessarily get this exact number) | Start at 8 |
| Max Hull Verts | Vertex count per hull | 16 (leave at default) |
| Hull Precision | How fine the approximation is | Leave at default (results change, so keep it fixed when comparing) |
Press Apply and multiple convex hulls are generated following the rock's shape. The bumps that a single box couldn't represent become representable through subdivision.

Step 4: Fill in the gaps by hand. If a specific dip still doesn't match, add one primitive with Collision → Add Box Simplified Collision. Adding it just puts a large box in the center, so select it in the viewport and move, rotate, and scale it into place. You don't need to be precise everywhere. Getting the places the character touches right is enough.
Step 5: Save. Save the Static Mesh asset. Forget this and your work disappears the moment you close the editor.
Hit Play and stand on the rock. If your standing position, previously off, now roughly matches the visible surface, it worked. Convex hulls are approximations so it won't match perfectly, but landing inside the range where nothing feels off in play is enough.
When it doesn't work, check with the Collision display still on.
- Still off → raise Hull Count to 16, raise
Hull Precision, or add one primitive to that spot - Blocked by an invisible wall → the hulls are bulging out. Increasing the count tightens the fit
- Thin plates or shapes with holes can't be reproduced → convex hulls are bad at those. Building it from primitives by hand can be faster
- It got expensive → each hull is a collision candidate. Check that you haven't added too many
Two things to take away.
- Accuracy only matters where the character touches: Nobody notices if the back or the top of the rock is a bit off. Trying to make the whole thing accurate is what makes it expensive
- More Hull Count is not better: Each hull is a collision candidate, so more hulls means more cost. Stop once the shape fits, and the number you need depends on the mesh
Only for things like terrain, where you truly need to walk exactly along the surface, should you consider Use Complex Collision As Simple. But there's one thing that's easy to get wrong: rendering LODs and distance culling do not reduce collision cost. Collision stays live even off-screen, so if you really want that cost gone, you need to unload the Actor or the level itself (→ Level Streaming).
Terrain built with UE's Landscape is a different story. Landscape has its own Collision Mip Level setting, and the Static Mesh discussion here doesn't map onto it directly.
Bonus: Good to Know for Later
"Does it collide" and "what does it collide with" are separate settings. This article covered the shape of collision. Per-target reactions like "hits the player but bullets pass through" belong to Collision Presets and channels, an entirely different layer (→ Collision channels and presets). When fixing the shape doesn't produce the collisions you expect, look there.
Character movement collides with a capsule, not the mesh. A Character uses its CapsuleComponent for movement, so whether it fits through a narrow corridor is determined by the capsule's radius and height (no amount of mesh shaping changes it). Per-body-part hit detection is a separate matter, and typically uses the Bodies in a Skeletal Mesh's Physics Asset.
Collision on a Nanite mesh is separate data. Nanite is strictly a rendering mechanism; collision still uses Simple/Complex as before. "I turned on Nanite so collision gets optimized automatically" isn't the case, and you still design collision yourself (→ How Nanite works).
Summary
When you're unsure about collision settings, work through it in this order.
| Situation | What to do |
|---|---|
| Placing an ordinary mesh | Leave it on Project Default. Do nothing |
| Character sinks or snags | Rebuild the hulls with Auto Convex Collision |
| Still doesn't fit | Add just one primitive by hand |
| Terrain where surface accuracy is mandatory | Use Complex Collision As Simple. But LODs and culling don't reduce collision cost, so narrow the range by unloading the Actor or the level instead |
| You only want accurate line-of-sight | Do nothing (traces already look at the Complex side by default) |
Cheap and accurate are things you pick per use case. UE's defaults already contain that split, so the first thing to suspect isn't the setting, it's the shape of the Simple Collision. Fix that and most "I'm sinking into it" problems resolve while staying cheap.
That rock you've got placed right now: want to take a look at its collision shape?