You have a map with only one enemy type, yet opening the level puts every enemy mesh in memory. You're standing in the starting grasslands and the final boss's giant mesh is already loaded. Opening a single Blueprint drags in a chain of related assets and takes tens of seconds.
All of this comes from the fact that referencing an asset loads its actual data along with it. UE gives you soft references and async loading to control that. You change the reference so it only remembers a location, and load the data when you actually need it. This article covers the difference between hard and soft references, how to create soft references, how to load with Async Load Asset, which synchronous loads to avoid, and a hands-on where a placeholder mesh gets swapped for the real one.
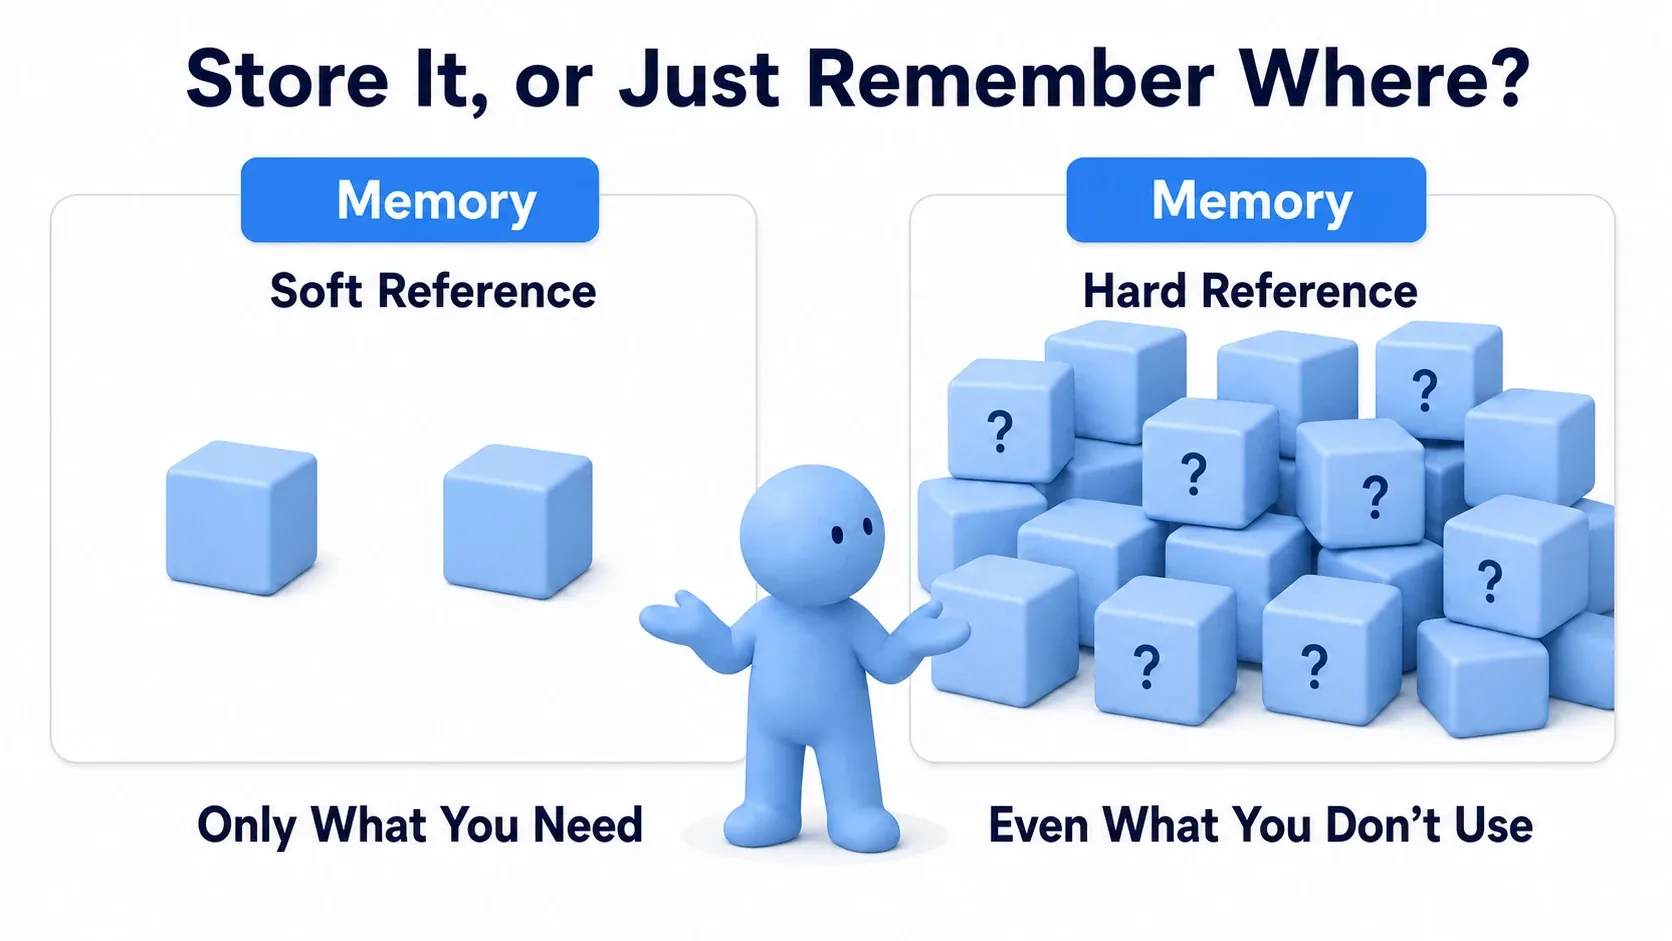
What You'll Learn
- Hard references load together; soft references only remember the location
- Creating Soft Object References and Soft Class References
- Loading on demand with
Async Load Asset- Why to avoid
Load Asset Blocking- Where it pays off ( large meshes, cutscenes, bosses, DLC )
- Hands-on: loading an enemy's mesh only when it's needed
Hard References vs. Soft References
First, what does "referencing" mean in UE? You set a variable's type to Static Mesh (object reference) and assign an asset to it. That's a hard reference. When something loads the referencing side, the referenced target is always loaded with it.
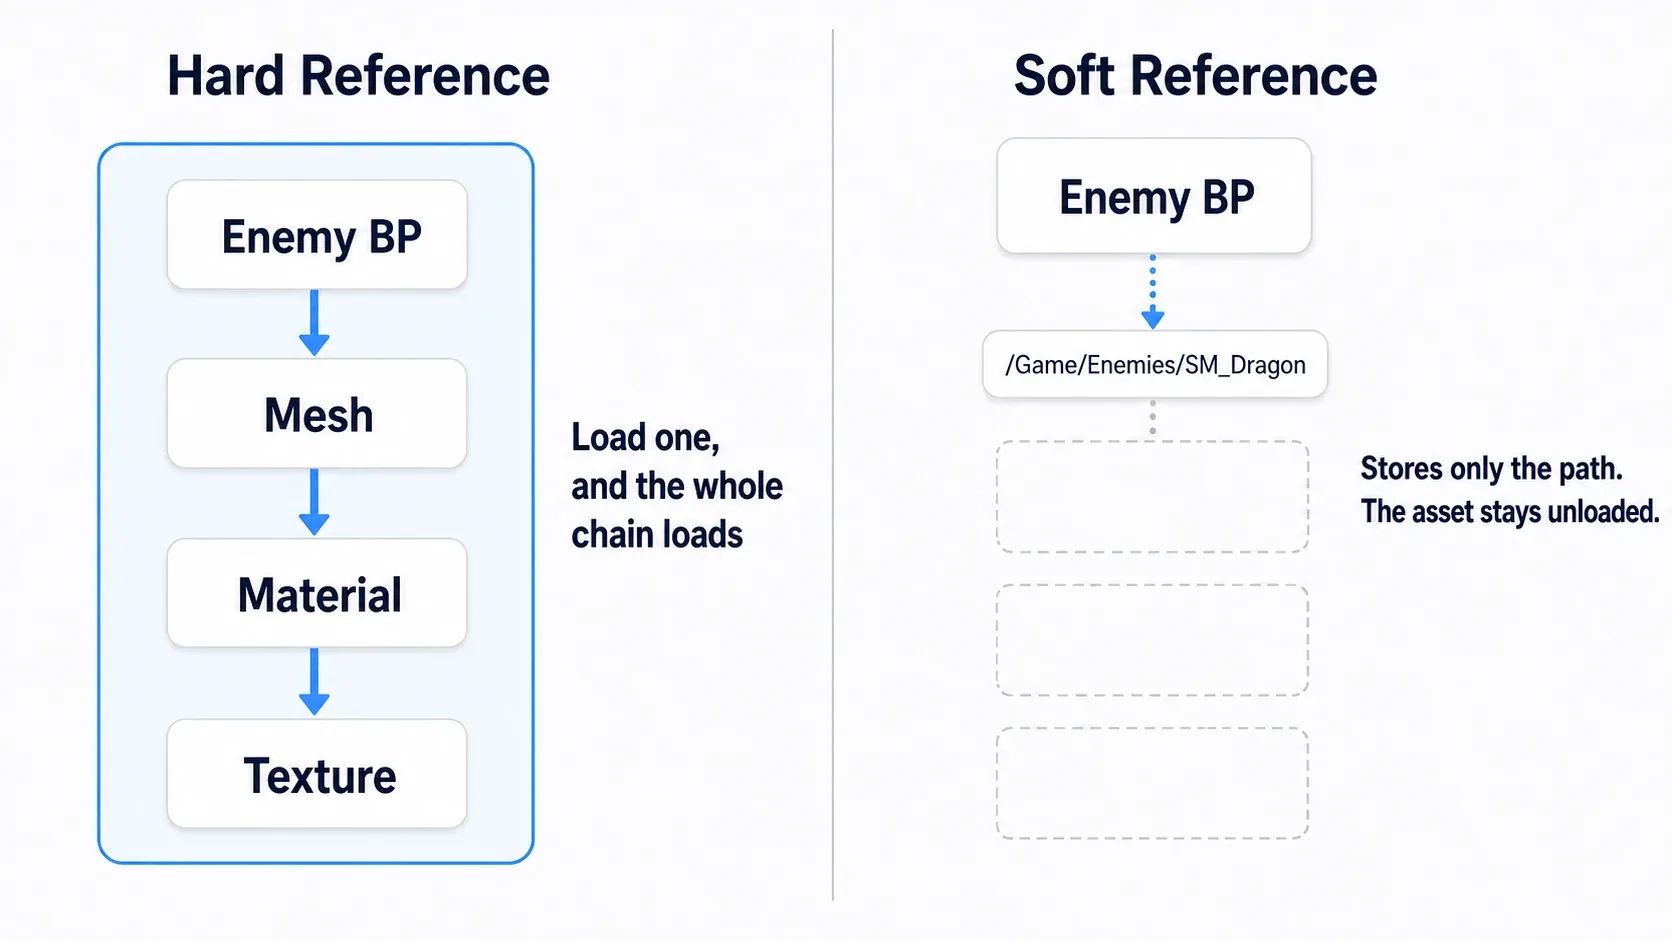
The problem is that this chains. An enemy Blueprint hard-references a mesh, that mesh references a material, and the material references textures. Load the enemy Blueprint and the materials and textures come along for the ride. List 20 enemy types in a Data Table and you drag in all 20 even when you only intend to spawn one.
Soft references break that chain. What a soft reference holds isn't the asset itself but a string containing the asset's location (path). It just knows "the dragon mesh lives at /Game/Enemies/SM_Dragon," and the dragon's data never enters memory.
| Hard reference | Soft reference | |
|---|---|---|
| What it holds | The asset's data | The asset's location (path) |
| When loaded | The target loads with it | The target doesn't load |
| Using it | Ready to use directly | Load it yourself first |
| Best for | Light things you always use | Large things you may not use |
Here's the key point. A soft reference isn't a mechanism for "not loading." It's a mechanism for deciding when to load. When you need the data, you load it yourself, as covered in the following sections.
Creating a Soft Reference
Creating one just means choosing a different reference kind when you pick the variable's type.
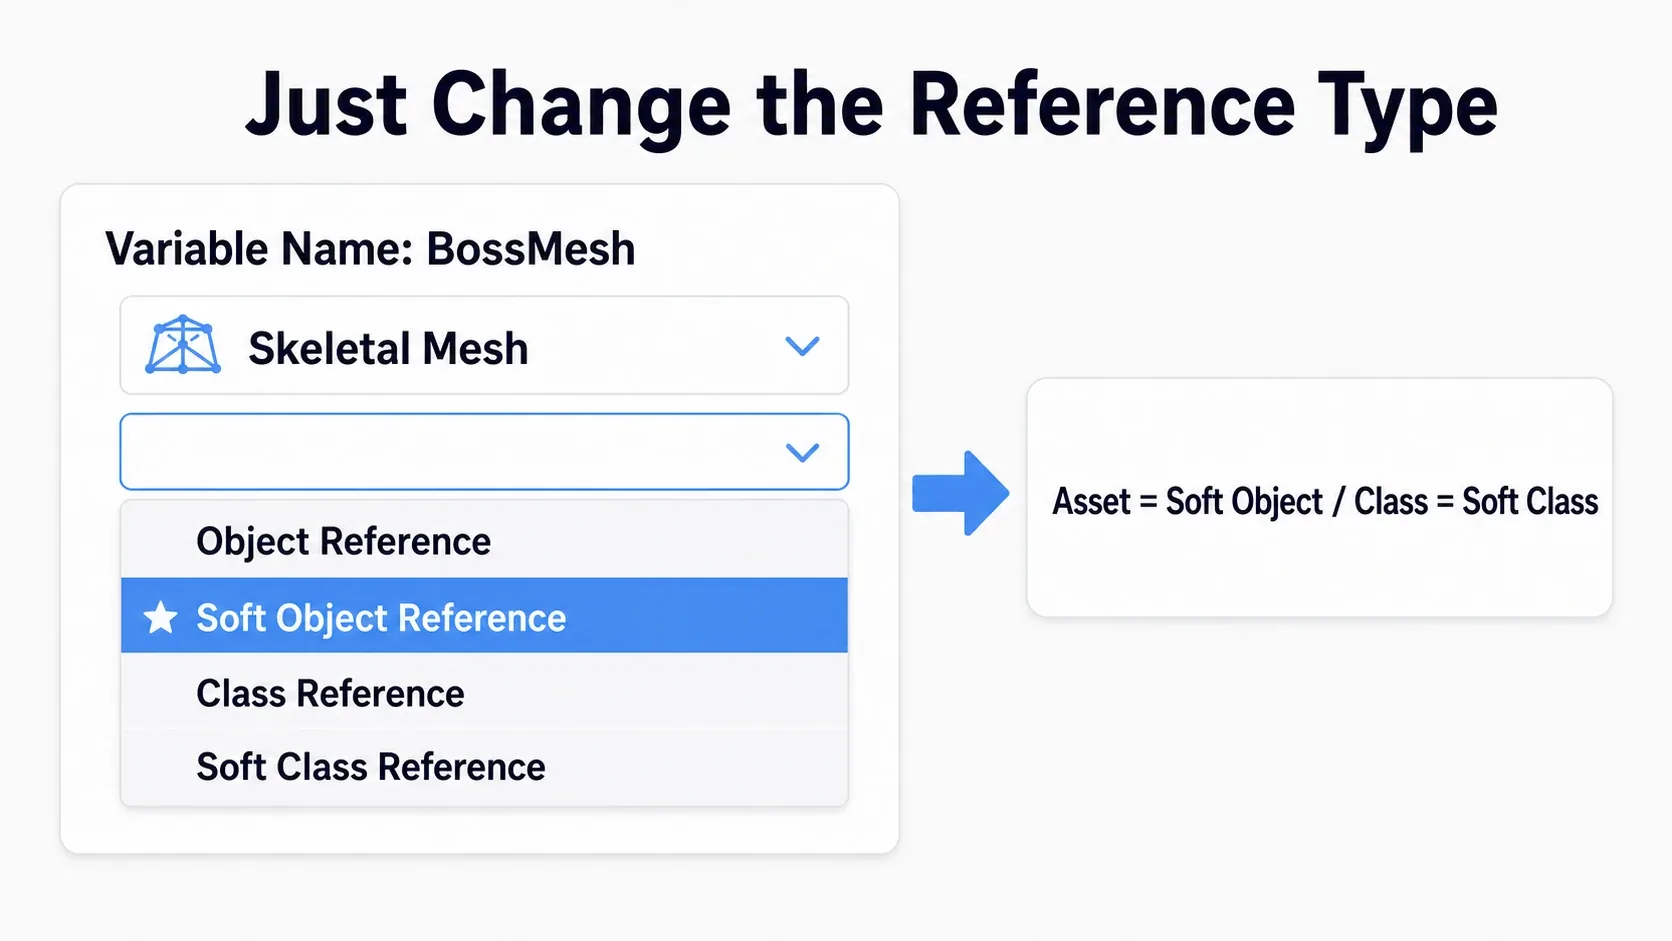
Create a variable, pick the target asset type in the type dropdown (Skeletal Mesh, for example), and a second set of options appears on the right. That's where you pick the reference kind.
| Reference kind | Meaning | Example |
|---|---|---|
| Object Reference | Hard reference (the data) | Your usual mesh variable |
| Soft Object Reference | Soft reference (the asset's location) | Assets like meshes, textures, sounds |
| Class Reference | Hard reference (a class) | A class variable you spawn from |
| Soft Class Reference | Soft reference (a class's location) | Loading a Blueprint class later |
For assets themselves (meshes, textures, sounds, Niagara systems) loaded later, use Soft Object Reference. For Blueprint classes (the enemy or UI type you spawn) loaded later, use Soft Class Reference. They look nearly identical in the details panel, showing a slot where you pick an asset. The only difference is that assigning one doesn't load the data.
Note: Once you've assigned an asset to a soft reference variable, you can treat it much like a hard reference. The difference only shows up at the moment of use. You can't wire a soft reference straight into
Set Skeletal Mesh Assetor similar nodes. You always have to load the data first.
Loading with Async Load Asset
The standard way to get data out of a soft reference is the Async Load Asset node. As "Async" implies, it loads in the background without stopping the game.
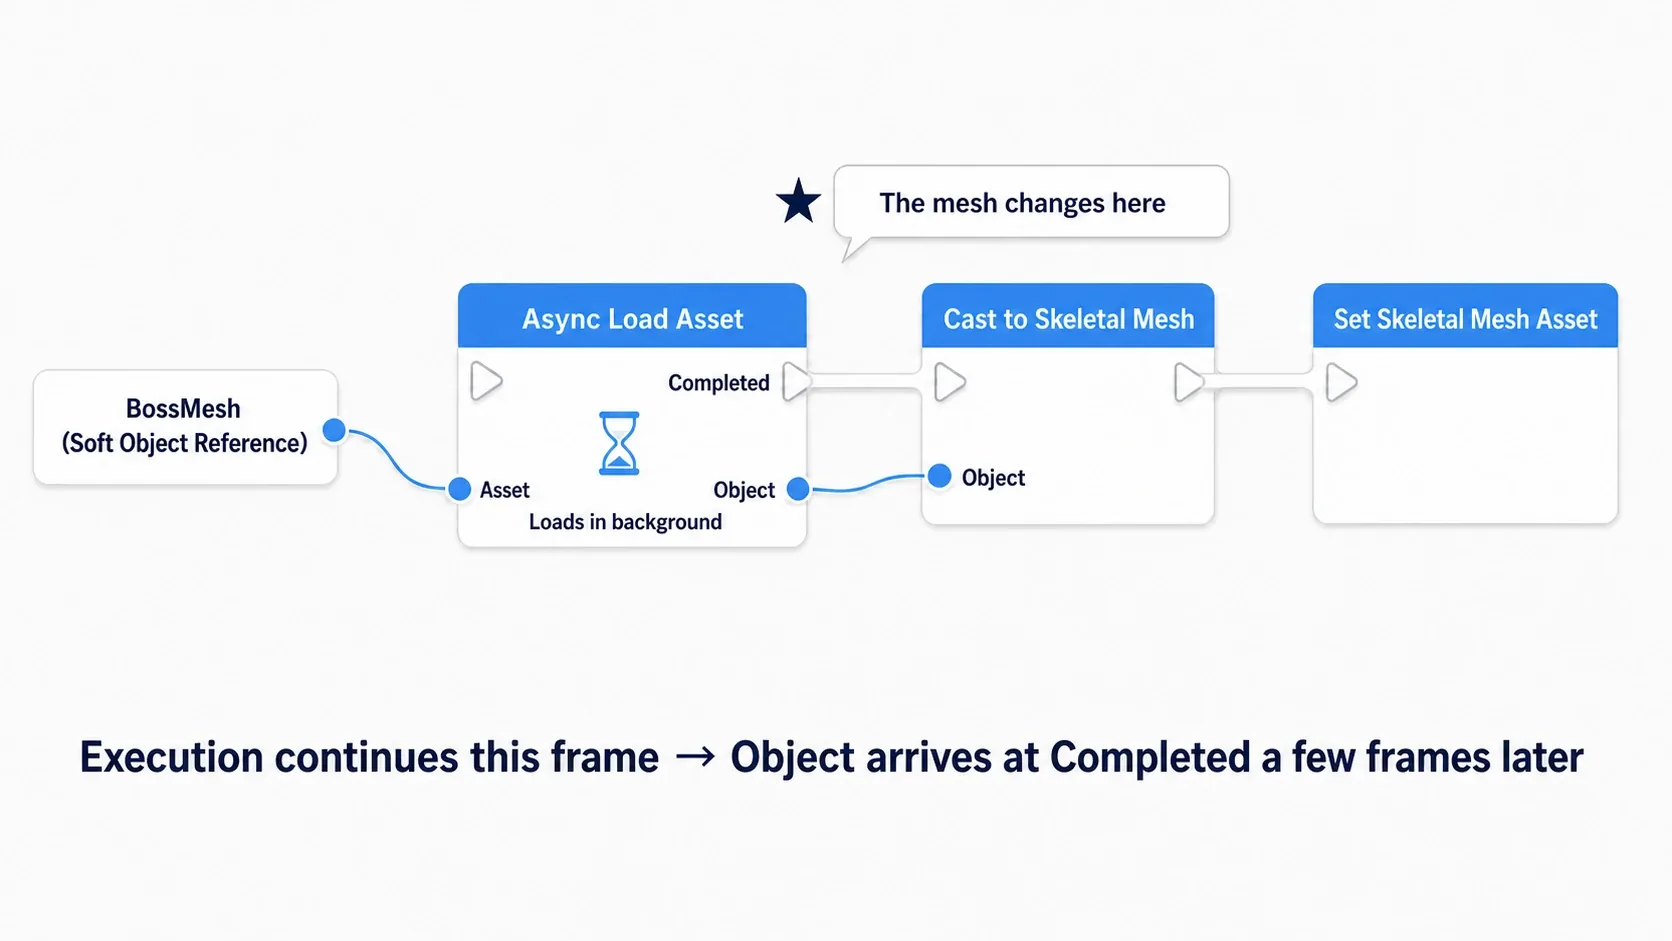
The node's pins are as follows.
| Pin | Kind | Contents |
|---|---|---|
| Asset | Input | The Soft Object Reference you want to load |
| Completed | Output (exec) | Fires the moment loading finishes |
| Object | Output (data) | The loaded asset's data (Object type) |
Here's the flow. Wire a soft reference into Async Load Asset's Asset pin and execution moves on immediately. When the background load finishes, Completed fires and Object holds the data. Since Object is a generic Object type, cast it to the type you want before passing it to Set Skeletal Mesh Asset or similar.
To load a class instead, use the twin node Async Load Class Asset. It takes a Soft Class Reference as input and gives you the loaded class from Completed. Use it when you want to load a class you'll spawn later.
Completed can take several frames, or hundreds of milliseconds for large assets. The game keeps running during that time, so decide what to show while loading (a placeholder mesh, a loading indicator, a translucent stand-in). In the hands-on section we'll build the placeholder-then-swap pattern.
Note: It's safe to call
Async Load Asseton an asset that's already loaded. It won't reload, and returns the cached data viaCompletedimmediately. You don't need to check "have I loaded this yet" yourself; just call it. To confirm whether the result is valid, run the returnedObjectthroughIs Valid.
Why Not Load Asset Blocking
There's another way to turn a soft reference into data: Load Asset Blocking. As the name says, it loads immediately, right there, and looks simpler at first glance. But in practice you avoid it almost everywhere.
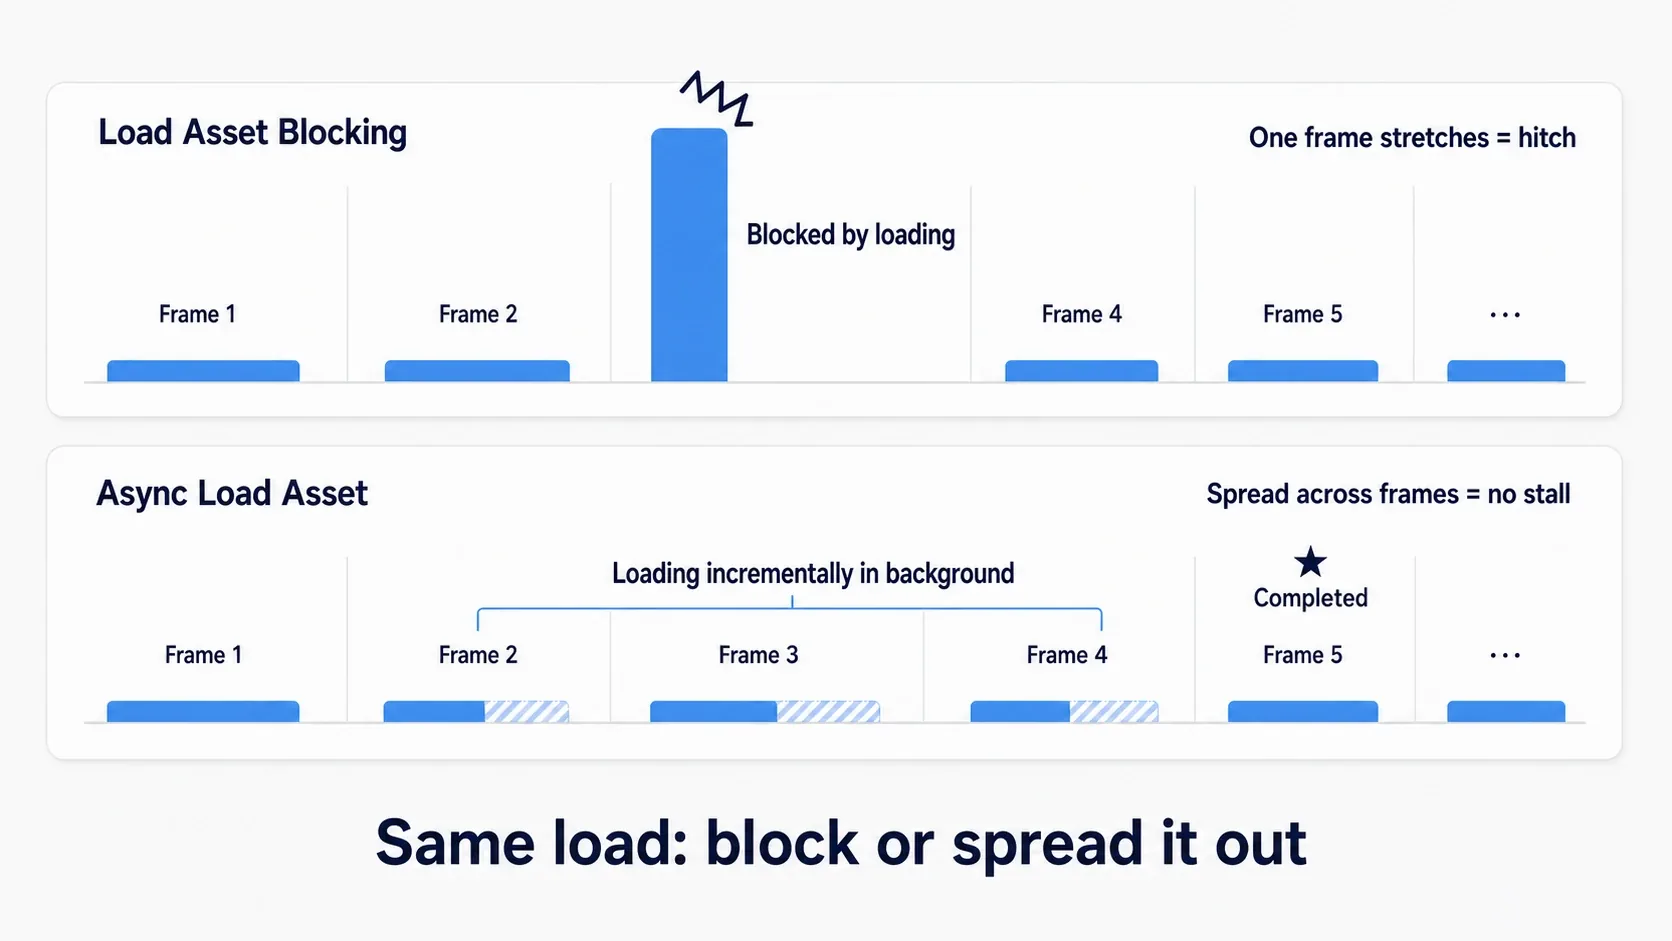
Load Asset Blocking halts the game thread while loading. Nothing advances to the next frame until it's done. For a small asset that's instant, but for a large mesh or texture that single frame's processing time spikes and you get a visible hitch. The official documentation also recommends Async Load Asset where possible.
| Async Load Asset | Load Asset Blocking | |
|---|---|---|
| While loading | The game keeps running | The game stops |
| Large assets | Spread across multiple frames | One long frame that hitches |
| Getting the result | Later, via Completed | Immediately, in place |
| Where it fits | Almost everywhere | Genuinely instant small items, or behind a loading screen |
Also watch out for synchronous loads you didn't intend. Even without Load Asset Blocking, converting a soft reference to a hard reference triggers a synchronous load at that instant. When you're hitting a load stall despite "using soft references," check whether such a conversion snuck in somewhere. Routing all loading through Async Load Asset is the safe approach.
Where It Pays Off
Soft references are useful, but making everything a soft reference backfires. The loading itself doesn't disappear, so an asset you always use ends up with a load wait every time you need it.
They pay off on assets where these conditions overlap.
| Condition | Example |
|---|---|
| Large | High-resolution skeletal meshes, 4K textures, long audio |
| Not always used | Bosses, enemies specific to one map, achievement unlocks |
| Predictable moment of use | Entering an area, starting a conversation, transitioning into a boss fight |
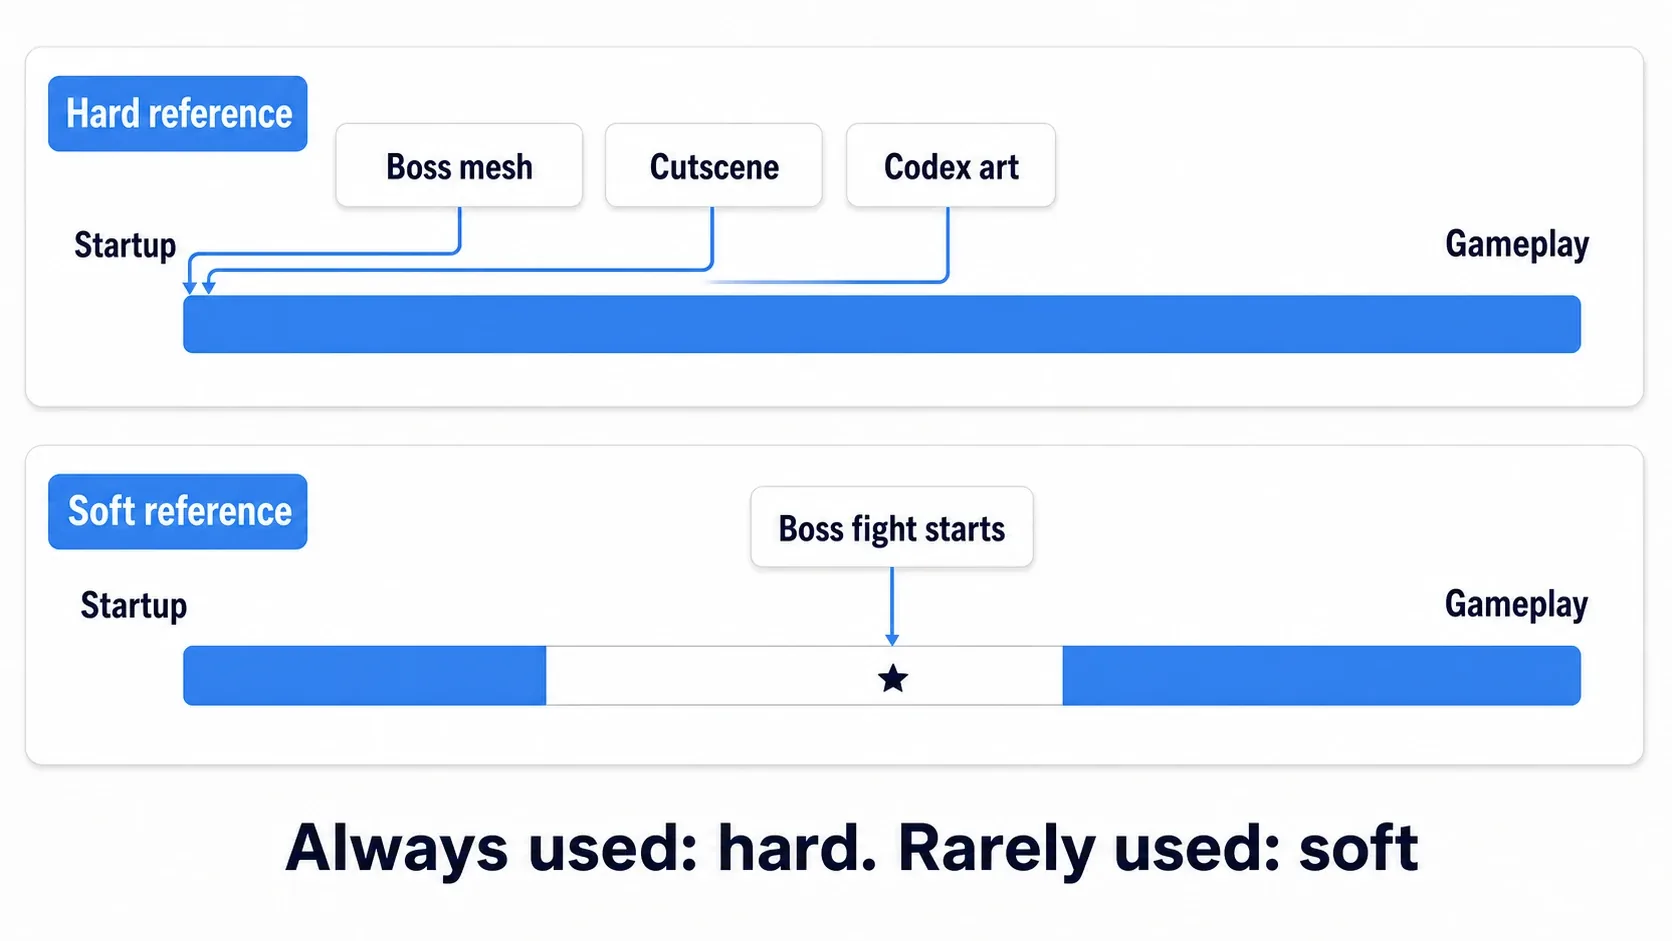
Concretely, these are the situations where it makes a difference.
- Bosses and large enemies: don't load until the player enters the arena. The boss's mesh disappears from the early map's memory footprint
- Cutscene-only assets: load right before the event starts and release when it's over
- Collection and encyclopedia screens: instead of holding every item icon at once, load only what's on screen
- DLC and additional content: keep it out of the base game's memory and load it only when the player enters that feature
Conversely, things always on screen, like the player character's default mesh, the common enemies, or core UI parts, are more comfortable as plain hard references with no load wait. The deciding question is "is it large, and is it not always used?"
You can also control loading volume wholesale from the level side. Combining this with Level Streaming and World Partition, which loads and unloads by area, works at a much larger granularity.
A Doorway into Asset Manager
Asset Manager is the system for managing soft references one tier more rigorously. It makes the engine aware of what assets exist, where, and how many, giving you a foundation for controlling loading and unloading centrally.
You reach for it once your asset types multiply and you want load state managed in one place. As an entry point, start by creating a Primary Data Asset and registering its type under Project Settings > Asset Manager. The concrete steps, and how to use soft references inside Data Assets, are covered in the article on data-driven design with Data Assets. This article stays focused on how soft references work and how to load them with Async Load Asset, and leaves the Asset Manager configuration to that one.
Get comfortable with the minimal form first: one variable as a soft reference, loaded with Async Load Asset. Asset Manager will still be there when that stops being enough.
Hands-On: Loading an Enemy Mesh On Demand
A field boss in an RPG, an area boss in a metroidvania, a floor boss in a roguelike. Large enemies that don't appear until you fight them are where soft references pay off most. Here we'll set up a boss whose high-resolution mesh doesn't load until the player enters the arena.
The Finished Result
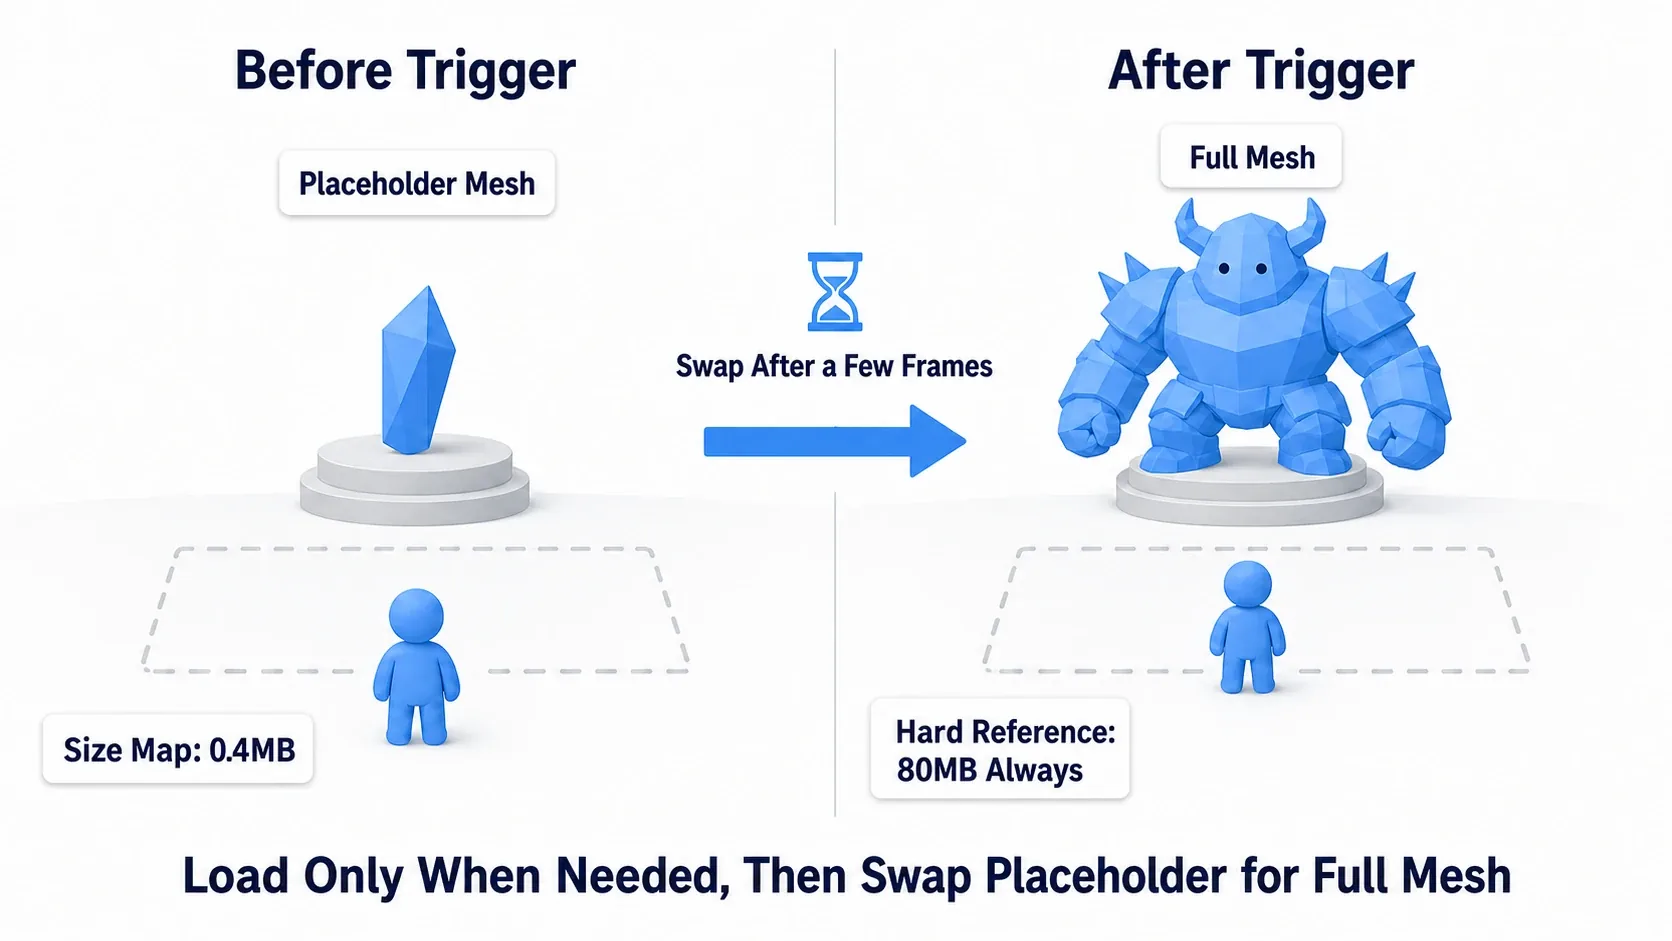
Before entering the arena, there's just a simple placeholder mesh where the boss stands. When the player touches the trigger, the boss's real mesh loads in the background and swaps in a few frames later. Until you enter, the boss's huge mesh isn't in memory at all.
Setup
Create a new project from the Third Person template (Blueprint) and prepare the following.
1. The boss (BP_Boss)
Create it with Character (or Actor) as the parent class, and assign a lightweight placeholder mesh to the Skeletal Mesh Component up front (the Starter Content Mannequin or anything low-poly). That's what shows while loading.
| Variable | Type | Default | Settings |
|---|---|---|---|
BossMesh | Skeletal Mesh ( Soft Object Reference ) | The boss's high-resolution mesh | Instance Editable on |
HasLoaded | Boolean | false | Prevents double loading |
The reference kind on BossMesh is the whole point. After picking Skeletal Mesh in the type dropdown, set the reference kind to Soft Object Reference. Leave it as a hard reference and the real mesh loads the moment BP_Boss loads, which defeats the entire purpose.
2. The trigger (BP_BossTrigger)
Create it with Actor as the parent class and add one Box Collision. Its job is to tell the boss to load when the player overlaps it. You can communicate that via Event Dispatchers, or just have the trigger hold a reference to the boss and call it directly. For clarity, we'll have the trigger reference the BP_Boss in the level and call the function directly.
The Boss's Graph
Build the load-and-swap function in BP_Boss.
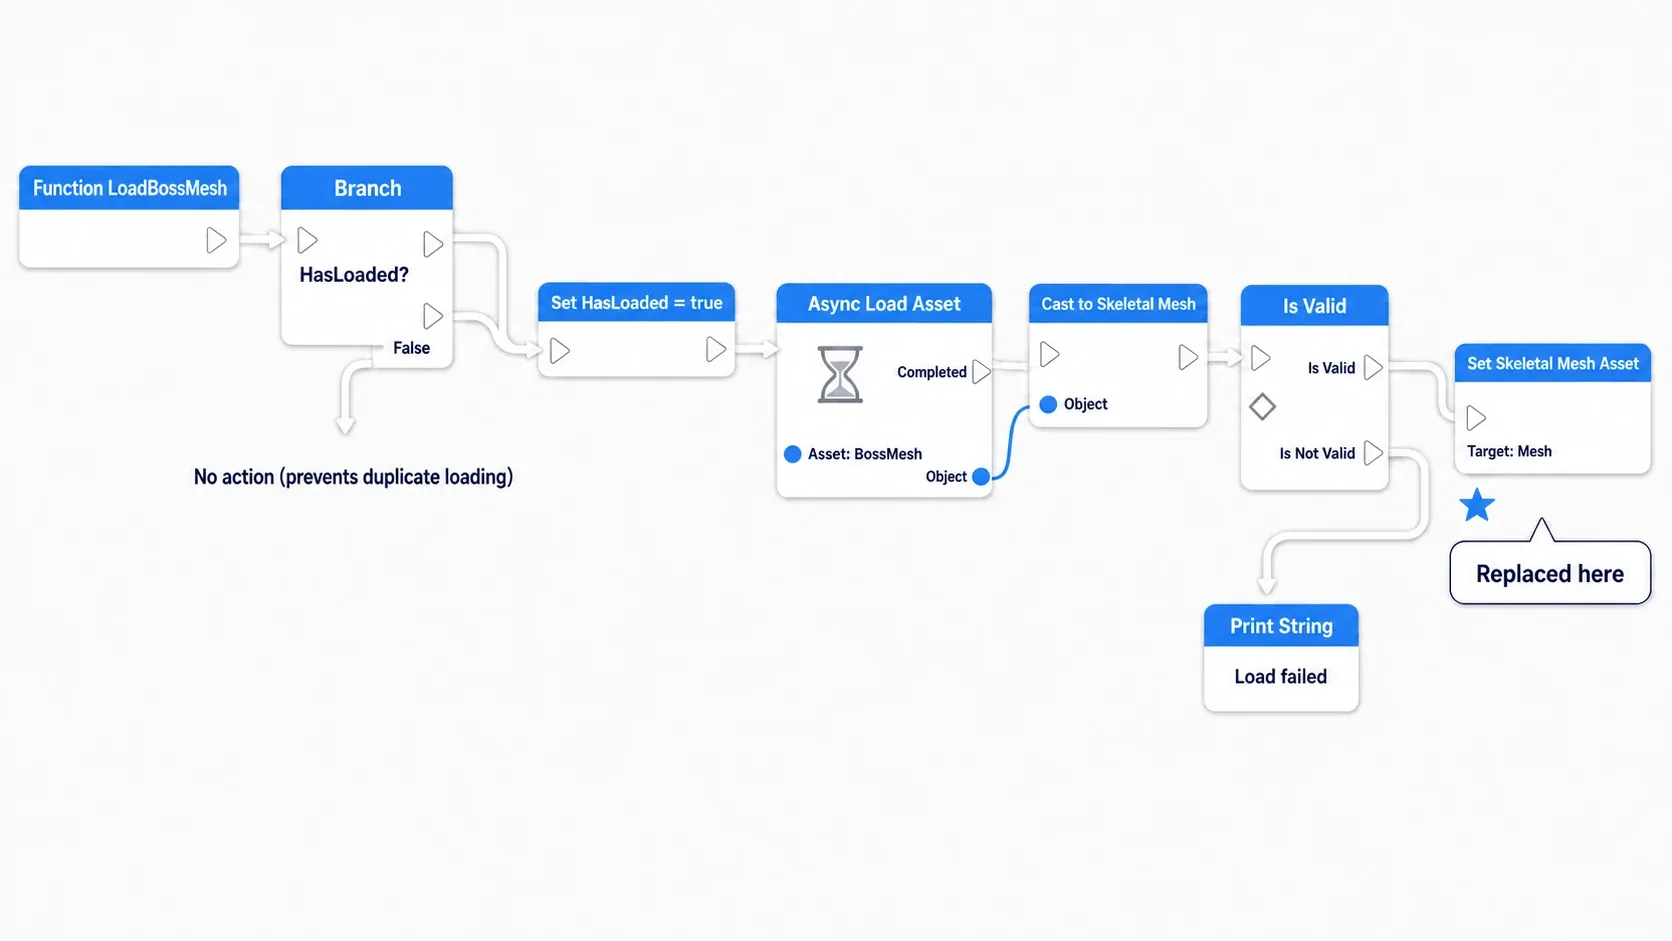
BP_Boss

Function LoadBossMesh
  → Branch (Condition: HasLoaded)
      True  → (do nothing; prevents double loading)
      False →
        Set (HasLoaded = true)
        → Async Load Asset (Asset: BossMesh)
            Completed →
              Cast to Skeletal Mesh (Object: the Object output of Async Load Asset)
                → Is Valid (As Skeletal Mesh)
                    Is Valid → Set Skeletal Mesh Asset
                                  Target : Mesh
                                  New Mesh : As Skeletal Mesh
                    Is Not Valid → Print String ("Failed to load BossMesh")
The trigger just calls LoadBossMesh when the player overlaps it.
BP_BossTrigger
On Component Begin Overlap (Box)
  → Cast to (the player character)  // respond only to the player
      → the target BP_Boss (reference) → LoadBossMesh
Because Async Load Asset is in the middle, the frame that calls LoadBossMesh doesn't stall the game. Completed fires on the frame the load finishes, and only then does the mesh swap. The Is Valid check is there because Object can come back empty if the asset was deleted or moved, and passing that to Set Skeletal Mesh Asset gives you an Accessed None (see the debugging article).
Verifying
First, confirm it isn't in memory. Right-click BP_Boss and open its Size Map.
- With
BossMeshas a hard reference (Object Reference), the Size Map includes the boss's high-resolution mesh plus all its materials and textures, and the total size is large (80MB, for example) - Switch it to a Soft Object Reference and that mesh disappears from the Size Map, with
BP_Bossitself dropping to a few hundred KB
That's your visible proof that referencing no longer loads the data.
Next, confirm it loads on demand. Launch with Standalone Game and approach the boss to enter the trigger.
Success means a simple placeholder mesh before you touch the trigger, and the real boss mesh a few frames after. The brief gap before the swap is itself evidence that the real mesh wasn't loaded until that moment.
If it isn't working, here's how to narrow it down.
- The real mesh is there from the start →
BossMesh's reference kind isn't Soft Object Reference. As a hard reference it loads when the actor is placed - Entering the trigger doesn't swap anything → the trigger's
On Component Begin Overlapisn't firing. CheckGenerate Overlap Eventson the Box Collision and the player's collision settings - It swaps, but the game freezes briefly → you're using
Load Asset Blocking, or a synchronous load is happening somewhere. Consolidate onAsync Load Asset - You get
Accessed None→ you're wiringObjectintoSet Skeletal Mesh Assetwithout going throughIs Valid, or you forgot to assign an asset toBossMesh - The second trigger entry is slow → the
HasLoadedbranch isn't working. SkipAsync Load Assetonce it's already loaded
Two things to take away.
- The reference kind decides when loading happens: hard references load at placement or spawn time; soft references load the moment you call
Async Load Asset. Taking "when do I load this" back into your own hands is the whole point of soft references - Always prepare what shows during loading:
Async Load Assettakes several frames. Fill that gap with a placeholder mesh or a loading indicator or you'll have a moment where nothing is there. If you're going async, decide what the "not here yet" state looks like first
The same thinking applies directly to cutscene-only assets, collection icons, and DLC content. When you spot something large that you don't always use, take a look at its reference kind.
Bonus: Good to Know for Later
- See the chain with Reference Viewer: right-click an asset and open Reference Viewer to see, as a graph, what it references and what references it. Paired with Size Map, it's how you track down "why is this mesh being loaded"
- Release what you no longer need: an asset loaded with
Async Load Assetstays in memory as long as something hard-references it. When the boss fight ends and the mesh is no longer needed, drop the reference so GC can reclaim it. Leaving everything loaded defeats the purpose of soft references - Loading an array? Use Async Load Assets: when you want to load several soft references at once, there's a plural
Async Load Assets. It suits cases like an encyclopedia where you load "just what's on screen" as a batch. Passing them together is easier to manage than loopingAsync Load Assetone at a time - Measure memory with Memreport: run
Memreport -fullin the console to dump what's currently in memory and how much. Compare before and after switching to soft references and you can confirm numerically that the asset you targeted actually went away (for how to think about measuring, see the measurement article) - Hard references are also why startup is slow: most cases of "opening a Blueprint takes tens of seconds" come from that Blueprint hard-referencing heavy assets. Trace it with Reference Viewer and move anything that can load later to a soft reference, and the editor itself gets snappier
Summary
- A hard reference loads the data the moment you reference it, and it chains outward from there
- A soft reference only remembers the asset's location, with no data loaded. Soft Object Reference for assets, Soft Class Reference for classes
- When you need the data, load it with
Async Load Assetand cast theObjectfromCompleted - Avoid
Load Asset Blockingand synchronous loads. They stop the game and cause hitches - It pays off on assets that are large and not always used. Making everything soft backfires
- Since you're going async, decide what shows during loading (a placeholder mesh) up front
What's the largest asset in the project you're building right now? Is it always on screen? If you find something large that you only use occasionally, start by changing its reference kind to Soft Object Reference. If your problem is instead a lot of light actors being created and destroyed, object pooling is the better fix.